
METE-ON 1 SHORT - Electric meter IROX - Free user manual and instructions
Find the device manual for free METE-ON 1 SHORT IROX in PDF.
| Product Type | Electric Meter with Weather Station |
| Brand | IROX |
| Model | METE-ON 1 SHORT |
| Power Supply | 4 LR6 AA batteries (alkaline) + power adapter |
| Main Functions | Time/date display, 3-day weather forecast, DCF/HBG radio reception, region and city selection, adjustable backlight (Auto/ON/OFF) |
| Radio Reception | HBG (Switzerland) and DCF (Germany) transmitters |
| Number of Regions | 90 European regions |
| Available Languages | English, German, French, Italian, Spanish, Swedish |
| Time Zone | Adjustable from -11h to +12h |
| Mounting | Wall (slot) or table (stand included) |
| Included Accessories | Power adapter, stand, 4 LR6 AA batteries, instruction manuals |
| Replacement Batteries | 4 LR6 AA batteries (alkaline recommended) |
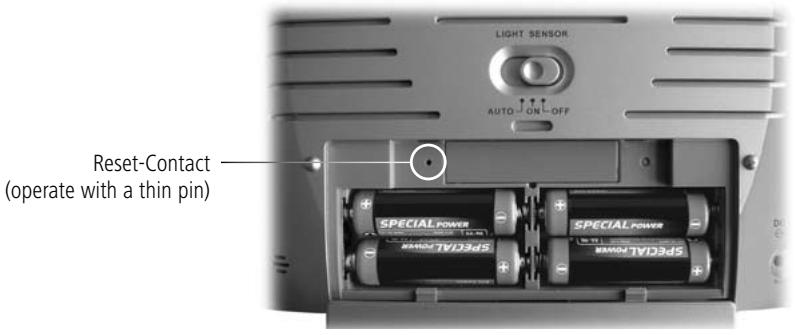
| Reset | RESET button on the back |
| Backlight | Activated by LIGHT button (7 seconds) or continuous adjustment |
Frequently Asked Questions - METE-ON 1 SHORT IROX
User questions about METE-ON 1 SHORT IROX
0 question about this device. Answer the ones you know or ask your own.
Ask a new question about this device
Download the instructions for your Electric meter in PDF format for free! Find your manual METE-ON 1 SHORT - IROX and take your electronic device back in hand. On this page are published all the documents necessary for the use of your device. METE-ON 1 SHORT by IROX.
USER MANUAL METE-ON 1 SHORT IROX
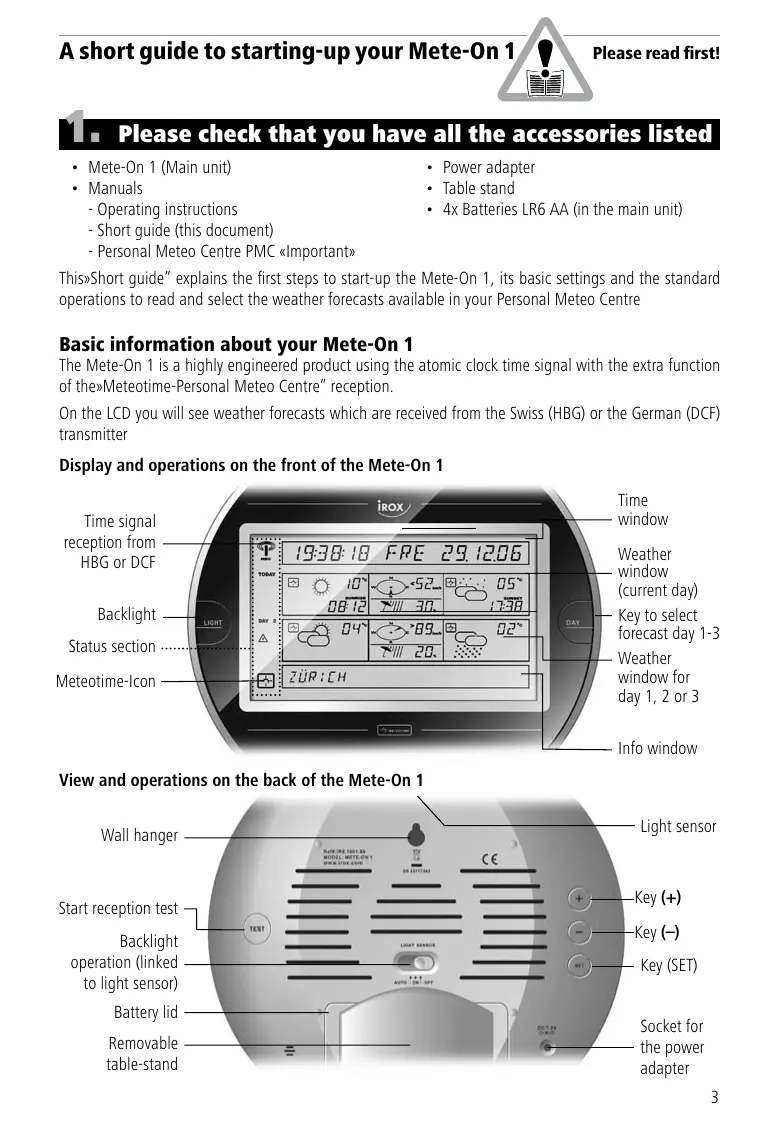
A short guide to starting-up
Please check that you have all the accessories listed
- Mete-On 1 (Main unit)
-
Manuals
-
Operating instructions
- Short guide (this document)
- Personal Meteo Centre PMC «Important»
Power adapter
Table stand
- 4x Batteries LR6 AA (in the main unit)
This Short guide" explains the first steps to start-up the Mete-On 1, its basic settings and the standard operations to read and select the weather forecasts available in your Personal Meteo Centre
Basic information about your Mete-On 1
The Mete-On 1 is a highly engineered product using the atomic clock time signal with the extra function of the»Meteotime-Personal Meteo Centre" reception.
On the LCD you will see weather forecasts which are received from the Swiss (HBG) or the German (DCF) transmitter
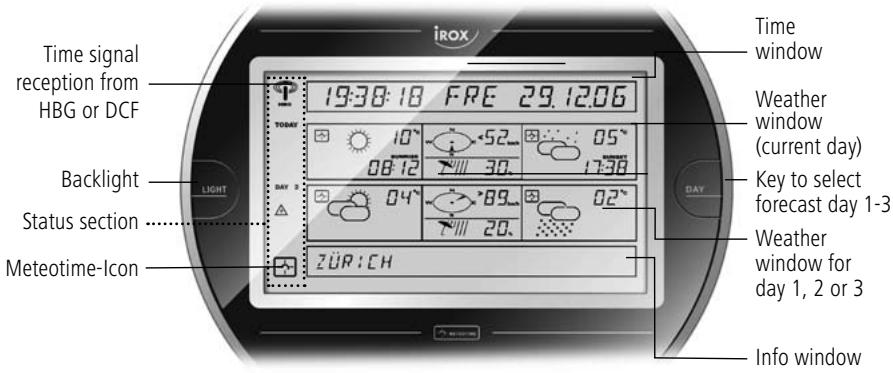
Display and operations on the front of the Mete-On 1
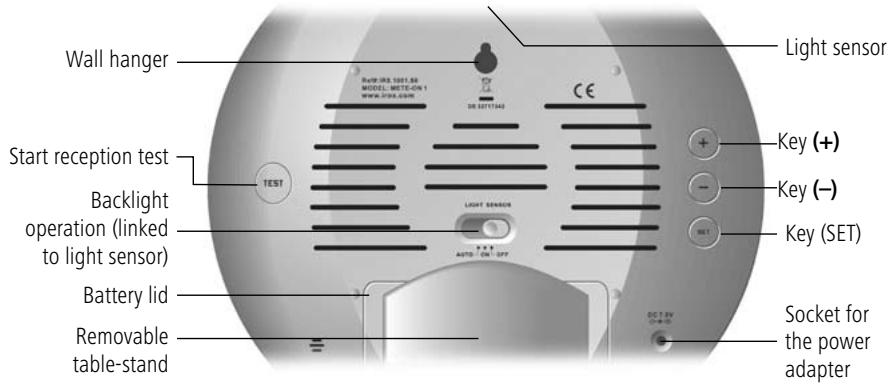
View and operations on the back of the Mete-On 1
2. Where to place the Mete-On 1
Please place the unit as far away as possible from any potential electric device which may disturb the reception of the Meteotime signal.
For more information, please take note of the advice provided in the Meteotime brochure «Personal Meteor Center PMC Important».
The Mete-On 1 may be hung on a wall or placed on a table. If you place the unit on a table, please use the provided table stand to assure stability.
3. Starting-up the Mete-On 1
The Mete-On 1 may be operated by batteries and/or through the power adapter from the mains. If you are using the power adapter, we strongly recommend leaving the activated batteries in the unit to prevent a datalog loss in case of a power interruption.
To open the battery lid, please remove the table stand.
In the battery compartment you will find the batteries already inserted, but deactivated by an insulation strip. Please remove this strip in order to activate the batteries!
4. Setting the Mete-On 1
After providing power to the unit, you have to enter the basic settings to assure the expected operation of the Mete-On 1.
4.1 Select the city for which you wish to view forecasts for
The Mete-On 1 can give you weather forecasts for up to 90 regions in Europe. To give you an optimal use, we have preset a total of more than 250 cities located in these 90 regions.
By default, the capital of Switzerland is activated (Bern/Schweiz). You may select at any time another city by doing the following:
In the basic display, press the «SET» key on the back once. You will now see in the Info window on the display «SELECT COUNTRY». By pressing the keys (+) or (-) you may scan step by step through the countries available (in alphabetical order).
As soon as you reach the country of your choice, press the «SET» key. In the Info window you will now see
«SELECT CITY». By pressing the keys (+) or (-) you may scan step by step through the cities available in the selected country (in alphabetical order).
By pressing the «SET» key you will activate your choice and return to the basic display.
4.2 Select your time zone
The time you receive from the transmitters HGB and DCF is the continental European time. Specifically in the UK you may want to adjust the time zone to show your local time (-1h versus the continent).
In the basic display, press the «SET» key on the back twice. You will now see in the Info window on the display «TIME ZONE» and the currently adjusted time difference versus the received time (from + 12 h to -11 h). By pressing the keys (+) or (-) you may adjust this now.
By pressing the «SET» key twice you will activate your choice and return to the basic display.
4.3 Select the language of the Mete-On 1
The default language of the Mete-On 1 is English. If you wish to change this, you may do so and select one of the other 5 languages (German, French, Italian, Spanish, Swedish).
In the basic display, press the «SET» key on the back 3 times. You will now see in the Info window on the display «ENGLISH».
By pressing the keys (+) or (-) you may adjust this now.
By pressing the «SET» key once you will activate your choice and return to the basic display.
4.4 How to activate the backlight
At any time, you may press the «LIGHT" key on the front and activate the backlight for a few seconds. When you make use of the power adapter, you have more options for the backlight to choose from.
On the back of the Mete-On 1 you will find the slide switch «LIGHT SENSOR». With this you may select how the backlight shall be activated when the power adapter is connected.
Position «AUTO»: The backlight is activated automatically when the light sensor on the product's top decides that the light of the environment is too dim to read the display.
Position «ON»: The backlight is permanently on.
Position «OFF»: The backlight is permanently off.

What the front shows
The Mete-On 1 has a well structured display
| ·Time window | Time and Calendar | |
| ·Weather window | TODAY | Weather forecast for the current day (day time and night time) |
| ·Weather window | DAY 1 / 2 / 3 | Weather forecast for the coming days (Day 1, Day 2 or Day 3) |
| ·Info window | Location for which the displayed forecast is valid (and other massages) |
Key functions:
| • Key «DAY» | to select the forecast in the «Weather window Day 1/2/3'' |
| • Key «LIGHT» | to activate the display backlight for approx. 7 seconds |
Errors and corrective actions
| ERROR · Time and Day are completely wrong | REASON The time signal reception is interrupted or disturbed. | WHAT TO DO The position and location of the Mete-On 1 are not suitable. Find a new place with good reception. For this use the «Reception Test» described in the Operating Instructions. |
| · The Meteotime-Icon in the Status window is not fully activated. · The forecasts are not complete or missing completely. | The time signal reception is interrupted or disturbed. | The position and location of the Mete-On 1 are not suitable. There may be electrical interferences in the surroundings or the signal may not get to the unit. Find a new place with good reception or move the electrical device to a place min. 1m away For this use the «Reception Test» described in the Operating Instructions. |
| · the time signal icon has no «waves». | The Mete-On 1 was not able to receive a good time signal in the last 12 hours. | The position and location of the Mete-On 1 are not suitable. Find a new place with good reception. For this use the «Reception Test» described in the Operating Instructions. |
| · Low Bat. | The batteries are used up. | Replace the batteries with new ones (4x Batteries LR6 AA - Alkaline or better) |
| · the Meteotime Icon in the relevant forecast window is not fully displayed | This piece of the forecast has not been fully received. | Most likely the reception was interrupted or disturbed by a one-time interference. If this status remains over repeated days, find another place or remove potential sources of a problem. |
| · no function, no regular display, no reaction to any keypress | After a battery exchange, the unit has not started up correctly. An unusual and very strong electrical occurrence has created a problem in the unit's processor. | Remove all batteries and press the key «LIGHT» to make sure any remaining power in the unit is discharged. After this, reinsert the batteries. or Press the RESET contact in the battery compartment. |
Notes
