
HBR556 - Weather Station IROX - Free user manual and instructions
Find the device manual for free HBR556 IROX in PDF.


User questions about HBR556 IROX
0 question about this device. Answer the ones you know or ask your own.
Ask a new question about this device
Download the instructions for your Weather Station in PDF format for free! Find your manual HBR556 - IROX and take your electronic device back in hand. On this page are published all the documents necessary for the use of your device. HBR556 by IROX.
USER MANUAL HBR556 IROX
WEATHER STATION WITH WEATHER FORECAST INDOOR/OUTDOOR RADIO-THERMO/HYGROMETER AND RADIO-CONTROLLED CLOCK (DCF77)
HBR556
INSTRUCTIONS FOR USE
1. INTRODUCTION
Congratulations on your purchase of the HBR556 radio weather station. The main appliance displays the weather forecast, the indoor and outdoor temperature/humidity and the time and date. The weather data are received by the external sensor.
The 433 MHz technology used in the appliance means that no cables are needed between the outdoor sensor and the main appliance.
The appliance is also equipped with a radio clock. The time is automatically synchronised with the time signal transmitter DCF77. If the appliance is located out of the range of the DCF77 signal, the time and date can also be set manually.
The appliance has a barometer to reliably calculate the weather forecast. As a basic principle, the appliance does not need to be operated. The respective barometric pressure tendency of the previous 24 hours is depicted graphically.
IROX TE656NL & TS33C MANUAL (3 ENG)
SIZE: W93 X H150 (mm)
BY ROSE KOON 08/06/07
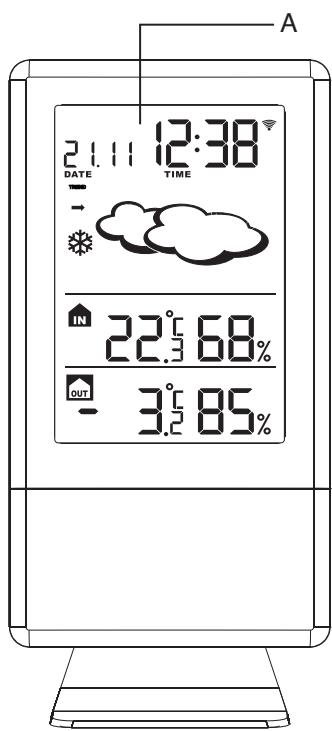
A LCD DISPLAY
For the convenient reading of all values.
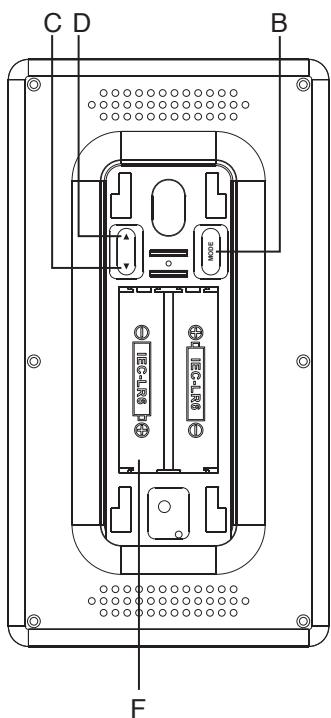
B MODE KEY (BACK PANEL)
Manual setting of clock / data (if required)
C DOWN KEY (▼)
- Reduces settings
- Switch radio signal reception on/off
- New search for the temperature sensor.
DUPKEY(▲)
Increases settings
- Keep pressed: Changes the display Barometric pressure - Date (barometric pressure is not compensated at sea level)
- Changes the display unit for the temperature display in degrees Celsius (^) or degrees Fahrenheit (^)
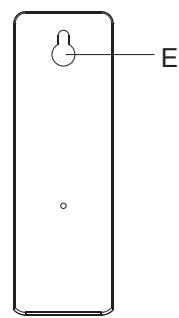
E HOLDER FOR WALL HANGING
For wall hanging
F BATTERY COMPARTMENT
For two batteries of the type UM-3 or 'AA'. 1.5V alkaline batteries or better are recommended.
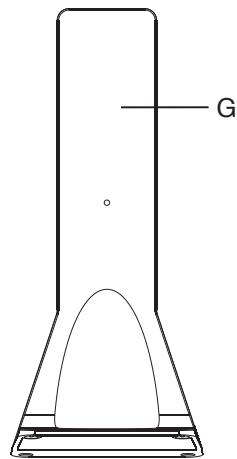
G REMOVABLE STAND
For setting the appliance up on a table
FEATURES OF THE THERMO/HYGRO TRANSMITTER UNIT HTS33
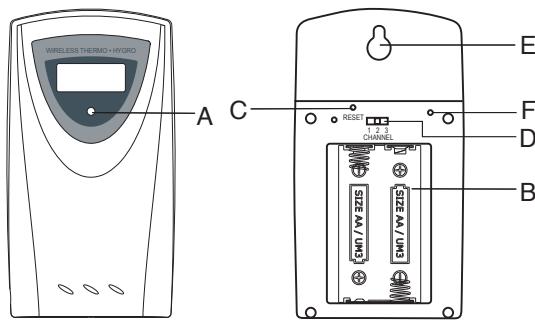
A LED DISPLAY
Flashes 1 briefly during signal transmission and 2 when battery is running out.
B BATTERY COMPARTMENT
For two batteries of the type UM-3 or 'AA'. 1.5V
alkaline batteries or better are recommended.
C RESET BUTTON
Resetting of the appliance to the default settings and after a change of channel.
D TRANSMISSION CHANNEL - SELECTOR SWITCH
Allocates channel 1, channel 2 or channel 3 to a sensor
E HOLDER FOR WALL HANGING
For wall hanging
F ^o C / ^o F SWITCH
Switching between the temperature display in degrees Celsius (^) or degrees Fahrenheit (^) on the display unit.
37
38
Please note the following instructions to ensure optimum operation of the appliances:
- Place the receiver unit and the transmitter unit within 1 metre of one another.
- Please follow the sequence described in 2b and 2e and wait until the measured value appears on the display.
- Then install the receiver unit and the external transmitter unit within the possible range of the appliances, i.e. within a maximum radius of 30 metres.
Please note that the actual range of the transmitters depends on the building materials of the respective building and on the respective position of the external transmitter unit and that the possible distance can be greatly reduced from the 30 metres by external influences (various radio transmitters and other sources of interference). In such cases, we recommend that you seek another position for both the transmitter and the receiver. Sometimes, moving them by just a few centimetres is sufficient!
Although the external transmitter units are weatherproof, you should not position them in places where they are exposed to direct sunlight, rain or snow.
2b) PREPARATION OF THE EXTERNAL THERMO/GYRO TRANSMITTER UNITS
- Remove the cover of the battery compartment.
- Set channel 1 by moving the sliding switch (important: only set to channel 1!)
- Insert the 2 batteries (1.5 V, UM-3 or size 'AA') in accordance with the respective polarities.
- Press the RESET button (e.g. with a paper clip)
- Screw down the cover of the battery compartment again.
39
- Open the cover of the battery compartment
- Insert the 2 batteries (1.5 V, UM-3 or size 'AA') in accordance with the respective polarities.
- Close the battery compartment again.
2d) BATTERY 'EMPTY' DISPLAY
When it is time to replace the battery with a new one, an indicator [ ] will appear next to the display of the indoor temperature (batteries receiver unit) or outdoor temperature (batteries transmitter unit) respectively.
2e) SETTING THE EXTERNAL SENSOR - THERMO/HYGRO
a. As soon as the batteries are in the outdoor sensor, the sensor starts to transmit the values measured in intervals of approx. 45 seconds. The main appliance also looks for signals (for approx. 2 minutes) as soon as the batteries are inserted. When the signal from the outdoor sensor is received, the outdoor temperature and the air humidity values appear on the display.
b. If no sensor signals are received within 2 minutes, [ ] then appears on the display. Press the [▼] key for 3 seconds to initiate a search for the signals of the external sensor. In this way, you can synchronise the receiving and transmitting signal between the outdoor sensor and the main appliance. Important: The external sensor must be set to channel 1.
3. WEATHER FORECAST
3a) WEATHER FORECAST
Based on the change in barometric pressure, the receiver unit calculates the weather development for the next 12-24 hours and indicates this with the following symbols:
| Symbols on the display | |||
| Forecast | Sunny | Slightly cloudy | Clouded |
| Symbols on the display | |||
| Forecast | Rainy | Strong rain | Snow |
3b) PLEASE NOTE THE FOLLOWING:
- When the weather station has been put into operation, it is not necessary to set the current barometric pressure. The appliance will calculate over the next few hours a weather forecast from the changes in barometric pressure.
- Lengthy, stable weather conditions make a weather forecast more difficult. A change in the weather symbol on the display may at times take longer than desired.
- The weather forecast is calculated solely by means of changes in the barometric pressure.
- The probability of the weather forecast is around 70% and applies for a radius of 20 - 30 kilometres.
- If the symbol 'sunny' appears at night, this means cloudless weather. Fog is not displayed by the weather station as this can occur with different weather conditions.
- If you take the weather station with you on your travels, the weather forecast will alter due to the differences in height above sea level and the resulting changes in barometric pressure. Please wait up to 24 hours until the weather station has calculated the weather forecast based on the barometric pressure conditions at your new location.
41
3c) BAROMETRIC PRESSURE - TENDENCY DISPLAY
The indicator for the barometric pressure tendency in the weather forecast window indicates the trend in barometric pressure change in the previous hour. Three different indicators are displayed:
| Indicator | TREND↑ | TREND→ | TREND↓ |
| Barometric pressure trend | increasing | staying the same | falling |
Note: By default, the barometric pressure measured is displayed in 'mbar/hPa'. The pressure is the pressure measured locally; it cannot be set to the sea level.
Frost alarm
The frost alarm symbol appears on the display when the outdoor temperature falls below 3^ (This is transmitted by the external sensor on channel 1). When the temperature rises above +6^ , the symbol disappears again.
42
4. RADIO CLOCK
4a) NOTES ABOUT THE RECEPTION OF THE TIME SIGNAL
The appliance is designed in such a way that the calendar clock is automatically synchronised as soon as it is within the range of the DCF77 signal.
To ensure a good reception of the time signal and minimise interference, you should not set up the appliance in the vicinity of metallic objects or electrical appliances.
It normally takes around 3 to 5 minutes until the signal is fully received for the first time (depending on the strength of the time signal received). The subsequent hourly synchronisation of the time then only takes a few seconds.
If the reception problems persist, please set the clock manually and wait until the next morning. The chances of successful reception are greater in the night (from midnight to around 4 am). One successful reception per week is perfectly sufficient to ensure that the clock runs precisely.
| \`\-(flashing)-reception active | last reception was good | last reception was not good or time was set manually | No symbol - Radio reception switched off |
4b) MANUAL SETTINGS
The appliance offers various options for changing the default settings. To do so, press the key [MODE] for three seconds to enter the setting mode. Every time the [MODE] key is pressed again, a flashing function which can be set appears on the display.
Press one of the keys [▲] or [▼] respectively there. You can change the following functions (in this sequence; in between, simply press the [MODE] key each time): - Year
- Calendar (Month - Day - Display Format (Day/Month or Month/Day)
- Time format 24h or 12h
- Time (hours - minutes)
4c) Switching the radio reception off permanently
You have the option of switching the radio reception on or off and using the appliance as a normal quartz clock. Press the [▼] button for 3 seconds to switch the radio reception on or off. When the radio reception is switched off, the receiving signal [▼] disappears from the display.
5. TECHNICAL DATA
Receiver unit
Indoor temperature
-5°C to +50°C
(23^ to +122^)
Relative measurement range
: 25% to 95%
Air humidity at
25^ (77^)
Resolution temperature
Resolution temperature
Transmission frequency
: 433 MHz
Number of channels
:3
Range
Maximum 30 metres
(in free field without
interferer
Measurement cycle
: approx. 43 - 47 secs
Measurement range
: 25% to 95%
relative humidity
1%
Resolution relative
humidity
Power supply
Receiver unit
: 2 x UM-3 or
'AA' 1.5V battery
External transmission
: 2 x UM-3 or
unit
'AA' 1.5V battery
45
Weights
Receiver unit
: 231g (without batteries)
External transmitter unit
: 62g (without batteries)
Dimensions
Receiver unit
: 95(L) x 198(H) x 33.5 (D)
mm
External transmitter unit
: 55.5× 101× 24mm
46
CARE INSTRUCTIONS
-
Protect the appliance against moisture, dust, knocks and extreme temperatures and only clean it with a dry cloth without using an aggressive solvent.
-
Do not intervene in the appliance; otherwise, the guarantee will expire.
-
Please use only new batteries and never mix old and new batteries. Please also remember that old batteries should not be disposed of with household waste but should be hand in at the designated collection centres.
Important: With all Irox appliances, all disposal fees in Switzerland (vRG; advance recycling fee) and in the EU (WEEE) have been paid.
PLEASE NOTE
- Due to printing restrictions, the depiction of the display in these instructions for use may deviate from the actual display. Subject to change.
EC Declaration of Conformity
Product: TE656 / HBR556
When used for its designated purpose, this product complies with the basic requirements of Article 3 of R&TTE 1999/5/EC Directive:
Efficient use of radio frequency spectrum
(Article 3.2 of the R&TTE Directive)
Applied standard(s)
EN 300 220-1,3:2000
Electromagnetic compatibility
(Article 3.1.b of the R&TTE Directive)
Applied standard(s)
EN 301 489-1,3:2000
Applied standard(s)
EN 300 339:200
Additional information:
The product is thus compliant with the Low Voltage Directive 73/23/EEC and the Directive Regarding Electromagnetic Compatibility 89/336/EEC and bears the corresponding CE label.
Compliant in the following countries:
All EU countries,
Switzerland and Norway
CH and
N
QA MANAGER : H.Y.WANG
K.S plastic factory