
HP1D-USB - Network adapter SMC - Free user manual and instructions
Find the device manual for free HP1D-USB SMC in PDF.


User questions about HP1D-USB SMC
0 question about this device. Answer the ones you know or ask your own.
Ask a new question about this device
Download the instructions for your Network adapter in PDF format for free! Find your manual HP1D-USB - SMC and take your electronic device back in hand. On this page are published all the documents necessary for the use of your device. HP1D-USB by SMC.
USER MANUAL HP1D-USB SMC
Information furnished by SMC Networks, Inc. (SMC) is believed to be accurate and reliable. However, no responsibility is assumed by SMC for its use, nor for any infringements of patents or other rights of third parties which may result from its use. No license is granted by implication or otherwise under any patent or patent rights of SMC. SMC reserves the right to change specifications at any time without notice.
Copyright © 2004 by
SMC Networks, Inc.
38 Tesla
Irvine, CA 92618
All rights reserved.
Trademarks:
SMC is a registered trademark; and EZ Connect is a trademark of SMC Networks, Inc. Other product and company names are trademarks or registered trademarks of their respective holders.
TABLE OF CONTENTS
CHAPTER 1 | Introduction
Features and Benefits
Package Contents
Minimum Requirements
CHAPTER 2 | Getting to Know the Powerline Adapter
LED Indicators
Resetting the Powerline Adapter
CHAPTER 3 | Getting Connected
Basic Installation Procedure
Installing the USB Drivers
CHAPTER 4 | Installing EZ Configuration Utility
Windows 98SE/Me/2000/XP
Macintosh Computer
CHAPTER 5 | Using the EZ Configuration Utility
Launch the Utility
Utility Layout
CHAPTER 6 | Understanding the Information in the SMC EZ Configuration Utility
Device List
Rename Devices
Delete Devices
CHAPTER 7 | Add a Powerline Device
CHAPTER 8 | Setting a Network Password
CHAPTER 9 | Running the Diagnostic Wizard
CHAPTER 10 | Understand the Diagnostic Report
APPENDIX A | Technical Specifications
APPENDIX B | Compliances
APPENDIX C | Technical Support
CHAPTER 1 | Introduction
Congratulations on your purchase of an EZ Connect™ Powerline to USB Desktop Adapter (SMCHP1D-USB). SMC is proud to provide you with a powerful yet simple communication device for creating a Powerline network that to extend the range of your wired or wireless network.
Features and Benefits
- EZ Configuration Utility - Works on both Windows and Mac based PCs
Plug and Play installation - works out of the box - Extends the range of your wired or wireless network
- Save time and money by using existing home wiring - no need to run expensive CAT-5 cabling
- Ideal solution for connecting your Game Console system to the Internet to play online games
Package Contents
Before installing the EZ Connect™ Powerline to USB Desktop Adapter, verify that you have the items listed under "Package Contents." Also be sure that you have the necessary cabling. If any of the items are missing or damaged, contact your local SMC distributor.
EZ Connect™ Powerline to USB Desktop Adapter
Powerline Cord
One USB cable
- CD with User Guide and EZ Configuration Utility
- Quick Installation Guide
If possible, retain the carton and original packing materials in case there is a need to return the product.
Minimum Requirements
- A Windows 98SE/Me/2000/XP PC with USB port
CD-ROM*
Note: A CD-ROM drive is only required if you want to install the EZ Configuration Utility from EZ Install CD. This utility can also be downloaded from www.smc.com
CHAPTER 2 | Getting to Know the Powerline Adapter
The SMCHP1D-ETH EZ Connect Powerline to USB Desktop Adapter is the perfect solution for the home/office environment. This Powerline Adapter offers:
- 1 - USB 1.1 Connection (LAN)
1 - Powerline Connector - LEDs for network status and troubleshooting
Note: You will need at least two SMC Powerline devices to create a Powerline network.
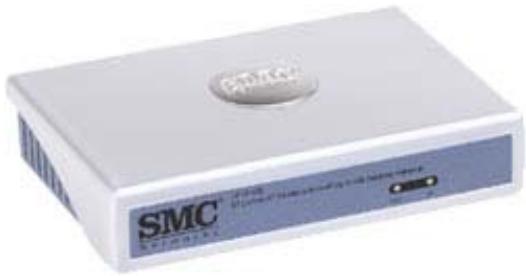
LED Indicators
The Barricade includes LED indicators on the front panel that simplify installation and network troubleshooting.
| LED | Label | Color | Activity |
| Power | PWR* | Green | Solid LED indicates that the unit is powered on No LED light indicates the unit is powered off |
| HomePlug | HP | Green | Solid LED indicates that a Powerline signal is detected Blinking LED indicates traffic is being transmitted No LED light indicates no Powerline signal is not detected |
The USB Powerline Adapter receives power from the USB port on your PC - so the PWR LED will come on when you connect this Adapter to the USB port - not when you connect it to the power outlet in the wall. The power cord that is connected to the power outlet is simply to link that PC to the Powerline network.
Resetting the Powerline Adapter
To reset the SMC EZ Connect Powerline Adapter you will need to use the EZ Configuration Utility to reset the password to the default setting of [HomePlug].
CHAPTER 3 | Getting Connected
The EZ Connect Powerline to USB Adapter is connected between the USB port on your Windows-based PC and the Powerline Network. The Powerline network is automatically created once you plug in the first Powerline Device.

Basic Installation Procedure
1. CONNECT the LAN
Connect an USB cable from your PC to the Powerline to USB Adapters USB 1.1 port on the back on the device.
2. CONNECT the Powerline
Run the included Power cord from the Powerline connector on the Adapter to an available power outlet in your home.
Note: For best performance, connect device directly to wall outlet. Do not connect to surge protector power bar.
Installing USB Driver
To install the USB drivers for the SMC EZ Connect Powerline to USB Adapter follow the steps outlined below.
- Put the EZ Install CD into your CD-ROM drive. The wizard will auto-run.
- Click on the [Install USB Drivers] option
- When the USB drivers are installed, you will be prompted to connect your SMCHP1D-USB adapter to your PC and then reboot your PC.
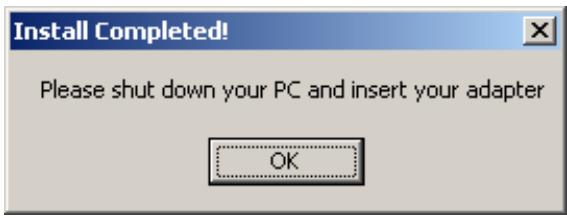
Click [OK] and then close all your open applications and manually reboot your PC.
- When you computer boots back up, the New Hardware wizard should launch and guide you through the installation of the USB Adapter. During the Driver Installation if you are prompted with following window:
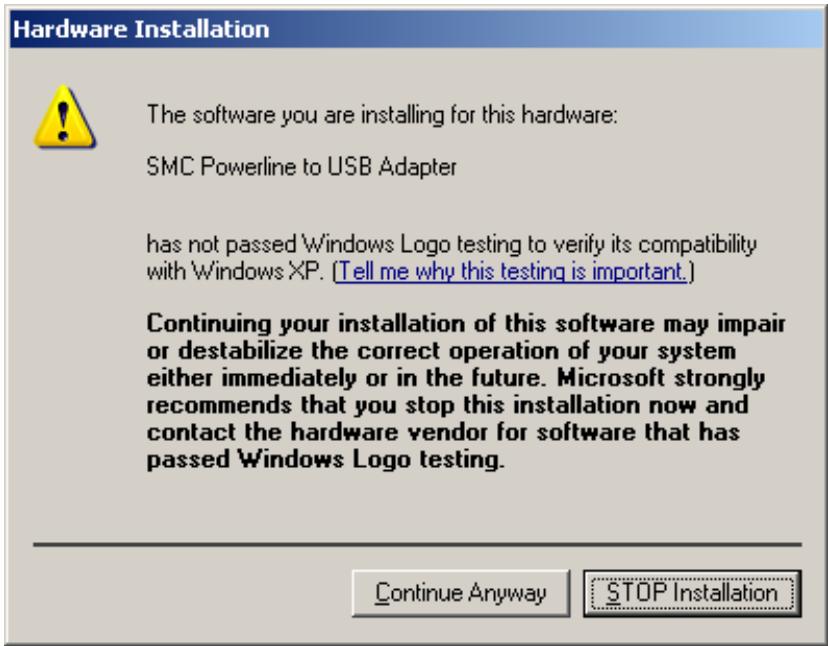
Click the [Continue Anyway] button to complete the installation.
Note: If the wizard is unable to locate the USB drivers you can manually install the drivers by browsing to the Drivers folder on the CD-ROM.
When you have finished installing the USB to Powerline Adapter, if this is the PC you are going to manage your Powerline network from, then install the EZ Configuration Utility - steps are outlined below.
CHAPTER 4 | Installing EZ Configuration Utility
Windows 98SE/Me/2000/XP
The screen shots were taken on a Windows 2000 machines, but the same steps apply will apply for Windows 98SE, Me, and XP.
To access the User Guide and install the EZ Configuration Utility just insert the CD into your CD-ROM drive and the Auto-run splash screen will appear:
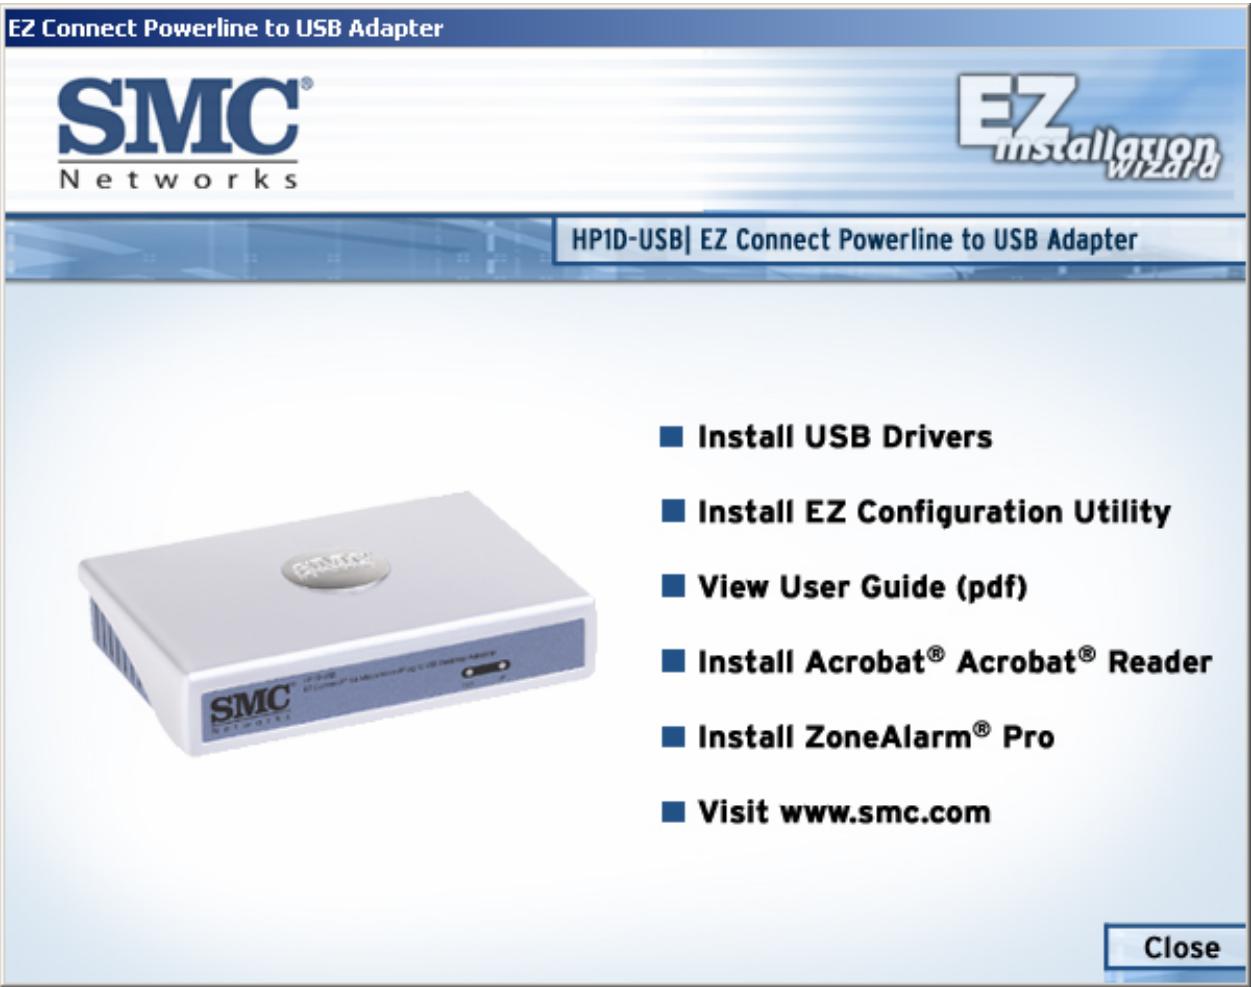
Note: If the CD does not Auto-Run you can click on your CD-ROM drive and double mouse-click on the [SMCHP1D-USB.exe] icon to launch this splash screen.
The USB Drivers are not compatible with the Mac OS. However, if you want to manage your Powerline Adapter from a Mac you can use the SMC EZ Configuration Utility. The EZ Configuration Utility for those operating systems are located on the CD-ROM in there respective folders: OSX and OS9.
To install the utility, follow the steps below:
- Click on the [Install EZ Configuration Utility] option on the splash screen (shown above)
- On the SMC Logo screen, click the [Next] button to start.
- Click the [Next] button again.
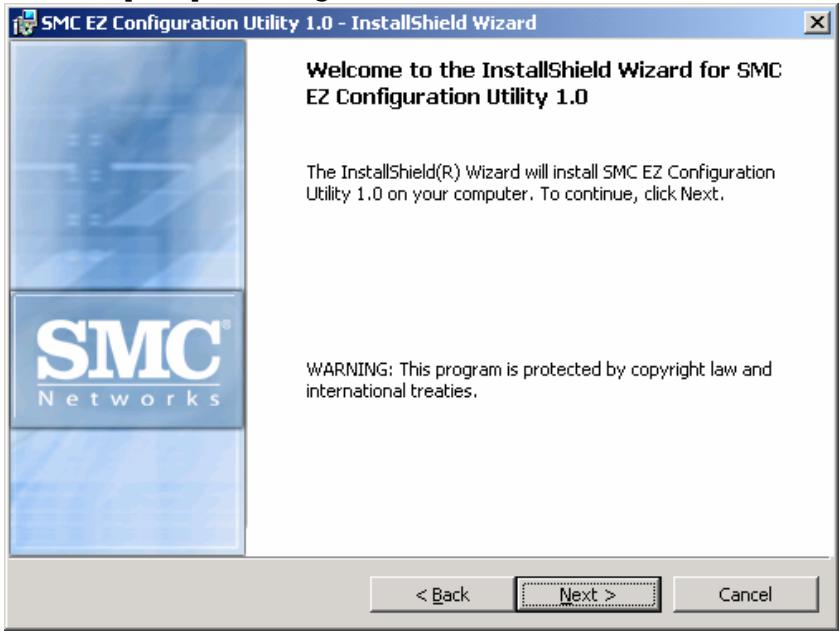
- Accept the License Agreement, and click the [Next] button to continue.

- Enter in theUsername and Organization information and set access rights, then click the [Next] button to continue.
- Confirm the installation location, and then click the [Next] button to continue. Default install location is: C:/Program Files/SMC.
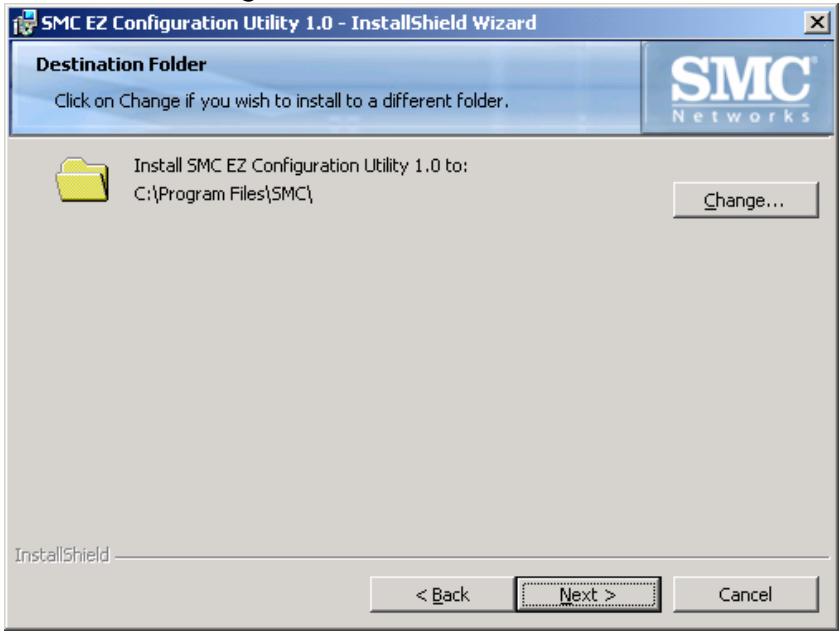
Note: You can change the installation location by clicking the [Change...] button.
- Confirm the Installation information. Then click the [Install] button to begin the process.
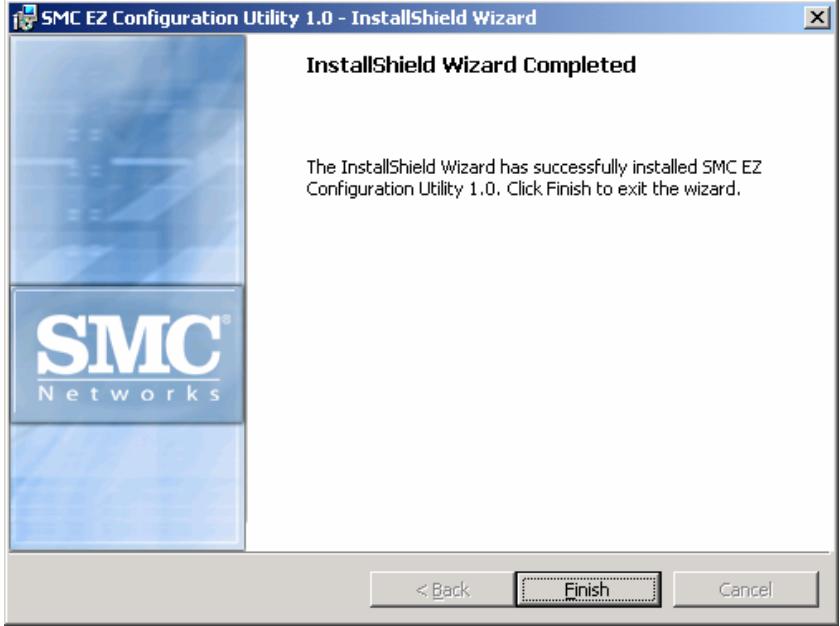
- To complete the Installation click the [Finish] button.
- When finished, you must restart your computer to finalize the installation. Click the [Yes] button to reboot your PC.
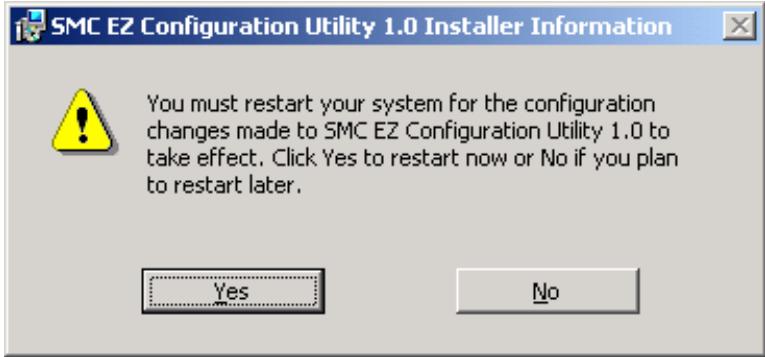
When you computer finishing restarting, the installation is complete and you can now use this utility to configure your Powerline network.
CHAPTER 5 | Using the EZ Configuration Utility
To access the EZ Configuration Utility, follow the steps below:
- Click on the [Start] button
- Choose [Programs]
- Select the [SMC EZ HomePlug Configuration Manager 1.0] folder, and then click on the [SMC EZ HomePlug Configuration Manager 1.0] icon.

SMCEZ
Configuration
Utility 1.0
Note: Before you run this utility please make sure that you have a SMC Powerline device connected directly to the PC.
The SMC EZ Configuration Utility window is shown below. With this utility you can configure and manage all of your SMC Powerline devices.
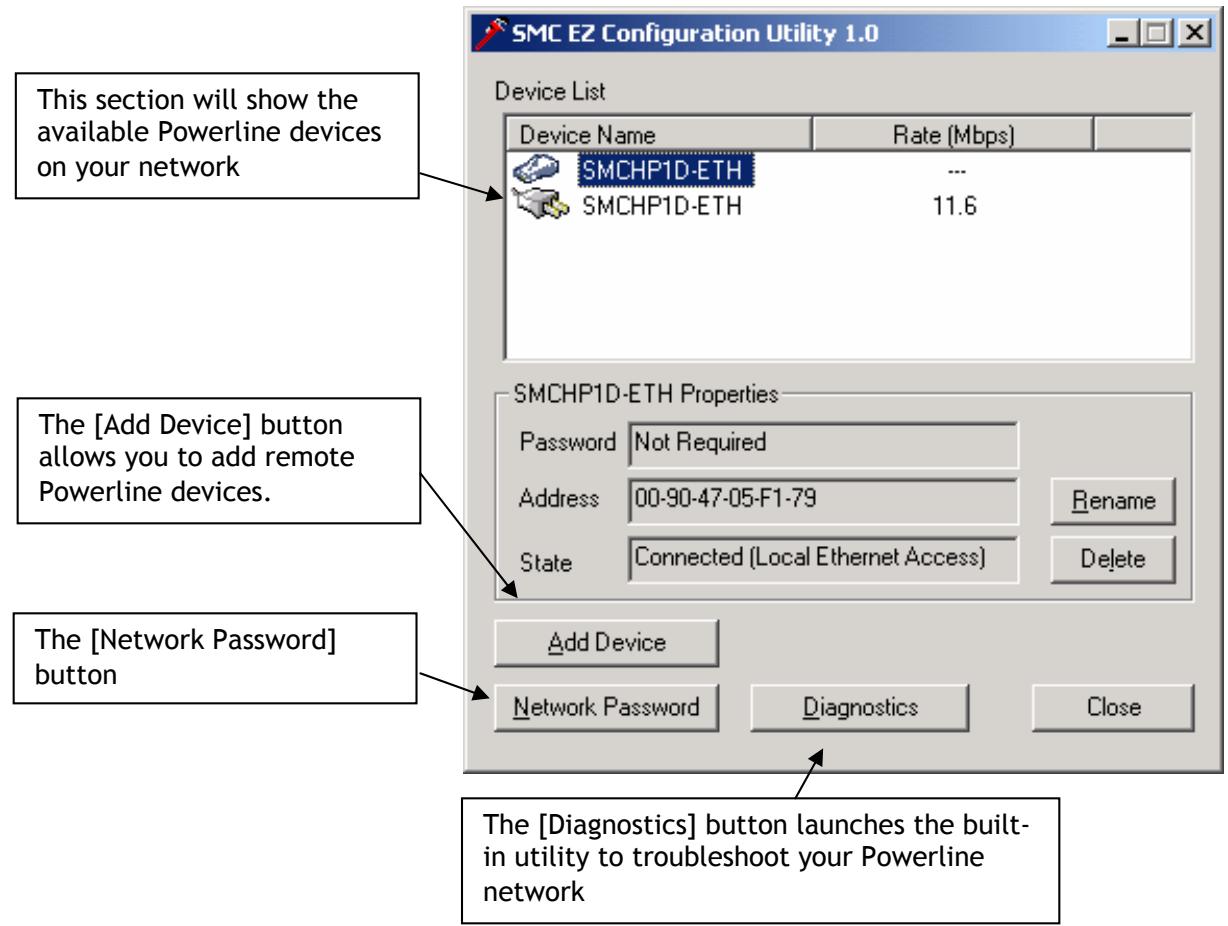
CHAPTER 6 | Understanding the Information in the SMC EZ Configuration Utility
When you launch the EZ Configuration utility it will automatically scan your Powerline network for all the available Powerline adapters. If a new Powerline device is added to your network it will automatically show up in the utility.
Device List
The Powerline adapters are displayed in the [Device List] window. The default device name is the Model number of the Powerline adapter.
There will be two types of devices displayed in your device list:
| Local Device | This is the Powerline device that is connected to the PC that you are using or if you are connect to a router and the Powerline device is connected to. The local device will not have a Rate associated to it or require you to enter a device password to change the Network Password. |
| Remote Device | These are Powerline adapters that are connected to other devices in your house, such as a PC. These devices will show you the Rate they are linked up at. If you wish to change the Network Password on these units, then you will have to enter the Device Password. |
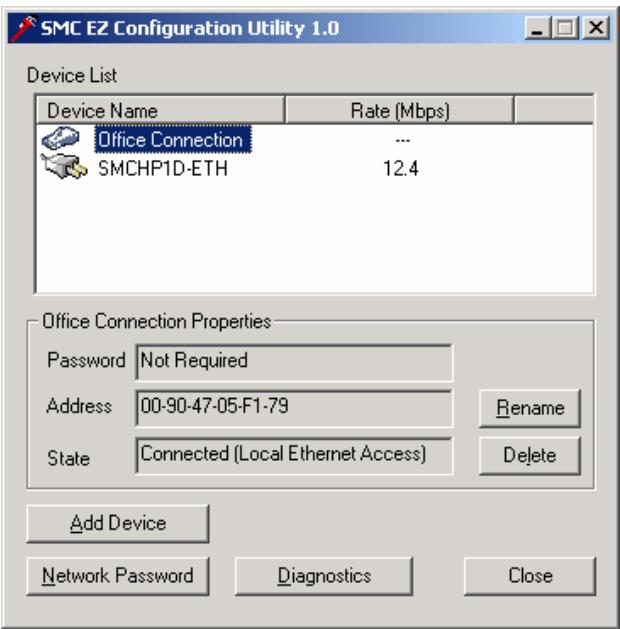
Local Device
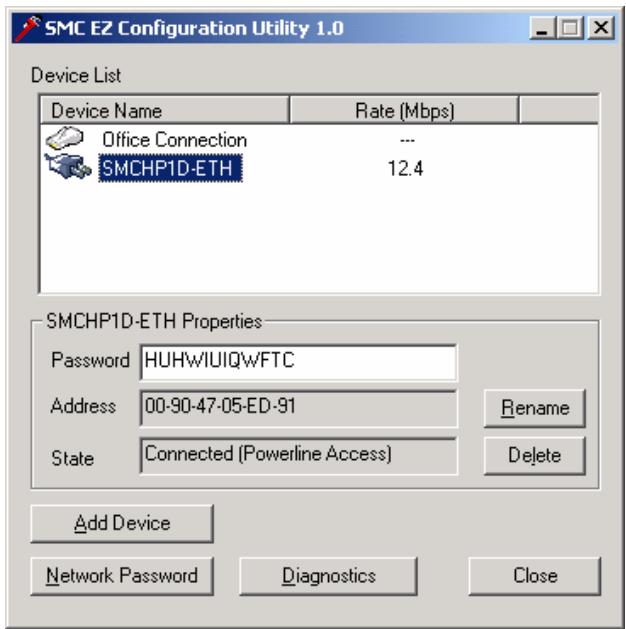
Remote Device
Device Names
The SMC EZ Configuration Utility allows you to change the name of your Powerline devices to make them easier to manage. For example, if you have 4 Powerline adapters in your house, you can give them a name that represents there locations.
To change the Device Name, highlight the Powerline adapter in your Device list and click on the [Rename] button or right mouse-click on the Device icon and select [Rename]
Delete Devices
You can also delete devices from the EZ Configuration Utility. To do this, simply highlight the Powerline adapter in your Device List and click on the [Delete] button or right mouse-click on the Device icon and select [Delete]
For more information on the other EZ Configuration Utility features, see the sections outlined below.
CHAPTER 7 | Add a Powerline Device
The [Add Device] button is used to add a Powerline device to the EZ Configuration Utility before you connect the hardware to your network.
When you click the [Add Device] button, the dialog box below will be displayed:
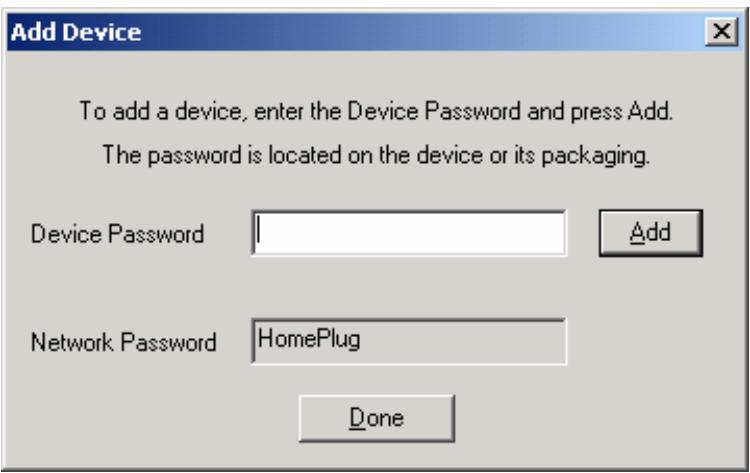
To add a Powerline device to your network, you will need to enter in the Device Password. The Device password is listed on the label on the back of your Powerline device. On the SMCHP1D-ETH and SMCHP1D-USB the Device Password is listed as [DEK:XXXXXXXXXX].
Note: DEK stands for "Device Encryption Key"
Once you have added the Powerline hardware to the EZ Configuration Utility, then you can connect the actual unit in the remote location where it is needed to extend your network connection over the Powerline network.
By using this feature you can easily setup a Powerline network with the EZ Configuration Utility and setup and manage the network very efficiently.
CHAPTER 8 | Setting a Network Password
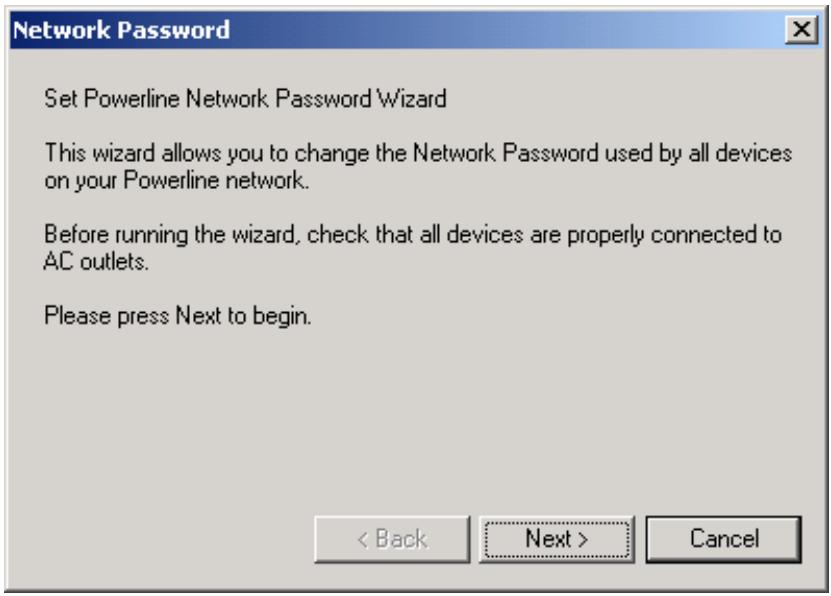
When you click the [Network Password] button the Network Password wizard will launch. This wizard is used to change the Security Key for all the devices configured with the EZ Configuration Manger. Before then remote Powerline device's security/network password can be changed with this wizard, the Device Password must be configured in the utility.
- Click the [Next] button to start the wizard.
- Set the Network Password that you want to use. The default network password is "HomePlug"
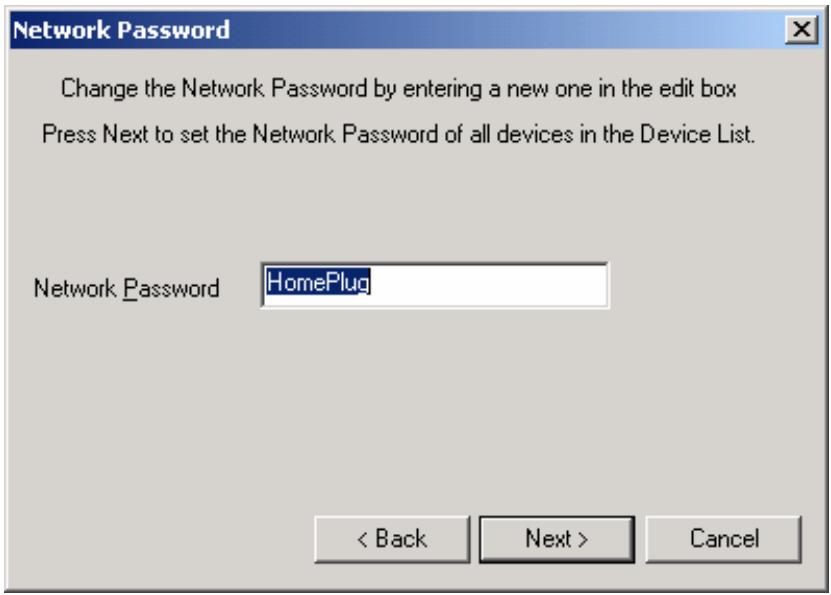
Note: It is highly recommended that you change this password from the default setting.
- This wizard will configure Network Passwords for the local adapter, as well as the remote adapters in your Powerline network.
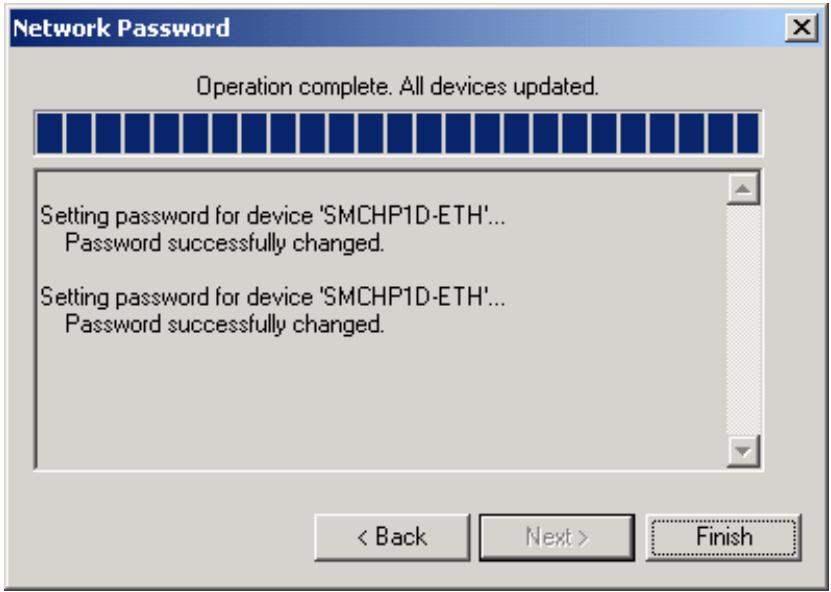
Note: You can only set passwords for remote Powerline devices if you have the Device Password (DEK) configured in the SMC EZ Configuration Utility. For information on how to do this, please refer to the previous section.
- When the wizard has completed, click the [Finish] button to return to the EZ Configuration Utility.
CHAPTER 9 | Running the Diagnostic Wizard
The SMC EZ Configuration Utility has a built-in diagnostic tool to help you trouble shoot your Powerline network. To access this tool and detailed report, follow the steps outlined below:
- After you click the [Diagnostics] button on the default utility page, the Powerline Diagnostics Wizard will launch. To start the wizard, click the [Next] button.
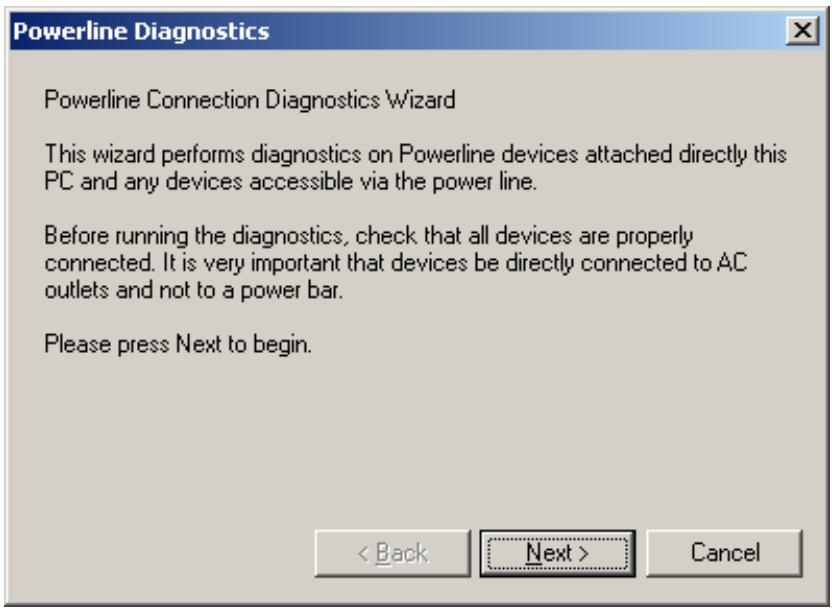
- This utility will scan your whole Powerline network
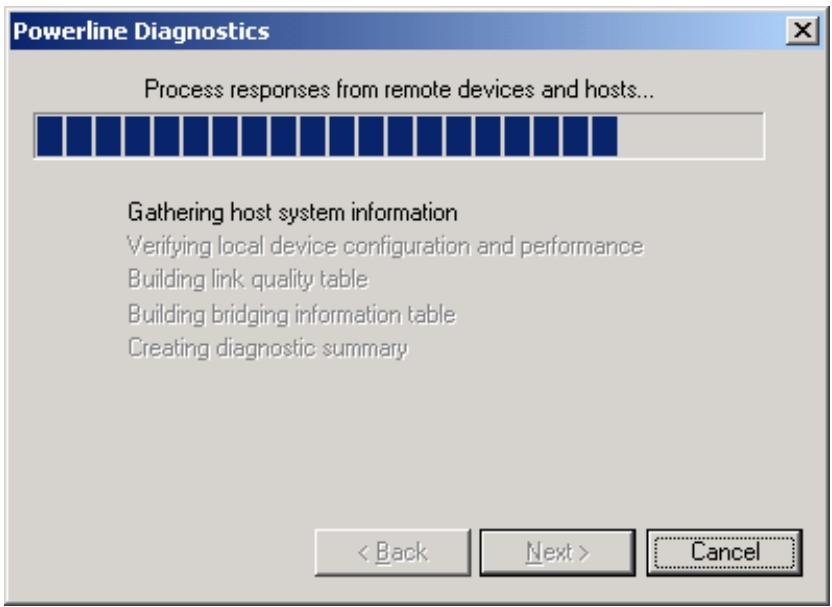
- When the scan has completed, click the [Next] button to view the report summary.
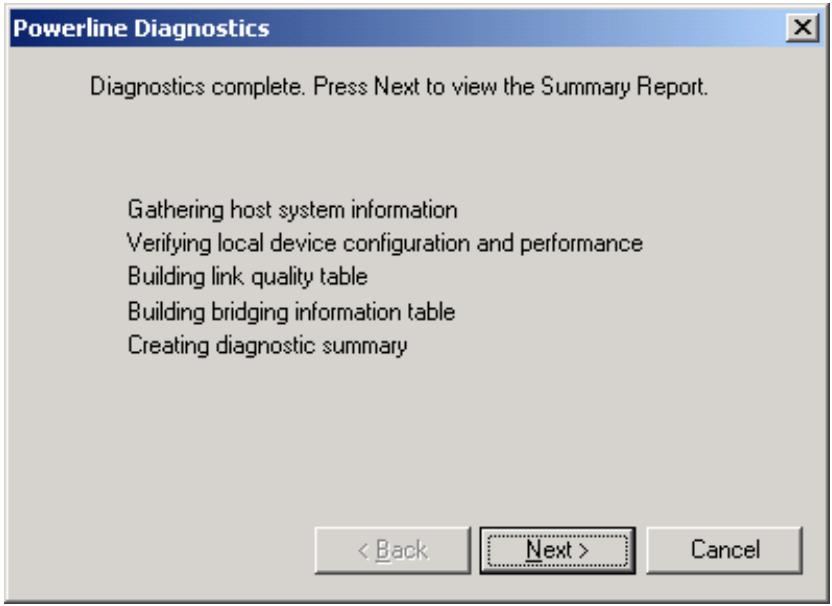
- The report summary will tell you in there is anything wrong with your Powerline network. To access a complete report click the [Detail Report...] button.
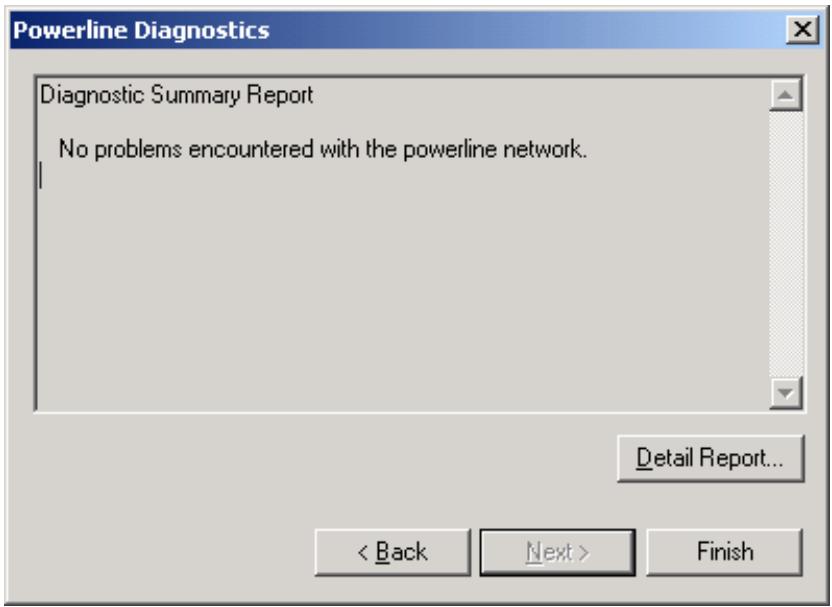
If you don't want to review the details, click the [Finish] button to return to the main utility screen.
CHAPTER 10 | Understand the Diagnostic Report
The SMC Diagnostic report is exported to a text file called [DiagnosticDetails.txt]. You can use this report to review the details of your Powerline network and get help resolving connectivity issues.
Thu Dec 18 21:12:01 2003
SMC EZ Configuration utility 1.0 Report
>> Host Information
App Name:ConnectMan.exe
App version:v1.05.02.00
Host Name:xxxxxxxxxx
OS Platform: windows 2000 v5.0 Build 2195
Library Path:C:\\Program Files\\SMC\\HomePlug\\CSTDI.dll
Library version: v5.03.16.5401
Driver Path:C:\\Program Files\\SMC\\HomePlug\\CSTDIPD5.SYS
Driver version:v5.03.16.54
Image Path:\?C:\\PROGRA-1\\SMC\\HomePlug\\CSTDIPD5.SYS
>> Host Network Connections
Name Status Adapter Address IP Address Subnet Mask
SMC1255TX Connected 00-04-E2-64-C1-1E 192.168.2.103 255.255.255.0
>>Powerline devices
Name Device Address Interface Status Manufacturer Product SMCHP1D-ETH 00-90-47-05-F1-79 Local Ethernet Connected SMC HP1D-ETH SMCHP1D-ETH 00-90-47-05-ED-91 Remote Connected SMC HP1D-ETH
>>Network Key Mismatch Test: Passed (no key mismatch detected).
>> Local Device 'SMCHP1D-ETH' Configuration
Network Connection:SMC1255TX
Interface Type:Local Ethernet
Firmware Version:CS110x MAC-1-1-1-4-OFFC-20030507-XXXRC4
HomePlugMAC/PHY:CS110200
Loopback Rate:1610.0 fps (OK)
>>Link Quality Summary Table
Source Device Destination Device PHY Rate (Mbps)
SMCHP1D-ETH SMCHP1D-ETH 13.4
SMCHP1D-ETH SMCHP1D-ETH 11.2
>> Bridge Information Summary Table
Device Name Device Address Bridged Address IP Address
SMCHP1D-ETH 00-90-47-05-F1-79 00-30-1B-11-34-86 192.168.2.101 00-20-E0-88-DB-AA UNKNOWN 00-04-E2-64-C1-1E 192.168.2.103 (user) 00-70-46-00-00-01 192.168.2.1
SMCHP1D-ETH 00-90-47-05-ED-91 None UNKNOWN
This report has eight sections, which are listed below:
- Host Information
Host Network Connections
Powerline Devices
Network Key Mismatch Test - Local Device Configuration
- Link Quality Summary Table
- Bridge Information Summary Table
Diagnostic Summary Report
Host Information
This section provides information about SMC EZ Configuration Utility and the PC you are running the utility on.
Host Information
App Name : ConnectMan.exe
Library Path : C:\Program Files\SMC HomePlug\CSTDI.dll
Library version: v5.03.16.5401
Driver\Path : C:\Program Files\SMC/HomePlug\CSTDIPD5.SYS
Driver version : v5.03.16.54
Image Path : \??\C:\PROGRAMA-1\SMC/HomePlug\CSTDIPD5.SYS
Host Network Connections
This section will outline the model name, if you are connected, the MAC Address, IP Address, and Subnet Mask for the Network Adapter installed on your PC.
Host Network Connections
Name
SMC1255TX
Status
Connected
Adapter Address
00-04-E2-64-C1-1E
IP Address
192.168.2.103
Subnet Mask
255.255.255.0
Powerline Devices
This section lists out the Powerline devices on your network. In this section on the diagnostic report you will get the Device Name, Device Address (MAC Address), Interface, Status, Manufacture, and Product (Model) of your Powerline device.
This section is useful to check the status of all your Powerline devices to insure they are connected and operating correctly.
Powerline devices
Name
SMCHP1D-ETH
SMCHP1D-ETH
Device Address
00-90-47-05-F1-79
00-90-47-05-ED-91
Interface
Local Ethernet
Remote
Status
Connected
Connected
Manufacturer
SMC
SMC
Product
HP1D-ETH
HP1D-ETH
Network Key Mismatch Test
This section will display the results of the Network Key test. This test will check to confirm if each Powerline device on network has the same encryption key.
Positive Results - Network is configured correctly.
Network Key Mismatch Test: Passed (no key mismatch detected).
Negative Results - Power network is not configured correctly.
Please refer to the summary section at the bottom of the Diagnostic Report to see which device has the wrong password.
Network Key Mismatch Test: Fail. (multiple network keys detected).
Local Device [Model] Configuration
This section will outline the hardware information about the local Powerline Device. The local Powerline device is typically the one connected directly to the PC the utility is used on. However, if you have a Powerline device connected to one of the LAN ports on your router, and the PC is connected to the Router via a wired or wireless connection, it will show the Powerline device connected to the Router as your local device.
>>> Local Device 'SMCHP1D-ETH' Configuration
Network Connection: SMC1255Tx
Interface Type : Local Ethernet
Firmware version : CS110x MAC-1-1-1-4-OFFC-20030507-XXXRC4
HomePlug MAC/PHY : CS110200
Loopback Rate : 1610.0 fps (OK)
Link Quality Summary Table
In this section it the link quality for each Powerline device on your network is listed. To improve your PHY Rate, plug the Powerline adapter into another power outlet in your house.
>> Link Quality Summary Table Source Device Destination Device PHY Rate (Mbps) SMCHP1D-ETH SMCHP1D-ETH 13.4 SMCHP1D-ETH SMCHP1D-ETH 11.2
Bridge Information Summary Table
In this section it you will get a complete summary of your Powerline network. The reason the first Powerline Device shown below has 5 Bridged Addresses listed is because this Powerline device is connected to the LAN port of a Barricade Router.
>> Bridge Information Summary Table
Device Name Device Address Bridged Address IP Address
SMCHP1D-ETH 00-90-47-05-F1-79 00-30-1B-11-34-86 192.168.2.101
00-20-E0-88-DB-AA UNKNOWN
00-04-E2-64-C1-1E 192.168.2.103 (user)
00-70-46-00-00-01 192.168.2.1
00-07-95-D8-A7-AA UNKNOWN
SMCHP1D-ETH 00-90-47-05-ED-91 None UNKNOWN
Diagnostic Summary Report
This section of the diagnostic report will outline any steps required to fix a connectivity issue. For example, if you fail the Network Key Mismatch Test, this section will provide an explanation of the issue, display which device has the wrong password, and provide a method to resolve this issue.
Diagnostic Summary Report Multiple keys detected. At least one device connected to the powerline is using a Network Password that is different than the Network Password used by the local adapter. Use the Network Manager Add Device' function to set the Network Password of all new devices connected to the powerline. Device 'SMCHP1D-ETH' is using a different Network Password. Use the Network Manager 'Network Password' function to set the correct Network Password for this device.
Appendix A - Product Specification
Below is an outline of the Technical Specifications for the EZ Connect Powerline to USB Desktop Adapter (SMCHP1D-USB)
Standards:
HomePlug v1.01 compatible
USB 1.1
Interface:
USB 1.1
Electrical plug (Powerline)
LEDs:
Power (PWR)
HomePlug LINK/ACT (HP)
Power Input:
100-240VAC @ 50-60Hz (internal)
0.15A
Security:
56-bit Data Encryption (DES) with
Dynamic Key Management
Protocols:
Forward Error Correction (FEC)
Automatic Channel Adaptation
Software:
Device Detect/Diagnostic
DEK Password Setup for Local and Remote
Device
Supports Windows 98, Me, 2000, XP
Mac OS 9.x and OS X 10.1.x
Driver:
Supports Windows 98SE, Me, 2000, XP
Operating Temperature:
32^ to 104^ (0^ to 40^)
Operating Humidity:
10% to 90% Non-Condensing
Frequency:
4.3 MHZ - 20.9 MHZ
Modulation:
OFDM Symbol Modulation,
Modulation Schemes:
This equipment has been tested and found to comply with the limits for a Class B digital device, pursuant to Part 15 of the FCC Rules. These limits are designed to provide reasonable protection against harmful interference in a residential installation. This equipment generates uses and can radiate radio frequency energy and, if not installed and used in accordance with the instructions, may cause harmful interference to radio communications. However, there is no guarantee that interference will not occur in a particular installation. If this equipment does cause harmful interference to radio or television reception, which can be determined by turning the equipment off and on, the user is encouraged to try to correct the interference by one of the following measures:
Reorient or relocate the receiving antenna
- Increase the separation between the equipment or device
- Connect the equipment to an outlet other than the receiver's
- Consult a dealer or an experienced radio/TV technician for assistance
This device complies with Part 15 of the FCC Rules. Operation is subject to the following two conditions: (1) This device may not cause harmful interference, and (2) this device must accept any interference received, including interference that may cause undesired operation.
FCC Caution: Any changes or modifications not expressly approved by the party responsible for compliance could void the user's authority to operate this equipment.
IMPORTANT NOTE: FCC Radiation Exposure Statement
This equipment complies with FCC radiation exposure limits set forth for an uncontrolled environment. This equipment should be installed and operated with a minimum distance of 20 centimeters (8 inches) between the radiator and your body. This transmitter must not be colocated or operating in conjunction with any other antenna or transmitter.
Appendix C - Technical Support
PHONE
From U.S.A. and Canada (24 hours a day, 7 days a week)
(800) SMC-4-YOU
(949) 679-8000
Fax: (949) 679-1481
From Europe (8:00 AM - 5:30 PM UK Time)
44 (0) 118 974 8700
Fax: 44 (0) 118 974 8701
INTERNET
E-mail addresses:
- techsupport@smc.com
- european.techsupport@smc-europe.com
Product Updates:
http://www.smc.com/
World Wide Web:
http://www.smc.com/
http://www.smc-europe.com/
U.S.A. and Canada: (800) SMC-4-YOU Fax (949) 679-1481
Spain: 34-93-477-4935 Fax 34-93-477-3774
If you are looking for other contact information, please visit www.smc.com