
DV600 - Digital video camera GENIUS - Free user manual and instructions
Find the device manual for free DV600 GENIUS in PDF.

| Product Type | Multifunction Digital Video Camera |
| Brand | Genius |
| Model | DV600 |
| Dimensions (L x H x D) | 90 x 70 x 37 mm (without protruding parts) |
| Weight | 136 g (without battery and SD card) |
| Power Supply | 4 AAA alkaline batteries 1.5 V or USB 5 V (webcam mode) |
| Image Sensor | CMOS 1/2" 3.3 megapixels (active 3.14 MP) |
| Photo Resolution | 2976x2232 (interpolated), 2048x1536, 1600x1200, 640x480 |
| Video Resolution | 640x480 at 15 fps, 320x240 at 30 fps, ASF format (MPEG-4) |
| Lens | F/3.0, fixed focal length 8.34 mm |
| Focus Range | Standard: 1.2 m to infinity; Macro: 17-22 cm |
| Digital Zoom | 4x |
| LCD Screen | 1.5-inch color TFT (240x354 pixels) |
| Internal Memory | 16 MB built-in |
| External Memory | SD/MMC card up to 512 MB |
| Flash | Auto, Off |
| Self-timer | 5, 10, 30 seconds |
| Main Functions | Video recording, photo, MP3 player, voice recorder, webcam, mass storage |
| Connectivity | USB 1.1, video output, audio output |
| Included Accessories | CD-ROM, carrying case, wrist strap, earphones, USB cable, TV cable, audio cable, 4 AAA batteries, manual, quick guide |
| Maintenance and Cleaning | Clean the lens and screen with a soft brush or dry cloth. Do not use detergents or solvents. |
| Safety | Do not expose to direct sunlight, do not open the device, avoid moisture and high temperatures. |
| Spare Parts and Repairability | No user-repairable parts. Contact the dealer in case of problems. |
| General Information | Designed for capturing photos, videos, voice, and MP3 playback. Can be used as a webcam. |
Frequently Asked Questions - DV600 GENIUS
User questions about DV600 GENIUS
0 question about this device. Answer the ones you know or ask your own.
Ask a new question about this device
Download the instructions for your Digital video camera in PDF format for free! Find your manual DV600 - GENIUS and take your electronic device back in hand. On this page are published all the documents necessary for the use of your device. DV600 by GENIUS.
USER MANUAL DV600 GENIUS
Recording Video with Self-Timer
Special effects
Video playback
Video index
Video playback menu
Camera Mode
Status Identifier
AE Lock
Camera Menu
Flash function
Ev value adjust
Taking a photo with self-timer
Special effects
Shooting photos
To take close-up pictures
To take portrait and distant pictures
Playback photos
Trim function
Photo index
Camera playback menu
MP3 player
Status Identifier
Playing MP3 song
Volume, Bass, Treble adjust
Fast forward, Fast rewind, Next,
Previous
Repeat one, Repeat all, Random,
playing in-order
MP3 playback menu
Voice modes
Status Identifier
Record Voice
Voice playback menu
Setup Mode
Status Identifier
Setting
Help screen Prompt
- Connecting
Your Computer 40-42
Using the Digital Video Camera as a Web
camera or a Mass Storage drive
Connecting to Your TV/VCR
System Requirements
-
Installing Drivers 42-43
-
Installing the
Applications for PC....44-47
- Appendix:Digital
Video Camera
Specifications 48-49
10.Troubleshooting. 50
1. Introduction
Overview
This is a high-quality yet affordable Digital Video Camera that allows you to create, edit, share and send photos to your friends and family.
This Digital Video Camera is also not just a Digital Camera. It lets you record short segments of videos or voices. What's more, it can be used as a MP3 Player, and a Web camera when you connect it to a computer.
This easy-to-follow manual shows you how to use your new Digital Video Camera and install all the software included in the software CD-ROM. You'll find clear instructions on how to take pictures, record videos and voices, play MP3 songs, and use your Digital Video Camera as a PC camera. Guidelines on how to use the software to transfer photos and video segments from the Digital Video Camera into your computer are also provided.
Whenever you want to send snapshots or short video clips via email, create exciting photo albums, produce videos, or even chat with your friends or family face to face over the Internet, or play MP3 music, this Digital Video Camera gives you all the tools that you need.
2. Attention
Please read through this manual carefully before using the Digital Video Camera and follow the instructions to avoid damage caused by improper operation.
Safety Precaution
The software CD-ROM packaged with the Digital Video Camera is for PC use only. Playing this CD-ROM on a stereo or CD player may cause damage to it.
- This Digital Video Camera is a precision electronic device. Do not attempt to service this Digital Video Camera yourself; opening or removing covers may expose you to dangerous voltage points or other risks.
Do not expose this Digital Video Camera under direct sunlight to avoid causing a fire.
Before Using Your Digital Video Camera
Try to take some pictures before you perform the formal recording. Before taking pictures with this Digital Video Camera at any important occasion (such as a wedding ceremony or an overseas trip), do test the Digital Video Camera beforehand to ensure that it functions well. Any additional loss caused by the malfunction of this product (such as costs of photography or any loss of benefit generated by the photography) is not the responsibility of our company and no compensation will be given for it.
Copyright information Unless agreed by the right owner, all the pictures taken with this Digital Video Camera cannot be used in violation of copyright law. Moreover, when "No Photography" restriction is placed on site, you cannot record any live performance, improvisation or exhibits even for personal purpose. Any transfer of pictures or memory card with data must be conducted under the constraints of copyright law.
Notes on the LCD (Liquid Crystal Display) monitor 1. If the liquid contacts the skin: Please wipe dry the skin with a cloth and wash with large amount of water. 2. If the liquid gets in the eye:
Please immediately rinse with fresh water for at least 15 minutes and then consult with a doctor to receive treatment as soon as possible.
- If anyone accidentally swallows the liquid:
Please rinse the mouth with water, drink large amount of water and receive treatment as soon as possible.
Operational Caution
This product consists of intricate electrical parts. To ensure it works normally, do not drop or hit the Digital Video Camera when taking pictures.
-
Avoid to use or place the Digital Video Camera in the following locations:
-
Damp and dusty places.
- Sealed vehicles or places exposed to direct sunlight or places subject to extremely high temperatures or heat.
- Violently turbulent environment.
- Locations full of smoke, oil fumes or steam.
- Locations subject to strong magnetic fields.
-
Raining or snowing environment.
-
Do not open the battery cover when the power is on.
If water has entered the Digital Video Camera, immediately turn the power off and remove the batteries.
How to maintain your Digital Video Camera: -
If the lens or LCD monitor surface is dirty, please use a lens brush or soft cloth to wipe clean instead of touching them with your fingers.
- Do not use any solid object to hit the Digital Video Camera to avoid scratching the lens, or LCD monitor surface.
- Do not use any detergent or volatile solution, which will subject the Digital Video Camera case and paint to solving or distortion. Use a soft cloth only.
Package Contents
Carefully unpack your package and make sure that you have the following items. In the event that any item is missing or if you find any mismatch or damage, promptly contact your dealer.

CD-ROM (Driver & Application Software)
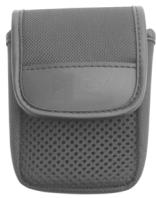
Pouch
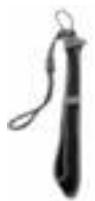
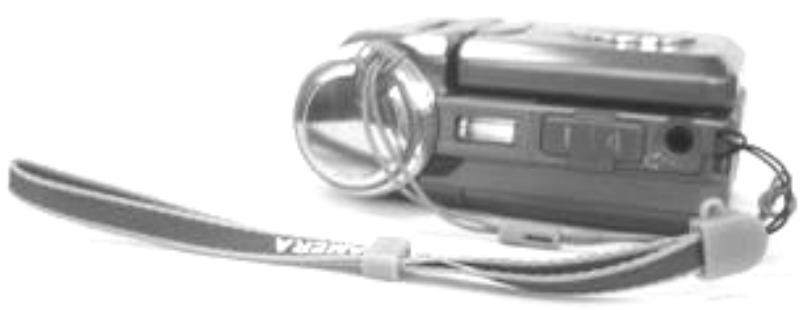
Wrist Strap& Lens Cover Strap
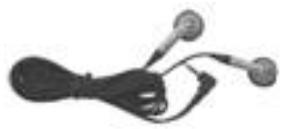
Earphone
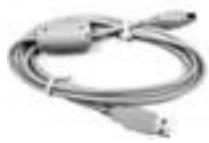
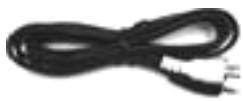
USB Cable
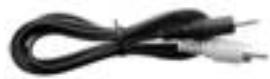
TV OUT Cable
Audio Cable
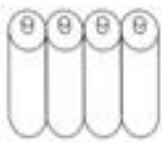
4x " AAA" Alkaline Batteries

User's Manual

Quick Guide

NOTE
■ Accessory and components may vary by area.
3. Getting to Know Your Digital Video Camera
Digital Video Camera Controls
Top View:
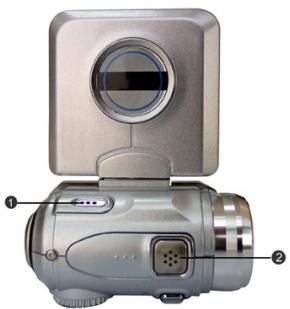
- Microphone
- Speaker
Front Side View:
- Lens
- Self-timer LED
- Built-in Flash
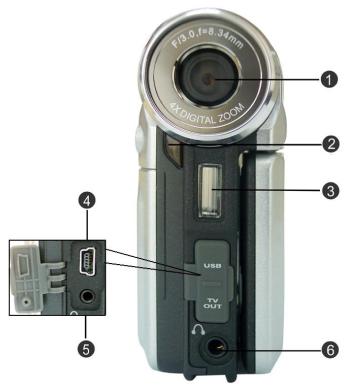
Terminal Compartment
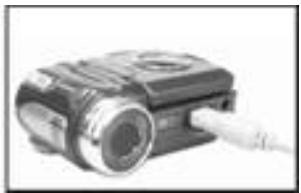
The Digital Video Camera has three ports for attaching the following cables: Audio Output, Video Output, USB. These ports will enable you to attach the appropriate cables from the Digital Video Camera to your computer, TV/OCR or earphone.
-
USB Port - Used to connect your Digital Video Camera to the computer via the USB cable. You can then transfer photos, recorded videos (voices), or MP3 songs between the Digital Video Camera and your computer, or use the Digital Video Camera as a Web camera.
-
Video Output Port - Used to connect your Digital Video Camera to a TV/VCR for viewing images/videos stored in your Digital Video Camera.
- AUDIO Output Port - Used to connect your Digital Video Camera to your telephone for Playback MP3 and Voice stored in your Digital Video Camera.
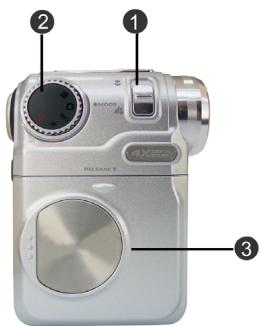
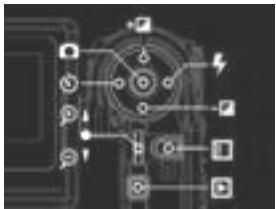
BACK VIEW:
- Multi-function. Button - In all modes, select direction such as Up, Down, left, right or other special function.
- Shutter button - Press the Shutter button to take pictures in Capture mode, and to start and stop recording videos or voices in Video or Voice mode.
- Dual Color LED (Power LED/Busy LED)-As the Digital Video Camera power is turned on, the LED will lit green. And when the Digital Video Camera is busy, the LED will turn to red.
- Menu button - Press the MENU button in all modes, the operation menus of each mode will display on the LCD monitor.
- Select button - Multi-select button with UP Select button, Down select button and OK button. In all modes, perform the tasks of select, confirm, and forward, Reward, OK and so on.
- Playback button - In video mode, camera mode, voice mode, MP3 player mode, press this button to enter corresponding function mode.
- Power Button - Press the button for one second, then the Digital Video Camera will power on/off.
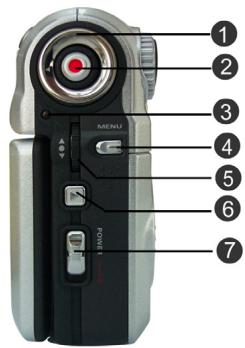
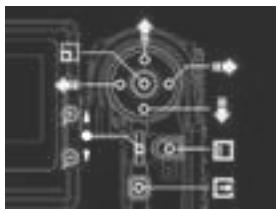
Right Side View:
-
Macro Switch - Use this to switch between "Normal" and "Macro" modes. The icon will appear on the LCD panel when the Macro mode is selected.
-
Mode dial- You can select the following modes by rotating this mode dial:
a. -Video mode b. -Camera mode c. MP3 -MP3 player mo

-Voice mode
e. SET
-Setup mode
3. Battery Cover
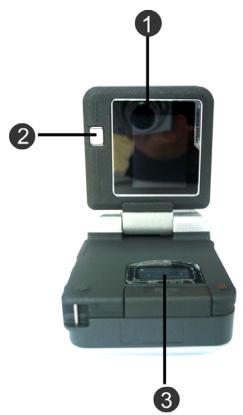
Bottom View:
- Color Liquid Crystal Display
- Display button -In Video mode and Camera mode, press this button to clear the icon on LCD panel or enter help screen: Normal Full screen Help Screen. In other modes, press this button to enter help screen: Normal Help Screen.
- SD Card slot
Battery power level

Full battery power

Medium battery power

Low battery power

Battery exhausted
4. Getting Started
Preparing Your Digital Video Camera
■ Step 1 Insert four "AAA" batteries into the battery compartment .
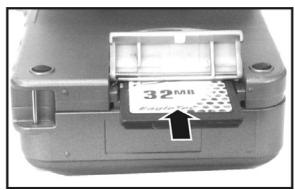
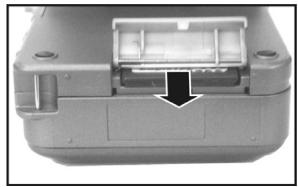
■ Step 2 When inserting a SD/MMC memory card, follow the direction shown in the compartment to insert the card, push the memory card all the way into the memory compartment. When pushing the card again, it will pop-up.

NOTE
- When a memory card is inserted, internal 16MB flash memory will be disabled no matter if the card is full or not. When the power is on, please do not remove the memory card.
5. Start Using Your Digital Video Camera
Step 1 Press the Power button to turn on the Digital Video Camera. The Power LED will be lit.
Step 2 The LCD Display will be turned on automatically.

NOTE
The LCD Display will turn off automatically if you do not operate the camera for over 1 minute, also the camera power will turn off automatically if you do not operate it over the time that you set.
Funtion Tree
Video Mode
- Display—Normal/Full screen/Help screen
- Recording Videos – Start/Pause/Stop
- Digital Zoom- 1.0 × 4.0 ×
- EV adjust-+2.0EV~-2.0EV
- Macro—Normal/Macro
- Self-Timer - 5 second/10 second/30 second/off
- Special effects Normal/Sepia/B&W/Negative/Red/Pink/Purple/Blue/Green/Yellow
- Video menu – White Balance – Auto/Sunny/Tungsten/Fluorescent/Cloudy
-Size-640x480/320x240
Quality-Fine/Normal/Basic
- Video playback-Single/Video index
Volume adjust
Video playback menu-Delete:Delete one/Delete all
- Protect : Protect one/Protect all
Camera Mode
- Display - Normal/Full screen/Help screen
- Taking pictures
- AE Locking—[ ]
- Digital Zoom-1.0x~4.0x
- EV adjust- +2.0EV -2.0EV
- Self-Timer—5 second/10 second/30 second/off
- Flash Mode—Off/Auto
- Macro—Normal/Macro
- Special effects—Normal/Sepia/B&W/Negative/Red/Pink/Purple/Blue/Green/Yellow
- Camera menu - White Balance - Auto/Sunny/Tungsten/Fluorescent/Cloud
-Size-2976x2232/2048x1536/1600x1200/640x480
Quality-Fine/Normal/Basic
-Date stamp-Date & Time/Date/Off
-
Camera Playback—Single/Photo Index
-
CameraPlaybackMenu-Delete:Deleteone/Deleteall
- Protect : Protect one/Protect all/Unprotect All
—Autoplay
DPOF-Set One
- Set All/Reset All
- Print - Print One/Print All
MP3 Player
-
Playing Song - Play/Pause/Stop
-
Random/Repeat One/Repeat All
Fast Forward/Fast Reverse -
Previous/Next
-
Volume Adjust
- Bass Adjust
- Treble Adjust
-
MP3 Player Menu—Delete : Delete one/Delete all
-
Protect : Protect one/Protect all/Unprotect All
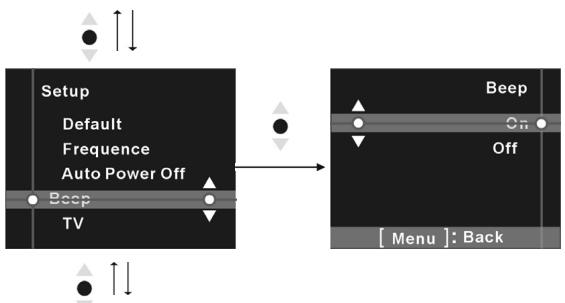
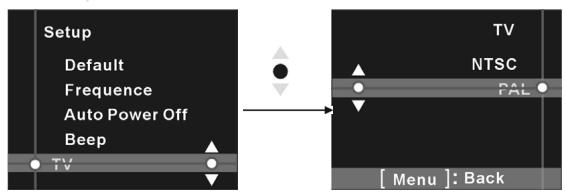
Setup Mode
- Beep-On/Off
- Date/Time
- Language—English, Russian, German, French, Italian, Spanish, Japanese, Brazil Portuguese
- Format-Ok/Cancel
- Memory information—Photo Total
—Video Total
—MP3 Total
—Voice Total
—Free Space - Default- Ok/Cancel
- TV-NTSC/PAL
- Frequency—60Hz/50Hz
- Auto Power—Off/3 min/5 min
Voice Mode
- Recording Voices
- Voice Playback—Play/Pause/Stop
- Random/Repeat one/Repeat All
- Fast Forward/Fast Reverse
- Next/Previous
- Volume Adjust
- Voice Playback Menu—Delete : Delete one/Delete all
- Protect : Protect one/Protect all/Unprotect All
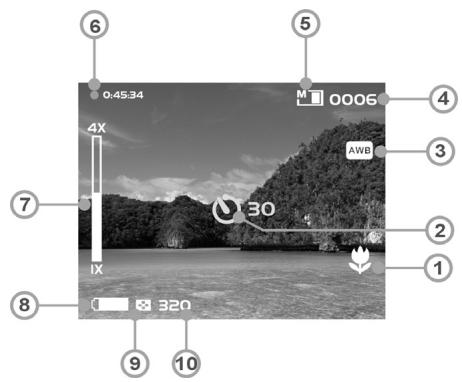
Video Mode [1]
Rotate mode dial to [Movie] [12]
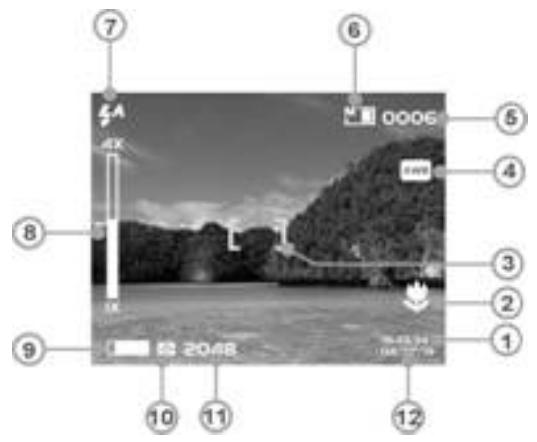
Status identifier
- Macro
- Self-Timer/Delay
- White Balance
- Video Counter
- Memory Status
- Time remain to record
- Zoom Lever
- Battery
- Quality
- Size
Recording Video
This digital video camera can record video in MPEG4 format. In video mode, press menu button to enter video menu.
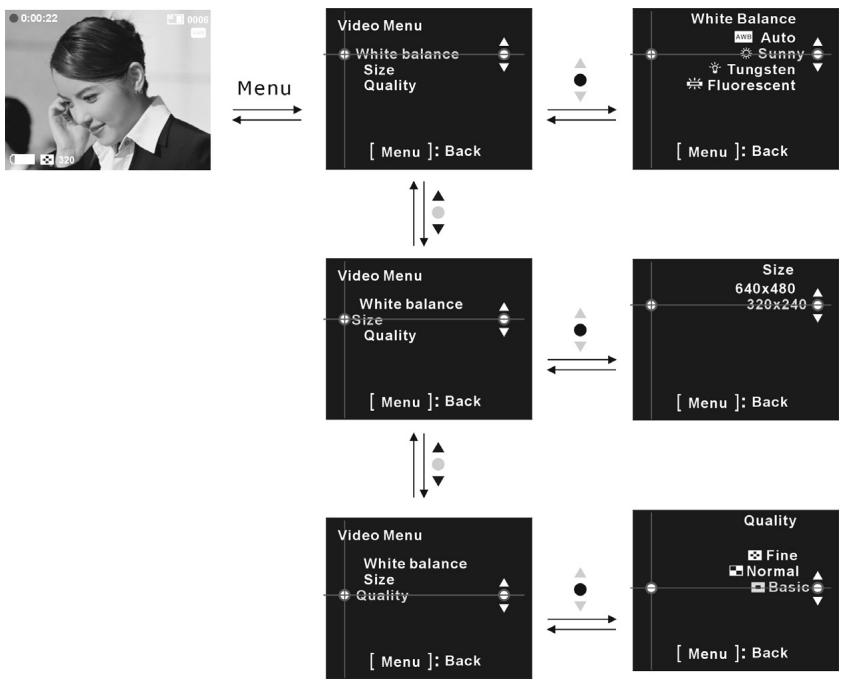
Select video size:
- Press up or down button of Select button to select「Size」and press OK button.
- Press up or down button of Select button to select the size that you want to record and press OK button.
Size options: 640X480, 320X240
Select the means of white balance:
- Press up or down button of Sselect button button to select「White balance」and press OK button.
- Press up or down button of Select button to select the means that you want to record and press OK button.
White balance options: Auto, Sunny, Tungsten, Fluorescent, Cloudy
Select video quality:
- Press up or down button of Select button to select「Quality」and press OK button.
- Press up or down button of Select button to select the quality that you want to record and press OK button.
Quality options: Fine, Normal, Basic
Start recording:
- Step 1: Press shutter to start recording video. You will see live views of the subjects or scenes you are recording on the LCD Display. Press up or down button of Select button to perform digital zooming.
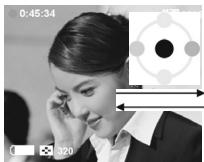


When recording, press up or down button of Multi-function button to adjust exposure value.

When recording, press right button of Multi-function button to pause recording, press again to continue recording.
Step 2: Again press Shutter button to stop recording.
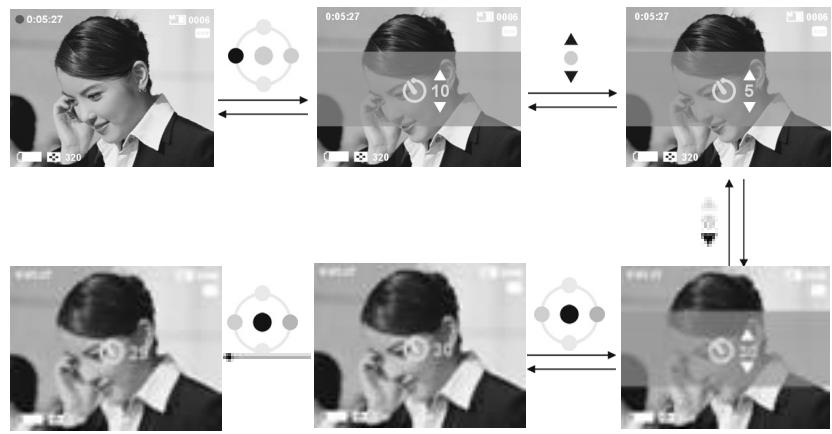
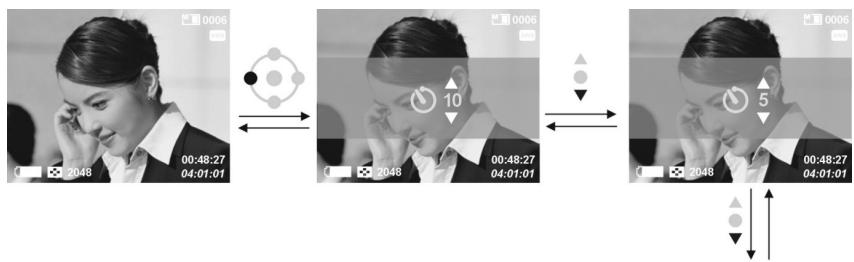
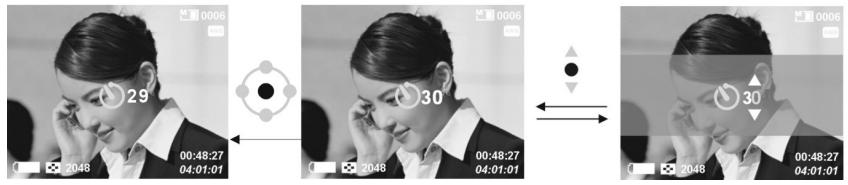
Recording video with self-timer
- Press left button of Multi-function button to enter self-timer setup interface.
- On self-timer setup interface, press up or down button of Sselect button to select the wait time of self-timer and press ok button.
- Press shutter button to count down. After count down to zero, the digital video camera will start recording. When counting down, pressing OK button will cancel counting down.
Special effects:
In video mode, press OK button to enter special effects menu.
Press up or down button of Select button to select the effect that you want to record.

Video playback:
In video mode, press Playback button to enter video playback mode.
- Press up or down button of Select button to select the video that you want to playback and press OK button to start playing.
- Press OK button again to stop playing.
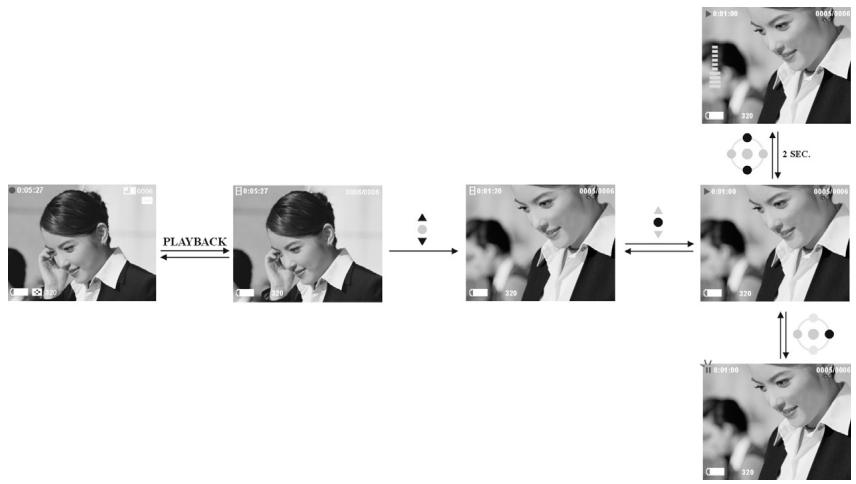
- When playing, press right button of Multi-function button to pause playing, press again to continue playing. Press up or down button of Multi-function button to adjust volume.
Videos Index:
In video playback mode, press left button of Multi-function button to browse videos index, which shows 6 images per page with a mid-size preview window. Press up or down button of Select button to change previewing images,press OK button to return to Playback Mode which displays selected image with full screen.

VideoPlaybackMenu:
In video playback mode, press Menu button to enter video playback menu.
Delete one
- Press up or down button of Select button to select [delete] and press OK button.
- Press up or down button of Select button to select [delete one] and press OK button to enter delete one video.
- Press up or down button of Select button to select the file that you want to delete, press OK button to delete file selected (protected file can't be deleted).
Delete all
- Press up or down button of Select button to select [delete] and press OK button.
- Press up or down button of select button to select [delete all] and press OK button to enter delete all videos.
- For delete all function, press up or down button of Select button to select [ok] and press OK button to delete all files, to select [cancel] and press OK button to exit Delete all file (protected file can't be deleted).
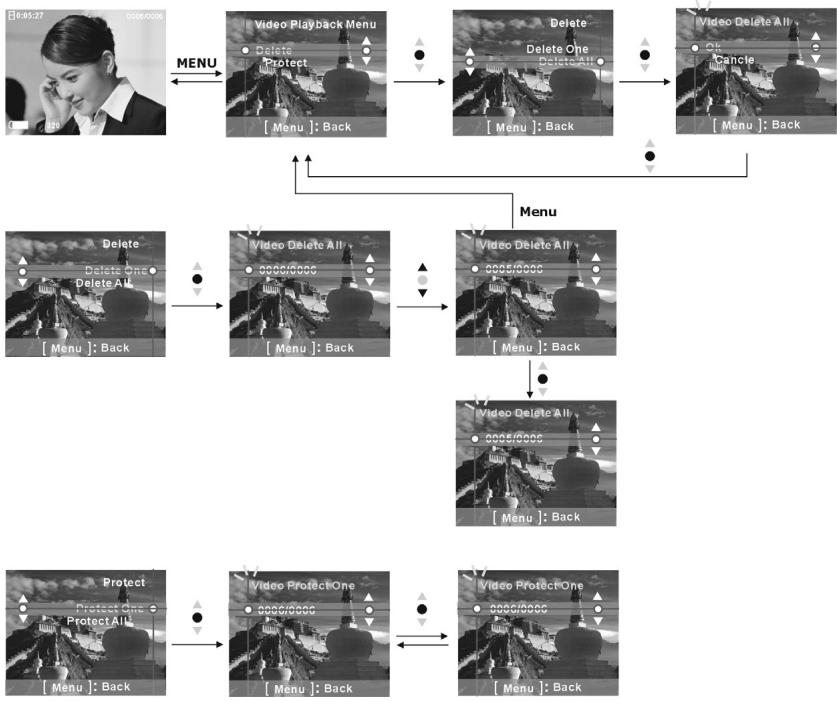
Protect one
- Press up or down button of Select button to select [Protect] and press OK button.
- Press up or down button of Select button to select [Protect one] and press OK button to enter protect one file interface.
- Press up or down button of Select button to select the file that you want to protect. If the current file is not protected, press OK utton to protect current file and the icon ^ will appear, press OK button again to unprotect current file and the icon ^ will disappear.
Protect all
- Press up or down button of Select button to select [Protect] and press OK button.
-
Press up or down button of Select button to select [Protect all] and press OK button to enter protect all files.
-
For Protect all, press up or down button of Select button to select [OK] and press OK button to protect all file, select [Cancel] and press OK button to unprotect all file.
Camera Mode
Rotate mode dial to switch to
Status identifier:
- Time
- Macro
- AE-Lock
- White Balance
- Photo Counter
- Memory Status
- Flash
- Zoom Lever
- Battery
- Quality
- Size
- Date
AE Lock:
When pressing the Shutter button half way, the image appears between the brackets [ ] indicates the stop auto exposure.
Camera menu:
Before taking photos, you can configure your camera options, press the menu button to enter the camera menu.
Select image size:
-
Press up or down button of Select button to select [Size] and press OK button.
-
Press up or down button of Select button to select the size that you want to record and press OK button.
Size options: 2976X2232, 2048X1536, 1600X1200, 640X480
Select white balance:
- Press up or down button of Select button to select [White balance] and press OK button.
- Press up or down button of Select button to select the type you want to record and press OK button.
White balance options: Auto, Sunny, Tungsten, Fluorescent, Cloudy
Select image quality:
- Press up or down button of Select button to select [Quality] and press OK button.
- Press up or down button of Sselect button to select the quality that you want to record and press OK button.
Quality options: Fine, Normal, Basic
Select date stamp:
- Press up or down button of Select button to select [Date stamp] and press OK button.
- Press up or down button of Select button to select the options you want and press OK button.
Date stamp options: Date & Time, Date, Off
Flash function:
Flash function is active only in camera mode, the flash has two status, if press right button of Multi -func button, it can sequence into auto and off status.

EV value adjust:
In camera mode, press up or down button of Multi-function button to adjust exposure value.
EV value range: -2.0 +2.0
Taking a photo with self-timer:
- Press left button of Multi-function button to enter self-timer setup interface.
- In self-timer setup, press up or down button of Select button to select the wait time of self-timer and press OK button.
- Press Shutter button to count down, after count down to zero, the digital video camera will take a picture. When counting down, you can press OK button to cancel counting down
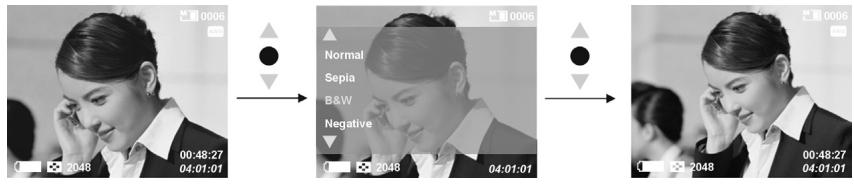
Special effects:
In camera mode, press OK button to enter special effects menu, press up or down button of Sselect button to select the effect that you want.
Effect options: Normal/Sepia/B&W/Negative/Red/Pink/Purple/Blue/Green/Yellow
Shooting photos:
Step 1 Make sure the Digital Video Camera is turned on.
■ Step 2 Use the LCD display to frame the subjects you want to photograph.
Step 3 Press shutter button half way to Lock auto exposure.
Step 4 Press the Shutter button whole way to take a picture.
The LCD will display the still scene until it is stored in the memory. When the LCD display resumes, you may focus your next target to take the next picture.
To take close-up pictures:
Step 1 Push the Macro switch upwards to select Macro mode. The Macro indicator on the LCD display will appear, allowing you to take pictures at a closer range (between 17 22cm ).
Step 2 To take pictures, follow the steps in the "Shooting Photos" section.
To take portrait and distant pictures:
Step 1 Push the Macro switch downward. This sets the digital Video Camera to normal mode, and the icon on the LCD display will disappear, allowing you to take pictures of people or scenarios at distance 1.2m infinity.
Step 2 To take pictures, follow the steps in the "Shooting Photos" section.
Photos playback:
- In camera mode, press Playback button to enter camera playback mode.
-
In camera playback mode .press up or down button of Sselect button to select the photo that you want.
-
Press OK button to be ready to scale up or down the current photo. Press up or down button of Select button to scale up or down. When photo is being scaled up, you can press up, down, left or right button of Multi-function button to move to the position that you want.
Trim function:
When current photo is being scaled up, you can press Shutter button to enter Trim function menu, press up or down button of Select button to select the image size that you want, then press OK button and current photo is trimmed as a new photo. The images size selected must be smaller than the size of the current photo.
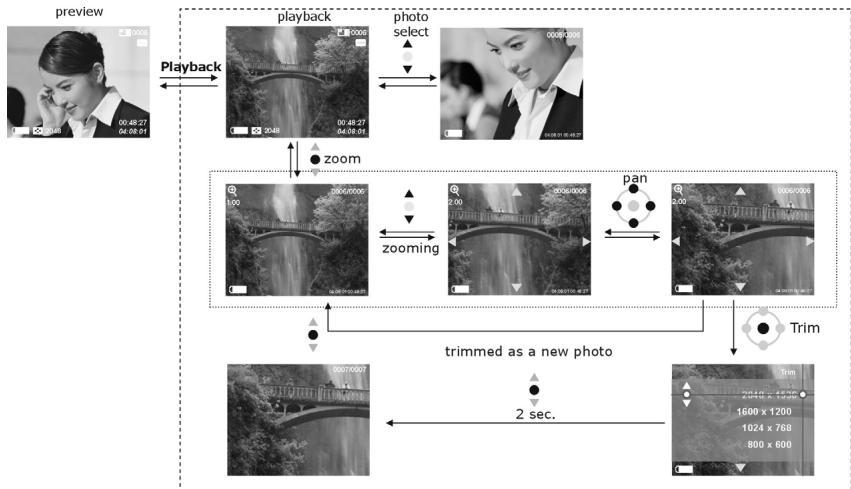
Photo index
In camera playback mode, press left button of Multi-function button to browse the photo index, which shows 8 images per page with a mid-size preview window. Press up or down button of Multi-function button to change previewing images, press ok button to return to Playback Mode which displays the selected image in the full screen.

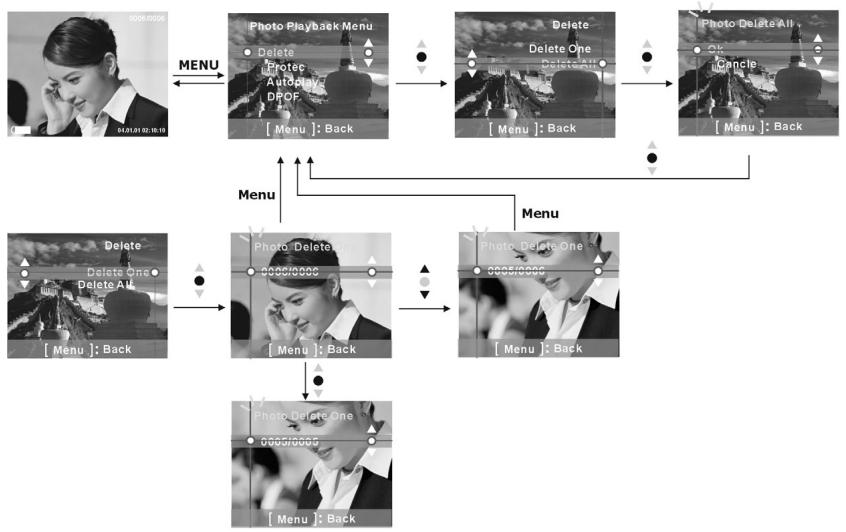
Camera Playback Menu:
In camera playback mode, press Menu button to enter camera playback menu.
Delete one
- Press up or down button of Select button to select [delete] and press OK button.
- Press up or down button of Select button to select [delete one]and press OK button to enter Delete one function.
- Press up or down button of Select button to select the file that you want to delete, press OK button to delete file selected (protected file can't be deleted).
Delete all
- Press up or down button of Select button to select [delete] and press OK button.
- Press up or down button of Select button to select [delete all] and press OK button to enter Delete all interface.
- In Delete all file interface, press up or down button of Select button to select [ok] and press OK button to delete all files (protected file can't be deleted), select [cancel] and press OK button to exit Delete all file interface.
Protect one
- Press up or down button of Select button to select「Protect」and press OK button.
- Press up or down button of Select button to select「Protect one」and press OK button to enter protect one file interface.
- Press up or down button of Select button to select the file that you want to Protect. If current file is not protected, press OK button to protect current file and the icon will appear, press OK button again to unprotect current file and icon will disappear.
Protect all:
- Press up or down button of Select button to select [Protect] and press OK button.
- Press up or down button of Select button to select [Protect all] and press OK button to enter Protect all file interface.
- In Protect all file interface, press up or down button of Select button to select [OK] and press OK button to protect all files, or select [cancel] and press OK button to unprotect all files.
Auto play:
Press up or down button of Select button to select [Auto play] and press OK button to slide show all pictures previously taken with the Digital Video Camera at a fixed interval, press Menu button to exit slide show.
DPOF:
Selecting DPOF option in Playback Menu can save your printing orders for compatible printers that read DPOF (Digital Print Order Format) files.
Set one
- Press up or down button of select button to select DPOF and press ok button.
- Press up or down button of select button to select「Set one」and press ok button to enter Set one interface.
- On Set one interface, press up or down button of select button to select the file that you want to set, then press ok button to add the number that you want to print, the max number is three.
Set all:
- Press up or down button of Select button to select [DPOF] and press OK button.
- Press up or down button of Select button to select [Set all] and press OK button to enter Set all interface.
- In Set all interface, press up or down button of Select button to select [ok] and press OK button to set all files to DPOF files, the print number of every file is one. To select [cancel] and press OK button to reset all files.


Direct Print (only support printers that support PictBridge)
Press up or down button of Select button to select [Print] and press OK button, then you will be informed to connect your digital video camera to a printer with USB cable. When connection is successful, a print menu appear.
Print one
- In Print menu, press up or down button of Select button to select [Print one] and press OK button to enter Print one file interface..
-
In Print one file interface, press up or down button of Select button to select from [photo to print], [copies to print], [paper size], [date stamp], [Print].- photo to print: Press left or right button of Multi-function button to select the photo file that you want to print.
-
copies to print: Press left or right button of Multi-function button to set print number that you want to print.
- paper size: Press left or right button of Multi-function button to set paper type that you want to print.
- date stamp: Press left or right button of Multi-function button to select print date or not.
- Print: Press OK button to start printing
Print all
- In Print menu, press up or down button of Select button to select [Print all] and press OK button to enter Print all file interface..
-
On print all file interface, press up or down button of Select button to select from [copies to print], [paper size], [date stamp], [Print].
-
copies to print: Press left or right button of Multi-function button to set print number that you want to print.
- paper size: Press left or right button of Multi-function button to set paper type that you want to print.
- date stamp: Press left or right button of Multi-function button to select print date or not.
- Print: Press OK button to start printing
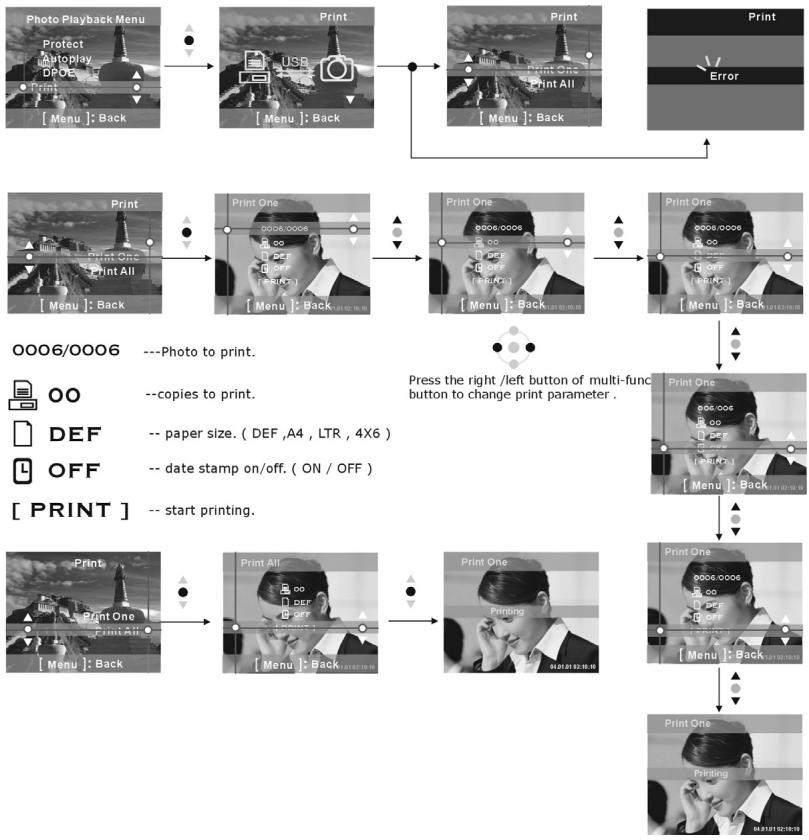
Direct Print (PictBridge)
MP3 Player
Status identifier:
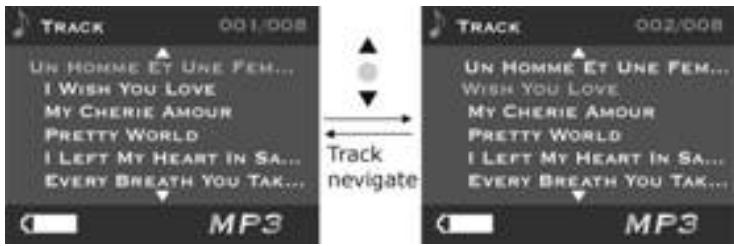
Playing MP3 songs:
In MP3 mode, press up or down button of Select button to select MP3 file that you want to play, then press OK button to be ready to play MP3 song selected. At this time, you will see the time length and the baud rate of current MP3 file, press the Shutter button to start playing.
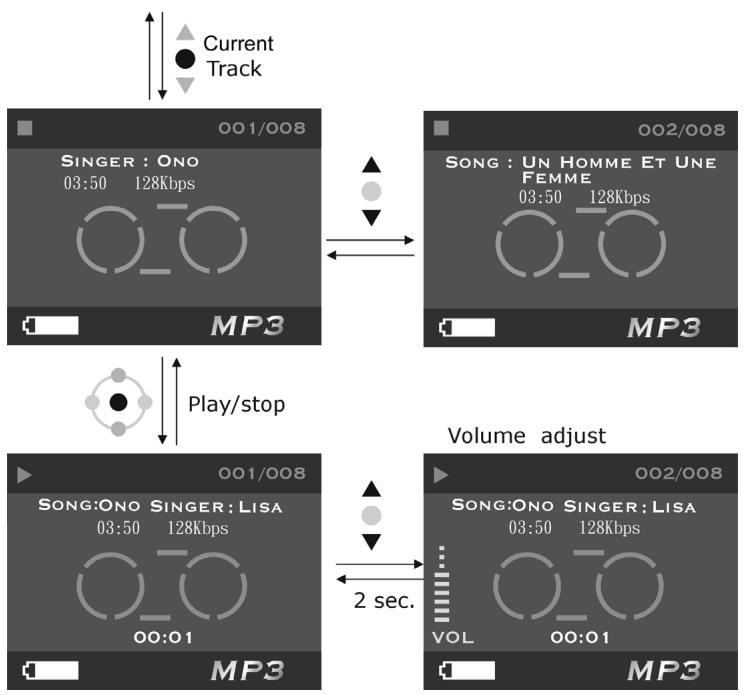
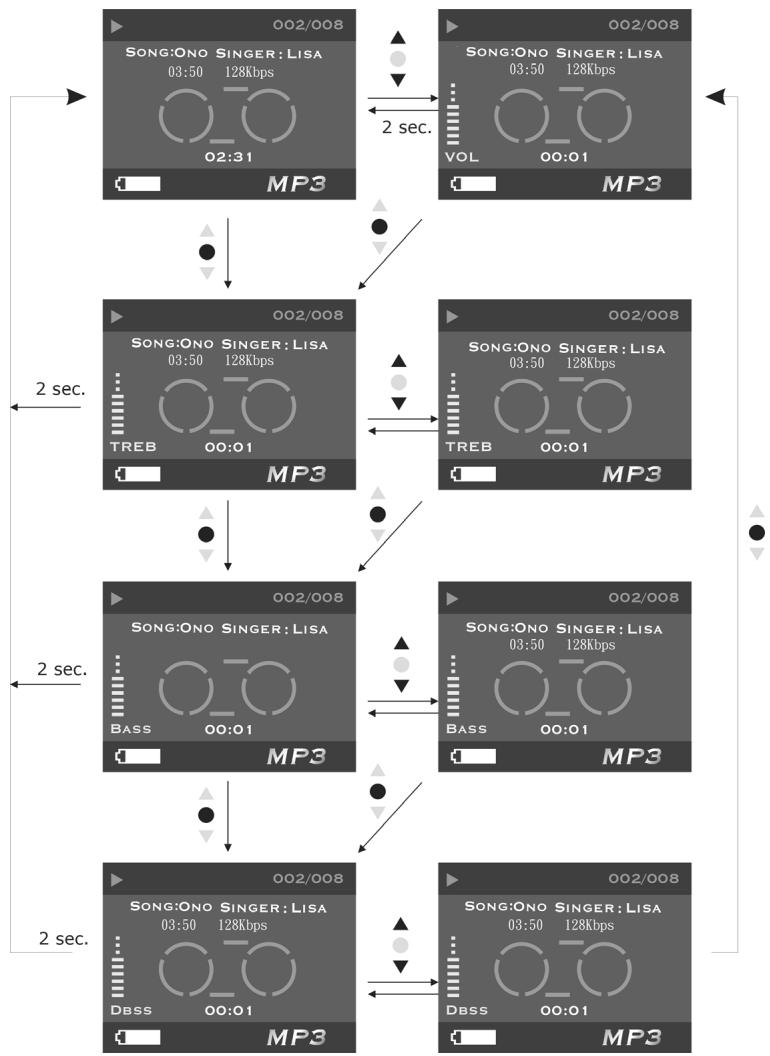
Volume, Bass, Treble adjust:
When playing MP3 songs, press up or down button of Multi-function button to adjust volume, press OK button to switch among volume, bass and treble.
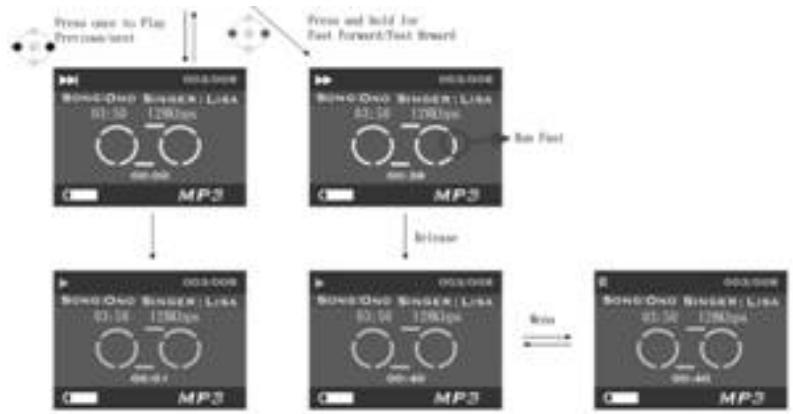
Fast forward, Fast reverse, Next, Previous:
When playing MP3 songs, press once up or down button of Multi-function button to select a previous song or next song, press left or right button of Multi-function button and hold for fast reverse or fast forward, press menu button to pause, press again to continue playing. When not playing, you can also press left or right button of Multi-function button to select previous song or next song.
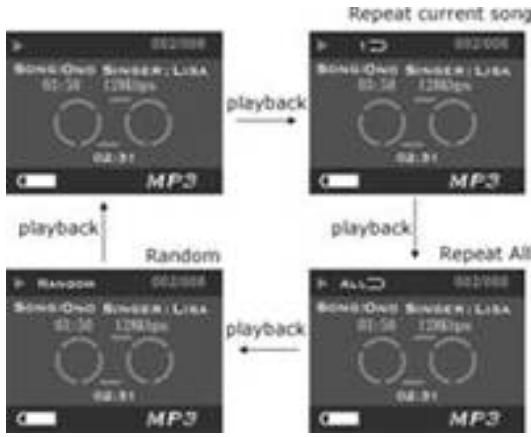
Repeat one, Repeat all, Random, playing in-order:
When playing MP3 songs, press Playback button to switch how you play the songs by:
- Repeat one:Reapeat playing single song
- Repeat all: Rerapeat playing all songs
- Random:Playing songs in random order
- Playing in-order:
MP3 player menu:
In MP3 mode, when MP3 player stops playing a song, press Menu button to enter MP3 player menu.

Delete one
- Press up or down button of Select button to select [delete] and press OK button.
- Press up or down button of Select button to select [delete one] and press OK button to enter Delete one file interface.
- Press up or down button of Select button to select the file that you want to delete, press OK button to delete file selected (protected file can't be deleted).
Delete all
- Press up or down button of Select button to select [delete] and press OK button.
- Press up or down button of Select button to select [delete all] and press OK button to enter Delete all file interface.
- In Delete all file interface, press up or down button of Select button to select [ok] and press OK button to delete all files, select [cancel] and press OK button to exit Dlete all file interface (protected file can't be deleted).
Protect one
- Press up or down button of Select button to select [Protect] and press OK button.
- Press up or down button of select button to select [Protect one] and press OK button to enter Protect one file interface.
- Press up or down button of Select button to select the file that you want to protect. If current file is not protected, press OK button to protect current file and the icon ^0 will appear, press OK button again to unprotect current file and the icon ^0 will disappear.
Protect all
- Press up or down button of Select button to select [Protect] and press OK button.
- Press up or down button of Select button to select [Protect all] and press OK button to enter Protect all file interface.
- In Protect all file interface, press up or down button of Select button to select [ok] and press OK button to protect all file, select [cancel] and press OK button to unprotect all files.
Voice Mode

Switch to Voice mode
Status Identifier:
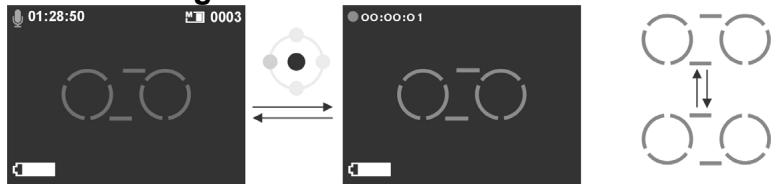
In voice mode, press Shutter button to start recording voice, press Shutter button again to stop recording.
Voice Recording:
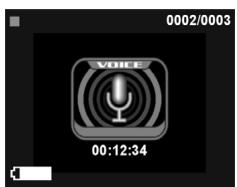
Voice playback:
In Voice mode, press Playback button to enter voice playback mode.
In voice mode, press up or down button of Select button to select voice file, then press OK button to start play voice selected, press OK button again to stop playing. In Voice playback mode, press up or down button of Multi-function button to adjust volume at any time.
Fast forward, Fast reverse, Next, Previous:
When playing voice, press once left or right button of Multi-function button to select previous voice or next voice, press and hold for fast reverse or fast forward, press Menu button to pause, press again to continue playing.
Repeat one, Repeat all, Random, playing in-order:
When playing voice, press Playback button to select one of the following:
- Repeat one:Repeat playing single voice
- Repeat all: Repeat playing all voice
- Random: playing voice file at random
- Playing in-order:

Voice playback menu:
In Voice playback mode, press menu button to enter Voice playback menu.
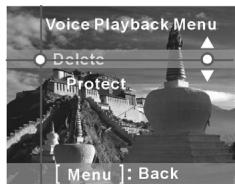
Menu
Delete one
- Press up or down button of Select button to select [delete] and press OK button.
- Press up or down button of Select button to select [delete one] and press OK button to enter Delete one file interface.
- Press up or down button of Select button to select the file that you want to delete, press OK button to delete file selected (protected file can't be deleted)..
Delete all
- Press up or down button of Select button to select [delete] and press OK button.
- Press up or down button of Select button to select [delete all] and press OK button to enter Delete all file interface.
- In Delete all file interface, press up or down button of Select button to select [ok] and press OK button to delete all files, select [cancel] and press OK button to exit Delete all file interface 9protected file can't be deleted).
Protect one
- Press up or down button of Select button to select [Protect] and press OK button.
- Press up or down button of Select button to select [Protect one] and press OK button to enter Protect one file interface.
- Press up or down button of Select button to select the file that you want to protect. If current file is protected, press OK button to protect current file and the icon will appear, press OK button again to unprotect current file and the icon will disappear.
Protect all
- Press up or down button of Select button to select [Protect] and press OK button.
- Press up or down button of Select button to select [Protect all] and press OK button to enter Protect all file interface.
- In Protect all file interface, press up or down button of Select button to select [ok] and press OK button to protect all files, select [cancel] and press OK button to unprotect all files.
Setup mode
Switch to setup mode
Status Identifier:
In setup mode, you can configure the basic settings for the Digital Video Camera:
- Date/Time
- Language
- Format
- Memory information
- Default
- Frequency
- Auto power off time
- Beep
- TV signal method
Options setup
In setup mode, press up or down button of Select button to select the option you want to set, then press OK button to set.
Date/Time: year/month/day/hour/minute/second
Language: English/Russian/German/French/Italian/Spanish/Japanese/Brazil
Portuguese
Format: Ok/Cancel
Memory information: Video file total/Photo file total/MP3 file total/Voice file total/Memory free space
Default: Ok/Cancel
Frequency: 60HZ/50HZ
Auto power off: Off / 3 minutes/ 5 minutes
Beep: On/Off

Setting:
Help screen:
This digital video camera has a help screen for every mode. Press Display button to enter help screen.
Help screen in camera mode
Help screen in camera playback mode
Help screen in video mode
Help screen in MP3 mode
Help screen in video playback mode

Help screen in voice mode
Help screen in voice playback mode
Help screen in setup mode
6. Connecting to your computer
If you are using the Digital Video Camera as a Web camera or a Mass Storage drive, follow these steps:
■ Step 1 Make sure the Digital Video Camera has four "AAA" batteries in the compartment.
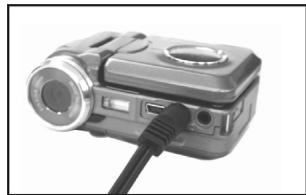
Step 2 Connect the smaller end of the USB cable into the USB port of your Digital Video Camera.

NOTE
Make sure to plug-in the USB cable in the right direction gently to avoid possible damage to the USB connector.
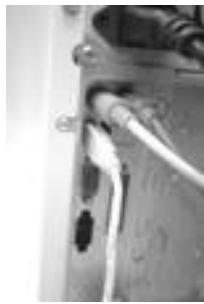
- Step 3 Connect the other end of the USB cable to the USB port located on the back of your computer.
■ Step 4 The Digital Video Camera's LCD display will turn on and enter the PC Connection Menu.
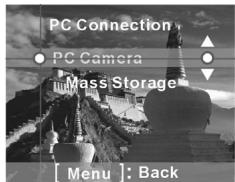
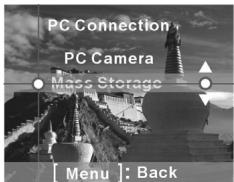
■ Step 5 Press up or down button of Select button to select Mass Storage Drive or PC Camera option on the menu screen.
Connecting to Your TV/VCR
Connect your Digital Video Camera to a television if you want to have a larger view of your photos.
■ Step 1 Connect the TV Output port to television with TV Output cable.
■ Step 2 Connect the Audio Output port to television with Audio output cable.
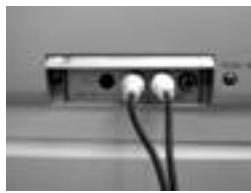
■ Step 3 On your television, select the channel for auxiliary Audio/Video input.

NOTE
Channels may vary by manufacturers; refer to your VCR's operating manual.
System Requirements
At least refer to the minimum system requirements for the Digital Video Camera. We recommend that you use a computer system that exceeds the minimum requirements in order to utilize the Digital Video Camera at its optimum efficiency.
The minimum system requirements for the Digital Video Camera is as following:
| System (PC) Requirements | |
| OS | Microsoft Windows 98SE/Me/2000/XP |
| CPU | Intel Pentium 166MHz or higher |
| Memory | Minimum 32 MB memory or above |
| CD-ROM | 4X or above |
| HDD | 10 MB free disk space (minimum) |
| Others | One standard USB 1.1 port |
For users of Microsoft Windows98SE,Me, connect the bigger end of the USB cable into the USB port of your PC and the other end into the USB port of your Digital Video Camera after you have installed the driver and applications to the PC. In PC connection menu, press up or down button of Select button to select PC Camera, then press OK button.
■ Step1 Select "my computer" and click the right mouse button.
Step2 Select and click "Device Manager".
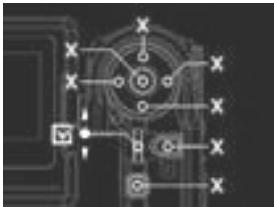
■ Step3 Select "GENERIC IDE DISK TYPE47" and click "Properties", the screen will appear as following:
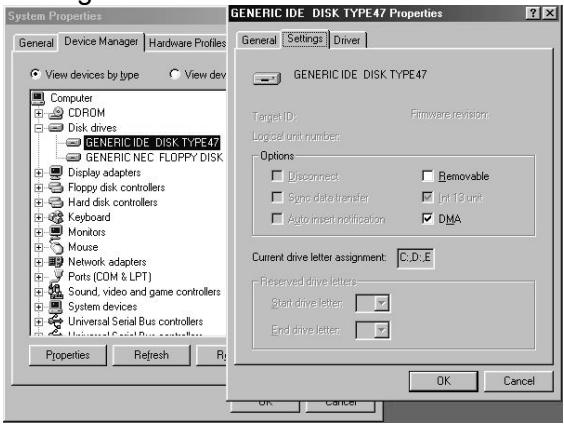
Step4 Select "DMA" and click "OK".

NOTE
Before playing Video Clips (.AVI file), make sure your PC has DirectX8.0 or higher, and an installed sound card.
7. Installing Drivers
Installing the Camera Driver for PC
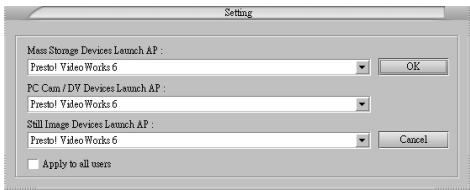
You can use the "Mass Storage" and "PC Camera" functions of the camera in the PC. To install the proper camera driver, perform the following:
- Insert the Software CD supplied by the package into the CD-ROM drive.
- The Auto-run program will be executed and the Welcome screen will appear with
the following message: (If your CD-ROM drive doesn't support the auto-run function, please double click on the "My Computer" icon on the desktop. Then double click the CD-ROM drive icon and click the "Driverssetup\Setup.exe" file in the root directory.)
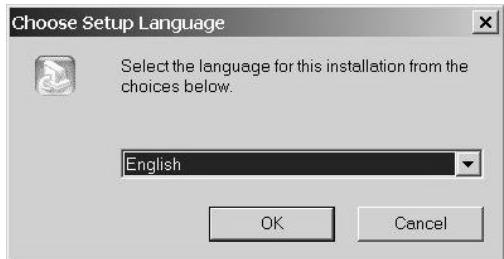
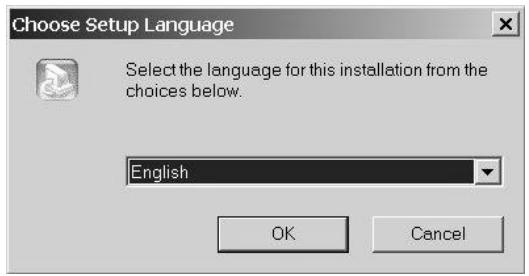
- Please select the desired language of the setup program you want to install.
- Please click on the "Driver > Install", and the following screen will appear:
- Select the desired language, and then press "OK".
- Entering the application setup screen, press "Next" to continue.
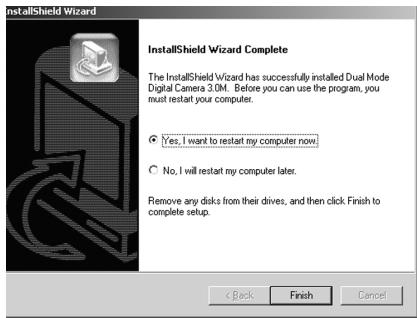
- After the installation is completed, the following screen will appear. Press "Finish" to complete the application installation.
8. Installing the Application
NewSoft application installation
- Insert the Software CD supplied by the package into the CD-ROM drive.
- The Auto-run program will be executed and the Welcome screen will appear the following message: (If your CD-ROM drive doesn't support the auto-run function, please double click on the "My Computer" icon on the desktop. Then double click the CD-ROM drive icon and click the "MP38\Setup.exe" file in the root directory.)
- Please select the desired language of the setup program you want to install.
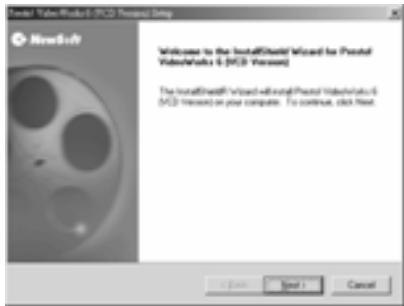
- Please click on the "New Soft Video works > Install", the following screen will appear:
- Select the desired language, and then press "OK".
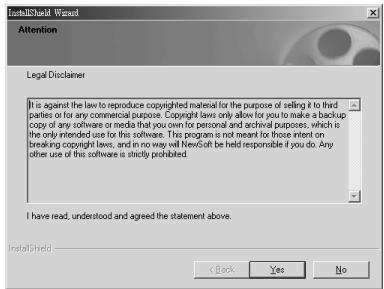
- Press "Yes" to accept the conditions of Legal Disclaimer and continue the installation.
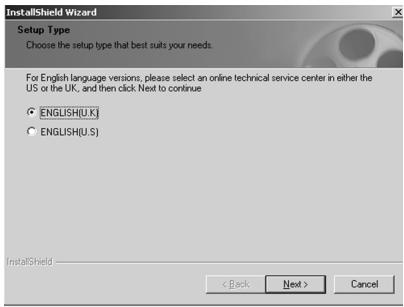
- Please select the area of language, then press "Next" to continue.
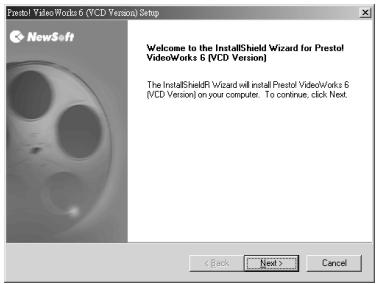
- Entering the application setup screen, press "Next" to continue.
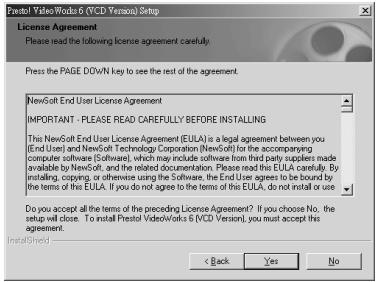
- Press "Yes" to accept the conditions of Software License Agreement and continue the installation.
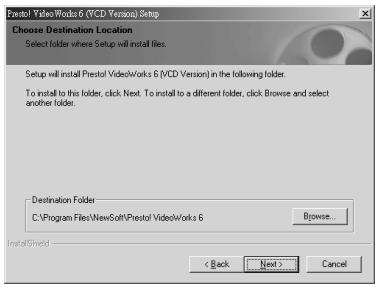
- Please follow the installation wizard to select the folder location.
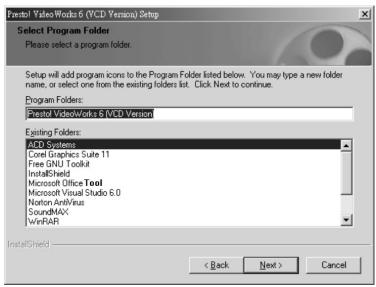
- Please select the program folder name.
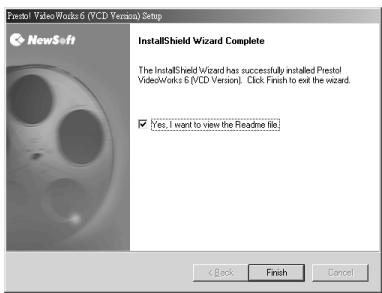
- After the installation is completed, the following screen will appear. Press "Finish" to complete the application installation.
- After the Multimedia Software is completed, the following screen will appear, press "Ok" to continue.
- Entering DirectX9 setup screen, press "Ok" after the content is confirmed.
- Appendix: Camera Specifications
| IMAGE SENSOR | 1/2" CMOS 3.3 Mega pixel Sensor |
| Active Pixels | 3.14 Mega Pixels |
| IMAGE RESOLUTION | Still Image: 6.6M 2976 x 2232 / Firmware Interpolation), 3M (2048 x 1536), 1600 x 1200, 640 x 480 Movie: 640 x 480/15 fps, 320 x 240 / 30fps, File format: ASF (MPEG-4) |
| LENS | F/3.0 , f=8.34mm / Fixd Focus Lens |
| Focus Range | Standard: 1.2m ~ Infinity , Macro: 17 ~ 22cm |
| Digital Zoom | 4X |
| Shutter Speed | 1/4 ~ 1/2000 sec. |
| White Balance | Auto, Sunny, Tungsten, Fluorescent, Cloudy |
| EV Compensation | -2.0EV~2.0EV |
| LCD Display | 1.5" color TFT (240x354 pixels) |
| PC Cam | 640 x 480/10 fps, 320 x 240 / 30fps |
| STORAGE MEMORY | Internal: Built-in 16 MB internal memory External: SD/MMC (Up to 512MB) |
| FLASH | Auto, off |
| SELF-TIMER | 5 second, 10 second, 30 second delay |
| POWER | Camera : "AAA" 1.5V alkaline battery x 4 |
| PC Cam : USB 5V | |
| WEIGHT | 136g (without battery and SD Card) |
| DIMENSIONS | 90x 70 x 37 mm (without protruding parts) |
| Design and Specifications are subject to change without notice. | |
■ Motion Storage data capability (Built-in 16MB memory):
320x240:
| Fine | Normal | Basic |
| Approx. 169 seconds ± 10% | Approx. 181 seconds ± 10% | Approx. 195 seconds ± 10% |
640x480:
| Fine | Normal | Basic |
| Approx. 84 seconds ± 10% | Approx. 87 seconds ± 10% | Approx. 90 seconds ± 10% |
- The above data shows the standard testing results. The actual capacity varies according to the shooting conditions and settings.
Sound storage data capability (Built-in 16MB memory): Approx. 21 minutes
■ Still storage data capability (Built-in 16MB memory) :
| Quality\Resolution | 640X480 | 1600X1200 | 2048X1536 | 2976X2232 |
| Fine | 139 ± 10% | 33 ± 10% | 19 ± 10% | 10 ± 10% |
| Normal | 142 ± 10% | 53 ± 10% | 37 ± 10% | 17 ± 10% |
| Basic | 152 ± 10% | 73 ± 10% | 50 ± 10% | 23 ± 10% |
- The above data shows the standard testing results. The actual capacity varies according to the shooting conditions and settings.
10. Troubleshooting
| Deadlock | Digital video camera appears deadlock suddenly when it is running. At this time, please check the condition of the batteries, then press power button to restart. If you still can’t restart, please check if your Digital Video Camera has been damaged by improper operation. Do not attempt to service it yourself, please contact the provider. |
| Any error prompt in direct print service mode | When entering direct print service mode, you might see error prompt caused by printer malfunctions, improper operating or power supplying problems. In these cases, please unplug the USB cable from your digital video camera. After you make sure all in good condition, press power button to restart for implementing print task. |
| Deadlock caused by card removing | Card removing when Digital Video Camera power is on may cause deadlock. In case of deadlock, please remove batteries then load again, press power button again to restart. |
| Can’t format memory card | Digital video camera maybe can’t format the memory card with special data format. In the case, please format the card with FAT format by your PC. |