
DV5122 - Digital Camera GENIUS - Free user manual and instructions
Find the device manual for free DV5122 GENIUS in PDF.

| Product type | Digital camera |
| Brand | GENIUS |
| Model | DV5122 |
| Dimensions (L x H x D) | 120 x 71 x 46 mm (excluding protruding parts) |
| Weight | Approximately 195 g (without battery or memory card) |
| Power supply | 4 AA alkaline batteries |
| Sensor | CMOS 5.0 megapixel 1/1.8" |
| Photo resolution | 12 MP (interpolated), 5 MP, 3 MP, 2 MP, VGA |
| Video resolution | 640x480 and 320x240 at 30 fps |
| Digital zoom | 4x |
| LCD screen | 2.0 inch TFT (480x234 pixels) |
| Internal memory | 32 MB built-in |
| Storage media | SD/MMC card (up to 2 GB) |
| Flash | Auto, forced, off; range 1.2-2.0 m |
| White balance | Auto, Sunny, Cloudy, Tungsten, Fluorescent |
| EV compensation | -2.0 to +2.0 EV in 0.5 steps |
| Color effects | Color, Black & white, Sepia |
| Self-timer | Off, 5 s, 10 s, 30 s |
| Interface | USB 2.0 |
| Shutter | 1/10 to 1/500 second |
| Auto power off | Off, 1 min, 3 min |
| Main functions | Photo capture, video and audio recording, webcam |
| Maintenance and cleaning | Clean the lens with a soft, dry cloth. Avoid moisture, smoke, and dust. |
| Safety | Do not disassemble, avoid water, use in a well-ventilated area, do not use while walking or driving. |
| Spare parts and repairability | Contact the dealer for repairs. Use only recommended batteries. |
Frequently Asked Questions - DV5122 GENIUS
User questions about DV5122 GENIUS
0 question about this device. Answer the ones you know or ask your own.
Ask a new question about this device
Download the instructions for your Digital Camera in PDF format for free! Find your manual DV5122 - GENIUS and take your electronic device back in hand. On this page are published all the documents necessary for the use of your device. DV5122 by GENIUS.
USER MANUAL DV5122 GENIUS
WEEE Warning Message
Symbol for Separate Collection in European Countries
This symbol indicates that this product is to be collected separately.
The following apply only to users in European countries:
- This product is designated for separate collection at an appropriate collection point. Do not dispose of as household waste.
- For more information, contact the retailer or the local authorities in charge of waste management.

FCC STATEMENT
This device complies with Part 15 of the FCC Rules. Operation is subject to the following two conditions:
(1). This device may not cause harmful interference, and
(2). This device must accept any interference received, including interference that may cause undesired operation.
Note:
This equipment has been tested and found to comply with the limits for Class B digital devices, pursuant to Part 15 of the FCC rules. These limits are designed to provide reasonable protection against harmful interference in a residential installation. This equipment generates uses and can radiate radio frequency energy and, if not installed and used in accordance with the instructions, may cause harmful interference to radio communications.
However, there is no guarantee that interference will not occur in a particular installation. If this equipment does cause harmful interference to radio or television reception, which can be determined by turning the equipment off and on, the user is encouraged to try to correct the interference by one or more of the following measures:
Reorient or relocate the receiving antenna
- Increase the separation between the equipment and receiver
- Connect the equipment into an outlet on a circuit different from that to which the receiver is connected
Use of shielded cable is required to comply with Class B limits in Subpart B of Part 15 of the FCC rules.
Do not make any changes or modifications to the equipment unless otherwise
specified in the manual. If such changes or modifications should be made, you could be required to stop operation of the equipment.
Product Information
- Product design and specifications are subject to change without notice. This includes primary product specifications, software, software drivers, and user's manual. This User Manual is a general reference guide for the product.
- The product and accessories that come with your camera may be different from those described in this manual. This is due to the fact that different retailers often specify slightly different product inclusions and accessories to suit their market requirements, customer demographics, and geographical preferences. Products very often vary between retailers especially with accessories such as batteries, memory cards, cables, carrying cases/pouches, and language support. Occasionally a retailer will specify a unique product color, appearance, and internal memory capacity. Contact your dealer for precise product definition and included accessories.
- The illustrations in this manual are for the purpose of explanation and may differ from the actual design of your camera.
- The manufacturer assumes no liability for any errors or discrepancies in this user manual.
- For driver updates, you can check the "Download" section of our website, www.geniusnet.com
SAFETY INSTRUCTIONS
Read and understand all Warnings and Cautions before using this product. Warnings
If foreign objects or water have entered the camera, turn the power OFF and remove the batteries. Continued use in this state might cause fire or electric shock. Consult the store of purchase.
If the camera has fallen or its case has been damaged, turn the power OFF and remove the batteries. Continued use in this state might cause fire or electric shock. Consult the store of purchase
- Do not disassemble, change or repair the camera. This might cause fire or electric shock. For repair or internal inspection, ask the store of purchase.
| ■ Do not use the camera in areas near water. This might cause fire or electric shock. Take special care during rain, snow, on the beach, or near the shore. | |
| ■ Do not place the camera on inclined or unstable surfaces. This might cause the camera to fall or tilt over, causing injury. | ⊗ |
| ■ Keep the batteries out of the reach of children. Swallowing batteries might cause poisoning. If the battery is accidentally swallowed, immediately consult a physician. | ⊗ |
| ■ Do not use the camera while you are walking, driving or riding a motorcycle. This might cause you to fall over or result in traffic accident. | ⊗ |
Cautions
| ■ Insert the batteries paying careful attention to the polarity (+ or -) of the terminals. Inserting the batteries with its polarities inverted might cause fire and injury, or damage to the surrounding areas due to the battery rupturing or leaking. | ⊗ |
| ■ Do not fire the flash close to anyone's eyes. This might cause damage to the person's eyesight. | ⊗ |
| ■ Do not subject the LCD monitor to impact. This might damage the glass on the screen or cause the internal fluid to leak. If the internal fluid enters your eyes or comes into contact with your body or clothes, rinse with fresh water. If the internal fluid has entered your eyes, consult a physician to receive treatment. | ⊗ |
| ■ A camera is a precision instrument. Do not drop it, strike it or use excessive force when handling the camera. This might cause damage to the camera. | ⊗ |
| ■ Do not use the camera in humid, steamy, smoky, or dusty places. This might cause fire or electric shock. | ⊗ |
| ■ Do not remove the battery immediately after long period of continuous use. The battery becomes hot during use. Touching a hot battery might cause burns. | ⊗ |
| ■ Do not wrap the camera or place it in cloth or blankets. This might cause heat to build up and deform the case, resulting in fire. Use the camera in a well-ventilated place. | ⊗ |
| ■ Do not leave the camera in places where the temperature may rise significantly, such as inside a car. This might adversely affect the case or the parts inside, resulting in fire. | ⊗ |
| ■ Before you move the camera, disconnect cords and cables. Failure to do this might damage cords and cables, resulting in fire and electric shock. | ⊗ |
Notes on Battery Usage
When you use the battery, carefully read and strictly observe the Safety Instructions and the notes described below:
- Different battery types and surrounding temperatures may affect the battery performance.
- Avoid using batteries in extremely cold environments as low temperatures can shorten the battery life and reduce camera performance.
The battery may feel warm when using the camera for an extended period of time or using the flash continuously. This is normal and not a malfunction.
The digital video camera may feel warm when being used continuously or for an extended period of time. This is normal and not a malfunction.
If you will not be using the batteries for an extended period of time, remove them from the camera to prevent leakage or corrosion.
Always keep the terminals in a clean state.
Never use manganese batteries.
■ Risk of explosion if battery is replaced by an incorrect type. - Dispose of used batteries according to the instructions.
CONTENTS
GETTING TO KNOW YOUR CAMERA 8
OVERVIEW 8
STANDARD ACCESSORIES 8
TOP VIEW 9
FRONT VIEW 9
BACK VIEW 9
LEFT VIEW 10
BOTTOM VIEW 11
HOW TO USE DIGITAL VIDEO CAMERA 12
LOADING THE BATTERY 12
INSERTING AND REMOVING AN SD CARD 12
BEGIN TO USE YOUR DIGITAL VIDEO CAMERA 13
VIDEO MODE [ ] 13
Status indicator 13
Hotkey menu 13
VIDEO MENU 15
Select image size 15
Select image quality. 15
Select white balance mode 16
Select the exposure compensation. 16
Select color effects 16
Return to Video mode 16
VIDEO RECORDING 16
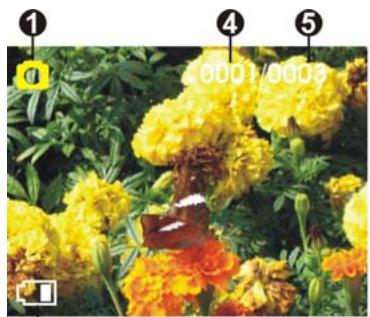
PHOTO MODE [O] 17
Status indicator 17
PHOTO MENU 20
Select image size 21
Select white balance mode 22
Select the exposure compensation 22
Select color effects 22
Selftimer 22
Select Date Stamp 22
Return to photo mode 22
SETTING THE FLASH 22
How to take pictures 22
AUDIO MODE 23
Status indicator 23
Begin recording 23
PLAYBACK MODE 23
Video playback 24
Voice playback 26
PLAYBACK MENU 27
Delete one 28
Delete all 28
Lock one 28
Lock all 29
Unlock one 29
Unlock all 29
Slide Show 29
DPOF 29
DPS 30
Return toPlaybackmode 30
SETUP MODE 31
Date/time 32
Beep 33
Format. 33
Defaults: 33
Memory info 33
Language 33
TV video 34
Auto Power Off 34
Frequency 34
Copy to card. 34
Exit setup 34
VIEWING PICTURES AND MOVIES ON A TV 35
TRANSFERRING DATA TO A COMPUTER 36
INSTALLING THE DIGITAL CAMERA DRIVER 36
Mass Storage 36
PC Camera 36
CONNECTING YOUR CAMERA TO A COMPUTER 36
SYSTEM REQUIREMENTS 38
INSTALLING BUNDLED SOFTWARE 39
Presto! Video Works 6 39
Presto! Mr. Photo 3 40
XviD 40
SPECIFICATIONS 45
TROUBLESHOOTING 46
Getting to Know Your Camera
Overview
This is a digital video camera of exceptional quality and value. You will be able to capture videos and edit pictures; then send and share them with friends and family.
This digital video camera not only functions as a digital camera for taking pictures, but is also able to record video and audio. You can also connect to the computer and use it as a webcam.
This manual will introduce you to using your digital video camera and how to install the accompanying software. You will earn how to use this digital video camera to take pictures, record video, record audio, send pictures and video to your computer, as well as how to use it as a webcam.
This digital video camera is your best choice and companion for whenever you wish to exchange pictures and clips through e-mail, create a photo album, record video, or even chat face to face with your family and friends on the Internet.
Standard Accessories
Unpack the package and make sure all standard accessories listed are included: Contact your retailer if you are missing any of the following components.
Digital Video Camera
USB Cable
AV out Cable
CD-ROM (Driver, Presto! Video Works 6, Presto! Mr. Photo 3 and User Manual)
Quick Guide
4 x "AA" Alkaline batteries
Pouch
Shoulder Strap
Top view
- Flash button - switch to flash mode under photo mode
- Menu button- enter the menu
- Shutter button- for filming
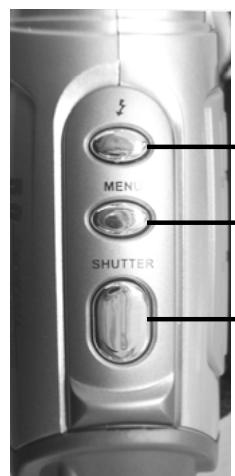
1: Flash button
2: Menu button
3:Shutter button
Front view
- Lens
- Auto shutter indicator
- Flash
- Microphone

- Lens
- Auto shutter indicator
- Flash
4.Microphone
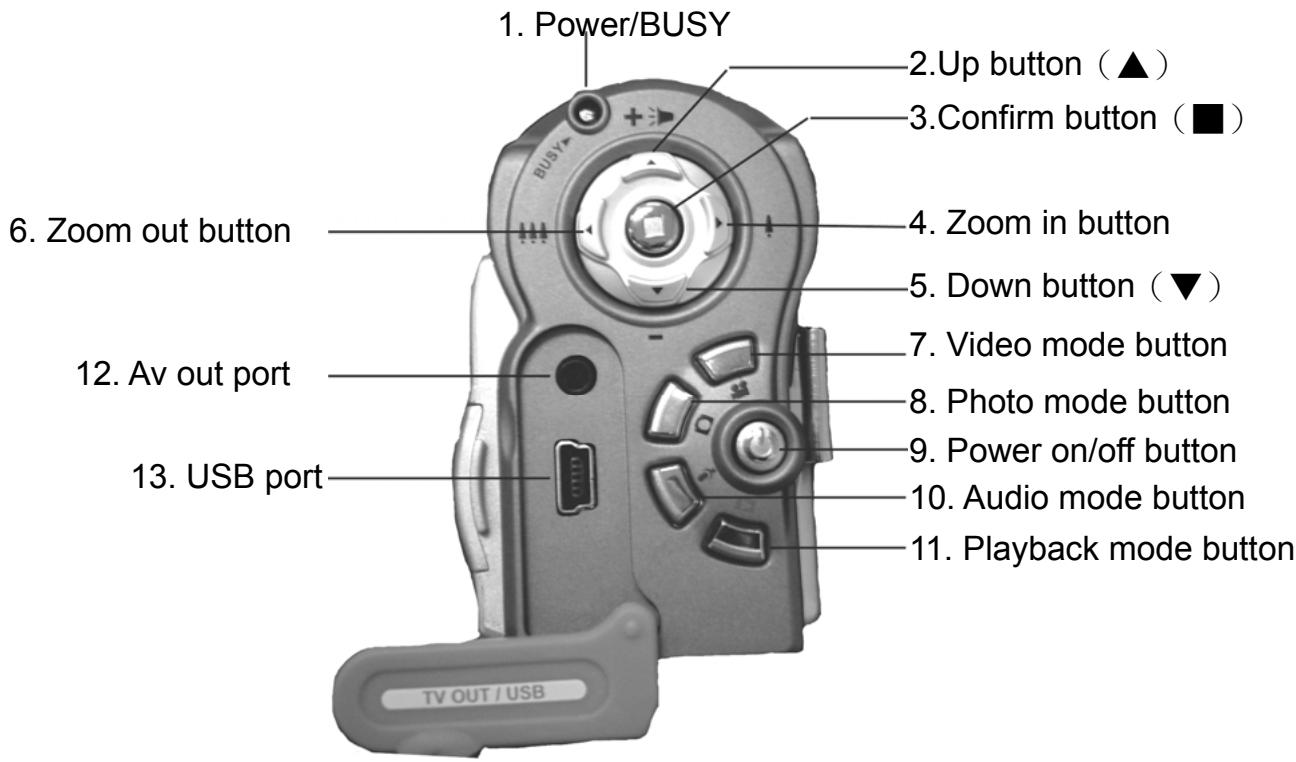
Back view
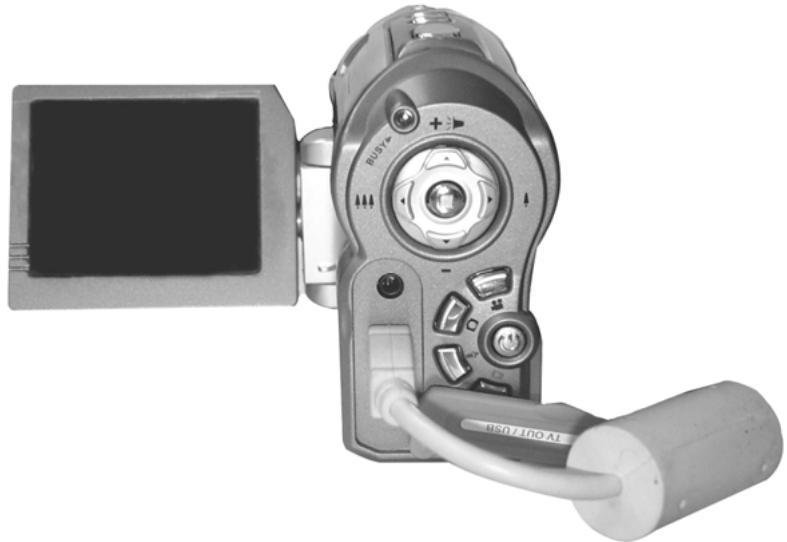
- Power/Busy indicator - when the digital video camera is powered on, the power indicator will be lit (green). When the system is busy, the busy indicator will flash (red).
- Up button (▲) – select up in different menus, selects the previous file in playback mode, increase the volume during playback of video and audio.
- Confirm button (■) - mainly used to confirm an action and to call out the shortcut menu.
- Zoom IN button - digital zoom in
- Down button () - select down in different menus, selects the previous file in playback mode, increase the volume during playback of video and audio.
- Zoom OUT button - digital zoom out
-
Movie mode button [Movie] [ ] - enter the movie mode
-
Photo mode button [STILL] - enter the still photo mode
-
On/off button - powers the system on and off
-
Audio mode button [VOICE] - enter the voice audio mode
-
Playback mode button - enter the playback mode
- TV-OUT port - connects to the TV to output the display onto the TV
- USB port - connects to the computer
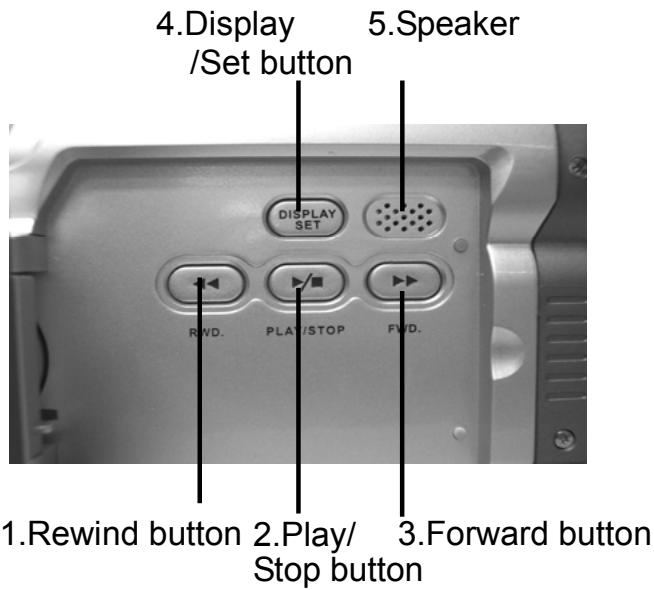
Left view
- Rewind button - fast rewind during video playback.
- Play/stop button - start or stop playback of video or audio under playback mode
- Forward button - fast forward during video playback.
- Display/Set button - switches between the display methods (normal/all/off). Switches back and forth between the video menu, photo menu, playback menu and the setup menu.
- SPEAKER - for audio playback
Bottom view
- Battery cover latch – press in and push the battery cover latch to open the battery compartment cover.
- Battery compartment
- SD/MMC card slot
- Battery cover
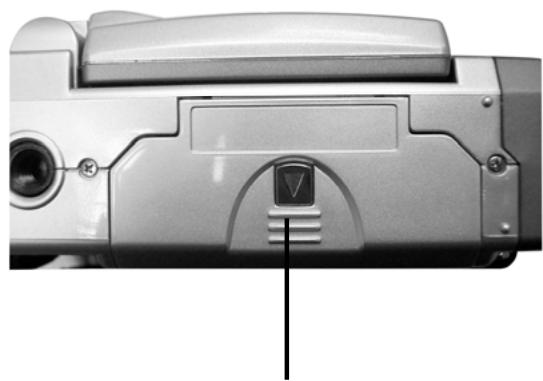
1. Battery cover latch
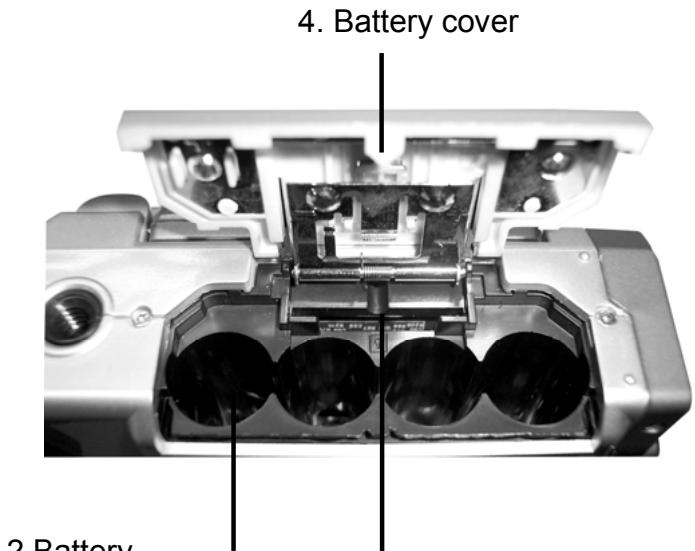
3. SD/MMC card slot
Battery status indicator:

full charge

half charge

battery power low

no power
How to use DIGITAL VIDEO CAMERA
Loading the Battery
Please insert four AA alkaline or rechargeable batteries and check the battery life. If the battery life is low, please immediately replace the batteries to ensure proper digital video camera operation.
Inserting and Removing an SD Card
Please insert the memory card as per the direction illustration below into the memory card slot. To remove the memory card, first lightly press the memory card and the memory card will automatically pop up.
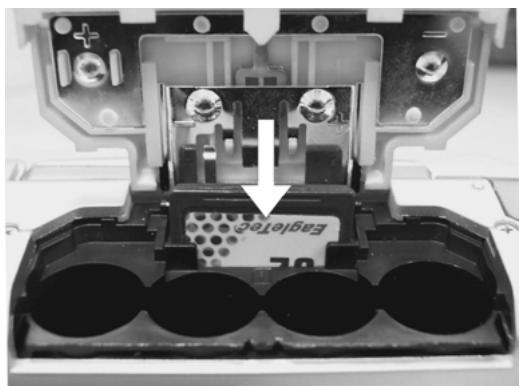
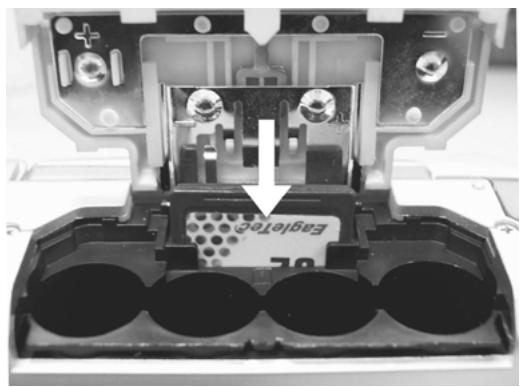

NOTE
- When inserting the memory card into the digital video camera, the camera has to be powered off. Turn on the power to the camera after the memory card is inserted and the internal 32MB memory will be deactivated automatically. After restarting, do not remove or insert the memory card to prevent loss and damage of data on memory card and built-in memory.
Begin using your digital video camera
Press the Power switch button, and the power indicator light will automatically light up. When the power indicator light is lit, release the power switch button.
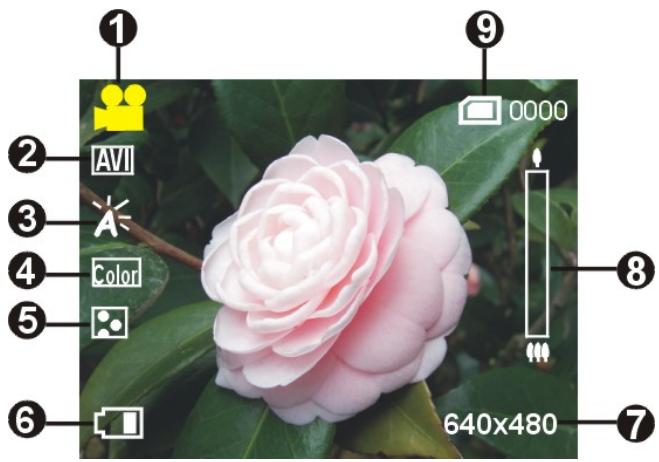
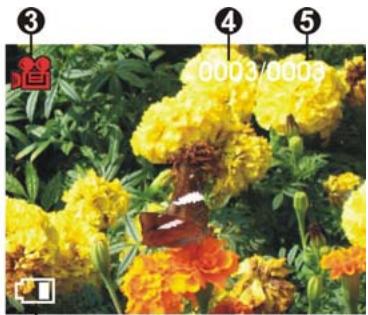
Video mode [2]
Press the video mode button
![GENIUS DV5122 - Video mode [2] - 1](/content/2025/01/175483/images/7368212d95c8099ffe0d817e6ca6686e528b9f05c311ab7bac9763df18e80484.jpg)
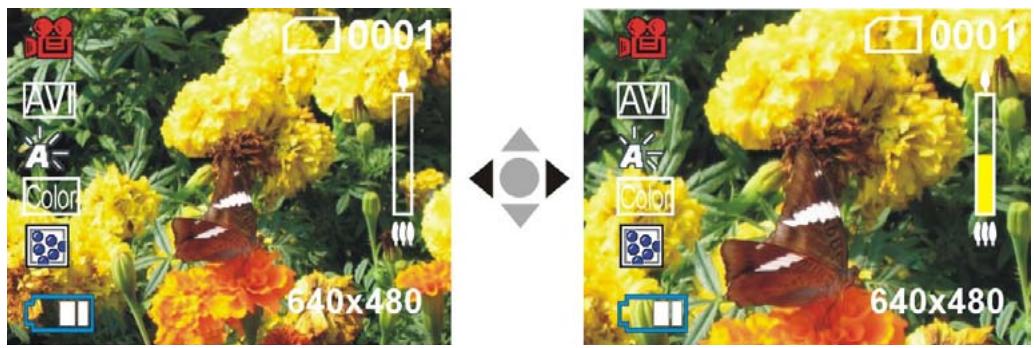
Status indicator
1 Video mode indicator
2 Image format
White balance
Color effects
Image quality
6 Battery status
7 Image size
Digital zoom status
Built-in storage status
Hotkey menu
Under the video mode, continuously press the Confirm button to select the shortcut functions: you can apply the following to the video to be captured: image file size, exposure, video quality, white balance, color effect setups. After pressing the confirm button to press the up button or down button to select each submenu.
The control options are as below:
| Size: | - 640 x 480 - 320 x 240 |
| EV: | - -2EV ~ +2EV |
| Image quality: | - Fine - Normal |
| White Balance: | - Auto - Sunny - Cloudy - Tungsten - Florescent |
| File format: | - AVI - ASF |
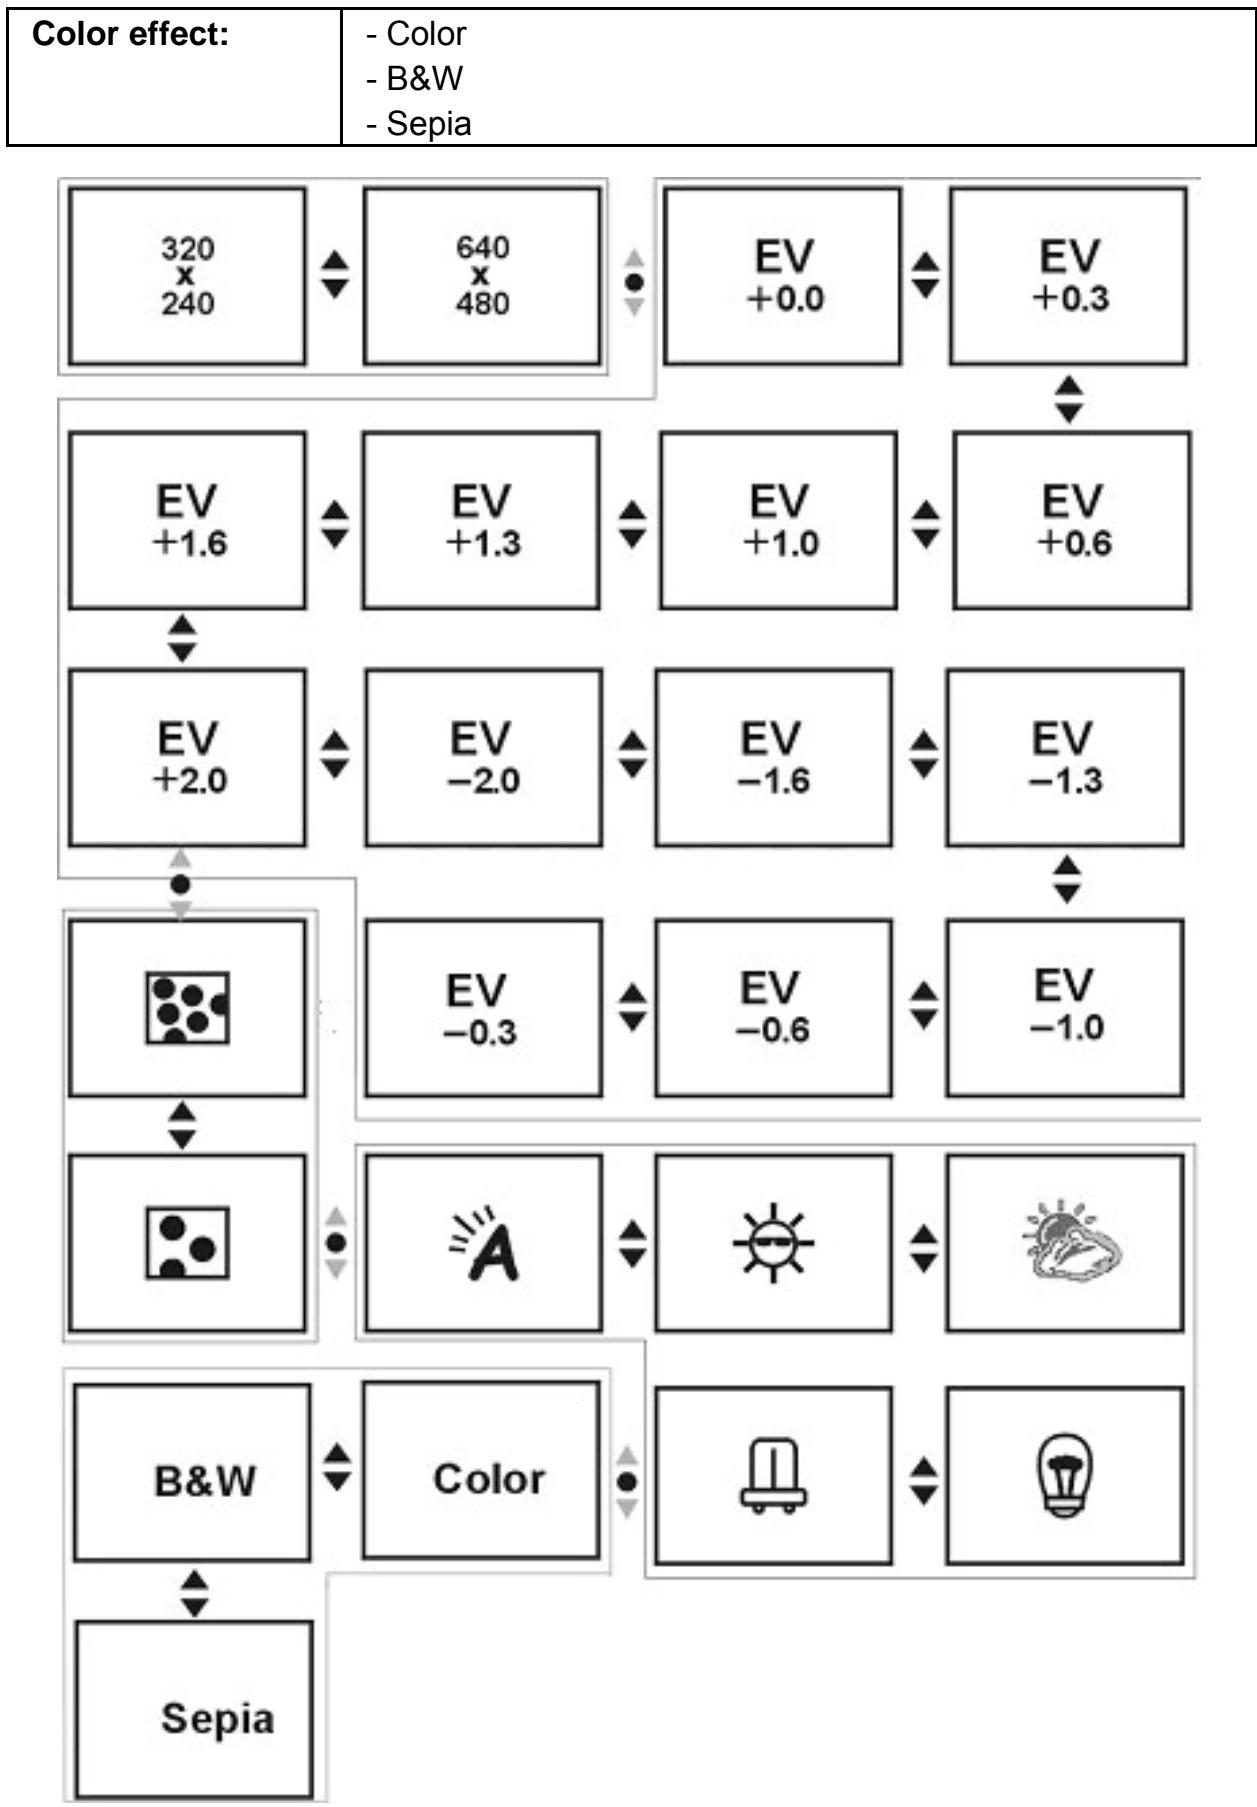
Video menu
Under Video mode, press the MENU button to enter the Video menu.
| Movie Options | Size: | - 640 x 480 (VGA) - 320 x 240 (QVGA) |
| Quality: | - Fine - Normal | |
| White Balance: | - Auto - Sunny - Cloudy - Tungsten - Florescent | |
| EV: | - -2EV ~ +2EV | |
| Color effect: | - Color - B&W - Sepia |
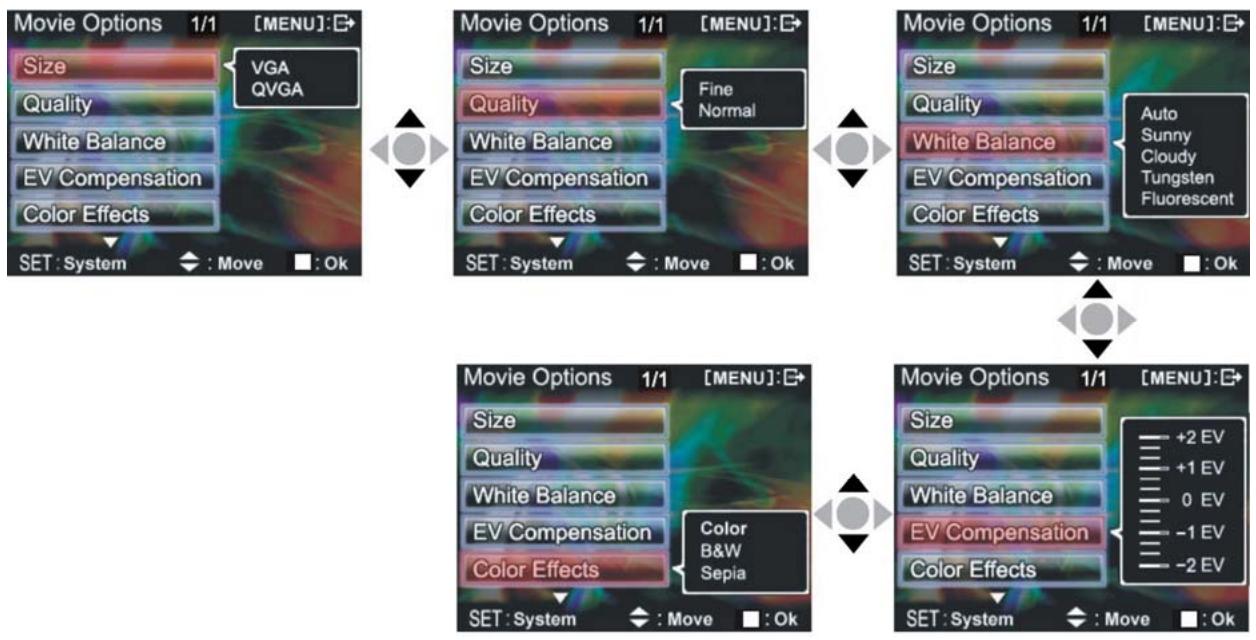
Select image size
- Press the confirm button to enter the submenu and use or to select the size option and press the confirm button.
- Use or to select your desired image size and press . Image size options: VGA(640X480), QVGA(320X240)
Select image quality
-
Press the confirm button to enter the submenu and use or to select the image quality option and press the confirm button.
-
Use or to select your desired image quality and press the confirm button. Image quality options: Fine, Normal
Select white balance mode
- Press the confirm button to enter the submenu and use or to select the white balance option and press the confirm button.
- Use or to select your desired white balance mode and press the confirm button . There will be five modes of white balance to choose from: Auto, Sunny, Cloudy, Tungsten, and Florescent.
Select the exposure compensation
- Press the confirm button to enter the submenu and use or to select the exposure compensation option and press the confirm button.
- Use or to select your desired exposure level and press the confirm button. There will be 13 levels of exposure compensation to select from.
Select color effects
- Press to enter the submenu and use or to select the color effects option and press the confirm button.
- Use the up button or down button to select your desired color effects and press . There will be three values to select from: Color, B&W and Sepia
Return to Video mode
Press the MENU button to return to Video mode.
Video recording
Step 1: Press the shutter to begin recording and the recorded image will appear on the screen; press the Zoom in or Zoom out buttons to perform digital zoom.
Step 2: Press the shutter during recording to stop, or automatically stop recording when memory is full.
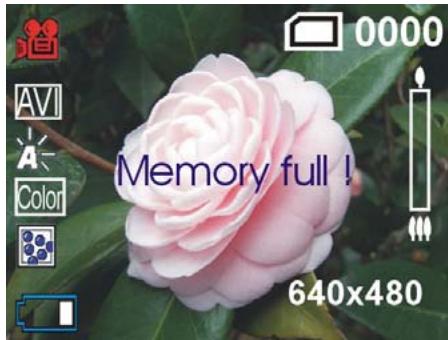
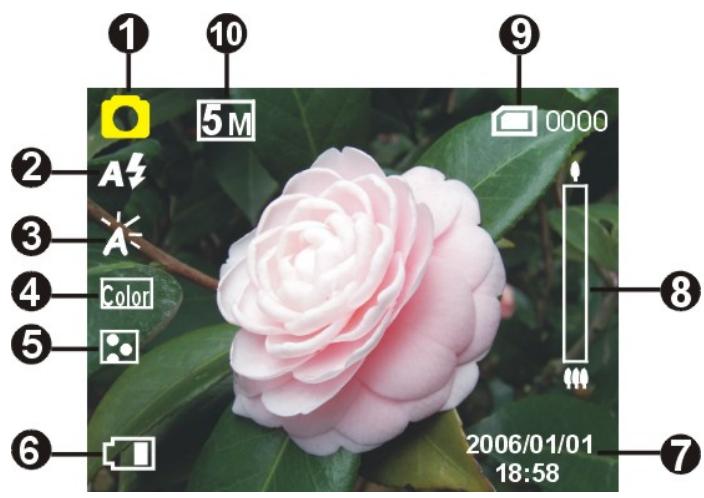
Photo mode [A]
Press Photo mode button [O].
Status indicator
Photo mode indicator
Flash mode
White balance status
Color effects
5 File quality
Battery status
Time display
Digital zoom
Built-in memory status
10 Image size
Hotkey menu:
Under photo mode, press Confirm button to select shortcut functions: you can apply the following to the video to be captured: image size, exposure, image quality, white balance, auto timer, color effect setup etc. After pressing , press or to select each submenu.
The control options are as below:
| Size: | - VGA - 2M - 3M - 5M - 12M |
| EV: | - -2EV ~ +2EV |
| Image quality: | - Fine - Normal |
| White Balance: | - Auto - Sunny - Cloudy - Tungsten - Florescent |
| Self-timer: | - Off - 5 seconds - 10 seconds - 30 seconds |
| Color effect: | - Color - B&W - Sepia |
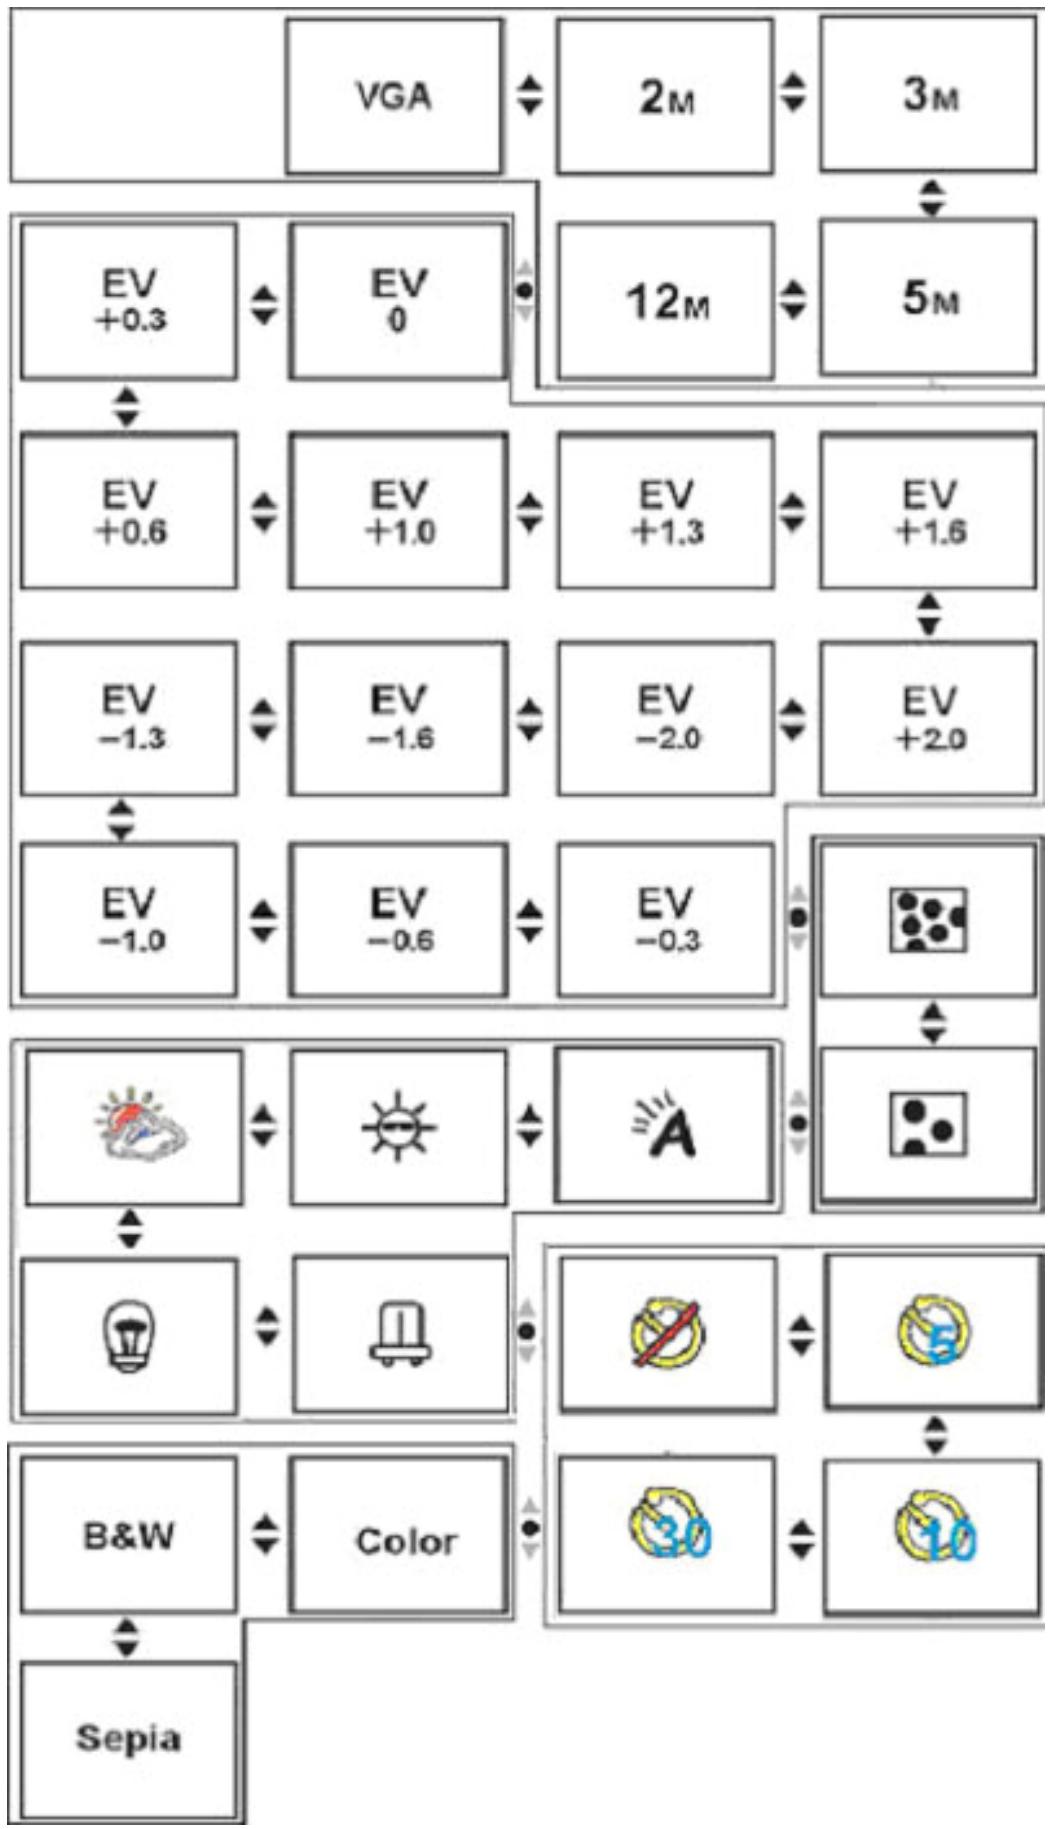
Photo menu
Setup the desired options before filming. Press MENU button to access the photo menu.
| Camera Options | Size: | - VGA - 2M - 3M - 5M - 12M |
| Image quality: | - Fine - Normal | |
| White Balance: | - Auto - Sunny - Cloudy - Tungsten - Florescent | |
| EV: | - -2EV ~ +2EV | |
| Self-timer: | - Off - 5 seconds - 10 seconds - 30 seconds | |
| Color effect: | - Color - B&W - Sepia | |
| Date Stamp | - On - Off |

Select image size
- Press the confirm button to enter the submenu and use or to select image size option, then press . There will be five image size options to select from.
- Press or to select your desired photo size, press to set image size. Image size options: 12M (4048 x 3040), 5M (2608 x 1952), 3M (2048 x 1536), 2M (1600 x 1200), VGA (640 x 480).
Select image quality
- Press to enter the submenu and use or to select image quality option, then press the confirm button.
- Press up button or down button to select your desired image quality, press the confirm button. Image quality options: Fine, Normal
Select white balance mode
- Press to enter the submenu and use or to select white balance option, then press.
- Press or to select your desired white balance mode, and press ■. White balance options: Auto, Sunny, Cloudy, Tungsten, Florescent.
Select the exposure compensation
- Press to enter the submenu and use or to select the exposure compensation option and press.
- Use or to select your desired exposure level and press . There will be 13 levels of exposure compensation to select from.
Select color effects
- Press to enter the submenu and use or to select the color effects option and press.
- Use or to select your desired color effects and press . There will be three values to select from. Color effects options: Color, B&W and Sepia
Self timer
- Press to enter the submenu and use or to select Self timer option, then press.
- Press or to select your desired Self timer count down time, and press ■. Self timer options: off, 5 seconds, 10 seconds, 30 seconds.
Select Date Stamp
Press to enter the submenu and use or to select On or Off, then press.
Date Stamp options: On, Off.
Return to photo mode
Press the MENU button to return to photo mode.
Setting the flash
Under photo mode, press the flash button to cycle through and select the the flash mode to use.
How to take pictures
Step 1: Make sure the digital video camera is turned on.
Step 2: Aim the digital video camera at the object to capture, and view the filming angle from the LCD screen.
Step 3: Press the shutter, when capturing a picture, the LCD displayed image will freeze until it is saved into memory. When the screen returns to the browsing status, you can begin to shoot the next picture.
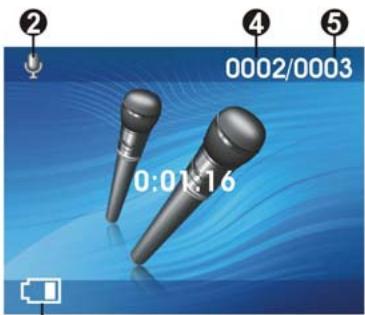
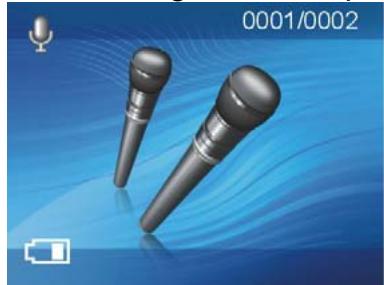
Audio mode
Press Audio mode button [].
Status indicator
Audio mode indicator
2 Battery status
3 Memory status
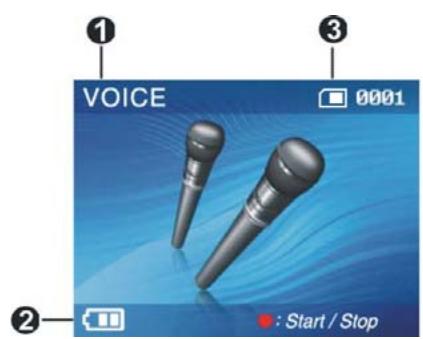
Begin recording
Under audio mode, press the shutter to begin recording, then press the shutter to stop recording.

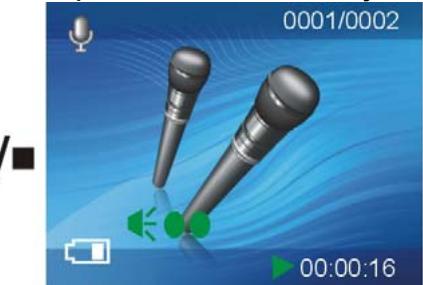
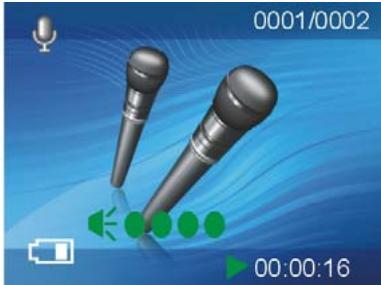
Playback mode
Press Playback mode button [ ]
If there are no files present, the display will be as below:

Otherwise it will display the current file, and and to browse other files.
6

6

6
Photo indicator
2 Audio indicator
3 Video indicator
Current file index
Total files
Battery status
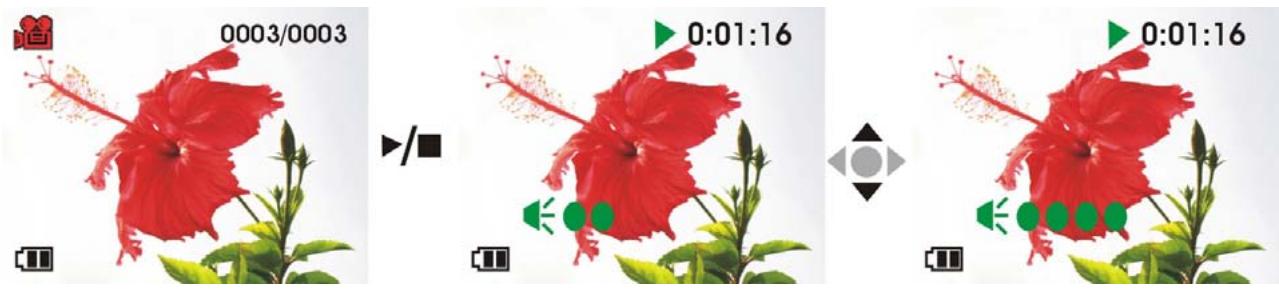
Video playback
- Press or to select the video to playback, and then press the Play button to begin playback (this camera supports MP4 format). To playback video clips not recorded by the camera, please rename the file in the format MPEG0001 before copying onto the camera. The 4 digits after MPEG should correspond to the current number of MP4 files already on the camera, with extensions of either AVI (please make sure the file type is supported by the camera: AVI); after that copy the file to the directory DCIM/100FSCAM. If no such directory exists, please first record a short video clip and then copy the files to the directory that contains the recorded video clip.
- Press Play button again to stop playback.
- During playback, press the Forward button to fast forward, and press the Rewind button to fast rewind; press the Shutter to pause playback, and press the Shutter again to resume play. During fast forward or rewind, press Play button to resume normal playback, press the Play button to stop playback.
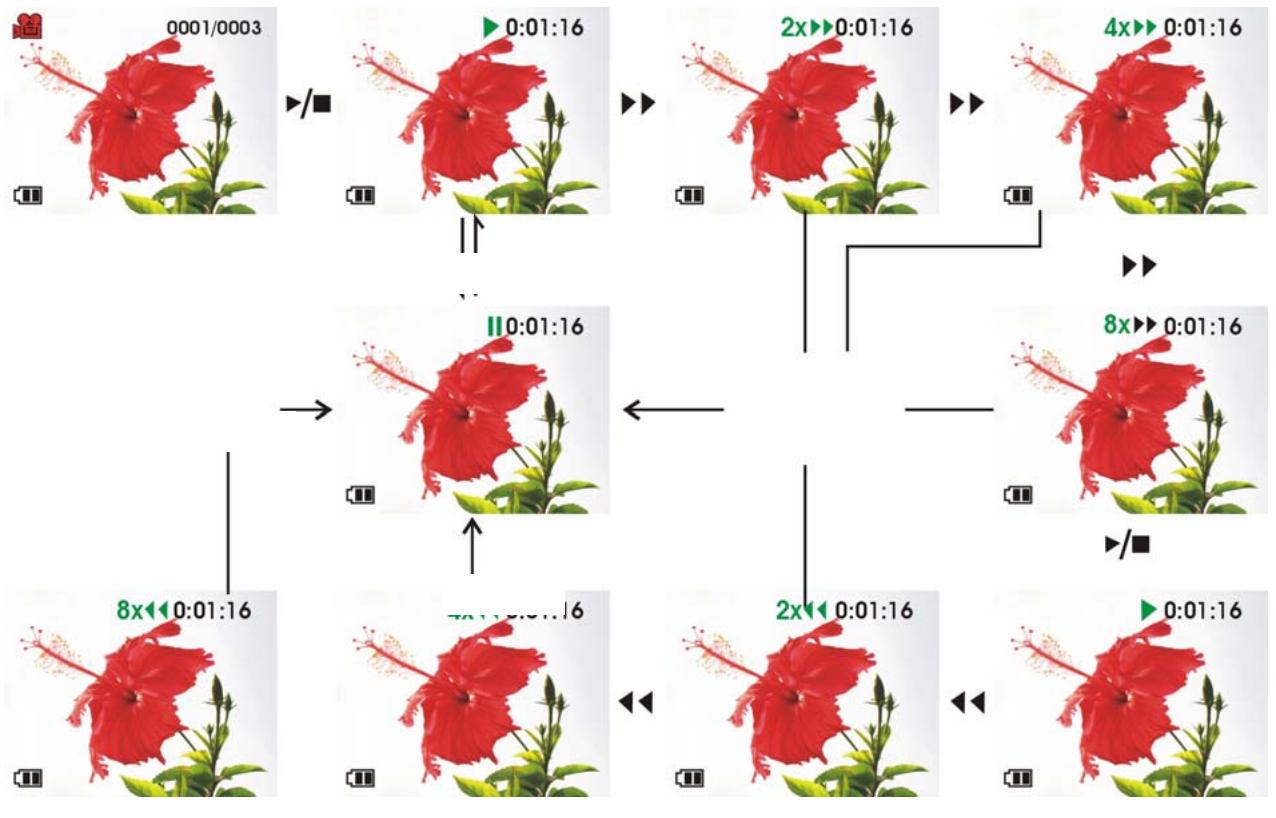
- You can also press or to adjust the volume, as well as use the DISP/SET button to turn off the LCD.
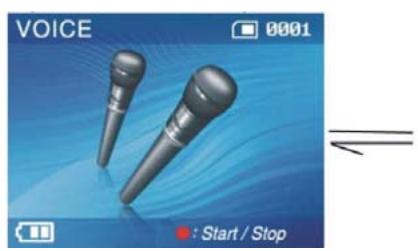
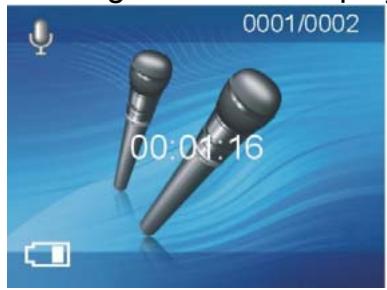
Voice playback
-
Under playback mode, use or to select the audio file. After the file has been selected, press Play button to begin playback. If you wish to playback audio clips not recorded by the camera, please rename the file in the format WAVE0001 before copying onto the camera. The 4 digits after WAVE should correspond to the current number of files already on the camera, with extensions of wav; after that copy the file to the directory DCIM/100FSCAM. If no such directory exists, please first record a short audio clip and then copy the files to the directory that contains the recorded video clip (please note that the camera only supports WAV format audio files).
-
Press play button again to stop playback.
- During playback, press the Shutter to pause playback, or then press the Shutter again to resume play.
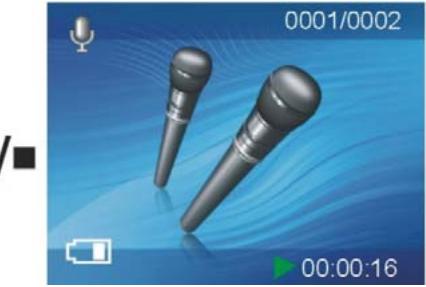
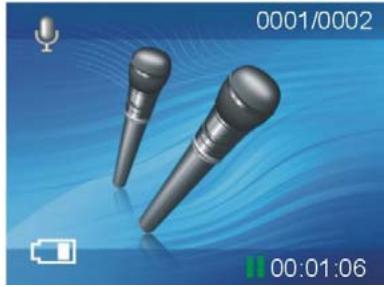
- During the audio playback, press or to adjust the volume.
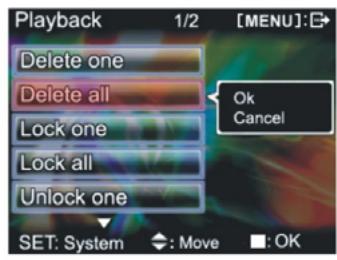
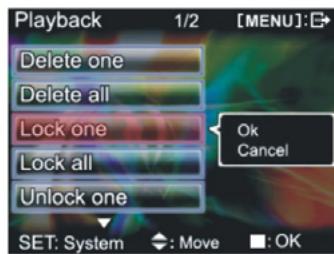
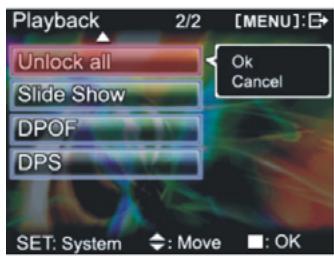
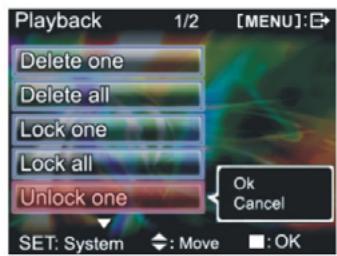
Playback menu
Under playback mode, press the MENU button into the Playback menu page.
| Playback | Delete one: | - Ok - Cancel |
| Delete all: | - Ok - Cancel | |
| Lock one: | - Ok - Cancel | |
| Lock all: | - Ok - Cancel | |
| Unlock one: | - Ok - Cancel | |
| Unlock all: | - Ok - Cancel | |
| Slide Show | - Start - Cancel | |
| DPOF | - Select all - Select None - Select One - Date On - Date Off - Cancel | |
| DPS | - Print All - Print One - Cancel |
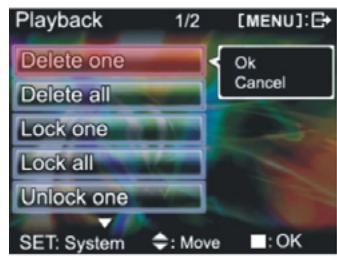


Delete one
- Press to enter the submenu and use or to select Ok or Cancel, then press.
- If confirm is selected then a single file will be deleted (protected files cannot be deleted), otherwise no action will be taken and you return to the main menu.
Delete all
- Press to enter the submenu and use or to select Ok or Cancel, then press.
- If confirm is selected then all files will be deleted (protected files cannot be deleted), otherwise no action will be taken and you return to the main menu.
Lock one
- Press to enter the submenu and use or to select Ok or Cancel, then press.
- If confirm is selected then a single file will be protected and the upper right of the LCD will show a locked icon, otherwise no action will be taken and you return to the main menu.
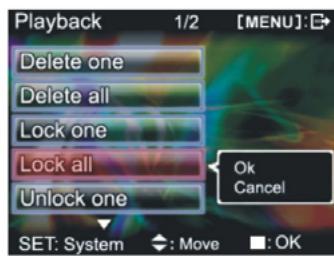
Lock all
- Press to enter the submenu and use or to select Ok or Cancel, then press.
- If confirm is selected then all files will be protected and the upper right of the LCD will show a locked icon, otherwise no action will be taken and you return to the main menu.
Unlock one
- Press to enter the submenu and use or to select Ok or Cancel, then press.
- If confirm is selected then the single file protection will be undone (only protected files will be applied), otherwise no action will be taken and you return to the main menu.
Unlock all
- Press to enter the submenu and use or to select Ok or Cancel, then press.
- If confirm is selected then the all file protection will be undone (only protected files will be applied), otherwise no action will be taken and you return to the main menu.
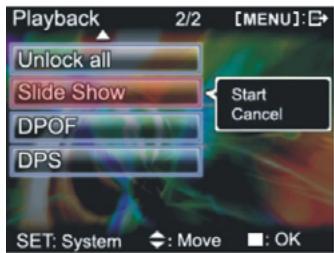
Slide Show
- Press to enter the submenu and use or to select Start or Cancel, then press.
- This function automatically repeats all files in order.
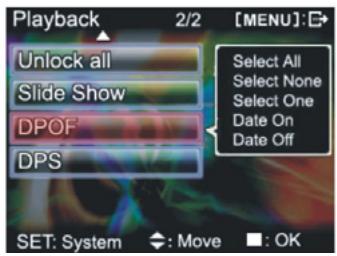
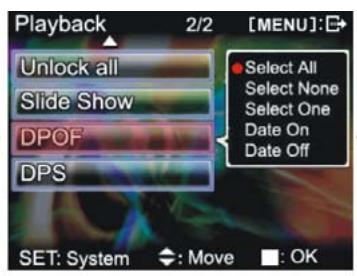
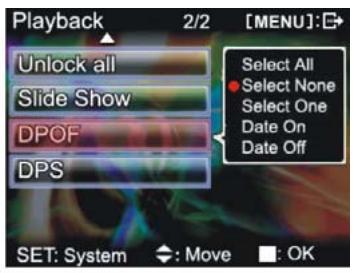
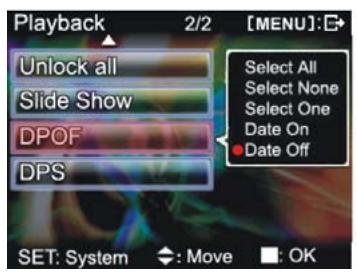
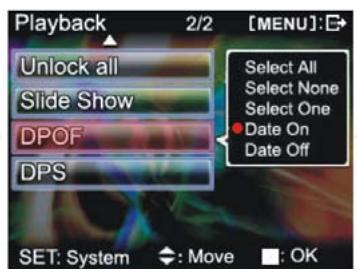
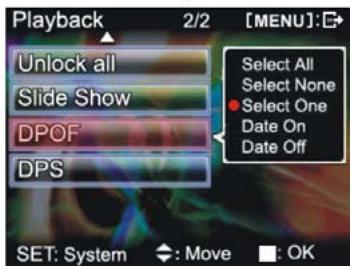
DPOF
DPOF can directly print out the photos stored on the SD card through a DPOF supported printer.
Press to enter the submenu and use or to select the "DPOF" options, then press.
| Options | Description |
| Select all | Prints every photo. |
| Select None | Cancel all settings. |
| Select One | Prints one photo. Use ▲ or ▼ to select which photo you would like to print and press the Zoom In button and Zoom out button to set the number of copies, maximum print copy is 5. |
| Date On | Print the date on all printed photos. |
| Date Off | Hide the date on all printed photos. |
| Cancel | Back to Playback menu. |


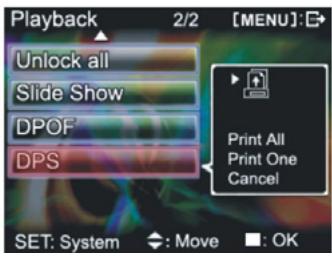
DPS
(Only supports DPS (direct print service) enabled printers)
- Press to enter the submenu and use or to select DPS options, then press
- Connect the digital video camera and printer with the USB cable and after successful connection is established the digital video camera will show print single and print all options.
3 Wait for OK and press to begin printing.
| Options | Description |
| Print All | Print every photo. -Print photo: press ▲ or ▼ to select the photo you wish to print. -Print copies: press the ZOOM-IN button and ZOOM-OUT button to set the number of prints, maximum print copy is 5. -Print: press □ to begin printing. |
| Print One | Print one photo. -Print photo: press the up button ▲ or down button ▼ to select the photo you wish to print. -Print copies: press the ZOOM-IN button and ZOOM-OUT button to set the number of prints, maximum print copy is 5. -Print: press the confirm button □ to begin printing. |
| Cancel | Back to Playback menu. |
Return toPlaybackmode
Press the MENU button to return to playback mode.
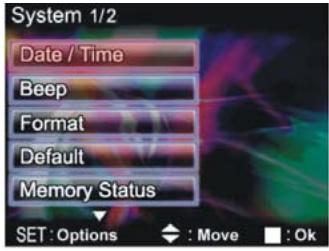
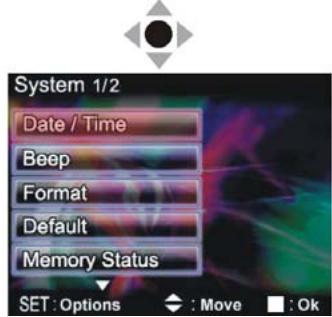
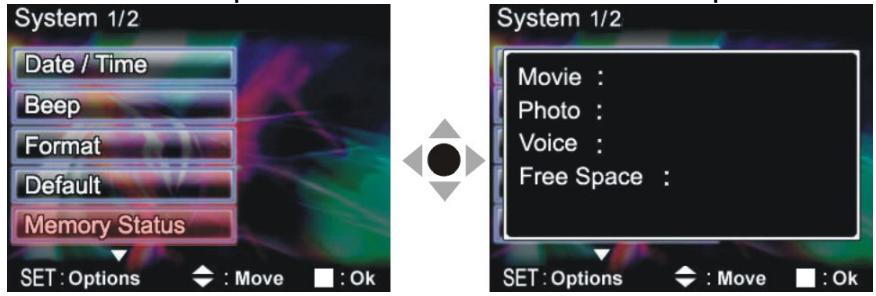
Setup mode
Press the MENU button under any mode (except for Audio mode) to enter the menu for each mode, then press DISPLAY/SET button to enter Setup mode.
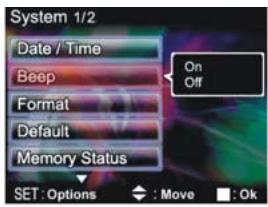
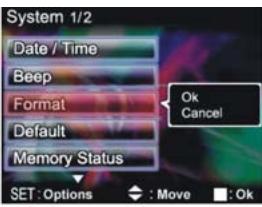
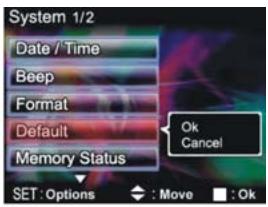
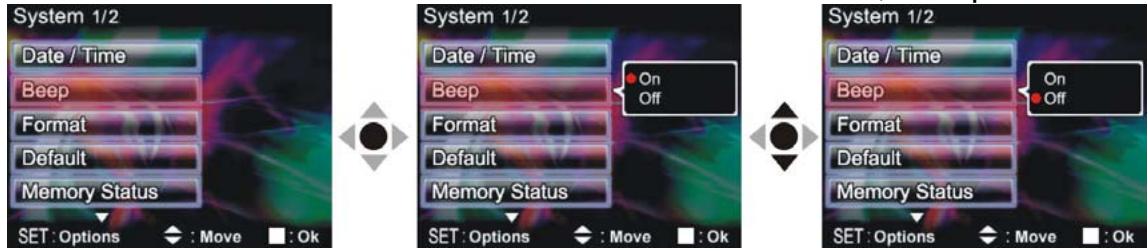
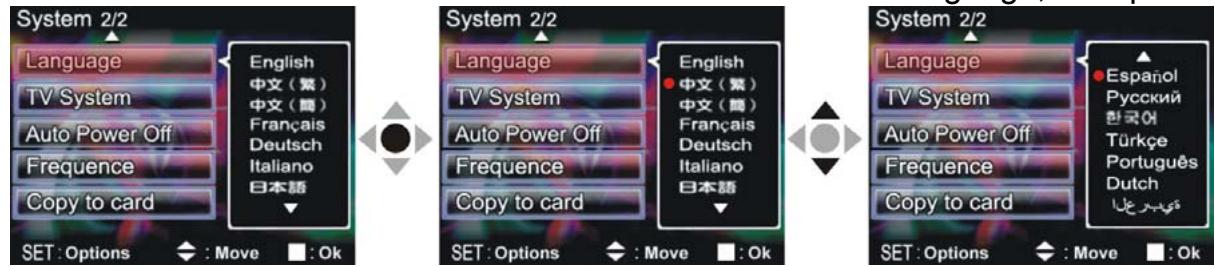
| System | Date / Time | |
| Beep | - On - Off | |
| Format | - Ok - Cancel | |
| Default | - Ok - Cancel | |
| Memory Status | ||
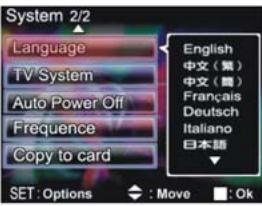
| Language | - English - Traditional Chinese - Simplified Chinese - French - German - Italian - Japanese - Spanish - Russian - Korean - Turkish - Portuguese - Dutch - Arabic | |
| TV System | - NTSC - PAL | |
| Auto Power Off | - Off - 1 min. - 3 min. | |
| Frequency | - 60Hz - 50Hz | |
| Copy to Card | - Ok - Cancel | |


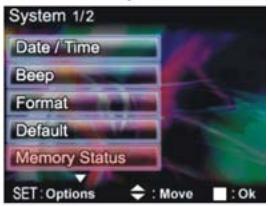


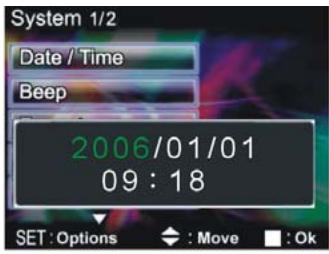
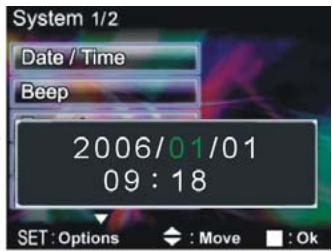
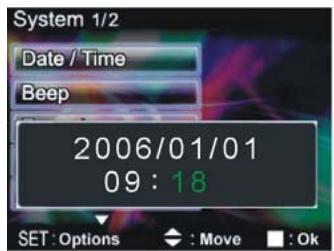
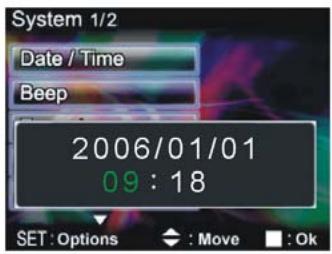
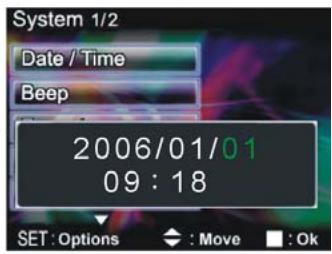
Date/time
Press to enter the submenu and use or to set the year, month, date, hour, minute, second.


Beep
Press to enter the submenu and use or to set On or Off, then press.
Format
Press to enter the submenu and use or to set Ok or Cancel, then press. This is set to delete all data in memory.
Defaults
Press to enter the submenu and use or to set Ok or Cancel, then press. This is set to use factory defaults.
Memory info
Press to check total video/photo.audio files and available space.
Language
Press to enter the submenu and use or down to select language, then press.
TV video
Press to enter the submenu and use or to set the video signal format (NTSC/PAL), then press.
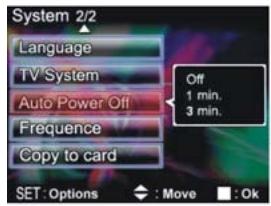
Auto Power Off
Press to enter the submenu and use or to set the auto power off with the following options, then press.
-
Off: no auto power off.
-
1 min: automatically shutdown after 1 minute.
- 3 min: automatically shutdown after 3 minutes.
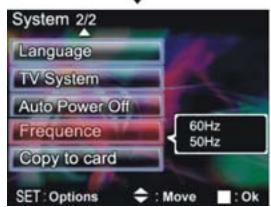
Frequency
Press to enter the submenu and use or to set the environment light source frequency (60Hz/50Hz), then press.
Copy to card
Press to enter the submenu and use or to set Ok or Cancel, then press. This will copy all files in the built-in memory to the SD/MMC card.
Exit setup
To exit the setup mode, press DISPLAY/SET button to return to each of the mode menus; press the MENU button to return to each modes.
Viewing Pictures and Movies on a TV
You can use the "Av out port" on the digital video camera to output the video/audio to an external device (such as a TV) as shown below.
Step 1: Insert the black plug of the AV out cable to the Av out port on the back of the digital video camera, and insert the yellow plug, white and red plug of the AV out cable to each port on the TV.
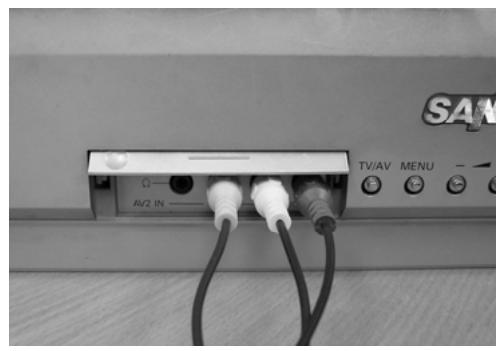
Step 2: Switch the TV to the correct channel.
Step 3: Enter the "Setup mode" page. Next, press to enter the submenu and use ▲ or ▼ to select "TV System". Finally, press to enter the submenu and use ▲ or ▼ to select NTSC or PAL standards and press □.

NOTE
- Different TV manufacturers will have different broadcast channels, please refer to the TV's user manual.
Transferring Data to a Computer
Installing the Digital Camera Driver
Before connecting this camera to a computer for the first time, you should install a driver on the computer. The driver is on the CD-ROM disc provided in the package.
Mass Storage
The digital video camera is able to provide removable storage functions like a card reader. You can use this camera as an SD card or removable disk.
If your operating system is Windows 98SE, you will need to install the camera drivers. Windows XP/ME/2000/Vista operating systems supports Plug-and-play and does not require manual installation of drivers.
When the drivers are already installed and connected to the camera, the camera's built-in memory and the SD memory card will be shown in Windows My Computer as removable storage. Drag and drop files normally as you would for any general disk drive.
PC Camera
You must install the camera drivers to be able to use the camera as a PC Camera on all Windows operating systems (Windows XP/ME/2000/98SE).

NOTE
-
All operating systems can accept and install this driver version.
-
Insert the CD-ROM into your computer's CD-ROM drive. The autorun screen appears.
- Press Driver button on the on screen to finish the installation. You may need to restart the PC and complete the driver installation.
If the CD does not auto-run, use Windows file manager to run the executable InstallMgr.exe under the root directory on the CD. Press the install button to install the drivers, and then follow the on screen instructions.
Connecting Your Camera to a Computer
You can transfer pictures, movies or voice recordings stored on your camera to a computer and send them in emails to friends or post them on websites. To do this you should:
- Install the camera driver on your computer.
- Connect the computer and camera with the supplied USB cable.
Step 1: Make sure the digital video camera is installed with four "AA" batteries.
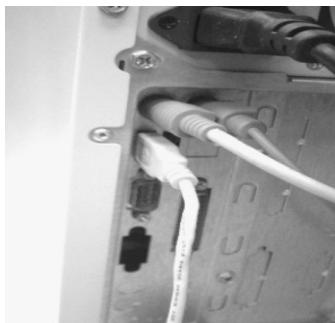
Step 2: Connect the smaller end of the USB cable plug to the USB port on digital video camera.
Step 3: Connect the larger plug of the USB cable to the USB port on the PC
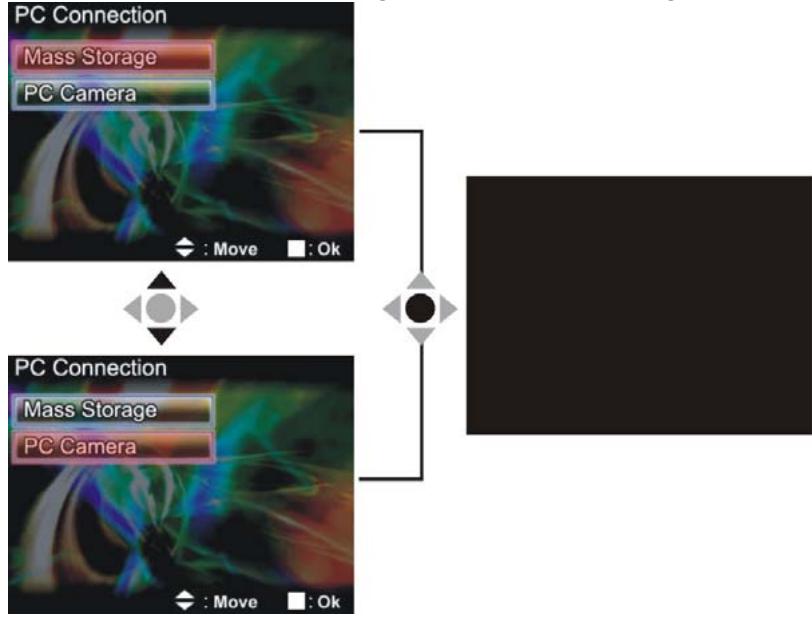
Step 4: Press or to select Mass Storage or PC camera and then press and the camera screen will turn off and enter the appropriate function. If Mass Storage function is selected, then there will be a newly added removable disk appearing in "My Computer" of the system. The newly added removable disk is the SD/MMC card reader provided by the digital camera and is ready for you to use. If PC camera is selected, then the digital camera can be used as a PC camera. For a clearer image on the computer display, focus on the target before using the digital camera. You will be able to visually connect with friends through the Internet using the PC camera.

NOTE
- Make sure to connect the USB cable properly to prevent damage.
PC Camera mode does not work in Vista.
System requirements
During operation and use of the digital video camera, please refer to the minimum system requirements for the digital video camera. We strongly suggest you operate the digital video camera on higher level PC equipment for even greater performance. The digital video camera minimum system requirements are as below:
Microsoft Windows 98SE, Me, 2000, XP, Vista
Intel® Pentium III 500 MHz or above CPU
256MB or above RAM
- Minimum 200MB hard disk drive space
- CD-ROM drive for software installation
Available USB port
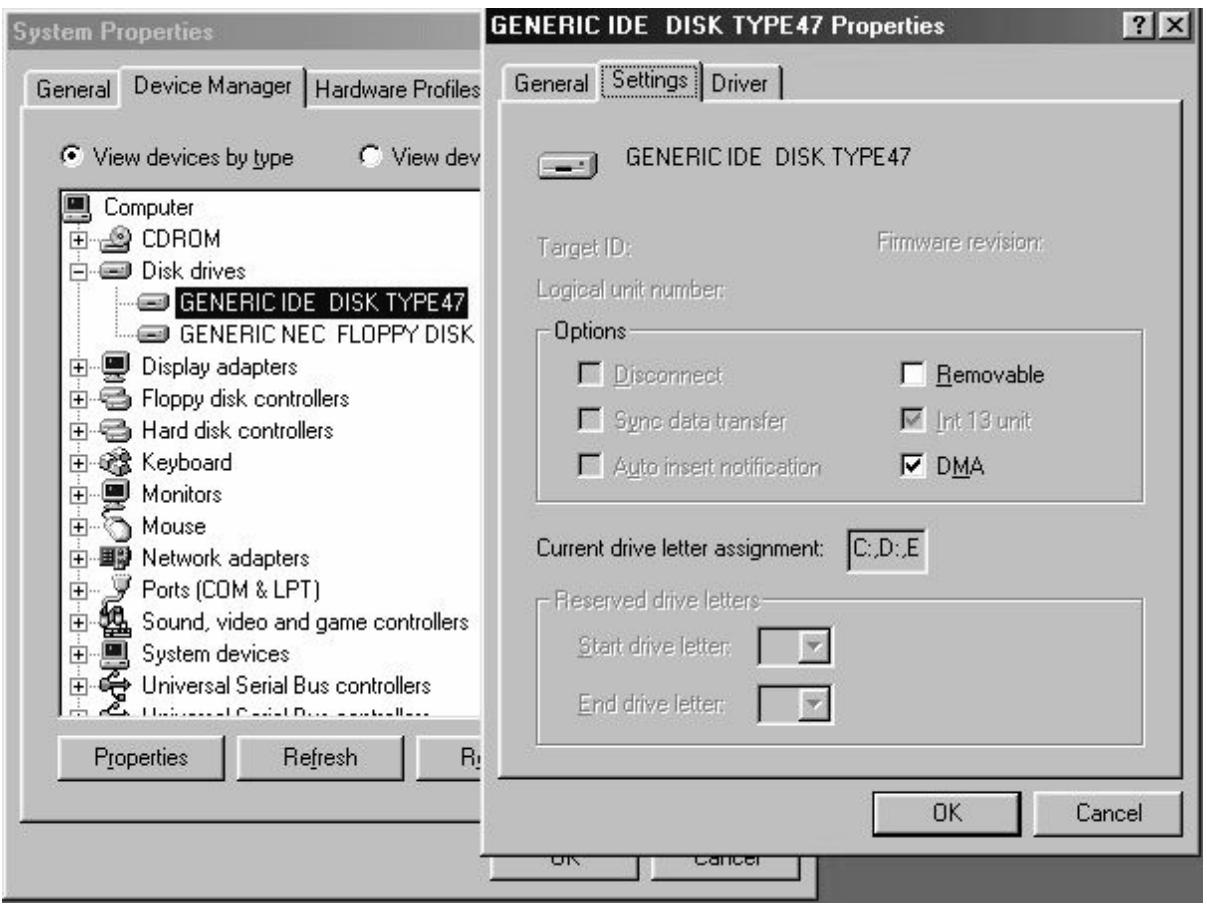
For Microsoft Windows98SE/Me users, connect the larger USB plug to the PC USB port and the other end to the digital video camera USB port after installing the drivers and application software. When the camera enters the “connection to PC” page, press
or to select webcam and then press and follow these procedures:
Step 1: Click the right mouse button on "My Computer".
Step 2: Then select "Device manager".
Step 3: Select "GENERIC IDE DISK TYPE47" and choose "Settings".
Step 4: Select "DMA" and press OK.

NOTE
- When playing back video on the PC, make sure the PC has DirectX8.0 or newer versions and is supported.
Installing Bundled Software
Presto! Video Works 6
Presto! Video Works 6 is advanced application software for video editing.
Install Presto! Video Works 6:
- Insert the included CD into the CD-ROM.
- If the CD does not auto-run, use Windows file manager to run the executable InstallMgr.exe under the root directory on the CD.
- Press the Presto! Video Works 6 button to install this software and follow the on screen instructions.
After application is started, you can find more information on Presto! Video Works 6 in the help files.
Presto! Mr. Photo 3
Presto! Mr. Photo 3 is advanced application software for photo editing.
Install Presto! Mr. Photo 3:
- Insert the included CD into the CD-ROM.
- If the CD does not auto-run, use Windows file manager to run the executable InstallMgr.exe under the root directory on the CD.
- Press the Presto! Mr. Photo 3 button to install this software and follow the on screen instructions.
After application is started, you can find more information on Presto! Mr. Photo 3 in the help files.
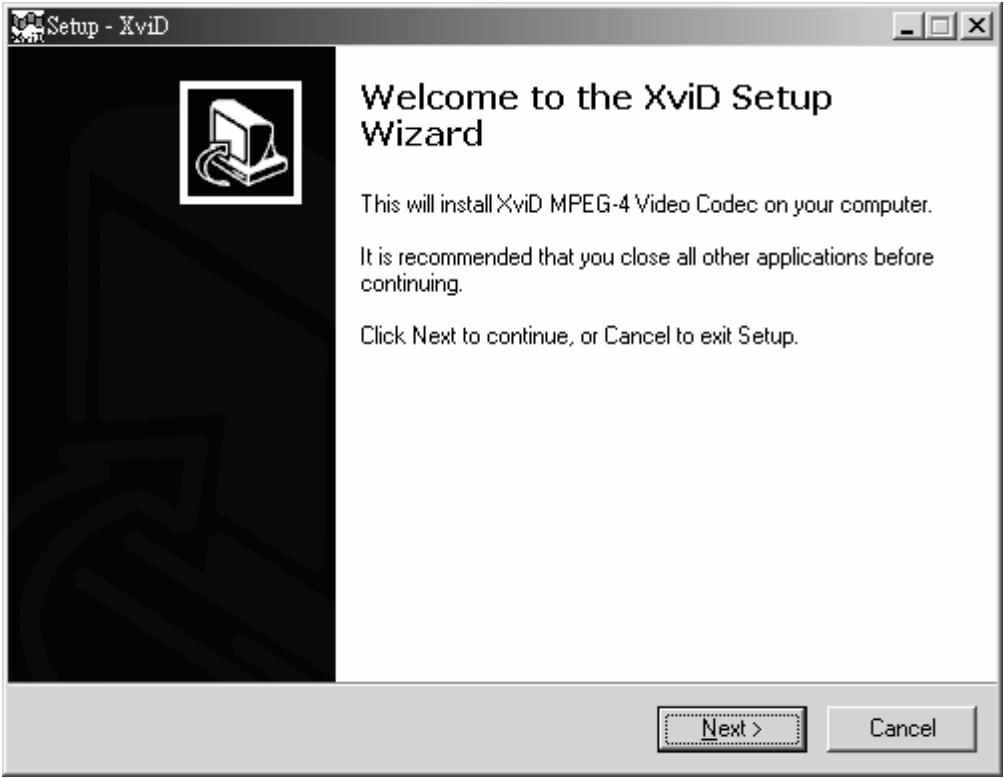
XyiD
This is XviD 1.03 codec installation.
- Insert the included CD into the CD-ROM.
- If the CD does not auto-run, use Windows file manager to run the executable InstallMgr.exe file under the root directory on the CD.
- Press the XviD button to install this software and follow the on screen instructions.
- Press the install button and the installation screen will be shown, please press "Next" to continue.
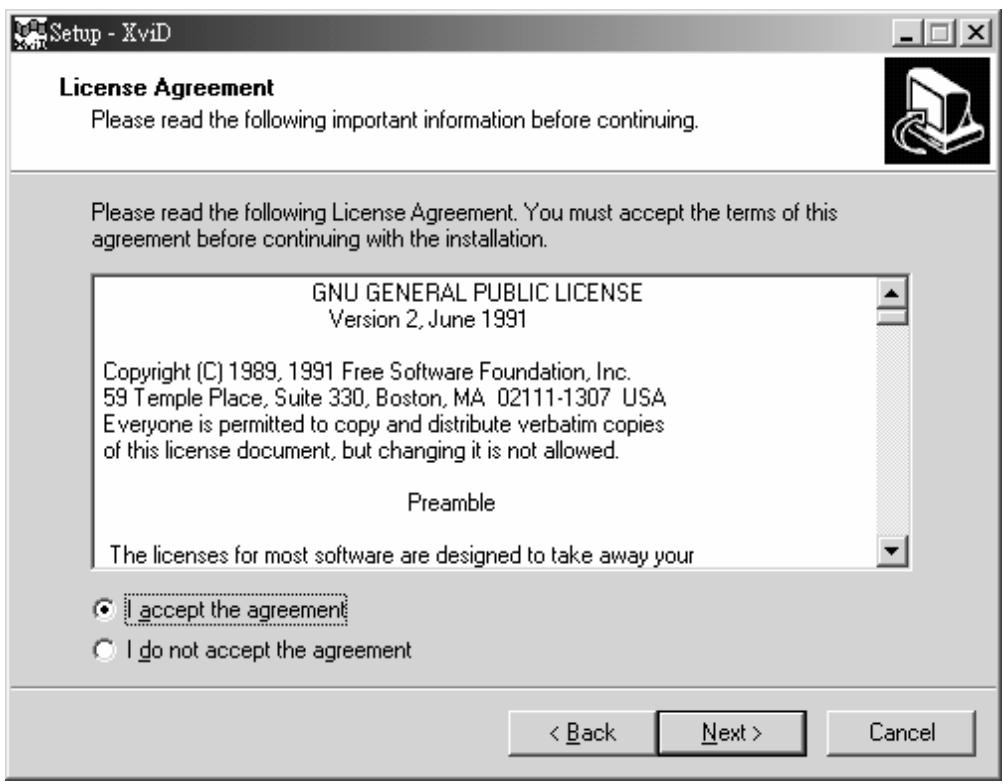
- At the EULA screen, please select "I accept the agreement" and then press "Next" to continue.
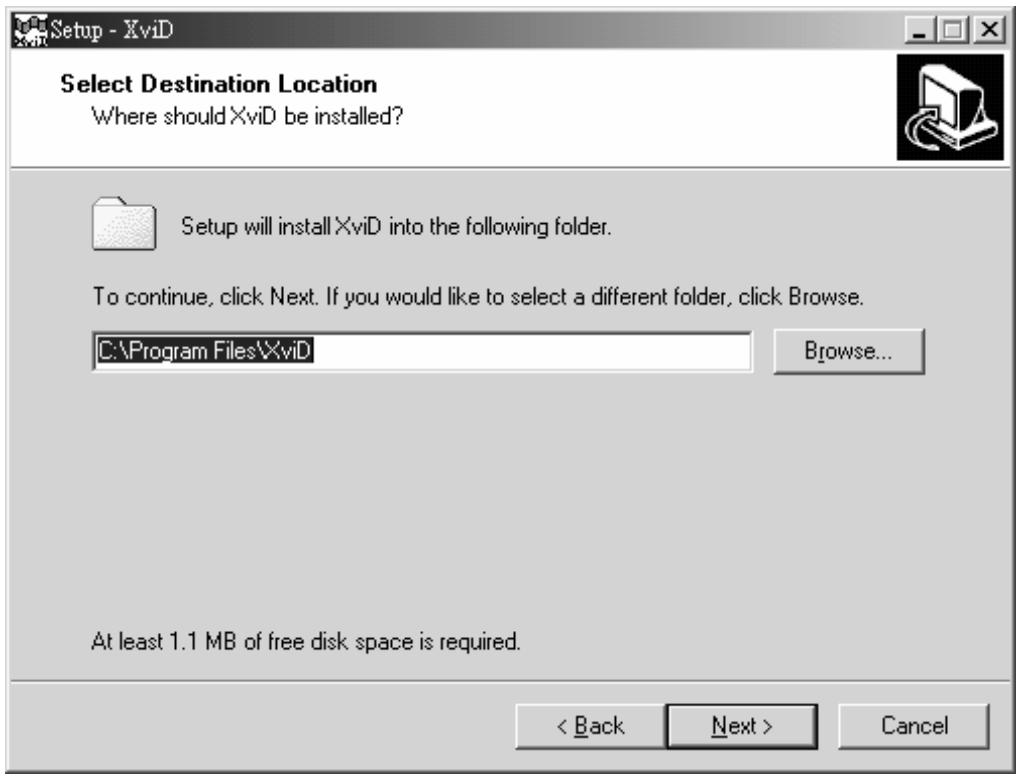
- Please follow the instructions and use "Browse" to choose the installation path to use, press "Next" to continue.
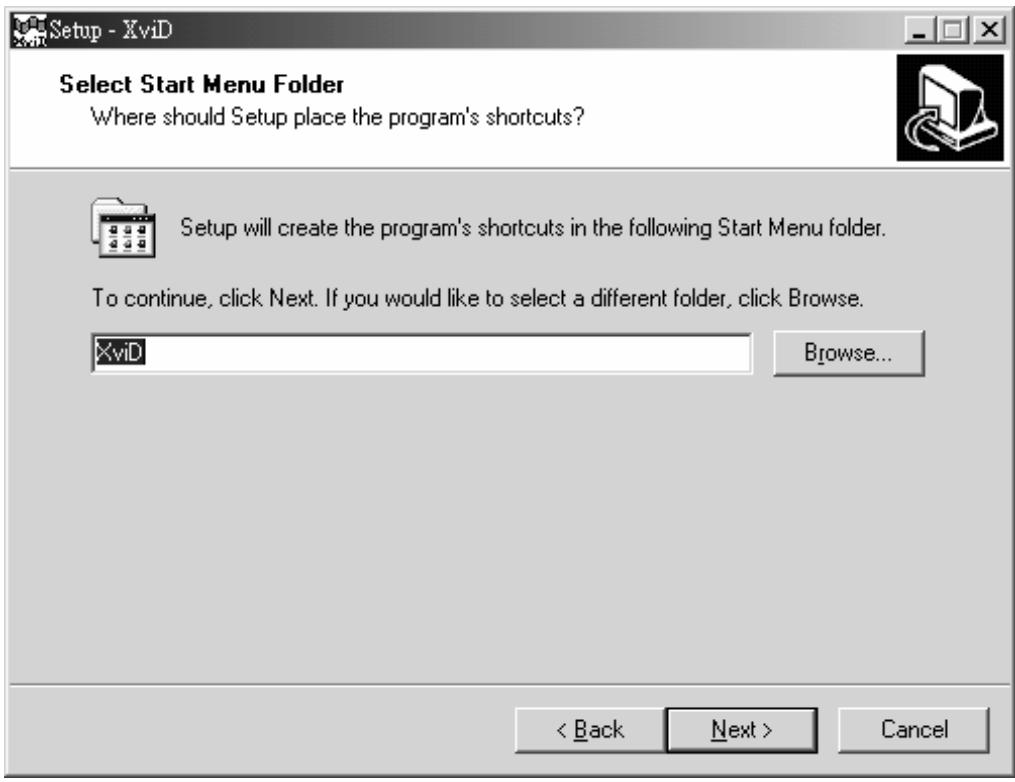
- Please choose the name of the folder to install program, press "Next" to continue.
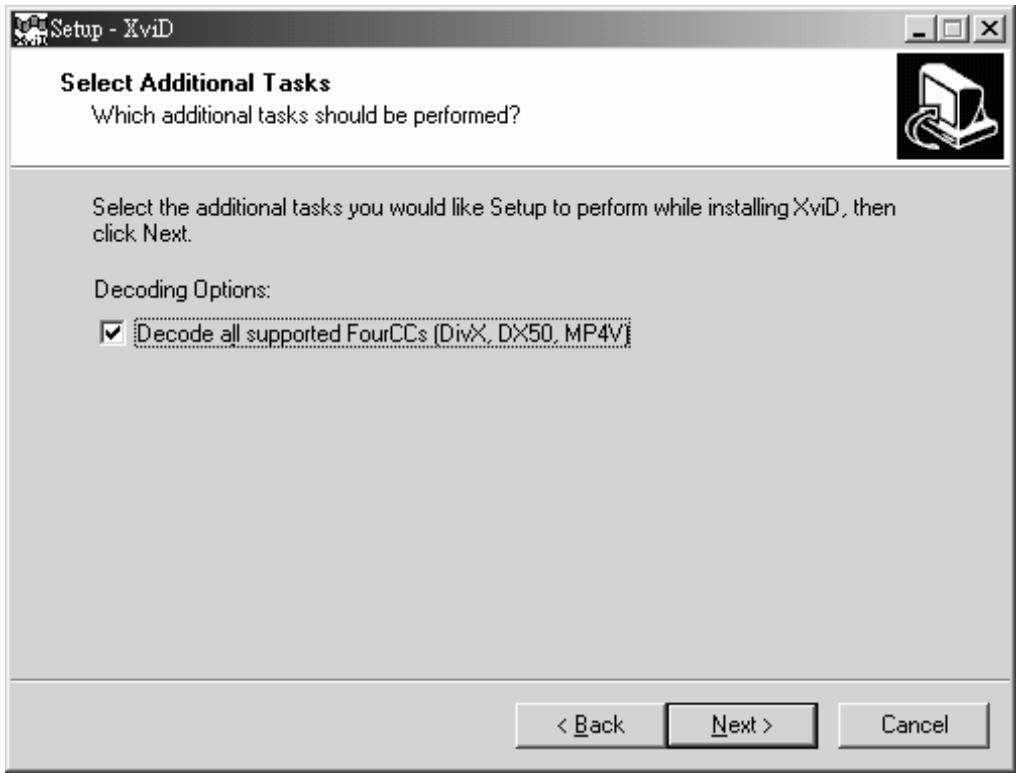
- At the install additional tasks screen, press "Next" to continue.
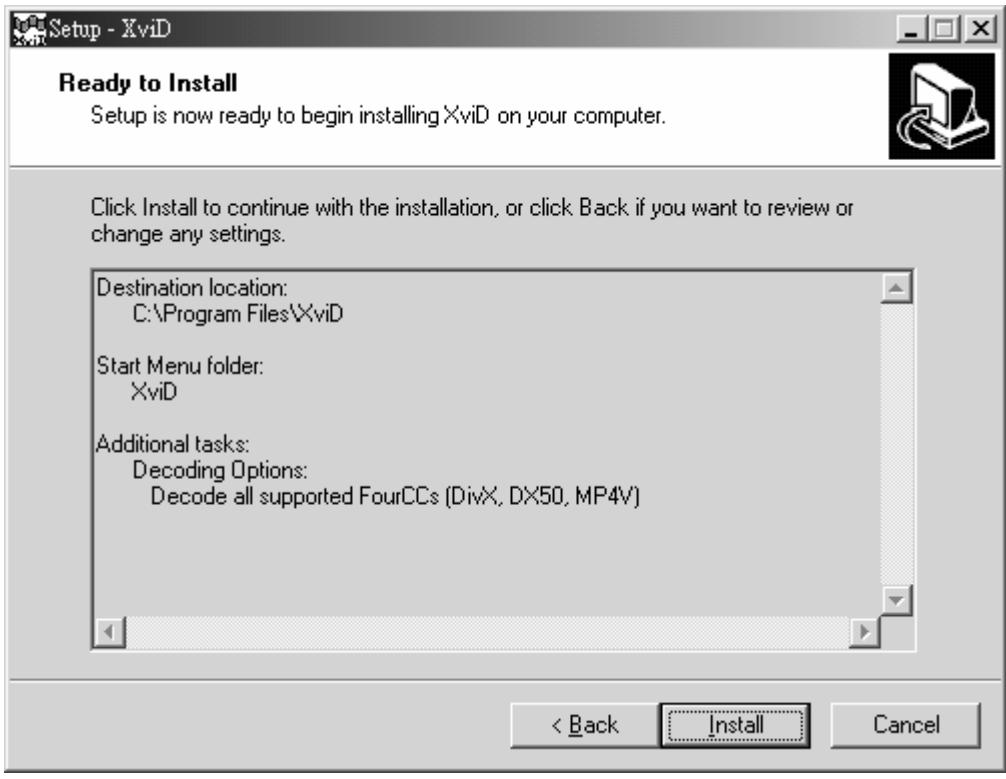
- At the ready to install screen, press "Install" to begin installation.
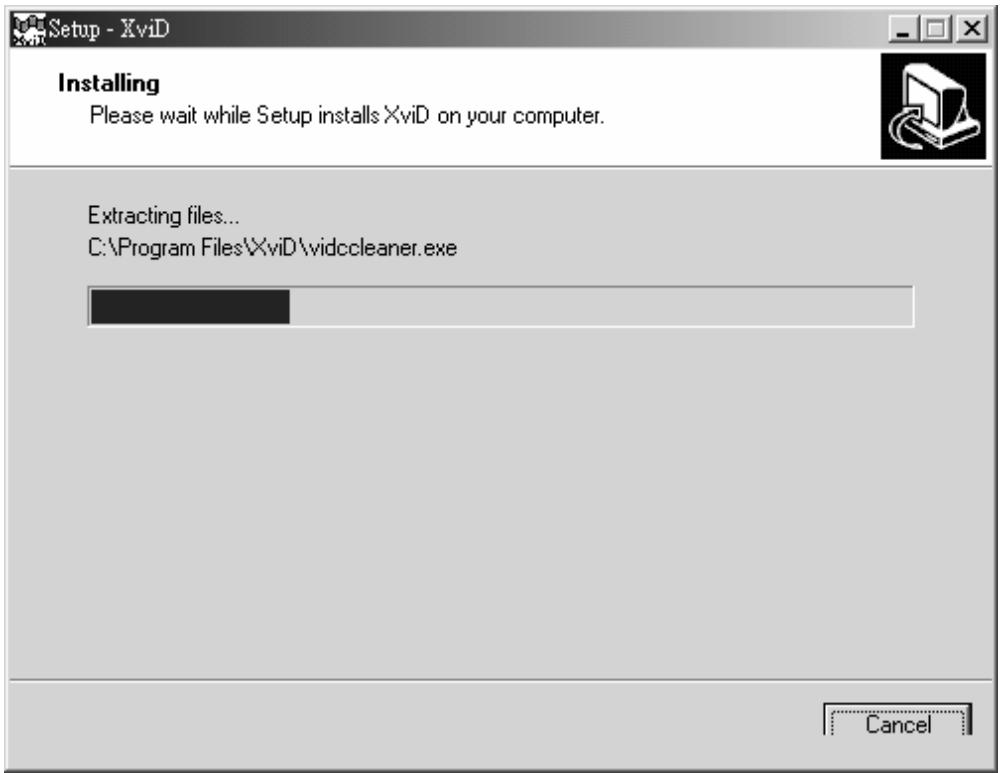
- Install in progress. To stop installation, please press "Cancel".
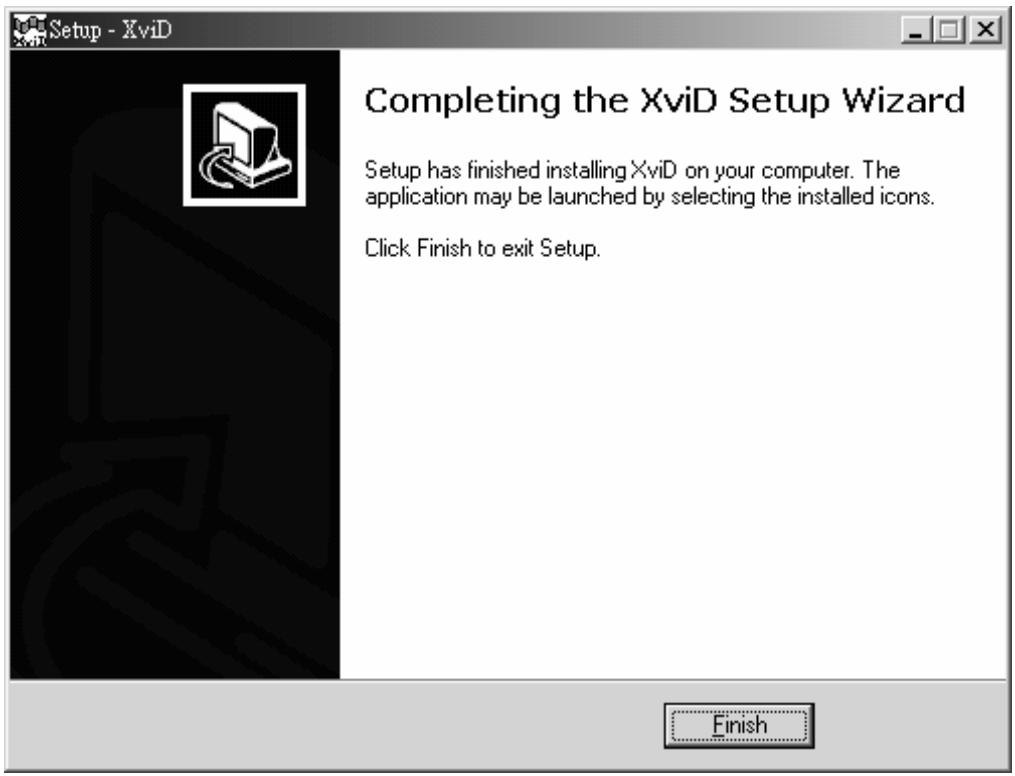
- The screen below will be shown after installation is complete, press "Finish" to end program installation.
Specifications
| Item | Description |
| Imaging sensor | 1/1.8” CMOS 5.0 Mega pixel sensor |
| Lens | F3.0/8.0, f:9.2mm, Fixed Focus Lens |
| Focal range | Normal: 0.4m ~ infinity |
| Image Resolution | 4048 x 3040 (12MP), F/W Interpolation 2608 x 1952 (5MP) 2048 x 1536 (3MP) 1600 x 1200 (2MP) 640 x 480 (VGA) |
| Movie clips | 640 x 480, 320 x 240 / 30fps |
| File format | Image: JPEG (DCF, DPOF & EXIF), Direct Print Movie: MPEG 4 (AVI, ASF), sound available Audio: WAV |
| Zoom | 4x Digital zoom |
| LCD | 2.0” TFT display (480x234 pixels) |
| Storage media | Built-in 32 MB Internal memory Supports SD/MMC card (up to 2GB) |
| Flash | 1.2 ~ 2.0m Auto/ Off/ Force |
| White balance | Auto/ Sunny/Cloudy/Tungsten/ Fluorescent |
| EV compensation | -2.0 EV ~ +2.0 EV (in 0.5 EV stop) |
| Color Effects | Color / B&W / Sepia |
| ISO | 100 |
| Self-timer | Off / 5 sec. / 10 sec. / 30 sec. options |
| Computer interface | USB 2.0 |
| Shutter | Mechanical shutter 1/10 ~ 1/500 second |
| Auto power off | Off/1 min / 3 min options |
| Battery | 4 x “AA” Alkaline batteries |
| Dimension (W x H x D) | 120 x 71 x 46mm (excluding protruding parts) |
| Weight | Approximately 195 g (without the battery & SD memory card) |
Troubleshooting
Power Supply
| Symptom | Cause | Measure |
| The power does not come on. | The battery is not loaded. | Load the battery correctly. |
| The battery is exhausted. | Replace with a new set of batteries. | |
| The power cuts out during use. | The digital video camera was left unattended and unused, so auto power off cuts it off. | Turn the power back on. |
| The battery is exhausted. | Replace with a new set of batteries. | |
| The power does not go off. | Digital video camera malfunction. | Replace with a new set of batteries. |
| The battery runs out quickly. | It is being used in extreme low temperature. | Don’t use this camera under extreme low temperature. |
| Many images are being captured in dark places inside, requiring flash. | Prepare extra batteries if you need take a lot of images with flash. | |
| The battery or digital video camera feels warm. | Long period of continuous use of the digital video camera or the flash. | Turn off the camera if you don’t use it. |
Shooting
| Symptom | Cause | Measure |
| Even if I press the shutter button, the digital video camera does not shoot. | The battery is running low. | Replace with a new set of batteries. |
| The power is not on. | Turn the power on. | |
| The digital video camera is not in shooting mode. | Slide the mode switch to shooting mode. | |
| The shutter button is not pressed all the way. | Press the shutter button all the way. | |
| The internal memory or memory card does not have any free space. | Load a new memory card, or delete unwanted files. | |
| End of memory card life. | Load a new memory card. | |
| The flash is recharging. | Wait until the system LED off. | |
| The memory card is unrecognized by the digital video camera. | Format the memory card in this digital video camera before its first use or when it was used other than this digital video camera. | |
| The auto power off function is activated. | Turn the power on again. | |
| Images do not appear on the LCD monitor. | The power is not on. | Turn the power on. |
| Although it is set to Auto Focus, it does not focus. | The lens or Self-timer LED is dirty. | Wipe clean with a soft, dry cloth or lens paper. |
| The distance to the subject is smaller than the effective range. | Get your subject within the effective focus range. | |
| The flash does not fire. The flash cannot recharge. | The flash is set to flash off. | Set the flash to something other than flash off mode. |
| Even though the flash fired, the image is dark. | The distance to the subject is greater than flash effective range. | Get closer to your subject and capture. |
| The image is too bright when flash fired. | The distance to the subject is near to flash effective range. | Don’t get closer to your digital video camera. |
| The image is too dark. | The image was captured in a dark place while set to flash off. | Set the flash to something other than flash off mode. |
| It is under-exposed. | Set the exposure compensation to a larger value. | |
| The image is too bright. | It is over-exposed. | Set the exposure compensation to a smaller value. |
| The image lacks natural color. | The image was captured in conditions that are hard for Auto White Balance to adjust to. | Add a white object to the composition. |
Playback
| Symptom | Cause | Measure |
| Cannot playback. | It is not set to playback mode. | Slide the mode switch to playback mode. |
| The contents of memory card cannot be replayed. | You played back a memory card that was not formatted by this device. | Loaded a card that was formatted and stored on by this device. |
| Files cannot be deleted. | The file is protected. | Cancel protection. |
| You played back a memory card that was not formatted by this device. | Load a card that was formatted and stored on by this device. | |
| Cannot format a memory card. | The memory card is write-protected. | Remove the write-protection. |
| End of memory card life. | Load a new memory card. | |
| The playback image is dark though I used the flash. | The LCD monitor is too dark. | Adjust the brightness of LCD monitor in the SYSTEM MENU. |
Other Problems
| Symptom | Cause | Measure |
| Cannot load the memory card. | The card is facing the wrong way. | Load correctly. |
| Even when the digital video camera's buttons are pressed, it does not operate. | The battery is running low. | Replace with a new set of batteries. |
| Digital video camera malfunction. | Turn the power off and remove the battery once, and try again. | |
| The date and time is wrong. | The correct date and time is not set. | Set the correct date and time. |
| The date set has disappeared. | The battery is removed with the power still on. | Set the date and time again. |
About connecting to your computer/software
| Symptom | Cause | Measure |
| Cannot download files. | The free space on the hard disk drive of your computer may be insufficient. | Check whether the hard disk drive has enough space for running Windows, and if the drive for loading files has a capacity at least that of the memory card inserted in the digital video camera. |
| No power supply. | Replace with a new set of batteries. | |
| The USB driver is not installed. | Install USB driver. |