
B&W ASW2500 - Subwoofer B&W - Free user manual and instructions
Find the device manual for free B&W ASW2500 B&W in PDF.

| Product type | Active subwoofer |
| Brand | B&W |
| Model | ASW2500 |
| Amplification | Built-in |
| Connections | RCA inputs, 4 mm binding post inputs, daisy-chain outputs |
| Adjustments | Volume, low-pass filter (crossover frequency), phase switch, low-pass filter switch (In/Out), EQ switch (A/B) |
| Operating modes | Always active, Auto (standby after 5 min), Permanent standby |
| Indicator light | Green LED (active) / red LED (standby) |
| Power supply | Mains 230V or 120V (depending on version) |
| Protection | Internal fuse (230V version with disconnector switch) |
| Supplied accessories | 4 rubber feet, 4 decoupling spikes, 4 nuts, manual, warranty card |
| Maintenance | Soft dry cloth, soft brush for the grille |
| Safety | Do not expose to moisture, do not open, check voltage, do not block ventilation |
| Recommended use | Home theater and 2-channel stereo |
| Compatibility | Can be used with THX controller (not certified) |
Frequently Asked Questions - B&W ASW2500 B&W
User questions about B&W ASW2500 B&W
0 question about this device. Answer the ones you know or ask your own.
Ask a new question about this device
Download the instructions for your Subwoofer in PDF format for free! Find your manual B&W ASW2500 - B&W and take your electronic device back in hand. On this page are published all the documents necessary for the use of your device. B&W ASW2500 by B&W.
USER MANUAL B&W ASW2500 B&W
ASW"2500 Owner's manual
English 1
Francais 4
Deutsch 8
Espanol 11
Portugues 15
Italiano 18
Nederlands 21
Dansk. 24
Elambdavika 26
Pycckn 30
Svenska 34
Norsk. 34
Suomi. 34
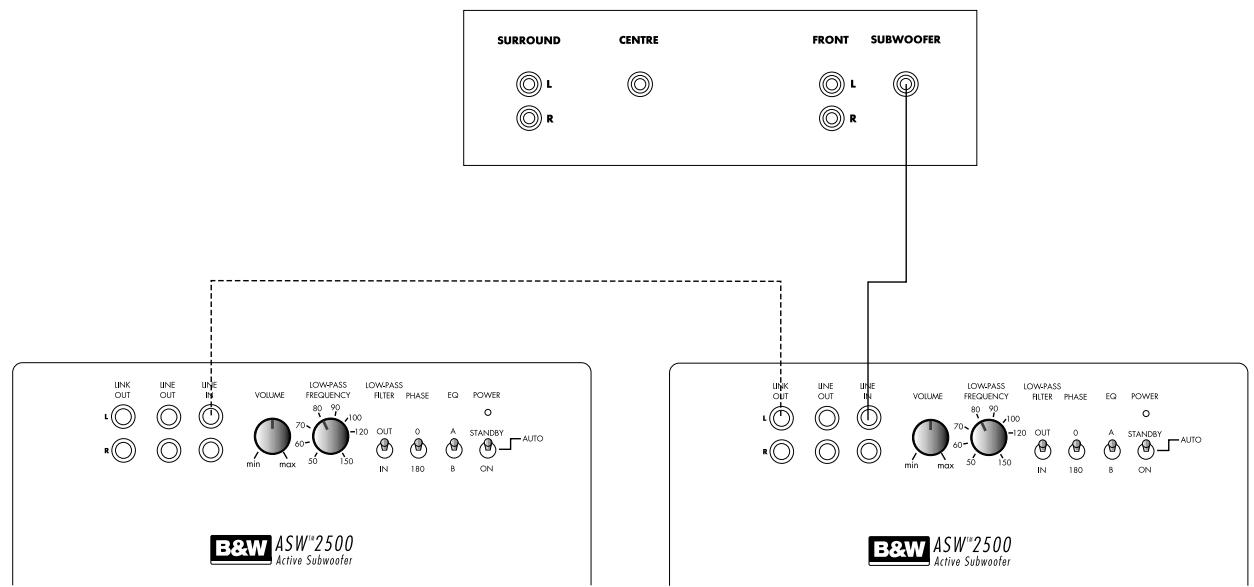
Figure 3
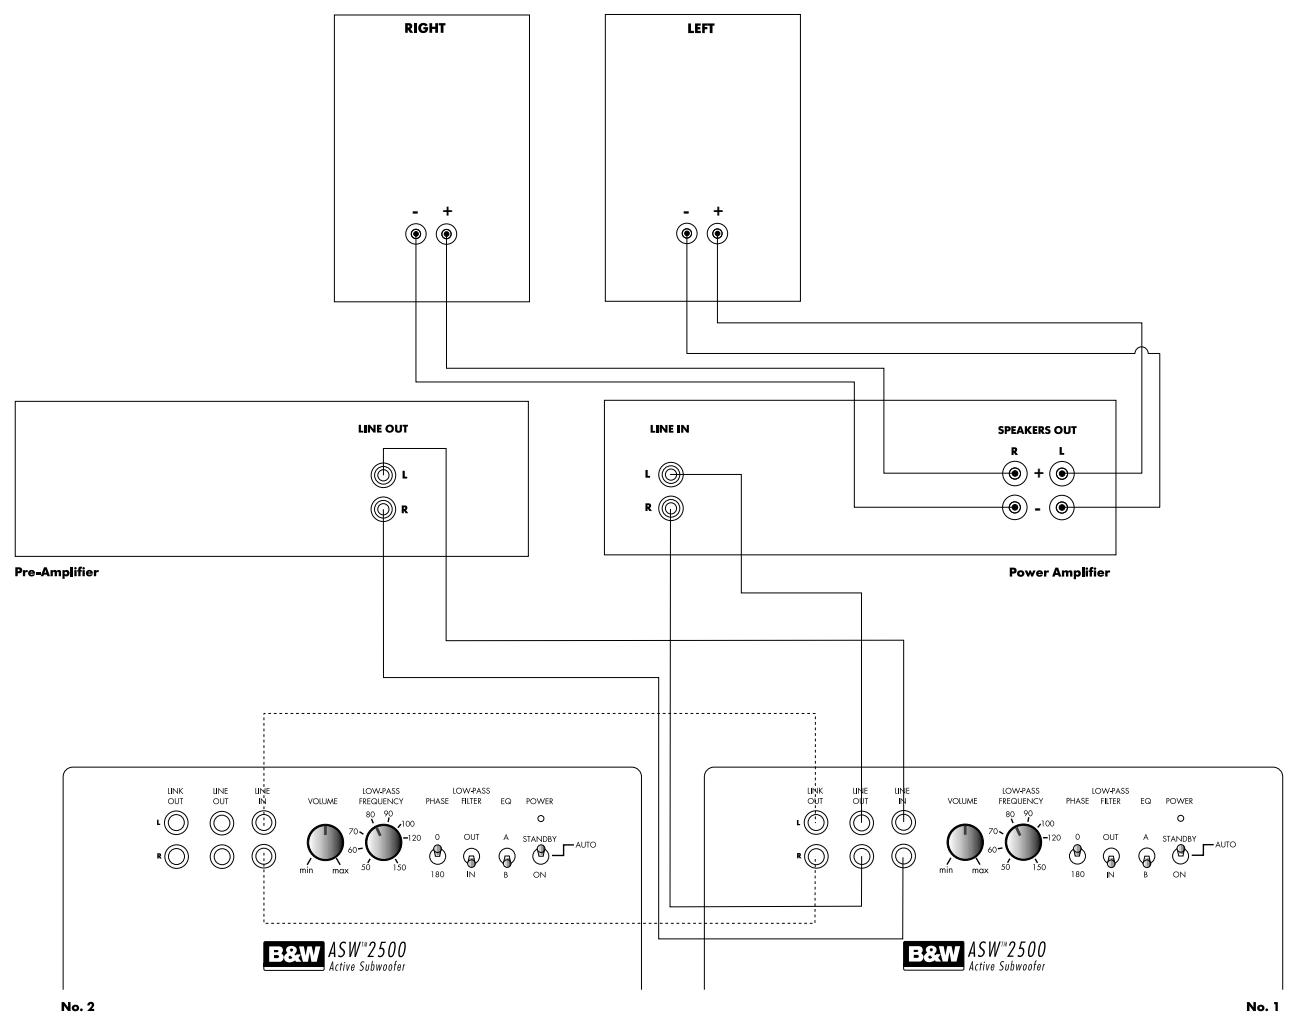
Figure 4
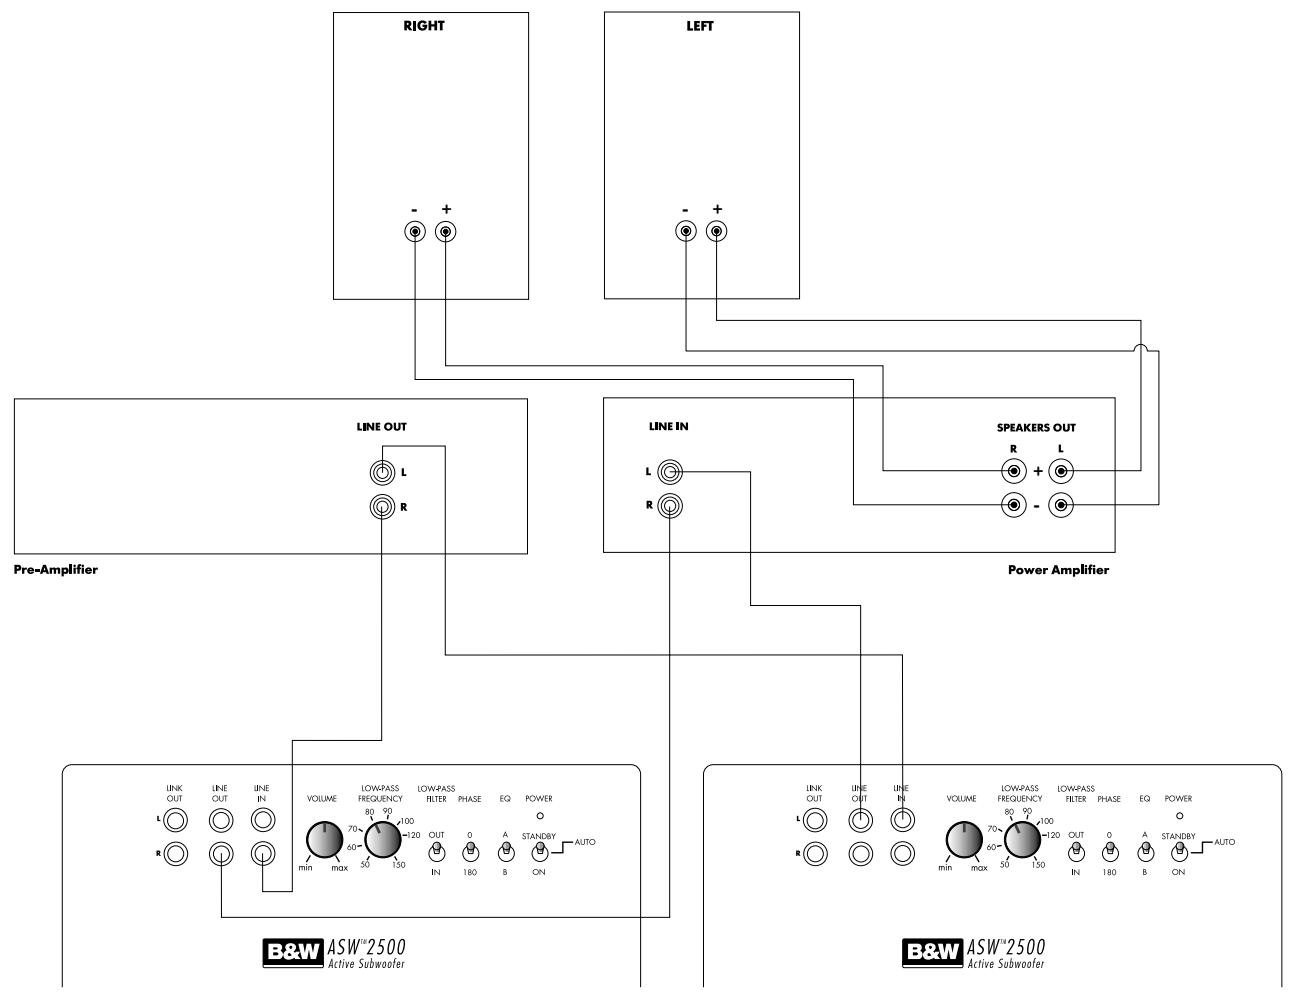
Figure 5
IMPORTANT SAFETY INSTRUCTIONS
CAUTION
RISK OF ELECTRIC SHOCK DO NOT OPEN

Caution:
To reduce the risk of electric shock, do not remove the back panel. No user-serviceable parts inside. Refer servicing to qualified personnel.
Explanation of Graphical Symbols:
The lightning flash within an equilateral triangle is intended to alert you to the presence of uninsulated "dangerous voltage" within the product's enclosure that may be of sufficient magnitude to constitute an electric shock to persons.

The exclamation point within an equilateral triangle is intended to alert you to the presence of important operating and maintenance (servicing) instructions in the literature accompanying the appliance.
1 Read Instructions - All the safety and operating instructions should be read before the appliance is operated.
2 Retain Instructions - The safety and operating instructions should be retained for future reference.
3 HeedWarnings - All warnings on the appliance and in the operating instructions should be adhered to.
4 Follow Instructions - All operating and use instructions should be followed.
5 Cleaning - Unplug the product from the wall outlet before cleaning. Refer to the cleaning instructions in the section of the manual titled "Aftercare".
6 Attachments - Do not use attachments not recommended by the product manufacturer, as they may cause hazards.
7 Water and Moisture - Do not use this product near water - for example, near a bathtub, washbowl, kitchen sink, laundry tub, in a wet basement, or near a swimming pool and the like.
8 Accessories - Do not place this product on an unstable cart, stand, tripod, bracket or table. The product may fall, causing serious injury to a child or adult, and serious damage to the product. Use only with a cart, stand, tripod, bracket or table recommended by the manufacturer or sold with the product. Any mounting of the product should follow
the manufacturer's instructions and should use a mounting accessory recommended by the manufacturer.
9 A product and cart combination should be moved with care. Quick stops, excessive force and uneven surfaces may cause the product and cart combination to overturn.
10 Ventilation - Openings in the rear control panel are provided for ventilation and to ensure reliable operation of the product and to prevent it from overheating, and these openings must not be blocked or covered. The panel itself forms part of the cooling mechanism and must not be obscured by placing the product on a bed, sofa, rug, or other similar surface. The product should not be placed in a built-in installation, such as a rack, bookcase or cabinet unless proper ventilation is provided or the manufacturer's instructions have been adhered to.
11 Power Sources - This product should be operated only from the type of power source indicated on the marking label situated on the rear panel above the power input socket. If you are not sure of the type of power supply to your home, consult your product dealer or local power company.
12 Grounding or Polarisation - The appliance is not required to be grounded. Versions of the product marked for use with 120V power supplies are equipped with a power cord fitted with a polarised alternating line plug (a plug having one blade wider than the other). This plug will fit onto the power outlet only one way. This is a safety feature. If you are unable to insert the plug fully into the outlet, try reversing the plug. If the plug should still fail to fit, contact your electrician to replace your obsolete outlet. Do not defeat the safety purpose of the polarised plug. When using an extension power-supply cord or a power-supply cord other than that supplied with the appliance, it should be fitted with the appropriate moulded-on plugs and carry safety approval appropriate to the country of use.
12 Power Cord Protection - Power-supply cords should be routed so that they are not likely to be walked on or pinched by items placed on or against them, paying particular attention to cords at plugs, convenience receptacles and the point where they exit from the appliance.
13 Overloading - Do not overload wall outlets, extension cords or integral convenience receptacles, as this can result in a risk of fire or electric shock.
14 Non-use Periods - The power cord of the appliance should be unplugged from the outlet when left unused for a long period of time.
15 Object and Liquid Entry - Never push objects of any kind into this product through openings, as they may touch dangerous voltage points or short out parts that could
result in a fire or electric shock. Never spill liquid of any kind on the product.
16 Servicing - Do not attempt to service this product yourself, as opening or removing covers may expose you to dangerous voltage or other hazards. Refer all servicing to qualified service personnel.
17 Damage Requiring Service - Unplug this product from the wall outlet and refer servicing to qualified personnel under the following conditions:
a When the power-supply cord or plug has been damaged.
b If liquid has been spilled or objects have fallen into the appliance.
c If the product has been exposed to rain or water.
d If the product does not operate normally by following the operating instructions. Adjust only those controls that are covered by the operating instructions, as an improper adjustment of other controls may result in damage and will often require extensive work by a qualified technician to restore the product to its normal operation.
e If the product has been dropped, or damaged in any way.
f When the product exhibits a distinct change in performance - this indicates a need for service.
18 Replacement Parts - When replacement parts are required, be sure the service technician has used replacement parts specified by the manufacturer or have the same characteristics as the original part. Unauthorised substitutions may result in fire, electric shock or other hazards.
19 Safety Check - Upon completion of any service or repairs to this product, ask the service technician to perform safety checks to determine that the product is in proper operating condition.
20 Wall or Ceiling Mounting - The product should be mounted to a wall or ceiling only as recommended by the manufacturer.
21 Heat - The product should be situated away from heat sources such as radiators, heat registers, stoves, or other products (including amplifiers) that produce heat.
WARNING:
CAUTION: 120V versions of the product are supplied with a power cord equipped with a polarised plug. To prevent electric shock, match wide blade of plug to wide slot, fully insert.
Ensure the plug is fully inserted into the wall outlet or extension cord receptacle to prevent blade or pin exposure.
To prevent fire or shock hazard, do not expose this equipment to rain or moisture.
Observe all warnings on the equipment itself.
To avoid electrical shock, do not open the enclosure or remove the amplifier from the rear panel. There are no user serviceable parts inside. Refer all service questions to an authorised B&W dealer.
Ensure that the voltage indicated on the amplifier panel matches that of the power supply.
The mains fuse holder is located on the back panel of the amplifier module. Replacement fuse must be of the same type and rating as supplied and marked on the product.
The product does not require earthing (grounding).
Ensure the product is adequately ventilated. Do not prevent air from circulating round the rear amplifier panel. Do not obscure or block the openings in the panel. Do not use the product in a rack, bookcase, cabinet or cupboard unless the volume behind the product is adequately ventilated to the room space.
Check that there are no cables under the carpet that may be damaged by the spike feet.
Do not walk the product on the spike feet as this may cause them to become detached from the cabinet and cause damage.
Take care not to impale yourself with the spike feet when moving the product.
Introduction
Thank you for purchasing the B&W ASW™ 2500 Active Subwoofer.
Since its foundation in 1966, the continuing philosophy of B&W has been the quest for perfect sound reproduction. Inspired by the company's founder, the late John Bowers, this quest has entailed not only high investment in audio technology and innovation but also an abiding appreciation of music and the demands of film sound to ensure that the technology is put to maximum effect.
The ASW™ 2500 has been designed for Home Theatre installations and to augment the bass performance of full-range speakers in 2-channel audio use. Adding the subwoofer to your system not only extends the bass to lower frequencies, it improves the midrange clarity by reducing the low-frequency demands on your existing speakers.
Please read through this manual fully before
using the subwoofer. All sound installations require some planning and experimentation if you are to get the best out of the products used and this manual will guide you in this process.
As the subwoofer is connected to the electricity power supply, it is important that you familiarise yourself with the safety instructions and heed all warnings.
Keep this manual in a safe place for future reference.
B&W loudspeakers are distributed to over 60 countries worldwide and we maintain an international network of carefully chosen and dedicated distributors. If you have a problem, which your dealer cannot resolve, our distributors will be more than willing to assist you.
Unpacking
(figure 1)
The easiest way to unpack the subwoofer and avoid damage is as follows:
- Open the carton flaps right back and invert the carton and contents.
- Lift the carton away from the product.
We recommend that you retain the packaging for future use.
In addition to this manual, the carton should contain:
1 Subwoofer
1 Accessory pack containing:
4 Rubber feet
4 Spike feet
4 Lock nuts
1 International warranty document
A tour of the subwoofer
(figure 2)
1 LINK OUT sockets
2 LINE OUT sockets
3 LINE IN sockets
4 VOLUME control
5 LOW-PASS FREQUENCY control
6 PHASE switch
7 LOW-PASS FILTER defeat switch
8 EQualisation switch
9 POWER On/Auto/Standby switch
10 Power/Standby indicator
11 Ventilation holes
12 Power input socket
13 Power isolator switch (230V versions only)
14 Fuse holder
Positioning the subwoofer
Because the subwoofer produces only low-frequency sounds, positioning is less critical in some respects compared to full-range speakers. Directional information is much less precise and you have more choice where to place the speakers to good effect. This said, best results are obtained if the subwoofer is placed between the satellite speakers or in the vicinity of one of them. If you use two subwoofer, it is best to put one near each satellite speaker.
Placing the subwoofer behind the listeners, even in surround sound installations, generally gives inferior imaging, but may be an acceptable compromise if domestic considerations dictate.
As with all speakers, the proximity of room boundaries affects the sound. Bass is generally increased as more surfaces come into close proximity with the speakers. Unlike full-range speakers, however, you can always restore the correct overall system balance by adjusting the volume level of the subwoofer. The more boost you get from the room, the less hard the speaker has to work; but there is a down side. Corner positions often excite more low-frequency room resonances, making the bass more uneven with frequency. There is no substitute for experiment as all rooms behave differently, so try the subwoofer in a variety of positions before making a final decision. A piece of music with a bass line ascending or descending the musical scale is useful for assessing the smoothness of the bass response. Listen for exaggerated or quiet notes. Having a separate subwoofer does enable you to optimise for room resonances independently from sitting the satellite speakers for best imaging.
If the subwoofer is to be used in a confined space (eg in custom furniture), the space must be ventilated to allow sufficient air to circulate and cool the unit. Ask your dealer for advice.
The subwoofer is supplied with four spike feet. The spikes pierce through carpet pile, giving a firm support directly to the floor surface without crushing the pile.
If the unit is to be placed on a vulnerable surface, such as a wooden floor, either place a protective disc under each spike or fit the four rubber feet in place of the spikes.
When fitting either the rubber feet or the spike feet, first screw the lock nuts fully onto the thread and then screw the feet fully onto the threaded inserts in the base of the cabinet. If the unit rocks, loosen the relevant two opposing feet until the support is firm, then re-tighten the lock nuts to the inserts.
Electrical connections
Disconnect all sound system equipment from the power supply until the signal connections have been made and checked. This avoids the risk of damage whilst connections are made or broken.
The function of the subwoofer is to receive signals from the amplification chain and, where
necessary for 2-channel audio, split the signal into low bass and higher frequencies and feed the latter back out to the satellite speakers. Left and right channel inputs may be combined into a single mono low bass feed to the subwoofer drive unit if required.
The subwoofer will input and output line-level signals via the RCA Phono sockets located on the back panel.
Use the following table to select the correct wiring method for your installation:
Application: Home Theatre
The subwoofer may be used with any decoder that has a line-level subwoofer output (normally from an RCA Phono socket). Most decoders with integral power amplifiers still output the subwoofer or Low-Frequency Effects (LFE) signal at line level.
- Decoder with one or more subwoofoers - fig. 3
Application: 2-channel audio
Separate pre- & power amplifiers:
a One or more subwoofoers with output combined into a single mono signal - fig. 4
b Two subwoofoers with separate left and right signal - fig. 5
The ASW^TM2500 is not suitable for use with 2-channel integrated pre/power amplifiers, unless they feature a line level output from the pre-amplifier.
Using more than one subwoofer
Using more than one unit in a single installation can improve performance in the following ways:
- Maintain stereo separation to the lowest frequencies.
- Cope with larger listening rooms.
- Enable greater maximum sound output – often useful for effectively reproducing special effects in Home Theatre applications.
- Smooth out the effects of low-frequency room resonances.
If you are using two subwoofoers for 2-channel audio, separation is improved if each channel has its own subwoofer, providing each one is placed close to the relevant satellite speaker. Only use the mono connection of figure 4 if you cannot place each subwoofer close to its satellite speaker.
Double-check the connections
ENSURE THAT THE VOLTAGE INDICATED ON THE AMPLIFIER PANEL MATCHES THAT OF THE POWER SUPPLY.
Before auditioning the sound quality of your new installation and fine-tuning it, double-check the connections. All too often, users complain that they cannot get a decent sound however they set
the controls, only to discover something has been wrongly connected. Make sure that:
- The phasing is correct - there should be no positive to negative connections to the satellite speakers. If something is out of phase you may get a fuzzy sound with an imprecise and floating image, a lack of bass or a combination of the two.
- There are no left to right mix-ups – this can result, for example, in the orchestra being the wrong way round or, more dramatically, sounds on your Home Theatre going in the opposite direction to the action on the screen.
Switching on and off
We recommend that you switch the subwoofer on before any power amplifiers receiving signals from the subwoofer. Similarly, when switching off, switch the subwoofer off last.
The on/auto/standby switch (9) at the top right of the amplifier panel does not isolate the amplifier completely from the power supply. It maintains a low-power input to an auxiliary sensing circuit. The 230V version of the amplifier has an additional switch (13) that completely isolates the power supply. To isolate other versions, either switch off at the wall outlet or disconnect the power cord from the amplifier. We recommend you isolate the subwoofer from the power supply if it is to be out of use for extended periods of time.
The switch (9) operates as follows:
On:
With the switch in this position, the amplifier remains permanently on, and the light glows green.
Auto:
On first switching the subwoofer to Auto, the amplifier becomes fully active and the light (10) above the on/auto/standby switch glows green. After a period of about 5 minutes without an input signal, the amplifier automatically reverts to standby mode, and the light glows red. When an input signal is detected, the amplifier automatically becomes fully active and the light glows green.
Standby:
In this position, the amplifier is in permanent standby, and the light glows red.
Setting the controls
There are 5 controls to consider:
The VOLUME control (4)
The LOW-PASS FREQUENCY control (5)
The PHASE switch (6)
The LOW-PASS FILTER switch (7)
The EQ (equalisation) switch (8)
The optimum settings depend on the other equipment used with the subwoofer. If using
more than one subwoofer, ensure the controls on each one are set the same.
Use with home theatre decoders
The ASW™ 2500 is not a THX® licensed component, but may be used with a THX® controller if desired.
- Set the decoder VOLUME control to the half way (12 o'clock) position.
- The setting of the LOW-PASS FREQUENCY control is irrelevant.
- Set the PHASE switch initially to 0^* .
- Set the LOW-PASS FILTER switch to OUT.
- Set the EQ switch initially to position A.
See also the section "Fine tuning".
If you have a THX® controller, ensure that the subwoofer function is enabled. When so configured it incorporates all the filtering and level setting required for the subwoofer in all modes. For level calibration, the internal test noise and channel level controls in the THX® controller should be used. In all cases the levels should be set to obtain 75dB SPL (C-weighted) at the listening position from the controller's internal noise test signal.
With other decoders, configure the front and surround speakers to "large" or "small" as appropriate before setting the levels. Use the internal noise test signal and volume controls of the decoder to set the levels of all the speakers. Only change the VOLUME control on the subwoofer if there is not enough range in the decoder to achieve the correct levels.
Inexpensive sound level meters are readily available from electronics stores and should be used to calibrate the levels. Refer to your decoder manual for further details on how to set the levels.
Use for 2-channel audio
- Set the VOLUME control initially to the half way (12 o'clock) position.
- Set the LOW-PASS FREQUENCY initially to 80Hz.
- Set the LOW-PASS FILTER switch to IN.
- Set the EQ switch initially to position B.
- Set the PHASE switch initially to 0^ .
See also the section "Fine tuning".
Fine-tuning
There are two settings of the EQ switch. Position A is optimised to allow the subwoofer to provide the highest listening levels, while position B gives greater bass extension coupled with a tighter sound.
2-channel audio
The optimum settings of the PHASE switch and the LOW-PASS FREQUENCY control are interrelated and also dependent on the low-frequency cut-off characteristic of the satellite speakers and
the relative positions of all the speakers in the installation.
Set the system up in the preferred position and play some programme with a steady bass content. The optimum setting for the LOW-PASS FREQUENCY depends on several variables; the bass performance and power handling of the satellite speakers, the number of subwoofoers used and their position relative to the satellite speakers. The range 80 - 90Hz is a good starting point for the LOW-PASS frequency. Unless two subwoofoers are used to preserve separate right and left channel information and are sited close to the relevant satellite speakers, using a higher cut-off frequency may compromise the stereo image and should only be considered if the bass performance of the satellite speakers is particularly limited.
At each setting of the cut-off frequency, listen with the phase switch in both positions. The correct one is that which gives the fullest bass and that will depend on the bass characteristics of your satellite speakers and the relative distances of the subwoofer(s) and the satellite speakers to the listeners. When using more than one subwoofer, ensure that each one has its cut-off frequency and phase switch set the same way.
Set the loudness of the subwoofer relative to the satellite systems to your liking. Use a wide variety of programme material to get an average setting. One that sounds impressive on one piece may sound overpowering on another. Listen at realistic levels as the perception of balance varies with sound level.
Home theatre
The situation with home theatre is somewhat different from 2-channel audio. The subwoofer (LFE) signal is a separate channel rather than an extension of the signal to the satellite speakers. The LOW-PASS filter is switched out, because the decoder provides all the filtering for any speakers set to "small". However, the position of the phase switch must still be assessed. Normally the phase will be set to 0^ , but if the subwoofer is positioned at a distance significantly different from the other speakers, or the power amplifier driving the other speakers happens to invert the signal, the 180^ position may be preferable. Listen with the switch in both positions and choose the one that gives the fullest sound. If there is little difference, leave the switch at 0^ .
Decoders normally have a calibrated noise signal that can be used to set the relative levels of all the speakers, making the task somewhat more straightforward than for 2-channel audio. However, do not be afraid to alter the settings to your personal preference. It is all too easy to get carried away with the capabilities of the subwoofer, especially with some special low-frequency effects. Often a more realistic portrayal, and one more satisfying in the long term, is to be had by setting the subwoofer level lower that the standard calibration level.
All applications
If you get problems with lumpy bass - if certain bass notes are exaggerated more than others - then you probably have a room interface problem and it is worth experimenting with the placement of the subwoofer. What may seem like small changes in position - 15cm (6in) or so - can have a profound effect on the sound. Try raising the subwoofer clear of the floor as well as lateral movement. The use of multiple subwoofoers can smooth the effects of room resonances, as each subwoofer will tend to excite resonances at different frequencies. If you alter the relative distances from the subwoofer(s) and satellite speakers to the listeners appreciably, reassess the phase switch setting. You should also check the level setting of the subwoofer (using either the decoder output levels or the volume control on the subwoofer amplifier as appropriate), but only after setting the phase correctly.
Taking care of the subwoofer
The cabinet of the subwoofer may be cleaned by dusting with a dry cloth. If you wish to use an aerosol cleaning spray, do not spray directly on the cabinet; spray onto the cloth. Remove the grille first so that the cloth does not become stained, but be careful not to disturb the drive unit. The grille itself may be cleaned using a soft brush.
Do not use the subwoofer as a table. When in use, objects left on top of the subwoofer are liable to rattle. In particular, avoid the risk of liquids being spilled (eg from drinks or vases of flowers).
If the system is taken out of use for a long period, disconnect the subwoofer from the power supply.
FRANÇAIS
AVERTISSEMENTS:
Pas pägressive at placere dine fddder under subwooferens spikes.
Introduktion
Eappuoy:Home Theatre
To subwoofer nop i va xpnoiomoin ±b i e oonioovdotnote surround Edo 0eineou line yia subwoofer (ouvn0wC u unofoxc RCA). Akoa kai o eEeepyaotc nou exouv evosawatwoev vo tELIOXUT (toulambdaotov o npaaotpoi ano autouc) "Byaocuv" to oma tou subwoofer n to kavalx aunaw ouxvoNTwV (LFE) 0e enineno line.
IcnoJIb3OBAHnE C DeKOepaMn DOMaUHnX KInHoteaTpOB
Ca6ByΦeP ASW™2500 HeЯBnaeTcR IInuEh3nupOBaHHbIM KOMNoHErTOM THX®, Ho, npn JxelaHm, MoKet 6bITb NcNoIb3OBAH C KOHTpONJIepom THX®.
-
UctaHOBuTe peRyIaTOp TPGOMKOCTNdeKOePa B cepeDHHoe noIooKeHne("12 Yacob").
-
Пложени рergyл对接ан икх actOT He nMeet 3aueHn.
- YctaHOBnTe nepeKnIOuChaTeIb HN3KNX YACTOT B noJoxKeHne BblKJI (OUT).
- YctaHOBnTe nepeKJIouaTeIb YACTOTOnI KOPPEKUNB noJoxHeA.
- IepBoHaayalHo, yctaHOBnte nepeKlIOuYateNb FA3bl Ha 0^
Cm. TaKxe pa3dJIe "ToUHaI HaCTpOka".
EcnBbnoB3yeTecb KOHTpOJIpePOM THX°, y6eIntEcB, yTO aKTHINPOBaHa erO fynKcHnca cABBypepa dIra ObScneueHn HAcTPOKn 0nblTPOB u balaHc caSBbypepa npu pa6oTe B IIObOM pexmme. JIa KaIb6pOBKn yPOBn 3Byka nCNoB3yIOTC peryJnAToPbI BHyTpEHero IpOBepOHoro Wyma u yPOBn KaHApOB KOHTpOJIpePA THX°. Bo Bcecx Clyuayx, 3Byuahne DoJnxHO 6bITb YCTaHOBNeHO dJa DOCTNXKeHn yPOBn 3ByKOBOrO DaBLeHn B MecTe HaxOJDeHn Cnywate75Dc CpOBepOHoro CInHana BHyTpEHero Wyma KOHTpOJIpePa.
Pn nCnoB3OBAHnCa6Byfepea CpyrMMn
DeKOdepaMn, pa3MeCTnTE nepeDnHe KOLOHKn
N KOLOHKn OKpyXaIOUeRO 3Byka NO npINHCnny
"6oJbWne" NIn "MaJIbe" nepeI NaCTpoKoY
yPOBHeN 3Byka. NcNoB3yIte npOBepOuHbI
WymOBoON CNrHaN IN peryJlTOpbl rPoMKoCTn
DeKOdepa INa HAcTPOuKN yPOBHeN 3ByuHnA
Bcex KOnoHOK. NImehnTe nOLOKeHne
peryJlTOpa rPOMKOCTn Ca6Byfepea TOnbKO
B TOM Clyuae, ecnn Dekoep He obnaJaet
DOCTaTOOHbIM DnAna3OHom INa DOCTNXeHn
npaBnJIbNbIX yPOBHeN 3ByaHnA.
Hedoporne n3Mepntelny yOBn 3Byka, KOtOpblie HaIO nCNoIb3OBAbT dJI KAIIN6pOBKn yOBHeN 3ByuHaN, pOdaIOTc BO BcEx Mara3InHax, TOpryUoXn 3JeKtpOnHoi annapatypo. IJa daJIbHeNeW nHΦopMaun O HacTpOnKe yOBHe 3ByuHaN cM. IHCTpyKUnIO n3KcPnLyataun DeKOdepa.
IcnoJb3OBAHHe c DByXKaHaJIbHbIMN 3ByKOBOCnpOn3BOJaUIMM annapaatamn
- Первонально, установиные ретулгов
- ГомКОCTN Декорpa в сесянhoe пооженце ("12 час").
- IepBoHaaybHo, yctaHOBnTe peryTOp HN3Knx YACTOT Ha 80r.
- YctaHOBuTe nepeKJIouaTeIb HN3KNX YACTOT B noJoxHeIe BKJI (IN).
- YctaHOBnTe nepeKJIouaTeIb YACTOTOnI KOPPEKUNB nOJoxHe B.
- IepboHaJIbHo, yCTaHOBInTe nepeKIOuAteIb FA3bl Ha 0^
Cm. TaKke pa3deJ "ToUHaN hAcTpoJa"
Tochna hactpoika
IpeekJIOUoateIb YACTOTHOJKOPKELUNOcHaueHdByMn IonoKeHnMn.IonoKeHne A npedHa3NaeHo dIg npedocTabHeNnCa6Bvepy Bo3MOxHocTn oecneueHnBicOaunx yPoBHeN 3ByaHn, aIonoKeHne B npedocTabnEt paCUnpeHn6acBOrO 3ByaHn n DoCTnxKeHne 6OoneILOTHOrO 3Byka.
Дыхканьн 3BYKOBOcnpOu3BODaA annapaTypa
OnTImaIbHbIe npaMeTpbl nepeKluOyateJIa
ΦA3bl n peryIaTopa HN3KNX YACTOT
B3aIMOCBra3aHbI N, NOMMO 3TORO, 3aBICAT OT
HN3KoUAcTOTHO XapaKTepnCTIKN
Cpa6aTbIBAHN BbIBOHyX KOJHOK N
OTHOcHTeJIbHO r paCtOHaHNA MEXdy BCEMN
KOJIOHKAMn aKyCTuYeCKo CnCTEmbl.
YcTaHOBnTe CnCTeMy B Bb6paHHe
noJoxeHne N BkIIOUHTe My3bIKy C
NoCToHHbIM 6acOBbIM pITMOM. ONTImaJIbHOe
noJoxeHne peryIaTopa HN3KNX YACTOT
3aBNCNT OT HeCKOJIbKIN X Oka3aTeJei:
6acOBOrO 3ByaHn I MOuHocTN BBIBODHBIX
KOLOHOK, KOINueCTBa NCNOJIb3YeMbIX
ca6BypepoB INx pacNoJoxeHn NO
OTHOseHnIO K BvIBoHDbIM KOLOHKAM. Yactota
80-90rAIBJIaTc XopoWe ToCkoj OTCeTa
dIra NaCTpOoiKn HN3KNX YactOT. Ppi
OTCYTCTBN BO3MOXHOCTn IODKIIQUeHnI
OTDeJIbHOrO ca6Byepa K npabOMy I nebOMy KaHaJy PAnOM C KaKDoB BBIOHOH
KOLOHKo, Heo6xoDIMO NOMHtB, YTO BoJee
BbICOKne IpeJeNbHbIe YAcTOfb MOrTy
HapUShTb CTpeo3ΦΦeKT INx HaDo
HCNoJIb3OBaTb TOJIbKO, ecNI
BOcPOn3BeDeHnE 6acOB BBIODHBIM
KOLOHKAMn Ype3BbIaHNo ORpaHNeHO.
При каддн Habсторke npedelbHOB
чackты,псилшьТeСьКЗуанИО
СИCTeMbI B O6Ox NOnOxKeHIX
nepeKlNoUaTeNЯ Pha3bl. ПравиьнБIM
YBJIETcTTo NOLOXKeHNe,пri KOTOpOM 6acbl
3ByuAT Han60one NoJHO u HacbiSeHNO.3TO
3aBnCIT OT Hn3KoUAcTOTHbIX XapaKTepnCTNK
ICNoJIb3YeMbIX BBIOBdHbIX KOJHOK I
OTHOCHTeLbHOrO paccTOrHnI OT ca6bYfepa
(IIIN Ca6ByfepOB) IN BbIOBdHbIX KOJHOK Do
Clyuatale.Iprn ICNoJIb3OBAHm
HECKoIbKnx Ca6ByfepOB,y6eINTeCb TOM,
4TO IN PpeJeIbHbIe YAcTOTbI n Pa3ObBiE
peekluoyateNHaCTpoEHBI OINHAKOBO.
「pomkoctb ca6bypepa no OTHoWeHIO K BbIBOHNbIM CnCTeMaM yCTaHaBInBaETcB 3aBNCmOcTn OT IuHoro Bkyca.ДЯ nOlyueHnHaIyUweRo 6aIahCa, npocnywaIte MHOKeCTBO pa3IINuHbIX My3bIkaIbHbIX pOnI3BeDeHn Iu36epnte ONtImaJIbHbI BapnaHT. BocnpaITne 6aIahCa 3aBNCNT OT UPOBHr pOMKOCTN, PO3ToMy cLywaIte My3bIKy Ha TaKoI rPOMKOCTN, KOtopa Hau6OJe ppneMeMa.
DomawHnKINHOteatp
ToHnHa HacTpoiKa ca6ByepeBa CnCTeMe
DOMaHrero KInHOTeaTpa HeCKoJIbKO
OTJNuaeTcA.CrHaN Hn3KoUactOThBIX
3ΦeKTOB (H43) ca6Byepe npedctabIeT
co60n OTJeIbHbIK KaH, a He npOdoJXeHne
CnIHana, NOdaBaemoro Ha BbIOdHbIE KOLOHN.
FInbTp Hn3KNX YACTOT OTKIoUey, TaK Ka
DeKOep oEcecneuBAeT BCIO Heo6xOIMyIO
fNtbpauu Dnla IIO6bIX KOLOHOK,
yCTaHOBHeHHx Ha "MaIbIe" napaMeTpbl.
Ondako, noLoXeHNIO nepeKlIOUaTeJIa 0a3bl
DOJXHO 6bITb yJeIeHO BHNMaHne. O6bIuHO,
0a3a yCTaHaBJIbAeTcRa Ha 0^ , HO ecnn
ca6Byepe pacnoLooXeH Ha DOBOJbHO 6oJIbWOM
pacCToAHIN OT dpyrNX KOLOHOK IIIN JKe
ycnINTeB MoUHocTn, nTAJOUIN dpyrNe
KOLOHK, NOChemy-Imbo pReO6pa3yET cRHaI,
MOXeT 6bITb pReNoOHTuTEbHee NCNOJb3OBaTB
noLoXeHne 180'. PocnyaTe My3bIKy C
peekloUoyatelem B obox NonoXeHNx IN
BbIbepnte To, KOTOpoe oecneuBAeT
Han6Oone HacbiueHoe 3ByaHne. Ecnn
pa3HnCa MeKdy 3ByaHne M He6OJIbShaA,
OCTaBBte peekloUoyateJIb B noLoXeHN 0°.
O6bIHy, DeKoJepbl pa60TaOTc KaJIIN6pOBaHHbIM UyMOBbIM CnHAnOM, KOtOpbl NcNOJb3YeTCr DnA HAcTPOIKN OTHCOnTeJIbHbIX yPoBHe 3ByaHnRA BCEX KOLOHOK, YTO O6JIeRHaET HAcTPOIKy CnCTembl DOMaShero KInHOteaTpA NO CpABHeHIO C DBYxKaHaJIbHO 3BYKOBOCpON3BOJaUeIe anIpaTpyoi. OdHaKO, He 6oJIteCb MeHrTB NaCTPOIKy B COOTBcETCBN C BaWIM BKYCUM. OChEB NERKO yBLeYbCR BO3MOXHOCTAMN ca6Bypepa, B Oco6EHHOCTn HeKOTOpBIIM cNeuΦnueCKMn Hn3KOHAcTOTbIMN 3ΦΦeKTamN. Ho Oeyb YactO Han6Oonee peAlnCTnHoe n, B KOHeHOM NTore, Han6Oonee yDObJIeTbpNTbHOE 3ByuHaHne DOCTnRaETcY cTaHOBko IyPoBHra Ca6Bypepa HnKe, Yem CTaHApTbIyPoBeH KaIIb6paun.
Bce cnoc06bl nCnoJb3OBaHnA
EcIn npBocnpo3BeDeHm My3bIKn npxpaMbIBaOT 6acbl, t.e. HeKOTOpbIe HtBb 3Byutr opa3do 60one nOupekHyTO, cem OctaIbHbIe, To 3TO, NO BceBepoTHOCTN Bbl3BaHO npo5nemampe3OHaHCA BV NOMeHn m MoXeT 6bItb NCpAbaNeHo N3MeHHeM pacNoLoKeHn Ca6Bypepa. Daxe He6oJIbUoe,-Okono 15cm,- nepemeueHne MoXeT cyueCTBeHHo NOBJIaRb Ha KaueCTBO 3Byka. IOnpo6yIte He TOnbKO nepeDnuratb ca6Bypep, Ho n npinOndHB erO ha nnom. NcNoIb3OBAHne HeCKoNBkIX ca6BypepoB MoXeT crnaIDTB pe3OHaHC, T.K. KaJdbn ca6Bypep 6yEd TBblBaTb pe3OHaHC Ha pa3hIx qactotax. Ppi cyueCTBeHHOM Im3MeHn pAcSToHHn OT ca6Bypepa (nIn ca6BypepoB) IN BBIONbIX KOJONOK Do CnyataTeNe Heo6XoDMO 3aHOBO npOBepNT noLOKeHne NepeKIIouaTeJIa fao3bl. TaKxe, NaDo hAcTPOINb yPoBeHb 3ByaHnra Ca6Bypepa (npn nOmoi BbxODHOro CnHana DeKOdepa nn Jx
peryIaTopa rpmKoCTn ca6Bypepa, no CNTyaun), HO cpeBa Heo6xOIMO npaBnblHo HAcTpOnTb pa3y.
Xyo3a ca6ByΦepom
YdaJIaTb Nblc KOpnyca ca6Bypepa MoXHo
npn NOMOUI cyXoro Kcyka TkaHn. PpN
NoIb3OBaHmN a3P03OJbHbIMN UCTAUMM
CpeCTBaMn IN CJIeDyET pacIbIaTb He
IpyMnKOM Ha KopNyc, a HA TkaHb. ChMnTE
peWetKy dJa TORO, YTO6bl He 3anaUkATb
TKaHb, ODAHko 6ydtE octopoXhbl n He
I NobpeiTe DInHaMnK. PeWetKy MoXHO
YHCTNTb MRAKO uETKOI.
He nCnoIb3yIte ca6ByepeB KaueCTBe cToIoka. PnB KJIIOUeHm Ca6Byepepa IpeMeTbI, JexkaIe HHa HEm, 6yDyT dpe6e3KaTb. B OcObeHNOCTn, N36eRaIte CTaBt bHa ca6ByepeBa3bl C ZBETAM, CTaKaHbI C HAnITKamN T.I., TaK KaN pOJNTaY XnIDKOCTb MoKeT Bbl3BaTb NOBpeXDeHn aannapata.
Ecnn cncTeMa dOnro He nCnOJIb3yETcA, ca6Bpyep Heo6xOaIMo OTKIIOHTb OT 3JekTpocetN.
NORSK
Advarsel:
Active closed-box subwoofer
Drive units
One 250mm (10 in) dia long throw
System frequency range
-6dB 20Hz - 50/150Hz adjustable (EQ at 'B')
System frequency response
±3dB 23Hz - 40/120Hz adjustable (EQ at 'B')
Amplifier
Power output 700W continuous (1kW short term)
Input impedance 15kΩ
Sensitivity 88dB spl at 1m for 100mV input
Volume control set to centre position)
Signal/Noise 90dB
Functions Input level
Phase 0/180
Low-pass filter bypass
Low-pass filter frequency
Bass roll-off alignment
Auto-sense on/standby
Inputs Line In (RCA Phono)
Outputs Line Out (RCA Phono, h-p filtered)
Low-Pass Filter Active 2nd-order, variable cut-off 50Hz - 150Hz
High-Pass Filter Active 2nd-order at 80Hz
Internal Volume
15 litres (0.5 cu ft)
Dimensions
Height: 315mm (12.4 in) not including feet
Width: 315mm (12.4 in)
Depth: 402mm (15.8 in) including controls
Net Weight
23.4kg (51.5 lb)

LISTEN AND YOU'LL SEE
THX is a registered trademark of Lucasfilm Ltd.
B&W Loudspeakers Ltd. reserves the right to amend details of the specification without notice in line with technical developments.
Copyright © B&W Loudspeakers Ltd. Printed in England.
Manufactured by B&W Loudspeakers Ltd, Meadow Road, Worthing, BN11 2RX
Tel: +44 (0) 1903 524801 Fax: +44 (0) 1903 524725 http://www.bwspeakers.com
Service/Distribution:
B&W (UK) Ltd, Marlborough Road, Lancing, West Sussex, BN15 8TR, England. Tel: 01903 750750 Fax: 01903 750694
B&W Loudspeakers of America, 54 Concord Street, North Reading, M.A. 01864-2699 United States of America
Tel: (978) 664-2870 Fax: (978) 664-4109
B&W Loudspeakers (Asia) Ltd, Flat U, 11F Camelpaint, Building Block 111, 60 Hoi Yuen Road, Kwun Tong, Kowloon, Hong Kong.
Tel: +(8522) 790 8903 Fax: +(8522) 341 2777

- ASW"2500 Owner's manual
- IMPORTANT SAFETY INSTRUCTIONS
- CAUTION
- RISK OF ELECTRIC SHOCK DO NOT OPEN
- Caution:
- Explanation of Graphical Symbols:
- WARNING:
- Introduction
- Unpacking
- A tour of the subwoofer
- Positioning the subwoofer
- Electrical connections
- Application: Home Theatre
- Application: 2-channel audio
- Using more than one subwoofer
- Double-check the connections
- Switching on and off
- Setting the controls
- Use with home theatre decoders
- Use for 2-channel audio
- Fine-tuning
- 2-channel audio
- Home theatre
- All applications
- Taking care of the subwoofer
- FRANÇAIS
- AVERTISSEMENTS:
- Introduktion
- Eappuoy:Home Theatre
- IcnoJIb3OBAHnE C DeKOepaMn DOMaUHnX KInHoteaTpOB
- IcnoJb3OBAHHe c DByXKaHaJIbHbIMN 3ByKOBOCnpOn3BOJaUIMM annapaatamn
- Tochna hactpoika
- Дыхканьн 3BYKOBOcnpOu3BODaA annapaTypa
- DomawHnKINHOteatp
- Bce cnoc06bl nCnoJb3OBaHnA
- Xyo3a ca6ByΦepom
- NORSK
- Advarsel:
- Drive units
- System frequency range
- System frequency response
- Amplifier
- Internal Volume
- Dimensions
- Net Weight
- LISTEN AND YOU'LL SEE
Brand : B&W
Model : B&W ASW2500
Category : Subwoofer