
ZE-MC192 - Multimedia car stereo ZENEC - Free user manual and instructions
Find the device manual for free ZE-MC192 ZENEC in PDF.
| Product type | 1-DIN multimedia car stereo with motorized 7" LCD screen (16:9) |
| Dimensions (W x H x D) | 178 x 50 x 178 mm |
| Power supply | 10.5-16 V DC, negative ground; 10 A fuse |
| Output power | 4 x 50 W max (4 x 35 W RMS) |
| Display | TFT 7" (diagonal); resolution 1440 x 234 (336,960 pixels); brightness 450 cd/m² |
| Viewing angles | Left/right >65°, up >45°, down >60° |
| Compatible formats (player) | DVD, DVD±R/RW, VCD, SVCD, CD, CD-R/RW, MP3, WMA, JPEG, MPEG4, DivX |
| DVD region code | 2 (Europe, Japan, South Africa, Middle East) |
| Audio decoders | Dolby Digital, Pro Logic II |
| Audio outputs | 5.1 preamp channels (front, rear, subwoofer, center) + 1 x 2 preamp channels |
| Video inputs/outputs | 2 video outputs (NTSC); 1 video input; 1 reverse camera input with auto switching |
| Radio tuner | FM (87.5-107.9 MHz) and AM (530-1710 kHz); RDS; 30 presets (18 FM + 12 AM) |
| Connectivity | Built-in iPod (direct control); SD card reader; Bluetooth (hands-free); Aux input (stereo) |
| Advanced functions | Dual zone (front/rear); motorized screen; infrared remote controls (3); anti-theft code; touch calibration |
| Compatible options | DVB-T (ZE-DVBT25); GPS (ZE-NA100/ZE-NA150) |
| Anti-theft protection | 4-digit security code (locks after 3 errors) |
| Audio settings | Equalizer (User, Jazz, Pop, Classic, Rock); Bass/Treble (±7); Loudness (4 levels); Fader/Balance |
| Maintenance and cleaning | Clean with a soft dry cloth; do not use solvents or abrasive products |
| Warranty | 2 years (parts and labor) |
Frequently Asked Questions - ZE-MC192 ZENEC
User questions about ZE-MC192 ZENEC
0 question about this device. Answer the ones you know or ask your own.
Ask a new question about this device
Download the instructions for your Multimedia car stereo in PDF format for free! Find your manual ZE-MC192 - ZENEC and take your electronic device back in hand. On this page are published all the documents necessary for the use of your device. ZE-MC192 by ZENEC.
USER MANUAL ZE-MC192 ZENEC
| Area A | Area B | Area F |
| Area C | Area D | |
| Area E |
Bereich A:
VERKEHRSDURCHSAGEN (TA)
VCD: (PBC off): Repeat Single (Track), Repeat off (Aus)
MP3: Repeat Single (Track), Repeat Folder (Ordner), Repeat off (Aus)
Power output: 35 Watts RMS x 4 channels into 4 Ohms @ < 10% THD+N
Signal to noise ratio: 70dBA below reference. (Reference: 1 Watt, 4 Ohms)
MAX power: 50 × 4 Watts into 4 Ohms, all channels driven
Frequency response: 20Hz to 20kHz, -3dB. Aux input used as source reference
Reference supply voltage: 14.4VDC
DVD/CD player
Compatible formats: DVD-R, DVD-RW, DVD+R, DVD+RW, CD-R, CD-RW, CD-DA, MP3, WMA, HDCD, SVCD, VCD, MPEG, JPEG, MP3/WMA files burned onto a DVD+R/W or DVD-R/W and CD-R/RW
Signal to noise ratio: 85dBA
Dynamic range: >95dB
Frequency response: 20Hz to 20kHz, -3dB
Channel separation: > 60dB @ 1kHz
D/A converter(s): 5-channel high performance 24-bit, 192kHz, multi-bit Delta Sigma modulation. DAC supports sample rates from 8~192kHz.
Electronic skip protection (ESP):
DVD: 2-3 sec, CD-DA: 10 sec, MP3: 100 sec, WMA: 200 sec
(ESP time is approximate)
Mechanical anti vibration ability: 10 200Hz , X/Y/Z direction: 1.0G
Video section
Format: NTSC, PAL (auto-detection)
Output: 1Vp-p (75-ohm), buffered
Input: 1Vp-p (75-ohm)
FM tuner section
Tuning range: 87.5MHz - 107.9MHz
Mono sensitivity (-30dB): 10dBu
Quieting sensitivity (-50dB): 15dBu
Alternate channel selectivity: 70dB
Signal to noise ratio @ 1kHz: 58dB
Image rejection: 60dB
Stereo separation @ 1kHz: 30dB
Frequency response: 30Hz - 15kHz, -3dB
AM tuner section
Tuning range: 530kHz - 1710kHz
Sensitivity (-20dB): 20dBu
Signal to noise ratio @ 1kHz: 50dB
Image rejection: 60dB
Frequency response: 50Hz - 2kHz -3dB
Monitor section
Screen size: 7'' (measured diagonally).
Screen type: TFT Liquid Crystal Display (LCD) active matrix
Response time: 30mSec rise time, 50mSec fall time
Resolution, DVD/Composite Video in: 336'960 sub pixels,
1440mm (W) x 234mm (H)
Viewing angle:
General
65 degrees left or right
45 degrees up
60 degrees down
Auxiliary input impedance: 10k
Power supply: 10.5 to 16V DC, negative ground
This unit is manufactured under license from Dolby Laboratories. "Dolby", "Pro Logic II", and the double - D symbol are trademarks of Dolby Laboratories.
CONTENTS
Thank you for your choosing our product. We hope you will find the instructions in this user manual clear and easy to follow. If you take a few minutes to look through it, you'll learn how to use all the features of your new ZE-MC192 for maximum enjoyment.
PREPARATION 72-73
FEATURES 72
TOOLS AND SUPPLIES 73
DISCONNECTING THE BATTERY 73
CONTROLS AND INDICATORS 74-77
FRONT PANEL 74-76
REMOTE CONTROL 78-83
FRONT ZONE REMOTE CONTROL 78-80
MULTI-ZONE REMOTE CONTROL 81-83
USING THE TFT MONITOR. 84-85
OPEN/CLOSE THE TFT MONITOR 84
TFT MONITOR AUTO OPEN 84
MONITOR TILT ANGLE ADJUSTMENT 84
REARCAMERAMODE 84
IMAGE SETTING 84
MOTOR MOVEMENT MECHANISM 85
BASIC OPERATIONS 86-88
POWER ON / OFF 86
PLAYING SOURCE SELECTION 86
VOLUME ADJUSTMENT 86
AUDIO CONTROL MENU 86
6-CHANNEL AUDIO CONTROL 87
ANTI-THEFT-CODE FUNCTION 88
REAR ZONE 88
SYSTEMRESET 88
MUTE. 88
SYSTEM SETUP MENU 89-96
MAIN MENU 89
SCREEN SETTING 90
GENERAL SETUP MENU 91-92
ASP(AUDIO SIGNAL PROCESSING) CONFIGURATION MENU 93-95
MULTI-ZONE OPERATION 96
RESET THE LOADING MECHANISM 100
ACCESSING DVD MODE 100
USING THE TOUCH-SCREEN CONTROLS 101
CONTROLLING PLAYBACK 101
ACCESSING THE DVD MENU 102
MOVING THROUGH CHAPTERS 102
FAST FORWARD/FAST REVERSE 103
SELECTING 2-CHANNEL OR 6-CHANNEL AUDIO PLAYBACK 103
GOTO SEARCH 104
DIRECT CHAPTER / TRACK SELECTION 104
VIEWING AN ALTERNATE PICTURE ANGLE (DVD ONLY) 104
ZOOMING 105
MULTI-LANGUAGE DISCS (DVD ONLY) 105
PLAYBACK INFORMATION 105-106
GENERAL DISC INFORMATION 106-107
DVD SETUP MENU. 108-114
ACCESSING THE DVD SETUP SCREEN 108
LANGUAGE MENU 109
AUDIO MENU 110
VIDEO MENU 111
SPEAKER MENU 112
SURROUND MENU. 113
RATING MENU 114
ACCESSING IPOD MODE 120
IPOD INSTRUCTIONS 120
PLAYBACK OF VIDEO ON IPOD 121
ANSWERING AN INCOMING CALL. 125
END A CALL 125
ACCESSING NAVIGATION 126
NOTE: 1. Certain description in the book may differ from the actual unit.
- Some pictures or icons in the book may differ from actual display.
PREPARATION
Please read all the instructions before beginning the installation. We recommend having your ZE-MC192 installed by a skilled dealer or a professional installer.
FEATURES
INTEGRATED DVD/CD/MP3/WMA-PLAYER
■Playback of CD, CD-R/RW, MP3, WMA, OGG, DVD, DVD-R/RW, DVD+R/RW, DVD-MP3, VCD, SVCD, DIVX5, MPEG4, JPEG and Picture CD
Region code 2
Integrated Dolby Digital and Pro Logic II decoder
Electronic (ESP) and mechanical anti-shock system
Last-playback-memory function
MOTORIZED LCD MONITOR
Fully motorized high-quality 7"16:9 LCD display with touchscreen-control
High brightness 450cd / m^2
High resolution 1440 x 234 (336'960 pixels)
Extended viewing angle left/right >65^ /up >45^ /down >60^
TUNER
FM/AM-tuner
Best stations memory (BSM)
30 preset stations (18 FM/12 AM)
Radio data system (RDS)
A/V-CONNECTIONS
2 x RCA video outputs (NTSC)
1 x RCA video input
1 x RCA video input for rear view camera with automatic switching function
■ Analog 5.1 RCA preamp line outputs (front, rear, subwoofer and center)
1 x 2-CH RCA preamp line outputs without volume adjustment
1 x RCA Aux-In (stereo)
ADDITIONAL FEATURES
Integrated iPod interface (iPod control)
Integrated SD-card reader
Theft protection (security code)
Integrated 4 × 50 watts digital amplifier
Dual zone function
White backlit key illumination
ISO connectors for power supply and speakers
3 x IR-remote controls
OPTIONAL ADD-ON POSSIBILITIES (TOUCHSCREEN COMPATIBLE)
DVB-T tuner ZE-DVBT25
Navigation system ZE-NA100
Portable navigation system ZE-NA150
TOOLS AND SUPPLIES
You will need the following tools and supplies to install the unit.
Torx type, flat-head and Philips screwdrivers
Wire cutters and strippers
Tools to remove the existing radio (screwdriver, socket wrench set or other tools)
Electrical tape
Crimping tool
Multimeter
Crimp connections
18 gauge wire for power connections
16-18 gauge wire for speaker connections
Heatshrink tubing
Soldering iron and solder
WARNING!
- Only connect the unit to a 12V negative ground system.
- Never install this unit where operation and viewing could interfere with safe driving conditions.
- To reduce the risk of a traffic accident (except when using for rear view video camera) never use the video display function while driving the vehicle. This is a violation of law.
- To reduce the risk of a traffic accident, never driving with the sound at a level that prevents you from hearing sounds outside around the vehicle.
- Never disassemble or adjust the unit without the assistance of a professional. For details, please consult your local car stereo specialty shop.
- To prevent injury from shock or fire, never expose this unit to moisture or water.
- Never use irregular discs.
- To prevent damage to the mechanism inside this unit and avoid impact to the TFT monitor.
- Do not change the fuse on the power wire without professional guidance. Using an improper fuse may cause damage to the unit and result in a fire.
- The monitor employs an automatic motorized mechanism. To prevent damages to the core mechanism, please do not push, pull or swivel the monitor manually.
DISCONNECTING THE BATTERY
To prevent a short circuit, be sure to turn off the ignition and remove the negative (-) battery cable prior to installation.
NOTE:
If the unit is to be installed in a car equipped with an on-board drive or navigation computer, do not disconnect the battery cable. If the cable is disconnected, the preset memory may be erased. Under these conditions, use extra caution during installation to avoid causing a short circuit.
NOTE:
It is especially important that you read the WARNINGS and NOTES in this manual.
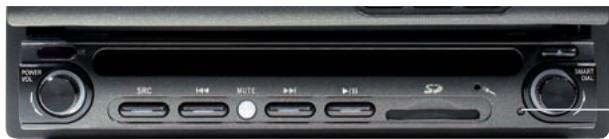
CONTROLS AND INDICATORS
FRONT PANEL

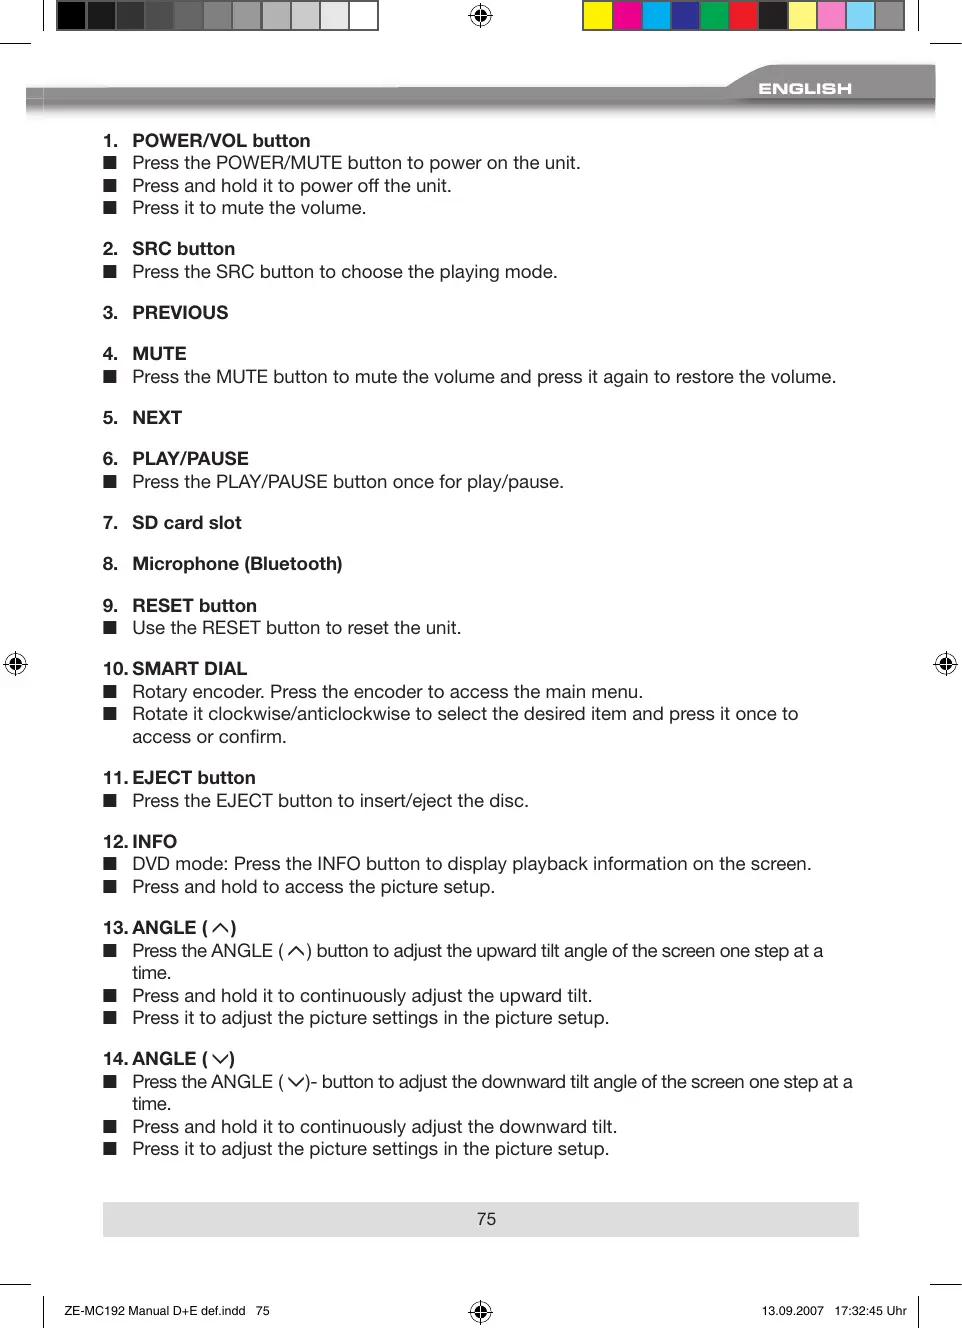
1. POWER/VOL button
Press the POWER/MUTE button to power on the unit.
Press and hold it to power off the unit.
Press it to mute the volume.
2. SRC button
Press the SRC button to choose the playing mode.
3. PREVIOUS
4. MUTE
Press the MUTE button to mute the volume and press it again to restore the volume.
5. NEXT
6. PLAY/PAUSE
Press the PLAY/PAUSE button once for play/pause.
7. SD card slot
8. Microphone (Bluetooth)
9. RESET button
Use the RESET button to reset the unit.
10. SMART DIAL
Rotary encoder. Press the encoder to access the main menu.
- Rotate it clockwise/anticlockwise to select the desired item and press it once to access or confirm.
11.EJECT button
Press the EJECT button to insert/eject the disc.
12. INFO
DVD mode: Press the INFO button to display playback information on the screen.
Press and hold to access the picture setup.
13. ANGLE (A)
Press the ANGLE ( ) button to adjust the upward tilt angle of the screen one step at a time.
Press and hold it to continuously adjust the upward tilt.
Press it to adjust the picture settings in the picture setup.
14. ANGLE (V)
Press the ANGLE ( )- button to adjust the downward tilt angle of the screen one step at a time.
Press and hold it to continuously adjust the downward tilt.
Press it to adjust the picture settings in the picture setup.
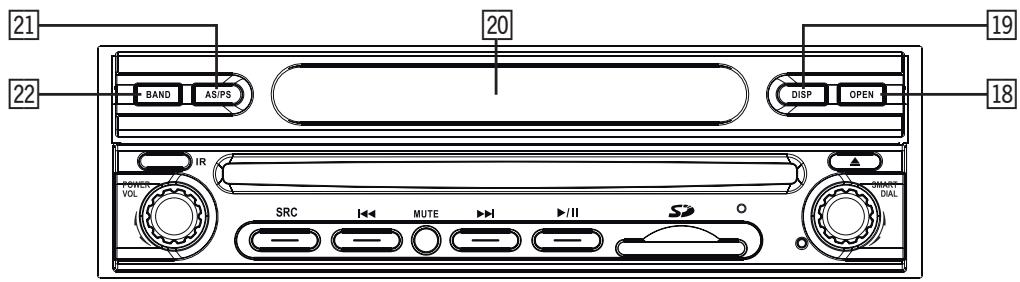
15.TFTdisplay
16. Disc slot
17. Remote control signal receiver
18. OPEN
Press the OPEN button to activate the automatic mechanical system and move the TFT monitor into the viewing position.
Press it again to close the TFT monitor.
19.DIS
Press the DISP button to display system information on the LCD screen.
20. LCD DISPLAY
- AS/PS (Auto store/program scan)
Press the AS/PS button to auto store strong radio stations in the 6 preset channels of the current band.
Press and hold it to start to scan radio station.
22. BAND
Press the FM/AM button to switch between FM and AM.
23. Disc indicator light
It is white when there is no disc in the slot, otherwise, it is red.
The touch key areas are outlined below, for DVD, VCD, playback mode and so on.
| Area A | Area B | Area F |
| Area C | Area D | |
| Area E |
Area A:
Return to MAIN MENU.
Area B:
Display playing information.
Area C:
Select the previous chapter.
Area D:
Select the next chapter.
Area E:
■ Display the on-screen controls, and different mode displays different menu.
Area F:
■ On DVD/VCD mode, display the GOTO search menu on the screen directly.
FRONT-ZONE REMOTE CONTROL
- POWER
Turn the power on/off. - OPEN
Open/close the TFT monitor. - MUTE
- Toggle on/off audio output.
- SRC
Select the playing mode. - NUMERIC BUTTONS
Directly access certain chapter/track/preset station for current band. - VOL UP
Increase the volume.
7. VOL DOWN
Decrease the volume.
8. INFORMATION
Display the playing information.
-
- / - -
Position search function on VCD/DVD mode.
10. STOP/BAND
Select the FM/AM band on the tuner mode.
- Stop the playback on others modes.
11.SEL
Enter the audio settings.
12. ESC
Exit the current menu.
13 MENU
Enter the main menu of the system.
14. PICTURE
Adjust the parameter of the TFT settings.
15. REPEAT A→B
Set start point A and end point B to repeat continually.
16. OK
Start or pause the playback and confirm settings.
17. DIRECTION BUTTONS
Up/down/left/right to select the items for setting.
18. TITLE
Enter the title menu of the current source.
19. ROOT
Enter the main menu of the disc.
Turn on PBC while playing VCD.
20. REPEAT
Repeat the playback of the current chapter.
21. NEXT
Select the next chapter/track for playback.
Search for available radio stations by increasing the tuning frequency.
22. PREVIOUS
Select the previous chapter/track for playback.
Search for available radio stations by decreasing the tuning frequency.
23. FAST REVERSE
Fast reverse the disc content.
24. FAST FORWARD
Fast forward the disc content.
25.AUDIO
Change the audio language for the disc playback.
26.ZOOM
Zooming IN/OUT on image.
27. ANGLE
■Playback in different angel for a scene (if it is applicable).
28. SUBTITLE
Language selection for the subtitle.
MULTI-ZONE REMOTE CONTROL
- R-SRC
Select the playing mode.
- NUMERIC BUTTONS
Directly access certain chapter/track/preset station in current band.
-
MUTE
-
Toggle on/off the audio output.
-
-/—
Position search function on VCD/DVD mode.
- TITLE
Enter the title menu of the current source.
- ROOT-Taste
Enter the main menu of the disc.
Turn on PBC while playing VCD.
7. OK
Start or pause the playback.
Confirm settings.
8. DIRECTION BUTTONS
Up/down/left/right to select the items for setting.
9. PREVIOUS
Select the previous chapter/track for playback.
Search for available radio stations by decreasing the tuning frequency.
10. NEXT
Select the next chapter/track for playback.
Search for available radio stations by increasing the tuning frequency.
11. STOP
- Stop the playback on other mode.
12. PLAY/PAUSE
Start/pause the playback.
13. ZOOM-Taste
Zooming in/out on an image.
14. FAST REVERSE
Fast reverse the disc content.
15. FAST FORWARD
Fast forward the disc content.
16. SLOWER PLAY
Slow forward the playback.
17. REPEAT
Repeat playback of the current chapter.
18.AUDIO
Change the audio language for the disc playback.
19. SUBTITLE
Language selection for the subtitles.
20. ANGLE
Play in different angel for a scene (if it is applicable).
21. REPEAT A→B
Set start point A and end point B to repeat continually.
SMART DIAL REMOTE CONTROL

1. VOL UP
Increase the volume.
2. VOL DOWN
Decrease the volume.
3. SMART DIAL
Press the encoder to access the system setup.
- Rotate it clockwise/anticlockwise to select the desired item and press it once to access or to confirm.
OPEN/CLOSE TFT MONITOR
Press the [▲] button on the front zone remote control or press the [OPEN] button on the front panel to open/close the monitor.
TFT MONITOR AUTO OPEN
If "TFT Auto Open" is "On", when the unit is turned on, the monitor automatically opens to the last viewing position.
If "TFT Auto Open" is "Off", when the unit is turned on, press the [▲] button on the remote control or press the [OPEN] button on the front panel to open the monitor into the desired viewing position.
If "TFT Auto Open" is "Manual", when the unit is turned on or turned off, the monitor has no movement.
See "General setting" for more instructions.
MONITOR TILT ANGLE ADJUSTMENT
The monitor angle can be adjusted for optimum viewing using by one of the following methods:
Press the [] [] buttons on the front panel to adjust the tilt angle of the screen one step at a time.
Press and hold the [][] buttons to continuously adjust the tilt angle.
Adjust the "Screen Tilt" in the "Screen setting" to adjust the tilt of the screen to the desired degree.
REAR CAMERA MODE
- When the vehicle is placed in "Reverse" and an optional rear camera is connected to the unit, the TFT monitor will automatically switch to the camera input source.
IMAGE SETTING
Video Output Format
The table below shows the video output format for each playing source.
| Playing source | Video output format |
| FM/AM Tuner | RGB mode |
| DVD | RGB mode |
| DVB-T | RGB mode |
| NAVI | RGB mode |
| AUX IN | CVBS mode |
| CAMERA | CVBS mode |
| iPOD (Video) | CVBS mode |
| SD Card | RGB mode |
*CVBS - Composite Video Baseband Signal
Adjustable Parameters
■ While in RGB mode, the only parameter which can be adjusted is brightness (BRIGHT).
To access "PICTURE", "COLOR", "CONTRAST" and "TINT" you have to be in CVBS mode.
Parameter Adjustment Procedure
1. Enter the picture quality setting mode:
Press the PIC button on the remote control.
2. Select the item to be set:
Press the [] [] buttons on the remote control.
3. Set the parameters:
Press the [←] [→] buttons on the remote control to adjust the selected feature to the desired setting.
NOTE:
There must be a video signal present on the AUX or CAMERA input to adjust the above settings.
- When the "PARKING" cable is connected to the brake switch, the display on the TFT monitor will display video only, when the vehicle is stopped and the parking brake is applied.
■ Parking brake function is overridden when the video source is set to CAMERA.
■ When the "parking brake inhibit" is active, the front monitor displays "Caution" with blue background, preventing the driver from watching video while driving to reduce the risk of a traffic accident. Rear video screens are not affected.
Please see the "INSTALLATION SECTION" for installation.
MONITOR MOVEMENT MECHANISM
If an obstruction occurs in the monitor path, the motion will stop automatically to prevent damage to the mechanism or the monitor.
■ Normal operation is resumed by pressing the [▲] button or disconnecting and reconnecting the power supply.
THE BASIC OPERATION
POWER ON/OFF
Press the [POWER/VOL] button on the front panel to turn the unit on. You can also turn on the unit by pressing the [POWER] button on the remote control.
Press and hold the [POWER /VOL] button on the front panel or press the [POWER] button on the remote control to power off the unit.
PLAYING SOURCE SELECTION
Press the [SRC] button on the front panel or the [SRC] button on the remote control to change the among available playing sources:
Tuner DVD A/V-In DVB-T SD-card iPod Camera (rear view video camera) Navi.
The playing mode is displayed on the TFT display.
AUX IN Mode
An external audio/video device can be connected to this unit via RCA cables to the "AUX-IN".
CAMERA Mode
The "CAMERA" mode is only available, if the camera is connected and when backing up. To install a rear view video camera, connect the CAMERA video input cable to the rear view camera output cable.
NOTE:
If you have not connected a device to the unit, the source can not be selected.
Example: If you have not connected an iPod to the unit, the iPod source will not be available.
VOLUME ADJUSTMENT
To increase or decrease the volume level, turn the rotary encoder on the front panel or press the [VOL + / VOL] -buttons on the remote control.
The volume ranges from "0" to "40".
Adjust the loudness and press and hold the [POWER /VOL] button to safe the adjusted loudness.
AUDIO CONTROL MENU
The audio control feature allows you to easily adjust your audio system to meet the acoustical characteristics of your vehicle, which vary depending on the type of vehicle and its measurements. To get the best possible sound quality from your new system, be sure to adjust the settings for the speakers as well. Proper setting of the fader and balance boosts the effects of the cabin equalizer.
Audio Adjustments
| Audio function | Adjustable range |
| EQ | User |
| Flat | |
| Jazz | |
| Pop | |
| Classical | |
| BASS | -7 to +7 |
| TREBLE | -7 to +7 |
| FADE | -9 to +9 |
| BAL | -9 to +9 |
| SUB | -7 to +7 |
| LOUD | Off, Level 1–4 |
NOTE:
The bass and treble levels are only adjustable when EQ is set to "User" mode.
- The loudness function compensates for deficiencies in sound ranges at low levels. Loudness levels range from 1-4 or "off". When the loudness function is on, "LOUD" is displayed on the screen.
Exiting the audio control menu
Touch the return arrow on the top right of the display.
Press the [ESC] button on the remote control to exit the audio control menu.
6-CHANNEL AUDIO CONTROL
| Item | Adjustable range |
| Master Volume | 0 to 40 |
| Front Left Channel Volume | -10 to +10 |
| Front Right Channel Volume | -10 to +10 |
| Rear Left Channel Volume | -10 to +10 |
| Rear Right Channel Volume | -10 to +10 |
| Center Channel Volume | -10 to +10 |
| Subwoofer Volume | -10 to +10 |
ANTI-THEFT-CODE FUNCTION
The anti-theft-code setup item exist in the second page of the general setup menu.
| Settings | Default | Options | Functions |
| Anti-theft-code | 0000 | ---- | You have to enter the password to turn anti-theft on or off. |
| Anti-theft | Off | On | System will require a password, if main battery power is remove for more than 40 seconds. |
| Off | No password is required, if main battery power is remove. |
REAR ZONE
If a monitor is installed in the rear zone and connected to the rear zone AV output, passengers on the back seat can control the unit by using the rear zone remote control.
See "Multi-Zone Remote Control" for instructions.
SYSTEMRESET
To correct a system halt or other unusual operation, use the tip of a pen to press the [RESET] button which is located on the front bottom-right corner of the unit. After a system reset, the unit restores the settings before the last power off.
RESET-Taste
MUTE
The volume will be muted when the following cases occur:
Automatic: Audio output mutes, when a telephone call is received by the car phone or when verbal navigation is performed.
■ When the "MUTE" wire is connected to a cell phone that will output a mute signal to the "MUTE" wire.
■ Manual: Press the [MUTE] button on the front panel or the [MUTE] button [d] on the remote control to mute the volume.
NOTE:
Press the [MUTE] button again to restore the volume.
Adjusting the volume or using any of the audio setup features will cancel the mute function.
SYSTEM MENU SETUP
MAIN MENU
There are two methods to access the MAIN menu.
Press the [MENU] button on the remote control.
Touch the A area on the touchscreen.
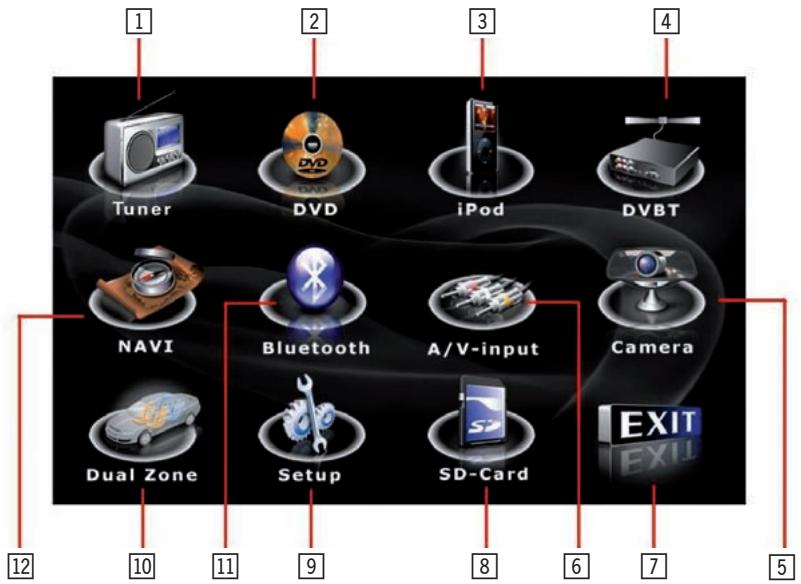
| 1 | Touch to access the Tuner mode. | |
| 2 | Touch to access the DVD mode. | |
| 3 | Touch to access the iPod mode. | |
| 4 | Touch to access the DVBT mode. | |
| 5 | Touch to access the Camera mode. | |
| 6 | Touch to access the AUX IN mode. | |
| 7 | Touch to turn to the previous menu. | |
| 8 | Touch to access the SD Card mode. | |
| 9 | Touch to access the General setup mode. | |
| 10 | Touch to access the Multizone mode. | |
| 11 | Touch to access the Bluetooth mode. | |
| 12 | Touch to access the Navigation mode. |

NOTE:
- Touch screen operations and buttons on the front panel are all useable to select the menu and to adjust "SETTING". The following instructions will show the different ways to access menus and adjustments.
SCREEN SETTING
Accessing the screen setup menu

Press the [SMART DIAL] button on the front panel or press the [MENU] button on the remote control to access the MAIN menu.
- Select the button on the bottom of the screen to access the screen setup.
Adjusting a Feature
| Setting | Options | Function |
| Brightness | 0 to 20 | Press the [▲] /[►] buttons to adjust the brightness. |
| Screen tilt | 1 to 6 | Touch the (1 to 6) number on the screen directly to adjust the tilt of the screen to the desired degree. |
| Screen saver | ON | No function. |
| OFF | ||
| TS calibrate | No | Touch “Yes” to enter the touch screen calibrate mode. |
| Yes | ||
| Version | Current software version. |
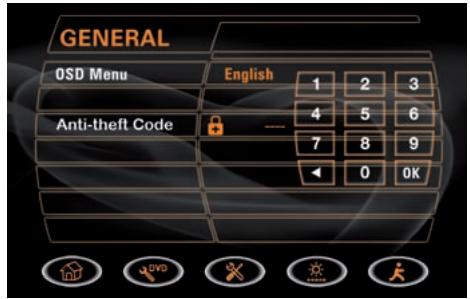
GENERAL SETUP MENU
Accessing the general setup menu
- Select the × button on the bottom of the screen to access the general setup.
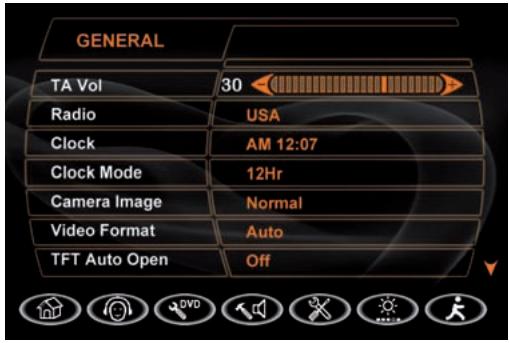

Selecting a feature for adjustment
Press the direction buttons on the remote control or touch the option directly on the screen to select the feature to be adjusted.
Adjusting a feature
- Enter the option field for the feature you want to adjust by pressing the [OK] button on the remote control or by pressing the [SMART DIAL] button. A submenu appears in a second row with the selected option.
- Select a new value by pressing the direction button.
- Confirm your selection by pressing the [OK] button or by pressing the [SMART DIAL] button. The new value setup is complete.
Adjusting the clock
- Access the "Clock" setting under the general setup menu.
- Press the direction button on the remote control to move the cursor to the "Hour" or "Min" position and press the [OK] button. You also can touch the "Hour" or "Min" position directly.
- The numeric keypad will pop up.
- Press the numeric button on the remote control or touch the numeric keypad on the screen to adjust the hours and minutes.
- Press the [OK] button on the remote control or on the keypad of the screen to confirm the adjustments.
Return to normal playback
The system will automatically return to the previous playback mode if no operation happened.
| Setting | Options | Function |
| TA Vol | 0 to 40 | TA loudness. |
| Radio | USA | Select the appropriate setting based on the country in which you reside. |
| S-America | ||
| Europe | ||
| Clock | (HH:MM) | See “Adjusting the clock” to learn how to set the clock. |
| Clock Mode | 12Hr | Clock displays 12 hour time using AM and PM. |
| 24Hr | Clock displays 24 hour time up to 23:59 | |
| Camera Image | Normal | The output of camera image is in normal mode. |
| Reverse | The output of camera image is in reverse mode. | |
| Video Format | Auto | The video output is switched automatically based on the current disc. |
| NTSC | The video output is in the standard NTSC format. | |
| PAL | The video output is in the standard PAL format. | |
| TFT Auto Open | On | The TFT panel automatically opens when the unit is turned on. |
| Off | You must press the OPEN button on the TFT panel or the按钮 on the remote control to open it. | |
| Manual | The TFT panel does not open or close when the unit is turned on or turned off. | |
| OSD Menu | English, | The menus are displayed in English, German, French, Spanish or Italian. |
| German | ||
| French | ||
| Spanish | ||
| Italian | ||
| Bluetooth | On | Select to activate/deactivate the Bluetooth function. |
| Off | ||
| Anti theft code | On | The moniceiver will require a password, if the main battery power (+12V) is remove for more than 40 seconds. |
| Off | No password is required, if the main battery power (+12V) is remove. |
ASP (AUDIO SIGNAL PROCESSING) SETUP MENU
The ASP configuration menu allows you to make some fine audio adjustments.
Accessing the ASP SETUP menu
Press the [MENU] button on the remote control to access the MAIN menu.
Select the button to access the ASP setup.
A menu appears with the option for the first item, and then you can touch the button to the option on the next page and press the button to return.
Selecting a feature for adjustment
Press the direction buttons on the remote control or touch the option directly on the screen to select a feature to be adjusted.
Adjusting a feature
- Enter the option field for the feature you want to adjust by pressing the [OK] button on the remote control or by pressing the [SMART DIAL] button. A submenu appears in a second row with the selected option.
- Select a new value by pressing the direction button.
- Confirm your selection by pressing the [OK] button on the remote control or by pressing the [SMART DIAL] button. The new setup is complete.
Return to normal playback
The system will automatically return the previous playback mode if no operation happens.
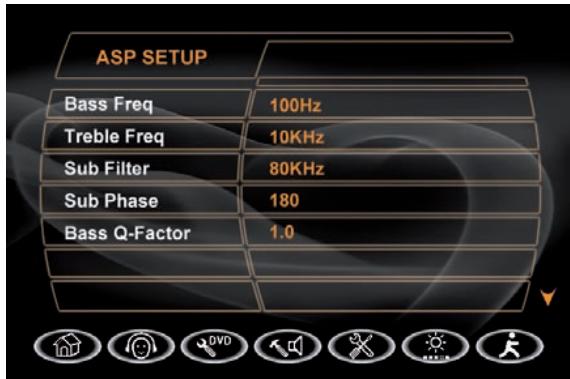
| Setting | Options | Function |
| Bass Freq | 60Hz | Depending on the audio source, select the bass center frequency to achieve the best bass effect. |
| 80Hz | ||
| 100Hz | ||
| 130Hz | ||
| 150Hz | ||
| 200Hz | ||
| Treble Freq | 10KHz | Depending on the audio source, select the treble center frequency to achieve the best treble effect. |
| 12.5KHz | ||
| 15KHz | ||
| 17KHz | ||
| Sub Filter | 80Hz | Selecting a crossover frequency sets a cut-off frequency of the subwoofer's LPF (low-pass filter) and the “SMALL” speakers’ HPF (high-pass filter). The crossover frequency setting has no effect if the subwoofer is set to “Off” and any other speaker is set to “Large”. |
| 120Hz | ||
| 160Hz | ||
| Sub Phase | 0° | Subwoofer output IN phase. |
| 180° | Subwoofer output OUT OF phase. | |
| ▲ NOTE: Depending on your installation, reversing the subwoofer phase may increase the bass output. | ||
| Bass Q-Factor | 1.0 | When the bass center frequency is selected, adjusting the bass Q-factor alters the sharpness of the bass output. |
| 1.25 | ||
| 1.5 | ||
| 2.0 | ||
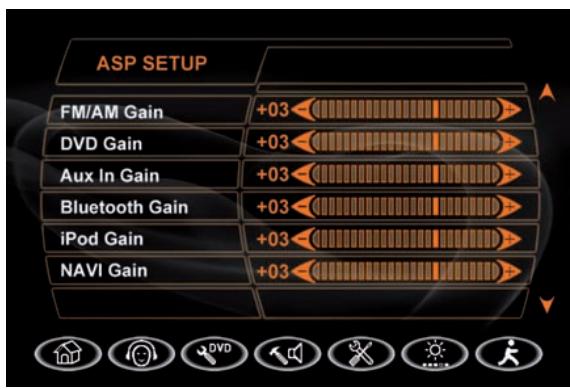
| FM/AM Gain | -7 bis +7 | Adjust the FM/AM gain. |
| DVD Gain | -7 bis +7 | Adjust the DVD gain. |
| AUX IN Gain | -7 bis +7 | Adjust the AUX IN gain. |
| Bluetooth Gain | -7 bis +7 | Adjust the Bluetooth gain. |
| iPod Gain | -7 bis +7 | Adjust the iPod gain. |
| NAVI Gain | -7 bis +7 | Adjust the NAVI gain. |
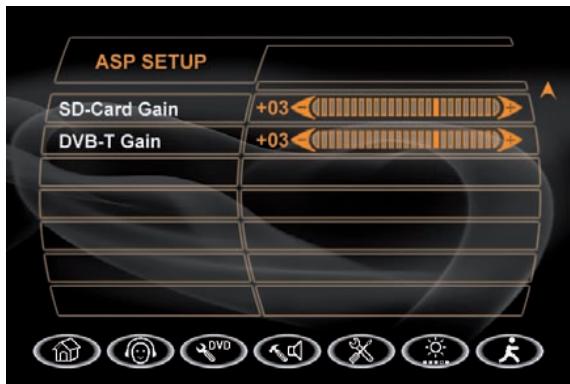
| SD Card Gain | -7 bis +7 | Adjust the SD Card gain. |
| DVB-T Gain | -7 bis +7 | Adjust the DVB-T gain. |
- Independent sources can be played simultaneously on the unit. For example, the FM/AM tuner can listen by the front passengers, while DVB-T is available for the rear passengers.
Accessing the rear-zone mode
- First you have to enter the general setup menu, then touch the icon to access the rear-zone menu.
- Use the multi-zone remote control to access the rear-zone and to select a source to play.
Exit the rear-zone mode
Press the Enter icon to deactivate the rear-zone mode.
- Current source information, touch this area to return to MAIN MENU.
- Current preset station playing back indicator.
- Stereo broadcasting indicator.
- Program name.
- Preset radio stations: Touch to recall preset stations or touch and hold to store a station, (total 6 stations a band you can store).
- Program type (PTY).
- Current time indicator.
- (1) Touch to change among the following bands: FM-1, FM-2, FM-3, AM-1, AM-2.
- Touch to automatically scan and store stations in current radio band. You can also press the AS/PS button on the unit.
- Touch to seek backward.
- Touch to seek forward.
- Touch to tune backward one step.
- Touch to tune forward one step.
- SCAN Touch to activate/deactivate SCAN function.
- PTV Program type indicator: Touch to activate/deactivate the PTY function.
- AF Touch to activate/deactivate the AF (Alternative Frequency) function.
- TA Touch to activate/deactivate the TA (Traffic Announcement) function.
-
REG Touch to activate/deactivate the region function.
-
MONO Touch to activate/deactivate the MONO function.
- Current radio band indicator.
- Radio frequency indicator.
- User defined equalizer mode.
- Loud setting indicator.
- Rear setting.
- Volume indicator.
NOTE:
This product features a tuner with RDS function. RDS (Radio Data System) is a system that transmits broadcast station information together with FM programs.
- You get display of program service name and PTY, tuning to stations broadcasting a desired PTY, automatic tuning to traffic information, and emergency broadcasts and radio text display.
RDS service was not available in AM broadcasting. RDS service availability depends on the FM broadcasting provider.
SWITCH TO RADIO TUNER SOURCE
Press the [SRC] button on the front panel or on the remote control to switch to the Tuner source.
You can also access the tuner mode from the MAIN menu directly.
SELECT FM/AM BAND
- Touch the x button on the screen, or press the BAND button [■/BAND] on the remote control to change among the following bands: FM-1, FM-2, FM-3, AM-1, AM-2.
AUTO TUNING
Press the [▶] button on the remote control or touch the▶按钮 on the screen to seek the next available channel by increasing the tuning frequency. Press the button again to stop searching.
Press the [ ] button on the remote control or touch the [ ] button on the screen to seek the next available channel by decreasing the tuning frequency. Press the button again to stop searching.
MANUAL TUNING
Touch the or button to increase or decrease the tuning frequency one step.
USING PRESET STATIONS
6 numbered preset buttons store and recall stations for each band. 6 stored stations (P01-P06) for the current band appear on the screen, touch the channel directly to select one of them.
You can touch the arrow buttons on the screen to select other stations.
Storing a Station
- Select a band (if needed), then select a station.
- Touch and hold an on-screen preset button (6) for three seconds. The preset number appears at the top of the screen.
Recalling a station
- Select a band (if needed).
- Touch an on-screen preset button (6) to select the corresponding stored station.
AUTO STORE (AS)
Press the [AS/PS] button on the front panel or press and hold the button on the screen to automatic scan and store strong radio stations in the 6 preset channels in the current band.
PROGRAM SCAN (PS)
- Press and hold the [AS/PS] button on the front panel or press the button on the screen. Scan the stations in the 6 preset channels in the current band.
- Touch the SCAN button on the screen to automatically scan all stations in current band to preview stations.
- Press any button to stop scanning and listen to the selected station.
SEEK THE PTY (Program Type)
- Touch PTY on the screen to enter the PTY menu, then touch to select one in the PTY menu, the unit will auto seek the next available PTY by increasing tuning frequency until the program type matches the PTY, if no matched was found, the tuner will return to original radio and "None" is displayed.
AF FUNCTION (Alternative Frequency/Auto Following)
Touch PTY on the screen to activate/deactivate the AF function. When AF is activated and a radio signal is too weak, the tuner automatically switches to the best alternative frequency.
NOTE:
During auto switching radio frequency, some interference could be heard. Turn off the AF function can cease this issue.
TA FUNCTION (Traffic Announcement)
Touch TA on the screen to activate/deactivate the AF function. When TA is activated, the unit will auto seek an available TP or TA station. After the seeking, no matter if PTY was found, the tuner will auto seek each 1 minutes.
- When TA is activated and a traffic announcement is received, the current playing source is overridden by the traffic announcement automatically, if the tuner was last set to the FM band but not if it was last set to the AM band. When traffic announcement is over, the current playing source will be resumed.
REGION
- When AF and Region are activated, auto tuning to those stations within the region assigned. When AF is activated and Region is deactivated, auto tuning to those station without any region boundary.
MONO
- When monophonic function is activated, the tuner automatically switches to mono mode. If monophonic function is deactivated, the tuner automatically switches to mono mode and stereo mode. It's depending from the signal strength of the selected radio station.
NOTE:
- When properly installed, DVD video cannot be displayed on the main TFT screen unless the parking brake is applied. If you attempt to play a DVD while the vehicle is moving, the TFT screen displays caution information with a blue background. Rear video screens, if applicable, will operate normally.
OPENING/CLOSING THE TFT VIDEO SCREEN
Opening the TFT screen
To open the TFT video screen, press the [OPEN] button on the front panel or press the [▲] button on the remote control.
Closing the TFT screen
Press the [OPEN] button on the front panel or press the [▲] button on the remote control again to close the TFT screen.
INSERT/EJECT DISC
Inserting a disc
When inserting a DVD disc, DVD mode is entered and the playback begins.
NOTE:
If Parental Lock (Rating) is activated and the disc inserted is not authorized, the 4-digit code must be entered and/or the disc must be authorized (see "RATING Parental Lock) Menu").
You cannot insert a disc if there is already a disc in the unit or if the power is off.
NOTE:
CD-R/RW, DVD-R/RW, DVD+R/RWs will not play unless the recording session is closed.
Ejecting a disc
Press the [▲] button on the front panel to eject the disc. The unit automatically reverts to the tuner mode.
RESET THE LOADING MECHANISM
If the disc loads abnormally or does not play properly, press and hold the [▲] button on the front panel to reset the loading mechanism. The disc is ejected and normal operation resumes.
ACCESSING DVD MODE
To switch to DVD mode when a disc is already inserted, press the [SRC] button on the front panel or on the remote control till DVD appears at the top of the screen.
USING THE TOUCH-SCREEN CONTROLS
- Touch to play/pause.
- Touch to stop playback.
- Touch to fast reverse.
- Touch to fast forward.
- Touch to repeat playback.
- A→B Touch to repeat from A to B. Select the repeat point A whenever you want to start and the point B whenever you want to end, then, the DVD will be played back from A to B continually.
- Touch to choose a language, if the disc is recorded in multiple languages.
- SUB.T Touch to display subtitles.
- Touch to return to the DVD main menu.
- Touch the stop button on the screen or press the [■/BAND] button on the remote control to stop DVD play and touch the play/pause button on the screen or the [OK] button on the remote control to resume the disc play.
Pausing playback
Touch the play/pause button on the screen to suspend or resume the disc play.
Repeat Playback
Press the repeat button on the screen or on the remote control to alter the repeat mode according to the following:
DVD: Repeat Title, Repeat Chapter, Repeat Off
VCD (PBC Off): Repeat Single, Repeat Off
MP3: Repeat Single, Repeat Folder, Repeat Off
NOTE:
For VCD play, the repeat function is not available if PBC is on.
PBCPlayback Control (VCD only)
■ For VCDs with playback functionality, playback control (PBC) provides additional controls for VCD playback.
Press the ROOT button on the remote control to toggle the PBC function "On"/"Off". Once PBC is on, playback starts from track one of the play list.
NOTE:
- When PBC is activated, fast forward, slow playback, and previous/next track are available. Repeat and direct track selection are not available. When PBC is activated, selecting random, scan, or search playback automatically deactivates PBC.
Sectional repeat function (A-B)
Use the A-B function to define a specific area of a disc to repeat.
Press the A-B button on the screen or on the remote control to set the start point (A) of the repeated section.
Press the A→B button again once you reach the desired end point (B) of the repeated section. The selected portion of the DVD will now repeat continuously.
Press the A-B button again to cancel the A-B section setting and stop repeat play.
ACCESSING THE DVD MENU
- You can touch the area F, and then touch the button to recall the main DVD menu.
- Use the arrow buttons on the remote control to select a title from the menu.
- Press the [TITLE] button on the remote control to select a different title for the playback.
- Press the [OK] button on the remote control or touch the item directly to confirm your selection and begin the playback.
MOVING THROUGH CHAPTERS
Press the [▶] button on the remote control to advance to the next chapter on the DVD.
Press the [←] button on the remote control to move to the previous chapter on the DVD.
- Touch the right side of the screen to advance to the next chapter, or touch the left side of the screen to move to the previous chapter.
FAST FORWARD/FAST REVERSE
Press the [▶] button on the remote control or touch the button of the area E on the screen to fast forward. Keep pressing or touching and releasing the button to increase the rate from "2X" to "4X", "8X", and "20X".
Press the [ ] button on the remote control or touch the button of the area E on the screen to fast reverse. Keep pressing or touching and releasing the button to increase the rate from "2X" to "4X", "8X", and "20X".
SELECTING 2-CHANNEL AND 6-CHANNEL AUDIO PLAYBACK
2-Channel audio (down mix) support for CD, SD Card and DVD
- Linear pulse code modulation (LPCM) and pulse code modulation (PCM) support is available for CD and DVD discs when 2-channel audio is selected.
5.1-Channel audio support for CD, SD Card and DVD
This is intended for down mixed sources.
NOTE:
■ 2-Channel audio support is available for AM / FM tuner and auxiliary input only.
| Speaker Setup | Front Speaker | Rear Speaker | Center Speaker | Sub-woofer |
| 2CH mode | * | * | * | |
| Play 2CH audio in 6CH mode with surround "off" | * | |||
| Play 2-channel (downmix) audio in 6-channel mode with surround "on" | * | * | * | * |
| Play 2-channel audio in 6-channel mode with surround "on" | * | * | * | * |
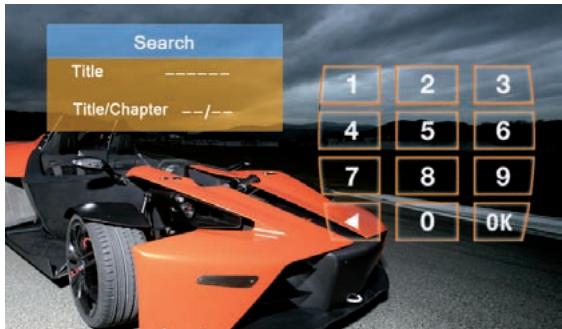
GOTO SEARCH
During DVD or VCD playback, perform the following steps to use the GOTO feature to access a specific location on a disc:
- Press the ["-/-"] button on remote control or touch the F Area on the screen to enter the "GOTO" mode.
- Press the [ ] / [ ] buttons on the remote control to select a category.
For DVD mode, you can choose time or title/ chapter search.
For VCD mode, press the [^- - - ] button to choose between track search and exit.
Search
Time
Title/Chapter

---/---
DVD Search
Time - Go to specific time in current title.
Title/Chapter - Go to specific chapter in a title.
VCD Track Search
Time - Go to specific time in the current track.
Track - Go to specific track.
Track Search
Time
Track

---/---
- Touch the ( / / - - - ) area on the screen to display a numeric keypad on the screen.
- Enter a time/track number into the field by using the numeric keypad on the remote control or on the screen.
- Press the [OK] button on the remote control or on the touch screen to go to the specified location on the disc.
- Press the [“-/-”] button on the remote control or touch the F area on the screen again to exit.
DIRECT CHAPTER/TRACK SELECTION
During DVD, VCD and CD playback, you can use the numeric keypad on the remote control to access a track directly.
VIEWING AN ALTERNATE PICTURE ANGLE (DVD ONLY)
- Some DVDs contain scenes that have been shot simultaneously from different angles. For discs recorded with multiple angles, press the [ANGLE] button on the remote control to toggle available angles of the on-screen image.
ZOOMING
Press the [ZOOM] button on the remote control to enlarge and pan through the video image using the following options: "Q1", "Q2", "Q3", and "OFF".
MULTI-LANGUAGE DISCS (DVD Only)
Changing audio language
If you are watching a disc recorded in multiple languages, press the [AUDIO] button on the remote control to choose a language. You also can touch area E, and then touch the button.
NOTE:
During VCD playback, press the [AUDIO] button on the remote control to choose between left channel, right channel, and stereo.
Changing subtitle language
If you are watching a disc recorded in multiple languages with subtitles, press the [SUBT] button on the remote control to choose the language in which the subtitles should appear. You also can touch area E, and then touch the SUBT button.
PLAYBACK INFORMATION
During DVD and VCD playback, press the [INFO] button on the remote control or touch area B to display playback information on the screen, including the media playing and current playback time.
DVD playback information
The following information is displayed at the top of the screen during the DVD playback:
- Indicates current playing source.
- Indicates the forth of 16 titles on the DVD is currently playing.
- Indicates the first of 20 chapter on the DVD is currently playing.
- Indicates the playback time of the current title.
- Indicates the EQ setting (or decoding mode when listening to a DVD with 5.1 surround sound.)
- Indicates the loud setting.
- Indicates the current system time.
- Indicates the current playback source of the rear zone.
VCD playback information
The following information is displayed at the top of the screen during the VCD playback:

- Indicates current playing source.
- Indicates the forth of 16 tracks on the DVD is currently playing.
- Indicates the playback time of the current title.
- Indicates EQ setting.
- Indicates the loud setting.
- Indicates the current system time.
- Indicates the current playback source of the rear zone.
GENERAL DISC INFORMATION
| Symbol | 12cm Disc Properties | Max Play Time |
| DVD VIDEO | Single side single layer (DVD-5) Single side double layer (DVD-9) Double side single layer (DVD-10) Double side double layer (DVD-18) | (MPEG 2 Method) 133 minutes 242 minutes 266 minutes 484 minutes |
| COMPACT DISC (DIGITALVIDEO) | Single side single layer (VCD) | (MPEG 1 Method) 74 minutes |
| COMPACT DISC (DIGITALAUDIO TEXT) | Single side single layer | 74 minutes |
Disc Symbols
| Symbol | Meaning |
| ⑧ | Number of audio languages recorded. The number inside the icon indicates the number of languages on the disc (maximum of 8). |
| 32 | Number of subtitle languages available on the disc (maximum is 32). |
| 9 | Number of angles provided (maximum is 9). |
| 16:9 LB | Aspect ratios available. “LB” stands for Letter Box and “PS” stands for Pan/Scan. In the example on the left, the 16:9 video can be converted to letter box video. |
| ALL | Indicates the region code where the disc can be played. ■ Region 1: USA, Canada, East Pacific Ocean Islands. ■ Region 2: Japan, Western Europe, Northern Europe, Egypt, South Africa, Middle East. ■ Region 3: Taiwan, Hong Kong, South Korea, Thailand, Indonesia, South-East Asia. ■ Region 4: Australia, New Zealand, Middle and South America, South Pacific Ocean Islands/Oceania. ■ Region 5: Russia, Mongolia, India, Middle Asia, Eastern Europe, North Korea, North Africa, North-West Asia. ■ Region 6: Mainland China. ■ ALL: All regions. |
In "DVD setup" mode, "LANGUAGE", "AUDIO", "VIDEO", "SPEAKER", "SURROUND", and "RATING" (parental lock) are available for setup. This operation can be performed by using the remote control or the touch screen.
ACCESSING THE DVD SETUP SCREEN
- Select the button on the bottom, then select the DVD button to access the DVD setup.
Accessing a menu
To access a menu (LANGUAGE, AUDIO, VIDEO, SPEAKER, SURROUND, RATING), press the direction buttons on the remote control to highlight the desired menu. You can also touch the on-screen menu selection to access the menu.
NOTE:
Once the DVD setup is complete, the settings are memorized. If you want to restore the factory default settings, please use the "Load Factory" in the RATING Menu (see rating menu).
Selecting a feature for adjustment
Once inside a menu, press the [] / [] buttons on the remote control or touch the item directly to select the feature to be adjusted.
Adjusting a feature
- Enter the option field for the feature you want to adjust by pressing the [OK] button on the remote control or by pressing the [SMART DIAL] button. A submenu appears in a second row with the selected option.
- Select a new value by pressing the [ ] / [] buttons on the remote control or rotate clockwise or anticlockwise the [SMART DIAL] button. The new setup is completed.
- Confirm your selection by pressing the [OK] button on the remote control or press the [SMART DIAL] button. The adjustment is now completed.
LANGUAGE MENU
If a DVD supports more than 1 subtitle or audio language, all the languages are available for selection during the playback. If the selected language is not supported by the DVD, the default language is used. During the playback, press the [SUBT] or [AUDIO] button on the remote control to change the language directly. This will not affect the DVD menu settings.
LANGUAGE Menu Features
| Setting | Options | Function |
| Subtitle | English German French Spanish Italian | Select the default language which you would like subtitles (if available) to be displayed. |
| Auto | ||
| Off | ||
| Audio | English German French Spanish Italian | Select the default language which you would like audio (if available) to be played. |
| DVD menu | English German French Spanish Italian | Select the default language in which you would like the DVD menu (if available) to be displayed. |
| External Subtitle | English | Select the default external language in which you would like to use this subtitle (if available) to be displayed. |
| Western Eur | ||
| Central Eur |

AUDIO Menu Features
| Setting | Options | Function |
| Pink noise | Off | Stop the output of pink noise. |
| Left | Left channel pink noise. | |
| Right | Right channel pink noise. | |
| DRC | Off | Employ the dynamic range control for better playback of lower volumes. |
| On | ||
| CENTER CONTROL | 4ms | Adjust the time difference between the center and front speakers to create a time delay between 1 and 5 milliseconds to producing a more accurate audio effect. |
| 3ms | ||
| 2ms | ||
| 1ms | ||
| 0ms | ||
| REAR CONTROL | 15ms | Adjust the time difference between the rear and front speakers to create a time delay between 3 and 15 milliseconds to producing a more accurate audio effect. |
| 12ms | ||
| 9ms | ||
| 6ms | ||
| 3ms | ||
| 0ms | ||
| Down Sampling | Off | Normal output. |
| On | Audio signal output at 48kHz. |
NOTE:
- When down sampling is on, the audio output signal will be converted to 48kHz . When down sampling is off, the original sampling frequency is preserved.
VIDEO MENU

VIDEO Menu Features
| Setting | Options | Function |
| TV Shape (Aspect Ratio) | 16:9 | Image is presented in wide view with a 16:9 aspect ratio. |
| Angle Mark | On | Angle indicator (if available) is shown. |
| Off | Angle indicator is not shown. | |
| View Mode | Fill | No function. |
| Original | ||
| H FIT | ||
| W FIT | ||
| Fit to Scan | ||
| Pan Scan |
NOTE:
■ For standard discs which are not formatted for "widescreen", use of the 16:9 aspect ratio will result in image distortion.

Speaker Menu Features
| Setting | Options | Function |
| Speaker Mode | Full 6CH | 6-channel mode. |
| Downmix | 2-channel mode. If you select this mode, the selections below will not be available. | |
| Front | Large | Use when the front speakers have a good bass output. |
| Small | Use when the front speakers do not have a good bass output. | |
| Surround | Large | Use when the rear speakers have a good bass output. |
| Small | Use when the rear speakers do not have a good bass output. | |
| None | Use when the rear speakers are not present. | |
| Subwoofer | Present | Use when the subwoofer is present. |
| None | Use when the subwoofer is not present. | |
| Center | Large | Use when the center speaker has a good bass output. |
| Small | Use when the center speaker does not have a good bass output. | |
| None | Use when the center speaker is not present. |
SPEAKER SELECTION
- Selecting "LARGE" for the multi-channel speaker option will give a full range output. Selecting "SMALL" for the multi channel speaker option will activate a high pass filter whose crossover is dependent upon the subwoofer low pass filter frequency. For example, if the subwoofer low pass filter is set to 80Hz , then the high pass small speaker crossover will be set to 90Hz .
SURROUND MENU
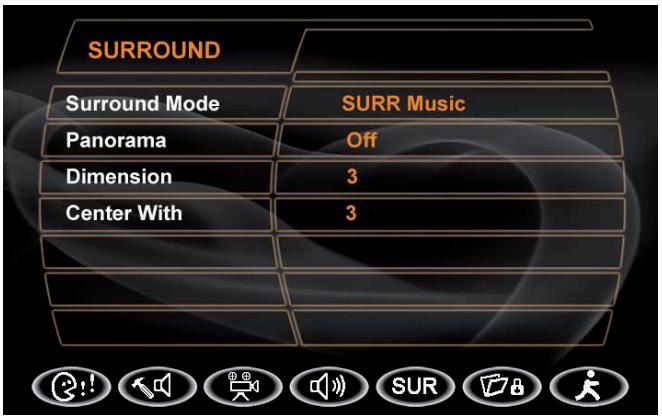
SUR Menu Features
| Setting | Options | Function |
| Surround Mode | Off | Play original audio format. |
| Surround 1 | ||
| SURR Matrix | Play mono output with surround effect. | |
| SURR Movie | Enhance movie surround effects. | |
| SURR Music | Play surround music effects. | |
| Panorama | On | Extend the sound from the front to the rear to achieve a better surround effect. |
| Off | Panorama is turned off. | |
| Dimension | 0 to 6 | Shift audio output between the front and rear speakers. |
| Center Width | 0 to 6 | Shift audio output between the front and center channel speakers. |
RATING (PARENTAL LOCK) MENU
The DVD system has a built-in parental lock feature to prevent unauthorized persons from viewing restricted disc contents. By default, the rating system is unlocked. Once setup, the parental lock is released only by entering the correct password. Once the password is entered, rating is available for setup.
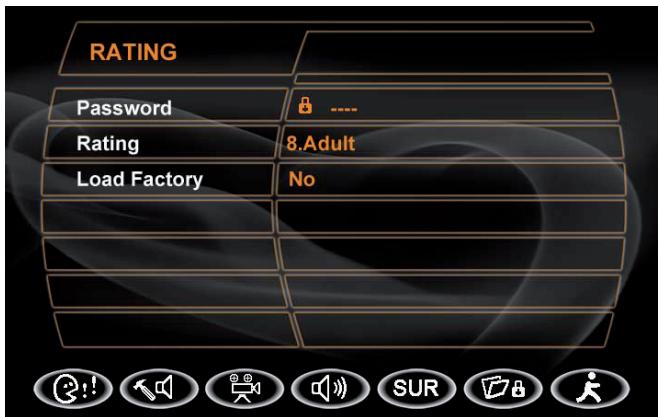
RATING Menu Features
| Setting | Options | Function |
| Password | ----- | Enter a 4-digit password to activate the “Rating” feature. |
| Rating | 1. Kid Safe | Select the appropriate rating level for the intended audience. You may override higher ratings by using your password. |
| 2. G | ||
| 3. PG | ||
| 4. PG-13 | ||
| 5. PG-R | ||
| 6. R | ||
| 7. NC-17 | ||
| 8. ADULT | ||
| Load Factory | No | Select “Yes” to restore the factory default settings for the DVD setup only (except the password and parental lock setting). |
| Yes |
- To reset the password, access the "RATING" menu and enter the current password. Once the correct password is entered, you can access the "Password" field and enter a new one.
NOTE:
- Record the password and keep it in a safe place for future reference. The rating for each disc is marked on the disc, disc packing, or documentation. If the rating is not available on the disc, the parental lock feature is unavailable. Some discs restrict only portions of the disc and the appropriate content will play. For details, please refer to the disc description.
- Instructions for insert/eject, play/pause, stopping playback, track selection, fast forward/ fast reverse, scan, and random play are the same for DVD, CD and MP3 operation. Please see the DVD player operation section for information about these topics.
The file naming formats listed below are compatible with this unit:
ISO 9660 - file name: 12 characters, file extension: 3 characters
ISO 9660 - file name: 31 characters, file extension: 3 characters
Joliet-64characters
If the file or folder name does not conform to ISO 9660 file system standards, it may not be displayed or played back correctly.

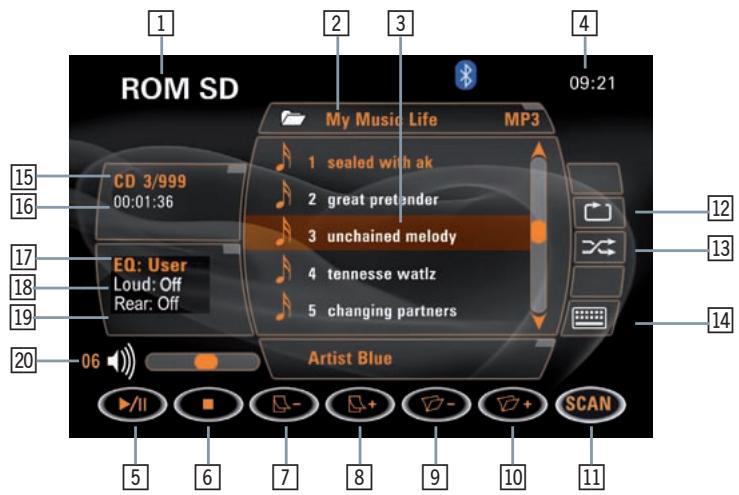
CD PLAYER USER INTERFACE
- Current source indicator, touch this area to access the MAIN menu.
- Disc title.
- Track title.
- Current time.
- /II Touch to play/pause.
- Touch to stop disc playback.
-
- Touch to turn to the previous page.
- + Touch to turn to the next page.
- Touch to fast backward current track
-
Touch to fast forward current track.
-
SCAN Touch to activate/deactivate the scan mode.
- Touch to activate/deactivate the repeat single mode.
- Touch to activate/deactivate the random mode.
- Current track and total number of tracks on disc.
- Elapsed playing time.
- Loud setting indicator.
- Rear setting.
- Volume indicator.
- Touch to display the numeric keypad on the screen, and then you can use the numeric keypad to access a track directly.
- System EQ setting.
Playing CD Files
After inserting a CD disc, files will play in the sequence of the directory. In playing back, you can press the numeric button on the remote control or touch a track on the screen directly to play.
Previous/Next page
Touch the - or + icon on the screen to navigate through the pages/files.
Fast backward/fast forward
Touch the or icon on the screen to fast backward or fast forward play.
MP3/WMA DISCS
This player allows you to playback MP3/WMA files recorded on CDROM, CD-R, CD-RW, DVD+R/RW and DVD-R/RW. For CD-RW discs, please make sure they are formatted using the full method and not the quick method to prevent improper disc operation. Use the following settings when compressing audio data for your MP3 disc:
Transfer Bit Rate: 320kbps
Sampling Frequency: 48kHz
When recording a MP3 up to the maximum disc capacity, disable additional writing. For recording on an empty disc up to maximum disc capacity, use the "Disc at once" setting.

The touch keys for MP3/WMA CD/DVD playback are described below.
- Current source indicator, touch this area to access MAIN menu.
- Disc title.
- Track title.
-
Current time.
-
/ Touch to play/pause the disc playback.
- Touch to stop the disc playback.
-
- Touch to turn to the previous page.
- + Touch to turn to the next page.
-
- Touch to navigate through the directories/folders.
- + Touch to navigate through the directories/folders.
- Touch to fast forward the current track.
- Touch to activate/deactivate the repeat single mode.
- Touch to activate/deactivate the random mode.
-
Touch to enter the numeric key pad.
-
Current track and total number of tracks on disc.
- Elapsed playing time.
- System EQ settings.
- Loud setting indicator.
- Rear setting.
- Volume indicator.
Playing MP3/WMA Files
After inserting a MP3/WMA disc, files will play in the sequence of the main directory. In playing back, you can press the numeric buttons on the remote control or touch the track directly to play.
Change Directory/Folder
Touch the - or ^+ icon on the screen to navigate through the directories/folders.
Previous/Next Page
Touch the - or ^+ icon on the screen to navigate through the pages/files.
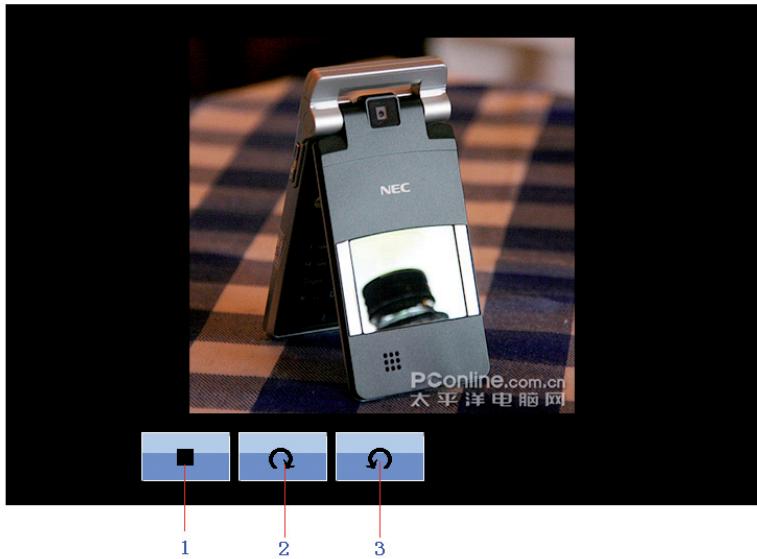
JPEG DISCS
- Stop playback and return to the picture list.
- Rotate picture clockwise 90^ .
- Rotate picture counterclockwise 90^ .
ACCESSING SD CARD MODE
Insert the SD card in the slot and press the [SRC] button on the front panel or on the remote control to switch to the SD card mode.
USING THE TOUCHSCREEN CONTROLS
The touch keys for SD card playback are described below. The interface is similar as the MP3 mode.
- Current source indicator, touch this area to access MAIN menu.
- Disc title.
- Track title.
- Current time.
- / II Touch to play/pause.
- Touch to stop disc playback.
-
- Touch to turn to the previous page.
- + Touch to turn to the next page.
-
- Touch to display previous folder.
- Touch to display next folder.
- SCAN Activate/deactivate the scan function.
- Touch to activate/deactivate repeat single mode.
- Touch to activate/deactivate random mode.
- Touch to display the numeric keypad on the screen to access a track directly.
- SD card indicator, display the current track and total number of tracks on SD card.
- Elapsed playing time.
- System EQ setting.
- Loud setting indicator.
- Rear setting.
- Volume indicator.
Accessing iPod mode
To switch to iPod mode, press the [SRC] button on the front panel or the [SRC] button on the remote control until the iPod symbol appears at the top of the screen.
The touch keys for iPod playback are described below:

- Current source indicator, touch this area to access the MAIN menu.
- Disc title.
- Track title.
- Current time.
- /II Touch to play/pause disc playback.
- Touch to stop disc playback.
-
- Touch to turn to the previous page.
- ^+ Touch to turn to the next page.
-
- Touch to navigate through the directories/folders.
- ^* Touch to navigate through the directories/folders.
- SCAN Activate/deactivate the scan function.
- Touch to wait for iPod video/photo.
- Touch to activate/deactivate the repeat single mode.
- Touch to activate/deactivate the random mode.
- Touch to access the root directory list.
- Touch to display a numeric keypad on the screen to access a track directly.
- Current track and total number of tracks on iPod.
- Current track and total number of tracks on disc.
-
Elapsed playing time.
-
System EQ setting.
- Loud setting indicator.
- Rear setting.
- Volume indicator.
MAIN MENU
Press the icon to enter the MAIN menu.

iPodVIDEOPLAYBACK
Press the icon to play back videos, which are stored on the iPod.
NOTE:
It is nessesary to activate the video output of the iPod.
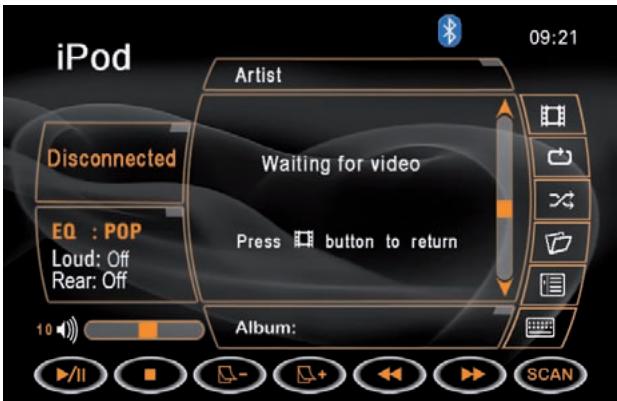
If there are videos on the iPod, you have to select them on iPod, otherwise there will be no picture on the display. However, you can return to the MAIN menu by pressing the icon again.
THE BLUETOOTH INTERFACE
BEFORE USING THE BLUETOOTH INTERFACE
Before using the Bluetooth interface, it's necessary to perform the following steps. For more operating details, refer to each section below.
- Select the "Bluetooth" option in the "GENERAL" setup and select "On" to activate the Bluetooth interface.
Pair your mobile phone to the unit (refer to the "Pairing" operation). It is necessary to pair your phone to the unit first. Without pairing, Bluetooth is not available.
THE BLUETOOTH INDICATOR
There is a Bluetooth indicator ( ) at the top of the screen.
When the Bluetooth function is "Off", the indicator is grey.
- When the Bluetooth function is "On" and no phone is connected to the unit, the indicator will blink.
If a phone has been connected to the unit, the indicator is on solid.
ACCESSING BLUETOOTH MODE
■ Access the MAIN menu first and touch the Bluetooth button on the screen to access the Bluetooth mode.
Touch the button at the top of the screen to access the Bluetooth mode directly.
BLUETOOTH USER INTERFACE
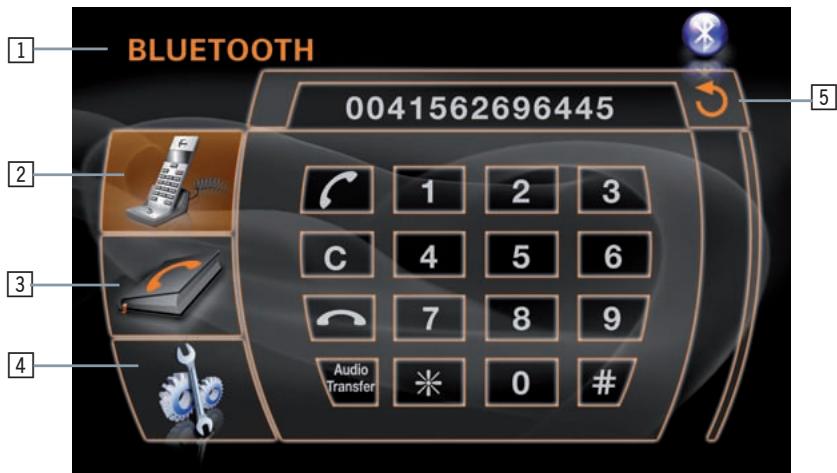
- Current source indicator, touch this area to access the MAIN menu.
- Touch to access the dial interface.
- Touch to access the phone book.
- Touch to access the Bluetooth setup.
- Touch to return to the previous menu.
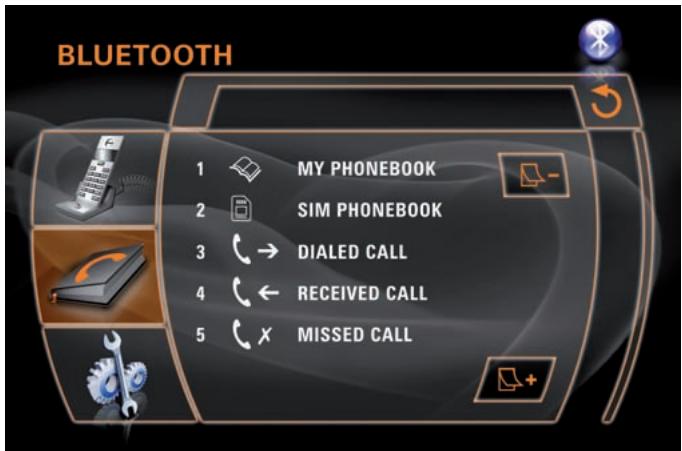
PHONE BOOK
Press the button to access the phone book.
- You can see the phone book list, SIM book list, dialed call list, received call list and missed call list.
If the number has been stored in the phone book, it can be accessed by touching or on the screen to navigate through the phone book entries.
Touch the number to initiate the phone call.
NOTE:
Not all Bluetooth enabled phones support this feature.
BLUETOOTH SETUP
- Select the button to access the Bluetooth setup.
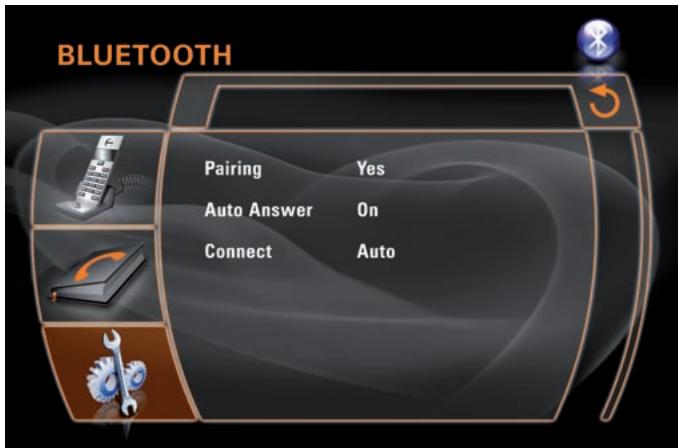
| Setting | Options | Function |
| Pairing | Yes | Press the “Yes” button to start to wait for pairing with one mobile phone. |
| Auto Answer | Off | Answer an incoming call manually. |
| On | The unit will automatically answer an incoming call (based on the cell phone Bluetooth functions). | |
| Connect | Manual | If this function is set to auto, connection between the last used phone and this unit will take place. |
| Auto |
PAIRING
■ Access the Bluetooth setup and press the “Yes” option on the screen, then “Wait pairing” displays on the screen. Now you can pair a phone with the unit.
This unit can pair with 4 mobile phones in all, but just one can be active at a time.
The default phone will be retained only if all other paired phones are deleted.
Default phone: The phone that was first paired with the unit.
When maximum pairing has been completed, that is, four mobile phones have been connected with the unit, and you want to still pair a new one, then the system will retain the default phone and last used phone used. The phone least used (except the default phone) will be deleted and the new paired phone will become the last used phone.
Last used phone: The phone connected with the unit that was used last.
If you want pair your phone with the unit, the password 1234 is used to complete the pairing. When asked, enter this password in the phone which you are pairing with this unit.
AUTO CONNECT
If the unit has been set to auto connect, it will attempt to connect to the last used phone first.
If auto connect is not activated, the unit will return to the previous operating mode.
■ When the phone connects to the unit successfully, all of the cell phone's Bluetooth enabled options will be active.
MAKING A PHONE CALL
There are four ways to make a phone call from this unit:
- Make use of the number dial on the screen to make a call.
- You can enter the phone number using the numeric keypad and press the OK button on the remote control to make a call (only in the Bluetooth mode).
- You can open the phone book and select one entry to make a call directly. Your cell phone must support this option.
- If your phone supports voice dial, access this mode on your phone instead of using the phone book.
ANSWERING AN INCOMING CALL
- You can answer an incoming call even if the playing source is other than the telephone is selected.
- You can answer an incoming call automatically or manually. Refer to Bluetooth setup and the controls and indicators title for exact instructions.
When a call comes in, the following interface will be displayed on the screen:
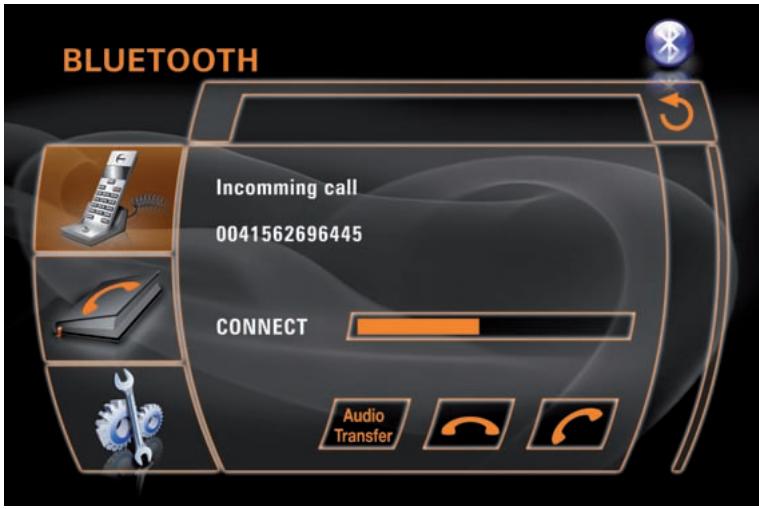
END A CALL
Touch the icon to end a call.
BLUETOOTH MOBILE PHONE COMPATIBILITY
The compatibility list gives an example of Bluetooth mobile phones on the market. If your Bluetooth phone is not listed, try it out in practice or contact your dealer for more information.
ACCESSING NAVIGATION
- Access the MAIN menu and select the NAVI icon on the screen to enter the navigation operation interface.
- Press the [SRC] button on the front panel or on the remote control to switch to navigation.
Please read the navigation software user manual.
Listening to an audio program while using/viewing the navigation
You can listen to an other playing mode while using the navigation mode.
- Select a playing mode.
- Touch the NAVI icon to select the navigation mode. The map will be shown on screen and audio will continue to play while you are in the navigation mode.
- Navigation voice prompts will mute the audio source, give the instruction and return to the audio source.
DVB-T OPERATION
Accessing DVB-T Mode
- Press the [SRC] button on the front panel or the [SRC] button on the remote control until DVB-T appears at the top of the screen.
- Access the MAIN menu and select the DVB-T icon on the touchscreen to enter the DVB-T operation interface.
DVB-T Operation
Please read the DVB-T user manual.
GENERAL
| Problem | Cause | Corrective action |
| Unit will not power on. | 1. Radio fuse blown. | 1. Install new fuse with correct rating. |
| 2. Car battery fuse blown. | 2. Install new fuse with correct rating. | |
| 3. Illegal operation. | 3. Press the [RESET] button located in the bottom right corner of the front panel. | |
| Remote control does not function. | 1. Battery depleted. | 1. Replace battery with new one. |
| 2. Battery installed incorrectly. | 2. Remove battery and install correctly. | |
| No/low audio output. | 1. Improper audio output connection. | 1. Check wiring and correct. |
| 2. Volume set too low. | 2. Increase volume level. | |
| 3. Improper “MUTE” connection. | 3. Review wiring diagram and check “MUTE” connection. | |
| 4. Speakers damaged. | 4. Replace speakers. | |
| 5. Heavily biased balance setting. | 5. Adjust the channel balance to the center position. | |
| 6. Speaker wiring is in contact with metal part of car. | 6. Insulate all speaker wiring connections. | |
| Poor sound quality or distortion. | 1. Pirated disc is in use. | 1. Use original copy. |
| 2. Speaker power rating not compatible with unit. | 2. Connect proper speakers. | |
| 3. Speaker is shorted. | 3. Check speaker contact. | |
| Tel-Mute malfunction. | 1. “MUTE” wire is grounded. | 1. Check that “MUTE” connection is not grounded and that it's properly insulated. |
| Unit resets itself when engine is off. | 1. Incorrect connection between ACC and positive battery wire. | 1. Check wiring and correct. |
TFT MONITOR
| Problem | Cause | Corrective action |
| Monitor does not open automatically. | 1. TFT Auto Open is turned off. | 1. Turn TFT Auto Open on. |
| No image. | 1. Incorrect connection to parking brake wire. | 1. Check wiring and correct. |
| 2. PRK SW is activated and parking brake is not engaged. | 2. Stop vehicle in safe place and apply parking brake. | |
| Flashing image or interference appears on screen. | 1. DVD is not compatible with current TV system settings. | 1. Change setup to accommodate disc. |
| 2. Improper video signal connections. | 2. Check wiring and correct. | |
| Prolonged image or improper height/width ratio display. | 1. Improper aspect ratio setup. | 1. Use correct aspect ratio setting. |
| Monitor stops at incorrect position. | 1. Moving path is blocked. | 1. Press OPEN key to restart monitor movement. |
| The Touchscreen doesn't work correct. | 1. The unit was disconnected or upgraded with a new software update. | 1. It's necessary to calibrate the touchscreen. |
TUNER
| Problem | Cause | Corrective action |
| Weak station searching. | 1. Auto antenna is not fully extended. | 1. Connect the auto antenna control cable properly. |
| 2. Auto antenna not properly connected. | 2. Connect the auto antenna control cable properly. | |
| 3. LOCAL function is activated. | 3. Turn LOCAL function off. |
CD/DVD
| Problem | Cause | Corrective action |
| Cannot insert disc. | 1. Disc already inside unit. | 1. Eject current disc and insert new one. |
| Disc does not play back. | 1. Disc is warped or scratched. | 1. Use disc in good condition. |
| 2. Disc is dirty or wet. | 2. Clean disc with soft cloth. | |
| 3. Incompatible disc is used. | 3. Use compatible disc. | |
| 4. Disc rating exceeds Parental Lock rating limit. | 4. Change Parental Lock settings to lower restriction. | |
| 5. Disc region code is not compatible with unit. | 5. Use disc with proper region cod. | |
| 6. Disc is inserted upside down. | 6. Insert disc with label side up. | |
| Image blurred, distorted, or dark. | 1. Disc is illegally copied. | 1. Use original disc. |
| PBC cannot be used during VCD playback. | 1. PCB is not available on the disc. | |
| No repeat or searching while playing VCD. | 1. PCB is on. | 1. Turn PCB off. |
MP3
| Problem | Cause | Corrective action |
| Interruption occurred during playback. | 1. Disc is dirty or scratched. | 1. Clean disc or replace. |
| 2. File is damaged/bad recording. | 2. Recreate disc with good files. | |
| Incorrect playback message displayed. | 1. Message is longer than LCD can display. |
ERROR MESSAGES
| Message displayed | Cause | Corrective action |
| Loading | 1. Disc is being read. | |
| No Disc | 1. Disc is dirty. | 1. Clean disc with soft cloth. |
| 2. Disc is upside down. | 2. Insert disc with label side up. | |
| 3. Disc not present in loading compartment. | 3. Insert disc. | |
| Bad Disc | 1. Disc is dirty. | 1. Clean disc with soft cloth. |
| 2. Disc is upside down. | 2. Insert disc with label side up. | |
| Unknown Disc | 1. Disc format is not compatible with this unit. | |
| Region Error | 1. DVD is not compatible with the region code of unit. | |
| Error | 1. Illegal mechanism operation. | 1. Press the “EJECT” button for 5 seconds to reset loading mechanism. |
CARE AND MAINTENANCE
- Use only a clean silicone cloth and neutral detergent to clean the front panel or monitor. A rough cloth and non neutral detergent (such as alcohol) may result in scratching or discoloration.
- Do not get water or cleaning fluids on the unit.
- If the temperature inside the player gets too hot, a protective circuit automatically stops the playback of the disc. If this occurs, allow the unit to cool before operating the player again.
- Never insert anything other than a 5'' (12 cm) compact disc into the player as the mechanism can be damaged by foreign objects.
- Do not attempt to use a 3'' (8 cm) CD-single disc in this unit, either with or without an adaptor, as damage to the player and/or disc may occur. Such damage is not covered by the warranty on this product.
- The CD player may not operate properly in extreme hot or cold temperature. If such conditions occur, allow the interior of the vehicle to reach a normal temperature before using the player.
- When the vehicle warms up during cold weather or under damp conditions, condensation may appear on the LCD panel. Should this occur, the screen will not operate properly until the moisture has evaporated.
- We suggest to use a cleaning disc in this unit more frequently than in the unit in your home due to the environmental conditions of the vehicle.
SPECIFICATIONS
CEA power ratings
Main amplifier
Power Output: 35 watts RMS X 4 channels into 4-ohms @ < 10% THD+N
Signal to Noise Ratio: 70dBA below reference. (Reference: 1 watt, 4-ohms)
MAX Power: 50 X 4 watts into 4-ohms, all channels driven
Frequency Response: 20Hz to 20kHz, -3dB. Aux input used as source reference
Reference Supply Voltage: 14.4VDC
DVD/CD player
Compatible formats: DVD-R, DVD-RW, DVD+R, DVD+RW,
CD-R, CD-RW, CD-DA, MP3, WMA, HDCD, SVCD, VCD,
MPEG, JPEG, MP3/WMA files burned onto a DVD+R/W or
DVD-R/W and CD-R/RW
Signal to Noise Ratio: 85dB A
Dynamic Range: >95dB
Frequency Response: 20Hz to 20kHz, -3dB
Channel Separation: > 60dB @ 1kHz
D/A Converter(s): 6-channel high performance 24-bit, 192kHz, multi-bit Sigma Delta modulation. DAC supports sample rates from 8~192kHz.
Electronic Skip Protection (ESP):
DVD: 2-3 sec, CD-DA: 10 sec, MP3: 100 sec, WMA: 200 sec
(ESP time is approximate)
Mechanical anti vibration ability: 10 200Hz X/Y/Z direction: 1.0G
Video section
Format: NTSC, PAL (auto-detection)
Output: 1Vp-p (75-ohm), buffered
Input: 1Vp-p (75-ohm)
FM tuner section
Tuning Range: 87.5MHz - 107.9MHz
Mono Sensitivity (-30dB): 10dBu
Quieting Sensitivity (-50dB): 15dBu
Alternate Channel Selectivity: 70dB
Signal to Noise Ratio @ 1kHz: 58dB
Image Rejection: 60dB
Stereo Separation @ 1kHz: 30dB
Frequency Response: 30Hz - 15kHz, -3dB
AM tuner section
Tuning Range: 530kHz - 1710kHz
Sensitivity (-20dB): 20dBu
Signal to Noise Ratio @ 1kHz: 50dB
Image Rejection: 60dB
Frequency Response: 50Hz - 2kHz , -3dB
Monitor section
Screen Size: 7" (Measured diagonally).
Screen Type: TFT Liquid Crystal Display (LCD) active matrix
Response Time: 30mSec rise time, 50mSec fall time
Resolution, DVD/Composite Video in: 336,960 sub pixels,
1440 (W) X 234 (H)
Viewing angle:
- 65 degrees left or right
45 degrees up - 60 degrees down
General
Auxiliary Input impedance: 10k
Power Supply: 10.5 to 16V DC, negative ground
■ Specification and design of this model is necessarily subject to changes without notice.

If at any time in the future you should need to dispose this product please note that waste electrical products should not be disposed of with household waste. Please recycle where facilities exist. Check with your Local Authority or retailer for recycling advice. (Waste Electrical and Electronic Equipment Directive)
This unit is manufactured under license from Dolby Laboratories. "Dolby", "Pro Logic II", and the double - D symbol are trademarks of Dolby Laboratories.
2 YEARS LIMITED WARRANTY
Dear customer
Thank you for purchasing this ZENEC product. It is advisable to keep the original packing material for any future transporting of the product.
Should your ZENEC product require warranty service, please return it to the retailer from whom it was purchased or the distributor in your country.
This ZENEC product is warranted against defective materials or workmanship for a period of TWO years from date of purchase at retail.
WARRANTY LIMITATIONS
This warranty does not cover any damage due to:
- Improper installation, incorrect audio or mains connection(s).
- Exposure to excessive humidity, fluids, heat sun rays or excessive dirt or dust.
- Accidents or abuse, unauthorized repair attempts and modifications not explicitly authorized by the manufacturer.
This warranty is limited to the repair or the replacement of the defective product at the manufacturer's option and does not include any other form of damage, whether incidental, consequential or otherwise. The warranty does not cover any transport costs or damages caused by transport or shipment of the product. Warranty work will not be carried out unless this warranty certificate is presented fully completed with model, serial number, purchaser's address, purchasing date and dealer stamp together with the original sales slip!
2 JAHRE GARANTIE
Serial number:
Date of purchase:
Your name:
Your address:
City:
State: ZIP or postal code
Country:
Dealer's address & stamp

ZENEC


- Bereich A:
- VERKEHRSDURCHSAGEN (TA)
- DVD/CD player
- Video section
- FM tuner section
- AM tuner section
- Monitor section
- Viewing angle:
- General
- CONTENTS
- PREPARATION 72-73
- CONTROLS AND INDICATORS 74-77
- REMOTE CONTROL 78-83
- USING THE TFT MONITOR. 84-85
- BASIC OPERATIONS 86-88
- SYSTEM SETUP MENU 89-96
- PREPARATION
- FEATURES
- INTEGRATED DVD/CD/MP3/WMA-PLAYER
- MOTORIZED LCD MONITOR
- TUNER
- A/V-CONNECTIONS
- ADDITIONAL FEATURES
- OPTIONAL ADD-ON POSSIBILITIES (TOUCHSCREEN COMPATIBLE)
- TOOLS AND SUPPLIES
- WARNING!
- DISCONNECTING THE BATTERY
- NOTE:
- CONTROLS AND INDICATORS
- FRONT PANEL
- POWER/VOL button
- SRC button
- PREVIOUS
- MUTE
- NEXT
- PLAY/PAUSE
- SD card slot
- Microphone (Bluetooth)
- RESET button
- SMART DIAL
- 11.EJECT button
- INFO
- ANGLE (A)
- ANGLE (V)
- 15.TFTdisplay
- Disc slot
- Remote control signal receiver
- OPEN
- 19.DIS
- LCD DISPLAY
- BAND
- Area A:
- Area B:
- Area C:
- Area D:
- Area E:
- Area F:
- FRONT-ZONE REMOTE CONTROL
- VOL DOWN
- INFORMATION
- STOP/BAND
- 11.SEL
- ESC
- MENU
- PICTURE
- REPEAT A→B
- OK
- DIRECTION BUTTONS
- TITLE
- ROOT
- REPEAT
- NEXT
- PREVIOUS
- FAST REVERSE
- FAST FORWARD
- 25.AUDIO
- 26.ZOOM
- ANGLE
- SUBTITLE
- MULTI-ZONE REMOTE CONTROL
- DIRECTION BUTTONS
- PREVIOUS
- NEXT
- STOP
- PLAY/PAUSE
- ZOOM-Taste
- FAST REVERSE
- FAST FORWARD
- SLOWER PLAY
- REPEAT
- 18.AUDIO
- SUBTITLE
- ANGLE
- REPEAT A→B
- SMART DIAL REMOTE CONTROL
- VOL UP
- VOL DOWN
- SMART DIAL
- OPEN/CLOSE TFT MONITOR
- TFT MONITOR AUTO OPEN
- MONITOR TILT ANGLE ADJUSTMENT
- REAR CAMERA MODE
- IMAGE SETTING
- Video Output Format
- Adjustable Parameters
- Parameter Adjustment Procedure
- Enter the picture quality setting mode:
- Select the item to be set:
- Set the parameters:
- MONITOR MOVEMENT MECHANISM
- THE BASIC OPERATION
- POWER ON/OFF
- PLAYING SOURCE SELECTION
- AUX IN Mode
- CAMERA Mode
- VOLUME ADJUSTMENT
- AUDIO CONTROL MENU
- Exiting the audio control menu
- ANTI-THEFT-CODE FUNCTION
- REAR ZONE
- SYSTEMRESET
- MUTE
- SYSTEM MENU SETUP
- MAIN MENU
- SCREEN SETTING
- Accessing the screen setup menu
- GENERAL SETUP MENU
- Accessing the general setup menu
- Selecting a feature for adjustment
- Adjusting a feature
- Adjusting the clock
- Return to normal playback
- ASP (AUDIO SIGNAL PROCESSING) SETUP MENU
- Accessing the ASP SETUP menu
- Accessing the rear-zone mode
- Exit the rear-zone mode
- SWITCH TO RADIO TUNER SOURCE
- SELECT FM/AM BAND
- AUTO TUNING
- MANUAL TUNING
- USING PRESET STATIONS
- Storing a Station
- Recalling a station
- AUTO STORE (AS)
- PROGRAM SCAN (PS)
- SEEK THE PTY (Program Type)
- AF FUNCTION (Alternative Frequency/Auto Following)
- TA FUNCTION (Traffic Announcement)
- REGION
- MONO
- OPENING/CLOSING THE TFT VIDEO SCREEN
- Opening the TFT screen
- Closing the TFT screen
- INSERT/EJECT DISC
- Inserting a disc
- Ejecting a disc
- RESET THE LOADING MECHANISM
- ACCESSING DVD MODE
- USING THE TOUCH-SCREEN CONTROLS
- Pausing playback
- Repeat Playback
- PBCPlayback Control (VCD only)
- Sectional repeat function (A-B)
- ACCESSING THE DVD MENU
- MOVING THROUGH CHAPTERS
- FAST FORWARD/FAST REVERSE
- SELECTING 2-CHANNEL AND 6-CHANNEL AUDIO PLAYBACK
- 2-Channel audio (down mix) support for CD, SD Card and DVD
- 5.1-Channel audio support for CD, SD Card and DVD
- GOTO SEARCH
- DVD Search
- VCD Track Search
- DIRECT CHAPTER/TRACK SELECTION
- VIEWING AN ALTERNATE PICTURE ANGLE (DVD ONLY)
- ZOOMING
- MULTI-LANGUAGE DISCS (DVD Only)
- Changing audio language
- Changing subtitle language
- PLAYBACK INFORMATION
- DVD playback information
- VCD playback information
- ACCESSING THE DVD SETUP SCREEN
- Accessing a menu
- LANGUAGE MENU
- VIDEO MENU
- SPEAKER SELECTION
- SURROUND MENU
- SUR Menu Features
- RATING (PARENTAL LOCK) MENU
- Playing CD Files
- Previous/Next page
- Fast backward/fast forward
- MP3/WMA DISCS
- Playing MP3/WMA Files
- Change Directory/Folder
- JPEG DISCS
- ACCESSING SD CARD MODE
- USING THE TOUCHSCREEN CONTROLS
- Accessing iPod mode
- iPodVIDEOPLAYBACK
- THE BLUETOOTH INTERFACE
- BEFORE USING THE BLUETOOTH INTERFACE
- THE BLUETOOTH INDICATOR
- ACCESSING BLUETOOTH MODE
- BLUETOOTH USER INTERFACE
- PHONE BOOK
- BLUETOOTH SETUP
- PAIRING
- AUTO CONNECT
- MAKING A PHONE CALL
- ANSWERING AN INCOMING CALL
- END A CALL
- BLUETOOTH MOBILE PHONE COMPATIBILITY
- ACCESSING NAVIGATION
- Listening to an audio program while using/viewing the navigation
- DVB-T OPERATION
- Accessing DVB-T Mode
- ERROR MESSAGES
- CARE AND MAINTENANCE
- SPECIFICATIONS
- CEA power ratings
- Main amplifier
- YEARS LIMITED WARRANTY
- WARRANTY LIMITATIONS
- JAHRE GARANTIE
- ZENEC
Brand : ZENEC
Model : ZE-MC192
Category : Multimedia car stereo