
MM210 - Alarm clock radio SWEEX - Free user manual and instructions
Find the device manual for free MM210 SWEEX in PDF.
User questions about MM210 SWEEX
0 question about this device. Answer the ones you know or ask your own.
Ask a new question about this device
Download the instructions for your Alarm clock radio in PDF format for free! Find your manual MM210 - SWEEX and take your electronic device back in hand. On this page are published all the documents necessary for the use of your device. MM210 by SWEEX.
USER MANUAL MM210 SWEEX
MM210 Sweex Wi-Fi Alarm Clock Internet Radio
Introduction
- Do not expose the Sweex Wi-Fi Alarm Clock to extreme temperatures. Do not place the device in direct sunlight or in the direct vicinity of heating elements.
- Do not use the Sweex Wi-Fi Alarm Clock in extremely moist or dusty surroundings.
- Protect the device against powerful shocks and falls — they may damage the internal electronics.
- Never attempt to open the device yourself, there are no serviceable parts inside. Opening the device will cause the warranty to lapse.
Package contents
In this package you will find:
- Wi-Fi Alarm Clock
- Power Adapter
- Manual
If you find that any of the package contents are missing, please return the package to the sales point where it was bought.
Product description
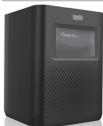
Front side:
natural_image
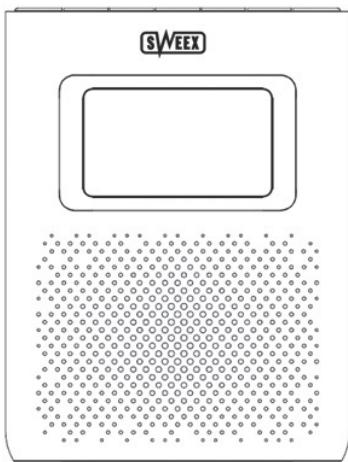
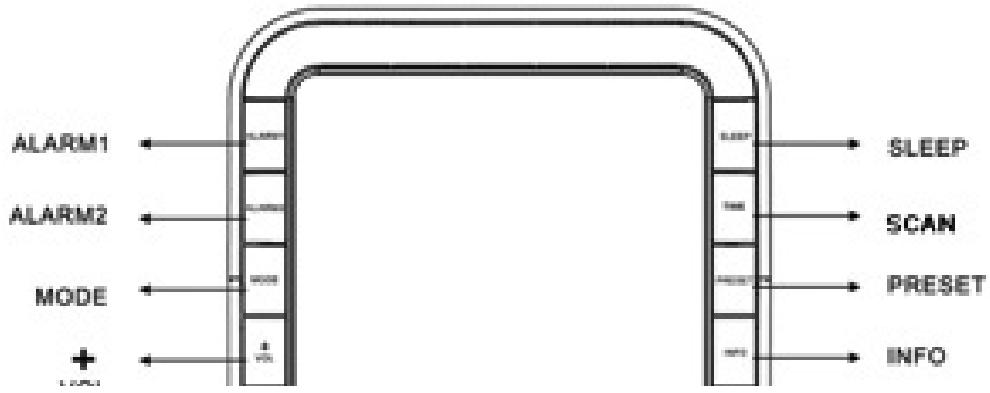
Diagram of a device with circular elements and dotted pattern, no readable text or symbolsTopside:
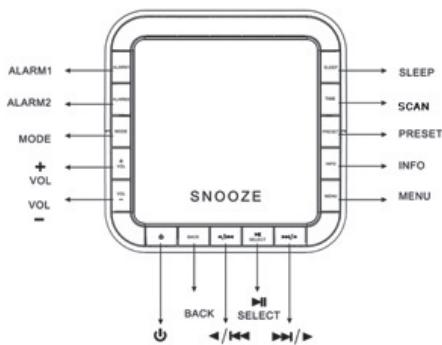
text_image
ALARM1 ALARM2 MODE + VOL VOL - SNOOZE SLEEP SCAN PRESET INFO MENU BACK SELECT /▶/▶| Control | Internet radio | FM mode | Music Player |
| STANDRY/ON | Press to turn the radio on/off | ||
| BACK | Press to switch between Internet Radio, Music Player, FM and Auxiliary Input mode. | ||
| Navigate left or up in menus, change frequency in FM mode | Previous Track | ||
| Press to selectFM mode: press to auto-search | Play/Pause | ||
| Navigate right or down in menus, change frequency in FM mode | Next Track | ||
| VOL + VOL - | Adjusts the volume | ||
| ALARM 1 ALARM 2 | Press to set alarm 1 / 2 | ||
| MODE | Press to switch between Internet Radio, Music Player, FM and Auxiliary Input mode | ||
| SLEEP | Press to set sleep time | ||
| SCAN | No Function | Press to auto-search | No Function |
| PRESET | Press and hold to save to presetsPress to load presets | No Function | |
| INFO | Press to display information or go back to the playback screen | ||
| MENU | Press to enter the main menu | ||
First use
Before you can start using the radio, you will need to connect to your wireless network first, this is done in 5 easy steps.
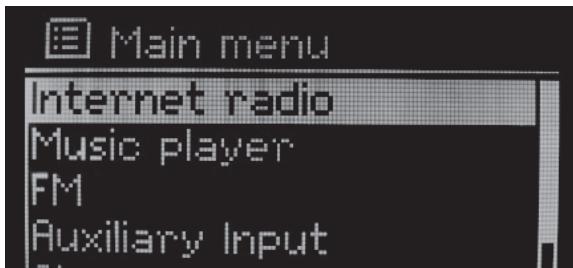
- After you turn on the radio for the first time, the following screen will appear:
text_image
Main menu Internet radio Music player FM Auxiliary Input- Press "Select" to enter Internet radio mode.
- You will be asked to select your WLAN region. Use the scroll knob to select the correct region and press "Select" to confirm.
- The radio will now scan for and display the available wireless networks. Select your network and press "Select" to connect. If your network is not listed or if you have a hidden network, please refer to the troubleshooting section of this manual.
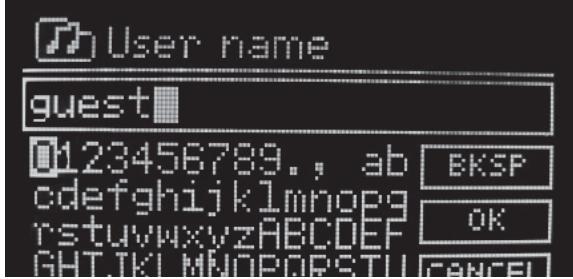
- If your wireless network is secured, the radio will now ask you to enter the network key. This key may also be known as WEP, WPA or Pre-shared (PSK) key. Use the navigation buttons to navigate to the right characters and press "Select" to enter them. Pressing the "Back" button will display different characters on screen. When finished, go to OK and press "Select" to confirm the key. Note: The key is case sensitive. For more info, refer to the "Text input" section of this manual.
You should now be connected to your wireless network and you are ready to tune in to one of the 11000 radio stations or 9000 podcasts. You should see the following screen:
text_image
User name guest 0123456789., ab cdefghijklmnopg rstuvwxyzABCDEFGHIJKLMNOPQRSTUVWXYZCDEF GHTJKLMNOPORSTU BKSFP OK CANCELTo listen to a radio station, scroll to Stations and press "Select", you can use the scroll knob to further navigate the menu and select a station by location, genre or search by station name. Podcasts work in a similar fashion.
Optionally you can also change the menu language of the radio, this can be done under the "System Setup" -> "Language" menu.
We also recommend setting the time zone after initial setup for correct display of the time on the radio. This setting can be accessed at "System Setup" -> "Time Setup" -> "Set Time Zone". For more information please refer to the menu reference in this manual.
Text input
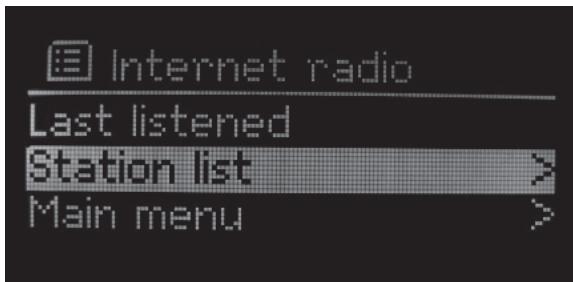
In this screen, you can use the navigation buttons to select the desired character.
text_image
Internet radio Last listened Station list > Main menu >To input other characters than those displayed, simply scroll further forward or back. To confirm your input, go to OK and press "Select". To go back one character, go to BKSP and press "Select". CANCEL will exit the text input screen.
Note: Searches for radio stations or podcasts are not case sensitive. Entering usernames, passwords or network keys is case sensitive.
Modes
The radio has four playback modes. Press the "Mode" button to switch between modes:
- Internet radio
In this mode, you can listen to internet radio stations and podcasts
- Music player
In this mode you can listen to music on local network shares and from streaming media servers, such as Windows Media Player 11 ®.
• FM
In this mode you can listen to ordinary FM radio stations
- Auxiliary input
This mode plays back sound received on the Auxiliary input on the back of the radio. Auxiliary input mode has no menu, options or settings.
Internet radio mode
In this mode, you can listen to internet radio stations and podcasts. You can also access lists of popular and new stations added to the internet radio service, access favourite stations and manually added stations. For more information on favourites and manual stations, please refer to the on-line services section of this manual. For more information on the individual menu options in Internet radio mode, please refer to the menu reference section of this manual.
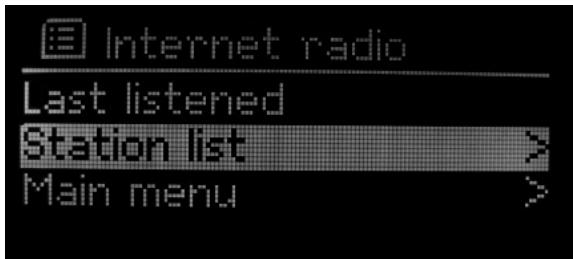
When tuned in to an internet radio station, you will see the following on the playback screen:
text_image
Internet radio Last listened Station list > Main menu >By pressing the "Info" button, you can display various information about the current station. When in a menu, pressing the "Info" button will return you to the playback screen.
Shortly pressing the preset button lets you select a preset station from the list of 10 presets, pressing the preset button for a few seconds lets you store the current station as a preset.
Music player mode
In this mode you can browse and listen to music on local network shares and from streaming UPnP media servers, such as ®. For more information on UPnP media streaming please refer to the "UPnP media streaming" chapter of this manual. For more information on the individual menu options in Internet radio mode, please refer to the menu reference section of this manual.
Protected shares
If you want to play back music from a network share that requires certain credentials, the radio will automatically ask you for a username and password.
FM mode
In this mode you can listen to ordinary FM radio stations. Press the navigation buttons to tune to a station manually or press the "Select" or "Scan" button to search automatically.
Shortly pressing the preset button lets you select a preset station from the list of 10 presets, pressing the preset button for a few seconds lets you store the current station as a preset.
Auxiliary mode
This mode plays back sound received on the Auxiliary input on the back of the radio. You can connect for example a MP3 player, CD player or other device to the AUX input. Auxiliary input mode has no menu, options or settings.
Menu reference
The radio has an extensive menu structure. This section of the manual will list and explain all available menu options
- Internet radio menu
This menu can be accessed by pressing the "Menu" button in internet radio mode.
> Last listened
Here you will find a list of stations you have last listened to. Select a station to listen to it.
> Station list
This will take you straight to the internet radio menu from where you can tune in to stations and podcasts.
> Main menu
Select "Main menu" to access the main menu.
- Music Player menu
This menu can be accessed by pressing the "Menu" button in Music Player mode.
> Shared media
Here you will see the available UPnP media servers. You can browse, select and play using the scroll knob. For more information on UPnP media streaming please refer to the "UPnP media streaming" chapter of this manual.
> Shared folders
In the shared folder menu you can browse network shares by workgroup, computer and share name.
> Main menu
Select "Main menu" to access the main menu.
• FM menu
This menu can be accessed by pressing the "Menu" button in FM mode.
> Scan setting
Here you can change the automatic scanning behaviour to lock on all stations, or strong stations only.
> Audio setting
Here you can change between the available options: "Stereo or mono" or "Mono only"
> Main menu
Select "Main menu" to access the main menu.
- Main menu
> Internet radio
> Last listened
Here is the list of stations you have last listened to
> My Favourites
In this menu you can select stations from your lists of favourite stations. For information on managing favourites, please refer to the on-line services section of this manual.
> Stations
> Location
Here you can browse radio stations by region and country first, then state and finally genre.
> Genre
Here you can browse radio stations by genre first, then country and state.
Search stations
This menu option lets you input text that you can search the list of stations with.
Popular stations
This is the list of overall most popular radio stations.
New stations
Here you will find the most recently added stations.
- Podcasts
Location
Here you can browse podcasts by region and country first, then state and optionally by genre.
Genre
Here you can browse podcasts by genre.
Search podcasts
This menu option lets you input text that you can search the list of podcasts with. Please note that this option searches the podcasts themselves rather than the actual broadcasts.
- My Added Stations
This is the list of stations added manually through the web-interface. For information on my added stations, please refer to the on-line services section of this manual.
- Help
Get access code
Here you can retrieve the access code used for the on-line services "My Favourites" and "My added stations".
FAQ
You can access in-radio help topics in the FAQ
- Music Player
Shared media
Here you will see the available UPnP media servers. You can browse, select and play using the scroll knob. For more information on UPnP media streaming please refer to the "UPnP media streaming" chapter of this manual.
Shared folders
In the shared folder menu you can browse network shares by workgroup, computer and share name.
• FM
Press "Select" to go to FM mode
- Auxiliary Input
Press "Select" to go to Auxiliary Input mode
- Sleep
This menu option lets you configure the sleep time. From off to 90 minutes in steps of 15 minutes. After the sleep time has passed, the radio will switch to stand-by automatically.
- Alarms
In this menu you can set the alarm clocks of the radio.
Alarm 1
Enable
Press "Select" to toggle the alarm on and off
Frequency Available options: Daily, Once, Weekends, Weekdays
Time Here you can set the time of the alarm
Mode (Internet / FM / Buzzer) Selects the mode in which the radio should wake up when the alarm rings and what it should play back.
Preset (not available in buzzer mode) Selects the FM or Internet station for the alarm
Volume Here you can set the volume of the alarm
SaveAlarm 2 Same as Alarm 1.
- System settings In this menu you can access and configure all of the radio's settings.
Network
In this menu you can configure all internet & networking related settings.
Internet Wizard
The wizard is the easiest way to let the radio connect to a wireless network. Simply follow the instructions on screen!
- PC settings
User name Here you can set the user name used for accessing network shares. The default is "guest"
Password (voor network share) Enter the password corresponding to that user here. The default is no password.
View settings You can use this menu to review the current settings for diagnostic purposes.
Active connection
MAC address
DHCP
PC settings
User name
Password
SSID
IP settings IP address Subnet mask Gateway addres Primary DNS Secondary DNS
Wlan region
- Wlan region
In this menu you can change the WLAN region. The WLAN region controls which frequencies the wireless networking module of the radip may operate on. Do not set the WLAN region to a different region than your current region, you may violate local regulations if you do this! The choices are:
Most of Europe
USA
Canada
Spain
France
Japan
Singapore
Australia
Republic of Korea
- Manual settings
This will start the wizard to manually configure a wireless network and optionally enter IP settings manually. This is for advanced users only. You will need to use the manual settings wizard only if you use a hidden wireless network or need to set a static IP address for the radio.
• Network profile
You can view and delete the preconfigured wireless networks in this menu. The network the radio is currently connected to cannot be deleted.
• Time/Date
In this menu you can set the time and time display options of the radio. By default, the radio uses its wireless connection to retrieve the current time from the Internet.
Set Time/Date
Auto update
Set format
Set timezone
Daylight savings
- Language
You can change the menu language here.
English (GB)
English (US)
Danish
Dutch
Finnish
French
German
Italian
Norwegian
Portugese
Spanish
Swedish
- Factory Reset
The Factory Reset option lets you reset all settings in the radio to the factory defaults. You need to press the "Info" button to confirm the reset. Please note that on-line services such as "My Favourites" and "My Added Stations" will not be reset.
- Software update
Press "Select" to let the radio search for newer software (firmware) online and upgrade if new software is available. New software may fix glitches or enable additional features.
- Info
> SW version
Here you can review the current software version of the radio.
> Radio ID
This will display the ID of the radio.
On-line services
You can manage your favourite radio stations and add unlisted stations manually using a web-interface. To do this, you will first need to register using the access code that can be found in the "Help" menu.
Registering is done in 3 simple steps:
- Open Internet Explorer: http://www.wifiradio-frontier.com/
- Click "Register here":

text_image
CANCEL- Fill out the form and click the "Register" button.
After registering, you can login with your email address and password. Using the menu on the left side you can browse stations, podcasts and manage your favourites and manually added stations.
Add a station to your favourites
To add a station to your favourites, browse to a station and click the button:
A popup will appear, follow the instructions in the popup to complete the process.

text_image
SWEEXAdd a station manually
Sometimes it may happen that a station is not present in the list of stations. In that case you can contact us by clicking the "Suggest a station" link at the bottom left of the webpage. You can also add a station manually so that it appears in the "My Added stations" list:
text_image
ALARM1 ALARM2 MODE + SLEEP SCAN PRESET INFOSimply fill out the form and press → when you're done! Note: some technical knowledge is required.
UPnP media streaming
UPnP media streaming is a more advanced method of playing back music from your music library compared to streaming files from network shares. With Windows Media Player 11, it is possible to directly access your music library using UPnP through the internet radio. We will explain how to setup WMP11 to enable this feature.
Start WMP11 and click "Tools" -> "Options" or click the title bar with the right mouse button and then select "Tools" -> "Options":
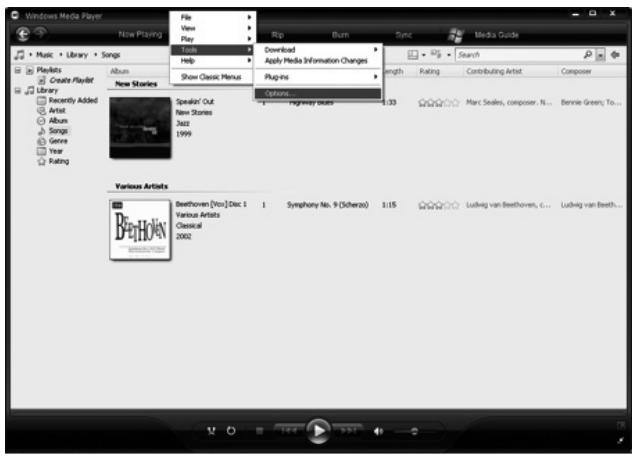
text_image
Windows Media Player Now Playing Music · Library · Songs Playlists Create Playlist Library Recently Added Artist Songs Genre Year Rating File View Play Tools Help New Stories Speaker' Out New Stories Jazz 1999 Options... Playboxy sounds Rip Burn Sync Media Guide Search Length Rating Contributing Artist Composer Marc Seales, composer... N... Bennie Green, To... Various Artists Beethoven [Vice] Dec 1 Various Artists Classical 2002 Symphony No. 9 (Scheras) 1:15 Ludwig van Beethoven, ... Ludwig van Beeth...In the options window, go to the "Library" tab and click the "Configure Sharing" button:
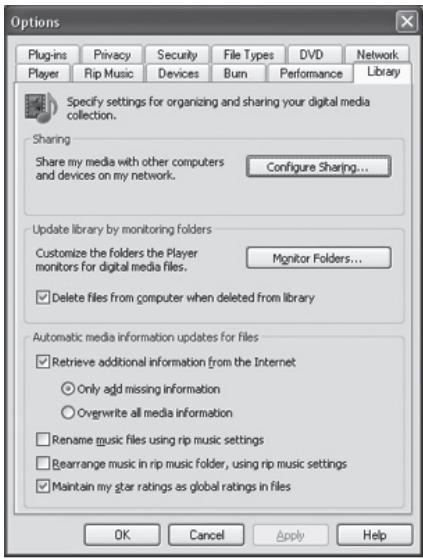
text_image
Options Plug-ins Privacy Security File Types DVD Network Player Rip Music Devices Burn Performance Library Specify settings for organizing and sharing your digital media collection. Sharing Share my media with other computers and devices on my network. Configure Sharing... Update library by monitoring folders Customize the folders the Player monitors for digital media files. Monitor Folders... Delete files from computer when deleted from library Automatic media information updates for files Retrieve additional information from the Internet Only add missing information Overwrite all media information Rename music files using rip music settings Bearrange music in rip music folder, using rip music settings Maintain my star ratings as global ratings in files OK Cancel Apply HelpCheck the "Share my media" checkbox and click OK:
Your computer should now become visible under "Shared media", you still have to authorise it however. Upon connecting, you will receive an error message on your radio and on
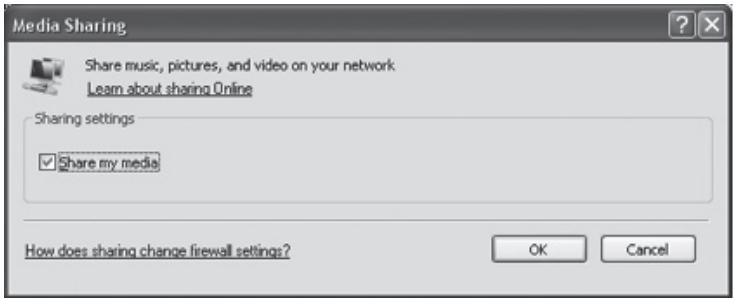
text_image
Media Sharing Share music, pictures, and video on your network Learn about sharing Online Sharing settings ✓ Share my media How does sharing change firewall settings? OK Cancelyour computer, the following message will appear:
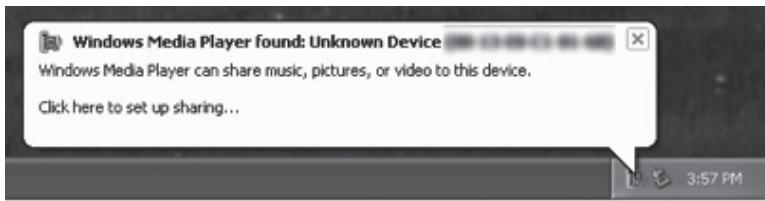
text_image
Windows Media Player found: Unknown Device Windows Media Player can share music, pictures, or video to this device. Click here to set up sharing...Click the balloon, you will see the following message, click "Allow" to allow the radio to stream from WMP11:
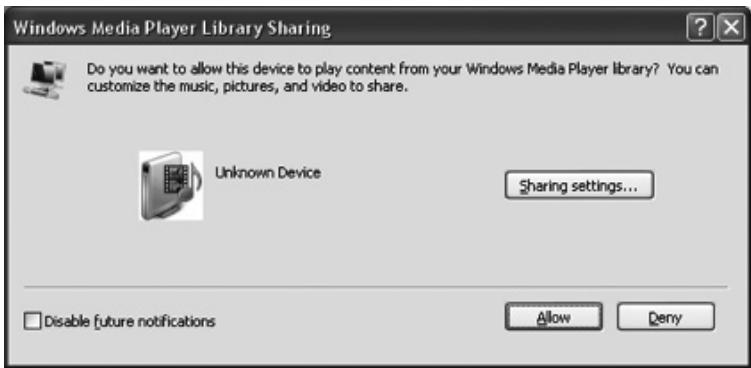
text_image
Windows Media Player Library Sharing Do you want to allow this device to play content from your Windows Media Player library? You can customize the music, pictures, and video to share. Unknown Device Sharing settings... Disable [future notifications Allow DenyOn the radio, you can now press "Select" to retry.
Besides WMP11 you may also use other software or hardware that supports UPnP media streaming, for example:
- Nokia N82, N95 ®
- Nero MediaHome ®
- Musicmatch Jukebox ®
Troubleshooting
• My wireless network is not listed
This may happen if your wireless network is hidden, or out of range. First try placing the radio closer to your wireless router or access point. If your network is hidden, it has to be added manually. This can be done through the "System settings" -> "Network" -> "Manual settings" menu
Warranty
Thank you for purchasing this Sweex product. Sweex devotes ample attention and care to the quality, reliability, functionality, durability and user friendliness of all its products. In this way Sweex distinguishes itself in the market and can we convince you as a buyer to continue purchasing products of the Sweex brand. We wish you a lot of pleasure with your purchase.
An important extra advantage for you is the possibility of product registration.
You can register the product you purchased online on www.sweex.com/productregistration.
By registering your product Sweex offers you a number of important yet equally useful advantages.
For example, if you wish so, you are regularly informed by us of the latest developments in our assortment by means of a digital newsletter.
Where applicable, you also automatically receive the latest drivers and/or firmware from us for the product you purchased to preserve or improve the compatibility and the performance.
Moreover, our support desk can assist you faster in case of possible support questions about the product if you registered the product.
Sweex warranty conditions.
2-year standard warranty within the EU
- In a standard manner a warranty period of 2 years as from the purchase date is available for this Sweex product within the EU.
- Should you wish to invoke this warranty within the first 2 years after the purchase then you can directly apply to the point of sale where you purchased the product for the conditions and procedures.
,Matters that are excluded from the warranty
- The warranty of Sweex only covers manufacturing defects. Excluded from the warranty are accessories like batteries, rechargeable batteries and also supplied software, where applicable.
- The liability of Sweex is limited to the costs of repair and/or replacement of the product covered by the warranty.
- The standard warranty is null and void if the product has been opened, changes have been made, physical damage was caused to the product and if the product is used for another purpose than for which it is originally meant.
All brand names and associated rights mentioned in this manual are and remain the sole property of the rightful claimant.