
PBN1220X - Built-in oven PROGRESS - Free user manual and instructions
Find the device manual for free PBN1220X PROGRESS in PDF.
| Product type | Built-in oven |
| Brand | PROGRESS |
| Model | PBN1220X |
| Dimensions (H x W x D) | 595 x 595 x 550 mm |
| Weight | 30 kg |
| Power supply | 220-240 V, 50/60 Hz |
| Maximum power | 3000 W |
| Capacity | 71 L |
| Cooking modes | Fan forced, Natural convection, Grill, Bottom heat |
| Number of functions | 8 |
| Cleaning | Catalytic (rear and side walls) |
| Interior lighting | Yes, halogen bulb |
| Safety | Child lock, auto shut-off, cool touch door |
| Door | Removable glass for cleaning |
| Included accessories | Metal grid, drip tray, baking tray |
| Repairability index | 7.6/10 |
| Availability of spare parts | 10 years after purchase |
| Energy class | A+ |
| Energy consumption | 0.93 kWh (conventional), 0.69 kWh (fan forced) |
Frequently Asked Questions - PBN1220X PROGRESS
User questions about PBN1220X PROGRESS
0 question about this device. Answer the ones you know or ask your own.
Ask a new question about this device
Download the instructions for your Built-in oven in PDF format for free! Find your manual PBN1220X - PROGRESS and take your electronic device back in hand. On this page are published all the documents necessary for the use of your device. PBN1220X by PROGRESS.
USER MANUAL PBN1220X PROGRESS
Warnings and important safety advice 3
Description of the appliance 5
Operation 6
Before first use 7
Using the oven 8
Baking charts 11
Cleaning and maintenance 14
Troubleshooting 19
Technical data 20
Instructions for the installation engineer 21
Instructions for building in 22
Customer service 23
How to read the instruction book

Safety information

Step-by-step instructions

Hints and tips

Environmental information
This appliance conforms to the following EEC guidelines:
- 2006/95 (low voltage guidelines);
- 89/336 (EMC guidelines);
93/68 (General guidelines); and subsequent changes.
Always keep these user instructions with the appliance. Should this appliance be given or sold to a third party, or in case you leave it behind when you move house, it is highly important that the new user has this user manual and advice at their disposal.
These warnings are provided for the safety of the users and those living with them. So read them carefully before connecting and/or using the appliance.
Installation
- Installation must be carried out by qualified technicians, whilst observing the prevailing guidelines. The individual operations for installing the appliance are described under the instructions for the installer.
- Leave installation and connection to an expert who has the expert knowledge to carry these out in accordance with known guidelines.
- Also ask an expert to make any necessary modifications to the electricity supply as a result of installation.
Operation
- This oven is intended for the preparation of food; never use it for other purposes.
- Beware hot air escaping from the oven if the oven door is opened during or after cooking.
- Operate the oven with utmost care. Shelves and other parts become very hot as a result of the intense heat from the heating elements.
- Should you, for whatever reason, use aluminium foil whilst cooking food in the oven, never let it come into direct contact with the bottom of the oven.
- Proceed carefully when cleaning the oven: never spray anything onto the grease filter (if fitted), the heating elements and the thermostat sensor.
- It is dangerous to make modifications of any type to this appliance or its properties.
- The oven window and surrounding appliance parts become hot during baking, roasting and grilling. Children should therefore be kept away from the appliance. Make sure that when connecting electrical appliances to
sockets near to the oven, the electrical leads do not come into contact with hot cooking areas or become jammed in the hot oven door.
Always use oven gloves to remove hot heatproof dishes or pots from the oven.
- Regular cleaning prevents deterioration of the surface materials.
- Before cleaning the oven, either switch off the electricity or pull out the mains plug.
- Make sure that the oven is switched off when it is not in use.
- This oven has been manufactured for use as a single appliance or a combination appliance with electric plates for single phase connection to 230 V.
- The appliance must not be cleaned with a steam cleaner or a steam jet cleaner.
- Do not use any abrasive cleaners or sharp metal scrapers. You could scratch the door glass and that could lead to cracking of the glass.
Personal safety
- This appliance is designed for use by adults. It is dangerous to allow children to use it or play with it.
- Keep children away whilst the oven is in use. Even after turning off the oven, the doors remain hot for a long time.
- This appliance is not intended for use by children or other persons whose physical, sensory or mental capabilities or lack of experience and knowledge prevents them from using the appliance safely without supervision or instruction by a responsible person to ensure that they can use the appliance safely.
Disposal

Packaging material
- The packaging materials are environmentally safe and can be reused. The plastic parts are labelled, e.g. >PE> , >PS< etc. Dispos of the packaging materials according to their label in communal disposal areas in the designated collection containers.

Old appliances
- The symbol on the product or its packaging indicates that this product cannot be handled like normal household rubbish, but that it must be taken to a collection point for the recycling or electrical and electronic appliances. Correct disposal of this appliance will help prevent possible negative consequences for the environment and the health of persons. Environment and health are endangered by incorrect disposal. Further information on recycling this product can be obtained from your town hall, your refuse collection service, or the shop from where you purchased it.

Warning: So that no more dangers can arise from the disused appliance, render it unusable before disposing of it.
Separate the appliance from the mains supply and remove the mains supply cable from it.
Customer service
Inspection and/or repairs must be carried out by the manufacturer's customer service or a customer service authorised by the manufacturer, and use only original replacement parts used.
- Do not try to repair malfunctions or damages yourself. Repairs carried out by untrained persons may cause damage or injury.
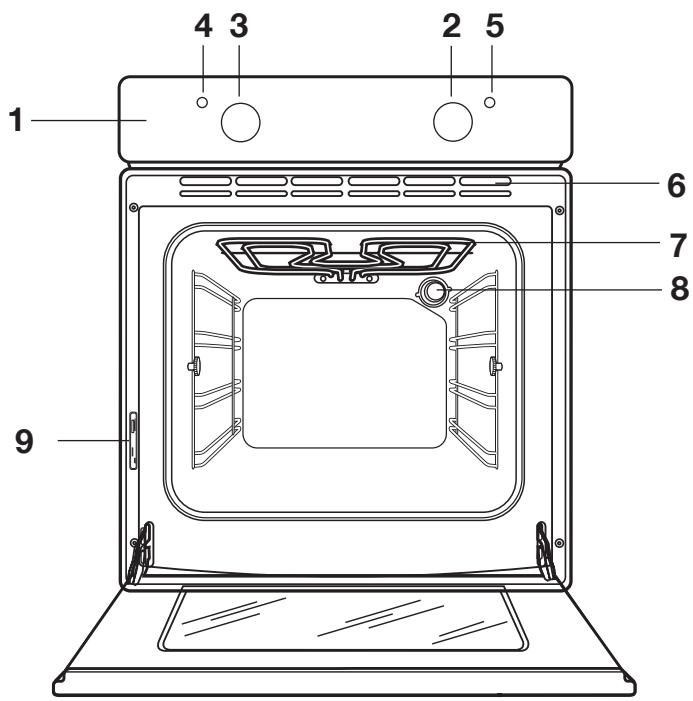
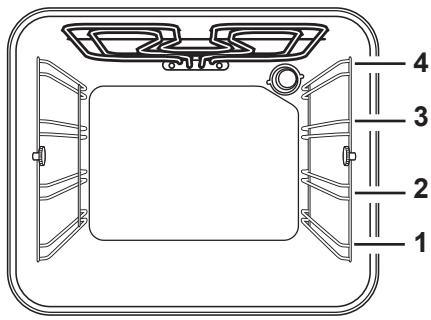
- Control panel
- Oven regulator
- Temperature regulator
- Temperature control - control indicator
-
Power indicator
-
Vents for cooling fan
- Grill
- Interior light
- Rating plate
Accessories

Dripping pan
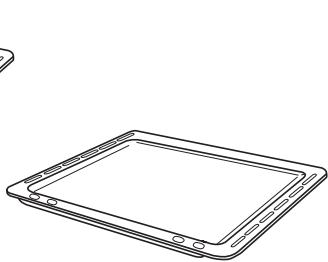
Baking tray
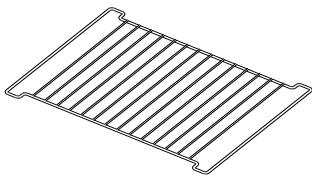
Shelf
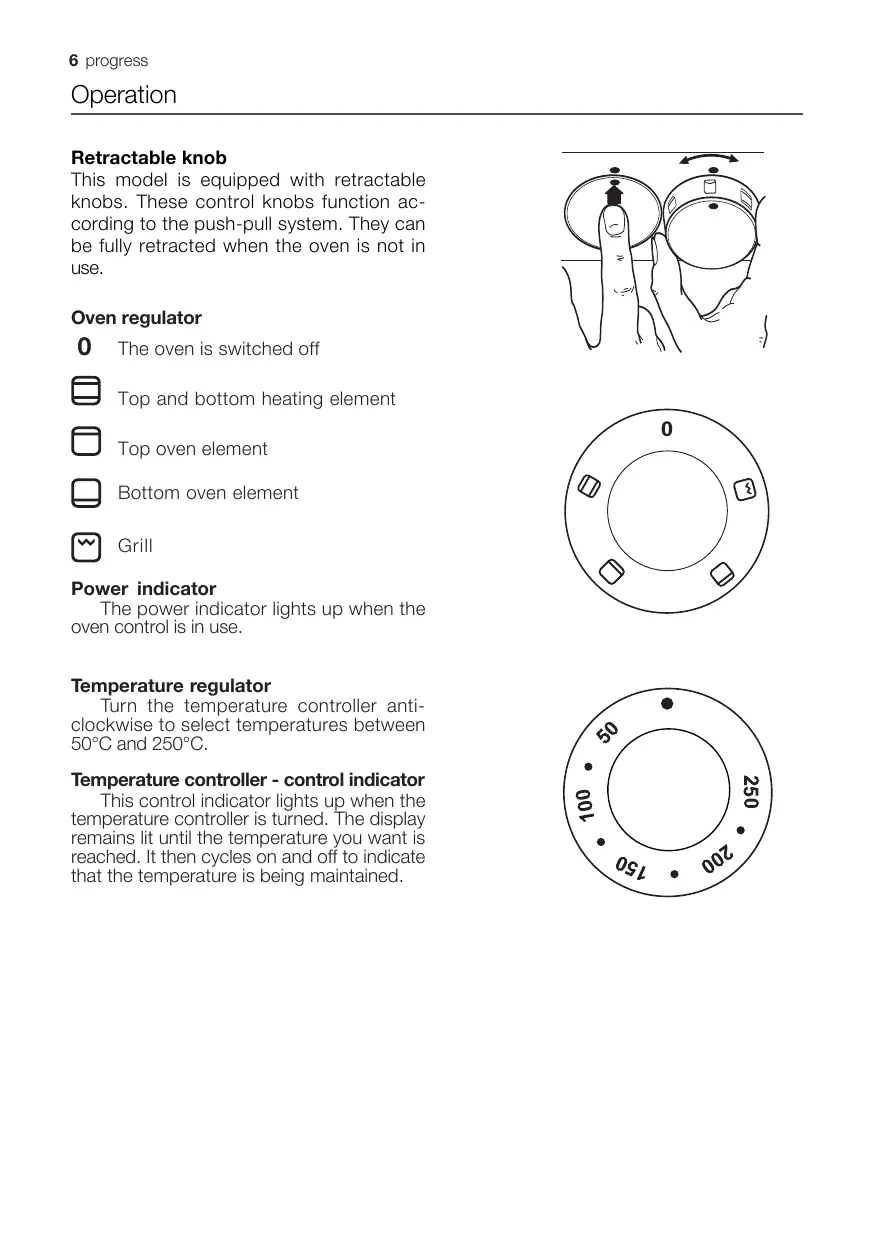
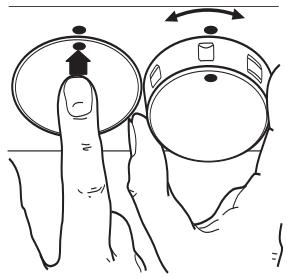
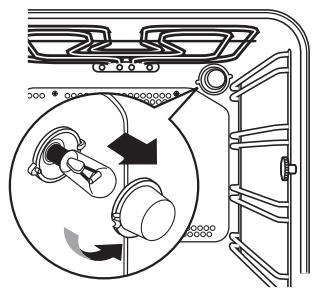
Retractable knob
This model is equipped with retractable knobs. These control knobs function according to the push-pull system. They can be fully retracted when the oven is not in use.
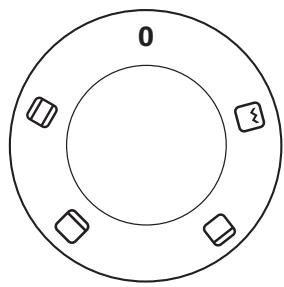
Oven regulator
0 The oven is switched off

Top and bottom heating element

Top oven element

Bottom oven element

Grill
Power indicator
The power indicator lights up when the oven control is in use.
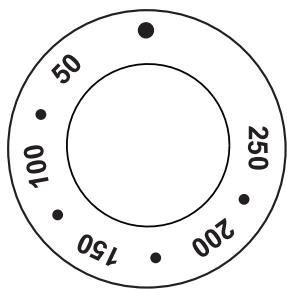
Temperature regulator
Turn the temperature controller anticlockwise to select temperatures between 50^ and 250^ .
Temperature controller - control indicator
This control indicator lights up when the temperature controller is turned. The display remains lit until the temperature you want is reached. It then cycles on and off to indicate that the temperature is being maintained.
Safety Thermostat
To avoid dangerous overheating (through improper use of the appliance or defective components) the oven is fitted with a safety thermostat which breaks the electricity supply. The oven switches back on again automatically, when the temperature drops.
Should the safety thermostat react as a result of improper use of the appliance, just eliminate the cause of the defect once the oven is cooled. If the thermostat reacts because of a defective component, please contact customer services.
Cooling fan
The oven is equipped with a cooling fan, which cools the control panel, the operating knobs and the oven door handle. The cooling fan is activated automatically when the oven is in use. The warm air is blown through the opening next to the oven door handle. The cooling fan shuts down when the oven function switch is in the "0" position.
Before using for the first time

Remove all packaging materials in and outside the oven before use.
Before using for the first time, the empty oven should be heated up.
During this time, an unpleasant odour may be emitted. This is absolutely normal. It is caused by manufacturing residues.
Ensure that the kitchen is well ventilated.

- Turn the oven regulator to Top and bottom heating element .
- Turn the temperature regulator to 250^ .
- Open a window for ventilation.
- Allow the oven to run empty for approximately 45 minutes.
Repeat the procedure for Grill for about 5-10 minutes.

Then let the oven cool down. Now dampen a soft cloth with warm water and mild washing-up liquid and clean the oven cavity.

Before using for the first time, carefully wash the oven accessories as well.
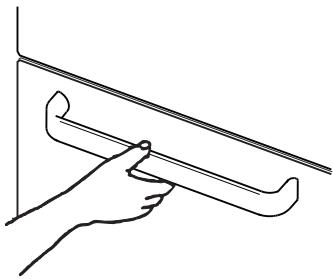

Always grasp the handle in the middle to open the door.

Important! - Do not line the oven with aluminium foil and do not put a backing tray or similar on the bottom or else the oven enamel will be damaged as a result of the arising heat spots. Always place pots and pans, heat-resistant pots and pans as well as aluminium trays on the shelf which has been placed on one of the shelving rails. When heating food, steam is generated as in a kettle. When the steam comes into contact with the glass in the oven door, it condenses and creates water droplets.
To reduce condensation, always preheat the empty oven for 10 minutes.
We recommend you wipe the water droplets away after every cooking process.

The oven door must be closed during cooking. Open the oven door carefully. Do not let the door "fall open", but use the door handle until the door is fully open.

The oven has four shelf levels. The shelf positions are counted from the floor of the oven upwards, as shown in the figure.
The shelves must be absolutely correctly installed (see diagram).
Do not place crockery or pots directly on the bottom of the oven.
Top and bottom oven element
- The heat is best distributed around the middle shelf height. If the underside of the food should be more strongly browned, simply use a lower shelf height. If you want the top to brown more intensely, place the shelf in a higher position.
- The material and finish of the baking tray and dishes used affect base browning. Enamelled, dark, heavy or uncoated moulds and cooking appliances enable stronger browning on the underside, whilst moulds made of glass or glazed aluminium or polished steel trays reflect the heat and therefore only permit moderate browning.
Always place dishes centrally on the shelf to ensure even browning. - Place the dish on an appropriately sized oven tray so that juices do not overflow onto the bottom of the oven. This also saves the effort of cleaning.
- Never place dishes, jars or oven trays directly on the bottom of the oven as this becomes very hot and could lead to damage. On this setting, the heat from the heating elements is generated above and below. Therefore you only need one shelf for this cooking method. This is especially suitable for dishes that must also be browned on the bottom, for example, quiches and pies.
Gratins, lasagne and other grilled dishes which are especially intended to be browned from above can also be cooked in this way.
So use heat from above and below:
- Turn the oven controller to the function you want .
- Turn the temperature control to the temperature you want.
Bottom oven element
This function is especially useful when blind-baking pastry. It can also be used for quiches or pies which have to have the pastry base baked through first.

The temperature controller's lamp lights up until the correct temperature is reached. It then cycles on and off to indicate that the temperature is being maintained.
Top oven element
Use this function to brown off cooked dishes, such as lasagnes or cauliflower cheese.
Grilling

Most foods should be placed on the rack in the grill pan in order to enable maximum air circulation and so the food does not lie in fat and its own juices. Fish, liver and kidneys can be placed directly in the grill pan if required.
The foods should be as dry as possible before they are grilled in order to avoid splatter. Brush lean meat or fish lightly with oil or melted butter so that the food remains succulent whilst cooking.
- Accompanying vegetables such as tomatoes and mushrooms can be placed in the grill when cooking meat.
- Bread should be grilled on the uppermost shelf.
- The food to be grilled should be turned from time to time.
Using the grill

The grill causes direct heat to gather quickly in the middle of the grill pan. For best results, grill food in small quantities. Energy can also be saved in this way.
- Turn the oven control in order to turn on the oven
- Turn the temperature control to the temperature you want.
- Choose the suitable shelf for the grill pan and grill according to whether or not the food to be grilled is thick or thin. Follow the instructions for grilling.
The grill element is controlled by the thermostat. During the grilling process the grill intermittently switches itself on and off in order to avoid overheating.

Hints and tips
Baking:
Baked goods usually require a medium temperature (150^ - 200^) . Therefore the oven must be pre-heated for 10 minutes.
Do not open the oven door before 3/4 of the cooking time has passed.
Shortcrust pastry is baked in a springform tin or on a tray for up to 2/3 of the baking time and then garnished before being fully baked. This further baking time depends on the type and amount of topping or filling. Sponge mixtures must be thoroughly stirred with a spoon. The baking time would be unnecessarily extended by too much liquid.
If two baking trays with pastries or biscuits are inserted into the oven at the same time, a shelf level must be left free between the trays.
If two baking trays with pastries or biscuits are inserted into the oven at the same time, the trays must be swapped and turned around after approximately 2/3 of the baking time.
Roasting:
Do not roast any joints that weigh less than 1kg . Smaller pieces could dry out when roasting. Dark meat that is well-cooked on the outside but should remain medium to rare on the inside, must be roasted at a higher temperature (200^ - 250^)
Light meat, poultry, and fish therefore require a lower temperature (150°C - 175°C). Only add sauce ingredients to the roasting pan at the beginning if the cooking time is short. Otherwise add them in the last half hour.
You can use a spoon to test whether the meat is cooked: if it cannot be depressed, it is cooked through. For medium/rare roast beef and fillet, roast at a higher temperature in a shorter time.
If cooking meat directly on the oven shelf, insert the roasting pan in the shelf level below to catch the juices.
Leave the roast to stand for at least 15 minutes before carving so that the meat juices cannot flow out.
To reduce the build up of smoke in the oven, it is recommended to pour a little water in the roasting pan. To prevent condensation forming, add water several times. The plates can be kept warm in the oven at minimum temperature until serving.

Important!
Do not line the oven with aluminium foil and do not place baking trays, pots, etc. on the oven floor, as the heat that builds up will damage the oven enamel.
Cooking times
Cooking times can vary according to the consistency, ingredients and amount of liquid in the individual foods.
Note the settings you used during your first attempts at cooking and roasting so that you can collect notes in case you want to prepare the same food again at a later date.
Based upon your own experiences you will be able to alter the values given in the charts.
Top and bottom oven element

Timings do not include pre-heating.
Always pre-heat the empty oven for 10 minutes.
| Weight (g) | TYPE OF DISH | Temperature °C | Shelf level 4 3 2 1 | Cooking time in min. |
| CAKES | ||||
| Sponge mixture | 170 | 1 | 45-60 | |
| Shortcrust pastry | 170 | 2 | 20-30 | |
| Buttermilk cheesecakes | 160 | 1 | 60-80 | |
| Apple cakes | 180 | 1 | 40-60 | |
| Strudel | 175 | 2 | 60-80 | |
| Jam tart | 175 | 2 | 30-40 | |
| Sponge cakes | 175 | 1 | 45-60 | |
| Biscuits | 175 | 1 | 30-40 | |
| Stollen | 170 | 1 | 40-60 | |
| Cake | 170 | 1 | 50-60 | |
| Small cakes | 175 | 2 | 25-35 | |
| Biscuits | 160 | 3 | 20-30 | |
| Meringue | 100 | 2 | 90-120 | |
| Small raised pastries | 190 | 2 | 12-20 | |
| Cream puffs/eclairs | 200 | 2 | 15-25 | |
| BREAD AND PIZZA | ||||
| 1000 | White bread | 190 | 1 | 40-60 |
| 500 | Rye bread | 190 | 2 | 30-45 |
| 500 | Rolls | 200 | 2 | 20-35 |
| 250 | Pizza | 210 | 1 | 15-30 |
| BAKES | ||||
| Pasta bake | 200 | 2 | 40-50 | |
| Vegetable flan | 200 | 2 | 45-60 | |
| Quiches | 200 | 2 | 35-45 | |
| Lasagne | 180 | 2 | 45-60 | |
| Cannelloni | 200 | 2 | 40-55 |
The temperatures quoted are guidelines. and must be adjusted to personal requirements where necessary.
Top and bottom heat

Timings do not include pre-heating. Always pre-heat the empty oven for 10 minutes.
| Weight (g) | TYPE OF DISH | Temperature °C | Shelf level 4 3 2 1 | Cooking time in min. |
| MEAT | ||||
| 1000 | Beef | 190 | 2 | 50-70 |
| 1200 | Pork | 180 | 2 | 100-130 |
| 1000 | Veal | 190 | 2 | 90-120 |
| 1500 | Roast beef, medium | 210 | 2 | 50-60 |
| 1500 | English roast beef | 210 | 2 | 60-70 |
| 1500 | Roast beef, well done | 210 | 2 | 70-80 |
| 2000 | Shoulder of pork | 180 | 2 | 120-150 |
| 1200 | Lamb | 190 | 2 | 110-130 |
| 1000 | Chicken | 190 | 2 | 60-80 |
| 5000 | Turkey | 180 | 2 | 210-240 |
| 1500 | Duck | 175 | 2 | 120-150 |
| 3000 | Goose | 175 | 2 | 150-200 |
| 1200 | Hare | 190 | 2 | 60-80 |
| 1200 | Knuckle of pork | 180 | 2 | 100-120 |
| Meatloaf | 180 | 2 | 40-60 | |
| GAME | ||||
| 1500 | Saddle of hare | 190 | 2 | 150-200 |
| 800 | Pheasant | 190 | 2 | 90-120 |
| Fish | ||||
| 1200 | River trout / bream | 190 | 2 | 30-40 |
| 1500 | Tuna/salmon | 190 | 2 | 25-35 |
The temperatures quoted are guidelines. and must be adjusted to personal requirements where necessary.
| TYPE OF DISH | Quantity | Grilling | Cooking time in minutes | |||
| Pieces | g. | Level | Temp. (°C) | First side | 2nd side | |
| Fillet steaks | 4 | 800 | 3 | 250 | 12~15 | 12~14 |
| Beef steaks | 4 | 600 | 3 | 250 | 10~12 | 6~8 |
| Grilled sausages | 8 | / | 3 | 250 | 12~15 | 10~12 |
| Pork cutlets | 4 | 600 | 3 | 250 | 12~16 | 12~14 |
| Chicken (in 2 halves) | 2 | 1000 | 3 | 250 | 30~35 | 25~30 |
| Kebabs | 4 | / | 3 | 250 | 10~15 | 10~12 |
| Chicken breast | 4 | 400 | 3 | 250 | 12~15 | 12~14 |
| Hamburger* | 6 | 600 | 2 | 250 | 20-30 | |
| *Pre-heat 5'00" | ||||||
| Fish fillet | 4 | 400 | 3 | 250 | 12~14 | 10~12 |
| Crispy toast | 4~6 | / | 3 | 250 | 5~7 | / |
| Slices of white bread | 4~6 | / | 3 | 250 | 2~4 | 2~3 |

Before any cleaning switch the oven off and let it cool down.
The appliance must not be cleaned with a steam cleaner or a steam jet cleaner.
Important: Before carrying out any cleaning operation, the appliance must be disconnected from the power supply.
For a longer appliance life it is necessary to carry out the following cleaning operations regularly:
Only perform when the oven has cooled down.
- Clean the enamelled parts with soapy water.
- Do not use abrasive cleaners.
- Dry the stainless steel parts and glass with a soft cloth.
- If there are stubborn stains, use commercially available for stainless steel or warm vinegar.
The oven's enamel is extremely durable and highly impermeable. The effect of hot fruit acids (lemon, plum or similar) can however leave behind permanent, matte and rough stains on the enamel surfaces. However, such marks in the brightly polished surface of the enamel do not affect the operation of the oven. Clean the oven thoroughly after every use. This is the easiest way to clean dirt off. It prevents dirt being burnt on.
Cleaning materials
Before using cleaning materials, always check that these are suitable for your oven and recommended by the manufacturer.
Cleaners that contain bleach should NEVER be used as they may dull the surface finishes. Harsh abrasives should also be avoided.
External cleaning
Regularly wipe over the control panel, oven door and door seal using a soft cloth well wrung out in warm water to which a little liquid detergent has been added.
To avoid damage to the oven's glass door do not use the following under any circumstances:
Household cleaners and bleaching solution
- Coated cleaning sponges which are unsuitable for saucepans with non-stick coating
- Brillo/Ajax pads or steel wool pads
Chemical oven pads or aerosols
Rustremovers
- Stain removers for sinks/washing up
Clean the outer and inner door glass using warm soapy water. Should the inside of the glass door be heavily soiled, use cleaning products such as "Hob Brite". Do not use paint scrapers to remove dirt.
Oven cavity
The enamelled oven floor is best cleaned whilst the oven is still warm.
Wipe the oven with a soft cloth which is washed out in warm soapy water after every use. From time to time a more thorough cleaning is required. Use a commercially available oven cleaner for this.
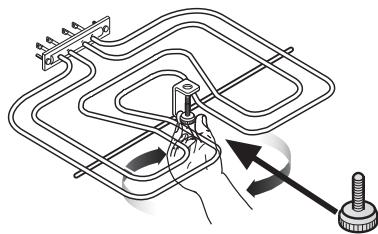
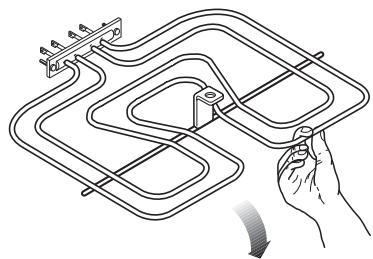
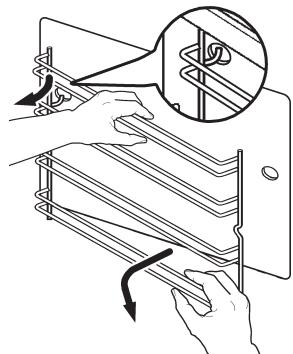
Grill heating element
This model has been fitted with a hinged grill element to enable you to clean the roof of the oven easily.

Before proceeding ensure the oven is cool and is disconnected from the electricity supply.
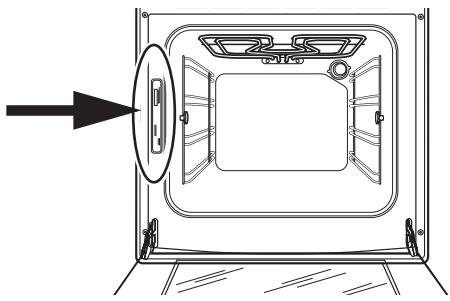
- Undo the screw fastening the grill element (see Fig.). When carrying out this operation for the first time, we recommend using a screwdriver.
- Then pull the grill element down carefully until you can access the oven cover (see Fig.).
- Clean the oven cover with a suitable cleaner and wipe dry before replacing the hinged grill element.
- Gently push up the grill element into place and tightly screw the holding nut.

Ensure the retaining nut on the grill element is properly tightened so that it does not fall down when in use.
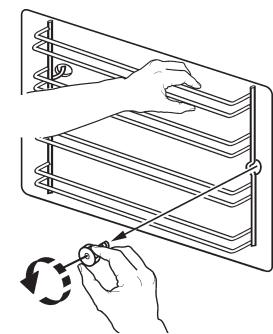
Oven shelves and shelf supports
Immerse the oven shelves in warm soapy water to clean them and remove stubborn dirt with a sponge thoroughly impregnated with soap.
Rinse well and dry with a soft cloth.
The shelf supports are to be removed for cleaning.

Proceed as follows:
- First ensure that the oven has cooled down and has been disconnected from the mains.
- Remove the front screw, holding the grill support with the other hand.
- Disengage the rear hook and take off the shelf support.
- Re-insert the shelf supports after cleaning; to do so, reverse the above sequence.

Before inserting the oven shelves, ensure that the retaining nuts have been properly tightened.
Changing the interior light

Separate the appliance from the power supply by switching off the fuse.
If the oven bulb needs replacing, the new bulb must have the following specifications:
- Electric power: 15 W / 25 W
- Electric rate: 230 V( 50 Hz)
- Heat resistance to 300^ C
- Connection type: E14
These replacement bulbs can be purchased from your dealer.
To change the oven bulb:
- Before proceeding ensure the oven is cool and is disconnected from the electricity supply.
- Twist the bulb's glass cover in an anticlockwise direction.
- Remove the burnt out bulb and replace it with a new one.
- Replace the glass cover and reconnect the oven to the electricity supply.
Oven door
The oven door consists of two glass panes. For easy cleaning the oven door can be taken off its hinges and the internal panes can be removed.

Warning - the oven door must be removed before cleaning. The oven door can suddenly slam shut if you try to pull the internal pane from the suspended door.

Remove as follows:
- Open the door fully;
- go to both of the door hinges.
- Lift the lever on the hinges and fold these to the front;
- Grip the door on both outer edges and close the door only about 45^ .
- Pull the door to the front from its position.
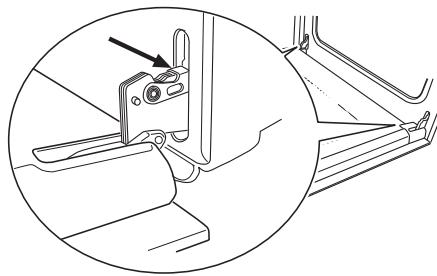
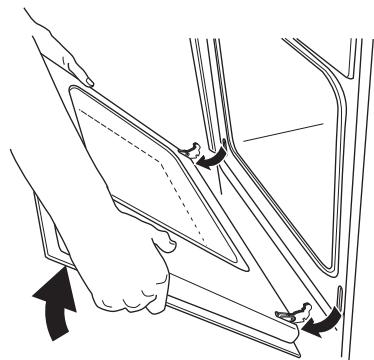
- Place the door on solid ground and protect the surface of the handle with a soft cloth.
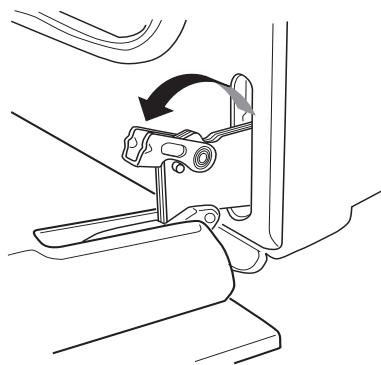
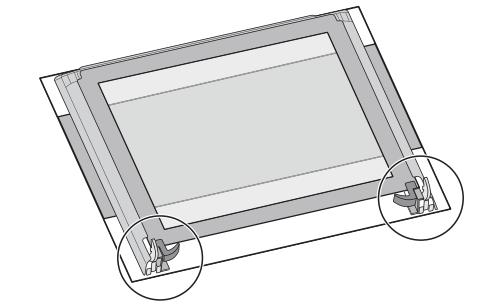
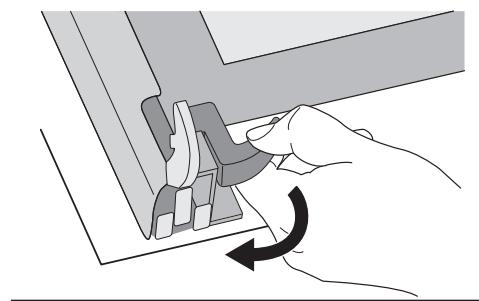
- Activate the interlocking system by removing the inner pane.
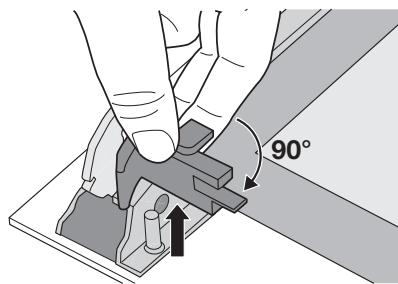
- Turn both the toggles 90^ and pull these out of their place.
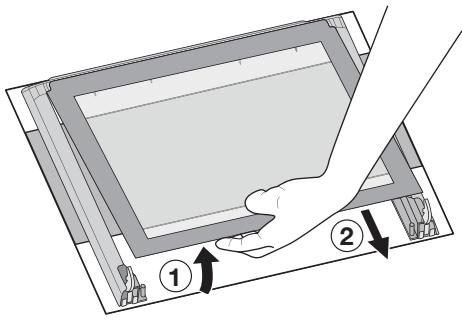
- Carefully lift the top pane out a little and pull out the pane which is visible on all four sides of the frame.
Clean the oven door with lukewarm water and a soft cloth. Do not use any scourers, metal wool, abrasive sponges or acids which could damage the heat reflecting special surfaces of the inner pane.
After cleaning the inner pane put back in the door. Insert the door in the oven; proceed in reverse order. Be mindful of the correct alignment of the panes.
Proceed as follows:
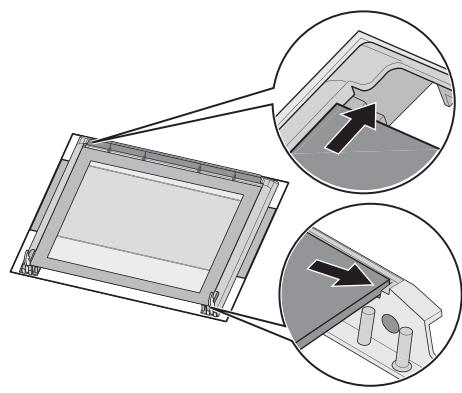
The inner pane with the frame on four sides must be installed so that the screen faces the outside of the oven. Touch the visible surface. If there is no roughness on the level of the screen, the pane is inserted correctly.
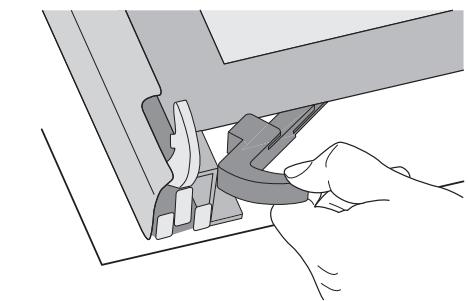
The inner pane must be put in its place according to figure.
After putting the panes in the oven door, secure them in reverse order, following the guidelines in Point 8.

Never clean the oven door while warm as the panes can shatter. If you notice scratches or flaws on the glass panes, call customer services immediately and arrange for the pane to be changed.

Models in stainless steel or aluminium: Clean the oven door and the panel controls made from stainless steel or aluminium with a damp sponge and afterwards dry them carefully with a soft cloth. Do not use any scourers, metal wool, acids or abrasive materials which could scratch the surfaces.
Cleaning the oven door seal
A seal is affixed to the opening of the oven.

Check the condition of the seal regularly. Clean the seal when necessary, without using objects or abrasive materials. If you notice damage to the seal, call the nearest customer service immediately. Do not use the oven whilst the seal is not in place.
Troubleshooting
If the appliance does not work properly, please check the following before calling an Electrolux Service Centre:
| PROBLEM | SOLUTION |
| ■ The oven does not switch on. | ◆ Check whether a cooking function and a temperature have been selected, or ◆ Check that the appliance is properly connected and the socket switch or the mains supply to the oven is on. |
| ■ The control light for the oven temperature does not come on. | ◆ Use the temperature controller to choose a temperature, or ◆ use the oven controller to select a function. |
| ■ The oven's interior light does not come on. | ◆ use the oven controller to select a function. or ◆ Check the light bulb and change it if necessary (see "Changing the interior light") |
| ■ Cooking the food takes too long or it cooks too fast. | ◆ Where required the temperature must be changed, or ◆ refer to the contents of this user guide, in particular, the "Hints and Tips" chapter. |
| ■ Steam and condensation settles on the food and in the oven cavity. | ◆ Do not leave dishes in the oven after cooking for longer than 15-20 minutes. |
Heating element ratings
Top oven element 800 W
Bottom oven element 1000 W
Top and bottom heating element 1800 W
Grill 1650W
Oven light 25 W
Total power requirement 1850 W
Operating voltage (50 Hz) 230 V
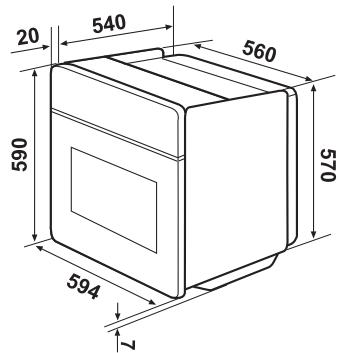
Dimensions of the recess
Height Under top edge 600 mm
In recess 587 mm
Width 560 mm
Depth 550 mm
Oven cavity
Height 335 mm
Width 395 mm
Depth 410 mm
Oven capacity 561

Installation and connection must be done in compliance with the regulations in force. All repairs may only be carried out once the appliance is turned off. Repairs must only be carried out by qualified service engineers.
The manufacturer denies all liability in cases where safety regulations have not been followed.
Connecting to the electrical supply
Before connection to the mains, please ensure the following:
- The fuse and the domestic electrical installation must be designed for the max. load of the appliance (see Rating plate).
- The domestic electrical installation must be equipped with a proper earth connection in accordance with the regulations in force.
- The plug socket or multi-pole off switch must be easily accessible once the appliance has been installed.
This appliance is supplied with a connection cable incorporating a standard plug, suitable for the total electric load shown on the rating plate. The plug is to be inserted into a suitable wall socket.
The following connection cables are suitable taking account of the respective nominal profiles required:
H07RN-F, H05RN-F, H05RR-F, H05VV-F, H05V2V2-F (T90), H05BB-F.
If the appliance is connected without a plug, or if the plug is not accessible, a multi-pole off switch (e.g. fuses, circuit breaker) with a minimum gap of 3mm between the contacts must be installed between the appliance and mains cable. The switch must not interrupt the earth wire at any point. The yellow-green earth wire must be 2 - 3cm longer than all other cables.
The power cable must also be designed so that at no point does it reach 50^ (above room temperature).
Once connected, the heating elements must be tested by being operated for about 3 minutes.
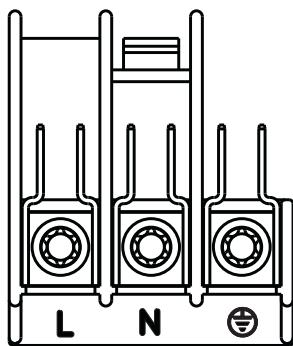
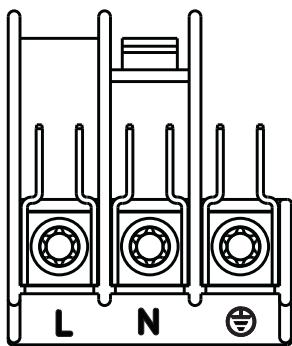
Terminal block
The oven is equipped with an easily accessible terminal block, which is meant for operation with a single phase voltage of 230V .
Live terminal
N Neutral terminal

or E - Earth terminal
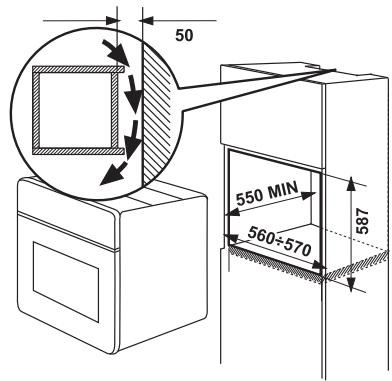
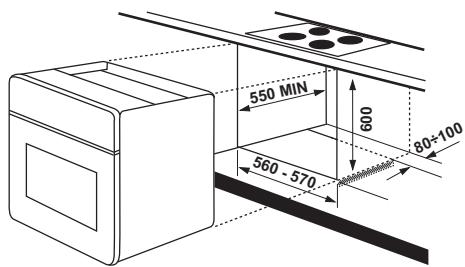
Instructions for building in
To ensure trouble-free operation of the built-in appliance, the kitchen units or recess that the appliance is built into must have suitable dimensions.
According to current regulations all parts that ensure shock protection from live power and operation isolating components are attached in this way so that they cannot be removed without tools.
These also include the fixing of any end walls at the beginning or end of a line of built-in units.
In any case, the accidental contact protection must be ensured by the building in of the appliance.
The appliance can be positioned with its back or side wall against higher kitchen units, appliances or walls. However, only other appliances or units of the same height as the appliance can be placed against the other side wall.
Oven dimensions
Instructions for building in
To ensure trouble-free operation of the built-in appliance, the kitchen units or recess that the appliance is built into must have suitable dimensions.
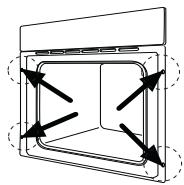
Securing in the unit
- Open the oven door.
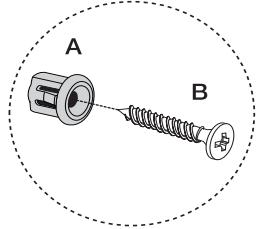
- Secure the oven with the aid of the four separators in the unit (A). These fit exactly in the holes in the frame. Then tighten the four provided wood screws (B).
If following the checks described here (see page 19) does not solve the problem, call the manufacturer's nearest customer service and give the type of defect, the appliance model (Mod.) and the production number (Prod. number) as well as the serial number (Ser. number), which can be found on the oven's rating plate.
Sommario
Mandos escamoteables
N terminal de conductor neutro

oE-
terminal de connexion a tierra
- How to read the instruction book
- Installation
- Operation
- Personal safety
- Disposal
- Packaging material
- Old appliances
- Separate the appliance from the mains supply and remove the mains supply cable from it.
- Customer service
- Accessories
- Retractable knob
- Oven regulator
- Power indicator
- Temperature regulator
- Temperature controller - control indicator
- Safety Thermostat
- Cooling fan
- Before using for the first time
- To reduce condensation, always preheat the empty oven for 10 minutes.
- Top and bottom oven element
- Bottom oven element
- Top oven element
- Grilling
- Using the grill
- Hints and tips
- Baking:
- Roasting:
- Important!
- Cooking times
- Top and bottom heat
- Before any cleaning switch the oven off and let it cool down.
- The appliance must not be cleaned with a steam cleaner or a steam jet cleaner.
- Cleaning materials
- External cleaning
- Oven cavity
- Grill heating element
- Before proceeding ensure the oven is cool and is disconnected from the electricity supply.
- Ensure the retaining nut on the grill element is properly tightened so that it does not fall down when in use.
- Oven shelves and shelf supports
- Proceed as follows:
- Before inserting the oven shelves, ensure that the retaining nuts have been properly tightened.
- Changing the interior light
- Separate the appliance from the power supply by switching off the fuse.
- Oven door
- Warning - the oven door must be removed before cleaning. The oven door can suddenly slam shut if you try to pull the internal pane from the suspended door.
- Cleaning the oven door seal
- Troubleshooting
- Heating element ratings
- Dimensions of the recess
- Connecting to the electrical supply
- Terminal block
- Instructions for building in
- Oven dimensions
- Securing in the unit
- Sommario
- Mandos escamoteables
Brand : PROGRESS
Model : PBN1220X
Category : Built-in oven