
DCC1200E - Coffee maker CUISINART - Free user manual and instructions
Find the device manual for free DCC1200E CUISINART in PDF.
| Product type | Coffee maker |
| Brand | Cuisinart |
| Model | DCC1200E |
| Reservoir capacity | 1.8 L |
| Number of cups | 12 cups (15 cl each) |
| Filter type | Removable permanent filter or No. 4 paper filter |
| Water filter | Built-in charcoal filter (replacement recommended every 60 uses) |
| Programming | Digital clock with up to 24-hour advance programming |
| Automatic shutoff | Yes, adjustable from 0 to 4 hours |
| Keep warm | Warming plate with temperature control (low, medium, high) |
| 1-4 cup function | Yes, to brew small quantities at optimal temperature |
| Anti-drip system | Yes, allows you to pour a cup before the cycle ends |
| Descaling | Automatic with indicator light and dedicated button |
| Audible signal | 5 beeps at end of cycle |
| Power | 220-240 V, 50/60 Hz, 1000 W (estimate) |
| Dimensions (approx.) | 25 x 20 x 35 cm (estimate) |
| Weight (approx.) | 2.5 kg (estimate) |
| Materials | Plastic, glass (carafe), stainless steel (warming plate) |
| Cleaning | Carafe, filter basket, and spoon are dishwasher safe (top rack); exterior with damp sponge; do not immerse base |
| Safety | Automatic shutoff, do not touch hot plate, do not use outdoors |
| Spare parts | Carafe, permanent filter, water filter available |
| Repairability | Repairs by professional only; do not disassemble yourself |
| Warranty | Not specified, consult manufacturer |
| Use | Household use only |
Frequently Asked Questions - DCC1200E CUISINART
Important: Never immerse the base in water.
If the problem persists, descaling may be necessary.
2. Use the HRES and MIN buttons to set the desired time.
3. Turn the selector to AUTO 1.
4. Flip the 0/1 switch upward. The green indicator lights up.
Coffee will be ready at the programmed time.
Automatic descaling is recommended with a specific product.
User questions about DCC1200E CUISINART
0 question about this device. Answer the ones you know or ask your own.
Ask a new question about this device
Download the instructions for your Coffee maker in PDF format for free! Find your manual DCC1200E - CUISINART and take your electronic device back in hand. On this page are published all the documents necessary for the use of your device. DCC1200E by CUISINART.
USER MANUAL DCC1200E CUISINART
A. Assembly 11
B. Operating the appliance - The control panel - Programming 12
4.Chefs' tips and hints 14
5. Questions/Answers 14
6. Cleaning and storage 14
7. Safety cautions 15
INHALTSVERZEICHNIS
2. CHARACTERISTIQUES PRODUIT
5. QUESTIONS/RESPONSES
You have just purchased a Cuisinart® coffeemaker.
A combination of in-depth research into innovation and outstanding design have gone into creating an appliance of guaranteed high quality. Simple to use and to maintain.
The quality of the water is critical to achieve a great-tasting coffee. The charcoal water filter of your coffemaker ensures the purest flavour and avoids impurities. The leakproof lid keeps taste and temperature for a long time.
For even more convenient use, the brew pause allows you to pour a cup of coffee in mid-brew and the heater plate control knob keeps your coffee warm without burning it. The 1-4 cup setting allows you to brew smaller pots of coffee. You can also choose between paper filters or the convenient and cost-saving removable permanent filter provided.
Your coffeemaker is provided with advanced features such as: a digital clock with 24-hour advanced-brew setting, programmable auto-off, audible beep at the end of cycle and time-to-descale electronic indicator with flashing light, with descending button.
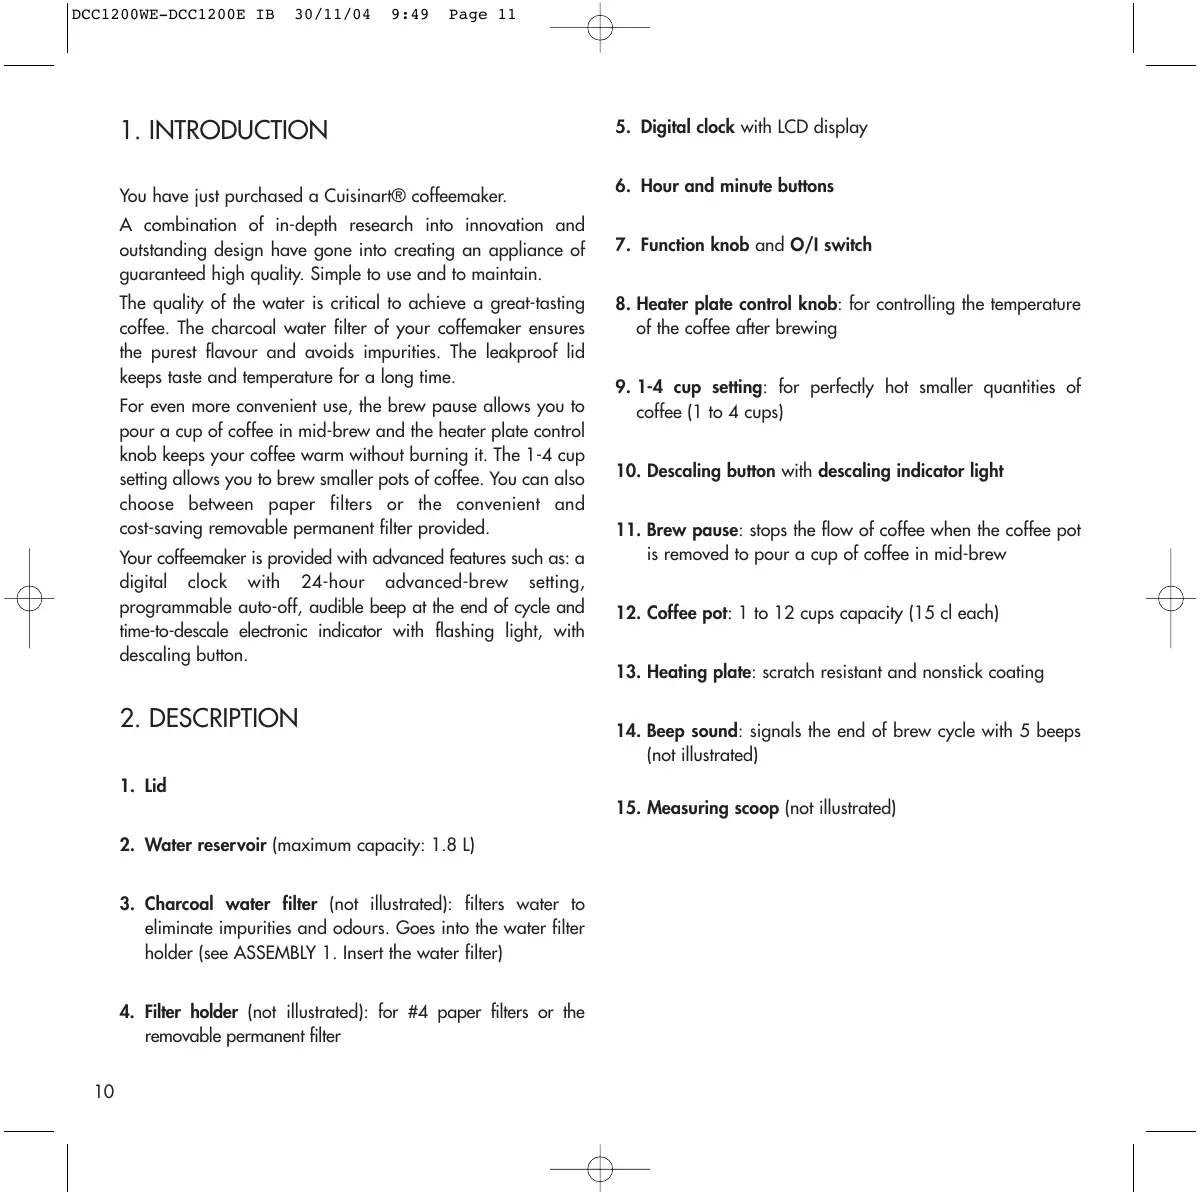
2. DESCRIPTION
- Lid
- Water reservoir (maximum capacity: 1.8 L)
- Charcoal water filter (not illustrated): filters water to eliminate impurities and odours. Goes into the water filter holder (see ASSEMBLY 1. Insert the water filter)
-
Filter holder (not illustrated): for #4 paper filters or the removable permanent filter
-
Digital clock with LCD display
- Hour and minute buttons
- Function knob and O/I switch
- Heater plate control knob: for controlling the temperature of the coffee after brewing
- 1-4 cup setting: for perfectly hot smaller quantities of coffee (1 to 4 cups)
- Dscaling button with descending indicator light
- Brew pause: stops the flow of coffee when the coffee pot is removed to pour a cup of coffee in mid-brew
- Coffee pot: 1 to 12 cups capacity (15 cl each)
- Heating plate: scratch resistant and nonstick coating
- Beep sound: signals the end of brew cycle with 5 beeps (not illustrated)
- Measuring scoop (not illustrated)
3. USE OF THE APPLIANCE
A. ASSEMBLY
Before the first use or after an extended period of non-use, fill the reservoir with cold water up to its maximum level (without coffee nor filter). Put the coffee pot into position, switch on (12 + 0/1 switch) and let the water flow.
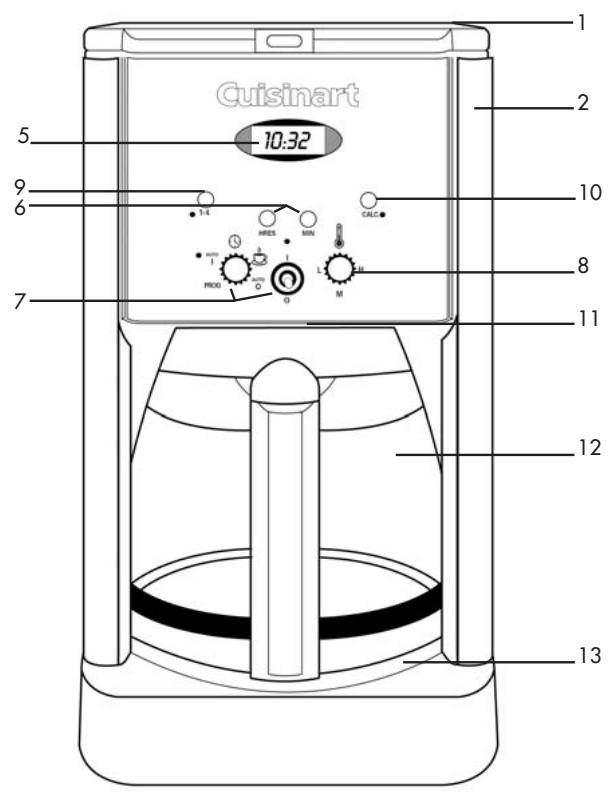
1. Insert the water filter
a. Remove the filter from polybag and soak in cold tap water for 15 minutes.
b. The water filter holder is located inside the water reservoir, on the left. Open the lid of the coffeemaker and remove the water filter holder by lifting it out. To open the water filter holder, place thumbs in slots directly under the arrows and pull open in opposite directions.
c. Place the filter at the bottom of the water filter holder as indicated on the diagram (Filter will only fit correctly in one end of the holder, that is the right side of the holder when positioned as on the diagram).
d. Close the water filter holder.
e. Re-place the water filter holder in the water reservoir pushing it all the way down to the base of the unit (The side of the holder where the filter is located should be downwards).
It is advised to replace the filter every 60th use approximately.
- Fill the water reservoir
Fill the reservoir with cold water depending on the desired number of cups (see height markings inside the reservoir).
Note: the coffee pot height markings represent the number of cups obtained. The difference between this scale and the water reservoir marks results from the amount of water lost in wetting the grounds.
- Add the ground coffee
Open the lid. Insert a #4 paper filter or the permanent filter (never both of them at the same time) in the filter holder. Add the desired amount of ground coffee in the filter. Use one measuring scoop per cup. This average dose can be adjusted to suit your taste.
- Flip the lid close. Push firmly on top.
- Make sure the coffee pot is in its position on the heating plate before switching the coffeemaker on.
- Turn the coffeemaker on.
B. OPERATING THE APPLIANCE
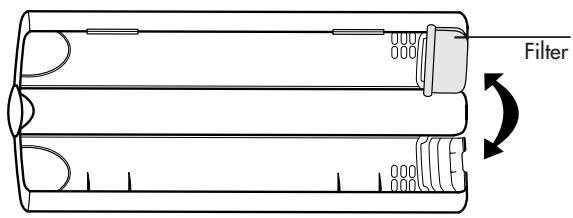
THE CONTROL PANEL
- Clock: displays the time of the day and the "AUTO 1" and "AUTO 0" functions times.
- Function knob: to set the time and program the automatic on or off time.
2a. PROG: to set the desired "auto on" time ("AUTO 1" function).
2b. AUTO 1: auto-on feature to program the starting time of the brew cycle. With green indicator light.
2c. AUTO 0: auto-off feature from 0 to 4 hours after coffeemaking start.
2d. : to set the time of the day.
2e. : to start the brew cycle directly.
- O/I switch: works in tandem with the function knob to start or stop a function.
- Central red indicator light: works with the O/I switch
- Heater plate control knob: to keep coffee warm after brewing. 3 positions: L = low, M = medium and H = high.
- Hour ("HRES") and minute ("MIN") buttons: to set the time and automatic on and off times.
- "CALC." : descending button: to eliminate calcium build-up. With red descending indicator light.
- 1-4 cup setting: ensures optimum temperature whilst preparing smaller pots of coffee (1 to 4 cups). With orange indicator light.
PROGRAMMING
- To turn the coffeemaker on and off
a. Turn on
- Turn the function knob on position.
- Flip the O/I switch up (I) and release.
- The central red indicator light illuminates and the brewing cycle starts.
- The end of brewing cycle is signalled by 5 beep sounds.
b. Turn off
- Depress the O/I switch (O) and release. The central red indicator light goes off and the appliance stops.
2. To set the time
- Turn the function knob on position.
- Press and hold the HRES and MIN buttons to increase the numbers and scroll them at increasing speed. When you get close to the desired number, pulse the push button to increase one digit at a time. When the numbers stop blinking, time is set.
Note: when the number count passes 12, "PM" will be displayed on the LCD to set the time from noon to midnight. When there is no indication, you will set AM times from 0 to noon. Always make sure that the time is set according to the correct period so that the automatic on and off functions operate correctly.
3. AUTO 1, auto-on feature
- Turn the function knob to PROG. The numbers blink.
- Press HRES and MIN to set the desired time to engage the auto-on. The numbers will blink 5 times, then stop.
- Turn the function knob to AUTO 1. The current time is now displayed.
- Lift and release the O/I switch. The green indicator light comes on to signal that the programming function is in use.
- At the programmed time, the central red indicator light will come on with the green light, indicating that the brewing cycle is starting.
- To turn off, depress the O/I switch down and release. The green indicator light (and the red if the brewing cycle has started) goes off.
4. AUTO 0, auto-off feature
- Turn the function knob to AUTO 0. The numbers blink.
- Press HRES and MIN to set the time after which you want the coffeemaker to shut off (from 0 to 4 hours). The numbers blink 5 times then stop.
5. Automatic descending
Use after use, scaling builds up. Scaling interferes with fine mechanics and gives coffee a hard and bitter taste. That is why the appliance should be regularly descaled to ensure good quality coffee. The descending frequency depends upon the hardness of your tap water and how often you use the coffemaker.
- When the coffeemaker needs descending, the descending indicator light next to the CALC. button begins to flash when the coffee is turned on (see Heading 6. CLEANING AND STORAGE).
- Press the CALC. button and switch on the appliance by flipping the O/I switch up. The descending indicator light stays on. The coffeemaker is now in "automatic descending" mode.
- When the cycle is completed, the 5 beeps sound and the coffemaker will shut off.
- A single descending cycle is generally enough. Switch the coffeemaker on (flip O/I switch up) to see if the descending light continues to flash. If not, the coffeemaker is descaled. If the indicator light continues to flash, repeat the descending operation.
- When the appliance is descaled, rinse by running a complete cycle with fresh water: fill the reservoir up to its maximum level with cold fresh water (without coffee nor filter). Switch the coffeemaker on (山) + O / I switch) and let water flow.
Note: pressing the descending button cancels all other settings. If it is pressed accidentally, press it again to cancel descending and return the coffeemaker to all its previous settings.
6. 1-4 cup setting
Allows to prepare small amounts of coffee (1 to 4 cups) while ensuring optimal temperature.
This function can be combined with all the other settings. Simply press the 1-4 button after having set functions and turned the unit on with 0/1 switch.
4. CHEFS' TIPS AND HINTS

- For a more flavourful coffee, use freshly ground coffee. Its flavour and aroma will develop even further when brewing.
- For a lightly flavoured coffee, place a cinnamon stick, some vanilla or a cardamom seed, for example, in the coffee pot.
- Reheating coffee that has gone cold is not recommended. Its taste will be altered and it will lose its aroma.
- Be sure to use the amounts of coffee recommended in the Cuisinart® recipe booklet.
5. QUESTIONS/ANSWERS
| What to do if: | Answers: |
| my appliance doesn’t work? | The appliance has been unplugged. |
| the coffee isn’t flowing? | The coffee pot and the filter basket are not properly positioned. |
| there are coffee grounds on the inside of the machine? | Do not exceed the maximum recommended quantities. |
| the programme function does not run? | Refer to section B. OPERATING THE APPLIANCE -THE PROGRAMMING |
6. CLEANING AND STORAGE
- When the CALC. light illuminates, decalcify the coffee maker with a decalcification solution, following the instructions of the product.
- It's also possible to clean with white vinegar, use 30cl vinegar in 30cl water. Pour the solution into the water reservoir and start the brewing cycle. Halfway through the cycle, turn the machine off, let it sit for one hour then restart the cycle. Run two cycles of water alone through the machine to rinse it.
Let the appliance cool down completely and switch it off before cleaning.
- To clean the outside of the coffeemaker, wipe clean with a sponge using a mild detergent, then dry carefully.
- The filter-holder, measuring scoop, coffee pot and its lid can be washed in the dishwasher (in the top tray only).
- Wipe the heating plate and the area under the filter-holder
with a damp cloth.
- Do not dry the inside of the water reservoir with a cloth as lint may remain.
- Do not use abrasive sponges or products that might damage the coating.
- NEVER IMMERSE THE BASE OF THE UNIT IN WATER OR ANY OTHER LIQUID.
7. SAFETY CAUTIONS
- Always use cold water to prepare coffee.
- Never touch the heating plate.
- Do not remove the coffee pot for longer than 30 seconds before end of the cycle or the coffee may overflow the filter holder.
- Never wind the cord around the appliance.
- Do not let the cord hang over the edge of the kitchen worktop and avoid any contact with the heating plate or hot surfaces.
- Do not place the appliance on or near a heating device.
- Always disconnect the appliance after use and before cleaning. Never leave the appliance unattended. To disconnect it, pull the plug and not the cord.
- Increased supervision is necessary when this appliance is used near children. The coffeemaker should not be used by children. Store out of children's reach.
- Do not use the appliance if it has fallen or if it shows noticeable signs of damage.
- Stop using the appliance immediately if the cord is damaged. If the power supply cord is damaged, it should be replaced by the manufacturer or its after-sales service only.
- Do not try to carry out any repairs yourself.
-
The use of attachments not recommended or sold by Cuisinart® may result in fire, electrical shock, or injury.
-
This appliance complies with the basic requirements of directives 89/336/EEC (electromagnetic compatibility) and 73/23/EEC (safety of domestic electrical appliances) amended by directive 93/68/EEC (CE marking).
- Use this appliance only for preparing coffee, following the instructions of this manual.
- Do not use outside.
- For domestic use only.
1. EINLEITUNG
- INHALTSVERZEICHNIS
- CHARACTERISTIQUES PRODUIT
- QUESTIONS/RESPONSES
- DESCRIPTION
- USE OF THE APPLIANCE
- ASSEMBLY
- Insert the water filter
- PROGRAMMING
- b. Turn off
- To set the time
- AUTO 1, auto-on feature
- AUTO 0, auto-off feature
- Automatic descending
- 1-4 cup setting
- CHEFS' TIPS AND HINTS
- QUESTIONS/ANSWERS
- CLEANING AND STORAGE
- SAFETY CAUTIONS
- EINLEITUNG
Brand : CUISINART
Model : DCC1200E
Category : Coffee maker