
CEC7E - Steamer CUISINART - Free user manual and instructions
Find the device manual for free CEC7E CUISINART in PDF.
| Product Type | Steamer (egg cooker) |
| Brand | Cuisinart |
| Model | CEC7E |
| Capacity (soft/medium/hard boiled eggs) | Up to 7 eggs |
| Capacity (poached eggs) | Up to 3 eggs |
| Dome material | Brushed steel with insulated handles |
| Plate coating | Non-stick |
| Power supply | 220-240V, 50Hz (standard estimate) |
| Power | Not specified |
| Cooking functions | Soft, medium, hard boiled, poached |
| Automatic shut-off | Yes, with audible signal |
| Indicator light | Yes (on/off) |
| Cooking time (approximate) | Soft 6-9 min, medium 12-14 min, hard 15-18 min, poached 10 min |
| Included accessories | 7-egg rack, poaching tray, measuring cup with pin, 2 egg cup holders |
| Cleaning removable parts | Dishwasher (top rack) or warm soapy water |
| Cleaning the base | Damp cloth, descaling with white vinegar |
| Safety | Do not immerse base, unplug before cleaning |
| Repairability | Not specified, no user repair |
| Dimensions (approx.) | 20 x 20 x 20 cm (estimated) |
| Weight (approx.) | 1 kg (estimated) |
| Warranty | Not specified |
Frequently Asked Questions - CEC7E CUISINART
User questions about CEC7E CUISINART
0 question about this device. Answer the ones you know or ask your own.
Ask a new question about this device
Download the instructions for your Steamer in PDF format for free! Find your manual CEC7E - CUISINART and take your electronic device back in hand. On this page are published all the documents necessary for the use of your device. CEC7E by CUISINART.
USER MANUAL CEC7E CUISINART
A. Assembly 9
B. Operating the appliance 9
4.Chef's tips and hints 10
5. Questions/Answers 11
6. Cleaning and storage 11
7. Safety Cautions 11
INHALTSVERZEICHNIS
2. CHARACTERISTIQUES PRODUIT


5. QUESTIONS/RESPONSES
You have just purchased a Cuisinart® egg cooker. A combination of in-depth research into innovation and outstanding design have gone into creating an appliance of guaranteed high quality. Simple to use and to maintain, this appliance allows you to prepare eggs in any number of ways that are both simple and original.
The egg cooker is ideal for cooking up to seven eggs in a number of different ways (hard-boiled, soft-boiled, medium, poached, etc) without the need for supervision thanks to the automatic shut-off at the end of the cooking time.
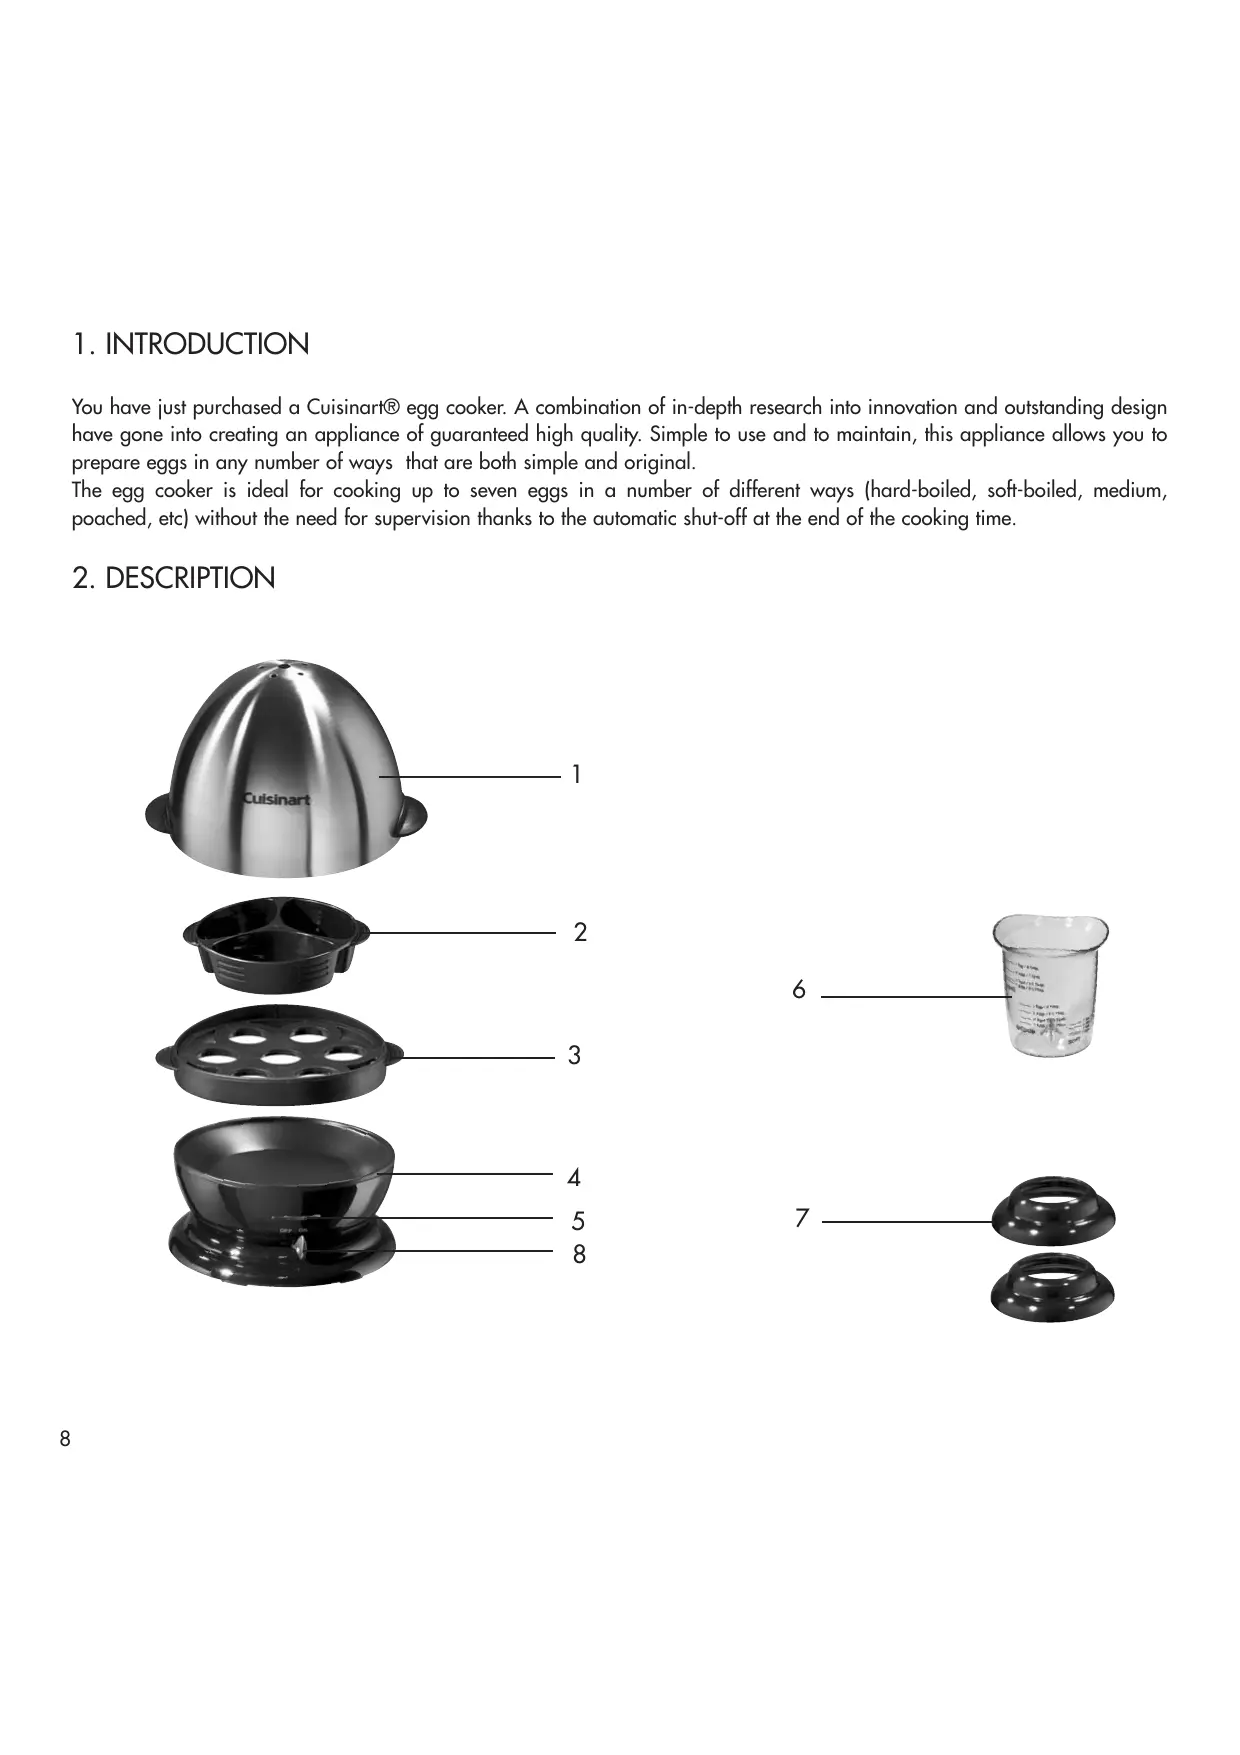
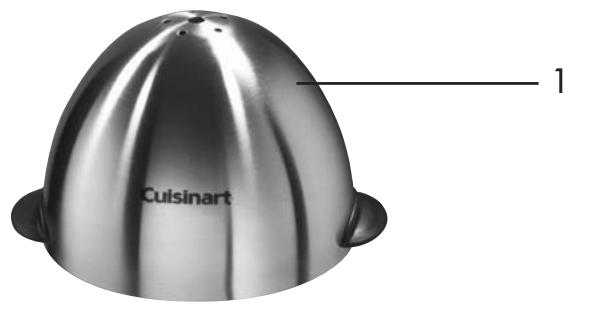
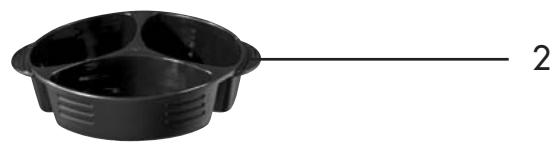
2.DESCRIPTION
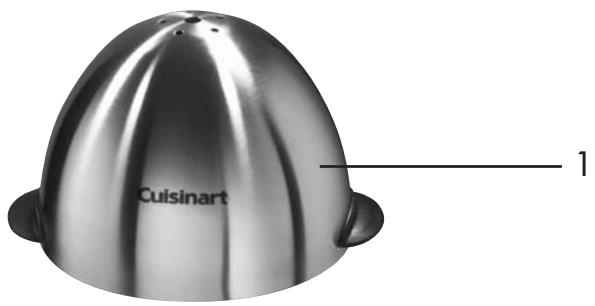
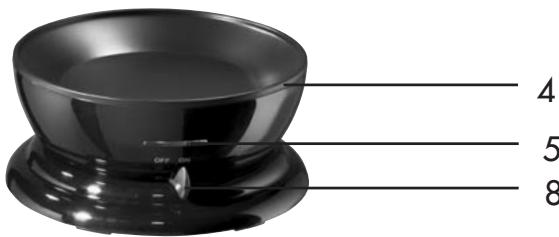


- Brushed stainless steel dome-shaped lid with insulated handles.
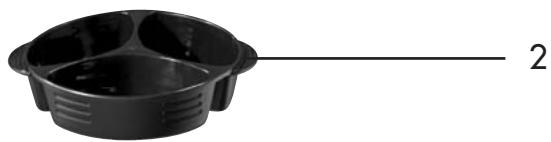
- 1 poaching dish for cooking up to three eggs.
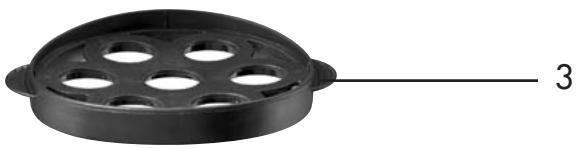
- 1 cooking rack for between one and seven eggs for cooking either hard-, soft-, or medium-boiled.
- Base with non-stick coated heating plate.
- Indicator light: when the switch is turned to the "ON" position the light will come on; when the switch is turned to the "OFF" position, the indicator light will go off.
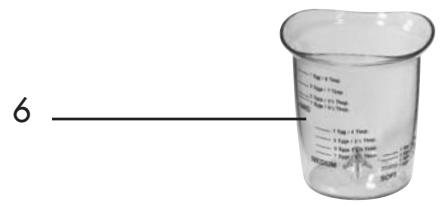
- Measuring beaker with piercing needle: should be filled with water according to the number of eggs and the desired consistency of your eggs. The pin is for piercing the eggs to prevent the shells from cracking during cooking.
- Two small "egg-cup" type holders to hold the eggs after cooking.
- On/Off switch: once the eggs are cooked the cooker will emit a signal.
3. USE OF THE APPLIANCE
A. ASSEMBLY
- Rinse the lid, the poaching tray and the cooking rack in hot soapy water or in the dishwasher (top rack only). DO NOT IMMERSE THE APPLIANCE IN WATER OR ANY OTHER LIQUID. The appliance should be cleaned with a sponge or a damp cloth. For further information see heading "Cleaning and Maintenance".
- Place the poaching dish, measuring beaker and the small egg holders next to the appliance.
NOTE! The needle at the bottom of the measuring beaker is extremely sharp. It is protected by a small plastic cover which can be replaced after use.
- Place the cooking rack for boiled eggs on the appliance.
-
Place the lid over the cooking rack.
-
Plug in to the mains. Your egg cooker is now assembled ready for use.
B. OPERATING THE APPLIANCE
The cooking rack can hold:
From 1 to 7 soft-boiled eggs
From 1 to 7 medium-boiled eggs
From 1 to 7 hard-boiled eggs
- Remove the lid of the egg cooker.
- Using the measuring beaker, choose the consistency of the eggs you prefer and the number of eggs you want to cook (see table of cooking times below). Fill with cold water to the line indicated. For best results, use distilled water; normal tap water contains minerals which can cause the eggs to become discoloured.
- Pour the cold water into the heating tray.
- Place the cooking rack into the base.
- Rinse the quantity of eggs required. You can cook up to seven eggs at any one time.
- Using the piercing needle that you will find in the bottom of the measuring beaker, pierce the top of each egg and place them in the cooking rack. Rinse the pin after use.
- Place the lid over the appliance and put switch into the "ON" position. The indicator light will come on.
- When the water has completely evaporated the eggs are cooked according to the consistency required. The cooking time will depend on the number of eggs and the consistency required (see table of approximate cooking times below).
- A signal will be emitted when cooking is complete. Remove the eggs immediately to prevent overcooking.
- Run cold water over the eggs. The eggs are ready to serve.
For additional eggs:
- In order to remove any deposits created by the minerals in the water, wipe the heating plate with a cloth that has been moistened with a spoon of white vinegar.
- Repeat steps 1 - 10.
| Consistency of Egg Desired | Number of Eggs | Approximately Cooking Time |
| Poached eggs | 1 to 3 | 10 minutes |
| Soft boiled eggs | 1 to 7 | 6 to 9 minutes |
| Medium-boiled eggs | 1 to 7 | 12 to 14 minutes |
| Hard-boiled eggs | 1 to 7 | 15 to 18 minutes |
The tray for poached eggs holds:
From 1 to 3 plain poached eggs
It is also possible to garnish the base of the poaching dish with ingredients such as bacon, herbs, cheese, etc.
- Remove the lid from the egg cooker and the cooking tray.
- Fill the measuring beaker with cold water up to the level for 1 to 3 soft-boiled eggs. Pour the cold water into the heating plate.
- Grease the poaching dish with butter or vegetable oil to prevent the eggs sticking during cooking.
- Break one egg into the poaching dish. The cooker can take up to three poached eggs.
- Place the cooking rack onto the base and place the poaching dish onto the cooking rack.
- Place the lid on the appliance and turn the switch to the "ON" position. The indicator light will come on.
- When the water has completely evaporated the eggs are poached. The cooking time is approximately 10 minutes.
-
When cooking is complete a signal will be emitted and the indicator will turn off. Remove the eggs immediately to prevent them overcooking.
-
Use a small spatula to remove the poached eggs from the poaching dish.
4. CHEFS' TIPS AND HINTS
- In order to avoid sharp temperature changes and thus avoid the risk of eggs cracking, always use eggs at room temperature.
- As far as possible, always use fresh eggs.
- Above all, never try to cook the eggs without the cooking rack.
- Piercing the top of the shell has two benefits: it prevents the shells from cracking during cooking and it slightly reduces the cooking time.
- Do not forget to grease the poaching dish with butter or oil when cooking poached eggs in order to prevent the whites sticking to the dish during cooking.
-
Eggs are a highly nutritional natural food containing:
-
7.5g protein
-6g fat - 30mg calcium
- 1.5mg iron
- Vitamins A, B, D and E
5. QUESTIONS/ANSWERS
| What to do if: | Answer: |
| My appliance does not work? | • Make sure the switch is in the “ON” position and check that you have put water into the appliance. • Check that the appliance is correctly plugged in. |
| The eggs are not cooking? | • Check that you have added the right quantity of water for the consistency you want. |
| The eggs have cracked in the appliance? | • The eggs were too cold |
6. CLEANING AND STORAGE
You can leave the appliance out on the kitchen work surface.
Always unplug the appliance when not in use.
You can wash the lid, the cooking rack and the poached egg dish in hot soapy water or in the dishwasher (in the top tray only).
Clean the heating plate with a cloth moistened with a spoonful of white vinegar. This will prevent any limescale deposits building up from minerals in the water and will also act as an anti-bacterial agent. You can also clean the heating plate using a damp sponge or cloth.
NOTE: If the appliance is not cleaned with white vinegar (see above) on a regular basis, deposits from the minerals in the water will build up and cause discoloration of eggshells. This discoloration however, will not affect the taste of the eggs.
Wipe main base of the appliance with a damp cloth.
DO NOT IMMERSE THE APPLIANCE IN WATER OR ANY OTHER LIQUID
Place the clean cooking rack, poaching dish, measuring beaker and egg holders on top of one another inside the housing before storing.
7. SAFETY CAUTIONS
- Do not immerse the housing of the appliance in water or any other liquid.
- Unplug the appliance after use, before assembling or taking apart or before cleaning. Never leave the appliance switched on unmonitored. To unplug, pull on the plug never the wire.
- Do not let the cord hang over the edge of the table or work surface and when storing wrap the cord into the space specially designated for this under the base of the appliance. Do not leave the wire in contact with hot surfaces.
- Never leave the appliance on or close to a source of heat.
- Avoid contact with moving parts when using the appliance.
- Be particularly vigilant when the appliance is in use near children. Always store out of the reach of children.
- Do not operate the appliance if it has been dropped or looks damaged in any way or is not functioning properly.
- Stop using the appliance IMMEDIATELY if the cord is damaged and have this replaced by a professional.
- Do not try to carry out any repairs yourself.
- The use of attachments not recommended or sold by Cuisinart® may result in fire, electrical shock, or injury.
- This appliance meets the norms laid down in the following EU directives: 89/336/EEC (electromagnetic compatibility) and 73/23/EEC (safety of domestic electrical appliances), and amendment directive 93/68 EEC (CE marking).
- This appliance should be used exclusively for cooking eggs, and according to the instructions in this manual.
- Do not use the appliance outdoors.
- For domestic use only.
1. EINLEITUNG
- INHALTSVERZEICHNIS
- CHARACTERISTIQUES PRODUIT
- QUESTIONS/RESPONSES
- 2.DESCRIPTION
- USE OF THE APPLIANCE
- ASSEMBLY
- OPERATING THE APPLIANCE
- The cooking rack can hold:
- The tray for poached eggs holds:
- CHEFS' TIPS AND HINTS
- QUESTIONS/ANSWERS
- CLEANING AND STORAGE
- DO NOT IMMERSE THE APPLIANCE IN WATER OR ANY OTHER LIQUID
- SAFETY CAUTIONS
- EINLEITUNG
Brand : CUISINART
Model : CEC7E
Category : Steamer