StarNet – DM256 - Digital audio converter AMS Neve - Free user manual and instructions
Find the device manual for free StarNet – DM256 AMS Neve in PDF.


User questions about StarNet – DM256 AMS Neve
0 question about this device. Answer the ones you know or ask your own.
Ask a new question about this device
Download the instructions for your Digital audio converter in PDF format for free! Find your manual StarNet – DM256 - AMS Neve and take your electronic device back in hand. On this page are published all the documents necessary for the use of your device. StarNet – DM256 by AMS Neve.
USER MANUAL StarNet – DM256 AMS Neve
Neve
StarNet - DM256

256 I/O Digital Audio Network to MADI Format Converter User Manual
Issue 1
FOR YOUR OWN SAFETY AND FOR THE PROTECTION OF OTHERS PLEASE OBSERVE THE FOLLOWING HEALTH AND SAFETY INSTRUCTIONS



- READ THESE INSTRUCTIONS AND KEEP THEM HANDY
• HEED ALL SAFETY WARNINGS
• DO NOT USE NEAR WATER - CLEAN ONLY WITH A DRY CLOTH
• DO NOT INSTALL NEAR HEAT SOURCES
• DO NOT BLOCK VENTILATION OPENINGS
• PROTECT THE POWER CORD
• USE ONLY ACCESSORIES SPECIFIED BY THE MANUFACTURER
• UNPLUG WHEN UNUSED FOR LONG PERIODS - OPTIONAL CARDS SHOULD NOT BE INSERTED OR REMOVED WITH THE POWER ON
• REFER ALL SERVICING TO QUALIFIED PERSONNEL ONLY
• NO USER-SERVICEABLE PARTS INSIDE
FAILURE TO OBSERVE THESE PROCEDURES AND RECOMMENDATIONS WILL INVALIDATE THE MANUFACTURER'S WARRANTY
POUR VOTRE SECURITE ET CELLE DES AUTRES MERCI DE RESPECTER LES INSTRUCTIONS DE SANTE ET SECURITE SUIVANTES



• LISEZ CES INSTRUCTIONS ET GARDEZ-LES À PORTÉE DE MAIN
• TENEZ COMPTE DE TOUS LES AVERTISSEMENTS DE SÉCURITÉ
• NE PAS UTILISER PRÈS D'UNE SOURCE D'EAU
• NETTOYER UNIQUEMENT AVEC UN CHIFFON SEC
• NE PAS INSTALLER PRÈS D'UNE SOURCE DE CHALEUR
- NE PAS BLOQUER LES BOUCHES D'AÉRATION
• PROTÉGER LE CORDON D'ALIMENTATION
• N'UTILISER QUE LES ACCESSOIRES SPÉCIFIÉS PAR LE FABRICANT
• DÉBRANCHER PENDANT DE LONGUES PÉRIODES D'INACTIVITÉ
- NE PAS INSÉRER OU RETIRER D'EVENTUELLES CARTES OPTIONNELLES ALORS QUE L'APPAREIL EST SOUS TENSION
- CONFIER TOUTES LES OPÉRATIONS DE MAINTENANCE À DU PERSONNEL QUALIFIÉ UNIQUEMENT
• AUCUNE PIÈCE INTERNE N'EST RÉPARABLE PAR L'UTILISATEUR
LE NON-RESPECT DE CES PROCÉDURES ET RECOMMANDATIONS INVALIDERA LA GARANTIE DU FABRICANT
Important Safety Instructions
For your own safety and for the protection of others, please observe the following safety precautions:
1) Read these instructions.
2) Keep these instructions.
3) Heed all warnings.
4) Follow all instructions.
5) WARNING: To reduce the risk of fire or electric shock, do not expose this apparatus to rain or moisture
6) Clean only with dry cloth.
7) Do not block any ventilation openings.
8) Do not install near any heat sources such as radiators, heat registers, stoves, or other apparatus (including amplifiers) that produce heat.
9) Protect the power cord from being walked on or pinched particularly at plugs, convenience receptacles, and the point where they exit from the apparatus.
10) Unplug this apparatus during lightning storms or when unused for long periods of time.
11) Refer all servicing to qualified service personnel. Servicing is required when the apparatus has been damaged in any way, such as when liquid has been spilled or objects have fallen into the apparatus, the apparatus has been exposed to rain or moisture, does not operate normally, or has been dropped.
WARNING:
TO REDUCE THE RISK OF FIRE OR ELECTRIC SHOCK, DO NOT EXPOSE THIS APPARATUS TO RAIN OR MOISTURE.
WARNING:
THIS APPARATUS HAS CLASS I CONSTRUCTION AND SHALL BE CONNECTED TO THE EXTERNAL PSU MAINS SOCKET OUTLET WITH A PROTECTIVE EARTHING CONNECTION.
WARNING:
WHERE THE MAINS PLUG OR AN APPLIANCE COUPLER IS USED AS THE DISCONNECT DEVICE, THE DISCONNECT DEVICE SHALL REMAIN READILY OPERABLE.
Head Office:
AMS Neve
Billington Road
Burnley
Lancashire
England
BB11 5UB
Phone: +44 (0) 1282 457 011
Fax: +44 (0) 1282 417 282
Email: Info@ams-neve.com
Web: www.ams-neve.com
Table of Contents
Health & Safety notice....2
Health & safety notice (French)....3
Important Safety Instructions ....4
Important Safety Instructions (French) 5
StarNet DM256 Introduction 7
Rackmount Instructions 8
Rackmount Instructions (French) 8
Configuring the StarNet DM256 9
Front Panel Controls....10
Rear Panel Connections....12
Ethernet Connections....13
MADI Port Settings 14
Global Settings....16
Dante Audio-Over-IP 18
Dante Network Connections ....19
Dante Controller 20
Firmware Updater 24
Dimensions and Power Requirements ....30
Unit Connection Table 31


The StarNet DM265 is a powerful, high channel count, MADI to Dante and Dante to MADI digital audio format converter housed in a 1U 19" rack chassis. The DM256 is a compact, professional unit, that harnesses Dante IP core technology, allowing a huge I/O count through a single ethernet connection. Capable of converting up to 256 channels of Dante Rx to 256 channels of MADI Tx and up to 256 channels of MADI Rx to 256 channels of Dante Tx, the DM256 is the ideal format conversion system for a wide range of recording studios, live sound venues, and broadcast or post-production suites.
The StarNet DM256 accommodates a large digital I/O count, greater than any current MADI conversion system on the outboard market. The 256 channels of MADI IN/MADI OUT are split over four MADI ports featuring duplex MADI SC optical connections, and dual-BNC coaxial connections, each capable of 64 I/O or legacy 56 I/O MADI formats, accommodating any professional MADI standard. All MADI ports are compatible with the AES 10 specification as defined by the Audio Engineering Society.
In addition, the Neve StarNet DM256 uses a modern, low-drift crystal oscillator clocking system and PLL. This system makes the DM256 the ideal master clock in any professional studio environment, devices can synchronise to the DM256 master clock via a 75 Ohm BNC word clock output, and the StarNet DM256 can synchronise with external equipment via a 75 Ohm BNC word clock input connection.
Dante connections are provided by dual Ethernet ports on the rear of the unit - labelled Primary and Secondary. This redundant system provides reliability in case of network failure. Alternatively, the Secondary port can be used to daisy-chain multiple units together when operating in switched mode.
The DM256 features a unique Maximum channel mapping (MCM) feature. This system keeps your sessions in line, with automatic multiplexing of MADI I/O assignments per-port allowing for regular switching of sample rates across the network.
To accommodate for 32-bit integer bit depths, the DM256 features multiple dithering options to prevent truncation-distortion above the noise floor. Automatic and manual Dithering can be applied globally or to each port individually.
The front-mounted OLED screen displays at-a-glance network settings, sample rate, bit depth, Pull-Up/Pull-Down, clock source, dither, channel mapping and comms IP settings. Simple menu navigation buttons are fitted either side of the OLED screen, and input/output LEDs display signal and clip information for all 16 analogue inputs & outputs.
The unit's external PSU keeps unwanted heat away from the internal components of the StarNet DM256, protecting them from heat damage and offering a long lifespan of any StarNet DM256 unit.
▶ Elevated Operating Ambient- If installed in a closed or multi-unit rack assembly, the operating ambient temperature of the rack environment may be greater than room ambient. Therefore, consideration should be given to installing the equipment in an environment compatible with the maximum ambient temperature (30°C) specified by the manufacturer.
▶ Reduced Air Flow - Installation of the equipment in a rack should be such that the amount of airflow required for safe operation of the equipment is not compromised.
▶ Mechanical Loading - The mounting of the equipment in the rack should be such that a hazardous condition is not created by improper or uneven mechanical loading.
▶ Reliable Earthing - Reliable earthing of rack-mounted equipment should be maintained. Particular attention should be given to supply connections other than direct connections to the branch circuit (e.g. use of power strips).
Installation en Baie (rack)
To operate the StarNet DM256, configure as follows:
▶ Ensure unit is switched off by depressing the front ON switch.
▶ Connect the PSU to the mains supply.
▶ Connect the supplied power adaptor (PS12221) to the rear 5-pin DIN input.
Connect your MADI input source/s to the rear unit MADI optical or Coaxial connectors.
Connect the Primary network port to the Dante network by using either a CAT5e or CAT6 Ethernet cable.
Connect the Secondary network port to the Dante network by using either a CAT5e or CAT6 Ethernet cable if required.
▶ Switch on the unit; it will default to the last-used setting. Adjust front headroom and meter controls as required.
▶ Select Port input type, channel count, clock source, dither from the front panel.
▶ Open Dante Controller on the computer connected to the Dante network to configure the unit's sample rate, bit depth, etc.


Front Panel
POWER: Switches the unit on or off. The button will light red when the unit is powered ON.
MADI Port Information Indicators: Each input port features several LEDs used to display connection information and user defined settings., This information is split into MADI, Clock, & Dither.

MADI Error: Illuminates Red if incoming RX MADI is not detected, or if there is a MADI stream violation, i.e. 8b/10b decoding error of incoming MADI stream.

MADI Error: Illuminates Amber if there is no MADI stream violation (i.e. 8b/10b decoding is good). But there is either no sync, OR incorrect number of Rx channels detected, OR Dante and MADI word clock are not locked.

MADI Optical: The COAX LED is switched off to indicate that optical MADI is selected for the current MADI port. Optical MADI is the default setting.

MADI COAX: Illuminates Green if coaxial MADI is selected for the current MADI port.

MADI 56: Illuminates Blue if legacy 56 channel MADI is selected for the current MADI port.

Clock Dante: Illuminates Green if Dante is selected as clock source for the current MADI port.

CLOCK Legacy: Illuminates Amber if Legacy MADI clock is selected for the current MADI port.

Dither Off: Both LEDs off if no dither settings are activated for the current MADI port.

Dither Auto: Illuminates Green if automatic dither is selected for the current MADI port.

Dither All: Illuminates Amber if All dither is selected for the current MADI port.
OLED Display
The OLED display mounted on the unit front panel is used to display Dante network settings, Sample Rate, Internal/External Clock settings, encoding settings and additional controls.

Front Panel Adjustable Settings
The following settings are adjusted via the front panel controls:

DIT: [OFF]
DIT: adjusts the unit's global dither settings. Dither has three global options – Off, Auto & All.
See Global Dither Settings for more information.
MCM: [OFF]
MCM: adjusts the unit's Maximum Channel Mapping setting. MCM has three global options – Off, 96k, & 192k.
See Maximum Channel Mapping (MCM) for more information.
Network: [Setup]
Network: Setup enters Ip config window
See Firmware Updater for more information.


DC IN: 5 pin DIN power inlet for the power supply.

CHASSIS: Provides a physical connection for the technical earth circuit.

TECH EARTH: Activates the technical earth circuit to the chassis connection.

SOFT: Soft keys are reserved for future firmware use.

COMMS: Ethernet port for communication data and firmware updates.
PRIMARY: RJ-45 Connector for Cat5/6 Ethernet port to connect to the primary Dante Audio-over-IP Network.

SECONDARY: RJ-45 Connector for Cat5/6 Ethernet port to connect to the secondary Dante Audio-over-IP Network.

WCLK I/P: Word Clock 75Ω BNC input.

WCLK O/P: Word Clock 75Ω BNC output.

MADI 1-4 Rx: BNC input connectors for each MADI port.

MADI 1-4 Tx: BNC output connectors for each MADI port.

MADI Optical Rx/Tx: Duplex MADI SC female connector for each MADI port.
Ethernet Connections

To connect the StarNet to the Dante Network using either the Primary or Secondary network port, an RJ-45 connector type with CAT5e or CAT6 Ethernet cable must be used.
Caution: The Unit must be connected via a Gigabit Ethernet switching hub.

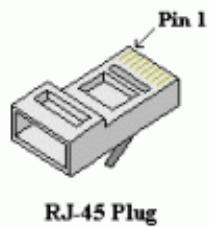
| Pin | CAT6 Core |
| 1 | Orange + White |
| 2 | Orange |
| 3 | Green + White |
| 4 | Blue |
| 5 | Blue + White |
| 6 | Green |
| 7 | Brown + White |
| 8 | Brown |

Configuring MADI Connections
Each of the four ports can connect either via optical duplex SC MADI connections, or coaxial dual BNC connectors.
Connect your device using one of the available connectors.
Optical MADI is the default connection type. If connecting this way, the COAX LED should be off.
If connecting using coaxial MADI, the port must be configured to accept the BNC connection.
Press Ⓜ to access the MADI port configuration window.
Pressing ⓗ will toggle through ports 1-4 until reaching the selected port.
Select Input:[COAX] by pressing
The Coax LED will illuminate Green once set.
Configuring MADI Channel Count
Each of the four ports is set to 64 I/O MADI by default. Each port can be configured independently to 56 I/O if using MADI systems that support only MADI 56.
Press Ⓜ to access the MADI port configuration window.
Pressing ⓗ will toggle through ports 1-4 until reaching the selected port.
Use the ◀▶ keys to navigate to the Channels setting.
Select Channels:[56] by pressing
The 56 LED will illuminate blue once set.
Configuring Legacy Clocking Mode
The DM256 includes a legacy clocking feature that allows older equipment which can only be set at 44.1 & 48kHz to clock the DM256 when set at higher sample rates.
A 1Fs sample clock is transmitted via the MADI Tx optical/coaxial port even if the DM256 sample rate is set to 2Fs (88.2/96kHz) or 4Fs (176.4/192kHz).
To function correctly, DM256 sample rates must be set at a whole 2 frame sizes or 4 frame sizes of that of the legacy equipment sample rate.
Legacy equipment set at 44.1kHz = DM256 set at 88.2kHz or 176.4kHz
Legacy equipment set at 48kHz = DM256 96kHz or 192kHz
Mismatched frame sizes will not function E.g., 44.1kHz/96kHz, 48/88.2 etc.


Press Ⓜ to access the MADI port configuration window.
Pressing Ⓜ will toggle through ports 1-4 until reaching the selected port.
Use the ◀▶ keys to navigate to the Clock setting.
Select Clock:[Legacy] by pressing
The LEGACY LED will illuminate amber once set.
Configuring MADI Port Dither Settings
Once the global setting is applied, dither can be activated on a per-port basis. Individual ports can either choose to deactivate dither, or to reflect the global dither setting.
See Global Dither Settings for further information.
Press Ⓜ to access the MADI port configuration window.
Pressing Ⓜ will toggle through ports 1-4 until reaching the selected port.
Use the ◀▶ keys to navigate to the Channels setting.


If no dithering is required
Select DIT:[OFF] by pressing
No LEDs will illuminate on the front panel.

If DIT:All is selected in the global dither settings -
Select DIT:[All] by pressing
The DITHER ALL LED will illuminate Amber once set.

If DIT:AUTO is selected in the global dither settings -
Select DIT:[AUTO] by pressing
The DITHER ALL LED will illuminate Green once set.
Global Dither Settings
MADI Ports are a maximum of 24-bit depth whereas Dante allows up to 32-bit audio per sample. The DM256 allows dither to be enabled so that any 32-bit audio samples received from the Dante network are fed into the MADI outputs truncated, with the bottom 2 bits dithered (triangular dither).
To enable individual MADI port dither options, the global dither setting must be activated. There are three global dither options – ALL, AUTO & OFF
Use the ◀▶ keys in the main OLED menu to navigate to the dither setting.
DIT: [ALL] Dither is added to the MADI Tx regardless of whether the Dante Rx audio length is 24 or 32 bits.
| PRI: Leader | SEC: -- |
| SR: 96k | PUP: None |
| CLK: WCK | ENC: PCM 32 |
| DIT: [ALL] | MCM: 96k |
| Network: | Setup |
| PRI: Leader | SEC: -- |
| SR: 96k | PUP: None |
| CLK: WCK | ENC: PCM 32 |
| DIT: [AUTO] | MCM: 96k |
| Network: | Setup |
DIT: [AUTO] The DM256 analyses each Dante Rx sample received and if 32-bit audio is received, it is automatically truncated to 24 bits, with dither applied to the bottom two bits. 24-bit audio is passed through untouched.
| PRI: Leader | SEC: -- |
| SR: 96k | PUP: None |
| CLK: WCK | ENC: PCM 32 |
| DIT: [OFF] | MCM: 96k |
| Network: | Setup |
DIT: [OFF] No dither is added. 32-bit audio is truncated to 24- and 24-bit audio is passed through untouched.

| PRI: Leader | SEC: -- |
| SR: 96k | PUP: None |
| CLK: WCK | ENC: PCM 32 |
| DIT: ALL | MCM: [OFF] |
| Network: | Setup |
| PRI: Leader | SEC: -- |
| SR: 96k | PUP: None |
| CLK: WCK | ENC: PCM 32 |
| DIT: ALL | MCM: [96k ] |
| Network: | Setup |
| PRI: Leader | SEC: -- |
| SR: 96k | PUP: None |
| CLK: WCK | ENC: PCM 32 |
| DIT: ALL | MCM: [192k] |
| Network: | Setup |
Maximum Channel Mapping (MCM)
Maximum Channel mapping is an I/O configuration tool included in the DM256. MADI protocol halves the number of channels per MADI port each time the sample rate is doubled. This can result in I/O mapping between Dante and MADI channels becoming disconnected as the sample rate on the Dante network changes. Without MCM in place, I/O mapping on the Dante side would have to change each time the sample rate is changed in order to keep the routing correct. The MCM option allows you to select the maximum sample rate you intend to operate at while retaining MADI and Dante I/O mapping for all sample rates.
Use the ◀▶ keys in the main OLED menu to navigate to the MCM setting.
If you intend to switch frequently between 1FS and 2FS, then setting the MCM:96K option will limit the number of channels on each MADI port to 32. When switching between 1FS and 2FS, the 1st MADI port will always carry channels 1-32, the 2nd MADI port channels 33-64, the 3rd MADI port channels 65–97 and the 4th MADI port channels 98-128.
Setting the MCM:192K will limit the number of channels on each MADI port to 16. When switching between 1FS, 2FS and 4FS, the 1st MADI port will always carry channels 1-16, the 2nd MADI port channels 16-32, the 3rd MADI port channels 33-48 and the 4th MADI port channels 49-64.
Below is an example of how MCM affects MADI porting to Dante mapping within Dante controller when set at MCM:192K.
A maximum of 64 I/O, using all four MADI ports is applied to all sample rates.

Dante is a complete, audio-over-lp networking solution developed by Audinate and supported by pro audio manufacturers. Dante enables digital audio distribution via standard Ethernet networks — the same networks used for home or office data networking.
The StarNet DM256 is a Dante-enabled networked audio device visible and controllable from the Dante network.
Digital MADI inputs will be converted to Dante digital signals within the unit to send to many other devices over the Dante Audio-over-IP network.
Digital Dante signals sent to the device over the Dante audio-over-IP network will be converted to digital MADI signals via the unit's optical or coaxial MADI output connectors to any MADI enabled device.
The PRIMARY or SECONDARY Dante ports must be connected via a CAT5 or CAT6 cable to the Dante network to use the StarNet DM256 as a Dante-enabled audio device.
Once the connection is made, PRI or SEC status on the OLED display will show as Leader or Follower depending on Dante controllers preferred master settings, this indicates a valid Dante connection.


The StarNet DM256 has both a PRIMARY Dante network port and a redundant SECONDARY Dante network port.
The Primary network port connects to the primary Dante network along with your Dante Controller-enabled Mac/PC. Additional Dante devices are also connected to this network and will appear as available transmitters or receivers in the Dante Controller routing matrix. Subscriptions from the StarNet DM256 can be made to any other known device via Dante Controller.
The secondary Dante network port is used to create a redundant Dante network and provides a failsafe Dante connection should the primary network fail. The secondary network connection must be made using a separate gigabit Ethernet switch.
All Dante connections should be made using CAT5e or CAT6 Ethernet cable and connections must be made by using gigabit switches.
For more information on Dante Networked audio please visit
www.audinate.com
The Dante Controller software allows users to route any of the StarNet DM256 audio paths to any available network audio device via the simple routing matrix on the main screen.

This window is uses horizontal and vertical tabs to make audio connections between units visible on the Dante network. Active connections are called subscriptions.
The horizontal tab shows ‘Transmitters’. These are digital audio outputs from your units, and the StarNet DM256 has 256 available transmitters.
The vertical tab shows 'Receivers'. These are digital audio inputs into your units. The StarNet DM256 has 256 available receivers.
Making Connections
Connections (subscriptions) are made by clicking the matrix boxes and are active when a green tick √ (subscribed) appears on the connection box. Audio from StarNet will now pass through to its routed location.
(In Progress) Indicates a subscription in progress.
(S) (Error) Indicates a failed connection. This could occur under a number of circumstances. See www.Audinate.com for troubleshooting.
⚠ Warning) Indicates an unresolved subscription. Typically, this is because the transmitting device is not visible on the network (or because the transmitting device is switched off or removed from the network).
(Pending) Indicates that the device is part way through setting up a subscription.
The Audinate, Dante Controller application is used to configure the StarNet DM256's sample rate, bit depth and additional settings. Dante Controller must be run on a Mac or PC connected to the Dante network. The unit will appear in Dante Controller as StarNetDM256. This name can be changed from within the Device View window.
StarNet DM256 settings can be adjusted from the Device View window within Dante Controller.
To open the Device View window, click the device name in the Dante Controller routing tab; this will open the Dante Controller Device View window.
With the Device View window open, click on the Device Config tab.
From this window, the user can adjust sample rate, bit depth, pull-up/pull-down adjustments and device latency settings.

For more information on Dante Controller, visit- https://dev.audinate.com/GA/dante-controller/userguide/pdf/latest/AUD-MAN-DanteController-4.4.x-v1.0.pdf


Primary v1 Multicast
Leader
Follower

Secondary v1 Multicast
Leader
Follower
The following settings are adjusted via Dante Controller.
PRI: Displays the status of the Primary Dante network connection set by Dante Controller.
- PRI: -- is displayed if no primary Dante network is discovered
- PRI: Leader is displayed when the StarNet DM256 has been selected as the master clock for the Primary Dante network.
- PRI: Follower is displayed when the StarNet DM256 is slaving to another device clock on the Primary Dante network.
SEC: Displays the status of the Secondary Dante network connection and is set by Dante Controller.
- SEC: -- is displayed if no secondary Dante network is discovered
- SEC: Leader is displayed when the StarNet DM256 has been selected as the leader clock for the Secondary Dante network.
- SEC: Follower is displayed when the StarNet DM256 is slaving to another device clock on the Secondary Dante network.
Note: The Primary and Secondary status indicators reflect the Leader Clock selection from the connected Dante network. The user can select multiple units on the network as 'Preferred Master', but the network will choose only one as its 'Leader Clock'.
The clock synchronisation protocol operates over primary and secondary networks in a redundant network. Each network will have a designated PTP leader clock; usually, this will be the same device on both networks. If this is not the case (e.g. if a non-redundant device is designated Preferred Leader), then one device will bridge the clock synchronisation information from the primary to the secondary network, ensuring that all devices derive their clock from the same source. Redundant PTP Follower clocks will synchronise their local clocks based on information from one of the connected networks. In the event of a failure on one network, a redundant device will continue to receive clock synchronisation information over the other network.


SR: Displays the current Sample rate set for the DM256.
The six available sample rates - 44.1kHz, 48kHz, 88.2kHz, 96kHz, 176.4kHz, or 192kHz are set from the Dante Controller Device View window.

PUP: Displays the StarNet's Pull Up/Pull Down sample rate adjustment.
Pull Up/Pull Down settings of -4%, -0.1%, +0.1%, +4.1667% or NONE are set in the Device View of Dante Controller Device View window.

CLK: Displays the StarNet DM256's clock source. The DM256 can generate its clock (INT), take its clock source from the Dante network through the ethernet connection (DANTE), or synchronise to an external clock source via the rear-mounted WCLK I/P BNC connector (WCK).

CLK: INT Reflects the user selection of Preferred Leader in Dante Controller. Once selected, and provided that there are no other Preferred Leader units on the network, the unit will default to its internal clock and will be selected as the clock leader for the network.

CLK: DANTE Indicates that the device is deriving its clock from the Dante network. This option is displayed when the unit is not set as Preferred Leader, and Network Status is showing Follower.
CLK: WCK Indicates that the unit is has been set to sync to external Word Clock and is locked to a valid incoming Work Clock signal. External clock synchronisation is selected via the Enable Sync To External option in Dante Controller.

ENC: Displays the DM256's current bit depth encoding of PCM 24, or PCM 32.

Preferred bit depth encoding is selected from the Device View of Dante Controller.


The Neve Firmware Updater app is used to check your unit's current firmware version and perform firmware updates if required. The app supports Windows 10/11 and Mac Intel/Silicon operating systems.
Installation Instructions
The Neve firmware updater for Mac can be downloaded here.
For Windows PC, the Neve firmware updater can be downloaded here.
Run the installer package on your PC/Mac and follow the on-screen steps. Once installed, the computer is ready to be connected to your StarNet DM256 via an Ethernet connection.
Physical Connection Instructions
The StarNet DM256 must be connected to the computer to perform a firmware update. This connection can be made in one of two ways.
Via a direct Mac/PC>Ethernet cable>DM256 Comms port. When connecting this way, manual IP addresses must be assigned on both the computer and StarNet DM256.
Via a network switch. Mac/PC>Ethernet cable>Network Switch (the switch must also be connected to a valid network server)>StarNet DM256. This method uses auto-assigned DHCP IP addresses for the DM256 and the computer.
If using DHCP mode on a valid Network, skip the following manual IP address setup instructions.
Manual IP Address Setup - Windows PC


▶ Open Control panel>Network&Internet>Network and Sharing Centre
▶ Click Change Adapter Settings
▶ Highlight the Ethernet connection
▶ Click Properties


▶ Select Internet Protocol version 4 (TCP/IPv4)
▶ Click Properties
▶ Click use the following IP address
▶ Enter a manual IP address - 10.10.251.001
▶ Enter Subnet Mask 255.0.0.0
▶ Alternative address - 192.168.99.006
▶ Alternative Subnet Mask 255.255.255.0
Manual IP Address Setup Mac


▶ Open System Preferences
Click Network
▶ Select the Ethernet connection on the left
▶ Click the Configure IPv4 drop-down box
▶ Select Manually
▶ Enter a manual IP address - 10.10.251.001
▶ Enter Subnet Mask 255.0.0.0
Alternative IP address – 192.168.99.001
Alternative Subnet Mask 255.255.255.0
Once a manual IP address has been selected on the computer, the StarNet DM256 manual address must be assigned within the same IP range.
If connecting through a valid DHCP network, then the DM256 can be set using DHCP:Yes
If connecting directly with an Ethernet cable from the computer to StarNet DM256, a manual IP address must be set using the front panel controls.

▶ Select Network [Setup]
The Static IP window will appear.

Use the arrow keys to select each [triple-digit] section of the IP address.
▶ Press ← to toggle up one number at a time
▶ Press and hold Ⓗ and press ▶ to toggle up 10 numbers at a time
▶ Press and hold ← and press ◀ to toggle down 10 numbers at a time
Enter a final address of:
10.10.251.006
▶ Alternative address – 192.168.99.006
▶ Select [OK] when complete
▶ Press ← to confirm the Manual IP address and leave the Static IP window
▶ Select [Cancel] at any time to leave the Static IP window without entering an IP address
▶ Current IP will be displayed at the bottom of the screen

Firmware Update Software Operation

The Neve Updater is a desktop application that can run on any Mac/PC. Once hardware is connected to the computer and IP addresses are set within the correct range, the software can be used to perform the necessary firmware updates.
Performing a Firmware Update


▶ Click Scan Network.
▶ Discovered units will appear in the Neve Products drop-down box.
▶ Product type, Name, IP address and Mac address are displayed underneath.
▶ Select the unit to update from the drop-down menu.
▶ Click Auto Update.
▶ Panels requiring firmware updates will appear on the app screen and the update process will begin.

The software will update the firmware in three stages, which is indicated on the progress bar.
- 1 st grey progress indicator is entering boot mode then another is shown to indicate erasing memory status.
- 2nd blue indicates update progress.
- 3rd grey indicates exiting program mode.
- Lower thin grey progress indicates overall progress.
The StarNet DM256 front panel will enter boot mode when programming, please do not press any buttons on the unit during this process.

Units can be renamed by clicking Rename (Max 21 characters)

To identify your hardware units, select the unit from the drop-down menu then click Identify. The StarNet DM256 📂 button will flash to identify the unit.

Advanced is reserved for the use of AMS Neve engineers when manually updating firmware.
It is not recommended for end-users to enter this mode.

The About window displays the software system information and the available firmware versions.

Set IP is used to reduce the scanning time when searching for units.

Set IP opens a pop-up window, which enables manual IP addresses to be set for each device.
Click 'Scan Manual IP addresses' to confirm.
For some Mac user accounts, certain applications may be quarantined upon installation. This is a security setting on Apple's operating system; if the Neve Updater app is quarantined, it may not work correctly. If when updating firmware, the message 'Update Firmware File Missing' appears, please ensure that the Neve updater app is not quarantined and follow the steps below-
▶ Open Terminal from - Applications/Utilities/Terminal
Enter the following command: xattr -d -r -s com.apple.quarantine "/Applications/app or folder name"
where app or folder name is the name of the folder or application to modify, for example /Applications/Neve Updater/
It is recommended to run the command on folders rather than apps
▶ Enter your user/admin password when prompted
▶ Close Terminal window

| Height | 45mm/1.75 inches |
| Width | 483mm/19 inches |
| Depth | 185mm/7.3 inches |
| Weight | 2.1kg/4.6lbs |
| Heat Dissipation | 13 watts |
| Power factor | >0.90 |
| Voltage | Input Voltage Range90-240v AC Only |

| External PSU Mains, fused @ 4 amps | 5 pin male XLR |
| MADI Inputs & Outputs | Optical SC Duplex – Multi Mode |
| MADI Inputs & Outputs | Coaxial BNC |
| Word Clock Input | 75 Ohm BNC |
| Word Clock Output | 75 Ohm BNC |
| Dante Primary | RJ45 Ethernet |
| Dante Secondary | RS45 Ethernet |



- NEVE
- STARNET - DM
- FOR YOUR OWN SAFETY AND FOR THE PROTECTION OF OTHERS PLEASE OBSERVE THE FOLLOWING HEALTH AND SAFETY INSTRUCTIONS
- FAILURE TO OBSERVE THESE PROCEDURES AND RECOMMENDATIONS WILL INVALIDATE THE MANUFACTURER'S WARRANTY
- POUR VOTRE SECURITE ET CELLE DES AUTRES MERCI DE RESPECTER LES INSTRUCTIONS DE SANTE ET SECURITE SUIVANTES
- LE NON-RESPECT DE CES PROCÉDURES ET RECOMMANDATIONS INVALIDERA LA GARANTIE DU FABRICANT
- IMPORTANT SAFETY INSTRUCTIONS
- WARNING
- TABLE OF CONTENTS
- INSTALLATION EN BAIE (RACK)
- TO OPERATE THE STARNET DM256, CONFIGURE AS FOLLOWS
- FRONT PANEL
- OLED DISPLAY
- FRONT PANEL ADJUSTABLE SETTINGS
- ETHERNET CONNECTIONS
- CONFIGURING MADI CONNECTIONS
- CONFIGURING MADI CHANNEL COUNT
- CONFIGURING LEGACY CLOCKING MODE
- CONFIGURING MADI PORT DITHER SETTINGS
- SEE GLOBAL DITHER SETTINGS FOR FURTHER INFORMATION
- GLOBAL DITHER SETTINGS
- MAXIMUM CHANNEL MAPPING (MCM)
- MAKING CONNECTIONS
- INSTALLATION INSTRUCTIONS
- PHYSICAL CONNECTION INSTRUCTIONS
- MANUAL IP ADDRESS SETUP - WINDOWS PC
- MANUAL IP ADDRESS SETUP MAC
- FIRMWARE UPDATE SOFTWARE OPERATION
- PERFORMING A FIRMWARE UPDATE
Brand : AMS Neve
Model : StarNet – DM256
Category : Digital audio converter