DAC 8 DSD - Digital to analog converter T+A - Free user manual and instructions
Find the device manual for free DAC 8 DSD T+A in PDF.


| Product Type | Digital-to-Analog Converter (DAC) |
| Brand | T+A |
| Model | DAC 8 DSD |
| Category | Digital-to-analog converter |
| Digital Inputs | S/P-DIF 1-4 (coaxial), BNC, OPT (TOSLINK), AES/EBU (XLR), USB |
| Analog Outputs | Balanced XLR, unbalanced RCA - with fixed or variable level |
| Digital Output | Signal from selected source, available for external devices |
| PCM Support | Up to 384 kHz sampling rate (USB and other inputs 32-192 kHz) |
| DSD Support | DSD64 to DSD512 (2.8 MHz to 24.6 MHz) depending on input and OS |
| Oversampling Modes | FIR 1, FIR 2, Bezier 1 (with IIR filter), Bezier 2 (pure) |
| Analogue Filter Bandwidth | Switchable between 60 kHz (CLEAN) and 120 kHz (WIDE) - except for DSD64 |
| True-DSD Technology | Direct digital signal path without filtering and noise shaping for DSD |
| Volume Control | High-quality preamplifier with 1.25 dB steps, bypassable via LINE/VRBL switch |
| Balance Control | Adjustable in 16 steps of 1.25 dB for left/right channel |
| Headphone Output | Stereo jack, minimum impedance 32 Ω, disconnects analog outputs when plugged |
| Display | Screen showing sampling frequency, signal type, volume/bargraph and status symbols |
| Remote Control | FM8 handset with rechargeable Li-Ion battery, USB charging |
| Auto Power Down | Automatic stand-by after 90 minutes of no input signal |
| Power Supply | Mains connection with protective earth, meets EuP directive |
| Housing | Robust all-metal case for effective screening and reduced electro-smog |
| Energy Efficiency | Modern power supply complies with latest energy-saving directives |
| Care and Maintenance | Clean with soft dry cloth only; disconnect from mains before cleaning |
| Safety Features | Do not open case; avoid liquids; ensure ventilation; keep away from heat sources |
| Repairability | Repairs must be performed by authorised T+A specialist workshops |
| Environmental Information | Uses non-hazardous materials, recyclable metal components |
Frequently Asked Questions - DAC 8 DSD T+A
User questions about DAC 8 DSD T+A
0 question about this device. Answer the ones you know or ask your own.
Ask a new question about this device
Download the instructions for your Digital to analog converter in PDF format for free! Find your manual DAC 8 DSD - T+A and take your electronic device back in hand. On this page are published all the documents necessary for the use of your device. DAC 8 DSD by T+A.
USER MANUAL DAC 8 DSD T+A
We are delighted that you have decided to purchase a T+A product. With your new DAC 8 DSD you have acquired a top-quality piece of equipment which has been designed and developed with the wishes of discerning listeners as absolute top priority.
This system represents our very best efforts at designing practical electronic equipment incorporating solid quality, user-friendly operation and a specification and performance which leaves nothing to be desired.
All these factors contribute to a piece of equipment which will satisfy your highest demands and your most searching requirements for a period of many years. All the components we use meet the German and European safety norms and standards which are currently valid. All the materials we use are subject to painstaking quality monitoring.
At all stages of production we avoid the use of substances which are environmentally unsound or potentially hazardous to health, such as chlorine-based cleaning agents and CFCs.
We also aim to avoid the use of plastics in general, and PVC in particular, in the design of our products. Instead we rely upon metals and other non-hazardous materials; metal components are ideal for recycling, and also provide effective electrical screening.
Our robust all-metal cases exclude any possibility of external sources of interference affecting the quality of reproduction. From the opposite point of view our products' electro-magnetic radiation (electro-smog) is reduced to an absolute minimum by the outstandingly effective screening provided by the metal case.
Our range of accessories includes high-quality cables and connectors
We would like to take this opportunity to thank you for the faith you have shown in our company by purchasing this product, and wish you many hours of enjoyment and sheer listening pleasure with your DAC 8 DSD.
The operation instructions, the connection guidance and the safety notes are for your own good - please read them carefully and observe them at all times. The operating instructions are an integral part of this device. If you ever transfer the product to a new owner please be sure to pass them on to the purchaser to guard against incorrect operation and possible hazards.

All the components we use meet the German and European safety norms and standards which are currently valid. This product complies with the EU directives. The declaration of conformity can be downloaded from www.ta-hifi.com/DoC.
Contents
Introduction 36
Operation
Front panel controls 38
Remote Control 42
Basic Functions of the DAC 8 DSD 43
Source switching 43
Pre amplifier function 43
Auto-power-down function 44
D/A converter settings 45
System Settings 47
Balance setting 47
Screen brightness 47
Display mode 48
Display of volume value 48
Basic settings, Installation, Using the system for the first time
Back panel connections 50
Installation and wiring 53
Safety notes 55
FCC Information to the user 57
USB DAC operation 58
General
Technical description - Digital filters / Oversampling 59
Trouble-shooting 62
Appendix
Wiring diagram 63
Specification 66
About these instructions
All the controls and functions of the DAC 8 DSD which are frequently used are described in the first section of these operating instructions.
The second part – “Basic settings, Installation, Using the system for the first time” covers connections and settings which are very seldom required; they are generally required only when the machine is set up and used for the first time.
Symbols used in these instructions

Caution!
Text passages marked with this symbol contain important information which must be observed if the machine is to operate safely and without problems.

This symbol marks text passages which provide supplementary notes and background information; they are intended to help the user understand how to get the best out of the machine.
Introduction
PCM and DSD
Two competing formats are available in the form of PCM and DSD, both of which are used to store audio signals at very high resolution and quality. Each of these formats has its own specific advantages. A vast amount has been written about the relative merits of these two formats, and we have no intention of participating in the dispute, much of which is less than objective in nature. Instead we consider it our task to develop equipment which reproduces both formats as effectively as possible, and exploits the strengths of each system to the full.
Our many years of experience with both systems have clearly shown that PCM and DSD cannot just be lumped together; it is essential to treat each format separately, and take their specific requirements into account. This applies both at the digital and analogue level.
For this reason the DAC 8 DSD employs two separate digital sections and two D/A converter sections - each optimised for one format.
DAC 8 DSD and DSD
By its nature the DSD format involves a noise floor which rises above the range of human hearing as frequency rises. Although this noise floor is not directly audible, it does subject the treble units in the loudspeakers to a significant load. It is also possible for the high-frequency noise to cause distortion in many low-bandwidth amplifiers. The lower the DSD sampling rate, the more severe the inherent noise, and it cannot be disregarded, especially with the 2,8 MHz (DSD64) format - as used on the SACD. As the DSD sampling rate rises, the high-frequency noise becomes increasingly insignificant, and with 11,2 MHz (DSD256) it is virtually irrelevant. In the past it has been standard practice to apply digital and analogue filtering processes in an attempt to reduce DSD noise, but such solutions are never entirely without side-effects on sound quality. For the DAC 8 DSD we have developed two special techniques designed to eliminate the sonic disadvantages:
- The T+A True-DSD technique, consisting of a direct digital signal path without filtering and noise-shaping, plus our True 1-bit DSD D/A converter
- Analogue reconstruction filter with adjustable bandwidth.
DAC 8 DSD and PCM
The PCM process makes extremely high-resolution sampling values available: up to 32 bits. However, the sampling rate of PCM is significantly lower than that of DSD, and the spacing in terms of time between the sampling values is greater.
This means that it is extremely important with PCM to employ maximum possible precision when converting the high resolution into analogue signals. Here at T+A our answer was to develop quadruple D/A converters which provide a four-fold improvement in accuracy over conventional converters. A further very important aspect of PCM reproduction is to reconstruct the curve of the original analogue signal between the sampling points with great accuracy, since these points are much more widely spaced in comparison with DSD. To this end the DAC 8 DSD employs a polynomial interpolation process (Bezier-Spline interpolation) developed in-house at T+A, which in mathematical terms delivers the smoothest curve for a given number of reference points (sampling points). The output signal generated by Bezier interpolation exhibits a very “natural” shape, devoid of the digital artefacts - such as pre- and post-oscillation - which are usually produced by the standard oversampling process. More detailed information on this can be found in the chapter “Technical description, oversampling / up-sampling”
Front panel controls

All the important functions of the DAC 8 DSD can be operated using the buttons on the front panel. Direct-acting buttons are provided for fundamental functions such as source select, D/A converter settings and volume control. All information relating to the machine's state is displayed on the integral screen and by the indicator leds. The following section explains the functions of the buttons on the machine, and the information provided on the screen.
① On / Off switch
ON
(On / Off switch)
A brief press on the ON button switches the unit on and off.
!
Caution!
The mains button is not a mains isolation switch. Even when the LED is not glowing, some parts of the machine are still connected to mains voltage. If you know you will not be using the machine for a long period, we recommend that you disconnect it from the mains by withdrawing the mains plug from the wall socket.
② Source select
S/P-DIF 1/2
Selects the digital inputs S/P DIF 1 (blue LED) and 2 (red LED) of the DAC 8 DSD. Press the button again to toggle between 1 and 2.
S/P-DIF 3/4
Selects the digital inputs S/P DIF 3 (blue LED) and 4 (red LED) of the DAC 8 DSD. Press the button again to toggle between 3 and 4.
| OPT / BNC | Selects the digital inputs OPT (blue LED) and BNC (red LED) of the DAC 8 DSD. Press the button again to toggle between the two inputs. |
| AES / USB | Selects the digital inputs USB (blue LED) and AES / EBU (red LED) of the DAC 8 DSD. Press the button again to toggle between USB and AES / EBU. |
| 3 Settings | |
| INVERT SYS | A brief press on this button toggles between normal and inverse signal phase.Inverse mode is indicated by the red LED.(see section entitled “Tone settings, D/A converter settings”) |
| FIR OVS | A brief press on this button switches to FIR oversampling. Press the button again to toggle between FIR 1 (blue LED) and FIR 2 (red LED) oversampling. |
| BEZIER OVS | A brief press on this button switches to Bezier oversampling. Press the button again to toggle between BEZ 1 (blue LED) and BEZ 2 (red LED) oversampling. |
| WIDE MODE | A brief press on this button toggles the analogue output filter between 60 kHz (“CLEAN” mode) and 120 kHz bandwidth (“WIDE” mode). “WIDE” mode is indicated by the blue LED.A long press on this button calls up the menu for system settings. (see section entitled “System settings”)i The bandwidth cannot be switched to the “WIDE” mode when playing DSD files with 2,8 MHz (DSD64). (see section entitled “Tone settings, D/A converter settings”) |
| i You will find a more detailed explanation of oversampling and output bandwidth in the section entitled “Technical description, oversampling / increasing the sampling rate”. | |
| 4 Volume | |
| VOL + / VOL - | Increases / reduces volumei You can disable the volume control if you wish, in which case it is by-passed by a gold-contact relay. This is accomplished by setting the switch on the back of the DAC 8 DSD to “LINE”. The headphone volume is independent and can still be adjusted. |
| 5 Headphones | |
| (Q)(Headphones) | Socket for stereo headphones with a minimum impedance of 32 Ω.i When headphones are plugged in, the analogue outputs are automatically switched off. |

Note regarding the use of headphones:
Continuous listening to programme material at very high volume using headphones or earphones can result in permanent loss of hearing. You can avoid subsequent health problems by avoiding continuous listening at high volume through headphones or earphones.
⑥ Display elements / Remote control receiver
Remote control receiver
(behind the Perspex screen)

When using the remote control system please point the FM8 handset in the direction of the receiver.
The line of sight between the FM8 and the remote control receiver in the DAC 8 DSD must not be interrupted by any obstacles. Installing the DAC 8 DSD behind the glass doors of a cabinet will also adversely affect the remote control system.
It is essential to prevent potentially interfering light (from fluorescent lamps and energy-saving bulbs) falling directly on the receiver, as this may markedly reduce the effective range of the remote control system.
Display
The front panel of the DAC 8 DSD incorporates a screen which provides information about the DAC's operational state. Additional information can also be called up on the screen when desired.

Screen segments:
- ① Display area. The sampling frequency, the type of signal and the set volume / balance (bargraph) is constantly displayed here. If you alter any value - e.g. select a new source - then the new value is briefly super-imposed here.
The meaning of the individual illuminated symbols is listed in the table on the next page.
- Segment ② of the screen contains eight illuminated symbols which display supplementary information relating to the current mode of operation.
• ③ The remote control receiver is located here.
Screen symbols and their meaning
| symbol | meaning | |||
| Lights up as soon as a connection is detected, and the first stage of the clock re-synchronization is locked. | ||||
| VA | In the second stage - i.e. once the symbol has lit up - the DAC 8 DSD attempts to switch over to its internal precision oscillator (local oscillator). This eliminates jitter effects, but is only possible if the clock quality of the connected signal is adequate.Once the switch has taken place, the symbol also lights up. | |||
| It is not possible to switch to the internal oscillator at the 32 kHz sampling frequency. | ||||
| IA | Indicates that USB data transfer is running in asynchronous mode. | |||
| OA | Lights up constantly when the “ANALOG OUT” outputs or the headphone output are switched on.The symbol goes out if the outputs are muted manually using the button of the FM8 handset.Flashes when the DAC 8 DSD’s outputs are muted because it has detected no signal. | |||
| AA | Lights when there is an error in the data transfer, or when the signal present is ‘non audio signal’ (e.g. DTS or Dolby Digital). | |||
| TA | Indicates that the device is being controlled exclusive via the CTRL (RS232) socket.When this symbol is lit, the buttons on the machine are blocked. | |||
| -PA | Lights up immediately when a signal with de-emphasis is detected. | |||
| Δ | Lights when the volume control is switched on, either because the slide switch on the back of the machine is in the appropriate position, or because headphones are connected.(see section entitled “Basic settings, Installation, Using the system for the first time”) | |||
| Depending on the played back DSD-file, the sampling frequency is displayed as follows: | Base clock | |||
| 2M8 DSD* | 2,8 MHz* | DSD64* | single rate DSD* | 44,1 kHz |
| 3M1 DSD | 3,1 MHz | DSD64 | single rate DSD | 48 kHz |
| 5M6 DSD | 5,6 MHz | DSD128 | double rate DSD | 44,1 kHz |
| 6M1 DSD | 6,1 MHz | DSD128 | double rate DSD | 48 kHz |
| 11M2 DSD | 11,2 MHz | DSD256 | quad rate DSD | 44,1 kHz |
| 12M3 DSD | 12,3 MHz | DSD256 | quad rate DSD | 48 kHz |
| 22M6 DSD | 22,6 MHz | DSD512 | octuple rate DSD | 44,1 kHz |
| 24M6 DSD | 24,6 MHz | DSD512 | octuple rate DSD | 48 kHz*SACD resolution |
Remote control
General Information
In general terms the remote control buttons have the same function as the corresponding buttons on the DAC 8 DSD front panel.
The infrared sensor for the remote control system is located in the display area of the DAC 8 DSD. There must be clear line-of-sight contact between the FM8 handset and the screen.
The following tables show the remote control buttons and their functions when operating the machine.

| A brief press switches the DAC 8 DSD on.Hold the button pressed in to switch the device off.A brief press when the machine is operating switches the outputs off and on (Muting). | |
| Buttons for source selection | |
| Toggles between the co-ax inputs S/P-DIF 1 and S/P-DIF 2. | |
| Toggles between the co-ax inputs S/P-DIF 3 and S/P-DIF 4. | |
| Toggles between the optical input OPT and the co-ax input BNC. | |
| Toggles between the USB input and the balanced AES/EBU input. | |
| - + | Increases / decreases the volume(only possible when the switch on the back of the DAC 8 DSD is set to “VRBL”, or when headphones are connected) |
| Navigation | |
| Selects the next point within a list / select button | |
| Selects the previous point within a list / select button | |
| Returns to the previous point / change button | |
| Confirms the input / change button | |
| Confirmation button during input procedures | |
| Brief press:Opens the menu for Tone settings and D/A converter settingsLong press:Opens the menu for system settings |
Charging the remote control handset
The FM8 is fitted with an internal rechargeable battery (Li-Ion battery) which cannot be removed or replaced by the user.
The FM8 remote control is designed for use with universal chargers with USB sockets, in accordance with the EU's wish to avoid electrical scrap and the EU Directive 2014/53/EU. Any existing universal USB charger or any computer with a USB port with 5V output voltage and at least 500 mA (0.5A) output current can be used for charging.
Connect the remote control to a suitable charger using the USB cable supplied in the set.
The LED on the remote control handset flashes red when charging is in progress. The LED lights a solid red when the battery is fully charged.

The FM8 cannot be used to control the DAC 8 DSD when the battery is on charge.
Basic functions of the DAC 8 DSD
The basic functions of the DAC 8 DSD, described in this chapter are always available, regardless of the selected source.
Source switching
The source buttons on the device and also the remote control handset have dual functions. The LED above the corresponding button on the DAC 8 DSD indicates which source is selected.
For example, if the LED above the OPT/BNC button lights blue, then the optical input "OPT" is selected; if the LED lights red, then the BNC input is active.
If you want to select the digital input to which you have connected the source device you wish to play, briefly press - once or twice - the source buttons 8/P-DIF 1/2, 8/P-DIF 3/4, OPT/BNC or AES/USB on the device, or the 1/2, 3/4, 5/6 or 7/8 button on the remote control handset.
As soon as the source device is delivering digital music data, the DAC 8 DSD automatically sets itself up to match the format and sampling rate of the signal; you can then listen to the music signal.
Pre amplifier function
The DAC 8 DSD can also be operated without a preamplifier, i.e. with active loudspeakers or power amplifiers connected directly to it. For 'Stand-alone' mode the device features a high-quality volume control. The volume control section can be bypassed by a gold contact relay to
be completely removed from the audio signal path.

It is possible to disable the volume control if you wish. This is accomplished by setting the switch on the back of the DAC 8 DSD to "LINE".
Volume control (can be disabled)
The volume of the DAC 8 DSD can be adjusted in fine increments (1,25 dB steps) using the - + button. A brief press on one volume button increases or reduces the volume by one increment. Holding one of the volume buttons pressed in causes the volume to change continuously. The currently set volume value is displayed by the bargraph.

The volume level is set and stored separately for the analogue outputs and the headphone output. After switching on the device, the volume is limited to value 50.

Continuous listening to programme material at very high volume can result in permanent loss of hearing.
Operation with active loudspeakers or power amplifiers
If operated with active speakers or power amplifiers volume can be controlled through the volume control of the DAC 8 DSD. To enable the DAC 8 DSD volume control section, please switch to "VRBL" (variable) on the DAC 8 DSD's back panel.
Operation with integrated- or preamplifiers
To achieve the highest possible audio quality with integrated amplifiers we recommend to bypass the volume control of the DAC 8 DSD by switching the switch on the back panel to the setting 'LINE'. In this case volume and tone are adjusted on the amplifiers.
Balance setting
For compensation of a non-symmetrical loudspeaker positioning, the DAC 8 DSD has the facility to alter the balance level between the left and right channel. The Balance setting can be changed in the system settings menu. (see chapter „System settings“ on page 47).
Auto-power-down function
The device features an automatic power-down function. If the DAC 8 DSD detects no connected source device (e.g. source device is switched off) for a period longer than ninety minutes, it automatically switches to stand-by mode.
The DAC 8 DSD satisfies the requirements of the latest directives concerning energy-saving measures (EuP directive). The modern design of the mains power supply makes an important contribution to this.
Tone settings, D/A converter settings
Operating the menu
- The menu is called up by briefly pressing the F1 button on the FM8 remote control handset.
- Use the ▲ / ▼ to select a menu point.
- You can alter the selected menu point using the ◀ / ▶ buttons.
- Once you have made an alteration, press the OK button to accept the new setting.
BAL (Balance)
This menu item is used to alter the balance level between the left and right channel, e.g. to compensate a non-symmetrical loudspeaker positioning. The balance can be adjusted in 16 steps (increments of 1,25 dB) for the left (Indicator "L") or the right (Indicator "R") channel; the screen displays the current value.
This menu item appears only if the volume control is switched on. This is accomplished by setting the switch on the back of the DAC 8 DSD to 'VRBL'.
Alternatively the following settings can be carried out directly using the operating buttons on the device itself. (see chapter entitled “Front panel controls”)
PHASE (Output phase)
The human ear is certainly capable of correctly detecting absolute phase when listening to particular instruments or voices. However, since certain recordings do not feature correct absolute phase, you can invert phase (i.e. turn it through 180° ) using the “INVERT” setting.
The correction is carried out at the digital level, and has absolutely no adverse effect on sound quality.
OVS (Oversampling)
The following settings are only available when PCM audio is played.
The DAC 8 DSD can exploit four different filter types offering different tonal characters:
- FIR 1 (blue LED) is a classic FIR filter with an extremely linear frequency response.
-
FIR 2 (red LED) is a FIR filter with improved peak handling.
-
BEZ 1 (blue LED) is a Bezier interpolator combined with a IIR filter. This process produces a result very similar to an analogue system.
- BEZ 2 (red LED) is a pure Bezier interpolator – offering perfect “timing” and dynamics.

Please refer to the Chapter 'Technical description - Digital filters / Oversampling' for an explanation of the different filter types.
FILTER (Bandwidth)
With the ⒽWIDE MODE button, the bandwidth of the analogue output filter can be switched between 60 kHz (“CLEAN”-mode) or 120 kHz (“WIDE”-mode).
The “WIDE”-setting allows a more spacious music reproduction.

DSD signals are characterised by a high-frequency noise floor in the ultra-sound region. This noise is inherent in the DSD principle, and is present in the recording itself. In basic terms the higher the sampling rate, the lower the high-frequency noise. At 2,8 MHz (DSD64) this noise is by no means negligible, and may constitute a problem for amplifiers and loudspeakers connected to the system. For this reason, the bandwidth cannot be switched to the 'WIDE' mode when playing 2,8 MHz DSD files (DSD64).

Please refer to the Chapter 'Technical description - Digital filters / Oversampling' for an explanation of the "WIDE" mode.
System settings
Operating the menu
Direct operation on the DAC 8 DSD:
- Call up the menu by holding the ⓄWIDE MENU button pressed in.
- When the menu is open you can select a menu point by briefly pressing the ⬤️ button again, repeatedly if necessary.
- The selected menu point can be adjusted using the volume buttons - 🔊 + .
- Once you have set the desired value, hold the ⏚️ button pressed in again to close the menu.
Operating the menu using the FM8 remote control handset:
- The menu is called up by briefly pressing the F1 button.
- Use the ▲ / ▼ to select a menu point.
- You can alter the selected menu point using the ◀ / ▶ buttons.
- Once you have made an alteration, press the OK button to accept the new setting.
Menu item BAL (Balance)
This menu item is used to alter the balance level between the left and right channel, e.g. to compensate a non-symmetrical loudspeaker positioning. The balance can be adjusted in 16 steps (increments of 1,25 dB) for the left (Indicator “L”) or the right (Indicator “R”) channel; the screen displays the current value.
This menu item appears only if the volume control is switched on. This is accomplished by setting the switch on the back of the DAC 8 DSD to 'VRBL'.
This menu point only appears if you opened the menu using the 📋 button on the front panel of the DAC 8 DSD.
Menu item BRGT (Screen brightness)
The screen brightness can be adjusted in eight stages to suit your personal preference; a further option is to switch off the screen completely. The change in brightness simultaneously affects the screen, the illuminated symbols and all the source and status LEDs, with one exception: when screen brightness is set to “fully off”, the “ON” LED is not switched off completely, so that the machine’s operating status is still evident.
Menu item D.MOD (Display Mode)
The type of indication for DSD playback can be adjusted under this menu item. Depending on the personal preference the display can be set to one of the following display modes:
Display Mode 1 (D.MOD 1): Display of the sampling rate in MHz (e.g. 2,8 MHz)
Display Mode 2 (D.MOD 2): Display of the DSD rate (e.g. DSD 64)
Menu item VOL (Volume-mode)
At this menu item you can change the manner how the volume value is displayed. The current set volume can be displayed in steps (setting "STP") from 0 to 64 or the attenuation in -dB (setting "DB") from --...80dB...0dB (in 1,25 dB increments).
Basic settings, Installation, Using the system for the first time
This section describes all those matters which are of fundamental importance when setting up and first using the equipment. This information is not relevant in daily use, but you should nevertheless read and note it before using the equipment for the first time.
Back panel connections

ANALOG OUT
| XLR | Symmetrical analogue output with fixed or variable level. |
| The position of the slide switch marked VRBL / LINE determines whether the output's level is fixed or variable (see below). | |
| RCA (Cinch) | Unsymmetrical analogue output with fixed or variable level. |
| The position of the slide switch marked VRBL / LINE determines whether the output's level is fixed or variable (see below). | |
| Switch(VRBL / LINE) | The slide switch determines whether the output level of the analogue outputs (ANALOG OUT) is fixed ("LINE" setting), or variable ("VRBL" setting) using the DAC 8 DSD's volume buttons. |
DIGITAL OUT
| Digital Out | At this socket is the signal from the chosen source available. It can be transmitted to e.g. a surround decoder or another DAC for e.g. multi room operation. |
| i It is not possible to produce a digital version of the media from the USB input, as in some cases the original contains copyright protection. |
DIGITAL IN
| S/P DIF 1 ... 4 | Input for digital source devices with co axial digital output.At these inputs theDAC 8 DSDaccepts digital stereo signals conforming to the S/P-DIF norm, with sampling rates of 32 to 192 kHz. |
| BNC | Input for digital source devices with co axial digital BNC output.At this input theDAC 8 DSDaccepts digital stereo signals conforming to the S/P-DIF norm, with sampling rates of 32 to 192 kHz. |
| OPT | Input for digital source devices with optical digital TOSLINK output.At this input theDAC 8 DSDaccepts digital stereo signals conforming to the S/P-DIF norm, with sampling rates of 32 to 96 kHz. |
| AES / EBU | Input for digital source devices with symmetrical XLR digital output.At these inputs theDAC 8 DSDaccepts digital stereo signals conforming to the AES/EBU norm, with sampling rates of 32 to 192 kHz. |
| USB | Socket for connecting a PC or MAC computer.At this input theDAC 8 DSDaccepts digital PCmstereo signals with sampling rates in the range44.1to384kHz, and digital DSDstereo signals from2,8/3,1MHz(DSD64) to22,6/24,6MHz(DSD512)**11,2/12,3MHz(DSD256) and22,6/24,6MHz(DSD512) only with a Windows PC. |
| If you wish theDAC 8 DSDto convert audio files from a Windows PC connected to it, you must first install the appropriate drivers on the computer. No drivers are required if you are using a MAC computer (see the chapter “USB operation”). |
SYS IN
Interface for connecting the MP 8.
CONTROL
CTRL
This interface can also be used for control of the DAC 8 DSD – for example in combination with a CRESTRON or AMX home automation system.
A description of the control interface and the control protocol can be found in the support area of the T+A website http://www.ta-hifi.com.

The connecting lead required for this is available in the T+A accessory range.
MAINS INPUT
The mains cable is plugged into this socket.
For correct connections refer to the sections “Installation and wiring” and “Safety notes”.
Installation and wiring
If the unit gets very cold (e. g. when being transported), condensation may form inside it. Please do not switch it on until it has had plenty of time to warm up to room temperature, so that any condensation evaporates completely.
If the device has been in storage, or has not been used for a protracted period (> two years), it is essential to have it checked by a specialist technician before re-use.
Before placing the unit on sensitive laquer or wood surfaces please check the compatibility of the surface and the unit's feet on a non visible point and if necessary use an underlay. We recommend a surface of stone, glass, metal or the like.
The unit should be placed on a rigid, level base (See also chapter "Safety notes"). When placing the unit on resonance absorbers or anti-resonant components make sure that the stability of the unit is not reduced.
The unit should be set up in a well ventilated dry site, out of direct sunlight and away from radiators.
The unit must not be located close to heat producing objects or devices, or anything which is heat sensitive or highly flammable.
Mains and loudspeaker cables, and also remote control leads must be kept as far away as possible from signal leads and antenna cables. Never run them over or under the unit. Carefully unpack the unit and store the original packing material carefully. The carton and packing are specially designed for this unit and will be needed again if you wish to move the equipment at any time.
If you have to transport the device, it must always be carried or sent in its original packaging in order to prevent damage and defects.
Notes on connections:
A complete connection diagram is shown in "Appendix A".
- Be sure to push all plugs firmly into their sockets. Loose connections can cause hum and other unwanted noises.
- When you connect the output sockets of the DAC 8 DSD to the sockets on the connected, e.g. amplifier, always connect like to like, i.e. "R" to "R" and "L" to "L". If you fail to heed this then the stereo channels will be reversed.
- The device is intended to be connected to mains outlet with protective earth connector. Please connect it only with the mains cable supplied to a properly installed mains outlet with protective earth connector.
- To achieve maximum possible interference rejection the mains plug should be connected to the mains socket in such a way that phase is connected to the mains socket contact marked with a dot. The phase of the mains socket can be determined using a special meter. If you are not sure about this, please ask your specialist dealer.
If you encounter problems when setting up and using the amplifier for the first time please remember that the cause is often simple, and equally simple to eliminate. Please refer to the section of these instructions entitled “Trouble shooting”.
| Loudspeaker and signal cables | Loudspeaker cables and signal cables (inter-connects) have a significant influence on the overall reproduction quality of your sound system, and their importance should not be under-estimated. For this reason T+A recommends the use of high-quality cables and connectors.Our accessory range includes a series of excellent cables and connectors whose properties are carefully matched to our speakers and electronic units, and which harmonise outstandingly well with them.For difficult and cramped situations the T+A range also includes special-length cables and special-purpose connectors (e.g. right-angled versions) which can be used to solve almost any problem concerning connections and system location. |
| Changing the batteries | The FM8 is fitted with an internal rechargeable battery (Li-Ion battery), which cannot be removed or replaced by the user. If you eventually notice that the battery only retains a little of its original capacity, and the period you can use the FM8 is greatly reduced, then it is time to contact your T+A dealer and ask him to fit a replacement battery.⚠ Caution!If the battery is replaced improperly, there is danger of explosion.Always replace batteries by batteries of the same or an equivalent type.Batteries shout not be exposed to excessive heat like sunshine, fire or the like.➊ Disposing of exhausted batteries:Exhausted batteries must never be thrown into the household waste!They should be returned to the battery vendor (specialist dealer) or your local toxic waste collection point, so that they can be recycled or disposed in a proper way. Most local authorities provide collection centres for such waste, and some provide pick-up vehicles for old batteries. |
| Care of the unit | Always disconnect the unit from the mains supply before cleaning it.The surfaces of the case should be wiped clean with a soft, dry cloth only.Never use solvent-based or abrasive cleaners!Before switching the unit on again, check that there are no short-circuits at the connections, and that all cables are plugged in correctly. |
| Storing the unit | If the device has to be stored, place it in its original packaging and store it in a dry, frost-free location. Storage temperature range 0...40°C |
Safety notes
| For your own safety please consider it essential to read these operating instructions right through, and observe in particular the notes regarding setting up, operation and safety. | |
| Installation | Please consider the weight of the device. Never place the device on an unstable surface; the machine could fall off, causing serious or even fatal injury. Many injuries, especially to children, can be avoided if the following simple safety precautions are observed:Use only such items of furniture which can safely bear the weight of the device.Ensure that the device does not project beyond the edges of the supporting furniture.Do not place the device on tall furniture (e.g. bookshelves) without securely anchoring both items, i.e. furniture and device.Explain to children the hazards involved in climbing on furniture to reach the device or its controls.When installing the unit on a shelf or in a cupboard it is essential to provide an adequate flow of cooling air, to ensure that the heat produced by the unit is dissipated effectively. Any heat build-up will shorten the life of the unit and could be a source of danger. Be sure to leave free space of 10 cm around the unit for ventilation.Do not place any object on the top cover.The unit must be set up in such a way that none of the connections can be touched directly (especially by children). Be sure to observe the notes and information in the section “Installation and Wiring”. |
| Power supply | The device is intended to be connected to mains outlet with protective earth connector. Please connect it only with the mains cable supplied to a properly installed mains outlet with protective earth connector.The power supply required for this unit is printed on the mains supply socket. The unit must never be connected to a power supply which does not meet these specifications. If the unit is not to be used for a long period disconnect it from the mains supply at the wall socket. |
| Mains leads / Mains plug | Mains leads must be deployed in such a way that there is no danger of damage to them (e.g. through persons treading on them or from furniture). Take particular care with plugs, distribution panels and connections at the device.Unplugging the mains plug will disconnect the device from the mains for service and repair. Please make sure that the mains plug is easily accessible. |
| Enclosure openings | Liquid or particles must never be allowed to get inside the unit through the ventilation slots. Mains voltage is present inside the unit, and any electric shock could cause serious injury or death. Never exert undue force on mains connectors.Protect the unit from drips and splashes of water; never place flower vases or fluid containers on the unit.Do not place naked flame sources, such as candle lights on the device. |
| Supervision of device operation | Like any other electrical appliance this device should never be used without proper supervision. Take care to keep the unit out of the reach of small children. |
| Service, Damage | The case should only be opened by a qualified specialist technician. Repairs and fuse replacements should be entrusted to an authorised T+A specialist workshop. With the exception of the connections and measures described in these instructions, no work of any kind may be carried out on the device by unqualified persons.If the unit is damaged, or if you suspect that it is not functioning correctly, immediately disconnect the mains plug at the wall socket, and ask an authorised T+A specialist workshop to check it. |
| Approved usage | The device is designed to operate in a temperate climate and altitudes up to 2000 m above sea level. The range of permissible operating temperatures is +10 ... +35°C. This device is designed exclusively for reproducing sound and/or pictures in the domestic environment. It is to be used in a dry indoor room which meets all the recommendations stated in these instructions.Where the equipment is to be used for other purposes, especially in the medical field or any field in which safety is an issue, it is essential to establish the unit's suitability for this purpose with the manufacturer, and to obtain prior written approval for this usage. |
| Over voltage | The unit may be damaged by excess voltage in the power supply, the mains circuit or in aerial systems, as may occur during thunderstorms (lightning strikes) or due to static discharges.Special power supply units and excess voltage protectors such as the T+A Power Bar mains distribution panel offer some degree of protection from damage to equipment due to the hazards described above. However, if you require absolute security from damage due to excess voltage, the only solution is to disconnect the unit from the mains power supply and any aerial systems.To avoid the risk of damage by over-voltages we recommend to disconnect all cables from this device and your HiFi system during thunderstorms.All mains power supply and aerial systems to which the unit is connected must meet all applicable safety regulations and must be installed by an approved electrical installer. |
| Approval and conformity with EC directives | In its original condition the unit meets all currently valid European regulations. It is approved for use as stipulated within the EC.By attaching the CE symbol to the unit T+A declares its conformity the EC directives and the national laws based on those directives. The declaration of conformity can be downloaded from www.ta-hifi.com/DoC. The original, unaltered factory serial number must be present on the outside of the unit and must be clearly legible! The serial number is a constituent part of our conformity declaration and therefore of the approval for operation of the device. The serial numbers on the unit and in the original T+A documentation supplied with it (in particular the inspection and guarantee certificates), must not be removed or modified, and must correspond. Infringing any of these conditions invalidates T+A conformity and approval, and the unit may not be operated within the EC. Improper use of the equipment makes the user liable to penalty under current EC and national laws. |
Disposing of this product
Any modifications or repairs to the unit, or any other intervention by a workshop or other third party not authorised by T+A, invalidates the approval and operational permit for the equipment. Only genuine T+A accessories may be connected to the unit, or such auxiliary devices which are themselves approved and fulfil all currently valid legal requirements. When used in conjunction with auxiliary devices or as part of a system this unit may only be used for the purposes stated in the section “Approved usage”.

The only permissible method of disposing of this product is to take it to your local collection centre for electrical waste.
The FM8 contains a Li-Ion battery. Like any other electrical device, the FM8 must not be discarded in the normal domestic waste. It must be taken to your local collection point for electrical scrap.
FCC Information to the user

Tested To Comply With FCC Standards
FOR HOME OR OFFICE USE
(for use in the United States of America only)
Class B digital device – instructions:
Note: This equipment has been tested and found to comply with the limits for a Class B digital device, pursuant to Part 15 of the FCC Rules. These limits are designed to provide reasonable protection against harmful interference in a residential installation. This equipment generates uses and can radiate radio frequency energy and, if not installed and used in accordance with the instructions, may cause harmful interference to radio communications. However, there is no guarantee that interference will not occur in a particular installation. If this equipment does cause harmful interference to radio or television reception, which can be determined by turning the equipment off and on, the user is encouraged to try to correct the interference by one or more of the following measures:
- Reorient or relocate the receiving antenna.
- Increase the separation between the equipment and receiver.
- Connect the equipment into an outlet on a circuit different form that to which the receiver is connected.
Consult the dealer or an experienced radio/TV technician for help.
USB DAC operation
| System-requirements | Intel Core i3 or higher or a comparable AMD Processor.4 GB RAMUSB 2.0 InterfaceMicrosoft Windows XP, Microsoft Windows Vista, Microsoft Windows 7 / 8 / 10or MAC OS X 10.6.+ |
| The above mentioned system requirements are for playing high resolution audio files up to the maximum sampling rate. The lower the sampling rate is the lower are the system requirements. | |
| USB operation mode | The DAC 8 DSD can be operated with the listed MAC operating systems without requiring the installation of a driver. Playback of DSD streams up to 5,6/6,1 MHz (DSD128) and PCM streams up to 384 kHz is possible with MAC operating systems.If the device is to be operated in conjunction with one of the stated Windows operating systems, a dedicated driver must first be installed. With the driver installed, it is possible to play DSD streams up to 22,6/24,6 MHz (DSD512) and PCM streams up to 384 kHz. |
| The drivers required, together with detailed installation instructions including information on audio playback via USB, are available for downloading from our website at http://www.ta-hifi.com/support | |
| Settings | A number of system settings have to be altered if you wish to operate DAC 8 DSD with your computer. These changes must be made regardless of the operating system. The installation instructions provide detailed information on how and where the settings are to be changed. |
| Notes on operation | To prevent fail functions and system crashes of your computer and the playback program, please note the following:For Windows OS: Install the driver before you use the DAC 8 DSD for the first time.Use only drivers, streaming methods (e.g. ASIO, WASAPI) and playback software which are compatible to your operating system and between each other.Never connect or disconnect the USB connection while the system is running. |
| Notes on setting up | Do not set up the DAC 8 DSD on or immediately adjacent to the computer to which it is connected, otherwise the device could be affected by interference radiated by the computer. |
Technical description Digital filters / Oversampling
Oversampling
The audio data on for example CDs is stored at a sampling rate of 44.1 - i. e. for each second of music 44.100 sampled values are available for each channel. In the DAC 8 DSD the audio data read from the CD is „multiplied“ to a higher sampling rate (352,8 kHz) before it is converted back into analogue music signals. This process delivers a very much better, more finely graduated signal to the converter, which can then be converted with correspondingly higher precision. The raised sampling rate is a calculating process for which there are many different mathematical methods. In almost all digital audio devices which exploit the advantages of increased digital sampling rate a process known as a FIR filter is employed for this purpose. At T+A we have been carrying out research for more than twenty years, aimed at improving the oversampling process, because the standard FIR method has one drawback to set against its indisputable advantages: it adds small pre- and post-echoes to the music signals. At T+A we have developed mathematical processes (known as Bezier polynomial interpolators) which do not share this disadvantage. For this reason they should sound better and more natural than the usual standard process. Since the calculating procedure employed by us is considerably more complex than the standard method, the DAC 8 DSD features a high-performance digital signal processor (DSP) which carries out the over-sampling process with immense precision (56 bit) using special algorithms developed by T+A.
The freely programmable DSP which we use is capable of carrying out the oversampling process using any method of calculation. For this reason we have implemented a slightly modified Bezier process (filters 3) in the DAC 8 DSD in addition to the pure Bezier process (filter 4), together with two variants of the standard process (filter 1 and filter 2). For more information on the different processes please refer to the next section. You can switch between the various algorithms, then decide for yourself which of the filters gives the results you prefer.
Oversampling 1 (Standard FIR Filter)
The long FIR filter is the standard oversampling process in digital technology, offering extremely linear frequency response, very high damping, linear phase characteristics and constant group delays. The disadvantage is the pre- and post-echoes which are added to the signal. These „time range errors“ tend to affect the music signal's dynamics, precision and naturalness, and reduce spatial orientation.


Frequency response and transient characteristics of the long FIR filter
Oversampling 2 (Impulse optimised filter)
Shortening the filter (lower coefficient) reduces the time range errors, albeit combined with a slight loss of linearity in the frequency range and damping performance.


Frequency response and transient characteristics of the short FIR filter
Oversampling 3 (Bezier-interpolator plus IIR-filter)
In this process an ideal Bezier interpolator is combined with what is known as an IIR filter. This eliminates the problematic pre-echo of the FIR method. This process produces highly „analogue“ system characteristics, with a sound quality and measured performance similar to those of good analogue record players.
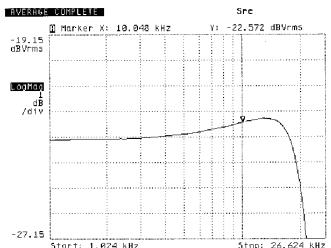

Frequency response and transient characteristics of the Bezier interpolator plus IIR filter
Oversampling 4 (pure Bezier interpolator)
This process delivers a perfect reconstruction of the original music signal. It exhibits no pre- or post-echoes of any kind, and does not add coloration or timing errors to the original signal. In sonic terms this method offers an impressive blend of naturalness, good dynamics and accuracy.


Frequency response and transient characteristics of the Bezier interpolator
Frequency bandwidth of the analogue reconstruction filter
"CLEAN"-Mode up to 60 kHz and "WIDE"-Mode up to 120 kHz
The “WIDE” setting produces the best sound quality, but only with high-quality amplifiers which are able to process signal frequencies up to 300 kHz without generating distortion.
If you are in any doubt about the ability of your amplifier to deal with very high signal frequencies up to 300 kHz, please check this with the manufacturer of your equipment.
Alternatively you can set the switch to the “WIDE” setting, and simply listen to the results. If you hear no interference, and if the sound image is better than that in the “CLEAN” setting, leave in the “WIDE” mode.

Frequency bandwidth of the two settings

The “WIDE” setting can be used without restriction with all T+A amplifiers.
Trouble shooting
Many problems have a simple cause and a correspondingly simple solution. The following section describes a few difficulties you may encounter, and the measures you need to take to cure them. If you find it impossible to solve a problem with the help of these notes please disconnect the unit from the mains and ask your authorised T+A specialist dealer for advice.
| Machine does not switch on | Cause 1:Mains lead not plugged in correctly.Remedy:Check connection, push connector in firmly. |
| Machine cannot be controlled by IR remote control. | Cause 1:The integrated battery of the FM8 is empty.Remedy:For charging connect the FM8 to the USB IN socket of the MP 8. |
| Cause 2:The remote control transmitter has no direct line-of-sight with the unit.Remedy:Make sure that the remote control transmitter has direct line-of-sight contact with the receiver - note that glass doors can interrupt the connection.Maximum range between transmitter and receiver: approx. 8 metres.Be sure to position the receiver where it is not subjected to direct sunlight or very bright artificial light. Fluorescent tubes and energy-saving lamps are powerful sources of interference. | |
| Operating system no longer responds | Cause:The DAC 8 DSD was switched off during playback.Remedy:Stop playback and close Media Player before switching off the DAC 8 DSD. |
| Machine does not respond to control commands | Cause:The DAC 8 DSD is controlled via the Control socket (RS 232), in which case the machine's integral controls may be blocked.Remedy:Set up your control software in such a way that it is possible to operate the machine; alternatively disconnect the control cable. |
Anhang A / Appendix A
*1 When the unit is connected to an AMP 8, the slide switch must be set to the 'VRBL' position in order to switch on the DAC 8 DSD's integral volume control.
*2 Instead of the symmetrical XLR connection an alternative is to use the asymmetrical RCA connection.
Anhang A / Appendix A
*1 The slide switch must be set to the 'LINE' position when the unit is connected to an integrated amplifier, in order to by-pass the DAC 8 DSD's integral volume control.
Anhang A / Appendix A


- CONTENTS
- INTRODUCTION
- OPERATION
- BASIC SETTINGS, INSTALLATION, USING THE SYSTEM FOR THE FIRST TIME
- GENERAL
- APPENDIX
- ABOUT THESE INSTRUCTIONS
- SYMBOLS USED IN THESE INSTRUCTIONS
- CAUTION
- PCM AND DSD
- DAC 8 DSD AND DSD
- DAC 8 DSD AND PCM
- FRONT PANEL CONTROLS
- ① ON / OFF SWITCH
- (ON / OFF SWITCH)
- ② SOURCE SELECT
- NOTE REGARDING THE USE OF HEADPHONES
- ⑥ DISPLAY ELEMENTS / REMOTE CONTROL RECEIVER
- DISPLAY
- SCREEN SEGMENTS
- REMOTE CONTROL
- GENERAL INFORMATION
- CHARGING THE REMOTE CONTROL HANDSET
- BASIC FUNCTIONS OF THE DAC 8 DSD
- SOURCE SWITCHING
- PRE AMPLIFIER FUNCTION
- AUTO-POWER-DOWN FUNCTION
- TONE SETTINGS, D/A CONVERTER SETTINGS
- OPERATING THE MENU
- BAL (BALANCE)
- PHASE (OUTPUT PHASE)
- OVS (OVERSAMPLING)
- FILTER (BANDWIDTH)
- SYSTEM SETTINGS
- DIRECT OPERATION ON THE DAC 8 DSD
- OPERATING THE MENU USING THE FM8 REMOTE CONTROL HANDSET
- MENU ITEM BAL (BALANCE)
- MENU ITEM BRGT (SCREEN BRIGHTNESS)
- BACK PANEL CONNECTIONS
- SYS IN
- CONTROL
- CTRL
- MAINS INPUT
- INSTALLATION AND WIRING
- NOTES ON CONNECTIONS
- SAFETY NOTES
- DISPOSING OF THIS PRODUCT
- FCC INFORMATION TO THE USER
- CLASS B DIGITAL DEVICE – INSTRUCTIONS
- USB DAC OPERATION
- TECHNICAL DESCRIPTION DIGITAL FILTERS / OVERSAMPLING
- OVERSAMPLING 1 (STANDARD FIR FILTER)
- OVERSAMPLING 2 (IMPULSE OPTIMISED FILTER)
- OVERSAMPLING 3 (BEZIER-INTERPOLATOR PLUS IIR-FILTER)
- OVERSAMPLING 4 (PURE BEZIER INTERPOLATOR)
- FREQUENCY BANDWIDTH OF THE ANALOGUE RECONSTRUCTION FILTER
- FREQUENCY BANDWIDTH OF THE TWO SETTINGS
- TROUBLE SHOOTING
- ANHANG A / APPENDIX A
Brand : T+A
Model : DAC 8 DSD
Category : Digital to analog converter