
Shift XT - Computer Case Phanteks - Free user manual and instructions
Find the device manual for free Shift XT Phanteks in PDF.



User questions about Shift XT Phanteks
0 question about this device. Answer the ones you know or ask your own.
Ask a new question about this device
Download the instructions for your Computer Case in PDF format for free! Find your manual Shift XT - Phanteks and take your electronic device back in hand. On this page are published all the documents necessary for the use of your device. Shift XT by Phanteks.
USER MANUAL Shift XT Phanteks
EVOLV SHIFT XT

Thank you
for choosing
PHANTEKS
1. WHAT'S INSIDE?
Introduction 5
Specifications 6
Accessories 7
Exploded View 8
2. BUILD YOUR SETUP
D-RGB Lighting Controls 9
Configure Your Evolv Shift XT 10
Removing External Panels 12
Installing Motherboard 14
Installing Motherboard Cables 15
Installing Power Supply 16
Installing SSD Drive 17
Installing Graphics Card 18
Optional Cooling: 19
Installing Fans 20
Installing AIO water cooler 21
Connect D-RGB lighting 22
Cable Management 23
Re-installing external panels 27
Optional: Top panel dust filter 30
Optional Upgrades: 31
SFX Power Supply 31
Cooling Products 32
Lighting Products 33
3. SUPPORT
Contact Us 34
Warranty 35
Introducing the Phanteks Evolv Shift XT
The Phanteks Evolv Shift XT is a truly unique small form-factor chassis that extends to unlock more cooling capacity when needed. Being part of the Phanteks Evolv series, the Evolv Shift XT offers premium build quality and components using 3mm thick anodized aluminum panels, PCI-e X16 Gen4 riser cable and USB-C Gen2 front IO. Performance is uncompromised with Ultra-Fine Mesh panels and vented aluminum panels while providing a clean and stylish look with the tempered glass infinity mirror.
The Phanteks team

Case Specifications
| S: 371 x 173 x 211 mm | |
| Dimension (DxWxH): | M: 371 x 173 x 244 mm |
| L: 371 x 173 x 272 mm | |
| Form factor: | Small form factor chassis |
| Materials: | Steel chassis, Aluminum panels, Tempered glass infinity mirror |
| MB support: | Mini-ITX |
| Front I/O: | Power button, 1x USB 3.0, D-RGB Mode, D-RGB Color, USB 3.1 GEN 2 Type-C |
PCI Slots & Drive Bays
| PCI slots | 3x | |
| Internal 2.5" | 1x | |
| Fan | 120mm | 140mm |
| Top | 2x | 2x |
| Radiator | 120mm | 140mm |
| Top | up to 240mm | - |
Included accessories
| 2.5" SSD bracket | 1x |
| Riser Cable PCI-e X16 Gen4 | 1x |
| Rear covers | 2x |
| Accessory bag | 1x |
| Toolbox | 1x |
Clearance
| CPU Cooler Clearance | 72 mm (2.83 in) |
| GPU Clearance (length) | 324 mm (12.76 in) |
| GPU Clearance (height) | 147mm (5.79 in) |
| GPU Clearance (thickness) | 3-slot, 62mm (2.44 in) |
| Top fan Clearance | 32 mm |
| Top radiator+fan Clearance | 60 mm |
Support
| Contact (International) | support@phanteks.com |
| Contact (America) | support@phanteksusa.com |
| Warranty | 5 Years, see page 28 |
2.5" SSD bracket
- Pre-installed
- Single Bracket

Riser Cable Gen4
- Pre-installed
- PCI-e X16 Gen4

Accessory box
Accessory box

Rear Cover for Fan
9x MB/SSD Screws
4x PSU Screws

Rear Cover for AIO + Fan
2x Spare Top Panel standoffs
3x Rear Cover Screws
6x Zip Tie 150mm 1x Screw Driver

1x Riser Lock

1x Phanteks Logo Badge
Dust Filter box

Top Dust Filters
- Chassis
- Front cover
- Right side mesh panel
- Left side mesh panel
- Top panel
- Bottom panel
- Radiator bracket
- Rear cover for fan
- Rear cover for fan + radiator
- Riser cable
- Single SSD bracket
- Infinity Mirror
- Front I/O

The Digital-RGB lighting can be easily controlled with the 2 buttons in the front of the chassis. Slide the front cover up to access them.


D-RGB COLOR BUTTON

D-RGB MODE BUTTON
D-RGB CONTROLS

2 sec
Press & Hold MODE: Turn off all LED's.
The Evolv Shift XT can be extended into 3 configuration. Choose the best configuration suited to your needs:
• Compact; highly space-efficient layout with direct fresh air for the GPU and CPU coolers.
• Air Boost; boost the airflow across the entire system with 2x 120mm or 140mm fans in the top.
• Liquid Cooled; install a 240 AIO liquid cooler for the best possible cooling.

Overview of each configuration:
Compact configuration

• CPU air cooler up to 72mm tall
• Direct fresh air for GPU cooler
Air Boost configuration

• Raises chassis height by 30mm
• CPU air cooler up to 72mm tall
• increased airflow with 2x 120 or 140mm fans
Liquid Cooled configuration

• Raises chassis height by 60mm
• 240 AIO liquid cooler in top
• Increased airflow with 2x 120 fans (on 240 radiator)
Removing the top panel
- Remove the magnetic aluminum front panel

- Slide the locks inwards to unlock

- Slide the top panel to the front and lift the top panel up with two hands

Removing the mesh panels
- Slide the mesh panels up to remove them

Remove the chassis
- Remove the thumb screw at the rear

- Slide the chassis to the front and lift it from the bottom panel

Remove the radiator bracket
- Unscrew the two chassis screws to lift up the radiator bracket.

- Slide the radiator bracket sideways to completely remove it.

It is recommended to install the motherboard first so most cables can be connected to it easily.
- Install the CPU air cooler and/or backplate on the motherboard first
- Secure the motherboard with 4x motherboard screws

REQUIRES:

4x
Aircooler build?
When using an aircooler build, pre-install it before installing the motherboard and perform step 1&2 of the next page first.
It is recommended to connect all motherboard cables at this stage:
- Connect the 8-pin CPU connector
- Connect the CPU Fan/Pump connector(s)
- Connect the 24-pin Motherboard connector
- Connect the Power Button connector

motherboard front I/O header diagram
- Connect the Front USB-C connector

- Connect the Front USB 3.0 connector

- Connect the Riser Cable to the PCI-e slot. Secure the riser cable with the riser lock (see page 25)
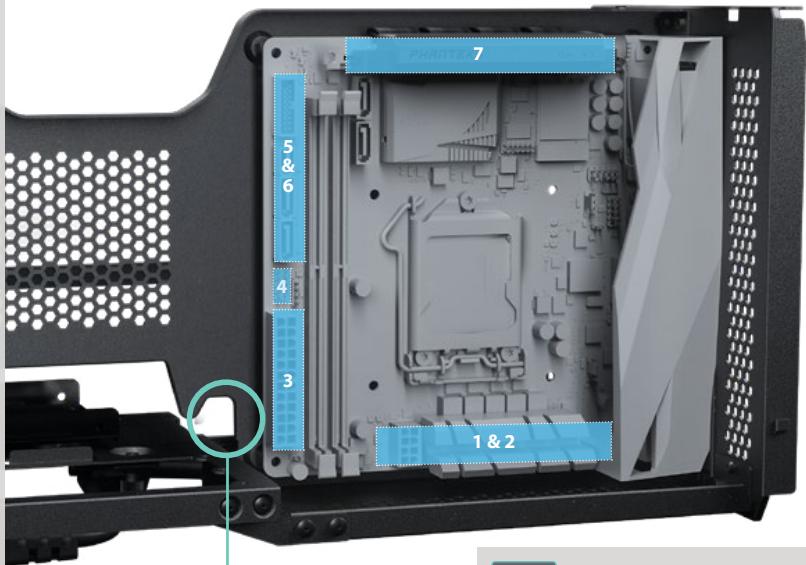

The Front USB cables can be guided through this hook for the best cable management.
An SFX or SFX-L power supply can be installed in the Shift XT chassis, the SFX form-factor is recommended.
- Turn the chassis on the side like the picture below
- Install the SFX/SFX-L PSU with four PSU screws
- Plug in the Power extension cable
- Turn the power switch to the 'ON' position

REQUIRES:

4x
Install an SSD
- Remove the SSD Bracket by sliding it off the 4x grommets
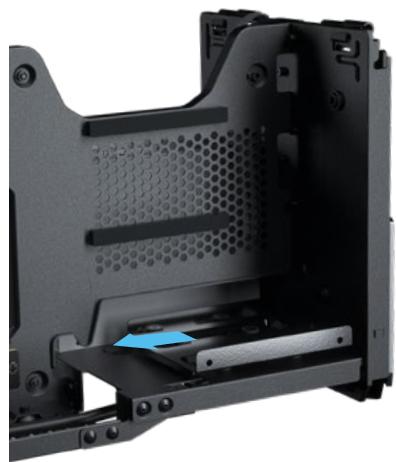
- Install your SSD drive on the SSD bracket with 4x SSD screws

- Slide the bracket with installed SSD back on the 4x grommets
REQUIRES:


Install and connect the Sata power cable now to the PSU, SSD and chassis lighting before proceeding with GPU installation.
A 3-slot graphics card (GPU) can be installed with a length up to 324mm and a total height of up to 147mm.
Installing the graphics card:
- Remove the 3 PCI-Slot covers by unscrewing the thumb screws.
- Install the GPU into the GPU slot and secure it with the thumb screws.

Optional: Secure the graphics card:
- The GPU can be secured with a velcro tie. Wrap the velcro tie around the PCI-e power connectors to hold it securely in position.
*This step is shown again in the chapter 'Cable Management' on page 26.
Optionally, the Shift XT chassis can be extended to allow for 2x fans and/or an AIO liquid cooler in the top. The radiator bracket should be in the upward position for the best installation process.
Option A:
If the radiator bracket was removed at the start of the process, place it back now and keep it in the open position.

Option B:
- If the radiator bracket is still in place, unscrew the 2x screws on the back of the top panel.

- Lift the bracket and keep it in the upward position.

By extending the chassis in the 'Air Boost' configuration, 2 fans can be installed in the top.
- Install two 120/140 mm fans on top of the radiator bracket. (directing the exhaust through the top is recommended)
- Run the cables along the hinge at the front of the chassis so the radiator bracket can still be lifted up.

Running the fan cables along the hinge at the front allows the radiator bracket to still be lifted up.

There is enough clearance to fit thicker than standard fans, like our Phanteks T30-120 fan

REQUIRES:


8x
A 240 AIO liquid cooler can be installed in the top in the 'Liquid Cooled' Configuration.
- Install the 240 radiator and 2x fans on top of the radiator bracket. (directing the exhaust through the top is recommended)
- Make sure the tubing and pump unit is guided as shown.
- Mount the pump unit onto the CPU.
- Run the cables along the hinge at the front of the chassis so the radiator bracket can still be lifted up.

Running the fan cables along the hinge at the front allows the radiator bracket to still be lifted up.

The total clearance for radiator+fan thickness is 60mm

REQUIRES:

Connect the SATA cable to the power supply

Expand D-RGB lighting with more lighting products (optional)
The integrated chassis lighting can be easily expanded with both Phanteks D-RGB products and third-party D-RGB products. Simply connect them to the pre-installed connectors as shown:
To Phanteks Digital-RGB products

To third Party D-RGB products

Sync D-RGB lighting with the Motherboard (optional)
By connecting the D-RGB Motherboard Adapter to a D-RGB equipped motherboard, the chassis lighting will be controlled through the motherboard software. When you do this, the D-RGB control of the front I/O buttons can not be used anymore.
To D-RGB Motherboard (optional)


Compatible with:

rainbow


addressable

addressable
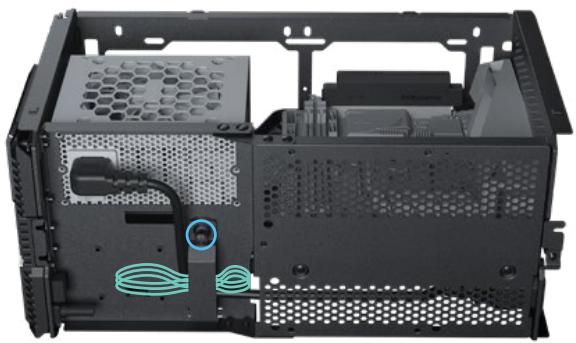
Bottom compartment cable management
Unscrew the thumb screw at the bottom to use the cable-tie bracket to secure any excess cables.
Organize power cables
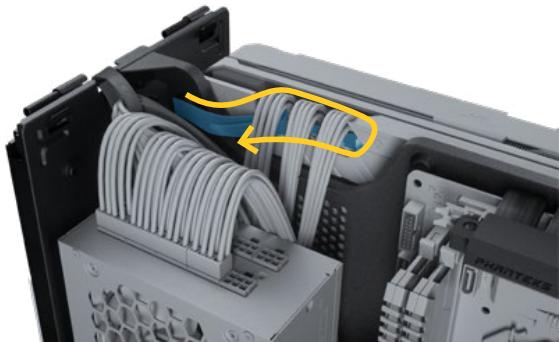
We recommend to install the power cables in the following order to achieve the best possible cable management.
- Install the 8-pin CPU cable like pictured below. Run the cable behind the PSU.

- Install the 24-pin Motherboard cable like pictured below. By making this loop around the 8-pin CPU cable, less excessive cable needs to be stored behind the PSU.
- Use the velcro tie to bind the 24-pin cable to the corner of the chassis.

- Install the 6/8-pin GPU cables like pictured below. The excessive cable can be pushed behind the PSU like the picture below.

Secure the graphics card
- If you have not done this during the 'Installing Graphics Card' chapter, please do it now.
- The GPU can be secured with a velcro tie. Wrap the velcro tie around the PCI-e power connectors to hold it securely in position.
* If the GPU is very short, this step is not necessary.

Secure the riser cable
- Secure the riser cable by mounting the Riser Lock to the
motherboard on the right side of the riser cable.
The Riser Lock prevents the riser cable unintentionally detaching.

Secure the AIO Tubings
The chassis has multiple zip-tie locations to tie down the tubing in the desired location.

REQUIRES:

Place the chassis back on the bottom panel
- Place the chassis on the bottom panel
- Slide the chassis to the rear
- Secure the chassis to the bottom panel with a thumbscrew in the rear.

REQUIRES:
1x


Re-install the mesh panels
- Slide the mesh panels down onto the chassis sides. Please mind the correct orientation.

Optional: Adjust top panel position for your configuration if using the 'Air Boost' or 'Liquid Cooled' configuration.
- Move the 2x stand-offs to the 2nd or 3rd position for the 'Air Boost' or 'Liquid Cooled' configuration respectively. Use the included screwdriver for this step.

Compact configuration

Air Boost configuration

Liquid Cooled configuration

- Slide the rear cover in the rear of the top panel as shown. Choose the correct size cover, depending on your build.
REQUIRES:

Small cover for Air Boost configuration

Large cover for Liquid Cooled configuration

- Secure the cover to the top panel with 2x rear cover screws.

Re-install the top panel on the chassis
- Place the top panel on the chassis
- Slide the top panel to the rear
- Secure the locks on the front

Install the front cover
- Place the magnetic aluminum front cover back on the front panel.

Optionally, dust filters can be installed to the top panel of the Shift XT to prefent dust falling in. We recommend this when using the compact configuration, because there are no exhaust fans to blow the dust out of the chassis.
- Align the dust filter strips on the inner side of the top panel.
- Remove the tape and secure the strips on the correct position as shown.
align here


Place the 3 Dust Filters in the correct position
REVOLT SFX PSU
PH-P650GSF / PH-P750GSF / PH-P750PSF
The Revolt SFX power supply is the perfect match for the Evolv Shift XT chassis. Its compact SFX form-factor and fully modular cable design makes cable management a breeze. The all-black flat ribbon power cables also helps routing the cables for a great clean look.
The Revolt SFX is available in three models:
• Revolt SFX 650 GOLD
• Revolt SFX 750 GOLD
• Revolt SFX 750 PLATINUM


GLACIER ONE 240 MP
PH-G0240MP_DBK01
The Glacier One 240 MP is capable of cooling powerful CPUs while operating silently. The included 120mm MP PWM fans offer high airflow, low noise, and excellent cooling performance with its pressure optimized fan blades.

PREMIUM T30-120 FAN
PH-F120T30_BG / PH-F120T30_BG_3P
The T30-120 fan is the ultimate PC cooling fan. It features a built-in fan profile switch which makes it optimized for every scenario; silent, balanced, or extreme performance. Go for this fan if you are looking for the absolute best performance. Available in single and triple pack.

HIGH AIRFLOW SK PWM FAN
PH-F120SK_DRGB / PH-F120SK_BBK PH-F140SK_DRGB / PH-F140SK_BBK
The high airflow SK PWM fans provide optimal air cooling and come in both 120mm or 140mm sizes and black or D-RGB versions. The SK fans are affordable high airflow fans with great value.
Available in Black, D-RGB, single and triple pack.


HIGH PRESSURE MP FAN
PH-F120MP_BBK02 / PH-F120MP_BK02 / PH-F120MP_WTO2
PH-F140MP_BBK02 / PH-F140MP_BK02
The MP fan delivers great performance combined with outstanding noise levels. The blade design is especially optimized for high pressure performance when installed on radiators. Available in black, black/white and white.

NEON STRIPS
PH-NELEDKT_M5 / PH-NELEDKT_CMBO / PH-NELEDKT_M1
Phanteks' NEON Digital-RGB LED STRIPS provide the smoothest lighting effect with many mounting positions to highlight your system. Its easy to use and secure mounting set lets you choose which hardware to highlight with a diffuse ray of light from the NEON LED strip. Multiple lengths available.

As a Phanteks customer, you are priority number one. We have a dedicated team of employees across the globe working hard every day to make sure we deliver the superior experience you deserve. We are here for you. If you have a question or a concern about our products, we have numerous ways you can reach us. Please choose one most convenient for you to connect with our team.
CUSTOMER SUPPORT INTERNATIONAL
Facebook : @Phanteks
Instagram: @Phanteks
RMA AND TECHNICAL SUPPORT INTERNATIONAL
Email : support@phanteks.com
RMA AND TECHNICAL SUPPORT AMERICAS
Hours : Monday-Friday 9:00-5:00 PST
Phone number : +1(909)598-2115
Email : support@phanteksusa.com

For up-to-date information please check www.Phanteks.com
PHANTEKS warrants its products to be free from defects in material and workmanship during the warranty period; when given normal, proper and intended usage. If a product proves to be defective in material or workmanship during the warranty period, PHANTEKS will, at its sole option, repair or replace the product with same product or similar product. The replacement product assumes the remaining warranty of the original product or 30 days, whichever provides longer coverage for the customer.
DURATION OF WARRANTY:
- I/O Ports - 2 years
- LED Lighting - 2 years
- Buttons - 2 years
- Chassis - 5 years
- External Panels - 5 years
- Riser Cable - 2 years
Please check www.phanteks.com/Warranty for more information.






- EVOLV SHIFT XT
- THANK YOU
- PHANTEKS
- WHAT'S INSIDE
- BUILD YOUR SETUP
- SUPPORT
- INTRODUCING THE PHANTEKS EVOLV SHIFT XT
- SSD BRACKET
- RISER CABLE GEN
- ACCESSORY BOX
- DUST FILTER BOX
- REMOVING THE TOP PANEL
- REMOVING THE MESH PANELS
- REMOVE THE CHASSIS
- REMOVE THE RADIATOR BRACKET
- AIRCOOLER BUILD
- IT IS RECOMMENDED TO CONNECT ALL MOTHERBOARD CABLES AT THIS STAGE
- INSTALL AN SSD
- REQUIRES
- INSTALLING THE GRAPHICS CARD
- OPTIONAL: SECURE THE GRAPHICS CARD
- OPTION A
- OPTION B
- BOTTOM COMPARTMENT CABLE MANAGEMENT
- ORGANIZE POWER CABLES
- SECURE THE GRAPHICS CARD
- SECURE THE RISER CABLE
- SECURE THE AIO TUBINGS
- PLACE THE CHASSIS BACK ON THE BOTTOM PANEL
- RE-INSTALL THE MESH PANELS
- RE-INSTALL THE TOP PANEL ON THE CHASSIS
- INSTALL THE FRONT COVER
- REVOLT SFX PSU
- GLACIER ONE 240 MP
- PREMIUM T30-120 FAN
- HIGH AIRFLOW SK PWM FAN
- HIGH PRESSURE MP FAN
- NEON STRIPS
- CUSTOMER SUPPORT INTERNATIONAL
- DURATION OF WARRANTY
Brand : Phanteks
Model : Shift XT
Category : Computer Case