
PR400 EVO - Audio Amplifier Atoll - Free user manual and instructions
Find the device manual for free PR400 EVO Atoll in PDF.


User questions about PR400 EVO Atoll
0 question about this device. Answer the ones you know or ask your own.
Ask a new question about this device
Download the instructions for your Audio Amplifier in PDF format for free! Find your manual PR400 EVO - Atoll and take your electronic device back in hand. On this page are published all the documents necessary for the use of your device. PR400 EVO by Atoll.
USER MANUAL PR400 EVO Atoll

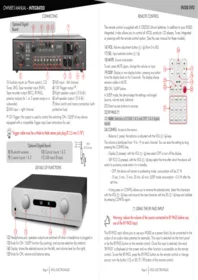
1) Auxiliary input.
2) CD input.
3) Tuner input.
4) DVD input.
5) TAPE recorder input (PLAY & REC).
6) BY-PASS input (*)
7) Preamp outputs (to 1 or 2 power amps or a subwoofer).
8) XLR outputs 1 & 2 - right channel.
9) XLR inputs 1 & 2 - right channel.
10) Main switch ON/OFF.
11) Power connection.
12) 12V Trigger output (1).
13) XLR inputs 1 & 2 - left channel.
14) XLR outputs 1 & 2 – left channel.
(1) Trigger output: this output is used to control the switching ON/OFF of any device equipped with a compatible Trigger input (see instructions for use).


Trigger cable must be a stereo Male to Male jack plug ∅ 3,5 mm (1/8").

Optional Digital Board
- Bluetooth® antenna - Coaxiales 1 & 2 Inputs - Optical Inputs 1 & 2 - USB-B Input

16) ON/SLEEP knob (by pushing); source selection (by rotation).
17) Headphone jack: Pre-out is switched off when a headphone is plugged in.
18) Knob to put ON (by pushing), volume, and menus setup. Access the Balance menu (press once), Light (press twice), Display (press three times), and SBY ECO (press four times). See Remote Control section: access the CONFIG menus.
REMOTE CONTROL
The remote control comes with 2 CR2025 Lithium batteries. In addition to your PR400 Preamp, it also allows you to control other ATOLL products.
19) Display off button: Pressing any button turns the display back on for 3 seconds.
20) Volume adjustment button ⊕ and ⊖ (from 0 to 100)
21) Input selection button.
22) Direct access to sources:
Access to the OPT, COAX, USB, BT inputs is only possible if the appliance is equipped with the DAC board.
23) Power on/off button.
When in standby mode, the device retains its settings (source, volume level, balance, backlight color).
24) Mute button. To exit, press any active button on the remote control.
25) Access to the CONFIG menus:
- Balance (press once): Once in this menu, the adjustment is made using the Vol and buttons. The volume is distributed from -9 to +9 on each channel.
- Light (press twice): Use the VOL ⊕ / ⊖ buttons to select the backlight color of the front panel buttons between red, blue, purple, or off.
- Display (press three times): Use the VOL ⊕ / ⊖ buttons to select ON/OFF to turn the display ON or OFF.
- SBY ECO (press four times): Use the VOL ⊕ / ⊖ buttons to select the time after which the unit will switch to economy mode when in STANDBY.
- OFF: The unit will remain in preheating mode: Power consumption will be 8 W.
- 10 sec, 5 min, 15 min, 30 min, 60 min: Power consumption will be <0.5 W after the set time, after switching to STANDBY.
- A long press on CONFIG renames the selected input. Select the characters with the VOL ⊕ / ⊖ buttons and move to the next character with the SEL ⊕ / ⊖ buttons and confirm by pressing CONFIG again.
26) BY-PASS(*) button.
(*) USING THE BY-PASS INPUT
Warning: reduce the volume of the source connected to BY-PASS before any use of the BY-PASS Input. The BY-PASS input bypasses the volume control of your PR400 (to be connected to the output of an audio-video preamp, for example). This input is selected via the front panel or by the BY-PASS button on the remote control. Once this input is selected, the word "BY-PASS" appears on the screen. To exit BY-PASS, press the BY-PASS button on the remote control or change the source.
USB INPUT
Your appliance is equipped with a High-Res. asynchronous USB Input (B type). It will be possible to use it only when you'll have downloaded the appropriate driver on your computer. This driver can be freely downloaded on our website at the page:

https://www.atoll-electronique.com/en/xmos-specific-driver-usb/
Attached are instructions for its installation.
This driver is not required for Macintosh computers.
To avoid problems transferring high-quality formats (24-bit/192 kHz), it is recommended to use a USB cable with a ferrite core.

ACCEPTED FORMATS
- Supported formats on optical and coaxial inputs: 16-24 bits (44.1 kHz, 48 kHz, 88.2 kHz, 96 kHz, 176.4 kHz, and 192 kHz).
• Supported formats on USB input:
– DSD: DSD64, DSD128, and DSD256. - PCM: 16-32 bits (44.1 kHz, 48 kHz, 88.2 kHz, 96 kHz, 176.4 kHz, 192 kHz, 352.8 kHz, and 384 kHz).
BLUETOOTH®
Your appliance allows the reception of audio signals sent from any device having a Bluetooth® transmitter (Smartphone, tablet, computer...).
First time association:
- Activate the Bluetooth® connectivity of your emitter device.
- Select the Bluetooth® (BT) input of PR400: unlock symbol BT 📋 appears.
- Select your appliance on the list of the possible receivers (named IN200).
- Once the connection is made, the lock symbol BT 🔒 appears.
The whole audio signals of your device source will then be transmitted towards your PR400. Your emitter device will remain associated until you unlock the PR400 with your Smartphone or switch off your amplifier.
Association of another emitter: Once associated with an emitter, you'll need to switch completely your PR400 off in order to make it visible from another emitter. The quality of reception of the signal depends on the power of the Bluetooth emitter and the distance between the 2 devices. Avoid being more than 5 meters from your PR400 for a correct reception without any risks of signal cuts.

CAUTIONS
- Do not make any connections when your device is powered on.
- Put your device in a dry and well ventilated place, far from a source of heat.
- Do not put something on your preamplifier.
- Do not make any plug in when the preamplifier is on.
- Strictly respect the left and right connections.
- Avoid any short-cut.

ADVISES
- To optimize the performance of your device, you should switch it on at least half an hour before any listening, the time for the power stage to reach its ideal working temperature. Your device will give you optimal listening quality after this time-lapse. Between two uses, it is, therefore, preferable to let the device in the SLEEP position so that it remains at its optimum temperature. At night or when you leave your home, it is best to use the main switch to turn off the device.
- To optimize the sound quality of your system, we recommend that you choose good-quality connection cords. Do not hesitate to ask your specialist dealer for advice.
You have just bought a preamplifier with exceptional audiophile performance. We really thank you for your confidence in our products. To get the best part of your preamplifier, please read carefully this manual.
CONCERNING THIS OWNER'S MANUAL
Paragraphs with grey and blue frames concerns only appliance getting the optional digital board installed.

YOU WILL FIND IN YOUR PACKAGE THE FOLLOWING PARTS AND DOCUMENTS
– A preamplifier PR400 EVO.
– A remote control (with 2 Lithium batteries CR2032).
- One power lead.
- This manual with the certificate of guarantee.
Latest update: 4th June 2025
ATOLL ELECTRONIQUE®
is a French Company that designs, manufactures, and commercializes all its products.


TECHNICAL DATA
| Analog power supplies: | 2×10 VA linear |
| Digital power supplies: | (10 VA + 1,6 VA) linear |
| Total of capacitors: | 112 000 μF |
| Number of inputs: | 5 LINES + 2 XLR |
| Input impedance: | 357 kΩ |
| Sensibility: | 4 V |
| Signal/noise ratio: | 100 dB |
| Distortion at 1kHz: | 0,004% |
| Standby power consumption (ECO): | < 0,5 W |
| Preheating power consumption: | 8 W |
| ON power consumption: | 12 W |
| Bandwidth: | 0,5 Hz - 780 kHz |
| Rising time: | 0,4 μs |
| Dimensions: | 440×370×130 mm |
| Weight: | 15 Kg |
(Technical data are subject to changes)
E.C. MARKING
E.C. marking certified the conformity with low tension directive 73/23/CEE, directive CEM 89/336/CEE and national transpositions.
WARRANTY CONDITIONS
The guarantee is two years period from date of purchase. We recommend you to ask your dealer to fill the guarantee and to conserve it. The guarantee is only available for appliance which have been use correctly.
MAINTENANCE
Before any cleaning, switch off your amplifier. Use a soft and dry rag to clean up the appliance. Never use acetone, white-spirit, ammoniac, or any kind of product containing abrasive agent. Never try to clean up inside the appliance.

WARRANTY FORM \~ PR400 EVO
To present to your dealer with the invoice when returning back the appliance:
ATOLL ELECTRONIQUE®
Bd des Merisiers
50370 BRECEY
FRANCE
Date of purchase:
Place of purchase:
Buyer signature:
Dealer Stamp
OWNER'S MANUAL
PR400 Evolution
PREAMPLIFIER

ELECTRONIQUE
www.atoll-electronique.com

- REMOTE CONTROL
- (*) USING THE BY-PASS INPUT
- USB INPUT
- ACCEPTED FORMATS
- BLUETOOTH®
- FIRST TIME ASSOCIATION
- CAUTIONS
- ADVISES
- CONCERNING THIS OWNER'S MANUAL
- YOU WILL FIND IN YOUR PACKAGE THE FOLLOWING PARTS AND DOCUMENTS
- ATOLL ELECTRONIQUE®
- TECHNICAL DATA
- E.C. MARKING
- WARRANTY CONDITIONS
- MAINTENANCE
- WARRANTY FORM \~ PR400 EVO
- OWNER'S MANUAL
- PR400 EVOLUTION
Brand : Atoll
Model : PR400 EVO
Category : Audio Amplifier