
DPX1002 - Projector VIEWSONIC - Free user manual and instructions
Find the device manual for free DPX1002 VIEWSONIC in PDF.
| Product Type | Digital Photo Frame |
| Brand | VIEWSONIC |
| Model | DPX1002 |
| Dimensions (approx.) | 20 x 15 x 5 cm |
| Weight (approx.) | 0.5 kg |
| Power Supply | AC Adapter (included) |
| Display | LCD Screen (size not specified) |
| Storage | Internal memory, memory card (SD/MMC), USB flash drive |
| Supported Photo Formats | JPEG (up to 8000x8000 px), BMP (up to 1024x1024 px) |
| Supported Audio Formats | MP3 |
| Supported Video Formats | Not specified in the manual |
| Remote Control | Yes, included |
| Main Functions | Photo display, slideshow, video/audio playback, calendar, alarm, clock |
| Cleaning | Clean, dry cloth; do not use liquid products |
| Maintenance | Do not block ventilation openings; avoid heat sources |
| Safety | Do not use near water; unplug if not used for extended periods |
| Package Contents | Photo frame, AC adapter, stand, quick start guide, USB cable, spare front panel |
| Customer Service (France) | www.viewsoniceurope.com/fr/ |
| Compliance | CE, RoHS, FCC Class B, ICES-003 |
Frequently Asked Questions - DPX1002 VIEWSONIC
User questions about DPX1002 VIEWSONIC
0 question about this device. Answer the ones you know or ask your own.
Ask a new question about this device
Download the instructions for your Projector in PDF format for free! Find your manual DPX1002 - VIEWSONIC and take your electronic device back in hand. On this page are published all the documents necessary for the use of your device. DPX1002 by VIEWSONIC.
USER MANUAL DPX1002 VIEWSONIC
This device complies with part 15 of FCC Rules. Operation is subject to the following two conditions: (1) this device may not cause harmful interference, and (2) this device must accept any interference received, including interference that may cause undesired operation.
This equipment has been tested and found to comply with the limits for a Class B digital device, pursuant to part 15 of the FCC Rules. These limits are designed to provide reasonable protection against harmful interference in a residential installation. This equipment generates, uses, and can radiate radio frequency energy, and if not installed and used in accordance with the instructions, may cause harmful interference to radio communications. However, there is no guarantee that interference will not occur in a particular installation. If this equipment does cause harmful interference to radio or television reception, which can be determined by turning the equipment off and on, the user is encouraged to try to correct the interference by one or more of the following measures:
Reorient or relocate the receiving antenna.
- Increase the separation between the equipment and receiver.
- Connect the equipment into an outlet on a circuit different from that to which the receiver is connected.
- Consult the dealer or an experienced radio/TV technician for help.
Warning: You are cautioned that changes or modifications not expressly approved by the party responsible for compliance could void your authority to operate the equipment.
For Canada
CE Conformity for European Countries
CE The device complies with the requirements of the EEC directive 2004/108/EC as amended by 92/31/EEC and 93/68/EEC Art.5 with regard to "Electromagnetic compatibility", and 2006/95/EC as amended by 93/68/EEC Art.13 with regard to "Safety."
Following information is only for EU-member states:
The mark shown to the right is in compliance with the Waste Electrical and Electronic Equipment Directive 2002/96/EC (WEEE).
The mark indicates the requirement NOT to dispose the equipment as unsorted municipal waste, but use the return and collection systems according to local law.
Important Safety Instructions

- Read these instructions.
- Keep these instructions.
- Heed all warnings.
- Follow all instructions.
- Do not use this unit near water.
- Clean with a soft, dry cloth. If still not clean, see "Cleaning the Display" in this guide for further instructions.
- Do not block any ventilation openings. Install the unit in accordance with the manufacturer's instructions.
- Do not install near any heat sources such as radiators, heat registers, stoves, or other devices (including amplifiers) that produce heat.
- Do not defeat the safety purpose of the polarized or grounding-type plug. A polarized plug has two blades with one wider than the other. A grounding type plug has two blades and a third grounding prong. The wide blade and the third prong are provided for your safety. If the provided plug does not fit into your outlet, consult an electrician for replacement of the obsolete outlet.
- Protect the power cord from being walked on or pinched particularly at plugs. Convenience receptacles and the point where they exit from the unit. Be sure that the power outlet is located near the unit so that it is easily accessible.
- Only use attachments/accessories specified by the manufacturer.
- Use only with the cart, stand, tripod, bracket, or table specified by the manufacturer, or sold with the unit. When a cart is used, use caution when moving the cart/unit combination to avoid injury from tipping over.
- Unplug this unit when unused for long periods of time.
- Refer all servicing to qualified service personnel. Servicing is required when the unit has been damaged in any way, such as: if the power-supply cord or plug is damaged, if liquid is spilled onto or objects fall into the unit, if the unit is exposed to rain or moisture, or if the unit does not operate normally or has been dropped.
Declaration of RoHS Compliance
This product has been designed and manufactured in compliance with Directive 2002/95/EC of the European Parliament and the Council on restriction of the use of certain hazardous substances in electrical and electronic equipment (RoHS Directive) and is deemed to comply with the maximum concentration values issued by the European Technical Adaptation Committee (TAC) as shown below:
| Substance | Proposed Maximum Concentration | Actual Concentration |
| Lead (Pb) | 0.1% | < 0.1% |
| Mercury (Hg) | 0.1% | < 0.1% |
| Cadmium (Cd) | 0.01% | < 0.01% |
| Hexavalent Chromium (Cr6+) | 0.1% | < 0.1% |
| Polybrominated biphenyls (PBB) | 0.1% | < 0.1% |
| Polybrominated diphenyl ethers (PBDE) | 0.1% | < 0.1% |
Certain components of products as stated above are exempted under the Annex of the RoHS Directives as noted below:
Examples of exempted components are:
- Mercury in compact fluorescent lamps not exceeding 5mg per lamp and in other lamps not specifically mentioned in the Annex of RoHS Directive.
- Lead in glass of cathode ray tubes, electronic components, fluorescent tubes, and electronic ceramic parts (e.g. piezoelectronic devices).
- Lead in high temperature type solders (i.e. lead-based alloys containing 85% by weight or more lead).
- Lead as an allotting element in steel containing up to 0.35% lead by weight, aluminium containing up to 0.4% lead by weight and as a cooper alloy containing up to 4% lead by weight.
Package contents
Check your Digital Photo Frame package for the following items.
Digital Photo Frame
Power adapter
- Stand
Quick Start Guide
USB cable
- Replacement front panel*
- The bundled front panel varies depending on the model you purchase.
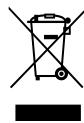
Replacing front panel
If your Digital Photo Frame package contains a spare front panel, follow these instructions to replace the front panel for personal preference.
- Locate the indent on the edge near the memory card socket.
- Follow the direction of the figure and gently lift the front panel.

- To install a new front panel, align the panel edge to the Digital Photo Frame and gently place the panel on the device.
Connect
- Align the head of the stand with the socket, then rotate clockwise until the stand locks into place.
- Plug the power adapter from the device to a power outlet.
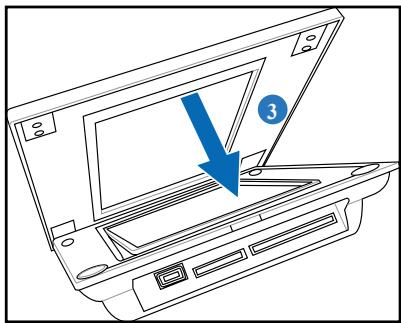
Locate control keys (in the back panel)
Locate the control buttons in the back panel according to the following table.
| Button | Function |
| OK | Enter or confirm the selection |
| Left | Move to the previous or left selection |
| Right | Move to the next or right selection |
| Up | Move upward |
| Down | Move downward |
| ◎ | Power On/Off |
Turn ON/OFF the device
Turn on the device
Press turn on the device, then the main screen appears.
Turn off the device
Hold for 2 seconds then release to turn off the device.

Tips: If you can't turn on the device normally, please try to turn off the device then turn it on again.
Remote Control
Refer to the following image and table for details of the remote control.
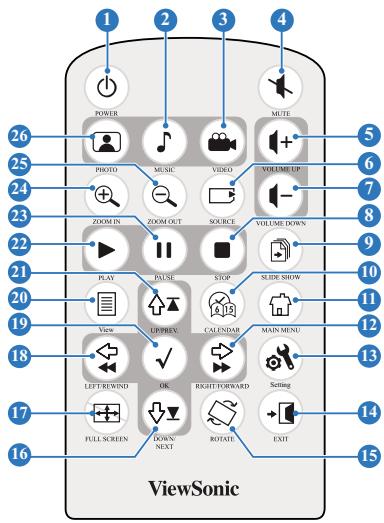
| No. | Item | Description | No. | Item | Description |
| 1 | POWER | Enable/disable Standby Mode | 14 | EXIT | Go back one menu level |
| 2 | MUSIC | Shortcut to the Audio menu | 15 | ROTATE | Rotate photo 90° clockwise |
| 3 | VIDEO | Shortcut to the Video menu | 16 | DOWN/NEXT | Navigate down in menus/skip to next available media |
| 4 | MUTE | Mute audio output | 17 | FULL SCREEN | Enlarge image to full screen |
| 5 | VOLUME UP | Increase audio volume | 18 | LEFT/REWIND | Navigate left in menus/rewind audio playback |
| 6 | SOURCE | Shortcut to Source menu | 19 | OK | Select/accept selected item |
| 7 | VOLUME DOWN | Decrease audio volume | 20 | View | Display advanced media options in media menus |
| 8 | STOP | Stop Video or Audio playback | 21 | UP/PREV. | Navigate up in menus/skip to previous available media |
| 9 | SLIDE SHOW | Start slide show of available photos | 22 | PLAY | Play selected media |
| 10 | CALENDAR | Show/hide Calendar in OSD | 23 | PAUSE | Pause current media |
| 11 | MAIN MENU | Display Main Menu | 24 | ZOOM IN | Enlarge photo image size |
| 12 | RIGHT/FORWARD | Navigate right in menus/fast forward audio playback | 25 | ZOOM OUT | Reduce photo image size |
| 13 | Setting | Shortcut to Settings menu | 26 | PHOTO | Shortcut to Photo menu |

- ZOOM IN/OUT are only available using the remote control.
Settings
Brightness
Allows you to adjust the screen brightness.
Language
Allows you to select the language you need.
Alarm Clock
Allows you to set the alarm time and turn on/off the alarm function.

Alarm Clock is disabled when the DPF is powered off.
Time and Date
Allows to set the time and date displayed in the OSD.
Show Calendar
Allows you to show/hide the calendar in the OSD.
Auto On/Off
Allows you to set the Auto On/Off schedule and enable or disable the Auto On/Off function.

Auto On/Off only works on Standby mode.
Default
Go to SETTINGS > Default, then select Yes to retore to the factory default setting or No to discard the selection.
Set Beep
Allows you to turn on/off the key control sound.
Status
Displays the software version and the current memory size.
Auto Tilt
Automatically adjusts the orientation of the screen when you rotate the frame. The default value is On.

Auto Tilt does not compensate if the frame is placed upside down—only 90^ rotation clockwise or counter clockwise is supported.
Volume
Allows you to adjust the volume between 0 and 16. The default value is 8.
View Photos
From the main screen, press the Up and Down navigation keys to select PHOTO, then select the photo source you want to display.
Photos pre-stored in the device will appear when no memory card or USB flash disk is connected.
When photo source is selected, press OK to switch between 3 view modes:
- Browse mode: manual viewing of photos one-by-one
- Thumbnail mode: list of all photos When viewing photos in Thumbnail mode, hold the Down navigation key ↓ for 2 seconds then release to quickly enter the setting menu for photo-related settings, or press View on the remote control.
- Slideshow mode: automatically shifting display of photos
- To exit the PHOTO function, switch to Thumbnail mode, then press the Up navigation key.
View photos from your memory card or USB flash disk
-
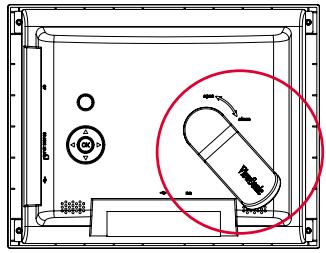
Insert your memory card with photos into the corresponding slot, OR: insert your USB flash disk into the USB port.
-
Photos on your memory card will appear after a few seconds.
Copy photos from your photo source
- In Thumnail mode, press the navigation keys to select one photo.
- Hold the Down navigation key 口 for 2 seconds then release to quickly enter the setting menu, or press View on the remote control.
- Select Copy to or Copy all to, then press OK.
- Select the source where you want to store the selected photos.
- Press OK to copy.
Copy multi-photos
- In Thumnail mode, select one photo, then press the Down navigation key 3 . The selected photo is labeled with a "+" mark.
- Repeat step 1 to other photos you want to copy to a source.
- Finishing selection, repeat step 2-5 in section Copy photos from your photo source.
Delete photos from your photo source
- In Thumnail mode, press the navigation keys to select one photo.
- Hold the Down navigation key 口 for 2 seconds then release to quickly enter the setting menu, or press View on the remote control.
- Select Delete or Delete all, then press OK.
Delete multi-photos
- In Thumnail mode, select one photo, then press the Down navigation key 3 . The selected photo is labeled with a "+" mark.
- Repeat step 1 to other photos you want to delete.
- Finishing selection, repeat step 2-3 in section Delete photos from your photo source.
Photo Setting menu
While in Thumnail mode, hold the Down navigation key 口 for 2 seconds then release to enter the photo setting menu You can adjust the screen view, slideshow sequence/effect/speed, copy or delete photos, effect, rotate photos, and set background music from the photo setting menu.
Full Screen: sets the displayed photo to full screen.
When set to Full Screen, the displayed photo is automatically cropped to fit the screen.
- Slideshow Sequence: sets the photo transition sequence.
- Slideshow Effect: sets the photo transition effect.
- Slideshow Speed: sets the photo transition frequency.
- Copy/Copy all to: copy one or all photos to a selected source.
- Delete/Delete all: delete one or all photos.
- Effect: displays photos in black and white.
- Rotate: rotate the displayed photo 0/90/180/270 degrees
- Background Music: display photos with background audio. Default value is Off.

Photo and Audio files must be from the same Source, for example, USB flash disk.
Supported format
JPEG: JPEG Baseline (4:4:4/4:2:2/4:2:0, support up to 8000x8000 pixels), Progressive JPEG (Support up to 1024x1024 pixels)
BMP: MS Windows V3.1/4/8/16/24 uncompressed Bitmap. (Support up to 1024x1024 pixels)
The system allows you to display 4000 photos at most from your own memory card or USB flash disk.
View Video
From the main screen, press the navigation keys to select VIDEO, then select the video source you want to play.
Videos pre-stored in the device will appear when no memory card or USB flash disk is connected.
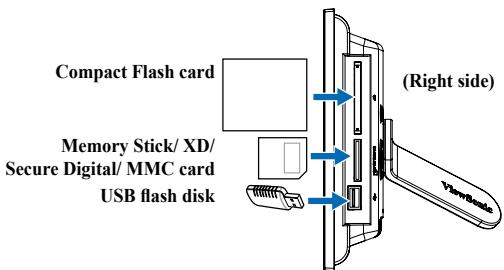
- Insert your memory card containing video into the corresponding slot, or insert your USB flash disk into the USB port. Videos on your memory card will appear after a few seconds. See page 9 for memory card and USB port locations.
- Press the navigation keys to select the desired video, then press OK to view.
- The selected video begins to play.
To exit the VIDEO functions, press Main Menu on the remote control.
Advanced video functions
Press View on the remote control or hold the Right navigation key 口 口 for two seconds to enter the video settings menu.
Repeat video
- Press the navigation keys to select one video.
- Press View on the remote control or hold the Right navigation key for two seconds to enter the video settings menu.
- Select Video Repeat, then press OK.
- Select All to repeat all videos, or One to repeat only the selected video.
- Press OK to play.
Copy video from your video source
- Press the navigation keys to select one video.
- Press View on the remote control or hold the Right navigation key for two seconds to enter the video settings menu.
- Select Copy to or Copy all to, then press OK.
- Select the source where you want to store the selected video.
- Press OK to copy.
Copy multi-video
- Select one video, then press the Right navigation key. The selected video is labeled with a "+" mark.
- Repeat step 1 for the other videos you want to copy to a source.
- Finishing selection, repeat step 2-5 in section Copy videos from your video source.
Delete video from your video source
- Press the navigation keys to select one video.
- Press View on the remote control or hold the Right navigation key for two seconds to enter the video settings menu.
- Select Delete or Delete all, then press OK.
Delete multi-video
- Select one video, then press the Right navigation key. The selected video is labeled with a "+" mark.
- Repeat step 1 for any other videos you want to delete.
- Finishing selection, repeat step 2-3 in section Delete videos from your video source.
Volume adjustment
- Press the navigation keys to select one video.
-
Press View on the remote control or hold the Right navigation key for two seconds to enter the video settings menu.
-
Select Volume, then press OK.
- Select the desired volume from 0 to 16.
- Press OK to set the volume.

The volume can also be set through the Setting and Audio menus.
Supported format
The following video formats are supported:
From the main screen, press the navigation keys to select AUDIO, then select the audio source you want to play.
Audio pre-stored in the device will appear when no memory card or USB flash disk is connected.
- Insert your memory card containing audio into the corresponding slot, or insert your USB flash disk into the USB port. Audio on your memory card will appear after a few seconds. See page 9 for memory card and USB port locations.
- Press the navigation keys to select the desired audio, then press OK to view.
- The selected audio begins to play. To exit the AUDIO functions, press Main Menu on the remote control.
Advanced audio functions
Press View on the remote control or hold the Right navigation key 口 口 for two seconds to enter the audio settings menu.
Repeat audio
- Press the navigation keys to select one audio.
- Press View on the remote control or hold the Right navigation key for two seconds to enter the audio settings menu.
- Select Music Repeat, then press OK.
- Select All to repeat all audio, or One to repeat only the selected audio.
- Press OK to play.
Copy audio from your audio source
- Press the navigation keys to select one audio.
- Press View on the remote control or hold the Right navigation key for two seconds to enter the audio settings menu.
- Select Copy to or Copy all to, then press OK.
- Select the source where you want to store the selected audio.
- Press OK to copy.
Copy multi-audio
- Select one audio, then press the Right navigation key. The selected audio is labeled with a "+" mark.
- Repeat step 1 for the other audio you want to copy to a source.
- Finishing selection, repeat step 2-5 in section Copy audio from your audio source.
Delete audio from your audio source
- Press the navigation keys to select one audio.
- Press View on the remote control or hold the Right navigation key for two seconds to enter the audio settings menu.
- Select Delete or Delete all, then press OK.
Delete multi-audio
- Select one audio, then press the Right navigation key. The selected audio is labeled with a "+" mark.
- Repeat step 1 for any other audio you want to delete.
- Finishing selection, repeat step 2-3 in section Delete audio from your audio source.
Volume adjustment
- Press the navigation keys to select one audio.
- Press View on the remote control or hold the Right navigation key for two seconds to enter the audio settings menu.
- Select Volume, then press OK.
- Select the desired volume from 0 to 16.
- Press OK to set the volume.

The volume can also be set through the Setting and Video menus.
Supported format
The following audio formats are supported:
MP3
Customer Support
For technical support or product service, see the table below or contact your reseller.
Note: You will need the product serial number.
| Country/Region | Web Site | T=Telephone F=Fax | |
| Australia/New Zealand | www.viewsonic.com.au | AUS=1800 880 818 NZ=0800 008 822 | service@au.viewsonic.com |
| Canada | www.viewsonic.com | T (Toll-Free)=1-866-463-4775 T (Toll)=1-424-233-2533 F=1-909-468-1202 | service.ca@viewsonic.com |
| Europe/Middle East/Baltic countries/North Africa | www.viewsoniceurope.com | Contact your reseller | |
| Hong Kong | www.hk.viewsonic.com | T=852 3102 2900 | service@hk.viewsonic.com |
| India | www.in.viewsonic.com | T=1800 11 9999 | service@in.viewsonic.com |
| Korea | www.kr.viewsonic.com | T=080 265 9080 | service@kr.viewsonic.com |
| Latin America (Argentina) | www.viewsonic.com/la/ | T=0800 666 0194 | soporte@viewsonic.com |
| Latin America (Brazil) | www.viewsonic.com/la/ | T=0800 891 6984 | soporte@viewsonic.com |
| Latin America (Chile) | www.viewsonic.com/la/ | T=800 440 303 | soporte@viewsonic.com |
| Latin America (Columbia) | www.viewsonic.com/la/ | T=01 800 915 6588 | soporte@viewsonic.com |
| Latin America (Mexico) | www.viewsonic.com/la/ | T=001 800 514 6518 | soporte@viewsonic.com |
| Renta y Datos, 29 SUR 721, COL. LA PAZ, 72160 PUEBLA, PUE. Tel: 01.222.891.55.77 CON 10 LINEAS Electroser, Av Reforma No. 403Gx39 y 41, 97000 Mérida, Yucatán. Tel: 01.999.925.19.16 Other places please refer to http://www.viewsonic.com/la/soporte/index.htm#Mexico | |||
| Latin America (Peru) | www.viewsonic.com/la/ | T=0800 53458 | soporte@viewsonic.com |
| Macau | www.hk.viewsonic.com | T=853 700 303 | service@hk.viewsonic.com |
| Puerto Rico & Virgin Islands | www.viewsonic.com | T=1-800-688-6688 (English) T=1-866-379-1304 (Spanish) F=1-909-468-1202 | service.us@viewsonic.com soporte@viewsonic.com |
| Singapore/Malaysia/ Thailand | www.ap.viewsonic.com | T=65 6461 6044 | service@sg.viewsonic.com |
| South Africa | www.viewsoniceurope.com | www.viewsoniceurope.com/uk/Support/Calldesk.htm | |
| United Kingdom | www.viewsoniceurope.com/uk/ | www.viewsoniceurope.com/uk/Support/Calldesk.htm | |
| United States | www.viewsonic.com | T (Toll-Free)=1-800-688-6688 T (Toll)=1-424-233-2530 F=1-909-468-1202 | service.us@viewsonic.com |
- For Canada
- CE Conformity for European Countries
- Following information is only for EU-member states:
- Important Safety Instructions
- Declaration of RoHS Compliance
- Package contents
- Replacing front panel
- Connect
- Locate control keys (in the back panel)
- Turn ON/OFF the device
- Turn on the device
- Turn off the device
- Remote Control
- Settings
- Brightness
- Language
- Alarm Clock
- Time and Date
- Show Calendar
- Auto On/Off
- Default
- Set Beep
- Status
- Auto Tilt
- Volume
- View Photos
- View photos from your memory card or USB flash disk
- Copy photos from your photo source
- Copy multi-photos
- Delete photos from your photo source
- Delete multi-photos
- Photo Setting menu
- Supported format
- View Video
- Advanced video functions
- Repeat video
- Copy video from your video source
- Copy multi-video
- Delete video from your video source
- Delete multi-video
- Volume adjustment
- Advanced audio functions
- Repeat audio
- Copy audio from your audio source
- Copy multi-audio
- Delete audio from your audio source
- Delete multi-audio
- Customer Support
Brand : VIEWSONIC
Model : DPX1002
Category : Projector