
DF88W - Interactive whiteboard VIEWSONIC - Free user manual and instructions
Find the device manual for free DF88W VIEWSONIC in PDF.

| Product type | Digital photo frame |
| Power supply | AC 100-240 V, 50/60 Hz; DC output 5 V / 1.8 A |
| Power consumption | ≤ 7.5 W |
| Display | LCD |
| Maximum image resolution | 12 megapixels (JPEG baseline) |
| Maximum video resolution | 720 × 560 pixels |
| Supported audio formats | MP3 (44.1 kHz, 32-320 kbps), WMA (44.1 kHz, 32-192 kbps) |
| Supported video formats | MPEG-1, MPEG-2, MPEG-4 (AVI DivX/Xvid), MJPEG |
| Internal memory | NAND (for ringtones and configuration) |
| Card readers | SD/MMC/MS Pro, CF |
| USB port | USB Host (USB key) and USB Slave (PC) |
| Remote control | Yes (range ≤ 5 m, angle ±45° horizontal, ±5° vertical) |
| Main functions | Photo display, music, video, clock, calendar, alarm, file management |
| Available languages | English, French, Spanish, German, Italian |
| Operating temperature | 0 °C to 40 °C |
| Operating humidity | ≤ 90% |
| Included accessories | Remote control, power adapter, USB cable, quick start guide, stand |
| Care and cleaning | Clean with a soft, dry cloth. Do not use liquid or abrasive products. |
| Safety | Use only the provided adapter. Do not expose to moisture or heat sources. |
| Spare parts and repairability | Spare parts are not listed. For any repair, contact VIEWSONIC support. |
Frequently Asked Questions - DF88W VIEWSONIC
User questions about DF88W VIEWSONIC
0 question about this device. Answer the ones you know or ask your own.
Ask a new question about this device
Download the instructions for your Interactive whiteboard in PDF format for free! Find your manual DF88W - VIEWSONIC and take your electronic device back in hand. On this page are published all the documents necessary for the use of your device. DF88W by VIEWSONIC.
USER MANUAL DF88W VIEWSONIC
Start a Legacy of Lasting Memories
1
Connect
2
Setup
3
View
DF88W
natural_image
Digital tablet displaying a photo of a golden retriever and a smiling child lying on grass (no text or symbols visible)Important safety instruction
1) Read these instructions.
2) Keep these instructions.
3) Heed all warnings.
4) Follow all instructions.
5) Do not use this apparatus near water.
6) Clean only with dry cloth.
7) Do not block any ventilation openings. Install in accordance with the manufacturer's instructions.
8) Do not install near any heat sources such as radiators, heat registers, stoves, or other apparatus (including amplifiers) that produce heat.
9) Do not defeat the safety purpose of the polarized or grounding-type plug. A polarized plug has two blades with one wider than the other. A grounding type plug has two blades and a third grounding prong. The wide blade or the third prong is provided for your safety. If the provided plug does not fit into your outlet, consult an electrician for replacement of the obsolete outlet.
10) Protect the power cord from being walked on or pinched particularly at plugs, convenience receptacles, and the point where they exit from the apparatus.
11) Only use attachments/accessories specified by the manufacturer.
12) Use only with the cart, stand, tripod, bracket, or table specified by the manufacturer, or sold with the apparatus. When a cart is used, use caution when moving the cart/apparatus combination to avoid injury from tip-over.
13) Unplug this apparatus during lightning storms or when unused for long periods of time.
14) Refer all servicing to qualified service personnel. Servicing is required when the apparatus has been damaged in any way, such as power-supply cord or plug is damaged, liquid has been spilled or objects have fallen into the apparatus, the apparatus has been exposed to rain or moisture, does not operate normally, or has been dropped.

EMC/EMI
This device complies with Part 15 of the FCC Rules. Operation is subject to the following conditions: (1) This device may not cause harmful interference, and (2) This device must accept any interference received, including interference that may cause undesired operation.
This Class B digital apparatus complies with Canadian ICES-003.
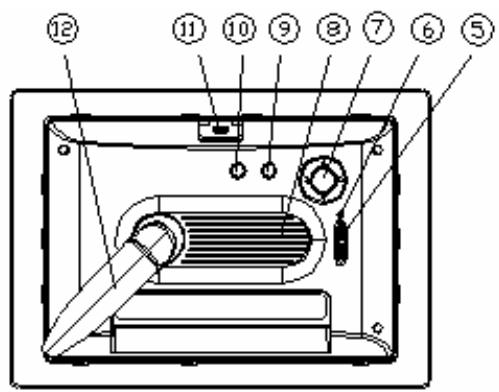
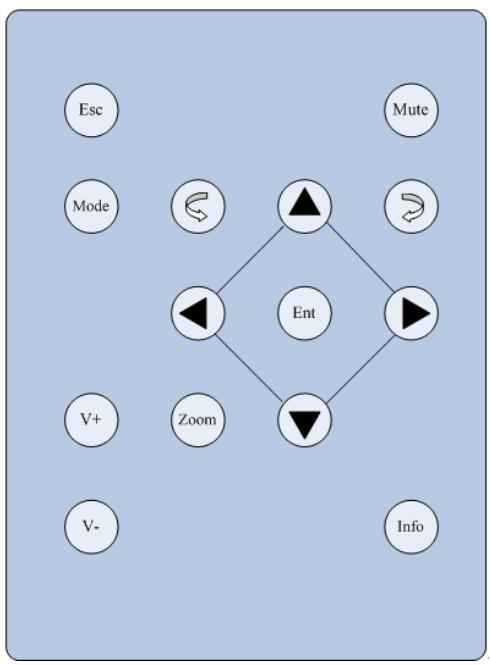
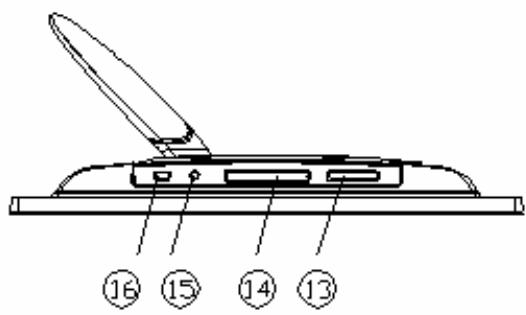
Identifying the Parts
□。LCD
2。 IR Sensor
3。 Front frame
4。 Transparent decorative frame
5。 Power switch
6。 Power indicator
7。Navigation button
⑧。Speaker
⑨。 Enter button
10。Esc button
□□。Locker of front frame
12。Stand
13。 SD/MMC/MS Pro card slot
14。CF card slot
15。DC-IN jack
16。USB port

Remote Control Buttons
flowchart
graph TD
    Esc --> Ent
    Mode --> Ent
    Ent --> Ent1["▲"]
    Ent --> Ent2["▼"]
    Ent1 --> Ent3["▲"]
    Ent2 --> Ent3
    Ent3 --> Ent4["▼"]
    Ent1 --> V+
    Ent2 --> V-
    Ent3 --> V-
    Ent4 --> Info
    Ent1 --> Mute
    Ent2 --> Mute
    Ent3 --> Mute
 | Direction |   wn wn  Left/Previous Left/Previous  Right/Next Right/Next |
 | Enter | Enters/Opens control bar. |
| [84HC] | Info | Views file properties or accesses the file management menu. |
 | Rotate | Rotates the image clockwise or counter-clockwise by 90°. |
 | Esc | Exit |
| [A0322] | Mute | Mute |
 | Zoom | Enlarges image. |
| [3H04] | Volume Adjustment | Turns up/down volume. |
 | Unspecified | Inactive button, no functionality. |

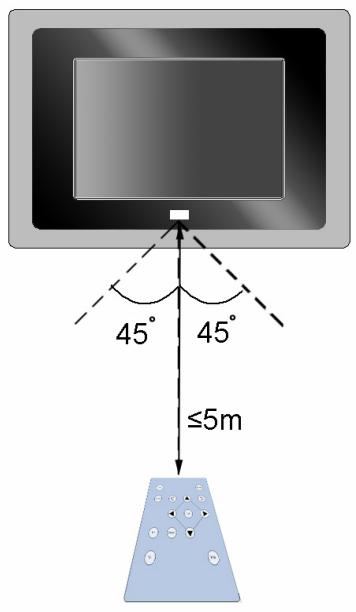
Tip: The remote control range is 5m or less within a +/-45 horizontal and +/-5 vertical angle from the remote sensor. If the remote's battery is low, the remote may not function properly, so replacing the battery immediately is recommended.
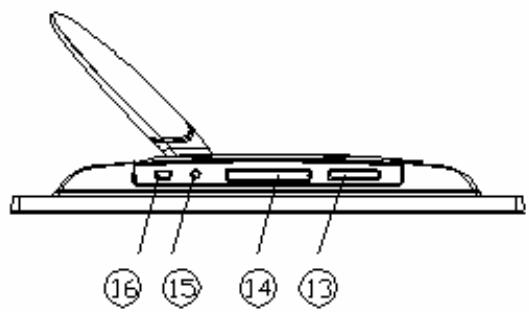
Getting Prepared
Installing Stand
Insert the stand into the corresponding slot in the back cover and rotate the stand clockwise until it is locked into place.
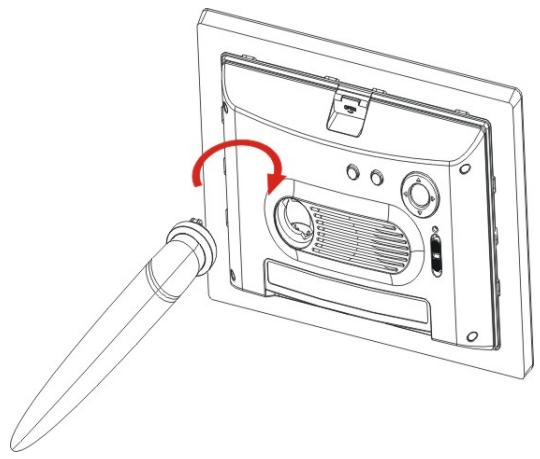
natural_image
Line drawing of a device panel with a pen inserted, showing internal components and a red rotation arrow (no text or symbols)Powering It On
Connect the power cable of the attached power adapter to the DC-IN jack of the digital photo frame and connect the power adapter to the AC power socket.
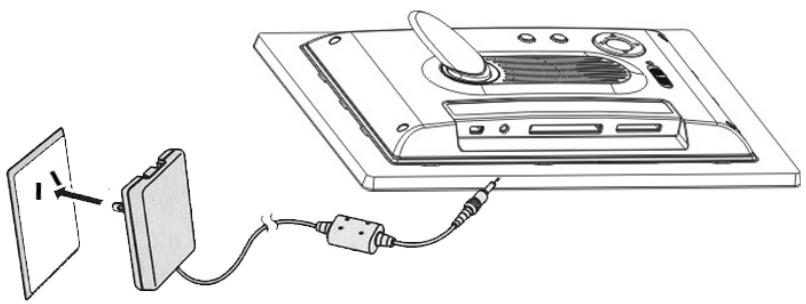
natural_image
Diagram showing a device connected to a wall-mounted power strip and cable, with no visible text or symbols.Turn on the power: When the power switch is OFF, the power is turned off. Move the power switch to ON to turn on the power or move it to LED to turn on the LED indicators.

Tip: Power input: AC100\~240V, 50\~60Hz. Power output: DC5V/1.8A. Power consumption: ≤7.5W.
Operating temperature: 0°C\~40°C. Operating humidity: ≤90%.
Inserting Cards
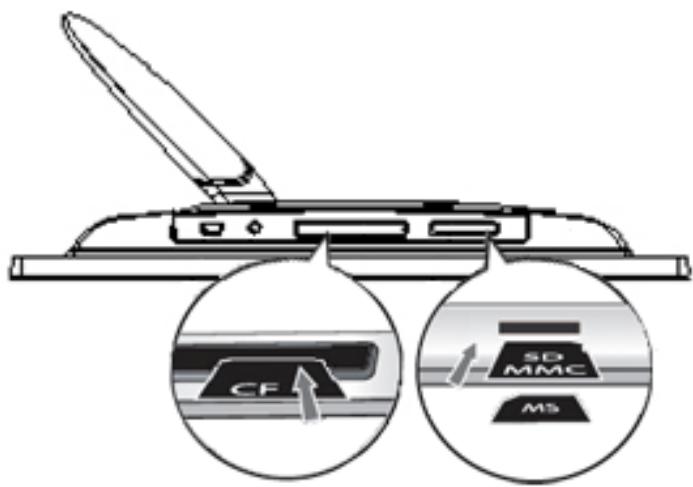
- Insert the memory card into the corresponding slot as shown in the illustration. If the card is improperly inserted, it may not function properly.
- It is recommended to not remove the memory card when a file is being played.

Tip: This product supports several types of memory cards such as SD/MMC, MS Pro, and CF. Since there are many memory card brands, it is recommended to test whether a card is compatible with this product. (Note: This product does not support illegal cards) If the card is inserted correctly and the startup picture is displayed but the card fails to read, it is recommended that you shut down and repower the unit or reformat the card before writing files onto it.
Operation
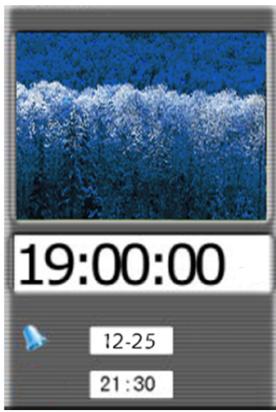
Turn on the power. After the startup logo is displayed, the startup interface screen is displayed. The default screen is the calendar.
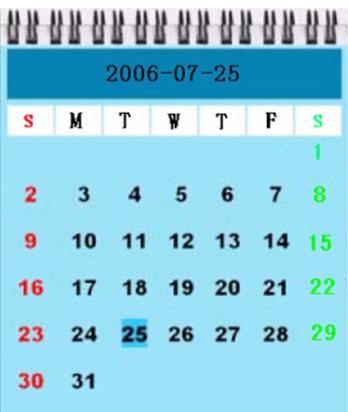
Calendar
other
2006-07-25 | Week | Value | |---|---| | S | M | | T | W | | T | F | | F | S | | 1 | | | 2 | 3 | | 4 | 5 | | 6 | 7 | | 7 | 8 | | 9 | 10 | | 11 | 11 | | 12 | 12 | | 13 | 13 | | 14 | 14 | | 15 | | | 16 | 17 | | 18 | 18 | | 19 | 19 | | 20 | 20 | | 21 | 21 | | 22 | | | 23 | 24 | | 25 | 25 | | 26 | 26 | | 27 | 27 | | 28 | 28 | | 29 | | | 30 | 31 | The values in the table are estimated based on the date '2006-07-25'. The numbers inside the cells represent the specific values for each week.This interface displays calendar, current time, and current alarm time.
- Use ▲▼ to view the previous/next month, and use Enter to access the card selection interface.
Card Select
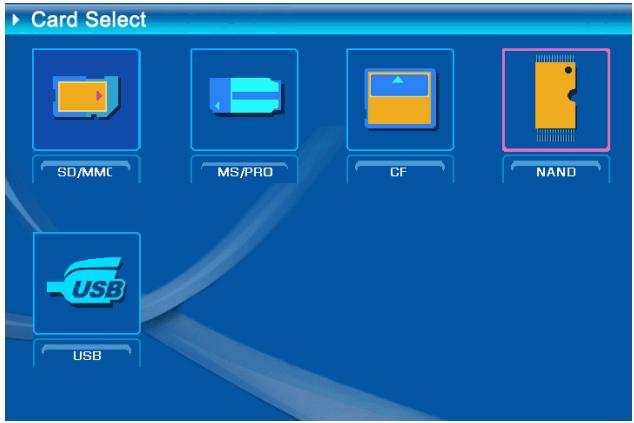
This interface is used to select the desired storage device.
- Use ▲▼ ◀▶ to move the cursor.
- Use Enter to access the selected option.
- Use Esc to go back to the calendar interface.
Function Select
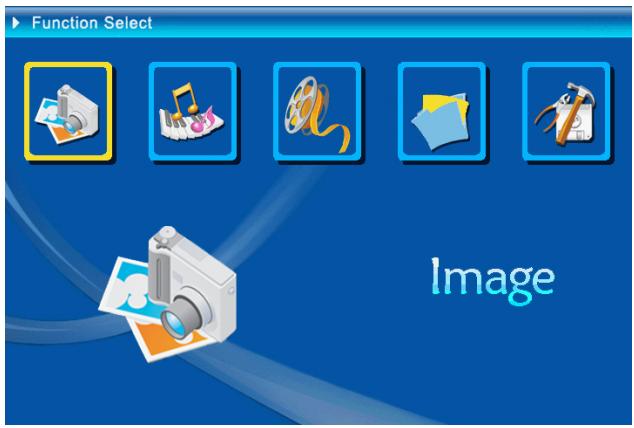
This interface is used to select functions.
- Use ▲▼ ◀▶ to move the cursor.
- Use Enter to access the selected option
- Use Esc to go back to the card selection interface.
Image

natural_image
Grid of nine photos showing children, flowers, and fruit including a child, flowers, and a cup (no text or symbols)Select and press Enter to view the images in a 9-image thumbnail screen.
- Use ▲▼ ◀▶ to move the cursor to
select image.
- Use Enter to view selected image and start the automatic slideshow.
- Use Esc to go back to the function selection interface.
In slideshow mode, all the images in the memory card will be played automatically.
- Use Esc to stop slideshow.
- Use ◀ to view the previous image and ▶ to view the next image.


- Use ▲ to access the brightness adjustment menu. Use ▼ to access the volume adjustment menu.
- Use ◀▶ to adjust parameters.
- Use Enter to confirm the adjustment. Use Esc to exit.
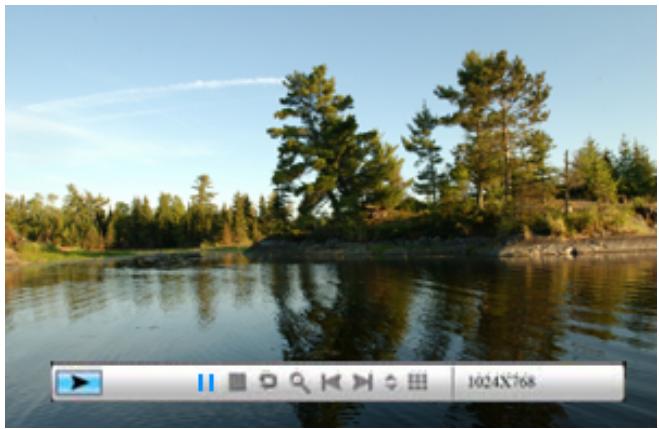
When browsing the images, use the image control bar to control the playing of images and use the music control bar to control the playing of music.
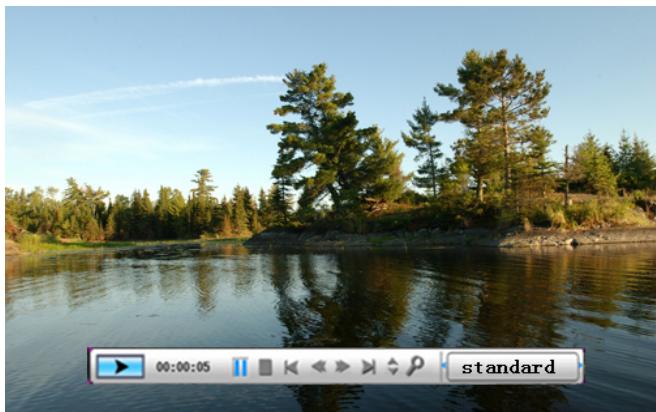
natural_image
Scenic lakeside view with evergreen trees reflected in calm water under clear sky (no text or symbols)- Use Enter to access the image control bar; use ▼ or ▲ to switch to the music control bar. Use Esc to close the control bar.
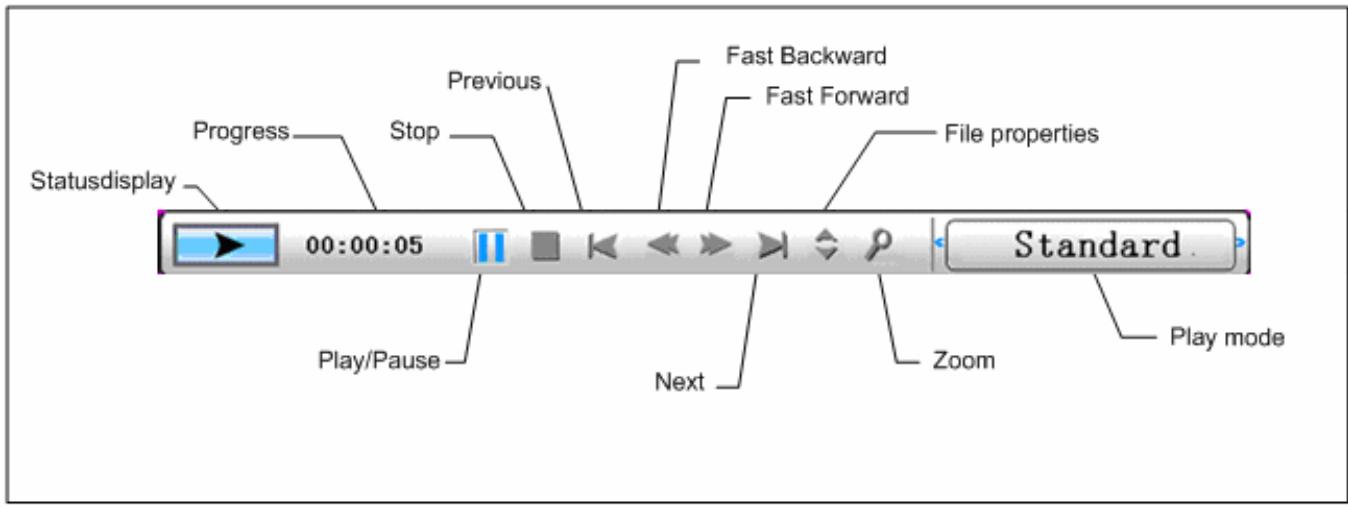
The figure below shows the image control bar.

- Use ◀▶ to select a button on the control bar. Use Enter to confirm the selection.
 | Status display | Displays the play status of the current image (play or pause). |
 | Play/Pause | Play/Pause the image slideshow. |
 | Stop | Stops browsing images and returns to the function selection interface. |
 | Rotate | Rotates the current image clockwise by 90°. |
 | Zoom | Enlarges the current image. |
 | Previous | Displays the previous image. |
 | Next | Displays the next image. |
 | Image info | Displays the properties of the current file. |
 | Thumbnails | Previews images in a 9-image screen. |
| 1024×768 | Resolution | Displays the resolution of the current image. |

Tip: This product supports JPEG (baseline) image files within 12 mega pixels.
Music
bar
| Position | Value | |---|---| | 00:00:05 | 100 |

Select 📄 and press Enter to access the music playing function. After that, the audio file in the directory will be played automatically.
- Use ▲ to activate/deactivate the spectrum effect.
-
Use Esc to go back to the function selection interface.
-
Use ▼ to access the volume adjustment menu.
- Use Enter to confirm the adjustment. Use Esc to exit.
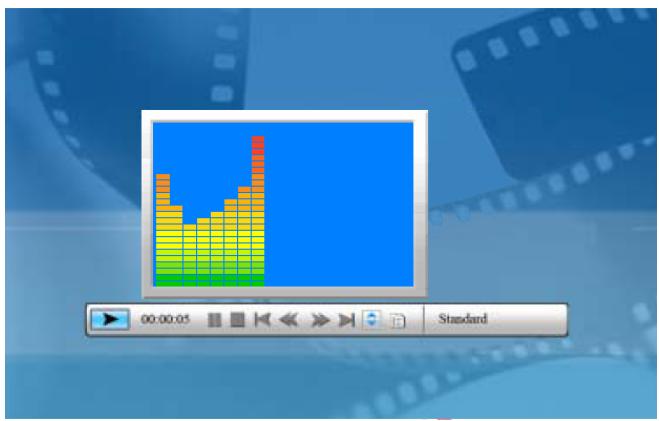
The figure below shows the music control bar.
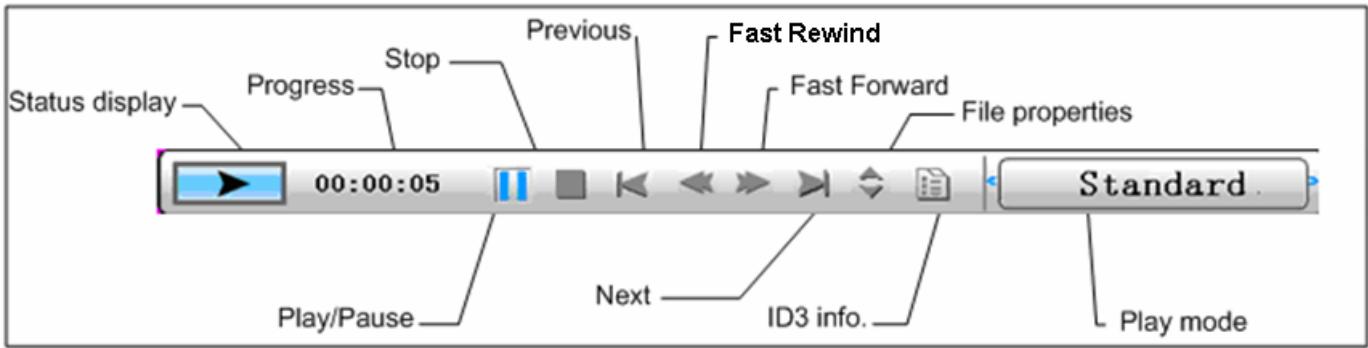
- Use ◀▶ to select a button on the control bar. Use Enter to confirm the selection.
 | Status display | Displays the play status of the music (play or pause). |
| 00:00:05 | Progress | Displays the progress of music playing. |
| Play/Pause | Play/Pause the music. | |
| Stop | Stops playing music and returns to the function selection interface. | |
| Previous | Plays the previous song. | |
| Fast Rewind | Speeds up the music playing backward. | |
| Fast Forward | Speeds up the music playing forward. | |
| Next | Plays the next song. | |
| File properties | Displays the properties of the current file. | |
| ID3 info | Displays the ID3 information of the music. | |
| Standard | Play mode | Press Enter to switch between these play modes: “standard”, “repeat one” and “Dir repeat”. |

Tip: This product supports MP3 audio files (MPEG 1.0 Layer 3, with a sampling rate of 44.1kHz and a bit rate of 32kbps-320kbps) and WMA audio files (WMA CBR, with a sampling rate of 44.1kHz and a bit rate of 32kbps-192.kbps).
Movie
natural_image
Scenic lakeside view with evergreen trees reflected in calm water, no visible text or symbols
Select 📄 and press Enter to access the movie playing function. After that, the video file in the directory will be played automatically.
- Use Enter to access the video control bar, and use Esc to close it.


- Use ▲ to access the brightness adjustment menu. Use ▼ to access the volume adjustment menu.
- Use ◀▶ to adjust parameters.
- Use Enter to confirm the adjustment. Use Esc to close the menu.
The figure below shows the video control bar.
- Use ◀▶ to select a button on the control bar. Use Enter to confirm the selection.

Displays the play status of the current video file (play or pause).
00:00:05 Progress
Displays the progress of video playing.
Play/Pause
Play/Pause the playing video file.
 | Stop | Stops playing video and returns to the function selection interface. |
 | Previous | Plays the previous video file. |
 | Fast Backward | Speeds up the video playing backward. |
 | Fast Forward | Speeds up the video playing forward. |
 | Next | Plays the next video file. |
 | File properties | Displays the properties of the current file. |
 | Zoom | Enlarges the current video display. |
| Standard | Play mode | Press Enter to switch between these play modes: “standard”, “repeat one” and “Dir repeat”. |

Tip: This product supports MPEG-1 (*.mpg, *.mpeg, *.dat), MPEG-2 (*.mpg, *.mpeg), MPEG-4 (divx or xvid AVI files) and MJPEG video files

Caution: To ensure smooth video playback, ensure that the code rate of the built-in video file or the video file on a USB disk is less than or equal to 7Mbps. Due to the limited transmission rate of a memory card, ensure that the code rate of the video file on a memory card is less than or equal to 4Mbps. The maximum supported resolution is 720 x 560 pixels.
File
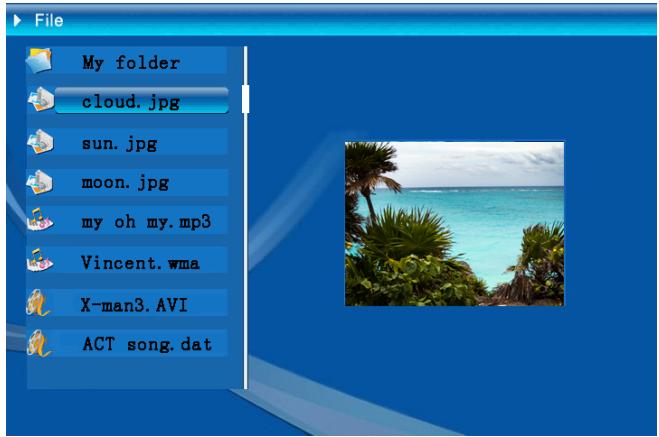

Select and press Enter to access the file management function. After that, all storage devices and the files in them are listed. You can view, copy, and delete the files. Press Esc to return to the function selection interface.
- Use ▲▼ to select a file. Use Enter or ▶ to access the sub-directory.
- Use Enter to play the selected file.
- Use Esc to return to the upper directory.

After selecting and marking a file, you can copy and delete it.
- Use ▲▼ to select a file, and then
press ▶ to add mark beside the
file, or press ▶ again to cancel the selection.
- Use ▲▼ to repeat the above step to mark more files.
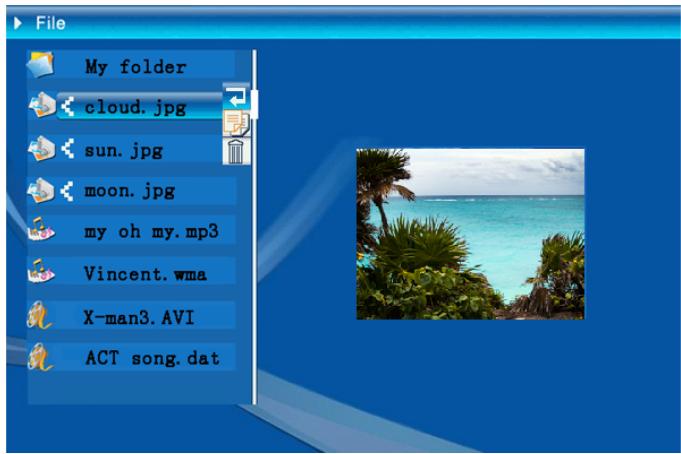
After selecting a file, press and hold down Enter to display the operating menu.
Deleting File
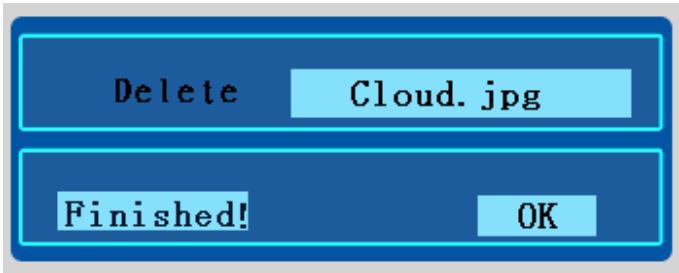
Use ▲▼ to move to and press Enter to confirm the deletion. Then press Enter again to return to the file management interface.
Copying File
Select and mark the desired file, press ◀ or Esc to leave the current directory and locate the target folder (A file cannot be copied into the same folder it is currently in.) and press and hold down Enter to display the operating menu.
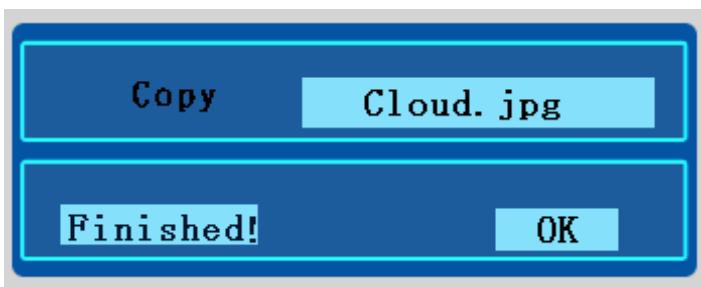
Select and press Enter to copy the file to the target folder.

Caution: If the free space in the memory card where the target folder is located is insufficient or the name of the target folder is repeated, the copying operation will fail and an error message will be displayed.
Setting
On the function selection interface, select

and press Enter to access the system setting interface.
- ▲▼: Moves an option or selects parameters.
- ▶: Accesses an option
- Enter: Accesses an option or confirms the setup.
• /Esc: Returns to the upper option.


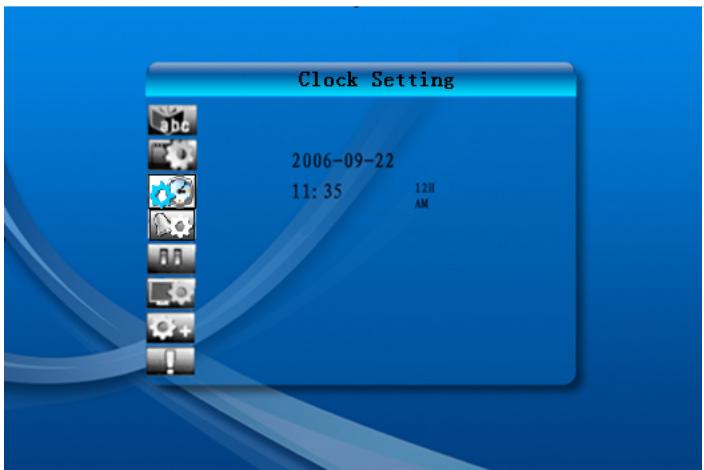
Language setup
Picture setup
Clock setup
Alarm setup
Startup setup
Video setup
Default
Version
English, French, Spanish, German, Italian
slideshow mode
“Fast”, “Medium”, “Slow”
Picture play mode
YYYY-MM-DD
HH:MM,AM/PM,12H/24H
YYYY-MM-DD
HH:MM
Ring 1/2/3 once/every day/off
Calendar/image/music/movie/image+music
Sets brightness, contrast and chroma.
Restores the default settings.
Views the current firmware version.

Tip: Three types of alarm rings are built in the system. You can also customize alarm rings in this way: Store MP3 files in the root directory of the memory card (NAND), name them RING1.MP3, RING2.MP3 and RING3.MP3, and then select the desired ring.

Caution: During the startup setup, if you set the system to automatically play images, audio files, video files, or audio files + video files, ensure that the files are stored in a directory of less than three layers. If the directory is too deep, the system will fail to locate and play the files.
Connecting to External Devices
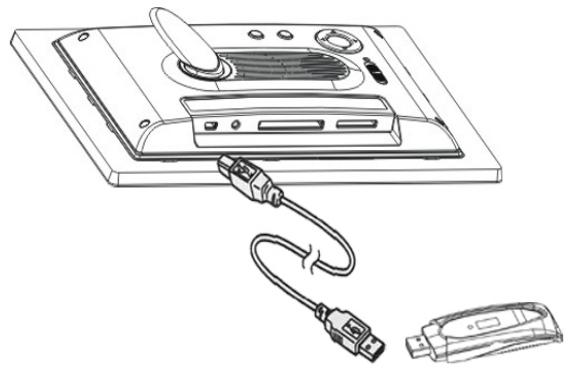
Connecting to USB Disk
Use the attached USB cable to connect to USB disks (USB Host mode) such as a USB disk or USB MP3 player. After the USB device is identified, the USB icon in the card selection interface will be highlighted and a device named "UDISK" will appear in the file list.
natural_image
Line drawing of a computer monitor with an attached USB cable and a separate USB device (no text or symbols)- Turn on the power.
- Connect the USB disk to the digital photo frame through the USB cable.
- In the card selection interface, select the USB icon to access the USB disk and operate it as a memory card.
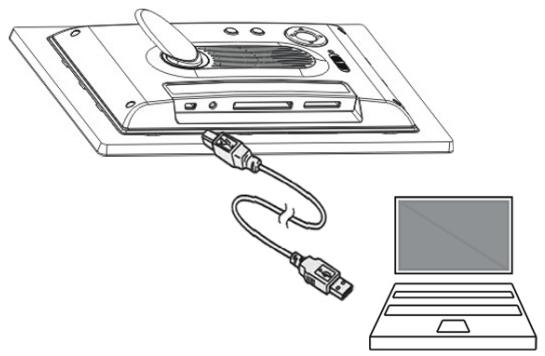
Connecting to PC
natural_image
Line drawing of a computer monitor connected to a laptop via cable (no text or symbols)Use the attached USB cable to connect the product to a PC (USB Slave mode). Then you can manage the memory card/memory in the digital photo frame through the PC.
- Turn on the power.
- Connect the product to the PC through the USB cable.
- After the PC automatically identifies the device and installs the driver, you can operate the device through the PC.

Tip: This product supports Windows 2000/XP/Vista. When formatting the memory card, ensure that FAT or FAT32 file system is used.

Caution:
- To avoid issues due to insufficient PC USB power supply, connect to the PC after the power supply is connected and the system is powered on.
- Due to the limited power supply of the system device, ensure that the driving current of the external USB device (for example, USB disk) is not higher than 500mA. If the driving current is higher than 500mA, use an external power supply.
Déballage
natural_image
Line drawing of a device with a pen inserted, showing internal components and a red curved arrow indicating rotation (no text or symbols)Démarrer-le
natural_image
Diagram showing a device connected to a wall-mounted power strip and cable, with no visible text or symbols.natural_image
Collage of nine photos showing a family, outdoors, flowers, and fruit including a child, woman, and tableware (no text or symbols)natural_image
Scenic lakeside view with evergreen trees reflected in calm water under clear sky (no text or symbols)

natural_image
Scenic lakeside view with pine trees and clear sky, no visible text or symbols on the scene itself.
natural_image
Line drawing of a computer monitor with cable and connector, showing external wiring (no text or symbols)natural_image
Line drawing of a computer monitor with an attached cable and connected to a laptop (no text or symbols present)
flowchart
graph TD
    Esc --> Ent
    Mode --> Ent
    Ent --> Ent1["▲"]
    Ent --> Ent2["▼"]
    Ent1 --> Ent3["▲"]
    Ent2 --> Ent3
    Ent3 --> Ent4["▼"]
    Ent1 --> V+ --> Zoom
    Ent2 --> V- --> Zoom
    Ent3 --> Info
    Ent4 --> Info
    Note: Some nodes include Esc, Mode, Ent, V+, and Info; some nodes include Mute, V-, and Info.
natural_image
Technical line drawing of a device panel with a pipette inserted, showing internal components and a red rotation arrow (no text or symbols)Encendida
natural_image
Diagram showing a device connected to a wall-mounted power strip and cable, with no visible text or symbols.other
2006-07-25 | Week | Value | |---|---| | S | M | | T | W | | T | F | | F | S | | 1 | | | 2 | 3 | | 4 | 5 | | 6 | 7 | | 7 | 8 | | 9 | 10 | | 11 | 12 | | 13 | 14 | | 14 | 15 | | 16 | 17 | | 18 | 19 | | 20 | 21 | | 21 | 22 | | 23 | 24 | | 25 | 26 | | 27 | 28 | | 29 | | | 30 | 31 | The image contains only the numerical values for each week.This interface is used to select the desired storage device.
- Use ▲▼ ◀▶ to move the cursor.
- Use Enter to access the selected option.
- Use Esc to go back to the calendar interface.
Interface principal
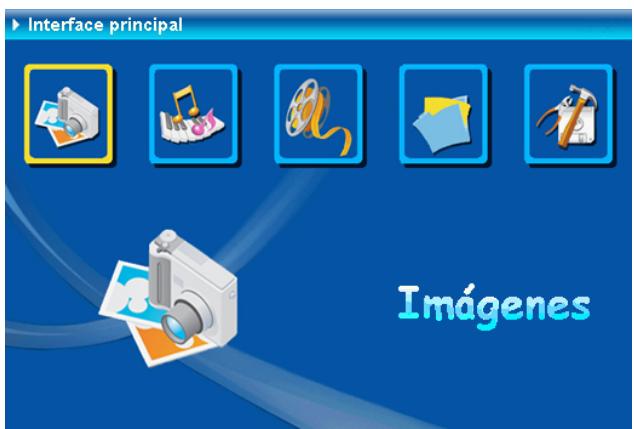
Elegir funciones
natural_image
Grid of nine photos showing a family, outdoor scenes, flowers, and fruit (no text or symbols)natural_image
Scenic lakeside view with evergreen trees reflected in calm water under clear sky (no text or symbols)bar
| Position | Value | |---|---| | 00:00:05 | 100 | | 01:00:05 | 120 | | 02:00:05 | 140 | | 03:00:05 | 160 | | 04:00:05 | 180 | | 05:00:05 | 200 | | 06:00:05 | 220 | | 07:00:05 | 240 | | 08:00:05 | 260 | | 09:00:05 | 280 | | 10:00:05 | 300 | | 11:00:05 | 320 | | 12:00:05 | 340 | | 13:00:05 | 360 | | 14:00:05 | 380 | | 15:00:05 | 400 | | 16:00:05 | 420 | | 17:00:05 | 440 | | 18:00:05 | 460 | | 19:00:05 | 480 | | 20:00:05 | 500 | | 21:00:05 | 520 | | 22:00:05 | 540 | | 23:00:05 | 560 | | 24:00:05 | 580 | | 25:00:05 | 600 | | 26:00:05 | 620 | | 27:00:05 | 640 | | 28:00:05 | 660 | | 29:00:05 | 680 | | 30:00:05 | 700 | | 31:00:05 | 720 | | 32:00:05 | 740 | | 33:00:05 | 760 | | 34:00:05 | 780 | | 35:00:05 | 800 | | 36:00:05 | 820 | | 37:00:05 | 840 | | 38:00:05 | 860 | | 39:00:05 | 880 | | 40:00:05 | 900 | | 41:00:05 | 920 | | 42:00:05 | 940 | | 43:00:05 | 960 | | 44:00:05 | 980 | | 45:00:05 | 100 | | 46:00:15 | - | | 47:15:15 | - | | 48:15:15 | - | | 49:15:15 | - | | 51:15:15 | - | | 52:15:15 | - | | 53:15:15 | - | | 54:15:15 | - | | 55:15:15 | - | | 56:15:15 | - | | 57:15:15 | - | | 58:15:15 | - | | 61.15:16 | - | | 62.15:16 | - | | 63.15:16 | - | | 64.15:16 | - | | 65.15:16 | - | | 66.15:16 | - | | 67.15:16 | - | | 68.15:16 | - | | 71.15:17 | - | | 72.15:17 | - | | 73.15:17 | - | | 74.15:17 | - | | 75.15:17 | - | | 76.15:17 | - | | 77.15:17 | - | | 78.15:17 | - | | 79.15:17 | - | | 81.15:18 | - | | 82.15:18 | - | | 83.15:18 | - | | 84.15:18 | - | | 85.15:18 | - | | 86.15:18 | - | | 87.15:18 | - | | 88.15:18 | - | | 91.15:19 | - | | 92.15:19 | - | | 93.15:19 | - | | 94.15:19 | - | | 95.15:22 | - | | 96.15:22 | - | | 97.15:22 | - | | 98.15:22 | - | | 99.15:22 | - | | Note:Standard

Optar icono
natural_image
Scenic lakeside view with evergreen trees reflected in calm water, no visible text or symbols
Select 📋, and then press Enter to copy the file to the target folder.

natural_image
Line drawing of a device with an attached cable and connector, showing no text or symbolsnatural_image
Line drawing of a device with a switch connected to a laptop (no text or symbols present)Corporate names and trademarks stated herein are the property of their respective companies. Copyright © 2007 ViewSonic Corporation. All rights reserved.
- Important safety instruction
- EMC/EMI
- Identifying the Parts
- Getting Prepared
- Installing Stand
- Powering It On
- Inserting Cards
- Operation
- Calendar
- Card Select
- Function Select
- Image
- Music
- Movie
- File
- Deleting File
- Copying File
- Setting
- Connecting to External Devices
- Connecting to USB Disk
- Connecting to PC
- Caution:
- Déballage
- Démarrer-le
- Encendida
- Interface principal
- Elegir funciones
Brand : VIEWSONIC
Model : DF88W
Category : Interactive whiteboard