
PMP - Portable media player DANE-ELEC - Free user manual and instructions
Find the device manual for free PMP DANE-ELEC in PDF.
User questions about PMP DANE-ELEC
0 question about this device. Answer the ones you know or ask your own.
Ask a new question about this device
Download the instructions for your Portable media player in PDF format for free! Find your manual PMP - DANE-ELEC and take your electronic device back in hand. On this page are published all the documents necessary for the use of your device. PMP by DANE-ELEC.
USER MANUAL PMP DANE-ELEC
Note: Please recharge the player before using it!
For Your Safety
Read this user guide carefully to ensure proper use of the product and to avoid any danger or physical damage.
Please use your player properly in case of explosion, fire, electric shock, etc.
- Do not repair the player by yourself, or it will cause damage.
- Do avoid getting the player wet or drop it in water.
- Do not use the player while raining.
- Please backup important data onto your personal computer as repair or other causes may result in data loss.
When using your player, pay attention to your health, especially the power of hearing. - Do not use the earphones while driving or riding a bicycle.
- It may cause traffic accident if you turn up the volume of the earphones while walking down the street.
-
Do not turn up the volume too high, doctors warn against prolonged exposure to high volume.
-
Stop using the device or turn down the volume if you have ringing in your ears.
- Always use the accessories provided by or approved by our company, also do not spray water on the player.
- The player (including the AC/DC adaptor) shall not be exposed to dripping or splashing and that no objects filled with liquids, such as vases, shall be placed on the player.
Function features
- Support USB 2.0 capability, much faster than USB 1.1, to enable faster communication with your PC.
- Support various EQ mode: including Normal, Pop, Rock, Classical, Jazz, PlayFX 3D, PlayFX DBB, PlayFX Auto volume.
- Support multiple languages.
- You can select your favorite music by Artist, Album, Genre, also you can make your own favorite list.
- The player can record outside voice.
- The player has repeat functions.
- The player support MP3/WMA/WAV/AAC/APE/FLAC format files. Including WMA
files with DRM (Digital Rights Management) function.
- The player has Video Playback, Photo Viewer, E-book, TV-out, FM transmitter, G-sensor functions, etc.
- The player can power off automatically after a preset time.
Accessories in the packing
NOTE: The following icons are only a guide and may differ slightly from the actual product appearance.

Player
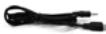
Av-out Cable
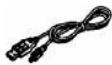
USB Cable

STAND

Earphones

Hop-pocket

User Guide
Components and Button functions

- AV-OUT port
- Earphone jack
- Microphone
- Power on/off/reset
- LCD display
- USB port
- Micro SD/T-flash card slot
Note: The function of the insulative packing materials in USB port is to make ESD defense.
Charging Li -polymer battery safely

- Connect the PC USB port and the player USB port with the USB cable supplied. At this time the screen of the player will display as the picture.
- In MSC mode, click the left mouse button on
the icon, then click the "Safely remove USB Mass Storage Device - Drive (G:) column. At this time, the power sign is shown dynamic in
the display when charging, once full charged, the power sign will stop moving, power is full, please shut off the power.
- The charging time is approximately 6 hours.
- To stop recharging, disconnect the USB cable.
Charge with adapter (Please use the adapter provided by or approved by our company):
Connect the player and power supply with the adapter, at this time the player will enter charging state, The power sign is shown dynamic when charging, once full charged, the power sign will stop moving, power is full, please shut off the power. The charging time is approximately 2.5 hours.
Notes:
- The AC/DC adaptor of the player should not be obstructed OR should be easily accessed during intended use.
- To be completely disconnect the power input, the AC/DC adaptor shall be disconnected from the mains.
Notes
Before your first time use, please recharge your digital player.
- Your computer must be turned on while connected to your player for charging.
Do not overcharge your player, or it may shorten the battery's life.
The times of charge/discharge are no less than 300 cycles.
- Do not put your player in places subject to serious shakes and do not move it while charging.
CAUTION
- Danger of explosion if battery is incorrectly replaced. Replace only with the same or equivalent type.
- Do not disassemble, crush, short-circuit or incinerate your battery as it may cause fire, injury, burns, or other hazards.
- Battery shall not be exposed to excessive heat such as sunshine, fire or the like.
- The li-polymer battery is consumptive material, so recharge it semiannually is needed even if the player is not be used.
Adding/Removing MP3 files/folders
You can use the player as a removable USB storage.
- Connect the PC USB port and the player USB port with the provided USB cable.
- Add MP3 files/folders to the USB storage's folder.
I. Open files/folders to transfer from your computer.
II. Open My Computer Removable Disk from the desktop.
III. Select the files/folders to transfer from your computer and draw and put them to a folder of your choice in the Removable Disk (you also can transfer files on your PC to the player using the "Copy" and "Paste" functions).
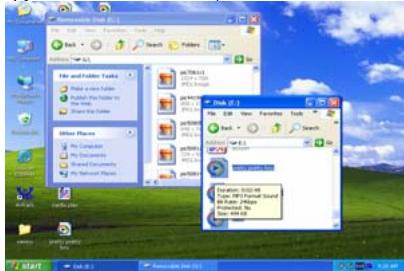
- Delete MP3 files from the removable USB storage (use the "Delete" command)
Remove the player from PC
Please follow the steps in case of damaging the player or data loss.
- Click the left mouse button on the right corner of the desktop.

icon that is on the taskbar at the bottom
- Click the "Safely remove USB Mass Storage Device - Drive (X:) column.
- Disconnect the player from your computer.
CAUTION:
Do not remove the player while files within the USB Mass Storage are being played on your computer.
Do not disconnect the player from your computer while transferring files, or it will cause damage to the player or data loss.
Basic operations
Turn power on
Slide and hold button in the direction of "ON".
Connect earphones to earphone jack, it will display as following:
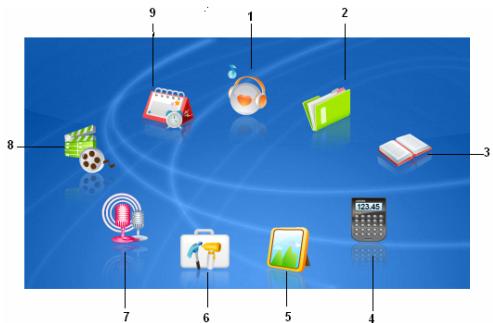
- Audio Playing
- E-BOOK
- Album
- Recording
-
Calendar
-
FILE Browse
- Calculator
- Settings
- Video
You can also browse pictures or read EBOOK files stored in the player or setup some parameters of your player while playing music.
Turn power off
In power on mode, slide and hold button in the direction of "ON" to power off.
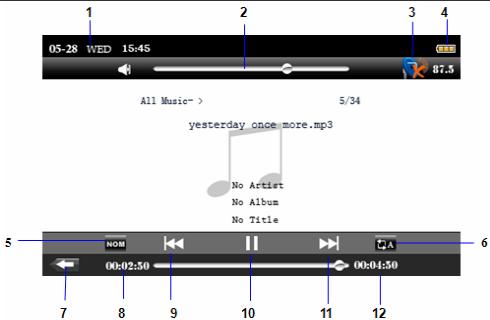
NOTE: The following picture is only for your reference.
- Time display
- FM Tx.(Only for the player with FM TX. function)
- EQ mode
- Return to main menu
- Previous one
-
Next one
-
Volume bar
- Battery status display
- Repeat mode
- Play time indicator
- Play/pause display
- Total time display
Menu Navigation
Skip button【Shift menus.
Play/Pause button (M): Play, Pause.

Return to main menu.

Add to my favourite list.

Remove all files from my favourite list.

Remove one from the list.
Touch the icons to enter into your desired option (e.g. Video, Calendar ,Audio, FILE Browse, Settings, Album, Calculator, E-BOOK, Recording).
NOTE:
Please insert Micro SD/T-Flash card as the indicated direction, in case of happening anything wrong, do not insert or pull out the card while power on.
Volume Adjustment
In Audio, Video playing, you can slide the volume bar to turn up /turn down the volume. The player default speaker mode is on while power on, connect earphone to earphone jack will turn off the speaker automatically and switch to earphone mode.
MUSIC
- Slide button in the direction of "ON" until to turn unit on and enter main menu, 2. Press "Audio" icon and enter submne interface: All music, Artist, Album, Genre, My favorite, Record, Dir List, MediaLib Update. then touch the relevant icon to enter.
-
Touch to add audio file to "My favorite" folder, you can touch to remove one/all files from the folder.
-
Touch to select your desired file, then touch icon to play it.
- In music play mode, touch the screen again and again, it will display music information: ID3, lyric, equalizer.
Touch【】button to change music files.
Touch to set repeat mode, touch NOM to set EQ mode. To Pause/Play: touch button.
- In main menu, select "FILE" icon and enter by touching it.
- You can browse all files(includir video files, music files, photos files, recorded files and E-book files, etc.).
- You can touch X to delete the file.
- Touch icon to turn to next/previous page, select your desired file, touch the relevant icon to open it.
-
Touch icon to return to main
-
In main menu, touch "EBOOK" icon to enter the mode.
- Select your desired file, touch the relevant icon to enter, so you can scan the text file.
- Touch / icon to turn to previous /next page. Or you can slide the screen with your finger tip
to switch the pages.
- Touch icon to turn to next/previous row.
- Touch to mark, touch to turn to the marked page.
- Touch icon and you can scan the ebook automatically, then you can click the icon to set the interval from 10s to 60s.
- Touch to change font color. (including: white, green, red, gray, brown, yellow, blue.)
- Touch icon to return to previous list, select one file stored in the player, you can touch icon to delete it.
- Touch icon to return to main menu.
Note: The player only supports TXT and LRC format files.
VOICE
menu.
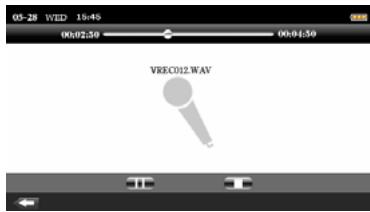
- In main menu, select "Voice" icon and enter by touching it.
- Touch icon to start recording. It will display as the picture.
- Touch to stop, touch icon to save the recorded file. The file will saved in: "Music record" folder.
- Touch to return to main
PHOTO
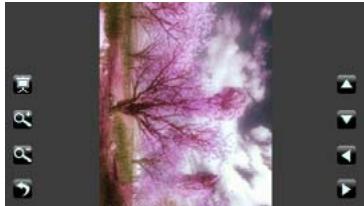
- In main menu, select "Photo" icon and enter by touching it.
- Touch icon to turn to previous/next page.
- Select and touch the icon to open your desired photo.
- Touch the screen and you will see the menu as the following picture.
- Touch to turn to
previous/next one.
- Touch to zoom in/out the photo. At this time you can touch to remove the picture.
- Touch icon and you can auto-scan the photo one by one.
- Touch icon to return to photos list, you can select one of the photo files and touch icon to delete it.
- Touch icon to return to main menu.
NOTE: 1. Swing the player will change the orientation of the picture.
2. If the pixel ≤ 480x272 , you will not zoom in/out the picture.
3. If the photo is zoomed in/out, you need resume the size of the picture first.
Then can touch to turn to previous/next one.
VIDEO

- In main menu, touch "Video" icon to enter the mode.
2 Select your desired file, and touch the icon to play.
3 Touch the screen and the menu will display as the picture, touch to pause.
4 Short press I button to turn to previous/next one. Long press I to speed up/back speed.
5 Touch icon to turn on TV-out function, so you can transmit signal to TV, touch to turn off the function.
6 Touch to turn on transmitter function, touch to turn off.
7 Touch icon to return to video files list. select one of the video files stored in the player, touch icon to delete it.
8 Touch icon to return to main menu.
NOTE:
- The max frame size: 720x576
The max frame rate: 25fps
The max bit rate: 1.5Mbit/s
- The extreme length of video name: 26 characters
Calendar
menu.
Calculator
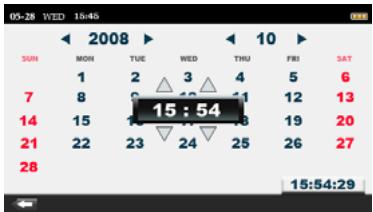
- In main menu, touch "Calendar" icon to enter the mode.
- You just need touch the icon to setup: YEAR, MONTH, click the relevant number to setup: DATE.
- Touch the time strip and the screen
will display as the picture, touch

to setup: HOUR, MINUTE. touch the time strip again to confirm.
-
Touch icon to return to main
-
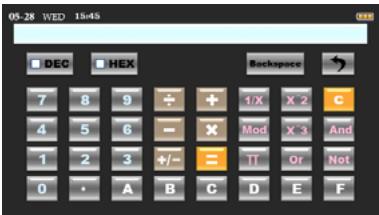
In main menu, select "Calculator" icon and enter by touching it.
- You can use the player as a calculator.
SETTING
- In main menu, select "Setting" icon and enter by touching it.
- So you can see the following
submenu: power, backlight,
brightness, locked time,
background, language,
TV-OUT, FM transmitter,
MSC/MTP.
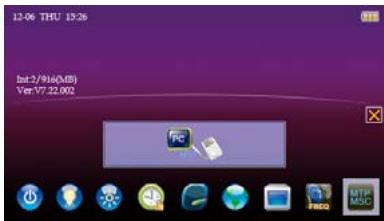
Enter this mode, you can see some information in the left screen: like Int., firmware Ver.

Enter the mode by touching it, then you can set the auto-off time by sliding the bar.

Enter the mode by touching it, then you can set the backlight time by sliding the bar.

Enter the mode by touching it, then you can set the brightness by sliding the scroll

Enter the mode by touching it, then you can set the locked time by sliding the scroll
bar.

bar.

Enter the mode by touching it, then you can set the background by sliding the scroll
language.

Enter the mode by touching it, then you can touch []_ to set the system
function, then touch【▶▶】to adjust the video output location in TV, touch again to turn off the function.

Enter the mode by touching it, then you can set the transmitter frequency.

Enter the mode by touching it, then you can see some system information.

Enter the mode by touching it, then the screen will display: Msc touch the
icon to switch between "MSC mode" and "MTP (Media Transfer Protocol) mode".
DRM 10(Optional function)
What is DRM?
Stands for digital rights management, a technology used to protect digital products from copyright infringement. When a customer buys a DRM-protected music download, the download is encrypted specifically for that customer. To allow the customer to use the file on a separate digital player they must link the DRM enabled player to Windows Media
Player 10 and link both applications. This allows the downloaded music file to then be used on a separate digital music player.
How to synchronize the DRM songs into your digital player?
- Purchase DRM songs from the internet, and download them into your computer.
- Playback the songs that you downloaded, if it could be played, the download is successful, or you need to download again.
- To make DRM function, the computer OS must be Windows XP system SP2 or higher version, installed with Windows Media player 10 or above, and have a valid internet connection.
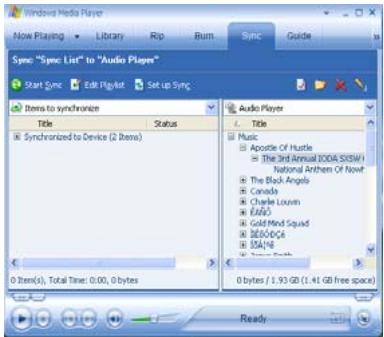
- Connect the DRM digital player with your PC, your PC will display:
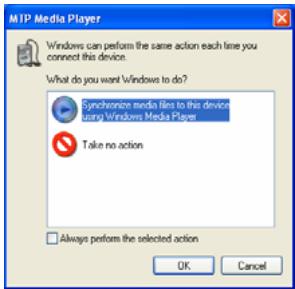
NOTE: before connect the player with PC, you must set it into MTP mode.
- Click "OK" to start synchronization, your PC will display:
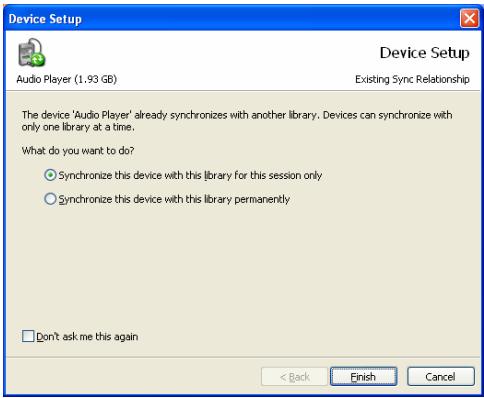
- Select "Manual" or "Automatic" as your requirement, for example, select "Manual"
and click "Finish", it will display:
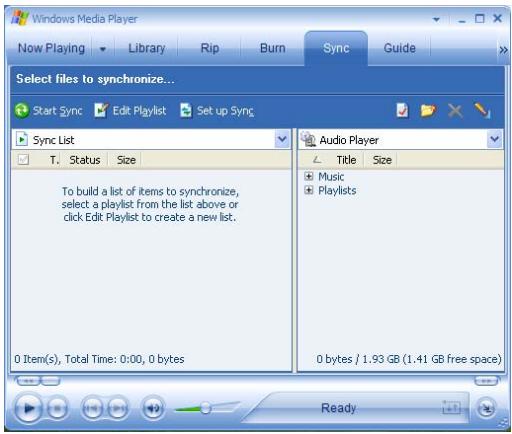
- Add the songs that you want to synchronize into the sync List.
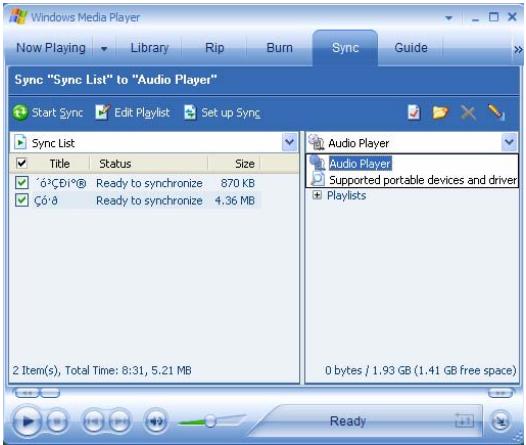
- If your player is with Micro SD/T-Flash card slot, You can select the synchronous media: Micro SD/T-Flash card, as following picture shows:
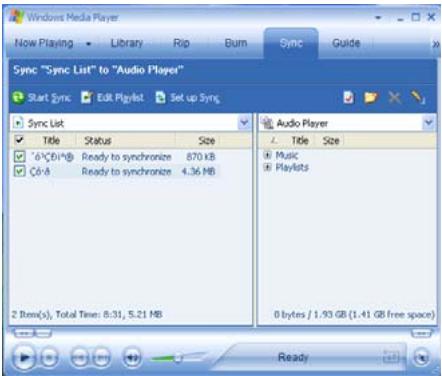
9. Click "Start Sync"
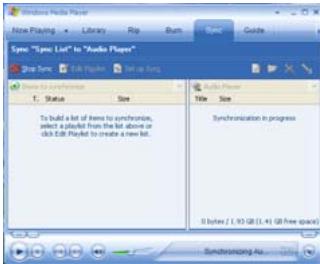
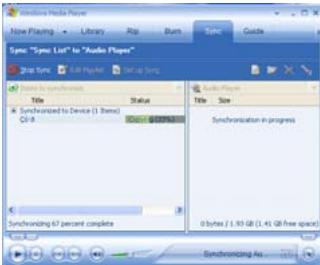
10. The dexter frame will display the synchronized songs.
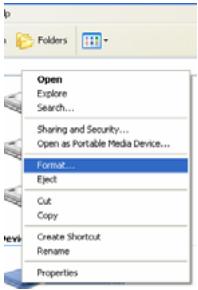
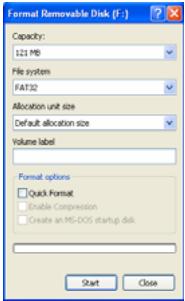
Format the player
The player is "FAT" format. If you wish to format it, right click removable disk and choose "Format" mode, then click "Start" to format in operating system. As following pictures show:
NOTICE

Our packages use cardboard, polyethylene, and do not use any unnecessary materials.

If you cannot switch on the player or it does not work normally once you have switched it on, please slide button in the direction of "OFF" to power off and reset the setting.

If you want to save settings, please slide and hold button in the direction of "ON" to power off.

If the player is be locked, you can short slide button in the direction of "ON" to unlock.
Technical Specification
| No. | Name | Description |
| 1 | Capacity of Flash Memory | Support Micro SD Card, up to 8G, Build-in Flash Memory, up to 16G. |
| 2 | USB Interface | USB2.0(High speed) |
| 3 | LCD Display | 4.3" TFT(480x272) |
| 4 | Power supply | Li-Polymer |
| 5 | S/N ratio | >80dB |
| 6 | Audio Frequency Range | 20Hz - 20kHz |
| 7 | EQ | Pop, Rock, Normal, Classic, Jazz, PlayFX 3D, PlayFX DBB, PlayFX Auto volume |
| 8 | Decoding Format | MP3/WMA / ADPCM / WAV/APE / FLAC, WMV/RM/RMVB/AVI(Xvid)/MP4/FLV, JPEG/BMP/GIF |
| 9 | FM | 87.50 --- 108.00MHz(Normal)30 Station preset support |
| 10 | File System | FAT16, FAT32 |
| 11 | Operating Moisture | 10%—75% |
| 12 | Operating Temperature | 5°C ---35°C (41°F---95°F) |