
DDW497W - Dishwasher DANBY - Free user manual and instructions
Find the device manual for free DDW497W DANBY in PDF.


| Product Type | Countertop Dishwasher |
| Brand | DANBY |
| Model | DDW497W |
| Capacity | 4 place settings |
| Wash Programs | Intensive (P1), Normal (P2), Quick (P3), Eco (P4), Pre-Wash (P5) |
| Power Supply | 120 V ~ 60 Hz |
| Recommended Water Pressure | 15 to 20 psi |
| Maximum Water Temperature | 71 °C (160 °F) |
| Intensive Wash Temperature | 69 °C (156.2 °F) |
| Intensive Program Duration | 125 minutes |
| Water Consumption (Intensive) | 10.4 L |
| Normal Program Duration | 130 minutes |
| Water Consumption (Normal) | 10.4 L |
| Quick Program Duration | 70 minutes |
| Water Consumption (Quick) | 9.6 L |
| Eco Program Duration | 120 minutes |
| Water Consumption (Eco) | 10.4 L |
| Pre-Wash Duration | 12 minutes |
| Water Consumption (Pre-Wash) | 5.4 L |
| Delay Start Function | Up to 24 hours |
| Rinse Aid Dispenser | Approx. 125 ml capacity |
| Detergent Dispenser | Approx. 20 g (powder) or liquid capacity |
| Safety | Automatic shut-off if door open, grounding required |
| Included Accessories | Quick-connect assembly, faucet adapter, inlet and drain hoses |
| Recommended Maintenance | Weekly rinse with white vinegar for descaling, regular filter cleaning |
Frequently Asked Questions - DDW497W DANBY
User questions about DDW497W DANBY
0 question about this device. Answer the ones you know or ask your own.
Ask a new question about this device
Download the instructions for your Dishwasher in PDF format for free! Find your manual DDW497W - DANBY and take your electronic device back in hand. On this page are published all the documents necessary for the use of your device. DDW497W by DANBY.
USER MANUAL DDW497W DANBY
Read and Follow All Safety Rules and Operating Instructions Before First Use of This Product.
ATTENTION:
Unit Parts Identification 1
Important Safety Information 3
Installation Instructions 4
Water Pressure 4
Connecting your Dishwasher 4
Disconnecting your Dishwasher 5
Loading your Dishwasher 5
Preparing your Dishes for Washing 5
Using the Right Detergent 5
How Much Detergent you Should Use 6
Using a Rinse Agent 6
The Pre-wash Program 6
Using Intensive Wash 6
Using Economy Wash 6
Operating Instructions 7
Program Summary/Selection 7
Common Dishwasher Problems & Solutions 8
Warranty 9
Inspect the unit for damage, ensure all parts and accessories are included, and read these instructions thoroughly before attempting operation.
Unit Parts Identification
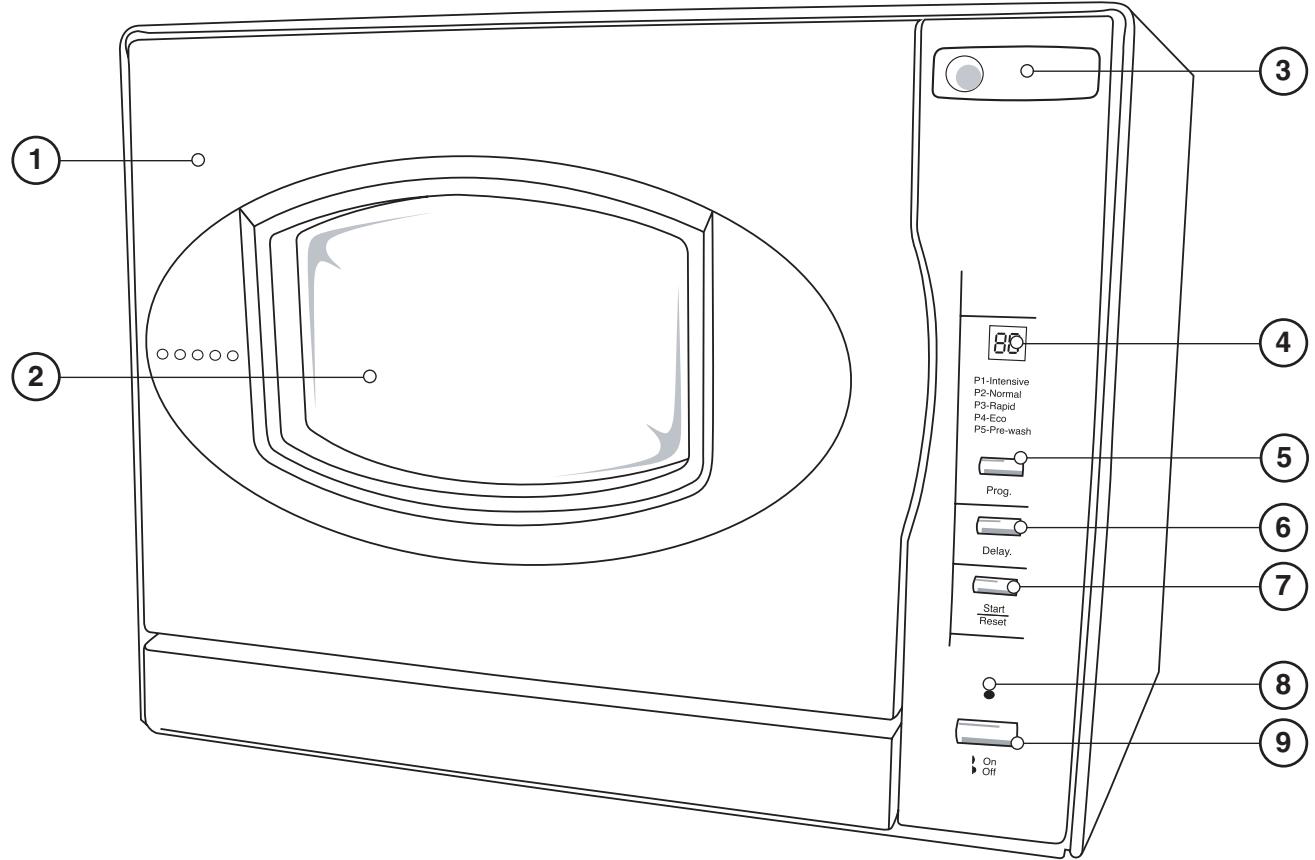
Part Identification
- Door
- Door window
- Door open button
- Display window
- Program button
- Delay button: Pressing this button delays the start of a wash cycle by up to 24 hours. Each press delays the start by one hour.
- Start/Reset button
- Power indicator
- On/Off button
Unit Parts Identification
Rear of Dishwasher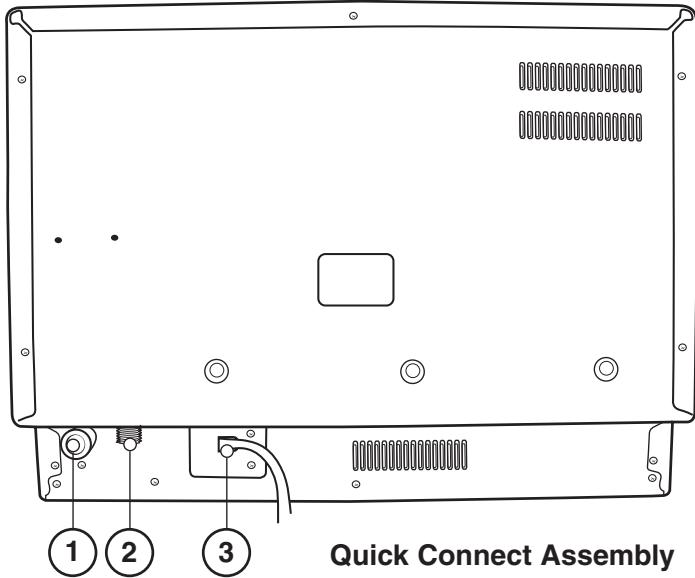
Detergent Dispensers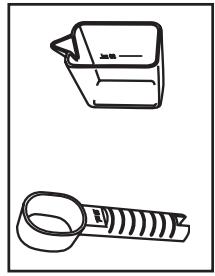
Dishwasher Cavity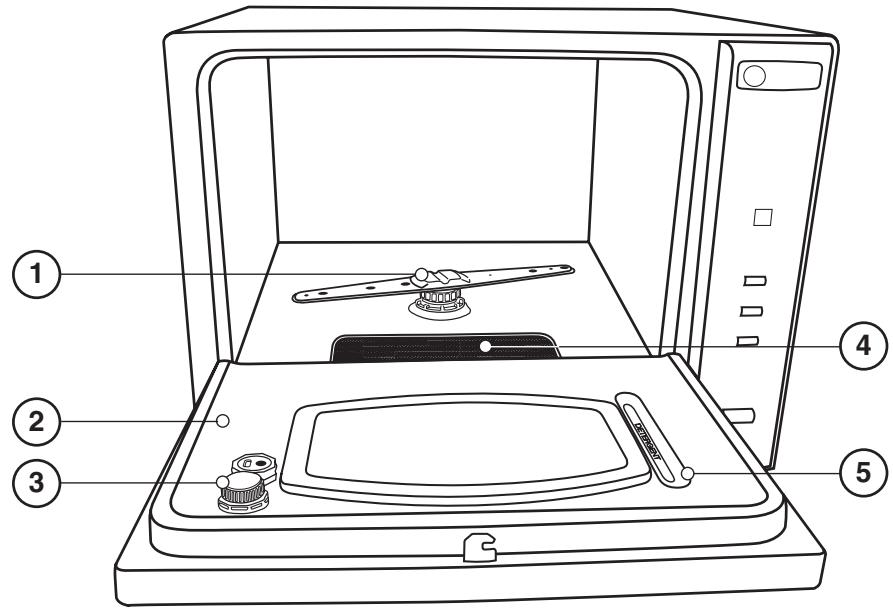
Rear of Dishwasher:
- Inlet Port
- Drain Port
- Power Cord
Detergent Dispensers:
Top: Liquid measurer
Bottom: Powder measurer
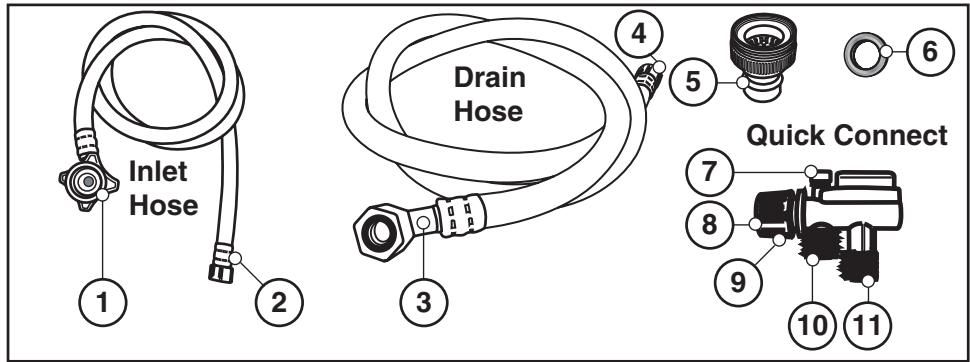
Quick Connect Assembly Inlet Hose:
- Inlet port connection
- Quick connect connection
Drain Hose:
- Drain port connection
- Quick connect connection
Faucet Adapter:
- Faucet Adapter
- Faucet washer
Quick Connect:
- Pressure relief valve
- Faucet adapter connection
- Locking collar
- Inlet hose connection
- Drain hose connection
Dishwasher Cavity:
- Spray Arm Assembly
- Inner door panel
- Rinse agent dispenser
- Filter screen
- Detergent fossa
IMPORTANT SAFETY INFORMATION

WARNING

When loading your dishwasher, follow basic safety precautions, including the following;
- Read all instructions before using the dishwasher.
- Use the dishwasher only for its intended function (normal, household use only).
- Use only detergents or wetting agents recommended for use in a dishwasher; do not use them for hand-washing, and keep them out of the reach of children.

DANGER

Dishwasher detergent is a strong alkaline and can be extremely dangerous if swallowed; avoid contact with skin and eyes and keep children away from the dishwasher when the door is open. Check that the detergent receptacle is empty at the end of each wash cycle.

WARNING

Instructions pertaining to the risk of fire, electric shock or injury to persons.
When loading items to be washed:
- Locate sharp items (e.g. forks or knives) so that they are not likely to damage the door seal.
- Load sharp knives with the handles up to reduce the risk of cut-type injuries.
- Do not wash plastic items unless they are marked "dishwasher safe" or the equivalent. For plastic items not so marked, check the manufacturer's recommendations.
- Do not touch the heating element (located under the filter) during or immediately after use.
- Do not operate the dishwasher unless all enclosure panels are properly in place.
- Do not tamper with controls.
- Do not abuse, sit on or stand on the door or dish-rack of the dishwasher.
- To reduce the risk of injury, do not allow children to operate (or play in or on) the dishwasher.
- Do not allow children to play around the dishwasher when opening or closing the dishwasher door.
- Under certain conditions, hydrogen gas may be produced in a hot-water system that has not been used in two weeks or more. Hydrogen gas is explosive. If the hot-water system has not been used for such a period, before using the dishwasher, turn on all hot water faucets and let the water flow from each for several minutes (this will release any accumulated hydrogen gas). As hydrogen gas is flammable, do not smoke or use an open flame during this time.
- Remove the door to the washing compartment when removing an old dishwasher from service or discarding it.
- Do not spray water on the appliance (it may cause electric shock or failure of electrical parts).
Electrical Instructions:
An electrical supply of 120V AC only, 60 Hz is required. For your personal safety, the appliance must be grounded. This appliance is equipped with a power cord having a 3-prong grounding plug. To minimize possible shock hazards it must be plugged into a matching 3-prong (grounding type) electrical outlet. If the power cord is damaged, it must be replaced by the manufacturer or its service agent, or a similarly qualified person in order to reduce the risk of a hazard.
Grounding Instructions:
This appliance must be grounded. In the event of a malfunction or breakdown, grounding will reduce the risk of electric shock by providing a path of least resistance for the electric current. This appliance is equipped with a cord having an equipment-grounding conductor and a grounding plug. The plug must be plugged into an appropriate outlet that is installed and grounded in accordance with all local codes and ordinances.
SAVE THESE INSTRUCTIONS!

WARNING

A hose that attaches to a sink spray can burst if it is installed on the same water line as the dishwasher. If your sink has one, it is recommended that the hose be disconnected and the hole plugged.
Remove All Packaging Materials Carefully.
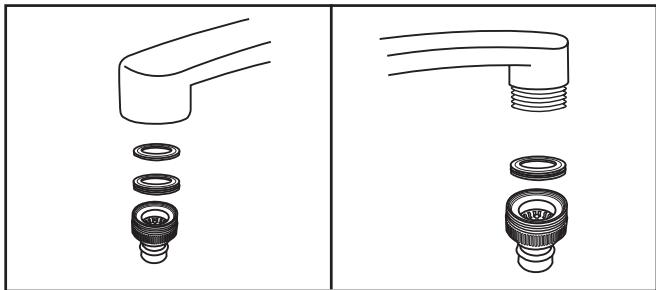
If your existing faucet adapter is not compatible with the "quick connect" hose assembly supplied;
- Connect the faucet adapter (included with dishwasher) to your faucet.
- If your faucet is inclusive of a 'male' type (threaded) connection, use only the standard rubber washer (0.2'' / 5 mm thick) supplied inside the adapter. Remove the second rubber washer.
- If your faucet is inclusive of a 'female' type (threaded) connection, both rubber washers must be installed inside the faucet adapter.
- The minimum height clearance required to install your dishwasher on a countertop surface with overhead cupboards is 45 cm (17.7").
- Make sure there is an electrical supply (outlet) within reach of the electrical power supply cord (195 cm / 6.3 ft).
- Make sure the water supply/faucet connection is within reach of the inlet and drain hose assembly (i.e., 58 cm / 22.8 ).
- The dishwasher must be installed on a solid, level surface.
Water Pressure
For best operating results, incoming water pressure should be between 15 and 20 pounds per square inch (psi).
For the Best Results:
Your dishwasher cleans by spraying a mixture of hot clean water and detergent (under pressure) against the soiled surfaces of dishes. The water is pumped through a rotating spray arm, drained through a filter (removing food and soiled particles) and pumped back through the spray arm. Soiled water is pumped out and replaced with clean water at the end of each cycle, (the number of times depends on the wash program being used). For best cleaning results, the water temperature must be at least 55°C (130°F) . To prevent damage to the dishwasher, the temperature of the incoming water supply should not exceed 65°C (149°F) .
Connecting your Dishwasher
Your dishwasher comes equipped with a 'quick connect' assembly (includes inlet and drain hose). The faucet adapter must be installed on the faucet before you can connect the dishwasher. This adapter is included inside your dishwasher. The faucet adapter is compatible with faucets inclusive of either male (outside) or female (inside) threaded faucet connections.
- Screw the faucet adapter onto (or into) the faucet tap. Check for leaks (use Teflon tape to eliminate if necessary).
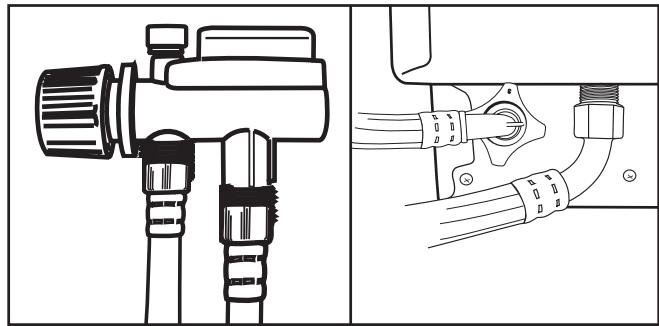
- Connect the six-sided connection of the drain hose to the drain port connection on the back of the dishwasher cabinet. Do not over-tighten (to avoid damage to threads).
- Connect the star-shaped connection of the inlet hose to the inlet port on the back of the dishwasher cabinet. Do not over-tighten (to avoid damage to threads).
- Connect the circular connection of the drain hose onto the longer (bottom) male connection on the quick connect.
- Connect the circular connection of the inlet hose onto the shorter (top) male connection on the quick connect.
- Attach the quick connect onto the faucet adapter, by pulling down the outer locking collar on the quick connect, while pushing the quick connect upward onto the faucet adapter.
- When the quick connect snaps onto the faucet adapter, release the locking collar. Verify the connection is secure.
- Slowly open the hot water line and check for any sign of water leaks at all hose connections. If leaks are located, immediately close the water supply and repair the hose connections.

IMPORTANT

- Once you open the water supply line, (even if it is closed immediately thereafter), the inlet hose will be pressurized.
- To relieve water pressure from inside the inlet hose, (make sure the water line (faucet) is closed): press and hold the red pressure relief button on the quick connect until the flow of water stops.

WARNING

FAILURE TO RELIEVE WATER PRESSURE, BEFORE DISCONNECTING THE QUICK-CONNECT FROM THE FAUCET, WILL RESULT IN BACK-PRESSURE OVER-SPRAY. THE TEMPERATURE OF INCOMING WATER CAN BE VERY HOT, AND BACK-PRESSURE OVER-SPRAY COULD CAUSE SEVERE BURNS AND/OR SCALDING.

DANGER

DO NOT LET CHILDREN DISCONNECT THE DISHWASHER; CLOSE SUPERVISION OF CHILDREN IS ALWAYS IMPORTANT AROUND APPLIANCES.
NOTE: Hard water conditions will adversely affect the washing performance of your dishwasher. Hard water conditions will also contribute to 'lime' (white film substance) deposits and/or 'scaling' on the stainless steel surface of the dishwasher tub and heater element, located in the sump underneath the removable filter screen. To assist in minimizing these conditions, it is recommended to periodically operate/rinse the inside of the dishwasher (empty) using 1 cup of white vinegar at least once a week.
Disconnecting your Dishwasher
- Close the hot water supply at the faucet.
- Disconnect the power supply cord.
- Remember to release the water pressure inside the inlet hose. Press and hold the red pressure relief button on the quick-connect until the flow of water stops.
- Disconnect the quick-connect hose assembly by pulling down on the outer locking collar, (thus releasing the quick-connect from the faucet adapter).
Loading your Dishwasher
The dishwasher is designed to accommodate a standard '4-piece' place setting, which includes the following items:
4 dinner plates, 4 soup plates, 4 dessert dishes, 4 saucers, 4 cups, 4 teaspoons, 1 oval platter, 1 small serving dish, 4 glasses, 4 soup spoons, 4 forks, 4 knives, 4 dessert spoons, 2 serving spoons, 1 serving fork, and 1 gravy ladle.
NOTE: For easier loading and unloading of large dinner plates from the dish rack, it may be necessary to temporarily remove the silverware basket. Once loading or unloading is complete, return the silverware basket to its original position.
Preparing Your Dishes for Washing
- Scrape off all solid food particles from the dishes.
- Remove excessive amounts of oil or grease.
- Empty any liquids from glasses and cups.
- All dishes should be thoroughly rinsed before being placed in the dishwasher.
Note: Dishes with dried-on food are more difficult to clean and may not come out clean in a normal wash cycle.
Using the Right Detergent
Use only detergent specifically designed for dishwashers (other types will cause excessive sudsing). If your detergent is old or lumpy, discard it, as old detergent loses its cleaning power and lumpy detergent won't dissolve properly.
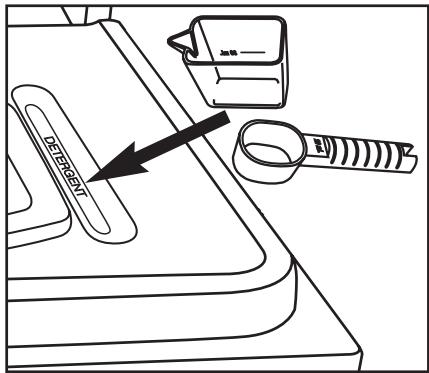
How Much Detergent to Use
This depends on whether your water is 'hard' or 'soft': Hard water requires more detergent to get dishes clean, while soft water requires less.
- The recessed detergent compartment located on the inside of the door holds approximately 20 grams of detergent.
Using a Rinse Agent
You can help prevent unsightly spots on dishes and glassware and reduce drying time by using a rinse agent. A rinse agent is specially formulated to rinse away food and detergent residues that can be left behind on your dishes. Used regularly, a rinse agent will automatically provide you with cleaner dishes every time you wash.
- To fill the rinse agent dispenser: unscrew the dispenser cap located on the inner door. Add the rinse agent slowly into the container until it just reaches the bottom of the filling cap inside the dispenser opening. Replace the cap. The dispenser automatically releases the rinse agent into the final rinse water at the end of the wash cycle. The dispenser holds approximately 125 ml (4.2 fl. oz.) of rinse agent.
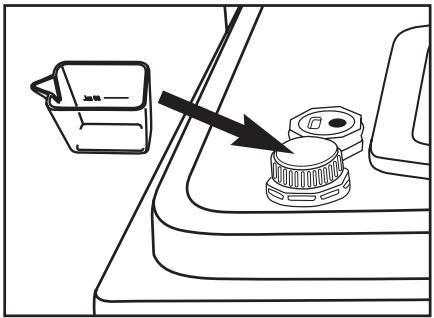
The Pre-wash Program (P5)
The Pre-wash is a convenience program that allows dishes to be rinsed if you don't have a full load ready to be washed (preventing foods from becoming dried or caked on to dish surfaces). It is not necessary to add detergent to the dishwasher during the Pre-wash cycle; however, due to the short duration of the Pre-wash cycle (6 minutes only), make sure the incoming water supply is hot. Open the hot water faucet and run till hot before connecting the dishwasher.

IMPORTANT

Your dishwasher is not a "garburator"; clean off large particles of food sediments before placing dishes in the dishwasher.
Using Intensive Wash (P1)
The Intensive wash feature gives you the option of washing/drying dishes at very high water temperatures. When activated, the intensive wash feature energizes a heating element that will raise and maintain the internal water temperature of the dishwasher at 69°C (156.2°F).

CAUTION

Water temperatures this high can cause severe burns/scalding; therefore, always exercise extreme care when opening and/or entering the dishwasher during the Intensive, Economy and Normal wash cycles, especially during their respective rinse cycles.
To activate this feature, push the program button until "P1" (intensive wash) appears in the display window.
- Push the start button and the intensive wash program activates ("P1" remains in the display window, and flashes when complete).

IMPORTANT

For the drain system to operate properly the highest distance between the faucet quick connect and the base of the dishwasher should not exceed 15 cm (6 inches).
Using Economy Wash (P4)
The economy program gives you the option of washing dishes at normal incoming water tank temperature, (usually between 54.4°C / 130°F and 60°C / 140°F). When activated, the economy program 'de-energizes' (by-passes) the dishwasher's heating element. To activate the economy program:
- Push the program button on the control panel until "P4" appears in the display window.
- Push the Start/Reset button and the economy feature activates ("P4" remains in the display window, and flashes when complete).

IMPORTANT

Drying time for dishes will be longer after using the economy program. Dishes are dried by a 'convection' method only. To speed-up the drying time, it is suggested that the dishwasher door be left partially open after program completion. This will allow humidity from within the dishwasher to escape. Push the door open button, and the door will pop open to a pre-set convection dry position.
- After unloading the dishwasher, remove the metallic filter screen (located on the bottom of the dishwasher tub), and wash off any bits of food that may be caught in it, then return the filter to its proper position.
NOTE: At the beginning of each cycle the dishwasher starts in drain mode. This is because the drain pump always retains a small amount of water (in the sump) from the previous (last) cycle. This is necessary to keep the pump primed; therefore, do not be alarmed if you see a small amount of water being pumped-out from the drain hose prior to the start of a regular wash cycle. (This is normal).
To operate the dishwasher;
- Attach the quick connect hose assembly to the faucet.
- Push the door release button to open the door.
- Check to make sure the filter is securely in its position.
- Place dishes on the dish-rack and cutlery inside the cutlery basket.
- Check to make sure the spray-arm can rotate freely by gently spinning it clockwise.
- Fill the detergent fossa, located in the recessed area on the inner door panel (up to 12 grams).
NOTE: If using the Pre-wash cycle only, it is not necessary to add any detergent.
- Firmly close the door.
- Open the hot water line.
- Push the power on/off button inward. Power button pushed in = on Power button pushed out = off The LED indicator (located just above the power button) will illuminate, thus confirming that the dishwasher is receiving power.
- Press the program button until the desired program code appears in the display window. The program codes are:
P1, for Intensive wash P2, for Normal wash P3, for Rapid wash P4, for Eco wash P5, for Pre-wash
- Press the Start/Reset button to begin the selected washing program. The display window will flash the program code throughout the cycle. At the end of the cycle the dishwasher will stop and sound a beep. The power indicator light remains on unless the power is turned off (the power on/off button is pushed out). You can select another program during operation by pressing the Start/Reset button, then pressing the program key (until the desired program code appears in the display window), and finally by pressing the Start/Reset button again to confirm program choice. The dishwasher will restart and begin the selected wash operation.
Note: For safety reasons, the dishwasher is designed to stop in the event that the door is opened during a wash cycle.
IMPORTANT: Once washing is complete, press the door open button and leave the dishwasher for about fifteen minutes. This allows the dishes to cool off, as they may be too hot to touch immediately after washing.
Intensive wash (P1)
Water Temperature: Wash 54°C (129.2°F) /
| Program Duration: | 125 minutes |
| Water Consumption: | 10.4 L (22 pts) |
| Normal wash (P2) | |
| Water Temperature: | Wash 52°C (125.6°F) / Rinse 67°C (152.6°F) |
| Program Duration: | 130 minutes |
| Water Consumption: | 10.4 L (22 pts) |
| Rapid wash (P3) | |
| Water Temperature: | Wash 49°C (120.2°F) / Rinse 55°C (131°F) |
| Program Duration: | 70 minutes |
| Water Consumption: | 9.6 L (20.3 pts) |
| Economy wash (P4) | |
| Water Temperature: | Wash 54°C (129.2°F) / Rinse 69°C (156.2°F) |
| Program Duration: | 120 minutes |
| Water Consumption: | 10.4 L (22 pts) |
| Pre-Wash (P5) | |
| Water Temperature: | Incoming water (tank temperature) |
| Program Duration: | 12 minutes |
| Water Consumption: | 5.4 L (11.4 pts) |
| Note: Washing time may vary depending on incoming water temperature and the relevant environmental temperature. | |
| Common Dishwasher Problems & Solutions | ||
| PROBLEM | POSSIBLE CAUSE | SOLUTION |
| The dishwasher will not start. | ·Dishwasher not receiving electrical power. | ·Check electrical connection (fuse / circuit breaker). |
| ·Door is unlatched. | ·Close and latch door. | |
| ·Dishwasher not level. | ·Level unit. | |
| Dishes are not clean. | ·Improper loading. | ·Array dishes so spray action reaches all surfaces. |
| ·Do not overload dishwasher. | ||
| ·Spray arm not rotating freely. | ·Check spray arm to make sure nothing (e.g. cutlery) is obstructing spray arm rotation. | |
| ·Check if filter screen has become dislodged and is obstructing spray arm rotation. | ||
| ·Not enough detergent and/or improper detergent being used. | ·Use more dishwasher detergent. | |
| ·Do not use detergent that is hard or caked. | ||
| ·Use only a recommended dishwasher detergent. | ||
| ·Improperly prepared dishes. | ·Excess food soil and liquids should be removed from dishes before loading. | |
| ·Water inlet hose kinked/bent due to improper installation. | ·Eliminate kink or bend from inlet hose. | |
| Chipping or breaking of glassware. | ·Improper loading of dishes. | ·Do not overload dishwasher. Load glasses on the upper rack only; not over dishwasher pins. Glasses loaded over dishwasher pins are not properly supported and are subject to damage. |
| Water remains in bottom of dishwasher | ·A small amount of water (in sump area) is normal. | ·This is necessary to keep the pump primed and is drained automatically at the beginning of each cycle. |
| ·Excessive amount of water; cycle not completed. | ·Allow dishwasher to complete full cycle. | |


For service, contact your nearest service depot or call:
1-800-26-Danby (1-800-263-2629)
to recommend a depot in your area.
Countertop Dishwasher
The model number can be found on the serial plate located on the back panel of the unit.
All repair parts are available for purchase or special order when you visit your nearest service depot. To request service and/or the location of the service depot nearest you, call the TOLL FREE NUMBER.
When requesting service or ordering parts, always provide the following information:
Product Type - Model Number - Part Description


- UNIT PARTS IDENTIFICATION
- PART IDENTIFICATION
- REAR OF DISHWASHER
- DETERGENT DISPENSERS
- QUICK CONNECT ASSEMBLY INLET HOSE
- DRAIN HOSE
- FAUCET ADAPTER
- QUICK CONNECT
- DISHWASHER CAVITY
- IMPORTANT SAFETY INFORMATION
- WARNING
- DANGER
- WHEN LOADING ITEMS TO BE WASHED
- ELECTRICAL INSTRUCTIONS
- GROUNDING INSTRUCTIONS
- SAVE THESE INSTRUCTIONS
- REMOVE ALL PACKAGING MATERIALS CAREFULLY
- WATER PRESSURE
- FOR THE BEST RESULTS
- CONNECTING YOUR DISHWASHER
- IMPORTANT
- DISCONNECTING YOUR DISHWASHER
- LOADING YOUR DISHWASHER
- PREPARING YOUR DISHES FOR WASHING
- USING THE RIGHT DETERGENT
- HOW MUCH DETERGENT TO USE
- USING A RINSE AGENT
- THE PRE-WASH PROGRAM (P5)
- USING INTENSIVE WASH (P1)
- CAUTION
- USING ECONOMY WASH (P4)
- INTENSIVE WASH (P1)
- COUNTERTOP DISHWASHER
Brand : DANBY
Model : DDW497W
Category : Dishwasher