
FIREONE - Audio Interface TASCAM - Free user manual and instructions
Find the device manual for free FIREONE TASCAM in PDF.
| Product type | Audio interface and control surface |
| Brand | TASCAM |
| Model | FIREONE |
| Power supply | USB (bus-powered) or optional AC adapter |
| Connectivity | USB 1.1/MIDI, 1 XLR mic input, 2 6.35 mm line inputs, 1 headphone output, 1 stereo line output, MIDI In/Out |
| Main functions | Motorized fader, 8 assignable F keys, jog wheel, transport (play, stop, record, etc.), numeric keypad, metronome and MIDI clock modes |
| Dimensions (approx.) | 320 x 200 x 50 mm |
| Weight (approx.) | 1.5 kg |
| Software compatibility | Ableton Live, Steinberg Cubase/Nuendo, Cakewalk SONAR, Apple Logic Pro, Final Cut Pro, MOTU Digital Performer |
| Maintenance and cleaning | Use a soft, dry cloth. Avoid solvents and moisture. |
| Safety | Use in a dry, well-ventilated environment. Do not expose to water or extreme temperatures. Unplug before cleaning. |
| Spare parts and repairability | Not user-serviceable. Contact an authorized TASCAM service center for any repairs. |
| General information | Compact control surface for digital audio workstations (DAW). Comes with drivers and plug-ins for major DAWs. |
Frequently Asked Questions - FIREONE TASCAM
User questions about FIREONE TASCAM
0 question about this device. Answer the ones you know or ask your own.
Ask a new question about this device
Download the instructions for your Audio Interface in PDF format for free! Find your manual FIREONE - TASCAM and take your electronic device back in hand. On this page are published all the documents necessary for the use of your device. FIREONE by TASCAM.
USER MANUAL FIREONE TASCAM
Control Assignments.... 2
Visual Metronome 2
MIDI Clock Rotate and Beat modes.... 2
Steinberg 3
Control Surface Configuration.... 3
Control Assignments....3
Visual Metronome 4
MIDI Clock Rotate and Beat modes.... 4
Metronome mode....4
Cakewalk SONAR 5
Control Surface Configuration.... 5
Control Assignments....5
Visual Metronome 6
MIDI Clock Rotate and Beat modes....6
Metronome mode: 6
Apple Logic 7
Control Surface Configuration....7
Control Assignments....7
Visual Metronome 8
MIDI Clock Rotate and Beat modes 8
Apple Final Cut Pro 9
Control Surface Configuration....9
Control Assignments....9
MOTU Digital Performer 10
MIDI Configuration.... 10
Control Surface Configuration.... 10
Control Assignments.... 11
Visual Metronome 11
MIDI Clock Rotate and Beat modes.... 11
Metronome mode:.... 11
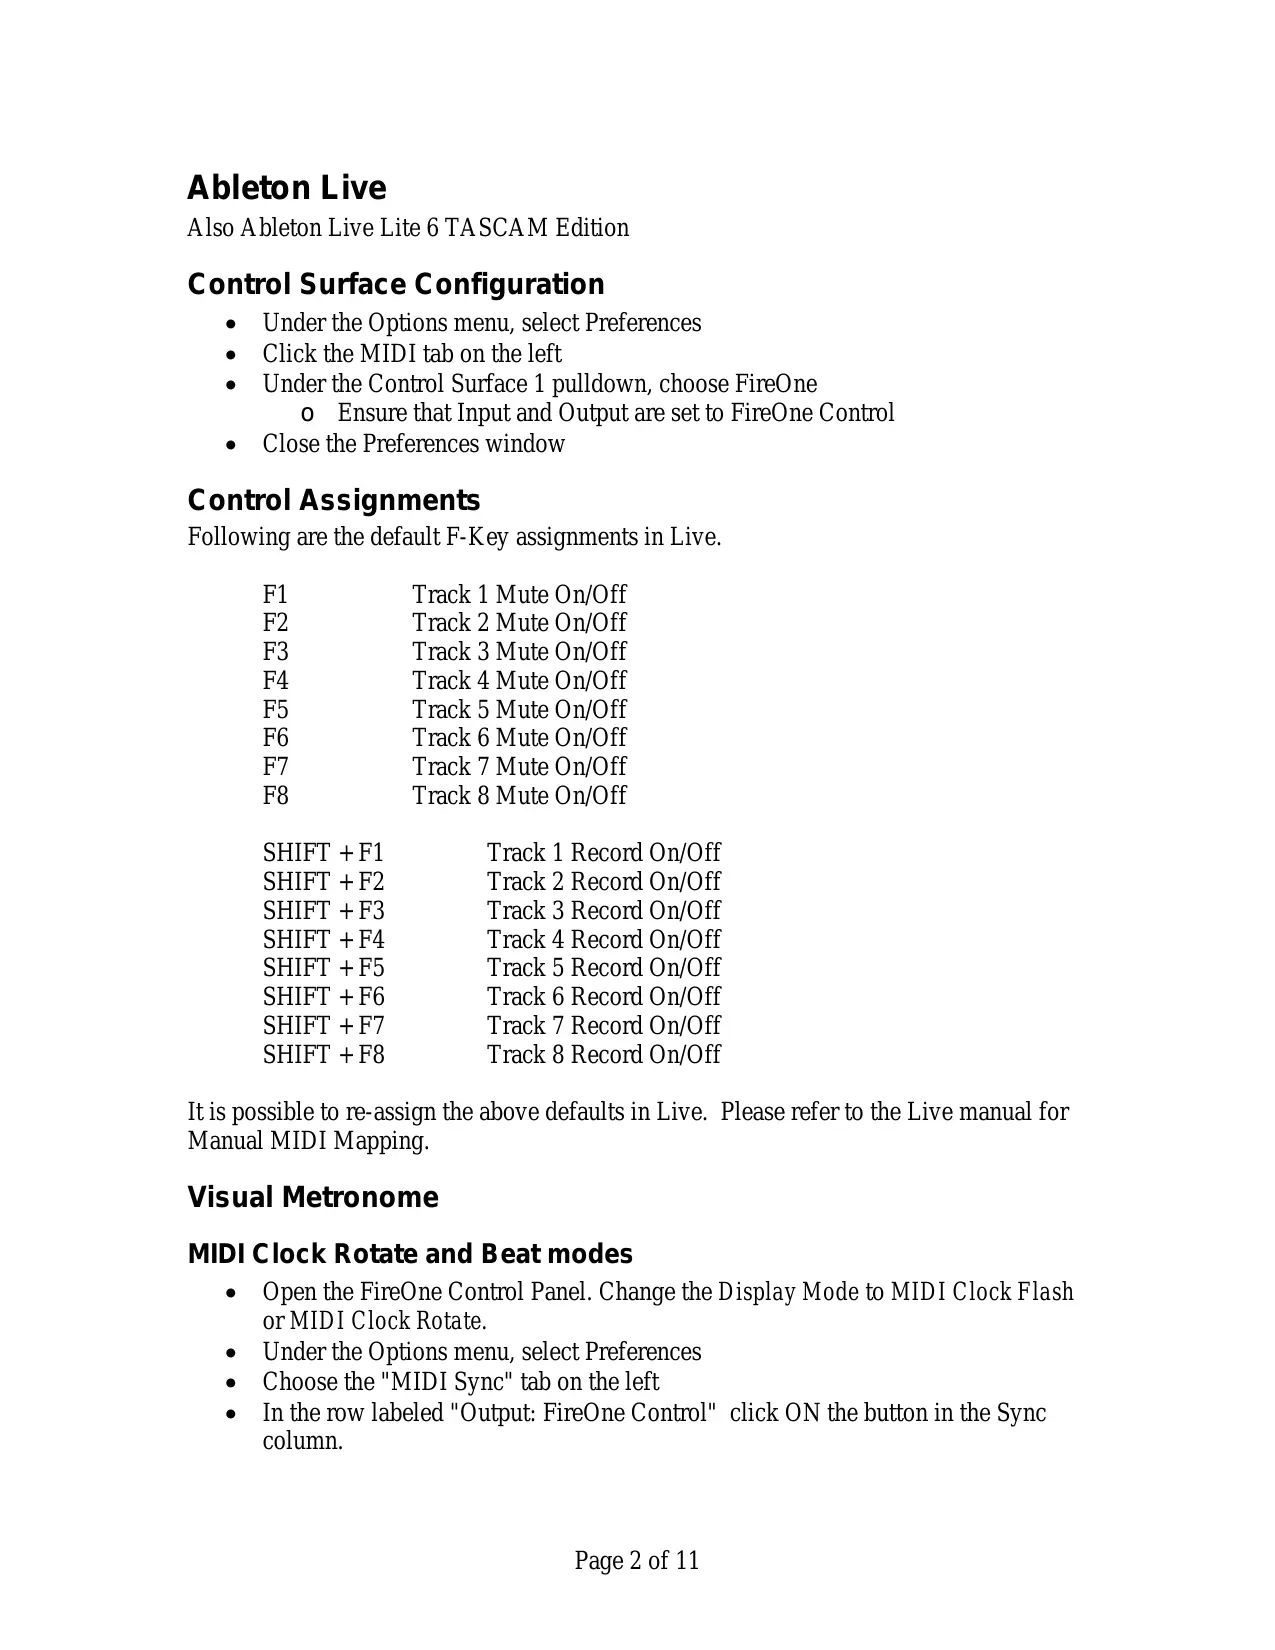
Ableton Live
Also Ableton Live Lite 6 TASCAM Edition
Control Surface Configuration
• Under the Options menu, select Preferences
- Click the MIDI tab on the left
- Under the Control Surface 1 pulldown, choose FireOne
- Ensure that Input and Output are set to FireOne Control
- Close the Preferences window
Control Assignments
Following are the default F-Key assignments in Live.
| F1 | Track 1 Mute On/Off |
| F2 | Track 2 Mute On/Off |
| F3 | Track 3 Mute On/Off |
| F4 | Track 4 Mute On/Off |
| F5 | Track 5 Mute On/Off |
| F6 | Track 6 Mute On/Off |
| F7 | Track 7 Mute On/Off |
| F8 | Track 8 Mute On/Off |
| SHIFT + F1 | Track 1 Record On/Off |
| SHIFT + F2 | Track 2 Record On/Off |
| SHIFT + F3 | Track 3 Record On/Off |
| SHIFT + F4 | Track 4 Record On/Off |
| SHIFT + F5 | Track 5 Record On/Off |
| SHIFT + F6 | Track 6 Record On/Off |
| SHIFT + F7 | Track 7 Record On/Off |
| SHIFT + F8 | Track 8 Record On/Off |
It is possible to re-assign the above defaults in Live. Please refer to the Live manual for Manual MIDI Mapping.
Visual Metronome
MIDI Clock Rotate and Beat modes
- Open the FireOne Control Panel. Change the Display Mode to MIDI Clock Flash or MIDI Clock Rotate.
• Under the Options menu, select Preferences - Choose the "MIDI Sync" tab on the left
- In the row labeled "Output: FireOne Control" click ON the button in the Sync column.
Steinberg
Control Surface Configuration
- Run the FireOne driver installer and check the box for your desired plug-in (Cubase or Nuendo). Please see the Release Notes for detailed installation instructions.
- Open the FireOne control panel and ensure the Control Protocol is set to Native
- Launch Cubase
- Select Device Setup under the Devices menu
- Click on the + in the upper right side of the window to add a new device. Select the TASCAM FireOne.
- In the TASCAM FireOne Device window, select FireOne Control for MIDI Input and MIDI Output.
- Click Apply
Control Assignments
NOTE: The following default assignments relate to Cubase 4. Not all the commands shown below will be present in other Steinberg apps, such as Cubase 3, Nuendo, or Cubase Studio 4.
| F1 | Show/hide the Time Display |
| F2 | Show/hide the Transport |
| F3 | Show/hide the Mixer |
| F4 | Show/hide VST Connections |
| F5 | Show/hide MediaBay |
| F6 | Show/hide the Loop Browser |
| F7 | Show/hide the SoundFrame Browser |
| F8 | Show/hide the DirectShow Video Player |
| SHIFT + F1 | New Project |
| SHIFT + F2 | Open Project |
| SHIFT + F3 | Close |
| SHIFT + F4 | Save |
| SHIFT + F5 | Save As... |
| SHIFT + F6 | Add Track >Audio >Mono |
| SHIFT + F7 | Add Track >MIDI |
| SHIFT + F8 | Display the Project Setup window |
It is possible to re-assign the above defaults in the Steinberg app:
- Select Device Setup under the Devices menu
- Click on the TASCAM FireOne device
- On the right will be a matrix with two columns of application commands that can be assigned to an F-Key. Click on an item to see other choices or make another selection.
- Click Apply
Visual Metronome
MIDI Clock Rotate and Beat modes
- Open the FireOne Control Panel. Change the Display Mode to MIDI Clock Flash or MIDI Clock Rotate.
• In the Transport | Synchronization Setup dialog:
○ Timecode Source = "Internal Timecode"
o MIDI Clock Destinations: Check "FireOne Control (Emulated)"
Metronome mode
- Open the FireOne Control Panel. Change the Display Mode to Metronome.
• In the Transport | Metronome Setup dialog:
○ Activate MIDI Click
o Port = FireOne Control (Emulated)
○ Channel = 1
○ Hi Note = G#4, Middle velocity
○ Lo Note = A4, Middle velocity
NOTE: Turn on the metronome from the transport bar, or select Metronome On from the Transport menu.
Cakewalk SONAR
FireOne has been tested with SONAR Versions 5 and 6.
Control Surface Configuration
- Run the FireOne driver installer and check the box for the SONAR plug-in. Please see the Release Notes for detailed installation instructions.
- Open the FireOne control panel and ensure the Control Protocol is set to Native
- Launch SONAR
- Select Control Surfaces under the Options menu
- Click on the yellow star to add a control surface
• From the Controller/Surface pulldown, select TASCAM FireOne - Select FireOne Control for both the MIDI Input Port and MIDI Output Port
- Click OK then close the Controllers/Surfaces window
Control Assignments
Following are the default F-Key assignments in SONAR.
| F1 | All Safe / All Record |
| F2 | Clear Solos |
| F3 | Clear Mutes |
| F4 | Close Window |
| F5 | Go | Previous Marker |
| F6 | Go | Next Marker |
| F7 | Send Enter key |
| F8 | Send Space key |
| SHIFT + F1 | Set Loop From |
| SHIFT + F2 | Set Loop Thru |
| SHIFT + F3 | Loop Toggle |
| SHIFT + F4 | Set Punch From |
| SHIFT + F5 | Set Punch Thru |
| SHIFT + F6 | Punch Toggle |
| SHIFT + F7 | Edit | Undo |
| SHIFT + F8 | Edit | Redo |
| Footswitch | Transport | Record |
It is possible to re-assign the above defaults in SONAR:
- Select TASCAM FireOne under the Tools menu
- You will see a pulldown menu for each of the F-Keys (unshifted and shifted) and the footswitch input.
- Use the pulldowns to select your desired function for each.
- The settings here are remembered globally by SONAR
- At the top of this window, there is a standard SONAR interface for saving assignment sets.
- At the bottom of this window, you can set the wheel resolution for transport locate.
Visual Metronome
MIDI Clock Rotate and Beat modes
- Open the FireOne Control Panel. Change the Display Mode to MIDI Clock Flash or MIDI Clock Rotate.
- Under the Options menu, select Project and choose the "Sync" tab
- Check the box for Transmit MIDI Start/Continue/Stop/Clock
- Check the box for FireOne Control in the area labeled "MIDI Sync Output Ports:"
- It is not necessary to also transmit MTC)
Metronome mode:
- Open the FireOne Control Panel. Change the Display Mode to Metronome.
- Under the Options menu, select Project Options and choose the "Metronome" Tab
- Check both "Playback" and "Recording"
- Choose "Use MIDI Note"
- Under MIDI Note, choose the Port number corresponding to the FireOne Control Port. If the FireOne is your only MIDI interface, this will be Port 2.
- Choose Channel = 1, Duration = 6
- First beat: Key = G#6, Velocity = 127
• Other beats: Key = A6, Velocity = 100
NOTE: The velocity you assign here will determine the brightness of the wheel's LEDs. If you want a greater difference between the first beat and the other beats, use a lower value for the other beats, keeping the first beat set to 127.
Apple Logic
FireOne has been tested with Apple Logic Pro
Control Surface Configuration
- Run the FireOne control panel installer
- Open the FireOne control panel and ensure the Control Protocol is set to Native
- Launch Logic Pro
- Click the Logic Pro menu and select Preferences > Control Surfaces > Setup...
- Click on the New menu in the Setup window and choose Install...
- Choose Mackie Control from the list and click the Add button. When Logic finishes, click Done.
- Select the Setup window again if it's not already on top. Click on the Out Port menu and set it to FireOne Control Port.
- Select the Input directly below that and set it to FireOne Control Port.
- The transport buttons (Play, Stop, etc.) and jog wheel should now be working.
- Click the close button.
Control Assignments
Following are the default F-Key assignments in Logic Pro.
| F1 | Screenshot 1/Arrange |
| F2 | Screenshot 2/Mixer View |
| F3 | Screenshot 3/Environment |
| F4 | Screenshot 4/Matrix Edit with Transform |
| F5 | Screenshot 5/Matrix Edit |
| F6 | Screenshot 6/Score Edit |
| F7 | Screenshot 7/Audio Window |
| F8 | New Audio window |
| SHIFT + F1 | New Arrange Window |
| SHIFT + F2 | New Mixer Window |
| SHIFT + F3 | New Event List Window |
| SHIFT + F4 | New Score Window |
| SHIFT + F5 | New Hyper Edit Window |
| SHIFT + F6 | New Matrix Edit Window |
| SHIFT + F7 | New Transport Window |
| SHIFT + F8 | New Audio Window |
It is possible to re-assign the above defaults in Logic Pro.
- Click the Logic Pro menu and select Preferences > Key Commands...
- In the top right corner of the Key Commands window is a search command. Search for something you want to assign, such as "metronome click."
- Select a command from the list on the left side of the display.
- Press the Learn New Assignment button on the bottom right corner of the window.
- Press a button on the FireOne to assign that command to the button.
Visual Metronome
MIDI Clock Rotate and Beat modes
- Open the FireOne Control Panel. Change the Display Mode to MIDI Clock Flash or MIDI Clock Rotate.
- In Logic Pro, click and hold click on the File menu and select File > Song Settings > Synchronization.
- Click the MIDI tab at the top of the window.
- Under Transmit MIDI Clock, click the Destination 1 checkbox and select FireOne Control Port from the pulldown menu.
- Press play. You should see the FireOne flash in time with the music.
Apple Final Cut Pro
Control Surface Configuration
- Run the FireOne control panel installer
- Open the FireOne control panel and ensure the Control Protocol is set to Native
- Launch Final Cut Pro
- Click the Tools menu and select Control Surfaces...
- Click on the + button at the bottom right corner of the window.
- Set Control Surface Type to Mackie Control, and set the Input and Output connections to FireOne – Control. Press OK when you're finished.
- Open the Tools menu and select Audio Mixer. You can only use a control surface with Final Cut Pro if the audio mixer window is open.
Control Assignments
Following are the default F-Key assignments in Final Cut Pro.
| F1 | Mark In |
| F2 | Mark Out |
| F3 | Toggle Link |
| F4 | Lock Video Track |
| F5 | Lock Audio Track |
| F6 | Set Audio Destination 1 |
| F7 | Set Audio Destination 2 |
| F8 | New Audio window |
It is possible to re-assign the above defaults in Final Cut Pro.
- Open the Tools menu and select Tools > Keyboard Layout > Customize.
- Click the Lock button at the bottom left corner of the window.
- Select a command from the list on the right side of the display, or search for the parameter you want to assign.
- Press a button on the FireOne to assign that command to the button.
You can assign eight more commands of your choice using the above steps with SHIFT plus a FireOne F-Key.
MOTU Digital Performer
The FireOne is only compatible with Universal Binary Digital Performer Versions 5 and higher that support both PowerPC and Intel Mac computers.
MIDI Configuration
- Launch OS X Audio MIDI Setup
• View the MIDI Devices tab - Click the Add Device icon
- Double-click on the "new external device" icon and configure its properties to match the capabilities of FireOne. We'll assume you will rename "new external device" to be "Fire1 DP" and that this device has 1 MIDI in and 1 MIDI out.
- Quit the “Fire1 DP” MIDI Properties" window.
- In the "MIDI Devices" tab, drag the "Fire1 DP " icon so that it is under the "FireOne" icon.
- In the "MIDI Devices" tab, connect the "Fire1 DP" MIDI out port to the "FireOne" MIDI in by a clicking on one port and dragging to the other port.
- Connect the "FireOne" MIDI out port to the "Fire1 DP" MIDI in port in the same way.
By setting this up, DP will be able to query OS X to determine what MIDI gear is connected to the FireOne's MIDI ports.
- Launch DP 5
- Load a project that has a MIDI track.
- Click on the output routing menu for a MIDI track. You should see "Fire1 DP" listed in the menu.
Control Surface Configuration
If you are running Universal Binary Digital Performer 5, or higher and have installed the FireOne plug-in:
• Under the Setup menu, choose Control Surface Setup
- Select FireOne as the Driver
- Select FireOne Control-1 as the MIDI port
- Click OK
Control Assignments
Following are the default F-Key assignments in Digital Performer.
| F1 | Control+F1 |
| F2 | Control+F2 |
| F3 | Control+F3 |
| F4 | Control+F4 |
| F5 | Control+F5 |
| F6 | Control+F6 |
| F7 | Control+F7 |
| F8 | Control+F8 |
| SHIFT + F1 | Option+F1 |
| SHIFT + F2 | Option+F2 |
| SHIFT + F3 | Option+F3 |
| SHIFT + F4 | Option+F4 |
| SHIFT + F5 | Option+F5 |
| SHIFT + F6 | Option+F6 |
| SHIFT + F7 | Option+F7 |
| SHIFT + F8 | Option+F8 |
It is possible to re-assign the above defaults in Digital Performer using the Setup > Command dialog.
Visual Metronome
MIDI Clock Rotate and Beat modes
- Open the FireOne Control Panel. Change the Display Mode to MIDI Clock Flash or MIDI Clock Rotate.
• Under the Preferences menu, select Transmit Sync - Choose FireOne Control 1 under the “Transmit beat clock via port(s):”
- Select “Generate MIDI Beat Clocks and “24 clocks per quarter note”
Metronome mode:
- Open the FireOne Control Panel. Change the Display Mode to Metronome.
- Under the Preferences menu, select Play & Record > Click (or double click the metronome icon in the Transport window)
- Select MIDI for Type of Click
- Select the FireOne Control Port 1 for Accented and Normal
○ Channel = 1
○ Accented Note = Ab4
o Normal Note = A4