
IF-DM - Audio Interface TASCAM - Free user manual and instructions
Find the device manual for free IF-DM TASCAM in PDF.
User questions about IF-DM TASCAM
0 question about this device. Answer the ones you know or ask your own.
Ask a new question about this device
Download the instructions for your Audio Interface in PDF format for free! Find your manual IF-DM - TASCAM and take your electronic device back in hand. On this page are published all the documents necessary for the use of your device. IF-DM by TASCAM.
USER MANUAL IF-DM TASCAM
INTRODUCTION ......2
FEATURES 3
SYSTEM REQUIREMENTS ......3
Macintosh....3
Windows....3
DM-3200 Requirements ....3
DM-24 Requirements....3
Trademarks......3
INSTALLATION......4
DIGITAL PERFORMER......7
SYSTEM CLOCKING 8
MASTER CLOCK......8
CLOCK SETTINGS 8
96 k & 88.2 k Operation......8
IF-FW/DM & MIXER ROUTING .....8
MIXER OUTPUTS 8
DM-3200 8
DM-24 9
MIXER INPUTS......9
DM-3200 9
DM-24 9
THE IF-FW/DM CONTROL PANEL
(WINDOWS)......10
ENABLE WDM....11
Introduction
Thank you for purchasing the TASCAM IF-FW/DM FireWire audio card for TASCAM mixers. It is designed to provide audio and MIDI interfacing between your TASCAM mixer and your computer based DAW, essentially turning your TASCAM mixer into a FireWire audio/MIDI interface.
Please take some time to look through this Owner's Manual and familiarize yourself with the IF-FW/DM's features, setup and operation. We suggest you pay particular attention to the setup notes for your com-
puter platform of choice (Mac or PC). You may also need to refer to your software's documentation for a clear understanding of how to set up an audio/MIDI interface from within your software. Your experience with the IF-FW/DM will be greatly enhanced by a good working knowledge of your audio software.
Be sure to check the TASCAM web site at www.tascam.com to ensure you have the latest software updates for your IF-FW/DM.
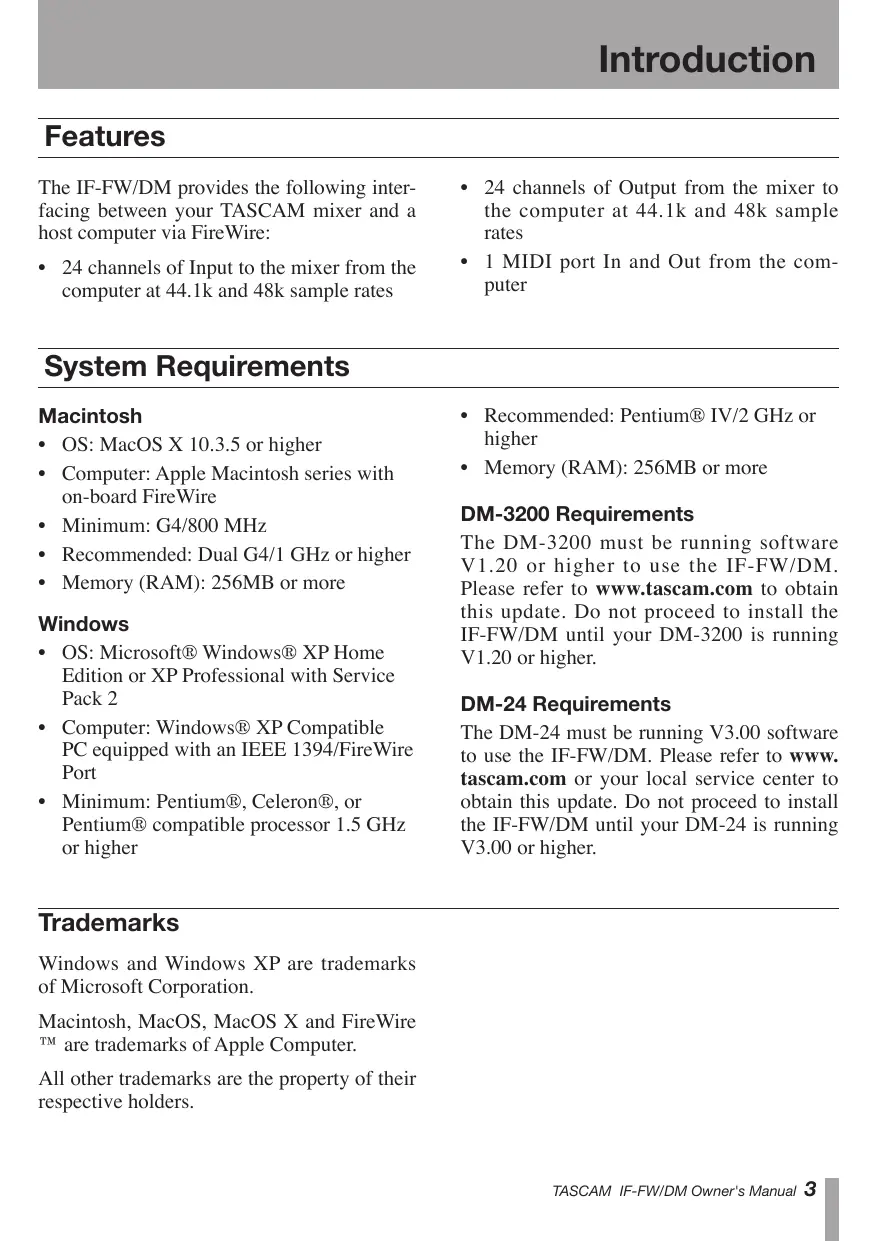
Features
The IF-FW/DM provides the following interfacing between your TASCAM mixer and a host computer via FireWire:
- 24 channels of Input to the mixer from the computer at 44.1k and 48k sample rates
- 24 channels of Output from the mixer to the computer at 44.1k and 48k sample rates
- 1 MIDI port In and Out from the computer
System Requirements
Macintosh
• OS: MacOS X 10.3.5 or higher
- Computer: Apple Macintosh series with on-board FireWire
• Minimum: G4/800 MHz
- Recommended: Dual G4/1 GHz or higher
• Memory (RAM): 256MB or more
Windows
- OS: Microsoft® Windows® XP Home Edition or XP Professional with Service Pack 2
- Computer: Windows® XP Compatible PC equipped with an IEEE 1394/FireWire Port
-
Minimum: Pentium®, Celeron®, or Pentium® compatible processor 1.5 GHz or higher
-
Recommended: Pentium® IV/2 GHz or higher
• Memory (RAM): 256MB or more
DM-3200 Requirements
The DM-3200 must be running software V1.20 or higher to use the IF-FW/DM. Please refer to www.tascam.com to obtain this update. Do not proceed to install the IF-FW/DM until your DM-3200 is running V1.20 or higher.
DM-24 Requirements
The DM-24 must be running V3.00 software to use the IF-FW/DM. Please refer to www.tascam.com or your local service center to obtain this update. Do not proceed to install the IF-FW/DM until your DM-24 is running V3.00 or higher.
Trademarks
Windows and Windows XP are trademarks of Microsoft Corporation.
Macintosh, MacOS, MacOS X and FireWire ^TM are trademarks of Apple Computer.
All other trademarks are the property of their respective holders.
Configure For Your Mixer
There is a series of jumpers on the IF-FW/DM that set its operating mode. These jumpers must be in the correct position to operate with a DM-3200 or DM-24, which communicate with the IF-FW/DM via different operating modes.
Early IF-FW/DM cards shipped configured for the DM-24. From the time of DM-3200 software version 1.20 availability, IF-FW/DM cards began shipping configured for the DM-3200.
Please confirm your card's configuration with the following pictures and instructions then make any necessary changes before installing the IF-FW/DM into your mixer.
NOTE
- The IF-FW/DM will not function if incorrectly configured for your mixer. Installing an incorrectly configured card will not harm anything.
- The IF-FW/DM must be installed in either mixer's Slot 1. It will not function in Slot 2.
Use commonly available needle-nose pliers to carefully change the configuration of the card as shown.
Picture 1 is IF-FW/DM Configured for a DM-3200. Note that jumpers J11 through J43 are across pin rows 2 and 3.
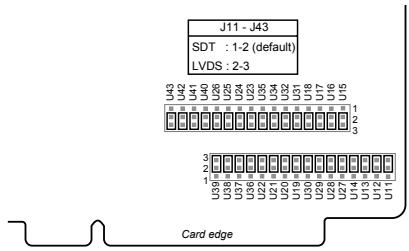
Picture 1
Picture 2 is IF-FW/DM Configured for a DM-24. Note that jumpers J11 through J43 are across pin rows 1 and 2.
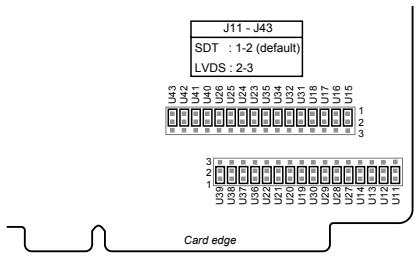
Picture 2
Installing the IF-FW/DM
- Remove the five screws holding the blank plate or card currently installed in Slot 1 then remove the plate or card.
- Insert the IF-FW/DM into Slot 1, making sure that the card edges slide into the white plastic guide inside Slot 1. Push it all the way in until it clicks and the card back plate is flush with the mixer's back panel. Excessive force is not required - if it does not click in easily, remove it and
start again with attention to the guides.
- Replace the five screws to hold the card in place.
NOTE
- The IF-FW/DM must be installed in to the mixer's Slot 1. It will not function in Slot 2.
- The following installation must be done with the mixer's power OFF and disconnected.
Making Connections
- Connect one end of the provided FireWire cable to the IF-FW/DM and the other end to an available FireWire port on your computer. An inferior FireWire cable can negatively affect the performance of the system.
- For Windows installations, do not make this connection until instructed to do so by the driver installer.
- Making the following MIDI connections is only necessary for IF-FW/DM use with the DM-24 mixer. The DM-3200's USB connection provides MIDI communication for DAW control and MTC.
a. Connect the MIDI Input of the IF-FW/DM to the MIDI Output of the mixer if you plan to use the IF-FW/DM's MIDI In port to get control surface messages to a DAW.
b. Connect the MIDI Output of the IF-FW/DM to the MIDI Input of the mixer if you plan to drive the mixer's automation from MTC provided by the DAW or if you require time code display from
the DAW in the mixer's readout from the IF-FW/DM's MIDI Out port.
- If you will not be using MIDI communication between the mixer and the DAW for surface control or time code, the IF-FW/DM's MIDI port may be used as an additional MIDI port by the DAW's sequencer. It can be used to connect a MIDI controller, sound module or sampler.
NOTE
- The IF-FW/DM must be connected by itself on a FireWire bus. More than one FireWire connector on a computer does not mean each connector has its own bus. More often, all connectors go to the same bus on the computer. If you require additional FireWire devices, it is necessary to add a FireWire card, thus adding a separate bus, for those devices.
- The maximum FireWire cable length is 3 meters.
Configuring the Computer
Macintosh
The IF-FW/DM uses the FireWire audio/MIDI services provided by OSX, so it is not necessary to install drivers. You must have OSX 10.3.5 or higher installed on your Mac to use the IF-FW/DM. Previous operating systems do not include the correct built-in services.
- Make the connections as described above.
-
Power up the Mac
-
Power up the mixer
- Open Audio/MIDI set and verify that the IF-FW/DM device is present
- Configure your DAW to use the IF-FW/DM Core Audio device according to the instructions for your application.
Windows
It is necessary to install driver software in order for Windows to recognize the IF-FW/DM. An installer is provided for this purpose, the drivers cannot be installed manually from Windows Device Manager. On the CD-ROM that came with your IF-FW/DM is a PC Driver installer. Launch the installer from the CD or copy it to your hard drive and launch it from there. The installer is launched by clicking “setup.exe”.
NOTE
The IF-FW/DM should be disconnected from the PC to begin driver installation.
- Launch the driver installer and carefully follow the on-screen instructions in the Installation Wizard.
- When presented with any Windows Logo warnings, click Continue Anyway.
- Follow the steps on all screens of the Installation Wizard through the Windows "New Hardware Wizard".
- You will be prompted to connect the IF-FW/DM to the computer at this point.
![TASCAM IF-FW/DM Setup Connect devices and turn them on To finish installation please connect all devices to this computer system and turn them on. Note: During this process the system may prompt you again to confirm installation of software that has not passed Windows Logo testing. Please select [Continue Anyway] to confirm installation. Click [Next] after you connected und turned on devices. Next >](/content/2025/01/168508/images/1d55df7642bfd656a42829fcd7d0b813b1f050a3958ae07aab0946fd47a30689.jpg)
- The New Hardware dialog will appear in the lower right of the Windows desktop.
- When presented with any Windows Logo warnings, click Continue Anyway.
- Installation activity will continue in the New Hardware dialog in the lower right of the Windows desktop. Do not click on anything during this activity - allow it to finish.
- “Your new hardware is installed and ready to use” will appear in the lower right of the Windows desktop.
- Click “Next” in the Setup/Installation window.
- The Setup/Installation window will present a "Finished" message. Click Exit.
- Your IF-FW/DM is installed and ready to use.
Windows 64-Bit
Windows driver version 1.10 & higher includes untested 64-bit drivers (requires 64-bit PC hardware and 64-bit Windows OS). This is not officially supported.
IF-FW/DM Interface Setup
Below are brief instructions for setting up common DAW software applications to use the IF-FW/DM interface. If your application is not covered here, but does support ASIO (PC), WDM (PC) or Core Audio (Mac), or if
you need more detailed instructions to configure your application, please refer to the documentation for your application to set up an audio/MIDI interface.
Cubase / Nuendo
- Select Device Setup under the Devices menu
-
Select VST Multitrack
-
Select ASIO IFFWDM under the ASIO Driver pulldown
- Click Apply then click OK
SONAR
- Select Audio under the Options menu
- Click the Drivers tab and enable the desired Inputs and Outputs
- Click the General tab and select IF-FW/DM devices for the Playback and Record Timing Masters
-
Click on Wave Profiler (run this any time you change anything in this window)
-
Click on Yes to profile the interface. The sample rate corresponding to the sample rate set on the mixer will show “OK”. Other sample rates will show “not available”. Close this window
- Click OK
Logic
- Under the Logic menu, select Preferences >Audio Hardware & Drivers
-
Ensure that Core Audio is checked and click the triangle on the left to expand the window
-
Select the IF-FW/DM in the Driver pull-down
- Click OK
Digital Performer
- Under the Setup menu, select Configure Audio System > Configure Hardware Driver
-
Highlight the IF-FW/DM to make it the selected Core Audio device for DP
-
Configure the Buffer Size and Host Buffer Multiplier according to your Mac's capabilities. Generally, less powerful Macs will require higher settings
- Click OK
System Clocking
Master Clock
When configured with the IF-FW/DM, the mixer must be the master clock relative to the computer DAW. The mixer itself may be
clocked to an external source other than the DAW.
Clock Settings
If it becomes necessary to switch between 44.1k and 48k sample rates on the mixer, the following steps are required for correct operation:
- Disconnect the FireWire cable between the DM-24 and the IF-FW/DM.
- Change the sample rate on the DM-24.
- Re-connect the FireWire cable.
NOTE
30 seconds must elapse between disconnection and reconnection of the FireWire cable.
96 k & 88.2 k Operation
The IF-FW/DM does not support these sample rates.
IF-FW/DM & Mixer Routing
The IF-FW/DM appears to a mixer just like any other optional I/O card except that it has
24 channels of I/O instead of 8.
Mixer Outputs
DM-3200
By default, the DM-3200 duplicates busses 1 - 8 on IF-FW/DM mixer outputs 17 - 24.
Also available are the Direct Outputs from channels 1 - 16. By default, those appear on IF-FW/DM mixer outputs 1 - 16.
These routing settings can be changed in the OUTPUT tab of the DM-3200's ROUTING screen.
DM-24
By default, the DM-24 duplicates busses 1 - 8 on IF-FW/DM mixer outputs 1 - 8, 9 - 16, and 17 - 24.
Also available are the Direct Outputs from channels 1 - 16 on the DM-24. By default, those appear on IF-FW/DM mixer outputs 1 - 16.
These routing settings can be changed in the OUTPUT tab of the DM-24's I/O screen.
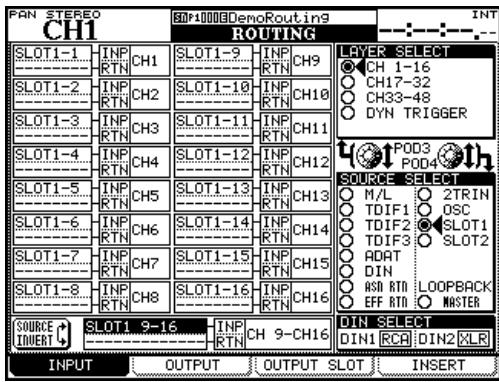
Mixer Inputs
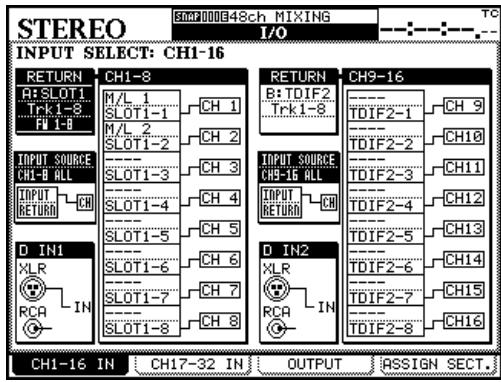
DM-3200
The IF-FW/DM's mixer inputs must be configured in banks of 8 in the CH1-16 IN and CH17-24 IN layer select of the mixer's Routing screen.
For 24 channel operation:
- Set INPUT CH1-8 to A:SLOT1,1-8
- Set INPUT CH9-16 to B:SLOT1, 9-16
- Set INPUT CH17-24 to A:SLOT1, 17-24
DM-24
The IF-FW/DM's mixer inputs must be configured in banks of 8 in the CH1-16 IN and CH17-24 IN tabs of the mixer's I/O screen.
For 24 channel operation:
- Set RETURN CH1-8 to A:SLOT1, Trk1-8, FW 1-8
- Set RETURN CH9-16 to B:SLOT1, Trk9-16, FW 9-16
- Set RETURN CH17-24 to A:SLOT1, Trk17-24, FW 17-24
Set the INPUT SOURCE to RETURN
IF-FW/DM Control Panel (Windows)
The IF-FW/DM Control Panel is found here: Start Menu > All Programs > TASCAM
IFFWDM > IFFWDM Control Panel.
There are three sliders available in the control panel. Generally, lower audio buffer settings offer lower latency but require a more powerful computer. It may be necessary to experiment with these settings to find the lowest setting your computer is capable of running. The most common symptom of settings that are too low for a particular computer is clicks & pops in the audio.
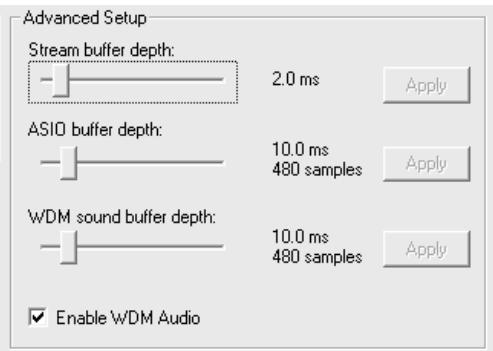
The three sliders are:
Stream buffer depth
Use this slider to control the size of the incoming 1394 audio stream. The larger the buffer size, the more latency in the audio. Too small of a buffer size can introduce clicks and pops in the audio.
ASIO buffer depth
Use this slider to reduce/increase latency when using a Steinberg ASIO application or when using Sonar in ASIO mode.
WDM sound buffer depth
Use this slider to reduce/increase latency when using a WDM application such as Sonar.
After adjusting the sliders, press Apply to set the changes.
NOTE
If the status says “trying to lock” and does not change in several seconds, reboot the computer. This may happen if the sample rate or clock source for the mixer is changed without removing the FireWire cable first.
Enable WDM
When first installed, the IF-FW/DM will 4 active stereo pairs of audio through its WDM driver. If you are using a DAW that cannot use ASIO and you want to access all 24 channels of audio, click this option. It may take 1 to 2 minutes for Windows to finish reconfiguring with a total of 12 stereo pairs of WDM audio. This affects the start-up time of the computer as well.
TASCAM
TEAC Professional Division
IF-FW/DM
TEAC CORPORATION
Phone: +81-422-52-5082 www.tascam.com
3-7-3, Nakacho, Musashino-shi, Tokyo 180-8550, Japan
TEAC AMERICA, INC.
Phone: +1-323-726-0303 www.tascam.com
7733 Telegraph Road, Montebello, California 90640
TEAC CANADA LTD.
Phone: +1905-890-8008 Facsimile: +1905-890-9888 www.tascam.com
5939 Wallace Street, Mississauga, Ontario L4Z 1Z8, Canada
TEAC MEXICO, S.A. De C.V
Phone: +52-555-581-5500 www.tascam.com
Campesinos No. 184, Colonia Granjes Esmeralda, Delegaacion Iztapalapa CP 09810, Mexico DF
TEAC UK LIMITED
Phone: +44-8541-302511 www.tascam.co.uk
Unit 19 & 20. The courtyards hatters Lane Watford, Hertfordshire. WD18 8TE, U.K.
TEAC EUROPE GmbH
Phone: +49-611-71580 www.tascam.de
Phone: +39-02-66010500 www.teac.it
Via C. Cantù 11, 20092 Cinisello Balsamo, Milano, Italy