
D4BL - Proximity sensor OMRON - Free user manual and instructions
Find the device manual for free D4BL OMRON in PDF.


| Product type | Proximity sensor |
| Brand | OMRON |
| Model | D4BL |
| Power supply | 24 V DC |
| Output type | Relay |
| Main functions | Contactless presence detection, reliable switching |
| Maintenance and cleaning | Clean with a soft dry cloth. Do not use solvents. |
| Safety | Comply with CE standards. Installation by a qualified professional. |
| Spare parts and repairability | No detachable parts. Non-repairable device. |
| General information | OMRON D4BL proximity sensor for industrial applications. |
| Conduit diameter | PG13.5, G1/2, 1/2-14NPT, M20 |
Frequently Asked Questions - D4BL OMRON
User questions about D4BL OMRON
0 question about this device. Answer the ones you know or ask your own.
Ask a new question about this device
Download the instructions for your Proximity sensor in PDF format for free! Find your manual D4BL - OMRON and take your electronic device back in hand. On this page are published all the documents necessary for the use of your device. D4BL by OMRON.
USER MANUAL D4BL OMRON
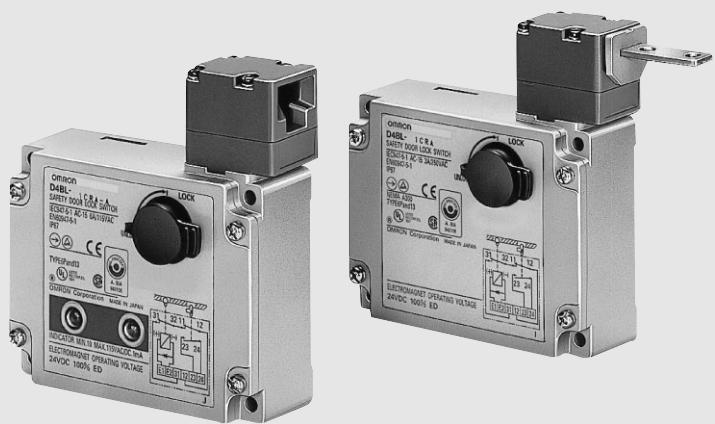
Guard Lock Safety-door Switch
D4BL
Protective Doors Are Locked Until Machines Completely Stop Operating
- A mechanical lock is applied automatically when the Operation Key is inserted. A high level of safety is achieved using a mechanism where the lock is only released when voltage is applied to the solenoid.
- Conforms to EN (TÜV) standards corresponding to the CE marking.
Approved by UL, CSA, BIA, and SUVA standards. - The switch contact is opened by a direct opening mechanism (NC contacts only) when the protective cover is opened. Direct opening mechanism that is EN-approved is indicated by on the switch.
- Auxiliary release key ensures easy maintenance and unlocks the door in the case of a power failure.
- Tough aluminum die-cast body incorporating a switch box with degree of protection satisfying IP67, UL, and CSA TYPE6P, 13.
- Equipped with a horizontal and vertical conduit opening.
- Models incorporating easy-to-see indicators for monitoring and those using an adjustable Operation Key for a double door are available.
- The mounting direction of the head can be changed to allow the Operation Key to be inserted from four directions.
Metric conduit types available
Model Number Structure
Model Number Legend
Switch
D4BL -□ □ □ □ -□ 1 2 3 4 5
-
Built-in Switch (with Safety Switch and Lock Monitor Switch Contacts)
C: 1NC/1NO (slow-action) + 1NC (slow-action)
D: 2NC (slow-action) + 1NC (slow-action) -
Head Mounting Direction
R: Four mounting directions possible (right-side mounting at shipping)
Operation Key (Order Separately)
D4BL-K1
- Operation Key Type
1: Horizontal mounting
2: Vertical mounting
3: Adjustable mounting (Horizontal)

SUVA
CNA
INSAI


- Door Lock and Release
(Auxiliary Release Key is Incorporated by All Models)
A: Mechanical lock/24-VDC solenoid release
B: Mechanical lock/110-VAC solenoid release
G: 24-VDC Solenoid lock/Mechanical release
- Indicator
Blank: Without indicator
A: 10 to 115 VAC or VDC driving (with orange
and green LED indicator unit)
Ordering Information
Switches
List of Models
| Lock method | Conduit size | Voltage for solenoid | Without indicator 1NC/1NO+ 1NC (Slow-action) | With LED indicator 1NC/1NO+ 1NC (Slow-action) | Without indicator 2NC+ 1NC (Slow-action) | With LED indicator 2NC+ 1NC (Slow-action) |
| Mechanical lock | PG13.5 | 24 VDC | D4BL-1CRA | D4BL-1CRA-A | D4BL-1DRA | D4BL-1DRA-A |
| 110 VAC | D4BL-1CRB | D4BL-1CRB-A | D4BL-1DRB | D4BL-1DRB-A | ||
| G1/2 | 24 VDC | D4BL-2CRA | D4BL-2CRA-A | D4BL-2DRA | D4BL-2DRA-A | |
| 110 VAC | D4BL-2CRB | D4BL-2CRB-A | D4BL-2DRB | D4BL-2DRB-A | ||
| M20 | 24 VDC | D4BL-4CRA | D4BL-4CRA-A | D4BL-4DRA | D4BL-4DRA-A | |
| 110 VAC | D4BL-4CRB | D4BL-4CRB-A | ||||
| Solenoid lock | Pg 13.5 | 24 VDC | D4BL-1CRG | D4BL-1CRG-A | D4BL-1DRG | D4BL-1DRG-A |
| G1/2 | 24 VDC | D4BL-2CRG | D4BL-2CRG-A | D4BL-2DRG | D4BL-2DRG-A | |
| M20 | 24 VDC | D4BL-4CRG-A |
Preferred model
Operation Keys (Order Separately)
| Mounting type | Model |
| Horizontal mounting | D4BL-K1 |
| Vertical mounting | D4BL-K2 |
| Adjustable mounting (Horizontal) | D4BL-K3 |
Specifications
Approved Standards
| Agency | Standard | File No. |
| TÜV Rheinland | EN60947-5-1 | R9451050 (Direct opening: approved) |
| BIA | GS-ET-19 | Mechanical lock: 9402293 Solenoid lock: 1998 20462-01 |
| SUVA | SUVA | E6186/2.d |
| UL | UL508 | E76675 |
| CSA | CSA C22.2, No.14 | LR45746 |
Standards and EC Directives
Conforms to the following EC Directives:
Machinery Directive
Low Voltage Directive
EN1088
Approved Standard Ratings
TUV (EN60947-5-1)
| Item | Standard model | Indicator model |
| Utilization category | AC-15 | AC-15 |
| Rated operating current (Ie) | 3 A | 6 A |
| Rated operating voltage (Ue) | 250 V | 115 V |
Use a 10-A fuse type gl or gG that conforms to IEC269 as a short-circuit protection device.
UL/CSA (UL508, CSA C22.2 No. 14)
A300
| Rated voltage | Carry current | Current | Volt-amperes | ||
| Make | Break | Make | Break | ||
| 120 VAC | 10 A | 60 A | 6 A | 7,200 VA | 720 VA |
| 240 VAC | 30 A | 3 A | |||
Note: The UL/CSA approved rating for products with indicators (-A) is 6 A/115 VAC.
Characteristics
| Degree of protection | IP67 (See note 2.) |
| Durability (See note 3.) | Mechanical:1,000,000 operations min. Electrical:500,000 operations min. (10-A resistive load at 250 VAC) |
| Operating speed | 0.05 to 0.5 m/s |
| Operating frequency | 30 operations/min max. |
| Rated frequency | 50/60 Hz |
| Operating characteristics | Direct opening force:19.61 N min. (EN60947-5-1) Direct opening travel:20 mm min. (EN60947-5-1) All stroke:23 mm min. |
| Holding force | 700 N min. (GS-ET-19) |
| Insulation resistance | 100 MΩ min. (at 500 VDC) |
| Rated insulation voltage (Ui) | 300 V (EN60947-5-1) |
| Conventional enclosed thermal current (Ithe) | 10 A (EN60947-5-1) |
| Dielectric strength (Uimp) | Impulse dielectric strength (Uimp) 4 kV (EN60947-5-1) between terminals of different polarity, be-tween each terminal and ground, and between each terminal and non-current-carrying metal part; 2.5 kV between solenoid and ground (EN60947-5-1) |
| Conditional short-circuit current | 100 V (EN60947-5-1) |
| Pollution degree (operating environment) | 3 (EN60947-5-1) |
| Protection against electric shock | Class I (with ground terminal) |
| Switching overvoltage | 1,500 V max. (EN60947-5-1) |
| Contact resistance | 50 mΩ max. (initial value) |
| Vibration resistance | Malfunction: 10 to 55 Hz, 0.35-mm single amplitude |
| Shock resistance | Destruction:1,000 m/s² min. (IEC68-2-27) Malfunction:300 m/s² min. (IEC68-2-27) |
| Ambient temperature | Operating:-10°C to 55°C (with no icing) |
| Ambient humidity | Operating:95% max. |
| Weight | Approx. 800 g |
Note: 1. The above values are initial values.
2. Although the switch box is protected from dust, oil or water penetration, do not use the D4BL in places where dust, oil, water, or chemicals may penetrate through the key hole on the head, otherwise Switch damage or malfunctioning may occur.
3. The durability is for an ambient temperature of 5^ to 35^ and an ambient humidity of 40% to 70% .
Solenoid Coil Characteristics
| Item | 24-VDC mechanical lock models | 110-VAC mechanical lock models | 24-VAC solenoid lock models |
| Rated operating voltage | 24 VDC +10%/_15% (100% ED) | 110 VAC ±10% (50/60 Hz) | 24 VDC +10%/_15% (100% ED) |
| Current consumption | Approx. 300 mA | Approx. 98 mA | Approx. 300 mA |
| Insulation | Class F (130°C or less) | ||
Indicator Characteristics
| Item | LED |
| Rated voltage | 10 to 115 VAC/VDC |
| Current leakage | Approx. 1 mA |
| Color (LED) | Orange, green |
Contact Form (Diagrams Show State with Key Inserted and Lock Engaged)
| Model | Contact | Diagram | Remarks | ||
| D4BL-□C□-□ | 1NC/1NO+1NC | 31 32 11 1223 24 | Lock position31-1223-24StrokeONOperation Keyinsertion comple-tion positionExtractioncompletionposition | ON | Only NC contacts 11-12and 31-32 have anapproved direct opening mechanism.The terminals 11-12and 23-24 can beused as unlike poles. |
| D4BL-□D□-□ | 2NC+1NC | 31 32 11 1221 22 | Lock position31-1221-22StrokeONOperation Keyinsertion comple-tion positionExtractioncompletionposition | ON | NC contacts 11-12,21-22, and 31-32have an approveddirect openingmechanism.The terminals 11-12and 21-22 can beused as unlike poles. |
Note: The EN-approved direct opening mechanism is indicated by on the switch.
Connections
Indicator Unit
Dimensions
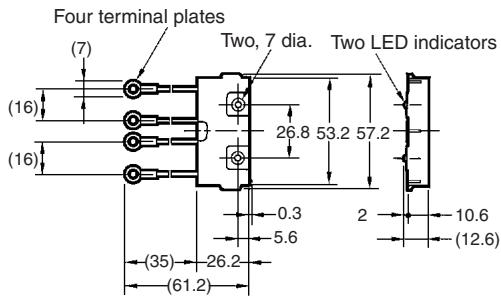
Circuit Connection Example
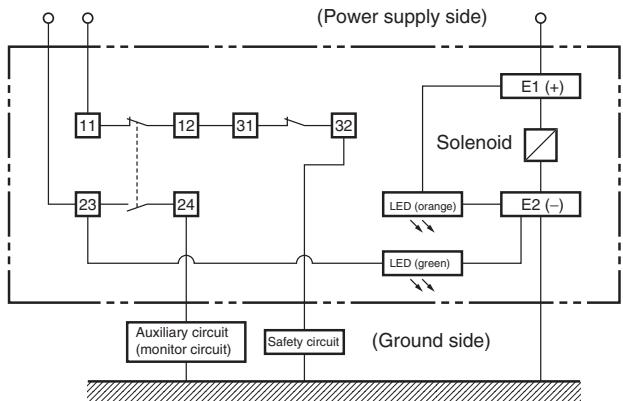
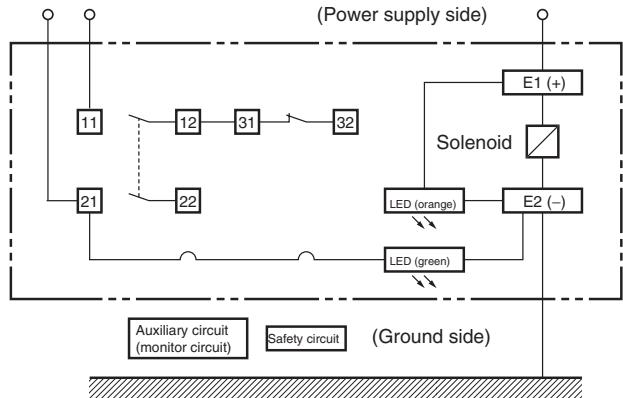
- Do not connect the indicators to the safety contact terminals (11-12-31-32) or the safety circuit side.
- When using indicators, connect them to the auxiliary circuit side (monitor circuit) or the solenoid input terminals as shown below.
- The indicators can be used to confirm the open/closed status of the door, the ON/OFF status of the power supply, and the ON/OFF status of the solenoid.
1. Orange: Lights when the solenoid turns ON. Green: Lights when the door opens.
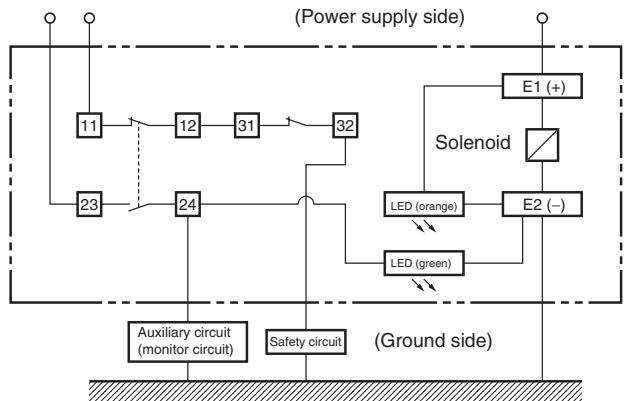
3. Orange: Lights when the solenoid turns ON. Green: Lights when door closes.
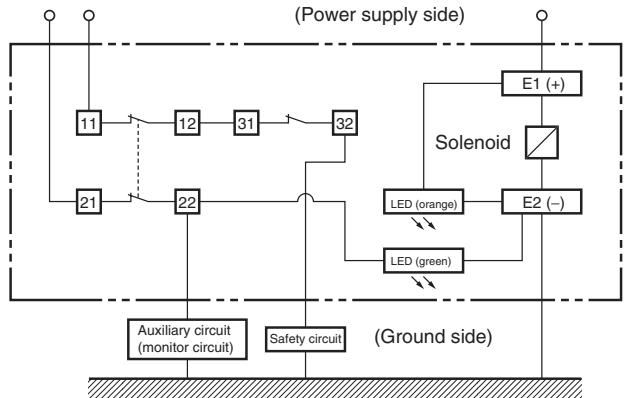
Internal Circuit
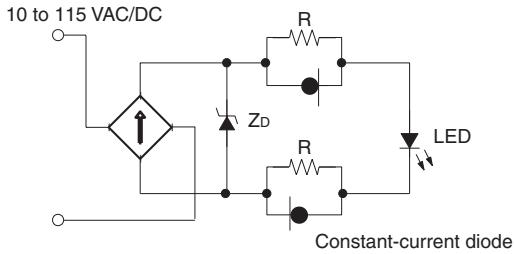
- Do not connect the indicators in parallel with the direct opening contact. If the indicators are broken, a short-circuit current may flow, causing equipment to malfunction.
- The 24-VDC solenoid terminals have polarity. Confirm the polarity before wiring.
- Be sure to use a special pushbutton switch to stop and start machinery and release locks.
2. Orange: Lights when the solenoid turns ON. Green: Lights when power turns ON.
4. Orange: Lights when the solenoid turns ON. Green: Lights when power turns ON.
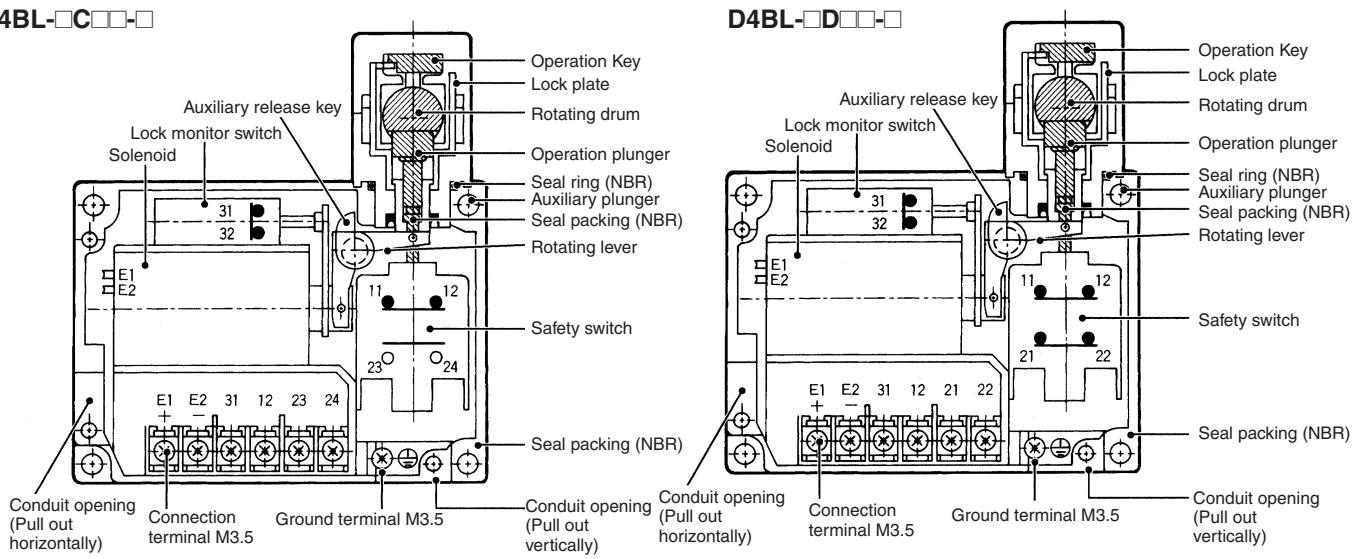
D4BL-□C□□
Dimensions
Note: 1. All units are in millimeters unless otherwise indicated.
2. Unless otherwise specified, a tolerance of ± 0.4mm applies to all dimensions.
Switches
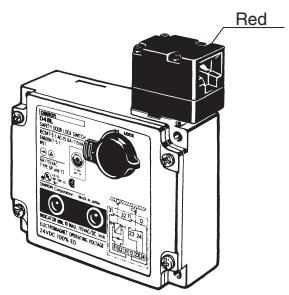
D4BL-□□□□
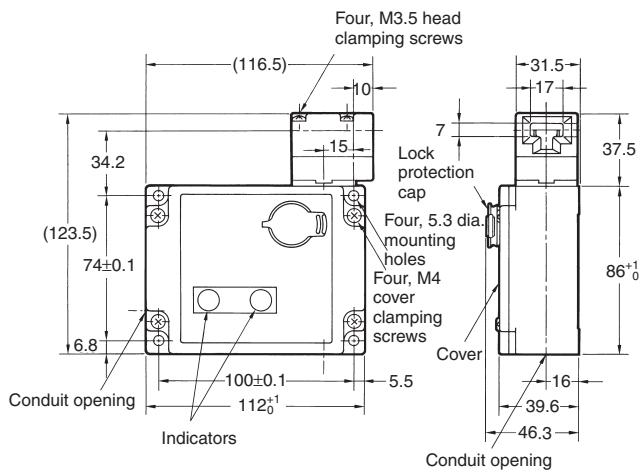
| Operating Characteristics | D4BL-☐☐☐ |
| Key insertion force | 19.61 N max. |
| Key extraction force | 19.61 N max. |
| Movement before being locked | 15 mm max. |
Operation Keys
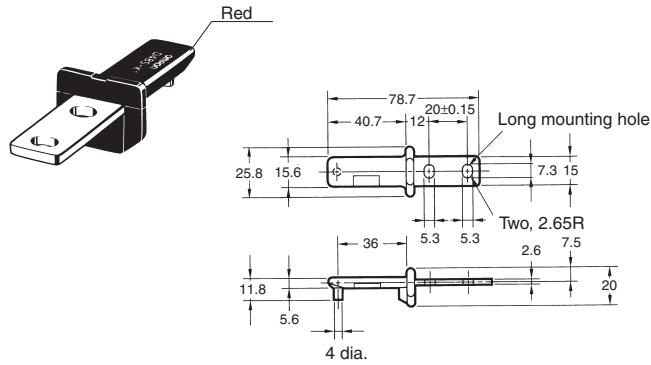
Horizontal Mounting
D4BL-K1
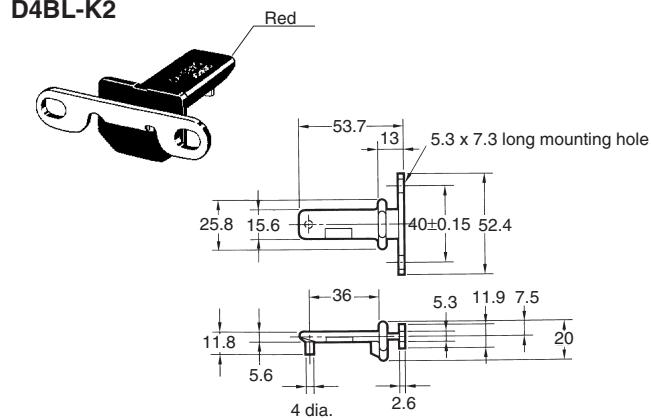
Vertical Mounting
D4BL-K2
Adjustable Mounting (Horizontal)
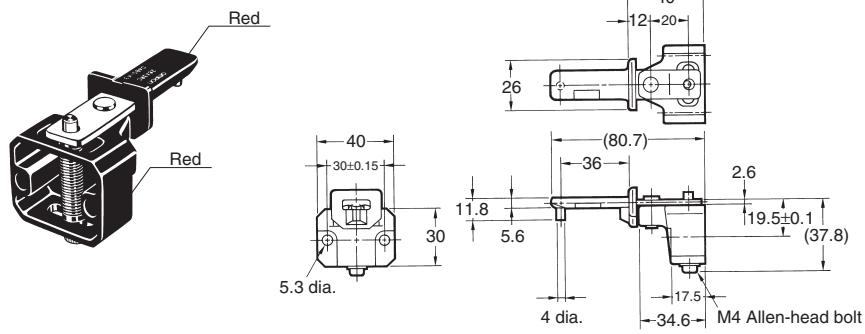
D4BL-K3
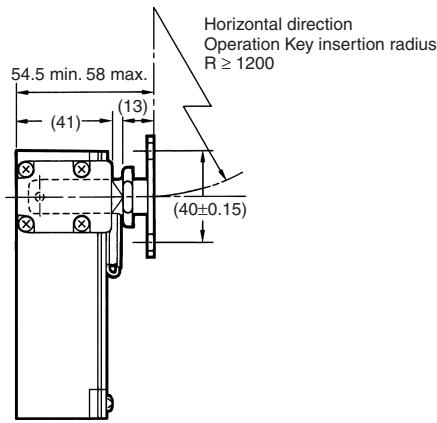
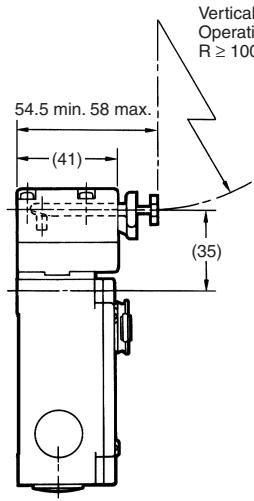
With Operation Key Inserted
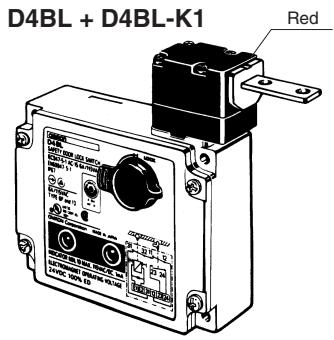
Horizontal Mounting
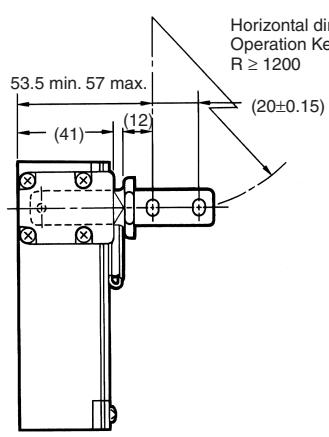
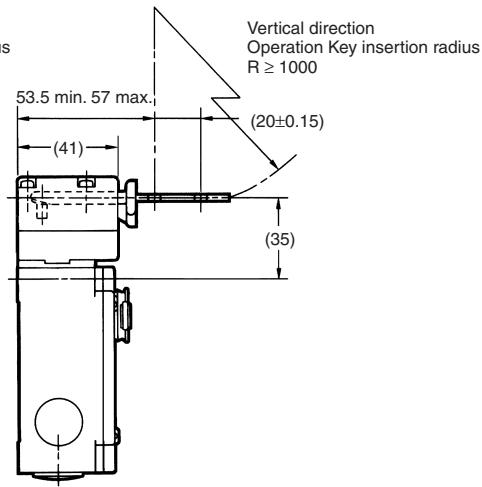
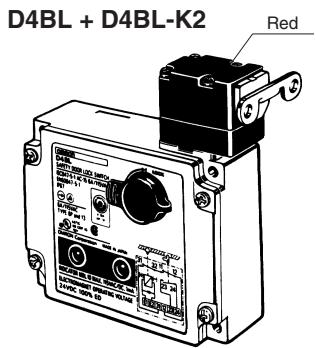
Vertical Mounting
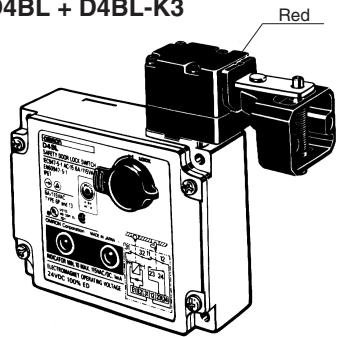
Adjustable Mounting (Horizontal)
D4BL + D4BL-K3
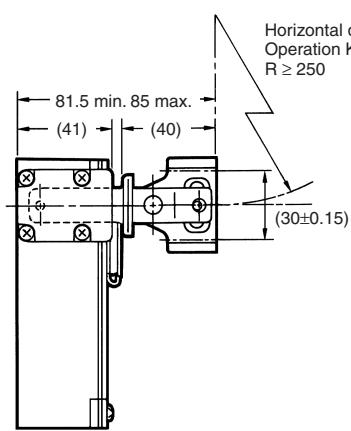
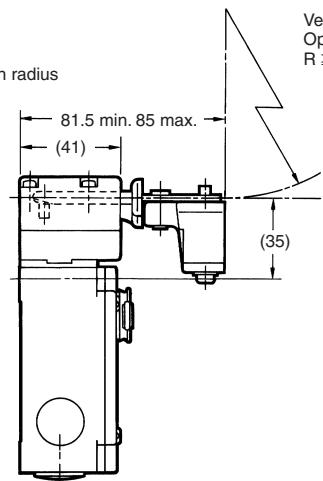
Vertical direction
Operation Key insertion radius R≥ 1000
Note: 1. Unless otherwise specified, a tolerance of ± 0.4mm applies to all dimensions.
2. In the above diagrams, the Operation Key is inserted from the front.
Do not insert the Operation Key to the Switch with the door open. Before using the machine, be sure to remove the shock-absorbing damper, which is provided before shipping. Otherwise the machine may start operating and injury may be caused.
Mount the Operation Key at a location where it will not come in contact with users when the door is opened or closed.
When operating the D4BL as a part of a safety circuit or an emergency stop circuit to prevent injury, operate the NC contacts that have a direct opening mechanism in direct opening mode. For safety purposes, tighten the switch body and Operation Key with one-way screws or equivalents or install a switch protection cover and warning label for safety purposes to prevent easy removal of the D4BL.
Connect the fuse to the D4BL in series to prevent it from short-circuit damage. The value of the breaking current of the fuse must be calculated by multiplying rated current by 150% to 200% .
When using the D4BL with EN ratings, use 10-A fuse Type gl or gG that complies with IEC60269.
In order to prevent the D4BL from burning due to overvoltage, insert a protection fuse into the solenoid circuit.
If the D4BL is imposed with force exceeding the lock strength, the D4BL may break and the equipment may continue to operate.
Auxiliary Release Key
The auxiliary release key is used to unlock the D4BL in case of emergency or in case the power supply to the D4BL fails.
Use an appropriate tool to set the auxiliary release key to UNLOCK so that the lock will be released and the door can be opened.
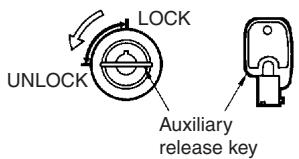
The auxiliary release key applied to the door of a machine room ensures the safety of people adjusting the equipment in the machine room. If the auxiliary release key is set to UNLOCK, the door will not be locked when the door is closed and no power will be supplied to the equipment.
To lock the door, set the auxiliary release key to LOCK.
Do not use the auxiliary release key to start or stop machines.
To prevent the auxiliary release key from being handled carelessly by unauthorized people, seal the auxiliary release key with sealing wax and the provided seal cap to ensure IP67.
Make sure that the auxiliary release key is kept with the person in charge.
Before attaching the cover to the D4BL, make sure that the auxiliary release key position is set to LOCK.
Stopper
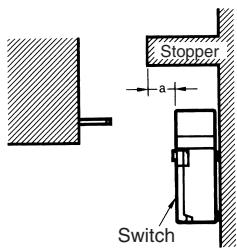
Do not use the Switch as a stopper. When mounting the Switch, be sure to locate a stopper as shown in the following illustration to prevent the top of the Operation Key from hitting the switch head.
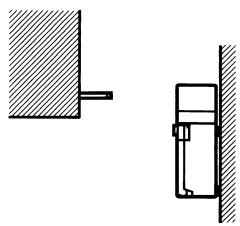
Correct Use
Operating Environment
Due to the wear and tear of the sealing of the D4BL, water and some types of oil and chemical sprayed onto the D4BL may cause contact or insulation failures, current leakages, or fires.
Do not use the D4BL in the following locations.
- Locations subject to severe temperature changes
- Locations subject to high temperatures or condensation
- Locations subject to severe vibration
- Locations where the product may come in contact with metal dust, oil, or chemicals
Operation Key
The D4BL is provided with a shock-absorbing damper to protect the D4BL from damage that may result from dropping the D4BL during transportation. Be sure to remove the damper after mounting the D4BL.
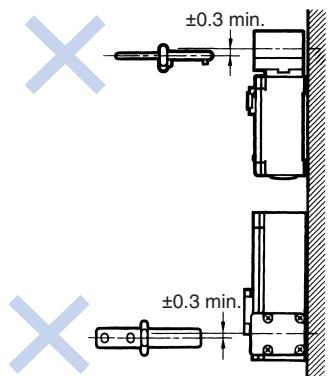
The mounting tolerance of the Operation Key is ± 0.3mm vertically or horizontally. Be sure to mount the D4BL correctly without leaning, otherwise the D4BL may soon break or wear out.
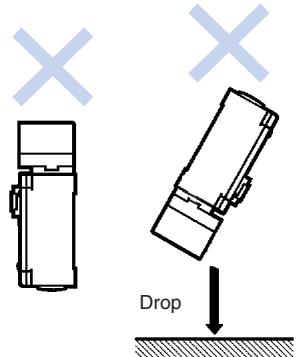
Do not drop the D4BL with the Operation Key inserted, otherwise the Operation Key may deform or break.
The head is constructed so that it cannot be operated with tools such as screwdrivers. Always use OMRON's Operation Key to operate the head in order to ensure the safety of the machine and protect the D4BL from damage.
The Operation Key provided for the D4BL is not compatible with that of the D4BS.
Mount the Operation Key and secure it with one-way screws or equivalents to prevent easy removal of the D4BL.
Securing the Door
If the Operation Key on the closed door is pulled outside the set zone by a force caused by vibration, the door's weight, or the door cushion rubber, the D4BL may be damaged. Secure the door with hooks so that it will remain within the set zone.
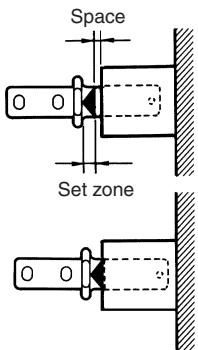

Tightening Torque
Be sure to tighten each screw of the D4BL properly, otherwise the D4BL may malfunction.
| Type | Torque | |
| 1 | M3.5 terminal screw (including terminal screw) | 0.59 to 0.78 N·m |
| 2 | Cover mounting screw | 1.18 to 1.37 N·m |
| 3 | Head mounting screw | 0.78 to 0.98 N·m |
| 4 | M5 body mounting screw | 4.90 to 5.88 N·m |
| 5 | Operation Key mounting screw | 2.35 to 2.75 N·m |
| 6 | Connector | 1.77 to 2.16 N·m |
| 7 | Cap screw | 1.27 to 1.67 N·m |
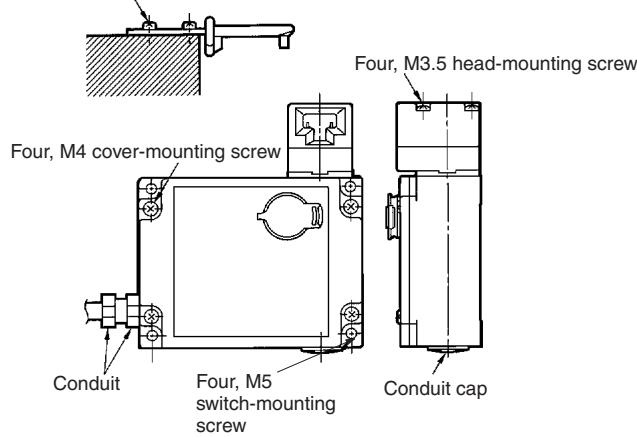
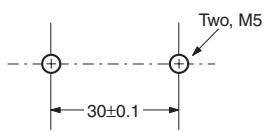
Two, M5 Operation Key mounting screw
Switch and Operation Key Mounting
Mount the D4BL and Operation Key with four M5 screws with washers and tighten each screw to the specified torque.
Mounting Dimensions
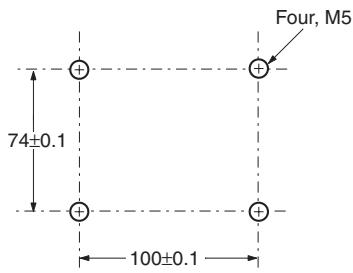
Switch Mounting Dimensions
Operation Key Mounting Holes
Horizontal Mounting D4BL-K1
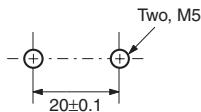
Vertical Mounting D4BL-K2
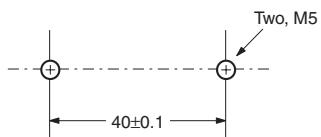
- Adjustable Mounting (Horizontal) D4BL-K3
Head Directions
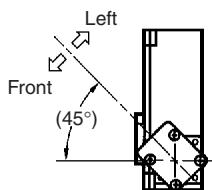
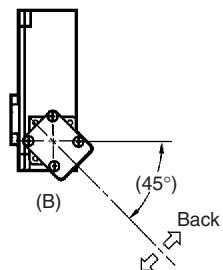
The head can be mounted in four directions. To remove the head, turn the head by 45^ as shown in figures A and B below.
To change the direction of the head, make sure that the protruding part of the rotating lever engages with the groove of the plunger. Then turn the head clockwise or counterclockwise to the desired direction. At that time, make sure that the groove of the plunger is located under the rotating lever. If the direction of the head is not set when the plunger is rotated by 45^ , the groove of the plunger presses the rotating lever. The head, plunger, or the built-in switch may be damaged as a result.
Head Direction Changes
(A)
Right
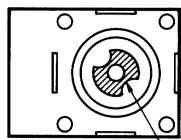
Head Bottom View
Operation plunger and groove mechanism
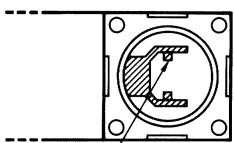
Switch Top View
Rotation lever and protruding part
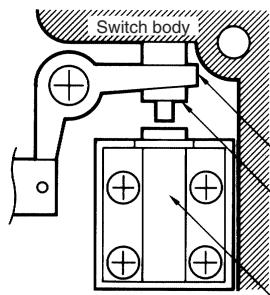
Normal Positions of Rotating Lever and Plunger
Rotating lever (with protruding part)
Plunger (with groove)
Built-in switch
Be sure to check the mechanical lock and solenoid release functions when mounting the D4BL.
If the head direction is changed, recheck the tightening torque of each of screw. Make sure that no foreign materials will penetrate through the key hole on the head.
Mounting the Cover
When tightening the cover, first check the specified torque, and then tighten each screw to the that torque. Also, make sure that no foreign matter has entered the switch.
When mounting the cover, make sure that the cover and switch box are properly aligned.
The following procedures are recommended for mounting and wiring the indicator unit securely.
In order to ensure IP67, use OMRON's SC-□M and Nippon Flex's ABS-08Pg13.5 and ABS-12 Pg13.5 Connectors.
Recommended cable: UL2464-type cable that is 20 to 18 AWG (0.5 to 1.0 mm^2 ) in size and has seven conductors
If the 1/2-14NPT is used, cover the cable and conduit end with sealing tape in order to ensure IP67. Tighten the connector to a torque of 1.77 to 2.16N· m .
Connect the indicator unit after connecting the seven-conductor cable.
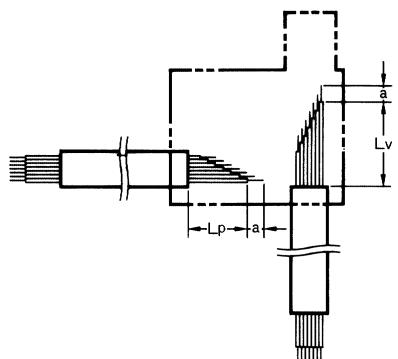
| Terminal no. | Lp (mm) | Lv (mm) | a (mm) |
| E1 | 30±2 | 80±2 | 8±1 |
| E2 | 35±2 | 75±2 | |
| 31 | 45±2 | 60±2 | |
| 12 | 55±2 | 50±2 | |
| 23 (21) | 65±2 | 45±2 | |
| 24 (22) | 70±2 | 35±2 | |
| = | 90±2 | 50±2 |
Properly attach and securely tighten the provided conduit cap to the unused conduit opening when wiring the D4BL.
Cable Connection Example
- Connect the wires to the terminals in the order shown below for wiring efficiency.
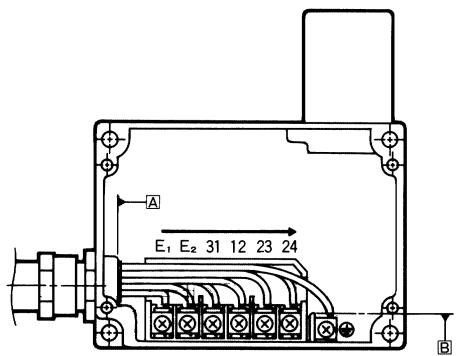
Tighten each wired terminal clockwise to a torque of 0.59 to 0.78 N·m.
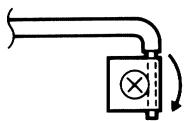
Twist the wire two or three times and make sure that no bare wire exists outside the terminal when tightening the terminal.
- The insulation sheath of the seven-conductor cable must come into contact with the wall of the conduit mouth, side A or side B.
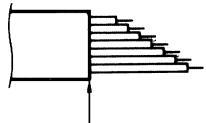
Insulation sheath edge
Maintenance and Repairs
Contact your OMRON representative for any repair or maintenance work on the D4BL. The D4BL must not be maintained or repaired by any unauthorized party.
Others
Do not touch the solenoid because the solenoid radiates heat while power is being supplied.
ALL DIMENSIONS SHOWN ARE IN MILLIMETERS.
To convert millimeters into inches, multiply by 0.03937. To convert grams into ounces, multiply by 0.03527.
- Guard Lock Safety-door Switch
- D4BL
- Protective Doors Are Locked Until Machines Completely Stop Operating
- Model Number Structure
- Switch
- D4BL -□ □ □ □ -□ 1 2 3 4 5
- Operation Key (Order Separately)
- D4BL-K1
- Ordering Information
- Specifications
- Standards and EC Directives
- Approved Standard Ratings
- UL/CSA (UL508, CSA C22.2 No. 14)
- Characteristics
- Connections
- Indicator Unit
- Circuit Connection Example
- Orange: Lights when the solenoid turns ON. Green: Lights when the door opens.
- Orange: Lights when the solenoid turns ON. Green: Lights when door closes.
- Internal Circuit
- Orange: Lights when the solenoid turns ON. Green: Lights when power turns ON.
- Orange: Lights when the solenoid turns ON. Green: Lights when power turns ON.
- Dimensions
- Switches
- Operation Keys
- Adjustable Mounting (Horizontal)
- With Operation Key Inserted
- Auxiliary Release Key
- Stopper
- Correct Use
- Operating Environment
- Operation Key
- Securing the Door
- Tightening Torque
- Switch and Operation Key Mounting
- Mounting Dimensions
- Operation Key Mounting Holes
- Head Directions
- Head Direction Changes
- Mounting the Cover
- Cable Connection Example
- Maintenance and Repairs
- Others
Brand : OMRON
Model : D4BL
Category : Proximity sensor