SWITCHING POWER SUPPLY 5-15V 0-20A - Power Supply GRAUPNER - Free user manual and instructions
Find the device manual for free SWITCHING POWER SUPPLY 5-15V 0-20A GRAUPNER in PDF.
User questions about SWITCHING POWER SUPPLY 5-15V 0-20A GRAUPNER
0 question about this device. Answer the ones you know or ask your own.
Ask a new question about this device
Download the instructions for your Power Supply in PDF format for free! Find your manual SWITCHING POWER SUPPLY 5-15V 0-20A - GRAUPNER and take your electronic device back in hand. On this page are published all the documents necessary for the use of your device. SWITCHING POWER SUPPLY 5-15V 0-20A by GRAUPNER.
USER MANUAL SWITCHING POWER SUPPLY 5-15V 0-20A GRAUPNER
Wide Adjustable Output Area Constant Current
Introduction
Please be sure to read right through these operating instruction attentively before you attempt to use your new switching power supply, as this will ensure that you can make full use of all of its facilities. Take particular note of the warnings and safety notes. These instructions should be kept in a safe place; if you ever dispose of the charger be sure to pass them on to the new owner.
This power supply is small, lightweight, compact, provided with a current limiter, a universal output for 4mm banana plugs and an automatic current regulator. At the same time, it is suitable for giving power or testing your equipment. It’s also provided with a protection circuitry to prevent any damages to the unity or your equipment in case of malfunctioning to high-voltages. Fitted out with a cooling system that guarantees a constant full operatively to the unit and prevents from overheating. This power supply is perfect to supply 12V chargers and DC mini drills. This power supply can also be used as a Pb charger.
1. Specification:
Input Voltage: 220\~240V AC 50Hz
Input Plug: #6458 EURO main plug, #6459 SCHUKO plug
Output Power: #6458 200W, #6459 300W
✨ Output Connection: 4mm Banana Clamp
✨ Output Voltage: 5V\~15V DC (adjustable)
Output Current: #6458 0\~15A (adjustable) #6459 0\~20A (adjustable)
✿ Size: #6458 142×130×84mm, #6458 170×170×85mm
2. Features:
✨ Over power protection, short circuit protection
✨ Inner cooling system by fan
✨ Adjustable maximum power output
Vo: output voltage (adjustable)
Io: output current in short circuit (adjustable)
✨ LED displaying output voltage and current
$$ \mathrm{Pw} = \mathrm{Vo} \times \mathrm{Io} $$
3. Operating Instructions:
- Using as a common DC power supply: plug in, adjust the voltage knob to get your
needed value (5\~15V). The voltage button “☐” will show the set voltage on screen. Then turn the Amp knob to get your needed max current cut off point, Amp button “☐” will show you the value.
- Read thoroughly the following contents before using.
- Disconnect the power supply from AC mains power before connecting device to the power supply.
-
Connect the device to the power supply ensuring the correct polarity. Red is positive. Black is negative and ensuring good contact.
-
Switch the power supply “OFF” with the switch on the front of the unit. Connect the power supply input AC lead.
-
Switch the power supply “ON” with the switch on the front of the unit. The “power on” led will illuminate. And the unit will commence supply of power to the device.
-
Warnings:
- When the power supply is operating. Do not attempt to open the power supply casing. In doing so will void warranty.
- Do ensure correct polarity when connecting device to the power supply. As damage to this device may occur if in correct connections are made.
- Do not attempt use with device requiring greater current than Rated 40 amps.
- Do not allow to rain and to become wet.
- Only connect to AC mains outlet when in use at all other time disconnect the power supply from AC mains outlet.
- Power supply may become warm during use or emit a slight buzzing sound. This is quite norm and can be disregarded.
-
Do place the power supply on a non flammable surface when in use.
• This power supply is for indoor use only. -
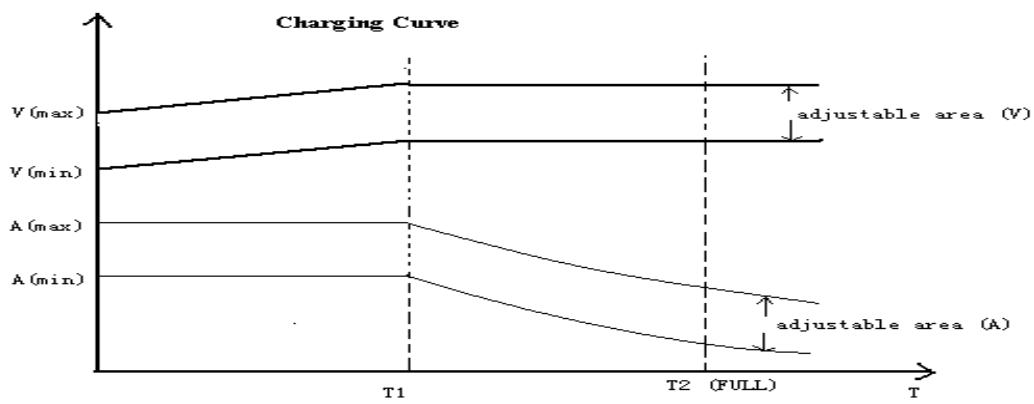
Using as a charger (charging with constant voltage, constant current):
line
| Time Point | V (max) | V (min) | A (max) | A (min) | | ---------- | ------- | ------- | ------- | ------- | | T1 | 0 | 0 | 0 | 0 | | T2 (FULL) | 0 | 0 | 0 | 0 || Charging battery | Suitable voltage area | Constant current | |
| 12VLead-acid battery | 13.8V~14.2V | (1/5~1/10) × | Battery capacity 1h |
| 6VLead-acid battery | 6.9V~7.1V | ||
| Four-cell LiFe pack | 14.0-14.4V | (1~4) × | Battery capacity 1h |
| Three-cell Lipo pack | 12.3V | (1/2~2) × | Battery capacity 1h |
| Three-cell LiFe pack | 10.6-10.8V | ||
| Two-cell LiPo pack | 8.2V | ||
| Two-cell LiFe pack | 7.0-7.2V | ||
e.g: 6VLead-acid battery: Constant current = 7Ah2 = 1.4A
WARNINGS AND SAFETY NOTES
- This product isn’t designed for use by children under the age of 14, it isn’t a toy! This appliance is not intended for use by persons (including children) with reduced physical, sensory or mental capabilities, or lack of experience and knowledge, unless they have been given supervision or instruction concerning use of the appliance by a person responsible for their safety. Children should be supervised to ensure that they do not play with the appliance.
- Protect the charger from dust, damp, rain, heat (e.g. direct sunshine) and vibration. It should only be operated in dry indoor conditions.
- The case slots serve to cool the charger, and must not be covered or enclosed; set up the charger with space round it, so that cooling air can circulate unhindered.
- The charger is designed to be powered by a 220\~240V AC main socket only. It is not permissible to modify the charger in any way. You must not connect AC power to the DC input.
- The charger and the battery to be charged should be set up on a heat-resistant, non-inflammable and non-conductive surface before use. Never place the charger directly on a car seat, carpet or similar. Keep all inflammable and volatile materials well away from the charging area. Provide good ventilation. Defective batteries can explode or burn!
- The charge output sockets and connecting leads must not be modified, and must not be inter-connected in any way. There is a danger of short-circuit between the charge outputs and the vehicle's bodywork when the charger is connected to the car battery. The charge leads and connecting leads must not be coiled up when the charger is in use. Avoid short-circuiting the charge output or the model battery with the car bodywork. For this reason the charger must never be placed directly on the vehicle's bodywork.
- Never leave the charger running or connected to the car battery unsupervised.
- Only one battery may be connected at each output at any one time.
- The following types of battery must not be connected to the charger:
- Ni-Cd / Ni-MH batteries, lead-acid batteries with a nominal voltage of more than 12V or less than 6V, Lithium-Ion / Li-Mn / Lithium-Polymer / LiFePO4 (LiFe) batteries with less than 2 cells and more than 3 cells (4 cells for LiFePO4).
- Batteries which require a different charge method from CC/CV or lead-acid types.
• Faulty or damaged cells or batteries.
- Batteries consisting of parallel-wired cells, or cells of different types.
- Batteries consisting of old and new cells, or cells of different makes.
• Non-rechargeable batteries (dry cells). Caution: explosion hazard!
- Batteries which are not expressly stated by the manufacturer to be suitable for the currents which this unit delivers during the charge process.
- Packs which are already fully charged or hot, or only partially discharged.
- Batteries or cells fitted with an integral charge circuit or charge termination circuit.
- Batteries installed in a device, or which are electrically connected to other components.
- To avoid short-circuits between the banana plugs fitted to the charge leads, please always connect the charge leads to the charger first, and only then to the battery to be charged. Reverse the sequence when disconnecting.
- As a basic rule always check that the charge quantity is approximately the same as you expected after the charger has indicated that the pack is fully charged. This is a simple method of detecting a problem reliably and in good time, should the charge process be terminated prematurely for any reason. The likelihood of premature termination varies according to many factors, but is at its highest with deep-discharged packs, low cell counts and particular cell types which are known to cause problems.
- We recommend that you carry out a series of test charges to satisfy yourself that the automatic termination circuit is working perfectly. This applies in particular when you are charging packs consisting of a small number of cells. If the cells feature has a poorly defined voltage peak, the charger may fail to detect the fully charged state.
- Before charging please check: have you selected the appropriate charge output for the battery? Are all connections firm, or is there an intermittent contact at any point in the circuit? Please bear in mind that it can be dangerous to fast-charge batteries. For example, if there is a brief interruption due to an intermittent contact, the result is inevitably a malfunction such as a restart of the charge process, which would result in the pack being massively overcharged.
- Be careful! A battery could explode or burn, if the charger does have a fault or if the user does choose the wrong charging output and parameters.
4. Operation:
- Connect the charger to an easily accessible mains power socket (220-240V AC, 50Hz). The red LED display will be on to confirm that the charger is ready for use.
Adjust the max. charge current and charge voltage like shown in the table.
Doing not so or adjusting the wrong voltage or current can cause explosion and fire.
-
Make absolutely sure that the polarity of the battery and the polarity of the charging cable match.
-
RED to positive pole (+)
- BLACK to negative pole
The charge current can be displayed in the LED display to indicate that charging is in progress.
- If the charge current is lower as 0.1 - 0.2A, the battery is fully charged. Disconnect the battery from the charge lead, and disconnect the charger from the mains socket.
- In case of charging LiFe or LiPo batteries, you must use the LiPo-Balancer 5 plus #3064 or LiPo-Balancer 6 plus #3065 for safety reasons. The maximum charge current must be limited to max. 10 A. Use a LiPo safety case #8370 or #8371.
5. Safety notes:
Make sure to follow the correct polarity connecting the battery charger. In case of wrong connection you could cause severe damages to the battery charger connected.
Protect the charger from dust, damp, rain, heat (e.g. direct sunshine) and vibration. It should only be operated in dry, indoor conditions.
The case surface serves to cool the charger and must not be covered or enclosed; cooling air must be able to circulate unhindered.
Do not leave the charger running unsupervised.
Power supply may become warm during use or emit a slight buzzing sound, this is normal and can be disregarded.
Do not attempt to open the casing, as there are no user serviceable parts inside, and this may void the warranty.
For indoor use only.
The following types of battery must not be connected to the charger:
- Faulty, damaged or hot batteries
- NiMH or NiCd batteries
- Non-rechargeable batteries (dry cells)
6. Caution: explosion hazard!
- Batteries which are not expressly stated by the manufacture to be suitable for the currents which the unit produces during the charge process.
- Batteries which are already fully charged or hot, or only partially discharged.
- Batteries fitted with an integral charge circuit or charge termination circuit.
Graupner GmbH & Co.KG, Henriettenstr. 94-96, 73230 Kirchheim/Teck, Germany
Declaration of Conformity
We hereby certify that the product designated in the following: Order Nr: 6461
complies with the essential safety requirements as laid down in the Outlines of the Council for the Adaptation of Legal Regulations for Electro-Magnetic Compatibility (89/336/EWG) and (73/23/EWG) LVD in its member states.
In assessing the electro-magnetic compatibility of this product the following norms have been applied: EN 61558-1 LVD EN 61558-2-17 LVD
This declaration of responsibility has been issued in accordance with the producer/importer Graupner GmbH & Co. KG Henriettenstr. 94-96 73230 Kirchheim/Teck
by Managing Director
73230 Kirchheim/Teck signed on 21.10.2008

text_image
d.h. BagnereSignature
When this product comes to the end of its useful life, you must not dispose of it in the ordinary domestic waste. The correct method of disposal is to take it to your local collection point for recycling electrical and electronic equipment. The symbol shown here, which may be found on the product itself, in the operating instructions or on the packaging, indicates that this is the case.
Individual markings indicate which materials can be recycled and re-used. You can make an important contribution to the protection of our common environment by re-using the product, recycling the basic materials or recycling redundant equipment in other ways.
Remove batteries from your device and dispose of them at your local collection point for batteries.
In case of R/C models, you have to remove electronic parts like servos, receiver, or speed controller from the product in question, and these parts must be disposed of with a corresponding collection point for electrical scrap.
If you don't know the location of your nearest disposal centre, please enquire at your local council office.