KH 2295 - Alarm clock radio EBENCH - Free user manual and instructions
Find the device manual for free KH 2295 EBENCH in PDF.
| Product type | RDS radio alarm clock |
| Brand | EBENCH |
| Model | KH 2295 |
| Power supply | 230 V ~ 50 Hz, 5 W |
| Radio frequency range | FM 87.5 - 108.5 MHz |
| Main functions | FM RDS radio, dual alarm, snooze, sleep timer, nap timer, appointment reminder, automatic time setting via RDS |
| Number of radio presets | 50 stations |
| Display | Date, time, frequency, RDS station name, adjustable in two brightness levels |
| Connectivity | 3.5 mm headphone jack, FM wire antenna |
| Alarm | Two independent alarms, choice of radio, buzzer or both |
| Snooze function | Alarm interruption for about 9 minutes |
| Timers | Sleep (0-120 min), Nap (0-120 min), Appointment reminder (5 memories) |
| Time setting | Automatic via RDS or manual |
| Key lock | Yes, to prevent accidental operation |
| Cleaning | Slightly damp cloth, avoid moisture inside |
| Safety | Do not expose to moisture, do not cover openings, unplug during thunderstorms, do not open the housing |
| General information | Household use only, no user-serviceable parts, warranty via provided card |
Frequently Asked Questions - KH 2295 EBENCH
User questions about KH 2295 EBENCH
0 question about this device. Answer the ones you know or ask your own.
Ask a new question about this device
Download the instructions for your Alarm clock radio in PDF format for free! Find your manual KH 2295 - EBENCH and take your electronic device back in hand. On this page are published all the documents necessary for the use of your device. KH 2295 by EBENCH.
USER MANUAL KH 2295 EBENCH
- Intended use 7
- Technical data 7
- Safety Instructions 7
- Items supplied 8
- Operating elements and displays 9
6.Preparing the RDS Radio Alarm for operation 10 - Setting the date and time 10
7.1 Automatic setting of the date and time 10
7.2 Manual setting of the date and time 11
- Using the RDS Radio Alarm. 12
8.1 Using the radio of the RDS Radio Alarm 12
8.1.1 Using the automatic radio station scanner 12
8.1.2 Manually setting and saving radio stations 12
8.1.3 Selecting saved radio stations 13
8.1.4 Using the review function for saved radio stations 14
8.1.5 Adjusting the volume 14
8.1.6 Improving the reception of VHF/FM radio stations 14
8.2 Using the alarm function 14
8.2.1 Programming alarm times 14
8.2.2 Switching the alarm standby on/off 16
8.2.3 Ending the alarm process 16
8.2.4 Using the snooze function (alarm interruption) 16
8.2.5 Switching off the alarm function for the weekend 16
8.3 Using the timer functions of the RDS Radio Alarm 17
8.3.1 Programming the sleep timer 17
8.3.2 Programming the appointment timer ("Special Day Alert") 17
8.3.3 Programming the Nap Timer 18
- Adjusting the display brightness 18
- Returning the RDS Radio Alarm to factory settings 19
-
Switching on the button lock 19
-
Connecting headphones to the RDS Radio Alarm 19
- Cleaning the RDS Radio Alarm 19
- Troubleshooting 19
14.1 The RDS Radio Alarm shows no functions 19
14.2 No or poor reception of VHF/FM radio stations 20
14.3 No sound 20
14.4 Other malfunctions 20
- Disposal 20
16.Warranty & Service. 21
17.Importer 21
RDS Radio Alarm E-Bench KH 2295
1. Intended use
The RDS Radio Alarm is intended exclusively ...
for the reception of VHF/FM radio stations
as an alarm
for stationary operation in covered areas
for private, non-commercial applications.
2. Technical data
Power supply:
230V /50Hz,5W
Reception range UKW/FM:
87,5-108,5MHz
3. Safety Instructions
Read the operating instructions carefully before using the appliance for the first time and preserve this booklet for later reference. Pass this booklet on to whoever might acquire the appliance at a future date.

Danger!
Should moisture/water permeate into the RDS Radio Alarm, ...
there is the risk of receiving an electric shock!
it could be irreparably damaged!
Thus:
DO NOT use or store the RDS Radio Alarm ...
in moist environments!
in close proximity to water! Additionally, NEVER subject the RDS Radio Alarm to spray or rain water.
Never place water-filled receptacles on the RDS Radio Alarm!
Exposure to strong heat sources can lead to an overheating of the RDS Radio Alarm and to the melting of plastic parts. This could irreparably damage the RDS Radio Alarm, and there is the additional risk of a fire! Thus:
Do not place the RDS Radio Alarm in close adjacency to sources of heat.
Do not place any open fire sources - e.g. burning candles - on the RDS Radio Alarm!
Do not cover the ventilation openings of the RDS-Radio Alarm! Consequently, do not place the RDS Radio Alarm on blankets or other textiles. Ensure that the ventilation openings are a minimum distance of 10~cm away from walls or large objects.
Do not use or store the RDS Radio Alarm in dusty environments. Otherwise dust could penetrate into the RDS Radio Alarm. If large quantities of dust enter into the RDS Radio Alarm it could overheat and be irreparably damaged. There is also the risk of a fire!
In the case of a defect, never attempt to repair the power cable yourself! There is the risk of receiving an electric shock! Instead, consult our service partner responsible for your country. Contact information for our service partners is
given in the warranty card. The warranty card is supplied with the appliance.

Danger!
Equipment connected to a power supply can be damaged during a thunderstorm. Thus:
During a thunderstorm, always remove the plug from the power socket.
The power socket should be close to the appliance and easily accessible, so that the plug can be quickly removed in the event of danger.

Caution!
The power socket to which the RDS Radio Alarm is connected must at all times be easily accessible. The plug can then be quickly removed in the event of technical problems.
The RDS Radio Alarm can be irreparably damaged if it falls or is dropped! Always place the RDS Radio Alarm on a firm, level and non-slip surface.
Bear in mind when selecting a position for the RDS Radio Alarm: Modern furniture is treated with a multitude of paints, polishes and other surface finishings. It is possible that through these the feet of the RDS Radio Alarm could be compromised. Then, residues could remain on the furniture surface, which may possibly not be removable. In cases of doubt, protect the furniture surface by placing the RDS Radio Alarm on a thin covering.

Note:
For damage resulting from ...
opening the housing of the RDS Radio Alarm
repairs attempted by unqualified persons
→ improper use of the RDS Radio Alarm
no liability or warranty will be accepted!
The RDS Radio Alarm becomes warm when switched-on. This is not a cause for concern and is not an indication of a technical problem.
4. Items supplied
RDS Radio Alarm KH 2295
Operating instructions
Warranty card
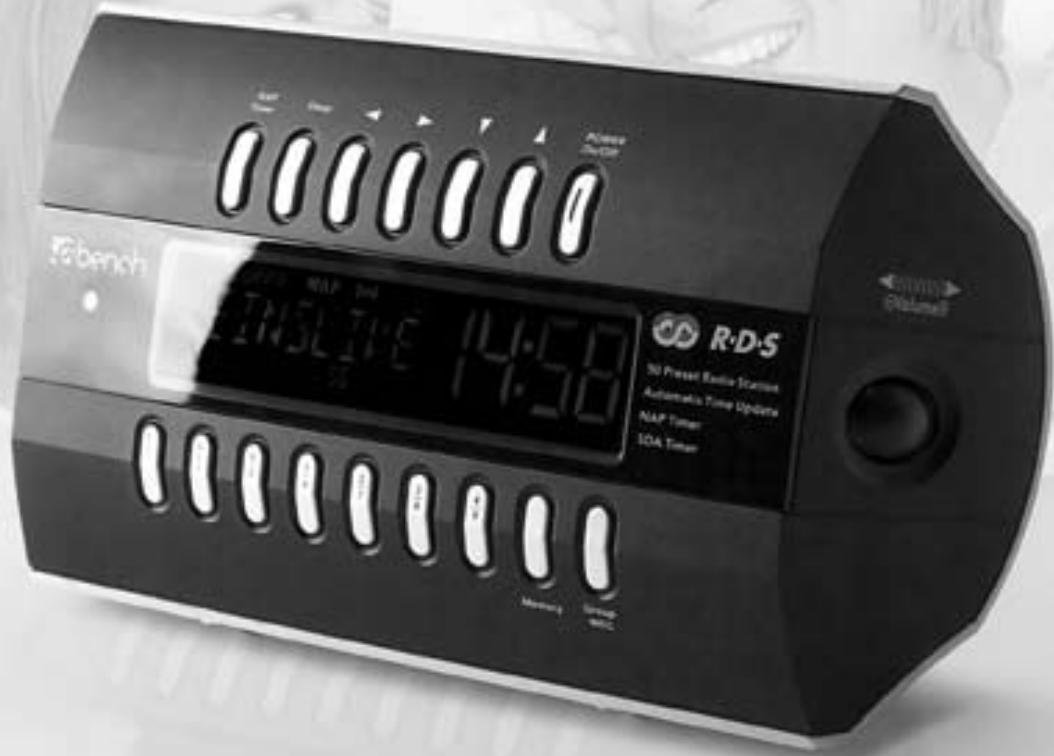
5. Operating elements and displays
① Headphone connection socket "Earphone" for the connection of headphones with a 3,5 mm jackplug
② Operational state display
③ Button “SNOOZE” for short term interruption of the alarm signal
④ Volume controller "Volume"
⑤ Button “NAP Timer” to activate adjustment of the siesta timer
⑥ Button “Sleep” to activate programming of the sleep timer
⑦ Button Navigation button left for diverse adjustments of the tunings of the RDS Radio Alarm
⑧ Button Navigation button right for diverse adjustments of the tunings of the RDS Radio Alarm
9 Button Navigation button downwards for diverse adjustments of the tunings of the RDS Radio Alarm
10 Button Navigation button upwards for diverse adjustments of the tunings of the RDS Radio Alarm
⑪ Button“POWEROn/Off”:
a) to switch the RDS Radio Alarm on from the Standby mode
b) to switch the RDS Radio Alarm off and into the Standby mode
c) to switch off the alarm process
12 Display
⑬ Button “Group WEC”
a) to switch the alarm readiness on/off for weekends
b) to select a programme-position group
⑭ Button “Memory”
a) to save the currently tuned radio station to a programme-position
b) to activate and save the time setting
⑮ Button "4/9"
a) for the selection of programme-positions
b) for the selection of programme-positions for appointment reminders
⑥ Button "3/8"
Functions as per button "4/9" ⑮
⑦ Button "2/7"
Functions as per button "4/9" ⑮
⑱ Button "1/6"
Functions as per button "4/9" ⑤
19 Button "0/5"
Functions as per button "4/9" ⑤
20 Button "AL2"
to activate the programming of alarm time 2
② Button "AL1"
a) to activate the programming of alarm time 1
b) to activate the review function for saved radio stations
② Sensor for automatic brightness regulation
② Power cable
24 VHF/FM wire aerial
for the reception of VHF/FM radio stations
② Button“Reset”
for returning to the factory settings
6. Preparing the RDS Radio Alarm for operation
1 Carefully take the RDS Radio Alarm out of the packaging.
Attention!
Do not allow the RDS Radio Alarm to fall! It could become irreparably damaged.
2 Place the RDS Radio Alarm only on a level, scratch resistant and non-slip surface.
The feet on the rear of the RDS Radio Alarm can be adjusted to three levels. You can thus set the slant of the RDS Radio Alarm to your wishes. However, ensure that both feet are adjusted to the same angle. Otherwise the RDS Radio Alarm will be unstable and could fall down.
3 Unwind the power cable ② to its full length. Insert the plug into a power socket. The display ⑫ will light up. The automatic station scanner starts, visible in the running of the frequencies in the display ⑫ . This takes about 30 seconds.
After this, the RDS Radio Alarm is ready for operation.
7. Setting the date and time
7.1 Automatic setting of the date and time
The clock of the RDS Radio Alarm is fitted with automatic time and date adjustment by means of RDS. It equalises running errors and also the change over from summer to winter time (and back again).
Notice:
RDS means "Radio Data System". It is a system for transmitting additional information with radio programmes. Additional information is for example the name of the station, which is shown in the display of the RDS receiver. Additionally, the RDS Radio Alarm uses RDS for the reception of time signals for the automatic adjustment of time and date settings.
After insertion of the plug in the power socket the radio of the RDS Radio Alarm is switched on. The automatic station scanner starts for several seconds, recognisable in the running of the frequencies in the display ⑫. Subsequently it breaks off the station scan; shown in the display ⑫ are the date "01-01-07" and the time "0:00". After a few seconds the time display changes over "1:00" and "1:59" to "2:00". The station scanner starts again; the clock in the radio alarm is now trying to receive date and time information over RDS. The clock symbol in the display blinks until a stable RDS reception is available. This can take several minutes. When time and date information is received, the radio switches itself off for the moment. In the display the current date and the current time is then displayed.
Notice:
In general, the date is only shown in the display when the radio is switched off.
After a few seconds the automatic station scanner starts again. The radio scans the frequency range for receivable VHF/FM radio stations and saves them automatically to fixed programme positions. Thereby, the clock symbol blinks in the display ② again.
As soon as the frequency ranges are fully scanned, the radio remains switched on; the last-saved radio station is playing.
Should no time or date information be received by means of RDS, there begins ...
the time display from the pre-programmed time "2:00"
the date display from the pre-programmed date "01-01-07".
In these cases you can ...
search for an RDS radio station manually. This is explained in chapter 8.1.2 "Manually setting and saving radio stations".
select an RDS radio station from those automatically saved to the fixed programme positions. This is explained in chapter 8.1.3 "Selecting saved radio stations".
alternatively, you can set the time and date manually. This is explained in chapter 7.2 "Manual setting of the date and time".
7.2 Manual setting of the date and time

Notice:
Manual time and date settings are corrected automatically as soon as an RDS radio station is received in radio operation.

Notice:
In carrying out the steps 2 to 9, you have ca. ten seconds for each one. If one step is delayed, you must start again from step 1.
1 Switch the RDS Radio Alarm off by pressing the button "POWER On/Off" ⑩
2 Press the button "Memory" ⑭ once. In the display ⑫ the hour indicator blinks.
3 Set the hour indicator by pressing the buttons ⑨ resp. ⑩. Subsequently press the button ⑧ to change to the setting of the minutes indicator. The minute indicator is now blinking.
4 Set the minute indicator by pressing the buttons ⑨ resp. ⑩
5 Press the button "Memory" ④ again once. In the display ② the day indicator for the date blinks. Set the day indicator by pressing the buttons ⑨ resp. ⑩ . The weekday indication before the date indication is automatically adapted for the set date display. The abbreviations in the display ⑫ stand for the following weekdays:
| MON | Monday |
| TUE | Tuesday |
| WED | Wednesday |
| THU | Thursday |
| FRI | Friday |
| SAT | Saturday |
| SUN | Sunday |
6 Press the button ⑧ to change to the setting of the month indicator. The month indicator now blinks.
7 Set the month indicator by pressing the buttons ⑨ resp. ⑩.
Press the button again to change to the setting of the year indicator. The year indicator now blinks.
9 Set the year indicator by pressing the buttons ⑨ resp. ⑩.
10 Press the button "Memory" ⑭ again once. In the display ⑫ "24HR" blinks. 24HR indicates the 24 hour display format, as used in the majority of the European and Asian countries.
To change to the 12 hour AM/PM display format, typical in the USA: Press the button resp. once. In the display ⑫ "12HR" blinks, the time is now shown in the 12 hour display format.
With the buttons ⑨ resp. ⑩ you can switch between both display formats.
11 When the desired indicator format is blinking in the display ②: Wait for ca. 10 seconds, without pressing a button. The display ② returns to its normal status; the time is now shown in the selected display format. The date is only shown when the radio is switched off.
8. Using the RDS Radio Alarm
8.1 Using the radio of the RDS Radio Alarm
The RDS Radio Alarm is fitted with an automatic station scanner with an automatic save function. The station scanner starts automatically, as soon as the RDS Radio Alarm is connected to mains power. If you would like to use the station scanner again at a later time:
8.1.1 Using the automatic radio station scanner
With the radio switched on, hold the button "Memory" ⑭ pressed down for ca. three seconds. The automatic station scanner now starts; Stations with sufficient reception strength are now automatically saved to fixed programme positions.
8.1.2 Manually setting and saving radio stations
If you wish to save other radio stations additionally to the ones automatically saved to fixed programme positions:
1 Search for a radio station with the buttons ⑨ resp. ⑩. With each press of the key you will shift the frequency in steps of 50kHz
Alternatively, you can also keep the buttons resp. pressed for a short period; this starts the manual station scanner. If a station is found with sufficient reception strength, the station scanner stops.
If a radio station you are searching for is being received, you can save it to one of the 50 fixed programme positions. Additionally:

Note:
To carry out the steps 2 to 4 you have ca. 5 seconds for each step. If one step is delayed, you must start again from step 2.
2 Press the button "Memory" ⑭ once. In the display ⑫ a two-figure programme position number as well as "GROUP" is shown, the clock symbol and "MEM" are blinking. To designate a programme position number for the tuned radio station:
3 First of all select the number for the first digit of the programme position number. For this, repeatedly press the button "Group WEC" ⑬. As soon as the desired figure for the first digit of the programme position is shown in the display ⑫:
4 Select the figure for the second digit of the two-figure programme position number. Repeatedly press the buttons "0/5" to "4/9". The buttons have the following functions:
Button "0/5" 19 - for selection of 0 resp. 5 as the second digit of the programme position
Button "1/6" ⑱ - for selection of 1 resp. 6 as the second digit of the programme position
Button "2/7" 1 - for selection of 2 resp. 7 as the second digit of the programme position
Button "3/8" ⑥ - for selection of 3 resp. 8 as the second digit of the programme position
Button "4/9" ⑤ - for selection of 4 resp. 9 as the second digit of the programme position
When the desired programme position number for the tuned radio station is shown in the display ⑫:
5 Press the button "Memory" again once. In the display 12 the programme position number is shown in addition to the station frequency details, "MEM" no longer blinks. With RDS radio stations the station name and additionally the RDS logo is shown instead of the frequency and the programme position. To show the frequency and programme position of RDS radio stations during their reception: Press once on the button "Memory" 14. The frequency and programme position of the tuned station is then shown in the display 12 for ca. 5 seconds.
The radio station is now saved to the shown programme position.
8.1.3 Selecting saved radio stations
Select a radio station from the stations automatically saved to the fixed programme positions. There are 50 fixed programme positions, beginning with programme position 10 and ending with programme position 59.
If you wish to receive the time signal, to automatically adjust the time and date: Select an RDS radio station, which is recognisable from the RDS logo shown in the display ②.
To select the programme position of a radio station:
1 First of all select the first digit of the programme position number of the desired radio station. For this, repeatedly press the button "Group WEC" ⑬. As soon as the desired figure for the first digit of the programme position is shown in in the display ⑫:
2 Select the figure for the second digit of the two-figure programme position number. Repeatedly press the buttons "0/5" to "4/9". The buttons have the following functions:
Button "0/5" 19 - for selection of 0 resp. 5 as the second digit of the programme position
Button "1/6" ⑱ - for selection of 1 resp. 6 as the second digit of the programme position
Button "2/7" 1 - for selection of 2 resp. 7 as the second digit of the programme position
Button "3/8" 16 - for selection of 3 resp. 8 as the second digit of the programme position
Button "4/9" ⑤ - for selection of 4 resp. 9 as the second digit of the programme position
The radio station saved to the selected programme position is now played back. In the display ② is shown the programme position number of the radio station in addition to the frequency details. With the relocation of an RDS radio station, after a few seconds the station name is shown instead of frequency and programme position number. To show the frequency and programme position of RDS radio stations during their reception: Press once on the button "Memory" ④. The frequency and programme position of the tuned station is then shown in the display ⑫ for ca. five seconds.
Example:
To select the radio station saved at programme position 26:
1 Repeatedly press the button "Group WEC" ⑬. As soon as a radio station in the programme position group 20 (20 bis 29) is shown in the display ⑫:
2 Repeatedly press the button "1/6" until programme position 26 is shown in the display ⑫.
8.1.4 Using the review function for saved radio stations
With the review function you can acquire an overview of all saved radio stations. To do this:
1 With the radio switched on, hold down the button "AL1" ①. All of the saved radio stations of the current programme position group are now shown one after the other for about five seconds. The programme position numbers of the currently reviewed radio stations are each shown in the display ②. If you wish to review the stations from other programme position groups:
2 Press the button "Group WEC" ③ once to change to another programme group.
3 To end the review function: Switch the radio off by pressing the button "POWER On/Off" ⑪.
8.1.5 Adjusting the volume
You can adjust the sound volume of the radio with the controller "Volume" ④.
1 To raise the sound volume level: Turn the controller "Volume" ④ to the right, in the direction of the symbol
2 To reduce the sound volume level: Turn the controller "Volume" ④ to the left, in the direction of the symbol .
When turning the volume controller, the current volume level is faded in shortly in the display ②. The maximum volume level is shown at "V30", the minimum level (muting) with "V00".
8.1.6 Improving the reception of VHF/FM radio stations
The RDS Radio Alarm has a wire aerial ② for the VHF/FM frequency ranges. To improve the reception of VHF/FM stations:
Move the wire aerial slowly in various directions, horizontally and vertically. When you have found a position that gives good reception of the tuned radio station: Fix the wire aerial in this position, e.g. with a piece of sellotape.
8.2 Using the alarm function
8.2.1 Programming alarm times
The RDS radio alarm has two separately programmable alarm times available: AL1 and AL2. To programme an alarm time:
1 Should the RDS Radio Alarm be switched on: First of all switch it off by pressing the button "POWER On/Off" ⑪. Keep the button "AL1" ⑫ pressed for ca. two seconds. Shown in the display ⑫ is:
"ALARM"
the symbol for alarm time 1
the currently programmed alarm time AL1
the abbreviation of the next weekday to which the alarm time is activated. The abbreviations in the display ② stand for the following weekdays:
MON Monday
TUE Tuesday
WED Wednesday
THU Thursday
FRI Friday
SAT Saturday
SUN Sunday

Note:
To carry out the steps 2 to 7 you have ca. ten seconds for each step. If one step is delayed, you must start again from step 2.
2 Press the button "AL1" again. On the lower edge of the display the abbreviations for all seven weekdays are shown.
3 Press the button once. The hour indicator of the alarm time starts to blink.
4 Programme the hour indicator for the desired alarm time. To do this, press the buttons ⑨ resp. 10.
5 Press the button again to change to programming the minute indicator. The minute indicator for the alarm time starts to blink.
6 Programme the minute indicator for the desired alarm time. To do this, press the buttons ⑨ resp. ⑩.
7 Press the button again to change to programming the weekday. Blinking in the display are "ON" and "MON". Here you can individually activate or deactivate the programmed alarm time for all weekdays:
By pressing the buttons ⑦ resp. ⑧ you can switch through the weekdays. The weekday just selected blinks in the display ②
By pressing the buttons resp. you can switch between the setting "ON" and "OFF" for the just selected weekday. The
just selected setting blinks in the display ⑫. With the setting "ON", the alarm is switched on to the programmed alarm time on the selected weekday. With the setting "OFF", the alarm is not switched on on the selected weekday.
Finally you must programme the type of alarm call required. Three types of alarm call are available:
Alarm call; radio: At the programmed alarm time on the selected weekday the radio switches itself on as the alarm signal. Thereby, the last radio station it was tuned to is switched on. The radio remains switched on for 60 minutes.
Alarm call; alarm-tone: At the programmed alarm time on the selected weekday the alarm-tone switches itself on as the alarm signal. The sound volume of the alarm tone rises gradually. The alarm tone remains switched on for ten minutes.
Alarm call; alarm tone and radio: At the programmed alarm time on the selected weekday the alarm-tone switches itself on for ten minutes. The sound volume of the alarm tone rises gradually. Subsequently, the radio switches itself on for ten minutes. Thereby, the last radio station it was tuned to is switched on.
The currently selected alarm call type is shown in the display ⑫ through the following symbols:
1 resp. 2 for alarm call; RDS radio alarm
1 resp. 2 for alarm call; alarm-tone
1 resp. 2 for alarm call; alarm tone and radio
To programme the alarm call type:
Press the button "AL1" once. In the display ⑫ the RDS radio alarm symbol for the alarm call type Radio blinks. Press the buttons ⑨ resp. ⑩ to switch between the three alarm call types.
9 When you have selected the desired alarm call type: Press the button "AL1" ② once. The programming for alarm time 1 is now saved.
The RDS Radio Alarm is now in alarm standby; shown in the display ⑫ after a few seconds are:
"ALARM"
the symbol for the programmed alarm call type
the programmed alarm time
the abbreviation for the next weekday on which the alarm function will be switched on.
If you would like to programme a second alarm time (AL2): Follow the steps 1 to 9 in this chapter. However, at the steps 1, 2, 8 and 9 press the button "AL2" ② instead of the button "AL1" ②
8.2.2 Switching the alarm standby on/off
To switch the alarm standby off: With the radio switched off, press and hold the button ...
"AL1" ② to switch off alarm time 1
"AL2" to switch off alarm time 2.
In the display the indicators extinguish for ...
"ALARM"
the symbol for the programmed alarm call type
the programmed alarm time
the abbreviation for the next weekday on which the alarm function will be switched on.
To switch the alarm standby back on: Once again press the buttons "AL1" ② resp. "AL2" ②0.
8.2.3 Ending the alarm process
To end the alarm process when the alarm signal sounds: Press the button "POWER On/Off" ①.
8.2.4 Using the snooze function (alarm interruption)
You can interrupt the alarm signal by pressing once on the button "SNOOZE" ③. The operational state display ② now blinks. After ca. 9 minutes the alarm call sounds again. If you wish to interrupt the alarm signal once more, press the button "SNOOZE" ③ again. The alarm signal can be interrupted any number of times.

Note:
The alarm call interruption functions with all three alarm call types. With the alarm call type "Radio and alarm tone", pressing the button "SNOOZE" ③ interrupts the alarm tone. After ca. 9 seconds it sounds again. If the alarm tone is not interrupted, it sound for ca. 10 minutes. Subsequently the radio switches itself on as the alarm signal. If the button "SNOOZE" ③ is now pressed, the radio is switched off. However, after ca. 9 minutes the alarm tone sounds again.
8.2.5 Switching off the alarm function for the weekend
To switch off the alarm function for weekends:
1 With the radio switched off, press the button "Group WEC" once. ⑬. In the display ⑫ "WEC" is shown. The alarm functions are now switched off for weekends.
2 To switch the alarm functions for weekends back on again: Press the button "Group WEC" ⑬ once more. In the display ⑫ the indicator "WEC" extinguishes.
8.3 Using the timer functions of the RDS Radio Alarm
8.3.1 Programming the sleep timer
With the sleep timer switched on, the radio automatically switches itself off after a programmed period of time. This facility can be used if you like to listen to music to help you fall asleep.
To programme the sleep timer:
1 Press the button "Sleep" ⑥ once. If you press the button "Sleep" ⑥ with the radio switched off, it switches itself on. Blinking in the display ② are the bed indicator, "60" and the clock symbol.
2 Programme in the desired period until switch off of the radio. Timespans between 0 and 120 minutes are available. To do this, press the buttons ⑨ resp. ⑩ . With each press of the buttons you increase or decrease the indicated timespan by ten minutes. If you select "00" as the timespan, the radio switches itself off after a few seconds without pressing a button.
3 Press the button "Sleep" ⑥ once more to confirm the programming. The radio now switches itself off automatically on expiry of the programmed timespan. The time remaining before automatic switch off is shown in the display ⑫.
4 To switch off the sleep timer: Hold the button "Sleep" ⑥ pressed down until the radio switches off. The bed symbol and the time-span indicator extinguish.
8.3.2 Programming the appointment timer ("Special Day Alert")
With the appointment timer you can remind yourself of important dates/times. The RDS Radio Alarm offers five memory slots ("SDA1" to "SDA0") for appointments. To programme the appointment timer:

Note:
To carry out the steps 1 to 8 you have ca. ten seconds for each step. If one step is delayed, you must start again from step 1.
1 With the radio switched off, press the button "Memory" four times. In the display there now blinks in rotation the date indicator "31-12-06" and "SDA1".
2 Press the button once. In the display ② the date indicator "31" now blinks.
3 By pressing the buttons ⑨ resp. ⑩, programme the desired day. The weekday details are thereby automatically modified to the programmed day.
4 Press the button once more. In the display 12 the month indicator "12" now blinks.
5 By pressing the buttons ⑨ resp. 10 programme the desired month. The weekday details are thereby automatically modified to the programmed month.
6 Press the button once more. In the display ⑫ the year indicator "06" now blinks.
7 By pressing the buttons resp. programme the desired year.
Press the button "Memory" ④ once to confirm the programming.
On the selected date the alarm tone of the RDS Radio Alarm reminds you of the programmed appointment. The reminder sounds hourly between 08:00 and 23:00. Thereby, the alarm tone remains switched on for 10 minutes. To interrupt the alarm tone: Press any button. The alarm tone sounds again on the next full hour (and each following full hour on this day).
To programme additional appointment reminders:
Follow the steps 1 to 8 in this chapter. However, before carrying out step 2 press once on ...
the button "2/7" 1 , to select the second memory slot ("SDA2") for appointments.
the button "3/8" ⑥, to select the third memory slot ("SDA3") for appointments.
the button "4/9" ⑤, to select the fourth memory slot ("SDA4") for appointments.
the button "0/5" ⑲, to select the fifth memory slot ("SDA0") for appointments.
The individually selected memory slot then blinks in rotation with the date indicator "31-12-06" in the display ②.
Subsequently, continue with further steps as described.
8.3.3 Programming the Nap Timer
With the so called "Nap Timer" you can arrange an alarm call after a short pause or a reminder for an appointment. You can programme time periods between 0 and 120 minutes until switch on of the reminder alarm. To programme the Nap Timer:
Press the "NAP Timer" button ⑤ once. In the display ⑫ "NAP" and "60" are blinking.
2 Programme the desired time interval until activation of the reminder alarm. Time intervals between 0 and 120 minutes are available. To do this, press the buttons ⑨ resp. ⑩ . With each press of the buttons you increase or decrease the indicated timespan by ten minutes.
3 Press the button "NAP Timer" ⑤ once more to confirm the programming.
The reminder alarm call sounds when the selected timespan has elapsed. The time remaining to the reminder alarm call and "NAP" are shown in the display ②. Until switch on of the reminder alarm call the operational state display ② blinks.
4 To switch off the Nap Timer: Hold the button "NAP Timer" ⑤ pressed down; "NAP" and the indicator for the timespan in the display ② extinguish.
9. Adjusting the display brightness
The brightness of the display ⑫ can be adjusted in two levels. This functions with both a switched on and a switched off radio. For this:
1 Hold the button "SNOOZE" ③ pressed for ca. three seconds, until the display brightness has diminished.
2 To raise the display brightness again: Once again hold the button "SNOOZE" ③ pressed down for ca. three seconds.
10. Returning the RDS Radio Alarm to factory settings
To return the RDS Radio Alarm to factory settings and to erase all programming that has been carried out:
1 Turn the RDS Radio Alarm so that the underside of it is visible to you.
2 With a pen/pencil (or other sharp pointed object) press the button "Reset" ⑤. The display extinguishes for several seconds, afterwards the automatic station scanning starts. The RDS Radio Alarm is now returned to the factory settings.
11. Switching on the button lock
To avoid an unintentional operation of the buttons of the RDS Radio Alarm, you can activate the button lock. This functions with both a switched on and a switched off radio. To do this:
1 Hold the button < ⑦ pressed down until "LOCK" appears in the display ②. The button lock is now activated. The button lock blocks the operation of all buttons; excluded are only the buttons < ⑦ (to deactivate the button lock) and "SNOOZE" ③.
2 To deactivate the button lock: Hold the button < ① pressed down until "UNLOCK" is shown in the display ②.
12. Connecting headphones to the RDS Radio Alarm
If you would like to connect headphones to the RDS Radio Alarm: Insert the 3,5mm jackplug of
the headphones into the headphone connection socket "Earphone" ①. The loudspeakers of the RDS Radio Alarm are automatically switched off with the connection of headphones. The headphone sound volume is to be adjusted with the volume controller "Volume" ④.
Danger!
Too frequent listening to music at high volume levels using headphones can cause hearing damage.
13. Cleaning the RDS Radio Alarm
Clean the housing and display of the RDS Radio Alarm with a lightly moistened cloth only. The display could be scratched if you use a dry cloth. In the case of stubborn stains, pour a few drops of mild detergent on the damp cloth.
Attention:
Take steps to ensure that no moisture permeates into the RDS Radio Alarm when cleaning it! There is the danger of receiving an electric shock!
14. Troubleshooting
14.1 The RDS Radio Alarm shows no functions
A Check to see that the power cable ② is correctly inserted into the power socket.
B Check to see that the power socket into which the power cable is inserted is "live". Connect a known working appliance to the power socket.
C Check to see if the button lock of the RDS Radio Alarm is activated. See chapter 11. "Switching on the button lock".
D Disconnect the RDS Radio Alarm from the power supply. Wait a few seconds, then reconnect it. Check to see if the malfunction is still extant.

Note:
Be aware that programming already carried out on the RDS Radio Alarm will be erased.
14.2 No or poor reception of VHF/FM radio stations
A Carry out the steps described in chapter 8.1.6 "Improving the reception of VHF/FM radio stations".
B Search for a radio station with better reception. This is explained in the chapters ...
8.1.1 "Using the automatic radio station scanner"
8.1.2 "Manually setting and saving radio stations"
8.1.3 "Selecting saved radio stations"
14.3 No sound
A Increase the sound volume level by turning the volume controller "Volume" ④ to the right.
B Check to see if headphones are connected to the RDS Radio Alarm. Connecting headphones to the RDS Radio Alarm automatically switches off the built-in loudspeakers.
14.4 Other malfunctions
Consult our service partner responsible for your country if ...
the measures described in chapter 14. "Troubleshooting" do not eliminate the problem or
other malfunctions occur during operation of the RDS Radio Alarm.
Contact information for our service partners is given in the warranty card. The warranty card is supplied with the appliance.

Danger!
In the case of a defect, never attempt to repair the power cable yourself! There is the danger of receiving an electric shock! Instead consult our service partner responsible for your country.

Warning!
The RDS Radio Alarm does not contain any user-serviceable parts. If the housing of the RDS Radio Alarm is opened, the warranty expires! For repairs which may be needed, consult our service partner responsible for your country.

Note:
For damage resulting from ...
opening the housing of the RDS Radio Alarm
repairs attempted by unqualified persons
improper use of the RDS Radio Alarm
no liability or warranty will be accepted!
15. Disposal

Do not dispose of the appliance in your normal domestic waste.
Dispose of the appliance through an approved disposal centre or at your community waste facility.
Observe the currently applicable regulations. In case of doubt, please contact your local waste disposal centre.
16. Warranty & Service
Please read the conditions for warranty and take note of the service centre addresses given on the warranty card.
17. Importer
Kompernaß GmbH
Burgstraße 21
D-44867 Bochum
www.kompernass.com