
KH 2249 - Radio EBENCH - Free user manual and instructions
Find the device manual for free KH 2249 EBENCH in PDF.
| Brand | EBENCH |
| Model | KH 2249 |
| Product type | Portable radio with alarm |
| Power supply | 3 AA/LR6 batteries (4.5 V DC) or mains adapter 230 V / 50 Hz, output 4.5 V DC min. 180 mA |
| FM frequency range | 87.5 - 108 MHz |
| AM frequency range | 540 - 1600 kHz |
| Dimensions (approx.) | 200 x 120 x 70 mm |
| Weight (approx.) | 500 g (with batteries) |
| Display | Digital screen with backlight |
| Alarm function | Programmable alarm with radio or buzzer |
| Night light function | Screen illumination via Light button |
| Time display | 12h or 24h format with date and seconds |
| Hourly signal | Hourly chime (activatable/deactivatable) |
| FM antenna | Telescopic |
| AM antenna | Built-in |
| Volume control | Combined On/Off volume dial |
| Frequency tuning | Tuning dial |
| Maintenance and cleaning | Slightly damp cloth; do not let moisture penetrate |
| Safety | Do not expose to water, excessive heat or shocks; do not open the casing |
| Spare parts and repairability | No user-serviceable parts; contact customer service |
| Included accessories | Removable stand, user manual, warranty card |
| Warranty | According to the provided warranty card |
Frequently Asked Questions - KH 2249 EBENCH
User questions about KH 2249 EBENCH
0 question about this device. Answer the ones you know or ask your own.
Ask a new question about this device
Download the instructions for your Radio in PDF format for free! Find your manual KH 2249 - EBENCH and take your electronic device back in hand. On this page are published all the documents necessary for the use of your device. KH 2249 by EBENCH.
USER MANUAL KH 2249 EBENCH
Instructions for use

Kompernaß GmbH
Burgstrasse 21
D-44867 Bochum
Deutschland/Germany
www.kompernass.com
| KH 2249 | v.1.1 |
| UK | 08-2006 |
Index
- Safety instructions 4
- Operating controls.. 6
- Scope of delivery 8
- Usage 8
- Technical data 8
6.Preparing the radio for use. 9 - Radio operation 12
- Turning the radio off 14
- Additional radio functions 14
- Cleaning the radio 20
- Troubleshooting 20
12.Disposing of the radio 23
1. Safety instructions

Danger!
Do not place or hang the radio ...
in areas exposed to direct sunlight! Otherwise the radio could overheat and be damaged beyond repair. This could cause a fire!
in the immediate vicinity of heat sources such as ovens, heaters and similar devices or vent openings of other electrical devices! Otherwise the radio could be damaged beyond repair. This could cause a fire!
in damp areas or near water. Otherwise moisture could enter the radio. This could cause danger of electrical shock and fire!

Danger!
The radio can be operated using AC power from a wall outlet with a power cable sold separately. Operating the radio using the wrong power cable could cause risk of electrical shock! The radio could also be damaged beyond repair!
Warning!
The radio contains no user-serviceable parts. The warranty is void if the casing of the radio is opened!
For repairs, please contact our service partner nearest you. You will find the addresses of our service partners on the warranty card. The warranty card is included in delivery of the radio.

Note:
No liability will be taken and no guarantee will be made for damages ...
due to opening the case of the radio
resulting from repair attempts not made by qualified experts
use of the radio for purposes other than intended!

Note:
Battery acid could leak out, especially if the batteries are old. Therefore you should remove all batteries if you do not plan to use the radio for long periods of time. This protects the radio from battery acid leakage.
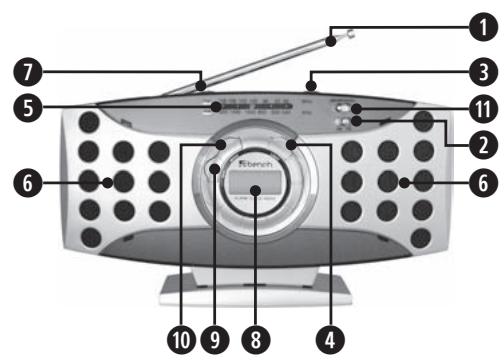
2. Operating controls
Extendable antenna for FM frequency range
Frequency range selection switch
3 Volume control knob / On/Off switch
Light button
5 Frequency range scale
Loudspeakers
Tuning knob
8 Display
Set button
10 Mode button
Automatic alarm switch
Eyelet for wall mounting
13 Battery compartment
14 Removable stand
15 Power cable connection for DC power

3. Scope of delivery
Radio
Removable stand
These instructions for use
Warranty card
4. Usage
The radio is exclusively intended ...
as an entertainment device
as a receiver for medium wave (AM) and frequency modulation (FM) radio stations.
for private non-commercial use.
5. Technical data
Direct Current (DC): 4,5V (3× AA / M gnon batteries) Power supply (Adaptor):
Input: 230V /50Hz
Output: 4,5 V DC, min. 180 mA
FM frequency range: 87,5-108 MHz
AM frequency range: 540-1600 kHz
6. Preparing the radio for use
Carefully remove the radio from the packaging. Do not drop the radio! Otherwise it could be damaged beyond repair. Only place the radio on a level, flat, scratchproof, non-slip surface.
Danger!
Do not place or hang the radio ...
in areas exposed to direct sunlight! Otherwise the radio could overheat and be damaged beyond repair. This could cause a fire!
in the immediate vicinity of heat sources such as ovens, heaters and similar devices or vent openings of other electrical devices! Otherwise the radio could be damaged beyond repair. This could cause a fire!
in damp areas or near water. Otherwise moisture could enter the radio. This could cause danger of electrical shock and fire!
Warning!
Do not place or hang the radio in areas exposed to extreme physical shock or constant vibrations. Physical shock and constant vibrations could lead to malfunctions and long-term damage.
6.1. Positioning the radio
Slide the stand into the stand track on the bottom of the radio. Make sure the stand audibly clicks into the locking unit.
To remove the stand: Carefully push the locking unit on the bottom of the stand towards the back. Then, without letting go of the locking unit, remove the stand from the stand holder.
6.2. Battery-powered operation
To operate the radio using batteries:
1 If the radio is turned on: Turn the volume knob to the right until it stops.
2 If the radio is connected to a power outlet with a power cable: Unplug the power plug from the electrical outlet.
3 Open the battery compartment on the back of the radio.
4 Insert three AA/LR6/Mignon type batteries in the battery compartment. Please insert the batteries in the battery compartment as shown in the picture.
5 Close the battery compartment again. Now the radio is ready for operation.

Note:
The batteries should be replaced if...
playback volume decreases without having adjusted the volume control knob
the sound is distorted during playback or
radio reception is interrupted abruptly.
In order to obtain maximum performance from the radio: always replace all three batteries.
6.3. Operating the radio using an AC power supply
The radio can be operated using AC power from a wall outlet with a power cable sold separately. You can obtain the required cable at any specialist shop. Pay attention to polarity of the power supply. This is printed on the radio casing beside the power input connection for DC power.

Danger!
Operating the radio using the wrong power cable could cause risk of electrical shock! The radio could also be damaged beyond repair!
To operate the radio using a power adapter in a power outlet:
1 If the radio is turned on: Turn the volume knob to the right until it stops.
2 Should batteries already be inserted in the radio: Remove the two lower batteries from the battery compartment. The upper battery must in all cases remain in the appliance, otherwise the clock no longer functions.
3 Plug the power adapter into the radio power input connection.
4 Insert the power cable plug into an electrical outlet. Now the radio is ready for operation.
7. Radio operation
7.1. Receiving radio stations
To receive a radio station:
1 Turn the radio on by turning the volume control to the left. To do this, you have to turn the knob until it stops.
2 Slide the automatic alarm switch to the On position.
3 Switch the frequency range selection switch to the frequency range FM (frequency modulation) or AM (medium wave) as desired.
4 Search for a radio station with good reception by turning the tuning knob. You can see the currently selected frequency on the frequency range scale.
5 Set the desired volume using the volume control knob.
7.2. Improving reception quality of FM radio stations
The radio is equipped with an extendable antenna for the FM frequency range. First extend the antenna to its full length. Turn the antenna until reception of the FM radio station has improved.
7.3. Improving reception quality of AM radio stations
The radio is equipped with an integrated antenna for the AM frequency range. Simply turn the radio until reception of the AM radio station has improved.
8. Turning the radio off
To turn the radio off, turn the volume knob to the right until it stops.
9. Additional radio functions
9.1. Setting the date and time
The time is displayed even when the radio is turned off. Please note that the alarm function only functions properly if the clock has been adjusted to the correct time.
To set up the date:
1 Press the Mode button four times. The currently selected month appears on the display screen.
2 You can set the desired month by repeatedly pressing the Set button.
3 Once you have selected the right month, press the Mode button. The currently selected day will appear on the display screen.
4 You can set the desired day by repeatedly pressing the Set button.
To set the time:
1 Press the Mode button again. The hour display will appear on the display screen and on the right side an A, P or H will be displayed.
You can select whether you want to use the clock in 24-hour or 12-hour display mode.
If an A or a P is displayed on the right side, then the 12-hour (AM/PM) display mode, as common in the USA, is currently active. If P is displayed, then PM will be shown to the left of the hour display on the screen. If an H is displayed on the right side, then the 24-hour display format, as common in most European and Asian countries, is currently active.
2 You can set the desired hour by repeatedly pressing the Set button.
3 Once you have selected the right hour, press the Mode button. Now the minute display will appear.
4 You can set the minute display by repeatedly pressing the Set button.
5 Once you have selected the right minute, press the Mode button.
6 Press the Set button once, the colon blinks again on the display screen. The time is set and will appear on the display screen.
9.2. Using the alarm function
The alarm function can be used to have the radio turn on automatically at a preprogrammed time. This function could be used as an alarm clock for example.
9.2.1. Turning on the alarm function
If you would like to have the alarm play a radio station, please make sure that the radio remains turned on with the volume control knob. Make sure that a radio station is selected and select the appropriate volume.
If the radio has been turned off using the volume control knob, you will hear an alarm sound at the preset time.
1 Press the Mode button. The selected alarm time and AL will appear on the display screen. Upon briefly pressing the Set button, a sound symbol will appear to the right of the time display.
2 Slide the automatic alarm switch to the Auto position. The radio or alarm sound will now be activated at the selected time.
9.2.2. Setting the alarm time
1 To set the desired alarm time: Press the Mode button again briefly. The hour indicator will blink on the display screen. Depending on whether you selected the 12-hour display format or the 24-hour display format upon setting the time: To the right of the hour display ...
A or P will be displayed for the 12-hour display format or
H will be displayed for the 24-hour display format.
2 You can set the desired hour of the alarm time by repeatedly pressing the Set button.
3 Subsequently press the Mode button again to save the desired hour. The minute indicator will blink on the display screen.
4 You can set the desired minute by repeatedly pressing the Set button.
5 Press the Mode button. The adjusted alarm time setting is now saved.
6 To turn the radio off: Slide the automatic alarm switch to the Off position. If you turn off the radio using the volume control knob, then the alarm sound will be activated. Press the Set button to turn off the alarm sound.
9.3. Switching to a different display mode
1 Briefly press the Set button: The selected alarm time will be displayed.

Note:
If you do not press the Set button again within two seconds, then the normal time will be displayed again.
2 Briefly press the Set button again: Now the stored date will be displayed.
3 Briefly press the Set button again: The second display will appear.
You can set up the seconds here: To do this, press the Mode button. The second display begins at 00.
4 To return to the normal display mode, press the Set button.
9.4. Using the illumination function
You can illuminate the display by pressing the Light button. The light will go off as soon as you release the Light button again.
9.5. Setting the Signal Tone
1 Press the button Mode. The time display of the alarm starts to blink.
2 Press the button Set once. The Sound Wave symbol appears in the display. The alarm function is activated.
3 Press the button Set once more. The Bell symbol appears in the display. A signal tone sounds every full hour.
4 To switch off the alarm function, press the button Set once again. The Sound Wave symbol disappears.
5 To switch off the signal tone, press the button Set once again The Bell symbol disappears.
10. Cleaning the radio
Clean the radio casing only using a slightly damp cloth. To remove persistent dirt, add a few drops of mild dishwashing liquid to the damp cloth. When cleaning the device, make sure that no moisture seeps into the radio!
Warning!
If moisture enters the radio, it could cause electric shock and a fire!
11.Troubleshooting
11.1. The radio is not functioning at all
For battery-powered operation
A Make sure the batteries have been inserted in the battery compartment according to the picture.
B The batteries may be old. If this is the case, replace the batteries. As an alternative you can operate the radio using a power adapter. For further information pertaining to power adapter operation, please refer to chapter 6.3.
For operation using a power adapter
A Make sure the power cable has been plugged into the radio and the power outlet correctly.
B Make sure that the electrical outlet that you inserted the power plug in carries electrical current. To do this, connect a device which is known to be functioning to this power outlet.
11.2. No reception or poor reception quality
A Carry out the steps described in chapter 7.2. or 7.3.
B Search for a radio station with better reception by turning the tuning knob.
11.3. No sound
Increase the volume by turning the volume control knob. The automatic alarm function should be in the On position.
11.4. Other malfunctions
Please contact your nearest service partner if ...
the malfunctions described in sections 11.1. to 11.3. can not be rectified as described or
other malfunctions occur upon operating the radio.
You will find the addresses of our service partners on the warranty card delivered with the radio.
Warning!
The radio contains no user-serviceable parts. The warranty is void if the casing of the radio is opened!
Note:
No liability will be taken and no guarantee will be made for damages ...
due to opening the case of the radio
resulting from repair attempts not made by qualified experts
use of the radio for purposes other than intended!
12. Disposing of the radio

Do not dispose of the radio in the household waste!
Please contact those responsible for waste management in your city or community and ask how this type of device is to be disposed of properly.

Note:
You should remove all batteries before disposing of the radio. Do not dispose of the batteries in the household waste! Return the used batteries to an appropriate recycling collection center. Used batteries can usually be returned to the store in which they were bought.


- Index
- Safety instructions
- Danger!
- Warning!
- Note:
- Operating controls
- Scope of delivery
- Usage
- Technical data
- Preparing the radio for use
- Positioning the radio
- Battery-powered operation
- Operating the radio using an AC power supply
- Radio operation
- Receiving radio stations
- Improving reception quality of FM radio stations
- Improving reception quality of AM radio stations
- Turning the radio off
- Additional radio functions
- Setting the date and time
- To set the time:
- Using the alarm function
- Turning on the alarm function
- Setting the alarm time
- Switching to a different display mode
- Using the illumination function
- Setting the Signal Tone
- Cleaning the radio
- 11.Troubleshooting
- The radio is not functioning at all
- For operation using a power adapter
- No reception or poor reception quality
- No sound
- Other malfunctions
- Warning!
- Disposing of the radio
Brand : EBENCH
Model : KH 2249
Category : Radio