
KH 222 - Portable CD player EBENCH - Free user manual and instructions
Find the device manual for free KH 222 EBENCH in PDF.
| Product type | Portable CD player with radio |
| Brand | EBENCH |
| Model | KH 222 |
| Mains power supply | 220 V AC, 50 Hz |
| Battery power supply | 8 C/LR14/UM2 batteries (1.5 V) |
| Output power | 2 x 1.2 W (RMS), 30 W (PMPO) |
| FM radio reception range | 88 MHz – 108 MHz |
| AM radio reception range | 540 kHz – 1610 kHz |
| CD laser type | 3-beam laser |
| CD frequency response | 100 Hz – 16 kHz |
| Dimensions (approx.) | 30 x 20 x 10 cm |
| Weight (approx.) | 1.5 kg |
| Main functions | CD play, pause, stop, track skip, fast search, track/CD repeat, programming (20 tracks), FM/AM stereo radio |
| Display | LCD display for CD |
| FM antenna | Telescopic VHF/FM antenna |
| Headphone output | 3.5 mm jack socket |
| Speakers | 2 built-in speakers |
| Maintenance and cleaning | Clean the casing with a slightly damp cloth; use a dry brush for the inside of the CD compartment and the laser lens |
| Safety | Do not expose to moisture, heat sources, or water; leave a 10 cm space around for ventilation |
| Spare parts and repairability | Do not open the casing; contact an authorized service center in case of malfunction |
Frequently Asked Questions - KH 222 EBENCH
User questions about KH 222 EBENCH
0 question about this device. Answer the ones you know or ask your own.
Ask a new question about this device
Download the instructions for your Portable CD player in PDF format for free! Find your manual KH 222 - EBENCH and take your electronic device back in hand. On this page are published all the documents necessary for the use of your device. KH 222 by EBENCH.
USER MANUAL KH 222 EBENCH
Operating Instructions
eBench KH 222
Portable CD Player/Radio
GB
Operating Instructions|1
Contents
- Technical Data 4
Radio 4
CD Player 4
2.Use 5 - Function 5
- Controls and displays 7
4.1. General 7
4.2.CD 7
4.3. Radio 7
4.4. Displays 7
4.5.Miscellaneous 7 - Point of installation and safety instructions 8
- Getting started 9
6.1. Connecting to the power supply 9
6.1.1. Battery operation 9
6.1.2. Exchanging batteries 9
6.1.3. Mains operation 10 - Radio operation 10
7.1 Enhancing the reception of FM/VHF radio stations 11
7.2 Enhancing the reception of AM/medium-wave radio stations 11 - Audio CDs 11
8.1. Playing audio CDs 11
8.1.1 CD playback pause (PAUSE mode) 12
8.1.2 CD playback stop (STOP mode) 12
8.2 Skip functions 12
8.2.1 Jump Forward/Back to beginning of the track 12
GB
2 | Operating Instructions
8.2.2 Rapid search Forward/Reverse 13
8.3. Repeat functions 13
8.3.1. Repeat track 13
8.3.2. Repeat CD 14
8.4. Programming a compilation of tracks (PROGRAM function) 14
11. Cleaning 15
9. Switching off the set 15
10. Connecting headphones 15
12. Functional faults 15
GB
Operating Instructions|3
1. Technical Data
Mains voltage: AC/alternating current: 220V 50Hz
DC/direct current : 12 V
1.5 V x 8 type C/LR14/UM2
Output 2x1.2 watt (RMS)
30 watt (PMPO)
Radio
Reception range
VHF/FM 88 MHz to 108 MHz
Reception range
Medium-wave/AM 540 kHz to 1610 kHz
CD Player
Laser 3-beam laser
Frequency response 100 Hz to 16 kHz
GB
4 | Operating Instructions
2.Use
The portable eBench KH 222 CD Player/Radio is exclusively intended for …
- an entertainment electronics system
the reception of radio stations - playback of audio CDs
- private, non-commercial use
Warning!
We do not accept any liability/warranty for damage incurred as a result of incorrect use!
3. Function
With the portable eBench KH 222 CD Player/Radio you can …
-Playback audio CDs
Receive VHF and medium-wave radio stations
GB
6 | Operating Instructions
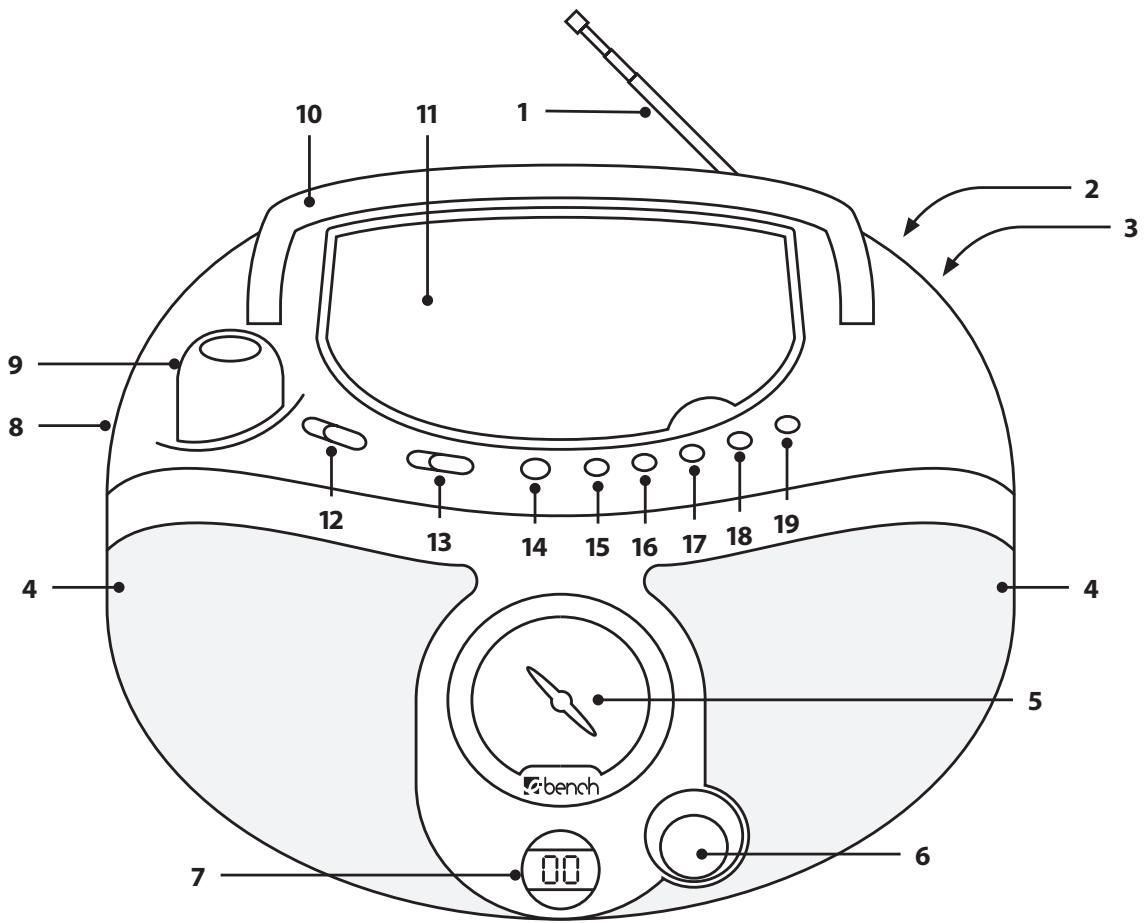
4. Controls and displays
4.1. General
- Volume control
- Function selector
4.2.CD
11.CD compartment
14. Play/Pause button
15. Stop button
16. Back button
17. Next button
18. Repeat button
19. Programme button
4.3. Radio
- Frequency-range selector
- Tuning control
4.4. Displays
- Frequency-range selector for radio
- LCD display for CD player
4.5. Miscellaneous
- VHF/FM antenna
- Loudspeakers
- Headphones connection (3.5 mm diam.)
- Power cable connection for alternating current
- Battery compartment
- Carrying handle
GB
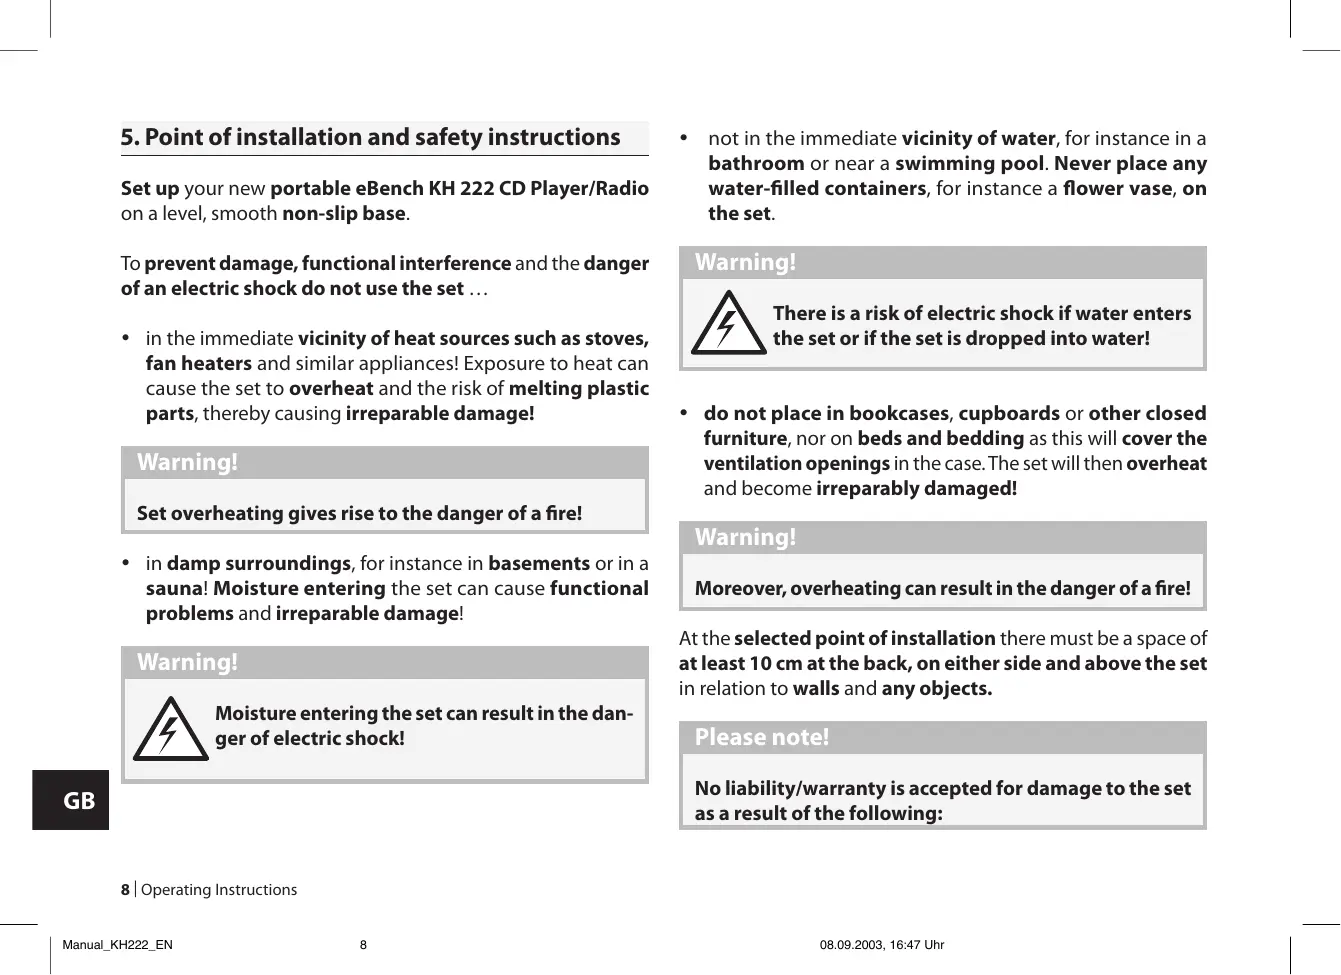
5. Point of installation and safety instructions
Set up your new portable eBench KH 222 CD Player/Radio on a level, smooth non-slip base.
To prevent damage, functional interference and the danger of an electric shock do not use the set ...
- in the immediate vicinity of heat sources such as stoves, fan heaters and similar appliances! Exposure to heat can cause the set to overheat and the risk of melting plastic parts, thereby causing irreparable damage!
Warning!
Set overheating gives rise to the danger of a fire!
- in damp surroundings, for instance in basements or in a sauna! Moisture entering the set can cause functional problems and irreparable damage!
Warning!

Moisture entering the set can result in the danger of electric shock!
not in the immediate vicinity of water, for instance in a bathroom or near a swimming pool. Never place any water-filled containers, for instance a flower vase, on the set.
Warning!

There is a risk of electric shock if water enters the set or if the set is dropped into water!
- do not place in bookcases, cupboards or other closed furniture, nor on beds and bedding as this will cover the ventilation openings in the case. The set will then overheat and become irreparably damaged!
Warning!
Moreover, overheating can result in the danger of a fire!
At the selected point of installation there must be a space of at least 10cm at the back, on either side and above the set in relation to walls and any objects.
Please note!
No liability/warranty is accepted for damage to the set as a result of the following:
8 | Operating Instructions
- Exposure to moisture
Water entering the set - Overheating
6. Getting started
6.1. Connecting to the power supply
The eBench KH 222 CD portable player/radio can be operated
with batteries or
- with the supplied mains cable plugged into a power socket.
6.1.1. Battery operation
Proceed as follows to operate the portable CD player/radio with batteries ...
1 In the event that the set is connected with a mains cable plugged into a power socket, then first disconnect the plug from the power socket.
2 Set"OFF"with the function selector on the top of the set.
3 Place the set upside down on a soft base that cannot damage the case.
4 Open the battery compartment on the underside of the set.
Prior to first time use
Remove any cardboard or plastic transport protection from the battery compartment.
5 Insert 8 batteries, type C/LR14/UM2 (not included) in the battery compartment. Insert the batteries according to the polarity indicated on the battery compartment cover.
6 Return the battery compartment cover and press down until it becomes audibly engaged.
The set is now operational.
6.1.2. Exchanging batteries
The batteries must be exchanged when ...
- The sound volume declines without turning down the volume control.
Audio CDs suddenly stop playing and the LCD display ceases to display information during CD mode
The sound is distorted during playback.
- Radio station reception suddenly ceases.
Always exchange all 8 batteries together to ensure full power once again.
Please note:
Spent batteries must not be disposed of in the domestic waste. Hand in spent batteries at collecting or waste-disposal points or return them to the place where they were purchased.
If you eventually dispose of the portable CD Player/Radio yourself, then ensure that the batteries are removed beforehand!
6.1.3. Mains operation
Proceed as follows to operate the portable CD Player/Radio from a power socket ...
1 Remove the batteries that may still be in the battery compartment.
2 Unpack the mains cable.
GB
3 First plug the mains cable into the socket identified by the letters "AC~" at the back of the set.
Operating Instructions
4 Plug the mains cable into the power socket.
The set is now operational.
Please note!
Only use the supplied mains cable to connect the set to the mains! The use of mains cables that were not intended for the eBench KH 222 portable CD Player/Radio can result in irreparable damage to the set!
Warning!

The use of unsuitable mains cables from other sets can give rise to the danger of an electric shock!
7. Radio operation
Proceed as follows to receive radio stations ...
1 Set "Radio" with the function selector on the top of the set.
2 Set with the frequency-range selector on the top of the set one of the frequency ranges "FM ST" (VHF Stereo) "FM" (VHF) or "AM" (medium wave).
3 Turn the tuning control on the front of the set to tune in a radio station with good reception characteristics.
The currently tuned frequency is indicated on the frequency range scale on the front of the set.
4 Turn the volume control on top of the set to adjust the required volume.
7.1 Enhancing the reception of FM/VHF radio stations
Having set "FM" with the frequency-range selector, the reception of radio stations within this frequency range can be enhanced with the FM/VHF antenna at the back of the set.
Extend the antenna to its full length and turn slowly in different directions until good reception of the tuned station is achieved.
7.2 Enhancing the reception of AM/medium-wave radio stations
The set features a built-in ferrite antenna for the AM/medium-wave frequency range. Having set "AM" with the frequency-range selector, radio station reception in this frequency range can be enhanced by turning the actual set in different directions.
8. Audio CDs
8.1. Playing audio CDs
Proceed in the following manner to play audio CDs ...
1 Set "CD" with the function selector on the top of the set. The LCD display on the front of the set will first display "--" and then "oo".
2 Open the CD compartment on the top of the set by raising the cover with a finger in the small recess bearing the inscription "Lift up to open".
Prior to first time use:
Remove the cardboard transport protection from the CD compartment.
3 Place a CD - with the label side up - in the CD compartment.
4 Press down the cover of the CD compartment until it becomes audibly engaged, After a few seconds the total number of tracks on the loaded CD will be indicated on the LCD display.
5 Press the "Play/Pause" button once. The first track on the CD will then be played.
The display will indicate ...
The track number of the music title that is currently being played, for instance "1" for the first track on the CD, and
- "PLAY" to the left of the current track number.
6 Turn the volume control on the top of the set to adjust the desired volume.
8.1.1 CD playback pause (PAUSE mode)
To stop playback of the audio CD press the "Play/Pause" button once. "PLAY", displayed to the left of the current track number, will start to flash.
Press the "Play/Pause" button once again to resume playback. The current piece of music will now continue from the point it was previously stopped. "PLAY", displayed to the left of the current track number, will cease to flash.
8.1.2 CD playback stop (STOP mode)
Press the "STOP" button to discontinue music playback.
GB
12 | Operating Instructions
8.2 Skip functions
The skip functions are used for the following purposes ...
- Press the respective button to select a track in the sequence on the audio CD by skipping forward ("Next") or back ("Back") to the beginning of each track and
- Select any section within a track during playback in rapid search forward or reverse.
8.2.1 Jump Forward/Back to beginning of the track
Proceed in the following manner to jump within a track on an audio CD forward/back to the beginning of a track ...
a) ... When no CD is being played (STOP mode):
1 Continue pressing the "Next" button (jump forward to the beginning of the next track) or "Back" (jump back to the beginning of the last track) until the display indicates the number of the desired track.
1 Press the "Play/Pause" button once to start play back of the selected track.
b) ... During playback of the current CD:
1 Continue pressing the "Next"/"Back" button until the display indicates the number of the desired track.
2. Playback of the selected track commences instantly without having to press the "Play/Pause" button.
c) ... With stopped CD playback (PAUSE mode):
1 Continue pressing the "Next"/"Back" button until the display indicates the number of the desired track.
2 The selected track is now automatically set in PAUSE mode. To play simply press the "Play/Pause" button once.
8.2.2 Rapid search Forward/Reverse
Proceed in the following manner to select certain sections within a track by rapid search Forward/Reverse ...
1 Keep the "Next" button (rapid search forward) of the "Back" button (rapid search reverse) depressed during playback of the desired track.
The current music title (track) can now be heard at high speed while the "Next" button forward or the "Back" button reverse is kept depressed.
2 Release the "Next"/"Back" button as soon as the desired
section within the track is reached.
Playback from the selected point of the track is now automatically continued at normal speed.
8.3. Repeat functions
The following can be set with the repeat functions ...
- Repeat a single track of an audio CD
Repeat the entire audio CD
8.3.1. Repeat track
To repeat playback of a single track press the "Repeat" button once during playback of the desired title.
"RPT" flashing on the LCD display to the left of the current track number indicates that track repeat has been switched on.
The selected track continues to be repeated until track repeat is switched off.
To turn off track repeat press the "Repeat" button twice. "RPT" flashing on the LCD display to the left of the current track number is turned off.
GB
8.3.2. Repeat CD
To repeat all tracks on the audio CD press the "Repeat" button twice during playback of a music title.
Activation of CD repeat is indicated by "RPT" appearing on the LCD display to the left of the current track number.
The entire audio CD continues to be repeated until CD repeat is turned off.
To turn off CD repeat press the "Repeat" button once. "RPT" indicated on the LCD display to the left of the current track number is faded out.
8.4. Programming a compilation of tracks (PROGRAM function)
You can compile your own music programme with the program function merely by selecting certain tracks on an audio CD for repeat. Moreover, you can decide the sequence in which the titles are to be played.
Proceed in the following manner to program your own track compilation for playback ...
GB
1 Place the desired audio CD in the set.
In the event that a CD is currently being played, then stop playback by pressing the "STOP" button.
2 Press the "Program" button once ...
- "1" flashes on the display to indicate the first program storage place.
- "PRG" is faded in to the left of the displayed title storage place.
3 Select with the "Next"/"Back" button the desired music title for the first program storage place.
4 Then press the "Program" button once again to program the selected music title.
The display will now indicate the number of the next program storage place – in this example "02" to denote the second program storage place.
5 Repeat steps 3 and 4 until all music titles of your compilation have been programmed in the desired sequence. Up to 20 titles can be programmed.
6 Press the "Play/Pause" button to start playback of the programmed compilation of titles. "PLAY" and "PRG" are indicated on the display.
Press the "STOP" button once to stop playback of the programmed compilation. The programmed compilation of titles continues to be stored.
Press the "STOP" button a second time to terminate the program function and erase the programmed compilation. "PRG" indicated on the display is faded out.
9. Switching off the set
To switch off the set adjust "OFF" with the functional selector on the top of the set.
10. Connecting headphones
Plug the 3.5 mm jack plug of the headphones into the "PHONE" socket on the left hand side of the set to connect the headphones.
11. Cleaning
Only use a slightly moist cloth to clean the case surface of the set. Ensure when cleaning that no moisture enters the set.
The inside of the CD compartment must only be cleaned with a clean, dry brush (e.g. lens brush available from photographic dealers). NEVER moist clean the inside of the CD compartment!
Warning!

Moisture penetrating the set can give rise to the danger of an electric shock!
Only clean the laser scanning lens inside the CD compartment (if necessary) with a clean, dry brush. NEVER touch the laser scanning lens with bare hands!
Please note!
Only clean the laser scanning lens inside the CD compartment (if necessary) with a clean, dry brush. NEVER touch the laser scanning lens with bare hands!
12. Functional faults
Proceed in the following manner in the event of functional faults of the set ...
- First disconnect the plug from the mains socket or remove the batteries from the battery compartment.
- Check that there is at least 10cm space above, behind and on either side of the set in relation to walls or objects.
If this is not the case, then switch off the set and allow it to cool down for at least one hour! Relocate the set in
such a manner that the above minimum distances are observed.
- If audio CD playback is faulty or does not function at all, then this can indicate that a film of condensation has formed on the laser scanning lens in the CD compartment.
This can happen if the set has been exposed to wide temperature fluctuations.
In this event place the set in a dry environment with a normal room temperature and wait at least five hours before switching on the set again.
Consult our service partner in your vicinity in the event of the following ...
- If the functional faults described in Chapter 12 cannot be remedied in the described manner.
If functional faults occur which are not described in Chapter 12.
Please refer to the enclosed Warranty Card for our service partner addresses.
GB
Warning!
NEVER open the case of the set! It does not contain any parts that can be repaired by the user. The warranty becomes null and void if the set's case has been opened.
We do not accept any liability/warranty for damage resulting from opening the case or repair attempts that were not carried out by qualified personnel!
- Operating Instructions
- Contents
- Technical Data
- Radio
- CD Player
- 2.Use
- Warning!
- Function
- Controls and displays
- General
- 4.2.CD
- Radio
- Displays
- Miscellaneous
- Point of installation and safety instructions
- Please note!
- Getting started
- Connecting to the power supply
- Battery operation
- Prior to first time use
- Exchanging batteries
- Please note:
- Mains operation
- GB
- Radio operation
- Enhancing the reception of FM/VHF radio stations
- Enhancing the reception of AM/medium-wave radio stations
- Audio CDs
- Playing audio CDs
- Prior to first time use:
- CD playback pause (PAUSE mode)
- CD playback stop (STOP mode)
- Skip functions
- Jump Forward/Back to beginning of the track
- Rapid search Forward/Reverse
- Repeat functions
- Repeat track
- Repeat CD
- Programming a compilation of tracks (PROGRAM function)
- Switching off the set
- Connecting headphones
- Cleaning
- Functional faults
Brand : EBENCH
Model : KH 222
Category : Portable CD player