
TEW-403PIPLUS - Wireless Access Point TRENDNET - Free user manual and instructions
Find the device manual for free TEW-403PIPLUS TRENDNET in PDF.
User questions about TEW-403PIPLUS TRENDNET
0 question about this device. Answer the ones you know or ask your own.
Ask a new question about this device
Download the instructions for your Wireless Access Point in PDF format for free! Find your manual TEW-403PIPLUS - TRENDNET and take your electronic device back in hand. On this page are published all the documents necessary for the use of your device. TEW-403PIPLUS by TRENDNET.
USER MANUAL TEW-403PIPLUS TRENDNET
TEW-401PCplus/TEW-403PIplus
125Mbps 802.11g Wireless Cards
Quick Installation Guide
natural_image
Two electronic devices: a wireless Cordbus T4.6398 Ethernet card and a Wi-Fi network card with I/O ports (no visible text or symbols on the devices themselves)Table of Contents
English 1
- Prepare for Installation 1
- Install Wireless Configuration Utility 2
- Install Hardware 5
- Install Drivers 7
- Configure Wireless Utility 10
Troubleshooting 18
1. Prepare for Installation
Thank you for purchasing the TEW-401PCplus/TEW-403PIplus. Your new wireless network adapter will allow you to connect to 802.11g and 802.11b networks and begin wirelessly sharing the Internet, files, and other resources.
This guide will help you set up and configure your wireless card. Following this installation should be quick and easy. If you run into problems, please refer to the Troubleshooting section or the more detailed installation procedures on the User's Guide CD-ROM. If you need further technical support, please visit www.TRENDNET.com or call by phone.
Verify Package Contents
Please make sure you have everything in the box:
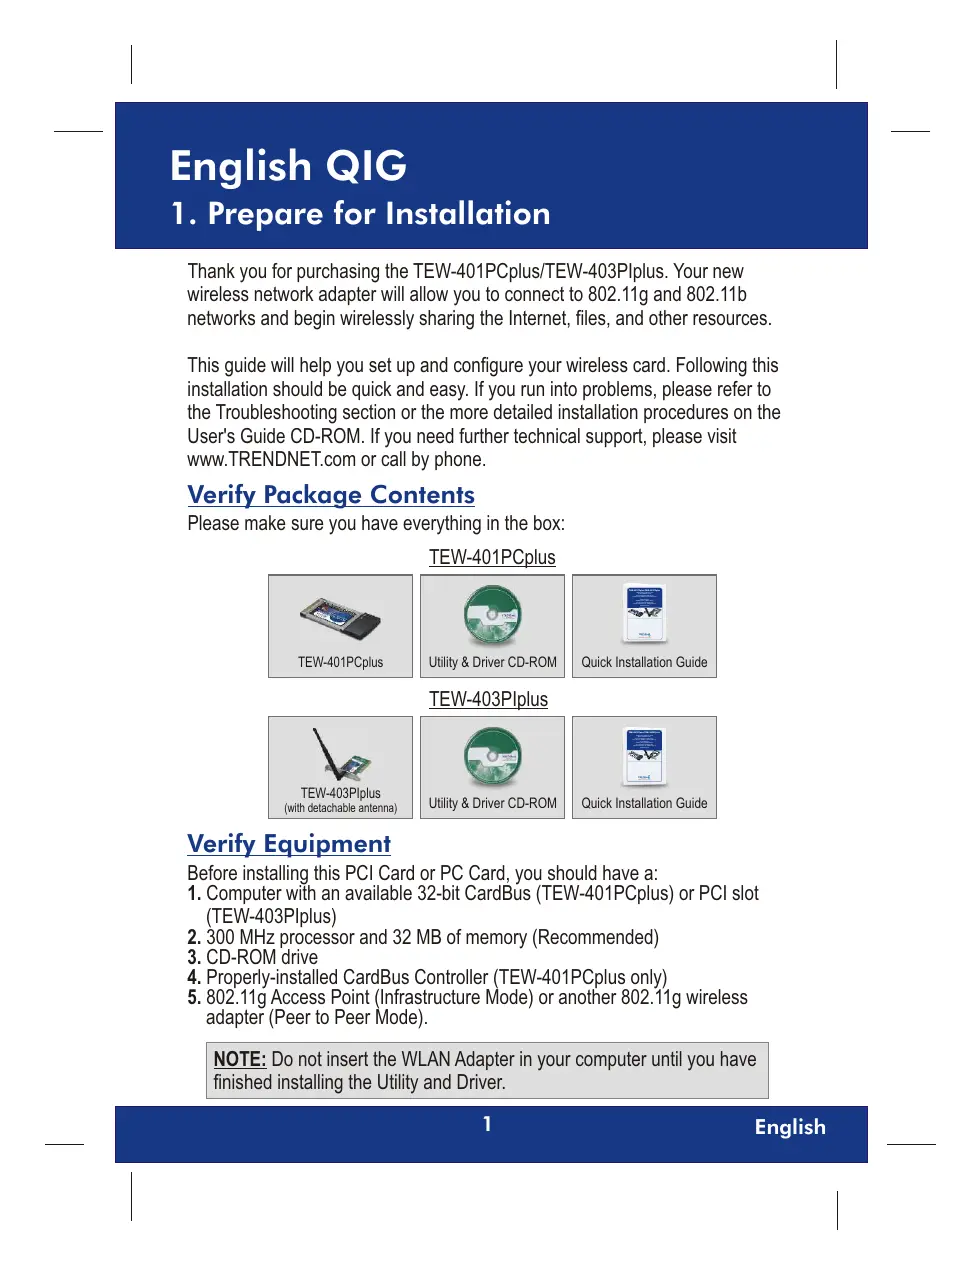
TEW-401PCplus
text_image
TEW-401PCplus
text_image
Utility & Driver CD-ROM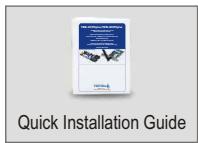
text_image
Quick Installation GuideTEW-403PIplus
text_image
TEW-403PIplus (with detachable antenna)
text_image
Utility & Driver CD-ROM
text_image
QUICK INSTALLATION GUIDE Quick Installation GuideVerify Equipment
Before installing this PCI Card or PC Card, you should have a:
- Computer with an available 32-bit CardBus (TEW-401PCplus) or PCI slot (TEW-403PIplus)
- 300 MHz processor and 32 MB of memory (Recommended)
- CD-ROM drive
- Properly-installed CardBus Controller (TEW-401PCplus only)
- 802.11g Access Point (Infrastructure Mode) or another 802.11g wireless adapter (Peer to Peer Mode).
NOTE: Do not insert the WLAN Adapter in your computer until you have finished installing the Utility and Driver.
2. Install Wireless Configuration Utility
Windows 95/98/98SE/ME
- Insert the TEW-401PCplus/403PIplus CD-ROM into your computer's CD-ROM drive; the installation menu window will appear automatically. If the window does not appear automatically, click Start, click Run, and type E:\Autorun.exe in the text-field. Click OK.
NOTE: Replace "E" in "E:\Autorun.exe" with whichever letter is assigned to your CD-ROM drive.
- On the Installation Menu, Select the Wireless Card and click Install Utility button.

text_image
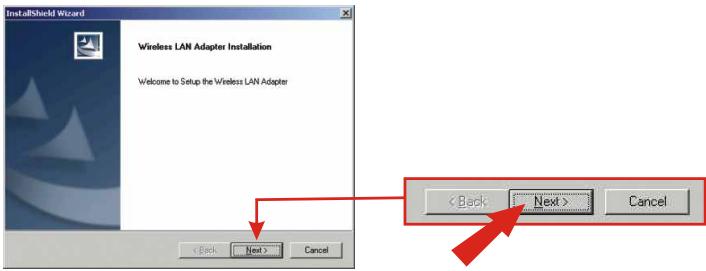
TRENDnet TRENDnet USA What's Next in Networking 125Mbps 802.11g WIRELESS LAN TEW-401PCPLUS TEW-403PIPLUS TEW-410APBPLUS TEW-411BRPLUS EXIT INSTALLATION GUIDES INSTALL UTILITY INSTALLATION GUIDES INSTALL UTILITY- Follow the Install Shield Wizard's instructions to install the wireless configuration utility, click Next to start.
text_image
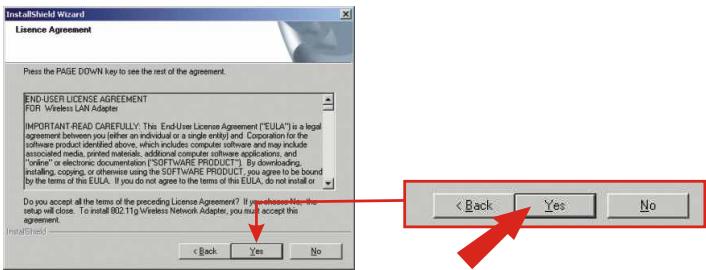
InstallShield Wizard Wireless LAN Adapter Installation Welcome to Setup the Wireless LAN Adapter < Back Next > Cancel- Simply go through the License Agreement and then click Yes to proceed.
text_image
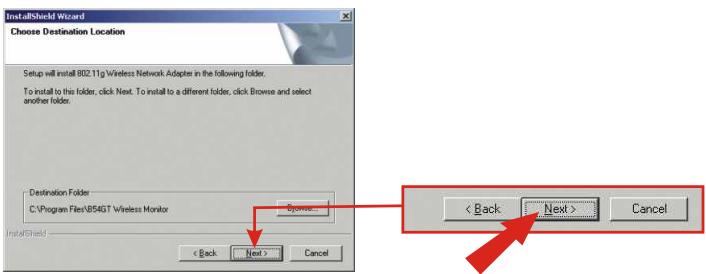
InstallShield Wizard Licence Agreement Press the PAGE DOWN key to see the rest of the agreement. END-USER LICENSE AGREEMENT FOR Wireless LAN Adapter IMPORTANT-READ CAREFULLY: This EndUse License Agreement ("EULA") is a legal agreement between you (either an individual or a single entity) and. Corporation for the software product identified above, which includes computer software and may include associated media, printed materials, additional computer software applications, and "online" or electronic documentation ("SOFTWARE PRODUCT"). By downloading, installing, copying, or otherwise using the SOFTWARE PRODUCT, you agree to be bound by the terms of this EULA. If you do not agree to the terms of this EULA, do not install or Do you accept all the terms of the preceding License Agreement? If you have Yes, then setup will close. To install B02.11g Wireless Network Adapter, you must accept this agreement. < Back Yes No < Back Yes No- Now the window will load the utility onto your computer, click Next to continue.
text_image
InstallShield Wizard Choose Destination Location Setup will install 802.11g Wireless Network Adapters in the following folder. To install to this folder, click Next. To install to a different folder, click Browse and select another folder. Destination Folder C:\Program Files\854GT Wireless Monitor < Back Next > Cancel InstallShield < Back Next > Cancel- During the Utility installation procedures of Windows 2000/XP, a warning message for the Windows Logo testing verification will appear. Click Yes for Windows 2000 and Continue Anyway for Windows XP to proceed.
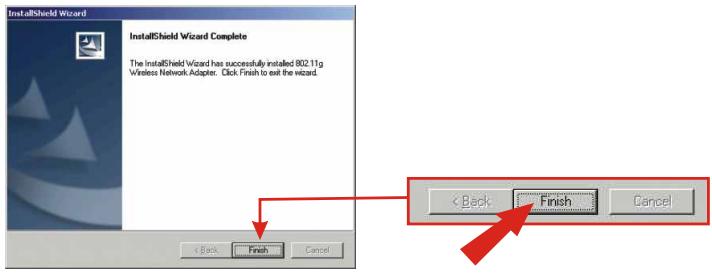
- The Configuration Utility has been installed; click Finish to complete the installation.
text_image
InstallShield Wizard Complete The InstallShield Wizard has successfully installed 802.11g Wireless Network Adapter. Click Finish to exit the wizard. < Back Finish Cancel < Back Finish CancelNOTE: For Windows 98SE/ME, Windows will prompt a message for restarting the computer, select "No, I will restart my computer later," and click Finish.
3. Install Hardware
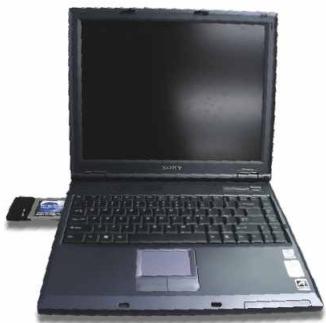
If you are installing the TEW-401PCplus Wireless PC Card:
Proceed only if you have already completed the steps in Section 2
- Shut down your computer.
- Insert the PC Card firmly into your notebook PC's open PC Card slot. Only the plastic end-piece should protrude from the slot.
- Reboot your computer.
natural_image
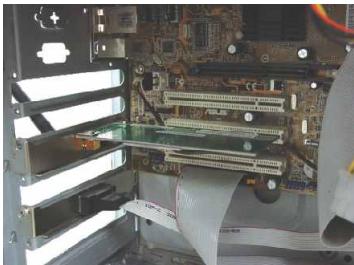
Black Sony laptop with visible keyboard and front screen, no text or symbols on the device itselfIf you are installing the TEW-403PIplus Wireless PCI Card:
Proceed only if you have already completed the steps in Section 2
- Shut down your computer.
- Open your computer case to reveal the motherboard and expansion slots. (Please refer to your computer's user manual if you need help opening the case)
- Insert the wireless card into one of motherboard's free PCI slots. Press down firmly and evenly on the card until it snaps into place.
natural_image
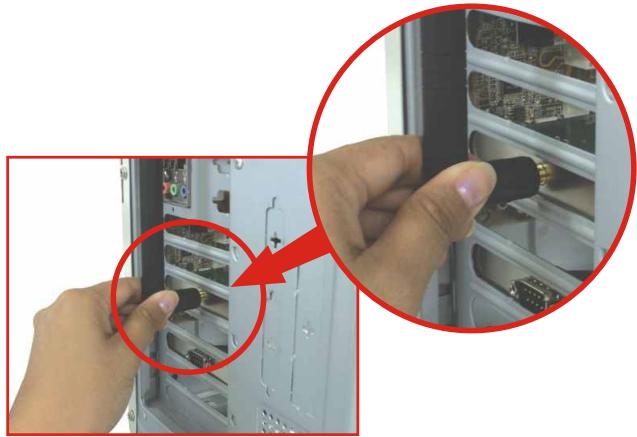
Interior view of a computer motherboard showing CPU socket, RAM slots, and cable spool (no visible text or labels)- Screw the PCI card's metal bracket into your case with a standard bracket screw. Attach the included antenna to the connector on the back of your card.
natural_image
Close-up of hands inserting a USB into a computer tower case, showing internal components and wiring (no text or symbols visible)- Close your computer case, and reboot your computer.
Windows 98SE/ME
- After your computer reboots, window will detect the new hardware and load the driver automatically.

text_image
Found New Hardware 802.11g Wireless Network Adapter Installing ...- After the driver is installed, windows will prompt the following message, click Yes to save the changes and restart the computer.
- Driver installation is now complete.
Windows 2000
- After your computer reboots, window will detect the new hardware and load the driver automatically.
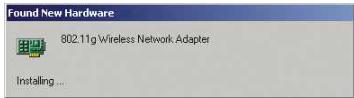
text_image
Found New Hardware 802.11g Wireless Network Adapter Installing ...- When Digital Signature Not Found Window appears, click Yes to continue.
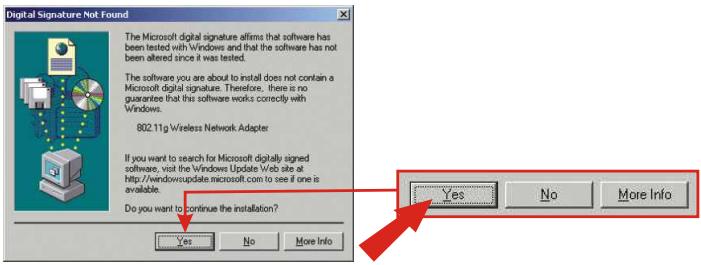
text_image
Digital Signature Not Found The Microsoft digital signature affirms that software has been tested with Windows and that the software has not been altered since it was tested. The software you are about to install does not contain a Microsoft digital signature. Therefore, there is no guarantee that this software works correctly with Windows. 802.11g Wireless Network Adapter If you want to search for Microsoft digitally signed software, visit the Windows Update Web site at http://windowsupdate.microsoft.com to see if one is available. Do you want to continue the installation? Yes No More Info Yes No More InfoNOTE: TRENDnet's Wireless Adapters have been fully tested under all supported Windows Operating Systems and have been approved for their functionality.
- Driver installation is now completed.
Windows XP
- After your computer reboots, the "Found New Hardware Wizard" will appear. Click Next to load the driver.

text_image
Found New Hardware Wizard Welcome to the Found New Hardware Wizard This wizard helps you install software for: 802.11g Wireless Network Adapter If your hardware came with an installation CD or floppy disk, insert it now. What do you want the wizard to do? Install the software automatically (Recommended) Install from a list or specific location (Advanced) Click Next to continue. < Back Next > Cancel- A warning message will tell you that the device you're installing has not yet been certified for Windows XP compatibility. Click Continue Anyway.
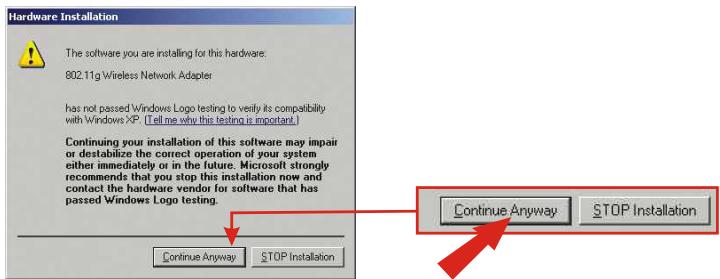
text_image
Hardware Installation The software you are installing for this hardware: 802.11g Wireless Network Adapter has not passed Windows Logo testing to verify its compatibility with Windows XP (Tell me why this testing is important.) Continuing your installation of this software may impair or destabilize the correct operation of your system either immediately or in the future. Microsoft strongly recommends that you stop this installation now and contact the hardware vendor for software that has passed Windows Logo testing. Continue Anyway STOP Installation Continue Anyway STOP InstallationNOTE: TRENDnet's Wireless Adapters have been fully tested under all supported Windows Operating Systems and have been approved for their functionality.
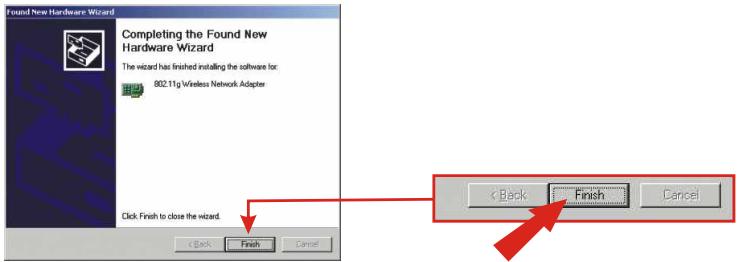
- Now the driver has been installed, click Finish to complete the installation.
text_image
Found New Hardware Wizard Completing the Found New Hardware Wizard The wizard has finished installing the software for: 802.11g Wireless Network Adapter Click Finish to close the wizard. < Back Finish Cancel < Back Finish Cancel- Restart your computer.
5. Configure Wireless Utility
Infrastructure Mode (PC-to-Access Point Connection)
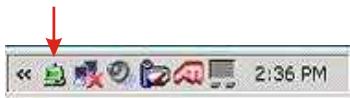
- Double-click the wireless computer icon in your system tray (next to the clock in the bottom right corner of your screen).
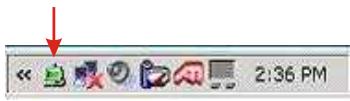
text_image
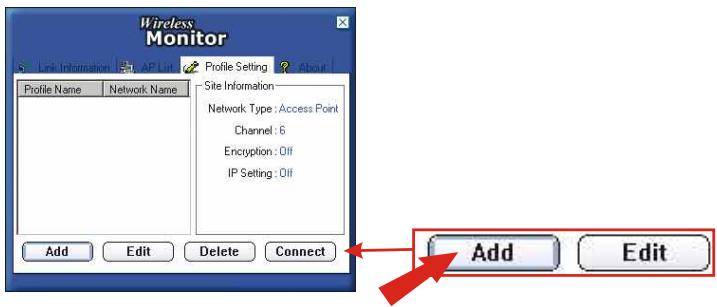
Screenshot of a software toolbar with icons and time display showing 2:36 PM- From the Wireless Monitor window, select Profile Setting tab, then click Add.

text_image
Wireless Monitor Link Information AP List Profile Setting About Profile Name Network Name Site Information Network Type :Access Point Channel : 6 Encryption : Off IP Setting : Off Add Edit Delete Connect Add Edit Delete- Type in a Profile Name, and then click Next.
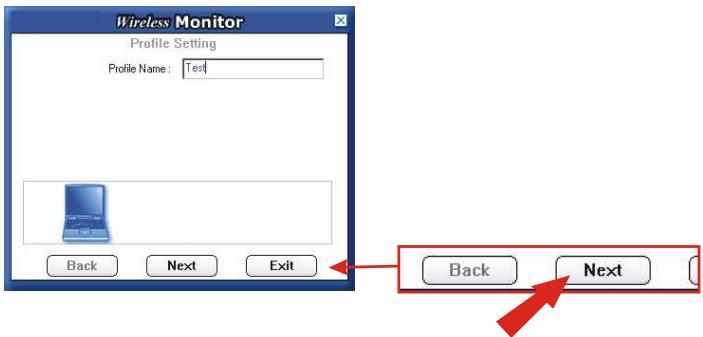
text_image
Wireless Monitor Profile Setting Profile Name: Text Back Next Exit Back Next- Type in your Access Point's or Wireless Router's SSID for the Network Name and click Next.
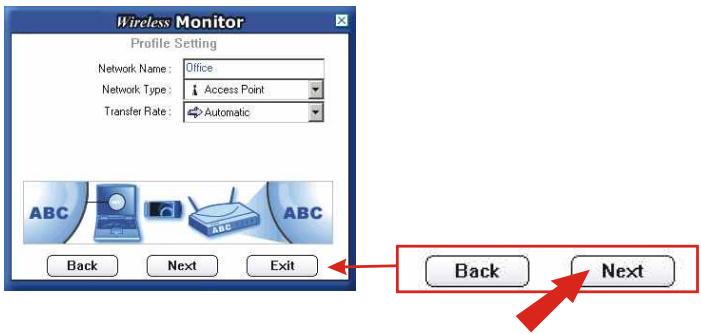
text_image
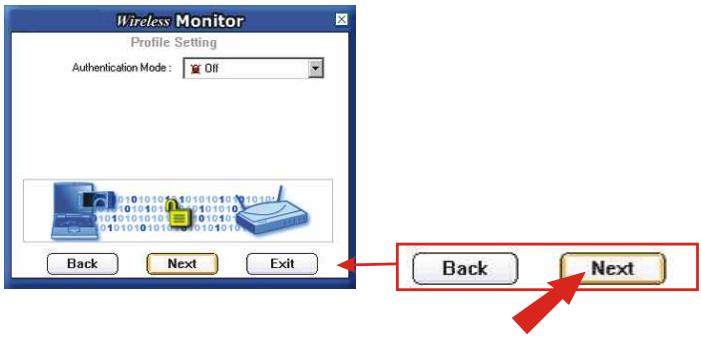
Wireless Monitor Profile Setting Network Name: Office Network Type: Access Point Transfer Rate: Automatic Back Next Exit Back Next- If your wireless network does not require security setting, click Next to continue.
text_image
Wireless Monitor Profile Setting Authentication Mode: Off Back Next Exit Back NextNOTE: If you would like to set the Authentication Mode, select the option from the drop down menu and make sure the setting matches your wireless network's security settings.
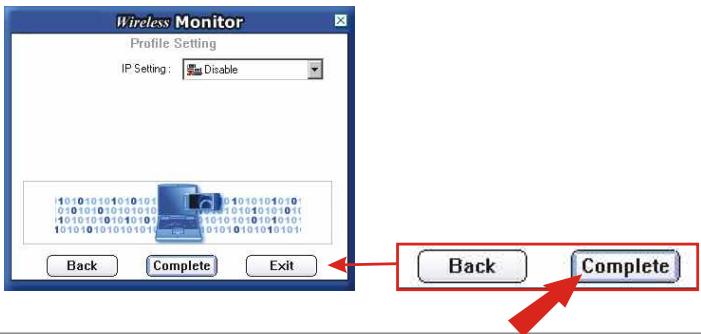
- If you do not need to configure IP settings, click Complete.
text_image
Wireless Monitor Profile Setting IP Setting: Disable Back Complete Exit Back CompleteNOTE: IP Setting is "Disable" means the wireless card will Obtain an IP address automatically from a DHCP server. Otherwise, please specify an IP address to meet your wireless network's configuration.
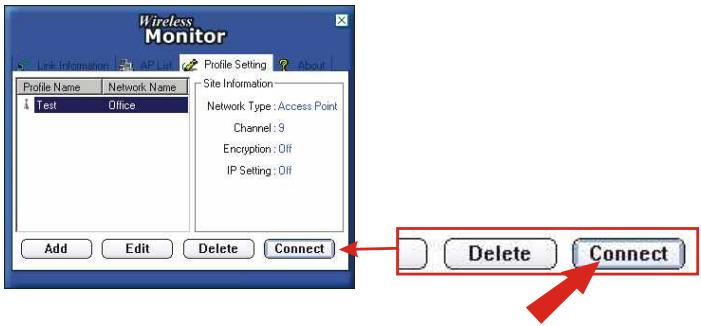
- Select the Profile you just created and click on the Connect button to connect.
text_image
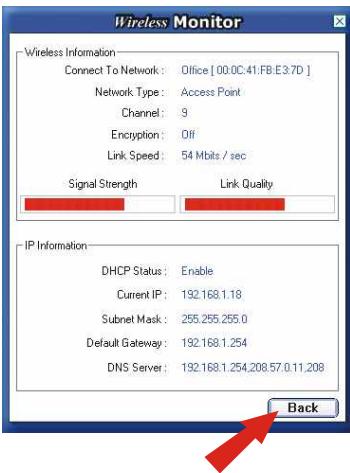
Wireless Monitor Profile Name Network Name Test Office Profile Setting About Site Information Network Type: Access Point Channel: 9 Encryption: Off IP Setting: Off Add Edit Delete Connect Delete Connect- To verify your connectivity, you can select the Link Information tab and click More button. If you see connection information, your card's wireless configuration is complete.
text_image
Wireless Monitor Wireless Information Connect To Network : Office [ 00:0C:41:FB:E3:7D ] Network Type : Access Point Channel : 9 Encryption : Off Link Speed : 54 Mbits / sec Signal Strength Link Quality IP Information DHCP Status : Enable Current IP : 192.168.1.18 Subnet Mask : 255.255.255.0 Default Gateway : 192.168.1.254 DNS Server : 192.168.1.254.208.57.0.11.208 BackYour Wireless Card is now configured and ready for use!
Ad-Hoc Mode (PC-to-PC connection)
- Double-click the wireless computer icon in your system tray (next to the clock in the bottom right corner of your screen).
text_image
Screenshot of a software toolbar with icons and time display showing 2:36 PM- From the Wireless Monitor window, select Profile Setting tab, then click Add.
text_image
Wireless Monitor Link Information AP List Profile Setting About Profile Name Network Name Site Information Network Type: Access Point Channel: 6 Encryption: Off IP Setting: Off Add Edit Delete Connect Add Edit- Create a Profile Name, and then click Next.
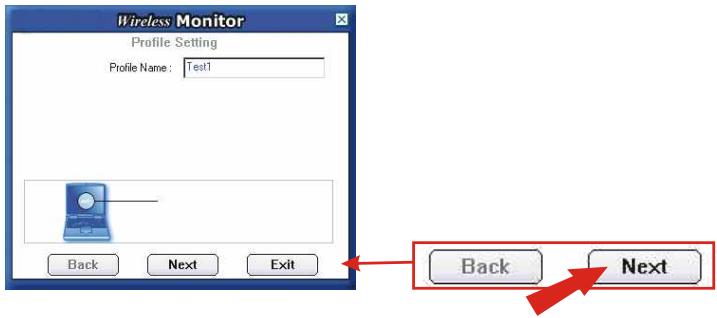
text_image
Wireless Monitor Profile Setting Profile Name: Test1 Back Next Exit Back Next- Create a Network Name for your Peer to Peer network and use the dropdown menus, set the: Network Type to Peer to Peer, Transfer Rate to Automatic, and select a Channel. Click Next to continue.
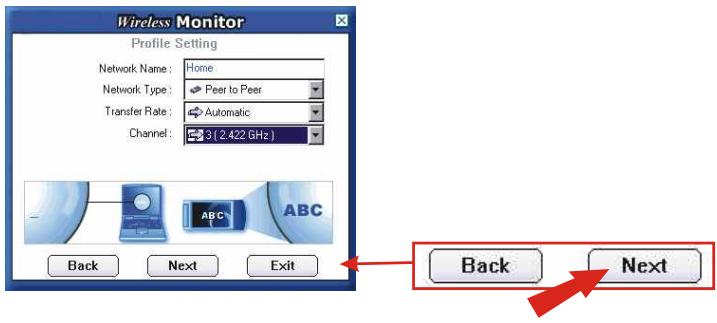
text_image
Wireless Monitor Profile Setting Network Name: Home Network Type: Peer to Peer Transfer Rate: Automatic Channel: 3 (2.422 GHz) Back Next Exit Back Next- If your wireless network does not require security setting, click Next to continue.
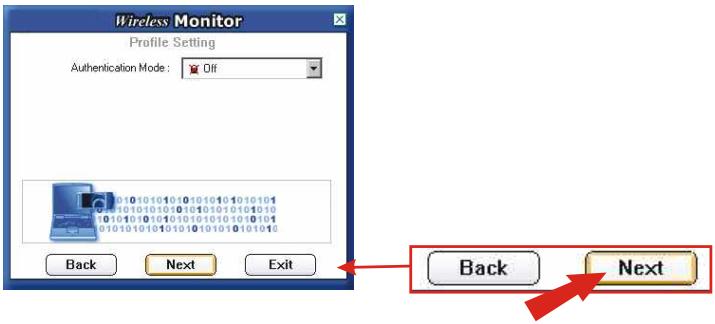
text_image
Wireless Monitor Profile Setting Authentication Mode: Off Back Next Exit Back NextNOTE: If you would like to set the Authentication Mode, select the option from the drop down menu and make sure the setting matches your wireless network's security settings.
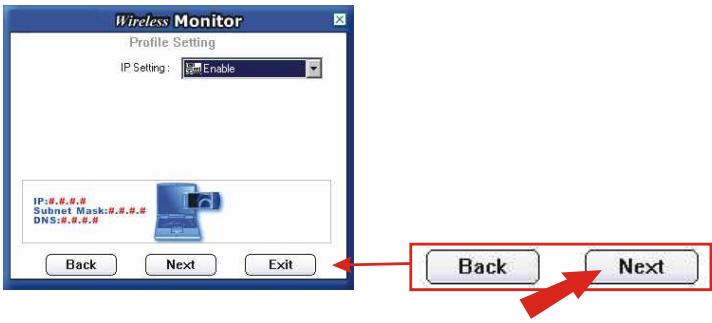
- If your wireless network does not require security setting, click Next to continue.
text_image
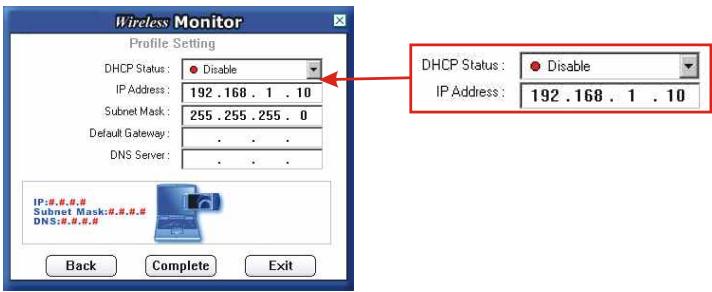
Wireless Monitor Profile Setting IP Setting: Enable IP#:.,#,. Subnet Mask:#,.,# DNS:#,.,# Back Next Exit Back Next- Using the drop-down menu, set the DHCP Status to Disable and input the IP address. (in this example, the IP address is 192.168.1.10 and the Subnet Mask is 255.255.255.0)
text_image
Wireless Monitor Profile Setting DHCP Status: Disable IP Address: 192 .168 . 1 . 10 Subnet Mask: 255 .255 .255 . 0 Default Gateway: . DNS Server: . DHCP Status: Disable IP Address: 192 .168 . 1 . 10 IP#:#.#.# Subnet Mask#:#.#.# DNS#:#.#.# Back Complete ExitNOTE: On the second computer, follow the same steps 1 9. On step 9, you must specify a different IP address. For example, you may use the IP address 192.168.1.11, but the Subnet Mask remains 255.255.255.0)
-
Click Complete to finish the configurations.
-
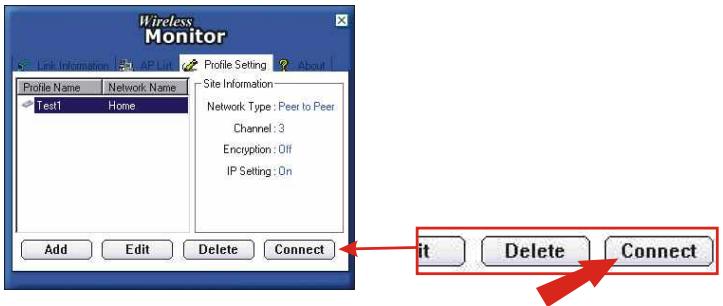
Once you have configured both computers for "Peer to Peer" connection, select the Profile Name then click Connect.
text_image
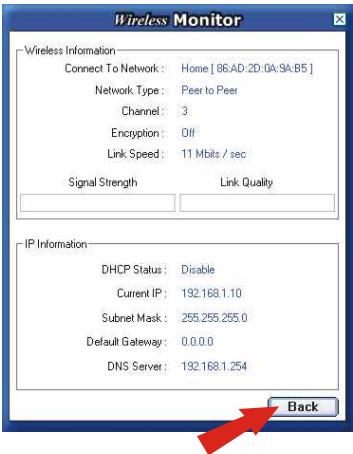
Wireless Monitor Link Information AP List Profile Setting About Profile Name Network Name Site Information Test1 Home Network Type: Peer to Peer Channel: 3 Encryption: Off IP Setting: On Add Edit Delete Connect it Delete Connect- To verify the "Peer to Peer" wireless network connection, select the Link Information tab, and click More. If you see connection information, your card's wireless configuration is not complete.
text_image
Wireless Monitor Wireless Information Connect To Network : Home [ 86:AD:2D:0A:9A:B5 ] Network Type : Peer to Peer Channel : 3 Encryption : Off Link Speed : 11 Mbits / sec Signal Strength Link Quality IP Information DHCP Status : Disable Current IP : 192.168.1.10 Subnet Mask : 255.255.255.0 Default Gateway : 0.0.0.0 DNS Server : 192.168.1.254 BackYour Wireless Network Adapter is now configured and ready for use!
Q1. I completed all the steps in the quick installation guide, but my card isn't connecting to my access point. What should I do?
A1. You should first verify that the Network SSID matches your wireless router or access point's SSID. If they already match, you should check your TCP/IP properties to ensure that Obtain an IP address automatically is selected.
Q2. Windows is unable to recognize my hardware. What should I do?
A2. Make sure your computer meets the minimum requirements as specified in Section 1 of this quick installation guide. Also, you must install the wireless configuration utility (as described in Section 2) before you physically install your network card. Lastly, you may consider moving the card to a different PCI/PC Card Slot.
Q3. I cannot open the wireless configuration utility. What should I do?
A3. Go to your device manager (control panel system) to make sure the adapter is installed properly. If you see a networking device with a yellow question mark or exclamation point, you will need to reinstall the device and/or the drivers.
If you still encounter problems, please refer to the User's Guide CD-ROM or contact technical support.
Contact Technical Support
Telephone: +1-310-626-6252
Fax: +1-310-626-6267
Website: www.TRENDNET.com
E-mail: support@trendware.com
Technical Support Hours
7:00AM \~ 6:00PM, Monday through Friday
Pacific Standard Time (except holidays)
Certifications
This equipment has been tested and found to comply with FCC and CE Rules.
Operation is subject to the following two conditions:
(1) This device may not cause harmful interference.
(2) This device must accept any interference received, including interference that may cause undesired operation.
TRENDnet® TRENDware, USA
What's Next in Networking
Product Warranty Registration
Please take a moment to register your product online. Go to TRENDware's website at http://www.TRENDNET.com
TRENDware International, Inc.
3135 Kashiwa Street
Torrance, CA 90505
http://www.TRENDNET.com