
DRX 950 - Car stereo SCOTT - Free user manual and instructions
Find the device manual for free DRX 950 SCOTT in PDF.
| Product type | Car stereo with 7" touch screen |
| Brand | SCOTT |
| Model | DRX 950 |
| Dimensions (W x H x D) | 178 x 50 x 165 mm |
| Weight | 2.6 kg |
| Power supply | 12 V DC (10.8~16 V), negative ground |
| Max output power | 40 W x 4 |
| Rated power (RMS) | 22 W x 4 |
| Load impedance | 4 Ω (4-8 Ω) |
| Fuse | 1.0 A |
| Screen | 7" TFT touch screen (16:9), resolution 480x234, brightness 300 cd/m², contrast 250:1 |
| Disc formats | DVD-Video, DVD+R/RW, DVD-R/RW, MPEG4, XVID, CD-DA, CD-R/RW, MP3, JPEG, VCD 2.0 |
| DVD region code | Not specified (check product) |
| Radio tuner | FM (87.5-108 MHz) and MW (522-1620 kHz) with RDS (AF, TA, PTY) |
| Main functions | DVD/VCD/CD/MP3/MPEG4/XVID player, USB/SD/MMC interface, touch screen, detachable panel, remote control, AV input, composite video output, Dual Zone mode, ESP anti-shock |
| Care and cleaning | Clean with a soft, dry cloth. Do not use alcohol. |
| Safety | Do not open the casing; do not expose to water; brown wire must be connected to parking brake for video display; use only recommended fuses. |
| Spare parts and repairability | Detachable front panel, remote control, cables, mounting brackets. Repair only by an authorized center. |
| General information | User manual provided. Maximum consumption 15 A. Reference DRX 950. |
Frequently Asked Questions - DRX 950 SCOTT
User questions about DRX 950 SCOTT
0 question about this device. Answer the ones you know or ask your own.
Ask a new question about this device
Download the instructions for your Car stereo in PDF format for free! Find your manual DRX 950 - SCOTT and take your electronic device back in hand. On this page are published all the documents necessary for the use of your device. DRX 950 by SCOTT.
USER MANUAL DRX 950 SCOTT
USB/SD/MMC INTERFACE
USER MANUAL AND INSTALLATION INSTRUCTIONS
CONTENTS
CONTENTS GB 1
ACCESSIONS GB2
PRECAUTION GB3
INSTALLATION/REMOVAL AND ELECTRICAL CONNECTIONS
DUAL ZONE MODE SETUP GB 5
FRONT PANEL GB 9
BASIC OPERATION 10
REMOTE CONTROL GB12
TOUCH SCREEN CONTROLS. GB17
RADIO OPERATION 1
DVD/VCD/CD/MP3/MPEG4/XVID OPERATION GB24
DVD SETUP GB34
TECHNICAL SPECIFICATIONS GB39
TROUBLESHOOTING. 1
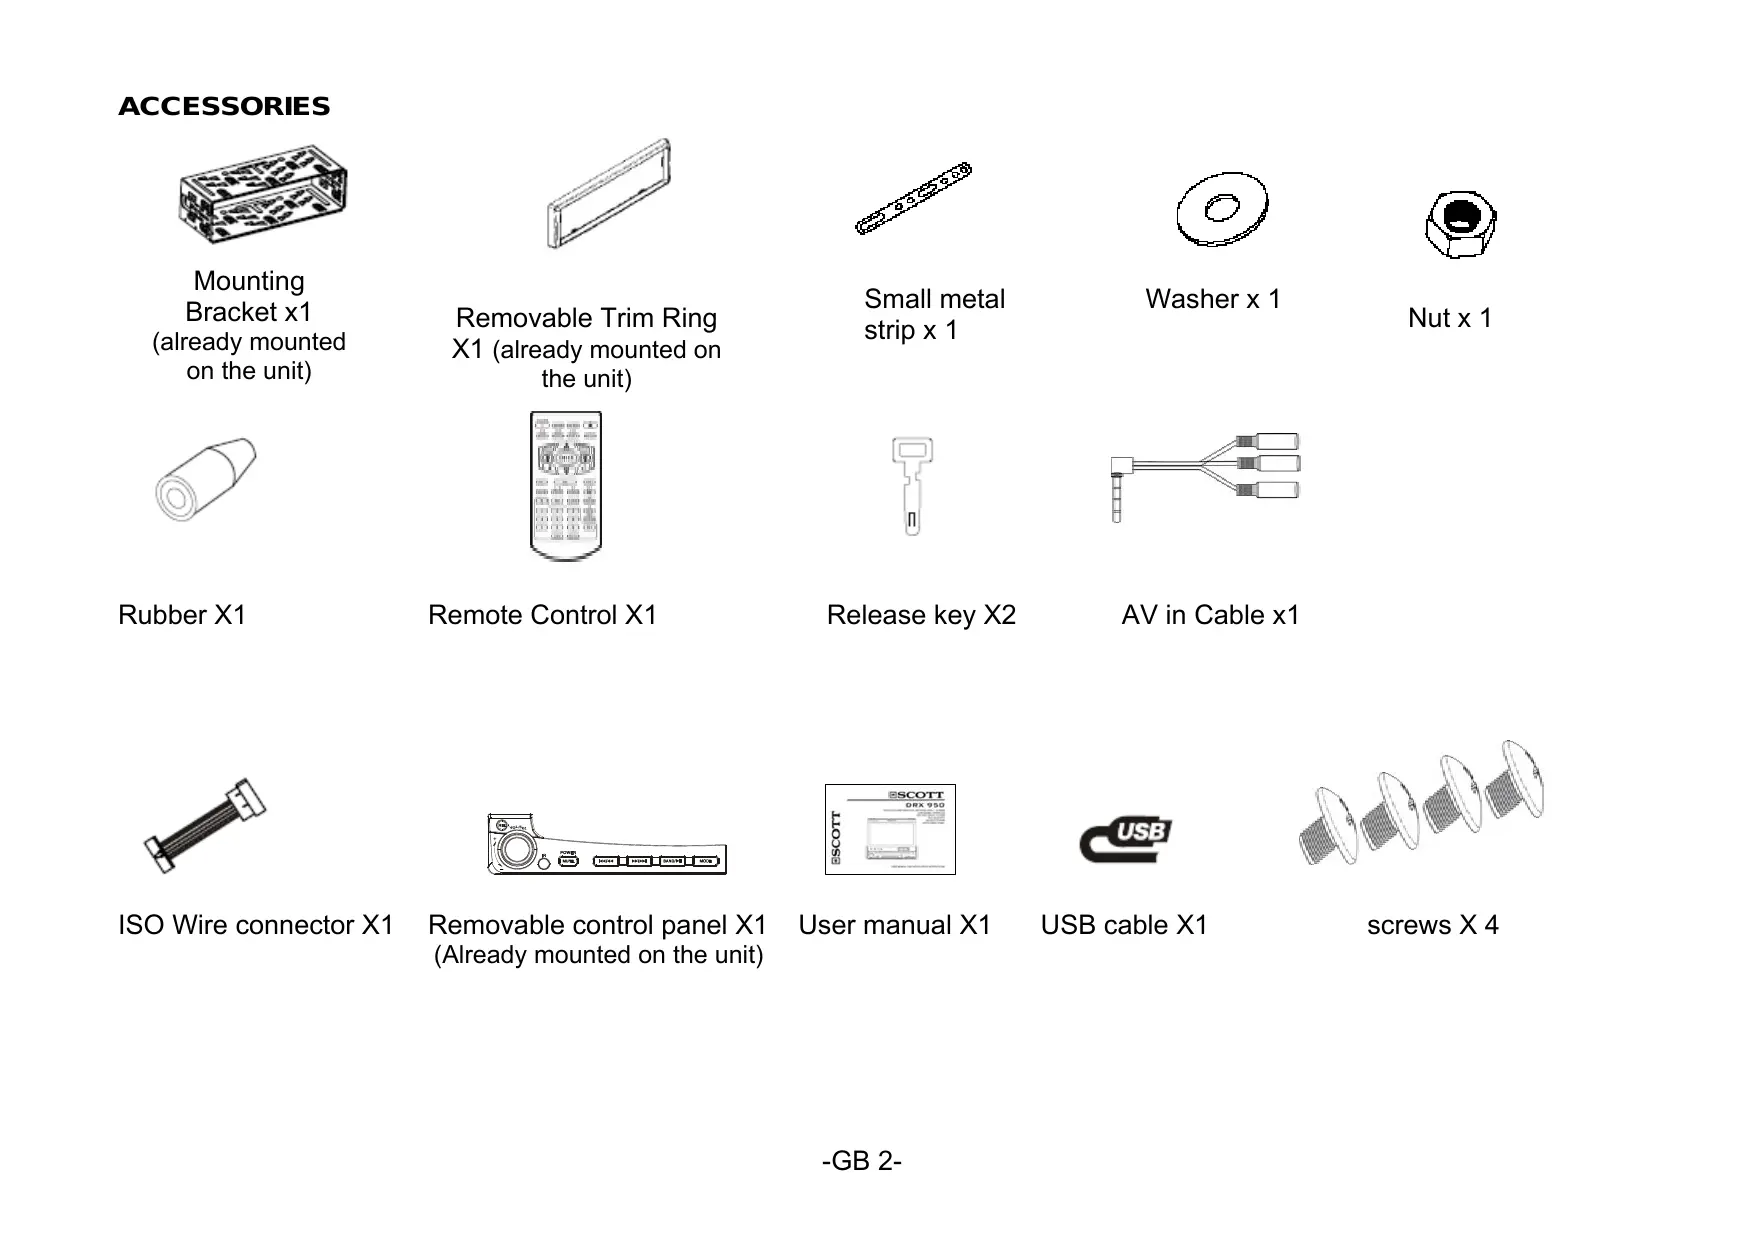
ACCESSORIES
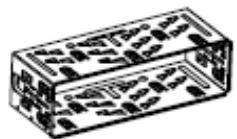
Mounting Bracket x1 (already mounted on the unit)
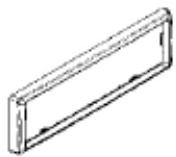
Removable Trim Ring X1 (already mounted on the unit)

Small metal strip x 1

Washer x 1

Nut x 1
Rubber X1
Remote Control X1

Release key X2
AV in Cable x1
ISO Wire connector X1
Removable control panel X1 (Already mounted on the unit)
User manual X1

USB cable X1
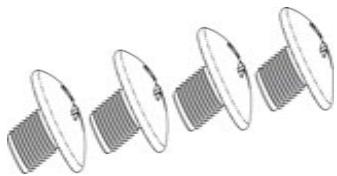
screws X 4
PRECAUTION
This unit is designed and manufactured with the user's safety in mind; however any improper use or operation may result in certain dangers. It is therefore highly recommended to read this manual thoroughly and adhere to the following precautions.
SAFETY PRECAUTIONS
- To prevent an electrical shock, do not open the housing of the unit. In any case of malfunctioning, only have the unit serviced by an approved and qualified service centre.
- Do not expose to any water or to a very humid environment. Do not operate the unit when your hands are wet as this may cause a short circuit.
- For safe driving, keep the volume low in order to concentrate on traffic conditions.
- Do not clean the unit with alcohol, only clean with a soft dry cloth.
- If the unit has been kept at a high temperature or in a high humidity environment, cool down the car interior before turning on the unit.
- Do not use the unit for a long time without running the vehicle engine, as this may drain the battery and the vehicle's engine may not be able to start.
- Before final installation in the dashboard opening, connect the wiring and make sure the unit is working properly.
- Only use parts provided with the unit to ensure proper installation.
- Do not route wiring in places that the heat may melt the wiring insulation.
- When replacing the fuse, ensure that the new fuse has the capacity recommended by the manufacturer.
PRECAUTION
OPERATION PRECAUTIONS
- Do not operate the player with scratched, bent or broken discs. When a disc is not loaded properly, do not force it into the disc loader.
- Never insert any other objects into the disc loader like a coin or pin, etc as this may cause damage or a short circuit.
- Do not use different disc formats other than 8 cm or 12cm round discs.
- Please dispose of used batteries according to the regulations in your country.
- If the unit is disconnected to the battery, it will lose memorized data.
- If the source disc has poor sound quality due to scratches, dirt or a bad recording, the playback sound quality may be poor.
Remote control:
- Do not let the remote control fall onto the floor, where it may become jammed under the brake or accelerator pedals.
- Do not short-circuit, disassemble or heat the battery.
- Do not dispose of the battery in a fire.
- Dispose of used batteries properly.
IMPORTANT: Please adjust the touch effect on the TFT screen when you use the unit for the first time.
(For more details, please refer to "SYSTEM SETUP - 5. SYSTEM: Touch Adjust".)
INSTALLATION/REMOVAL AND ELECTRICAL CONNECTIONS
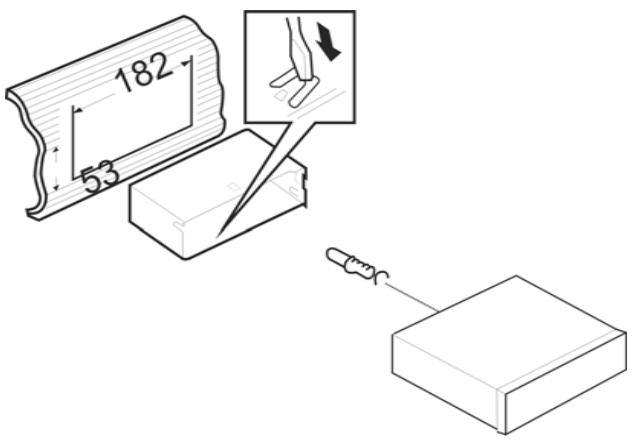
NOTE: The unit should be installed horizontally (do not go beyond an angle of over 30^ from to the horizontal) Before the final installation, first complete the electrical connections.
DIN FRONT-MOUNT
Installation of the unit
1. Metal Sleeve
Install the metal sleeve in the dashboard.
For optimum performance of the CD player, the unit should be positioned as horizontally as possible (do not go beyond 30^ from the horizontal). Fix the metal sleeve into place by pushing the metal tabs outwards using screwdriver. Then complete the electrical connections (page 7)
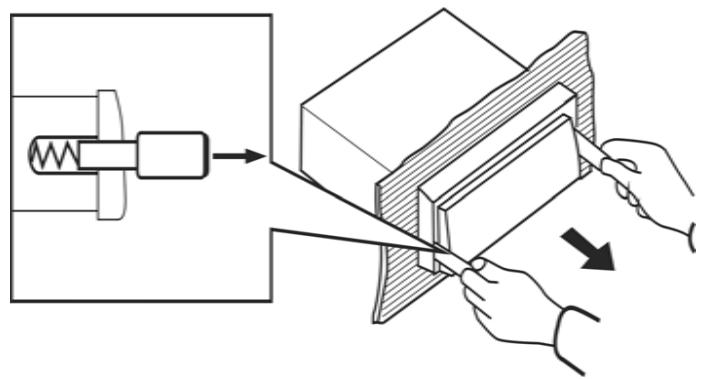
2. Front Mounting
Slide the main unit into the metal sleeve until the springs at either side of the radio snap into the sleeve openings.
3. Removing the Radio
Insert the release keys supplied with the unit into the grooves at both sides of the unit until you hear a click sound. Then remove the unit from the dashboard by pulling the release keys towards you.
ATTACHING & REMOVING THE DETACHABLE FRONT PANEL
Removing the detachable front panel
- Press the REL button to unlock the front panel.
- Push the front panel to right and pull the left side of the front panel away from the unit, as shown in the figure:
Attaching the detachable front panel
- First insert the right side of the front panel as shown in the figure and gently push the left side of the front panel onto the unit until you hear a click sound, which confirms that the front panel is firmly attached.

Note: Remove the protective plastic film from the screen in order to ensure optimum use of the touch screen.
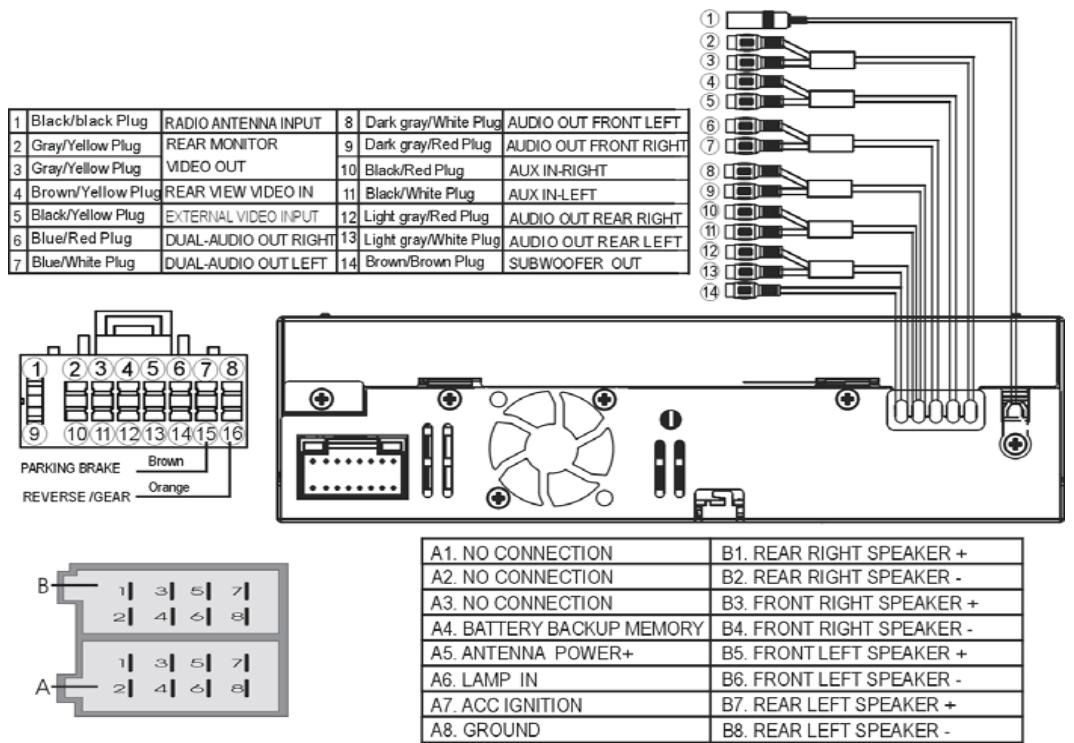
ELECTRICAL CONNECTIONS
Most vehicles are fitted with ISO connectors behind the dashboard, which makes it easier to connect your car radio. These connections can be found in the dashboard where the car radio will be fitted. Use these cables to connect the car radio. If your car is not fitted with these ISO connectors, we strongly advise you to consult your car dealer or a specialist to obtain the right adaptor. Once you have these cables, you will need to connect your loudspeakers and the power supply to the ISO connector, following the connection instructions below.
NOTES:
INCORRECT CONNECTIONS OR USE WILL VOID THE WARRANTY.
The manufacturer cannot be held responsible if the unit malfunctions due to incorrect connections.
- For safety reasons, the brown wire must be connected to the parking brake contact in order to activate the video display on the unit's screen.
The video display is activated permanently on the rear monitor.
- It is possible to connect a reversing camera (composite video) to the input provided for this purpose. In order to activate the reversing camera display, please also ensure that the orange cable is connected to the reversing contact or reversing light so that the unit automatically enters reversing camera mode when the reverse gear is engaged.
DUAL ZONE mode setup
This unit is equipped with a DUAL ZONE mode which allows the user, when one or two rear monitor(s) are (is) connected, to simultaneously obtain DVD, USB, SD or AUX mode on the rear monitor and radio mode on the unit.
In this case, the DUAL AUDIO OUT output must be used to obtain the sound for the DVD, the USB device, the SD card or auxiliary source on the rear monitor.
Main source and source selected to display on the rear monitor(s) (refer to the "SYSTEM SETUP" section)
In any source menu, press the icon located at the top left of the screen to display the system setup menu. Next, press the source directly to select the front or rear zone.
- When the unit is in radio mode, you can select any source for the rear monitor.
- When the unit is in a mode other than radio mode, the rear monitors will display the same source as the one selected on the unit
Controlling the unit or rear monitor
Press the IR-F/R button on the remote control to control the unit or the rear monitor.
Note: This function is switched off when the rear monitor is not available.
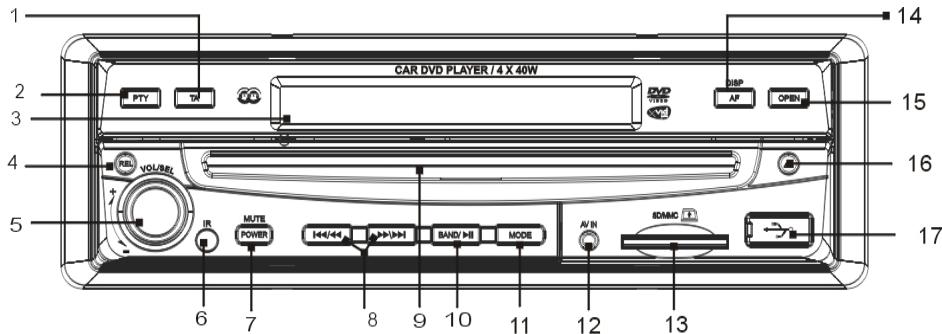
BASIC OPERATION
- TA (Traffic Announcement)
In radio mode, press the TA button to turn the traffic announcement function on /off.
- PTY (Program Type)
In radio mode, press once to seek a station by program type. Press it repeatedly to select a program type.
-
LCD screen
-
REL button
Press this button to unlock the detachable front panel.
- VOL/SEL+/- button
Adjust the volume by turning the button clockwise or counter clockwise. Press this button briefly to display the menu. You can choose one of the following settings: L-front/R-front/L-rear/R -rear/ Sub woof / Bass / Middle / Treble / TILT / Volume. Rotate the button to adjust the desired settings.
- IR window
Receives the infrared signal from the remote control.
- POWER/MUTE
Press this button to turn on the unit. Press and hold down the button for 1 second to turn off the unit.
When the unit is switched on, press the button briefly to shut off the sound output. Press it again to resume the previous sound level.
- / , buttons
In radio mode, press one of these buttons to seek a station automatically. Hold down one of the buttons to seek a station manually.
In DVD/USB/CARD mode press these buttons to select the previous or next file. Hold down the button for 2 seconds to fast forward or fast rewind.
-
Disc Loading Slot
-
BAND/II
In radio mode, press this button repeatedly to select the one of the following frequency bands: FM1/FM2/FM3/MW1/MW2.
In play mode, press this button to pause or resume playback.
- MODE button
Press this button to select one of the following sources: RADIO/DVD/SD/USB/AV1/AV2.
12. AV IN (audio/video in)
Connect the jack on the AV cable (supplied) to the AV IN input on the detachable front panel of the unit. You can then connect an external audio/video device to this adaptor, using a suitable A/V cable if necessary, then press the MODE button to switch to AV1 mode.
BASIC OPERATION
13. SD/MMC card slot
Insert an SD/MMC card. The unit will read the files from the SD/MMC card automatically.
NOTE: If the unit does not eject the SD/MMC card when it is pressed, just pull it out manually.
14. AF/DISP button (alternative frequencies/information display)
In radio mode, press this button to turn the alternative frequencies function on/off.
Hold down this button to display the following information: the current time, source selected for the main display, source selected for the front and rear displays and available media.
15. OPEN
Press to open or close the TFT screen.
16.
Press the button to eject a disc when it is loaded into the unit.
※ Press this button for a longer time to force the disc to eject if there is a malfunction while the disc is loading.
17. USB port
Insert a USB device, and the unit will automatically play the files on the device.
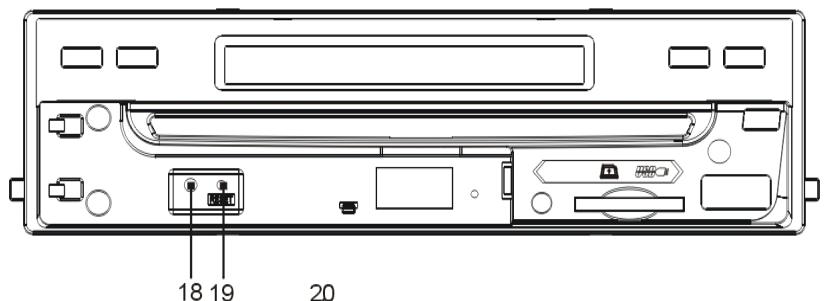
18. Anti-theft LED indicator
This indicator will flash when the detachable control panel is removed.
19. RESET
Insert a sharp object such as a pencil into the RESET button to reset the unit.
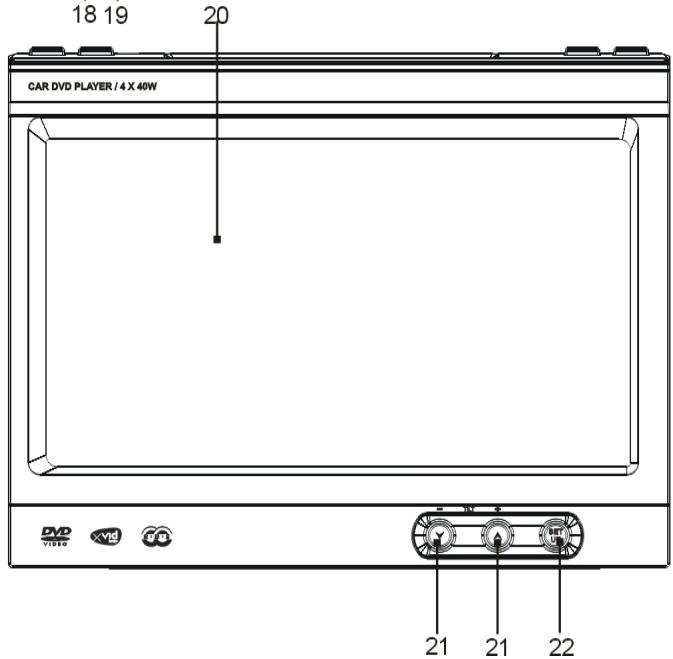
20. TFT touch screen
21. - TILT+
Press one of these buttons to adjust the angle of the TFT screen.
22. SETUP
In DVD mode, press the button to display the DVD setup menu. Hold down this button to display the system setup menu. In other modes, press the SETUP button to display the system setup menu.
REMOTE CONTROL
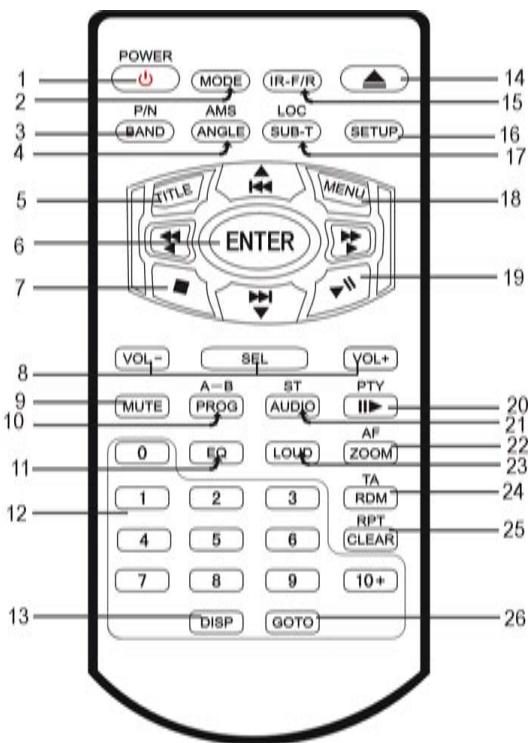
- POWER
- MODE
- BAND/P/N (band/TV system: PAL/NTSC)
- AMS/ANGLE (store stations automatically/angle
- TITLE
- [←/→] [↓/→] [▲/▼/←/→]/ENTER
- (Stop)
- VOL- VOL+/SEL (select)
-
MUTE
-
PROG/A-B (program/repeat A-B)
- EQ (equalizer)
- 0-9, 10+ number buttons
- DISP (display)
- (Eject)
- IR-F/R (front/rear in Dual Zone mode)
- SETUP
- SUB-T/LOC (subtitles/local stations)
- MENU
- II (play/pause)
- II▶/PTY (slow/program type)
- ST/AUDIO (stereo/audio)
- ZOOM/AF (zoom/alternative frequencies)
- LOUD (loudness)
- RDM/TA (random/traffic announcement)
- RPT/CLEAR
- GOTO
Installing the battery
Slide the tray out on the back of the remote control and insert the battery with polarity (+) on top as shown.
Use and care of the remote control
Point the remote control to the IR window on the detachable front panel for operation.
Notes:
Using the battery incorrectly can cause malfunctions. Take note of the following points for the remote control:
- Keep the battery out of the reach of children. Should the battery be swallowed, immediately consult a doctor.
- Use one CR2025 (3V) lithium battery
- Remove the battery if the remote control is not to be used for a month or longer.
1. POWER
Press to turn the unit on or off.
2. MODE
Press this button to select one of the following sources: RADIO/DVD/SD/USB/AV1/AV2.
3. BAND/P/N
In radio mode, press this button to select a frequency band. In DVD/VCD mode, press it to select one of the following TV systems: PAL, AUTO or NTSC.
4. AMS/ANGLE
In radio mode, press this button briefly to scan through the preset stations. Press it for a longer time to automatically store stations.
In DVD mode, press it to change the viewing angle (if different angles are available on the disc).
5. TITLE
In DVD playback mode, press the button to display the title menu.
6. [←/→] [←/→] [▲/▼/←/→]/ENTER
In the setup menu, use the / / / buttons as cursors and then press ENTER to access the selected item or confirm the selection.
In radio mode, press the / buttons to go from one preset station to another. Press the or button to seek a station automatically. Hold down the or button to seek a station manually.
In DVD/USB/CARD mode press the / buttons to select the previous or next file. Press the / buttons to fast forward or fast rewind.
7. (stop)
Press to stop playback.
8. VOL/VOL+ /SEL (select)
Refer to point 5 in the "BASIC OPERATION" section.
9. MUTE
Press this button to shut off the sound output. Press it again to resume the previous sound level.
10. PROG/A-B (program/repeat A-B)
In DVD/VCD/CD mode, press this button to set programmed playback.
In DVD/VCD mode, press this button to repeat a specific section (A-B) on a disc.
11. EQ (equalizer)
Press this button to select a preset equalizer mode.
In radio mode, press the number buttons (1-6) to select a preset station. Hold down one of these buttons to store a station under the corresponding preset number.
During playback, press the number buttons to select a chapter or track directly. Press the 10+ button to select a track or chapter with a number higher than 9. Press this button repeatedly to increase the number by ten (e.g. 1_, 2_, 3_, etc.).
13. DISP (display)
In DVD mode, press to display the following information: time elapsed or time remaining for the current title, time elapsed or time remaining for the current chapter, display off.
In VCD/CD mode: time elapsed for the current track, time remaining for the current track, time elapsed for the disc, time remaining on the disc, display off.
In MP3 mode: time remaining for the current track or time elapsed for the current track. Hold down this button to display the following information: the current time, front and rear monitor sources and available media.
14.
Press this button to eject a disc.
Hold down this button to open or close the TFT screen.
15. IR-F/R
Press this button to control the front or rear unit.
This function is disabled when no units are connected at the rear.
16. SETUP
In DVD mode, press this button to display the DVD setup menu. Hold down this button to display the system setup menu. In other modes, press the SETUP button to display the system setup menu.
17. LOC/SUB-T (local stations/subtitles)
In FM radio mode, press this button to receive the local stations only (strong signal). "LOC: ON" (local: on) is displayed. Press this button again to turn off this function.
During DVD playback, press this button to change the subtitle language.
18. MENU
In DVD mode, press this button to display the DVD menu.
In radio mode, press it to display RDS/RADIO menu.
- II (play/pause)
Press to start playback or resume playback.
- II▶/PTY (slow/program type)
In DVD mode, press this button to playback in slow motion forwards or backwards, in the following sequence:

In radio mode, press this button once to seek a station by program type. Press it repeatedly to select a program type.
- AUDIO/ST
In FM radio mode, press this button to select stereo or mono reception.
In DVD mode, press this button to select the audio language.
In VCD mode, press this button to select one of the following audio outputs: MONO LEFT, MONO RIGHT, MIX-MONO or STEREO.
- ZOOM/AF
In DVD/VCD mode, press to enlarge or reduce the picture size as follows:

In radio mode, press this button to turn the AF function on/off.
- LOUD
Press to turn the loudness function on/off.
- RDM/TA (random/traffic information)
In playback mode, press it to play tracks or chapters randomly.
In radio mode, press to turn the TA function on/off.
In other modes, hold down the button to turn the TA function on/off.
- RPT/CLEAR
In playback mode, hold down this button repeatedly to select a repeat playback mode.
During digit entry, press the button to clear the digit you have entered.
- GOTO
In radio mode, press this button and then use the number buttons to enter a frequency.
In DISC mode, press the GOTO button and the / cursors to select one of the following options and then press the ENTER button to go to the chosen option.
DVD mode: TITLE, CHAPTER, AUDIO, SUBTITLE, ANGLE, TT TIME, CH TIME, REPEAT, TIME DISP.
VCD mode: TRACK, DISC TIME, TRACK TIME, REPEAT, TIME DISP.
In CD mode: press the GOTO button to select one of the following fields: "DISC GOTO: : _", "TRACK GOTO: _: " or "SELECT /total track number". Then press the number buttons to select a time or track number.
In MP3/MPEG4 mode, press the GOTO button to highlight the track or time and then press the number buttons to select a track or time.
Note:
The GOTO function may not work for some discs (for example discs containing MP3 files).
Besides using the unit and remote control to perform operations, you can also do so by using the TFT touch screen.
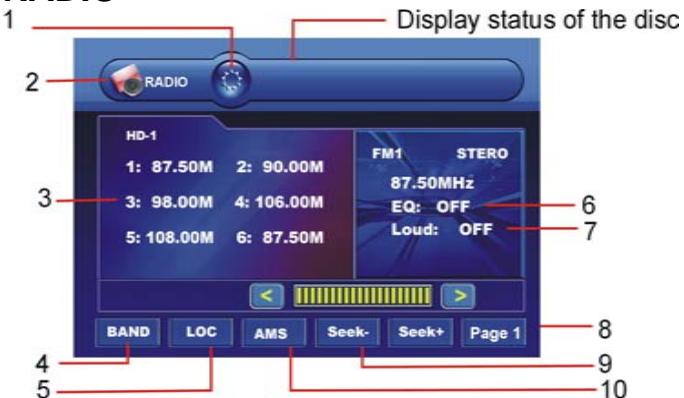
RADIO
A description of the different icon functions follows below:
4. BAND
- This icon allows you to dim the screen backlight (two levels).
- Display the system setup menu.
- Touch these icons to select one of the 6 preset stations. Hold down one of the 6 numbers to store the current frequency under that preset station number.
This icon allows you to select one of the following bands: FM1/FM2/FM3/MW1/MW2.
5. LOC (local stations)
Select local or distant stations.
6. EQ
Select a preset equalizer mode: POP, CLASSIC, ROCK, OFF.
7. LOUD
Turn the loudness function on/off.
8. Page1
Go to the RDS menu. (Refer to “RDS” for detail)
9. SEEK-/SEEK+
Seek a station automatically. Hold down to seek a station manually.
10. AMS
Touch briefly to scan through the preset stations. Hold down this icon to seek and store stations automatically.
RDS
- TA (traffic announcement)
Turn the Traffic
Announcement function on/off.
2. AF (alternative frequencies)
Turn the AF function on/off.
3. PTY (program type)
This icon allows you to turn the PTY function on. Press this icon repeatedly to select a program type.
4. Page 2
This icon allows you to display the RADIO menu. (Refer to the “RADIO” section for more details)
5. SEEK-/SEEK+
These icons allow you to seek a station automatically. Hold down to seek a station manually.
EON (Enhanced Other Networks)
ON: The unit keeps searching for alternative frequencies. If the current station does not broadcast traffic information,
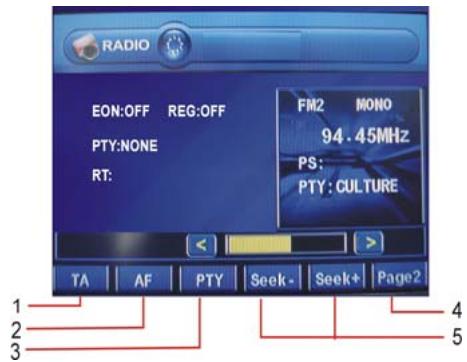
the unit will automatically receive a station that broadcasts traffic information when it is available.
OFF: Select this option to disable the EON function.
In DVD/USB/SD/MMC mode, press the lower part of the TFT screen to display the following menu:
SYSTEM SETUP
In any source menu, press the icon at left top corner to return to the system setup menu. If no operation is
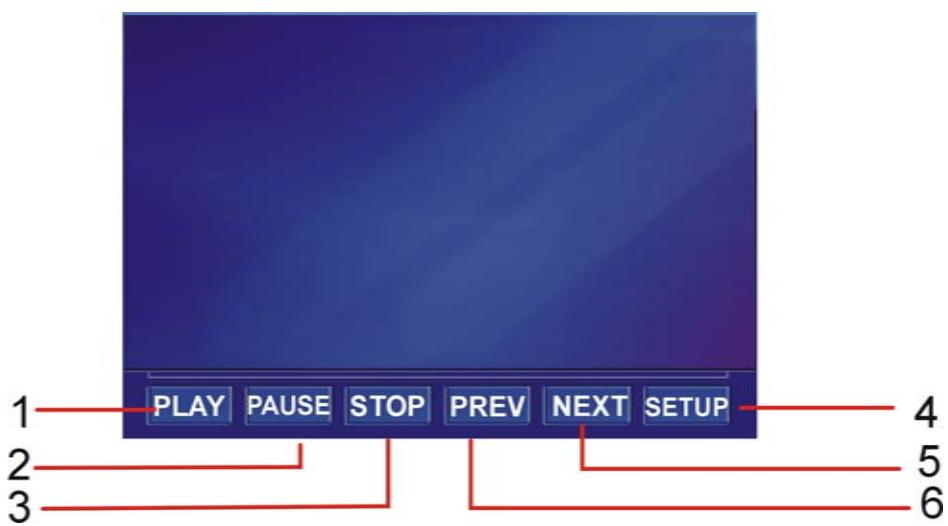
- PLAY
Start playback.
- PAUSE
Pause playback.
- STOP Stop playback.
- SETUP
Display the DVD SETUP menu.
- PREV
Skip to previous element.
REG (Regional)
ON: The unit ignores the regional variants of broadcasts. OFF: The unit receives the regional variants of broadcasts. performed in 5 seconds, the unit will return to the previous source menu.
1. Front (front monitor)
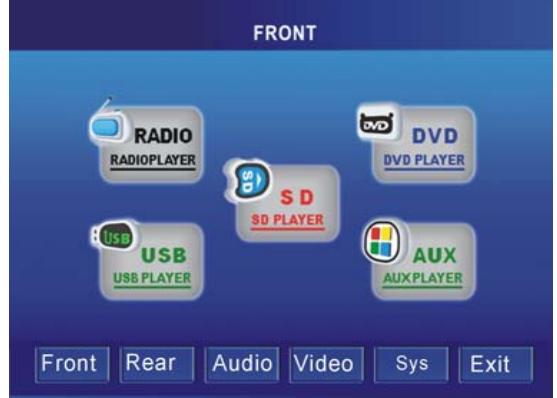
Press the icon to select the corresponding source: RADIO, DVD, USB, SD or AUX.
Press the icons on the bottom row to select a setting: Front, Rear, Audio, Video, Sys (System) or Exit.
6. NEXT
Skip to next element.
2. Rear
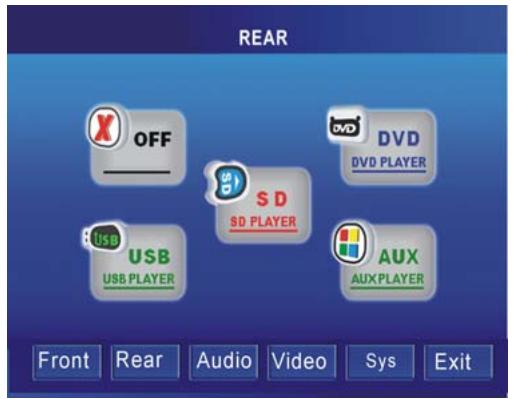
SYSTEM SETUP
If another monitor is connected to the unit (for example for passengers sitting at the rear of the vehicle), you can select a separate source from the source selected for the main TFT screen, except radio and AUX modes.
3. Audio
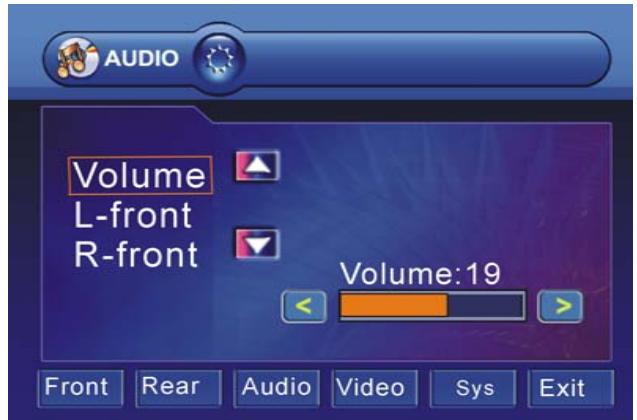
This sub-menu offers the following options: Volume, L-front, R-front, L-rear, R-rear, Subwoofer Bass, Middle and Treble can be adjusted. Press the / buttons to select a
setting and then touch the < and > buttons to adjust the setting.
4. Video
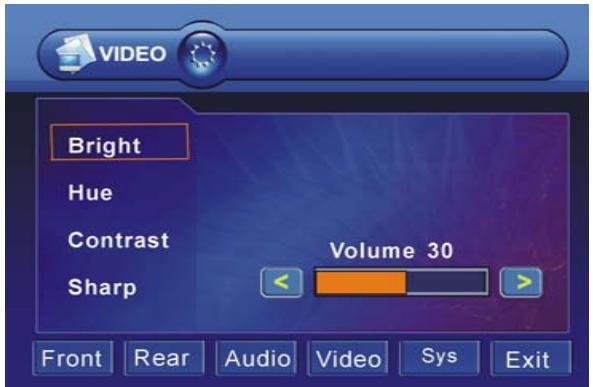
Bright: Adjust the screen brightness.
Hue: Adjust the screen hue.
Contrast: Adjust the screen contrast.
Sharp: Adjust the screen sharpness.
5. SYSTEM
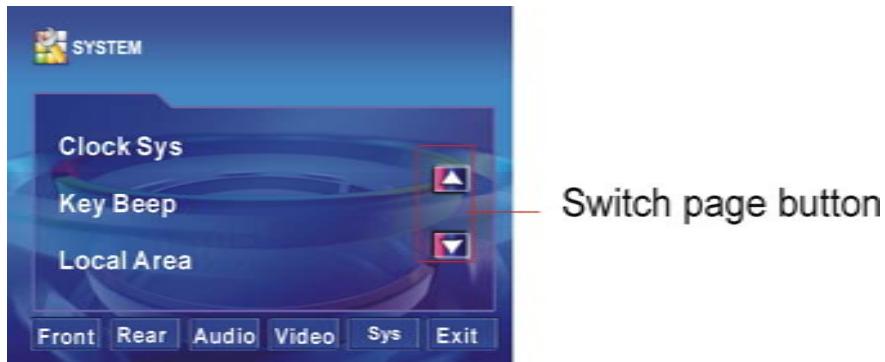
Clock Sys: Select 12-hour or 24-hour clock display.
Key Beep
ON: Enable button beep sound.
OFF: Disable beep sound.
Local Area
Select the option that corresponds to the zone in which you are located.
SYSTEM SETUP
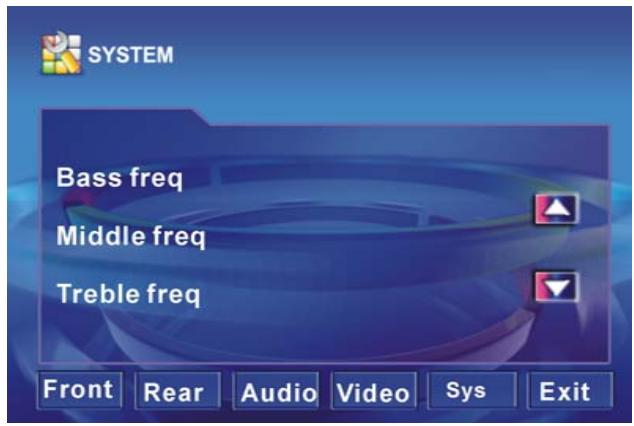
Bass freq: Adjust the bass.
Middle freq: Adjust the middle frequencies.
Treble freq: Adjust the trebles.

Subwoofer: Adjust the subwoofer frequencies.
Bass Q factor: Adjust the quality of the bass frequencies.
Mid Q factor: Adjust the quality of the middle frequencies.
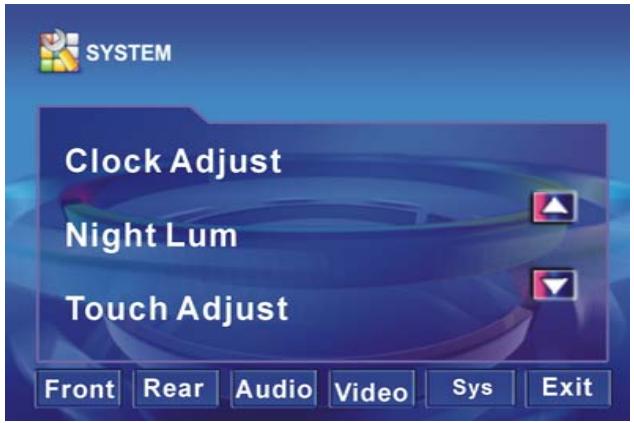
Clock Adjust: Adjust the time.
Night Lum (dimmer): Adjust the screen backlight brightness.
Touch Adjust
When using the product for the first time or the touch screen does not work properly, perform the following touch adjustment.
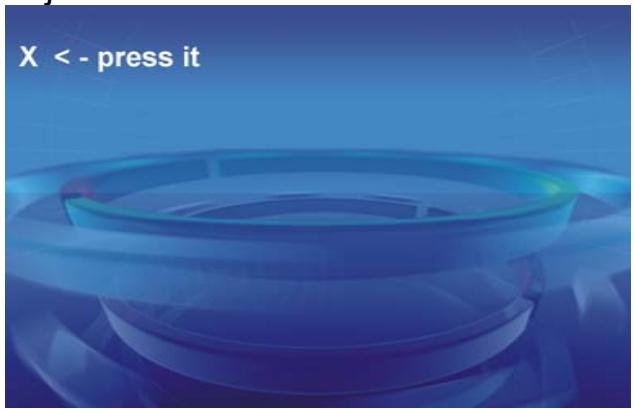
Accurately press the “X” symbol on the screen until the message “adjust succeed” is displayed.
6. EXIT
RADIO OPERATION
Press this button to return to the previous source menu.
Listening to the radio
- Press the [MODE] button to select the radio mode.
- Press the [BAND] button repeatedly to select the radio band in the following sequence:

- Press the [ / ] buttons on the unit to tune in a station automatically.
Tuning
There are 3 types of tuning mode available, seek tuning, manual tuning and preset tuning.
Seek tuning
- Press the [BAND] button to select the desired band.
- Press the [ / ] buttons on the unit to tune in a station automatically.
Manual tuning
- Press the [BAND] button to select the desired band.
- Hold down the [ / ] button on the unit to tune forwards or backwards manually.


RADIO OPERATION
Preset tuning - Recalling a preset station
Up to 30 stations on the (18 in FM and 12 in MW) can be stored in the unit's memory. Press [▲] or [▼] on the remote control to recall a preset station.
Auto store
Auto store is a function for storing up to 6 stations. If 6 stations with good reception cannot be received, the previous stored stations (if they exist) remain as they are.
- Press the [BAND] button to select the desired band (FM1-FM2-FM3-MW1-MW2).
- Hold down the [AMS] button for 2 seconds or longer. The stations with good reception are stored automatically.
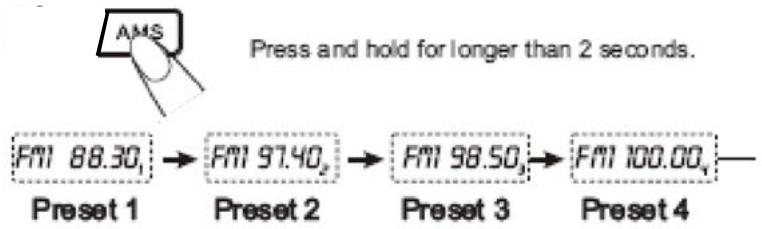
Manual store
In radio mode, press the [AMS] button on the remote control to scan stations. When your desired stations are searched, long press the digit [1-6] to store.
The RDS data are the PI, PS, TP, PTY, TA and AF DATA.
PI: Program identification Code for identifying program.
PS: Program Service Name Broadcast station name data expressed in alphanumeric character.
TP: Traffic Program identification data for traffic information broadcasting.
PTY: See "Using PTY to select Program" on the next page.
TA (Traffic Announcement): function enabling the broadcast of traffic information.
AF (Alternative Frequencies): function enabling automatic search for the best alternative frequency available.
RADIO OPERATION
Setting AF MODE
*Press AF button briefly to switch on/off AF mode. “AF” is displayed when AF function is on.
*With AF function on, it automatically searches for the best alternative frequency available for the current station.
*ALERT will be displayed when an emergency broadcasting is received; meanwhile sound output level will be adjusted to the preset output level automatically when the volume control is set at minimum.
*It is possible to programme the car radio so that it exits disc/USB/card mode or the current radio station when traffic information is broadcast. Press the TA button briefly to switch TA mode on or off.
When TA mode is switched on, the unit automatically broadcasts the traffic information available. To interrupt the broadcast of traffic information without switching off the TA function, briefly press the TA button. The unit will then return to the previous mode.
Using PTY to Select a Program
The PTY function allows you to search for stations with a particular program type. You can select the type by pressing the PTY button on the main unit or the remote control. Refer to the type for your selection as listed in table below:
| NEWS | POP | SOCIAL | FOLK M |
| AFFAIRS | ROCK | RELIGION | DOCUMENT |
| INFO | EASY M | PHONE IN | TEST |
| SPORT | LIGHT M | TRAVEL | ALARM |
| EDUCATE | CLASSIC | LEISURE | NONE |
| DRAMA | OTHER M | JAZZ | |
| CULTURE | WEATHER | COUNTRY | |
| SCIENCE | FINANCE | NATION M | |
| VARIED | CHILDREN | OLDIES |
When PTY is selected, the radio starts to search corresponding PTY information, and stops if the corresponding PTY information is found.
If corresponding PTY information is not found, normal radio reception is resumed.
MP3
- Playing a disc, an SD/MMC card or a USB device containing MP3 files
Connect a USB device using the supplied USB cable; insert a disc into the disc slot or an SD/MMC card into the card slot. The unit will automatically switch on when a disc, card or USB device is inserted. Press MODE button to select the source: DISC/USB/SD.
If a media containing MP3 or WMA files is inserted, playback will start automatically, even if the media contains JPEG files (audio files are read first). Press to return to the navigation menu and select other types of files.
During MP3 playback, press the button, then press the [▶/▶] buttons to select a folder, if applicable.
Then confirm using the ENTER button. Then select the next track desired using the buttons. Press [▶] PLAY button to start playback.
- Quick track selection
When playing MP3 files, press the or button on the remote control to go to the next or previous track.
- Repeat playing
When playing MP3 files, hold down the RPT button repeatedly on the remote control to select a repeat mode: REPEAT ONE, and REPEAT ALL (default mode). In REPEAT ONE mode, the unit will play the current track repeatedly. In REPEAT ALL mode, it will play all the tracks repeatedly.
- Selecting an MP3 track (or file) using the number buttons
Press the number buttons to select a track, then press the ENTER button to confirm.
Note:
- This function can only be operated using the remote control.
- If you make a mistake, press CLEAR button to clear.
DVD/VCD/CD/MP3/MPEG4/XVID OPERATION
5. Stop playing
When playing MP3 files, press the button to stop playback.
6. Pause playback
When playing MP3 files, press the button on the main unit or on the remote control to switch between [▶] play and pause.
7. Skip backward/forward/F.F/F.REW playback
Press the or button on the remote control to perform fast rewind or fast forward.

VCD/CD
1. Playing a VCD/CD
Insert a VCD/CD disc into the slot. The unit will automatically switch on. If a disc is already loaded, press the [▶] PLAY button to start playback.
2. Quick track selection
During VCD/CD playback, first press button to return to the beginning of the current track. Press this button again to play the previous track. Press the button to play the next.
3. Repeat play
During VCD/CD playback, hold down the RPT button on the remote control to repeat a track. Hold it down again to repeat all (default mode).
DVD/VCD/CD/MP3/MPEG4/XVID OPERATION
4. Play track at random
During VCD/CD playback, press the RDM button on the remote control to play any track at random. Press this button again to return to normal play.
Note:
- This function can only be operated by using the remote control.
5. Number buttons
Use the number button to select a track to play.
Note:
- This function can only be operated by using the remote control.
6. Stop play
During VCD/CD playback, first press the button to stop playback. Press the button to resume play. Press the STOP button twice to stop playback completely.
Note:
- This function can only be operated by using the remote control.
7. Pause playback
During VCD/CD playback, press the button on the unit or the remote control to switch between play and pause.
8. Skip backward/forward/F.F/F.REW playback
Press the or button on the remote control to perform fast rewind or fast forward.

DVD/VCD/CD/MP3/MPEG4/XVID OPERATION
9. System switch
In VCD playback, press the P/N button on the remote control to set the TV system to PAL, AUTO or NTSC.
Note:
- This function can only be operated by using the remote control.
10. Slow motion playback
In VCD mode, press the | · | button to play slow forward. The following speeds are available:

Note:
- This function can only be operated by using the remote control.
11. Increase or decrease the size of the picture
Press the ZOOM button to increase or decrease the picture size. Press the button repeatedly to change the zoom size.
Note:
- This function can only be operated by using the remote control.
12. On screen display
In VCD/CD mode, press the DISP button on the remote control and the display shows: SINGLE ELAPSED--SINGLE REMAIN-TOTALE ELAPSED--TOTAL REMAIN-DISPLAY OFF
13. Selecting an audio mode
In VCD/CD mode, press the AUDIO button on the remote control repeatedly to select an audio mode in the following order: MONO LEFT - MONO RIGHT - MIX MONO - STEREO.
DVD/VCD/CD/MP3/MPEG4/XVID OPERATION
14. Programmed playback
In VCD/CD mode, press the PROG button and the program menu will be displayed. Press the number buttons to select the track number. Use the direction buttons to move the cursor to START and press ENTER to start programmed playback.
Move the cursor to EXIT and press ENTER to exit the programmed playback. Move the cursor to and press ENTER to go to the last page; move the cursor to and press ENTER to go to the next page. During this process, press STOP to cancel the programmed playback.
Note:
- This function can only be operated by using the remote control.
MPEG4/XVID
1. Playing an MPEG4/XVID file
Disc/SD/MMC Card/USB disk operation refer to previous section MP3.
2. Number buttons
You can select any track directly by using the number buttons. The track will play automatically.
Note:
- This function can only be operated by using the remote control.
During MPEG4 (AVI, MPEG4) playback, first press the STOP button to stop playback. Press the PLAY button to resume play.
Press the STOP button twice to stop playback completely.
Note:
- This function can only be operated by using the remote control.
4. Pause playback
During MPEG4 (AVI, MPEG4) playback, press the PLAY button on the remote control or the button on the main unit to switch between play and pause.
5. Repeat playing
When playing MPEG4 files (AVI, MPEG), hold down the RPT button on the remote control to repeat the current track. Press it again to repeat all (default mode).
6. On screen display
Press the DISP button on the remote control and the display shows:

7. Quick track selection
During playback, first press button to return to the beginning of the current track. Press this button again to play the previous track. Press the button to play the next.
8. Skip backward/forward/F.F/F.REW playback
Press the or button on the remote control to perform fast rewind or fast forward.

DVD/VCD/CD/MP3/MPEG4/XVID OPERATION
DVD
1. Playing a DVD
Insert a DVD into the slot. The unit will automatically switch on. If a disc is already loaded, press the MODE button on the remote control to switch to DVD mode.
2. Quick chapter selection
During playback, first press button to return to the beginning of the current chapter. Press this button again to play the previous chapter. Press the button to play the next chapter.
3. Stop play
During DVD playback, first press the button to stop playback. Press the button to resume play. Press the button twice to stop playback completely.
Note:
- This function can only be operated by using the remote control.
4. Pause playback
During DVD playback, press the PLAY button to switch between play and pause.
5. Skip backward/forward/F.F/F.REW playback
Press the or button on the remote control to perform fast rewind or fast forward.

6. Repeat play
During DVD playback, hold down the RPT button on the remote control to select a repeat mode from:

DVD/VCD/CD/MP3/MPEG4/XVID OPERATION
7. System switch
In DVD playback, press the P/N button on the remote control to set the TV system to PAL, AUTO or NTSC. Note:
- This function can only be operated by using the remote control.
8. Slow motion playback
In DVD mode, press the | button to play forward or backward in slow motion. The following speeds are available:

Note:
- This function can only be operated by using the remote control.
9. Increase or decrease the size of the picture
Press the ZOOM button to increase or decrease the picture size. Press the button repeatedly to change the zoom size.

Note:
- This function can only be operated by using the remote control.
10. On screen display
In DVD mode, press the DISP button on the remote control and the display shows: TITLE ELAPSED-TITLE REMAIN-CHAPTER ELAPSED-CHAPTER REMAIN-DISPLAY OFF
DVD/VCD/CD/MP3/MPEG4/XVID OPERATION
11. Changing the viewing angle (multi-angle)
With DVDs featuring multi-angle (scenes shot from multiple angles) recordings, press the ANGLE button to switch between viewing angles during playback. The viewing angle changes in the following order: ANGLE1-ANGLE2-ANGLE3.
Note:
- This function is operated by using the remote control.
-
This function is only available with DVDs featuring multi-angle recordings.
-
The symbol on a DVD packaging indicates that it features multi-angle scenes. The number in the symbol indicates the number of angles from which scenes were shot.
- The ANGLE button does not function during fast forward/fast rewind or pause.
12. Changing audio language (multi-audio)
DVDs can provide audio playback with different languages. With DVDs featuring multi-audio recordings, you can press the AUDIO button to switch between language and audio systems during playback.
Note:
- This function can only be operated by using the remote control (for some DVDs, you need to change the language in the menu).
- This function is only available with DVDs featuring multi-audio recordings.
- The number in the ② symbol on a DVD packaging indicates the number of recorded languages/audio systems.
13. Changing the subtitle language (multi-subtitle)
With DVDs featuring multi-subtitle recording, press the SUB-T button to switch between subtitle languages during playback.
Note:
- This function can only be operated by using the remote control (for some DVDs, you need to change the language in the menu).
- This function is only available with DVDs featuring multi-audio recordings.
- The number in the symbol on a DVD packaging indicates the number of recorded subtitle languages.
DVD/VCD/CD/MP3/MPEG4/XVID OPERATION
14. Using the menus
In DVD mode, press the TITLE button on the remote control to display the DVD player menu. Note:
- This function is operated by using the remote control.
Note:
Auto switch to video
When playing a DVD whilst driving, there is DVD: PARKING BRAKE display on the screen. This message warns you that you must stop the car and activate the hand break in order to access the video mode.
Auto switch when reversing the car
When reversing the car, the screen of the unit will show reversing view automatically if a reversing camera is connected.
15. Repeat a specific segment on a disc
- During normal playback, press the A-B button once to determine to the starting point of the segment to be repeated and "A-" will appear on the screen.
- Press A-B again to determine the end point of the segment to be repeated and "A-B" will display on the screen.
- Set point A to set point B will be repeated in a loop until you turn off A-B repeat.
- Press A-B again to cancel the A-B repeat mode.
DVD SETUP
At STOP mode, press SETUP button on the remote control to display the setup menu. It includes General Setup, Audio Setup, Preference Page, Password Setup and Exit Setup menu.
- Within the setup menu, you can use [▲] [▼] [▲] [▶] buttons on the remote control to move the cursor, and then press the ENTER button to make your selection. Press [▲] can return to the previous menu.
- To exit setup menu, you can press SETUP button.
1. GENERAL SETUP PAGE
Setup TV screen display format and on screen display language.
1.1 TV DISPLAY (display format)
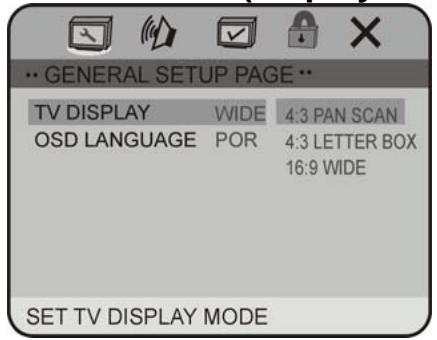
Reminder:
JPEG files can only be displayed in 16:9 format.
These options make it possible to choose the display format on the screen. However, the display format depends on the disc. WIDE means the picture will be showed fully on screen at 16:9 ratio. PS and LB: the picture will be displayed in 4:3 format, with black strips on the screen. Select the display format ratio that matches your monitor screen and disc.
| Picture Format on Disc | Monitor Screen Size | ||
| 4:3 | 16:9 | ||
| Pan Scan | Letter box | Wide Screen | |
| 4:3 | |||
| 16:9 | |||
Note:
The display format of DVD titles may vary; please refer to the information that accompanies your specific DVD.
Some DVD titles may be recorded in special formats. In such cases, the DVD titles will always appear on the screen in their original format, regardless of which screen display format you select.
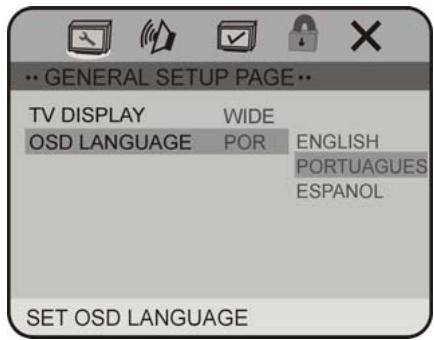
1.2 OSD LANGUAGE
On Screen Display (OSD) Language: select the whole setup menu and on-screen display language.
DVD SETUP
2. AUDIO SETUP PAGE
2.1 DOLBY DIGITAL SETUP
2.1.1 DUAL MONO
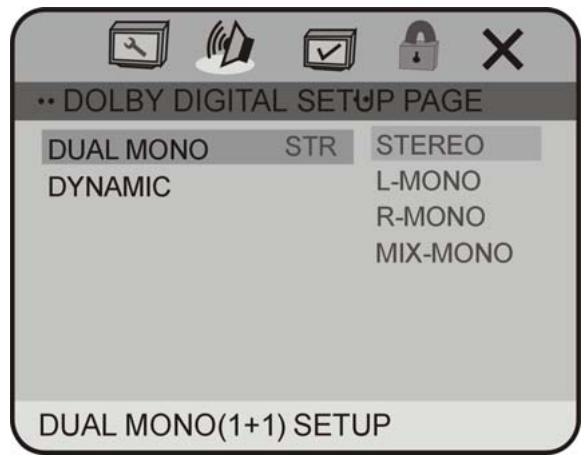
The available settings are: STEREO, L-MONO, R-MONO and MIX-MONO.
2.2.2 DYNAMIC
Select "FULL" to limit the volume variations as much as possible. Select "OFF", to switch off the dynamic compression function.
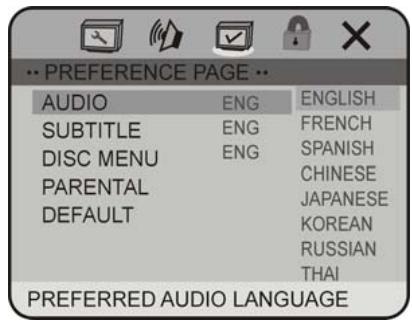
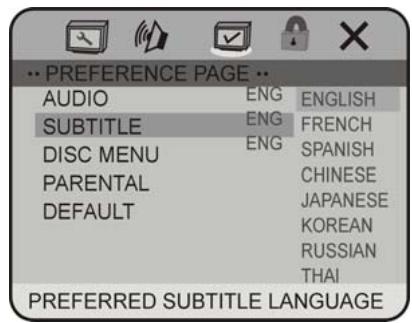
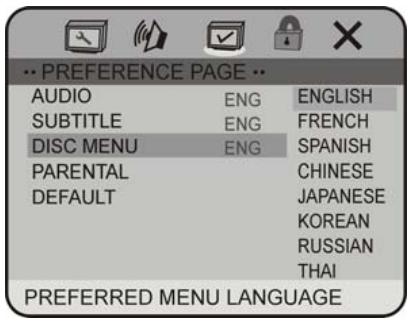
3. PREFERENCE SETUP PAGE
The preference setting is active only when no disc is inserted or play is stopped completely. The settings take effect the next time the unit is switched on.
3.1 AUDIO
Sets the preferred audio language as the default when playing DVD. (If available in DVD disc.)
3.2 SUBTITLE
Sets the preferred subtitle language as the default when playing DVD (if available in DVD disc).
DVD SETUP
3.3 DISC MENU
Sets the preferred menu language as the default when playing DVD (if available in DVD disc).
3.4 PARENTAL
The parental control function works in conjunction with the different censorship classes assigned to DVDs. These classes help to control the types of DVDs that the family watches. There are up to 8 censorship classes for DVDs.
Note:
- The PARENTAL control can be changed when PASSWORD MODE is set to OFF, operation refer to next section 4.1.
- After setting the level of parental control, please set the PASSWORD MODE ON to lock the change.

3.5 DEFAULT
DEFAULT: Resets to all the manufacturer's original settings. Press ENTER to perform the reset.

DVD SETUP
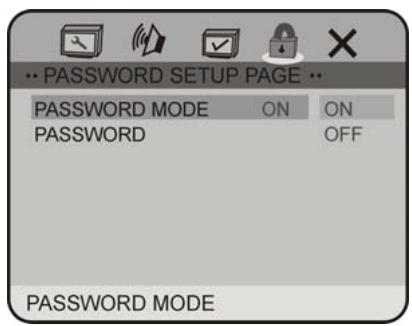
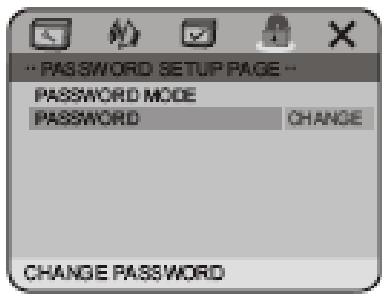
4. PASSWORD SETUP PAGE
4.1 PASSWORD MODE
-
Set PASSWORD MODE ON to lock the parental control function, and OFF to adjust the parental control level.
-
Need to input the password to select ON/OFF.
- The initial password is136900.
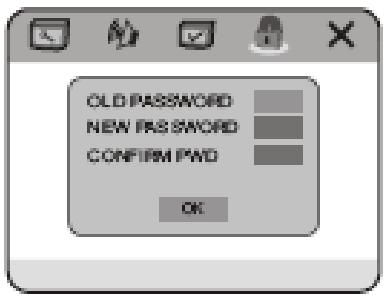
4.2 PASSWORD CHANGE
You can change the password; please type 6 digits as new password.
Note: In case you forgot the password, you can always use the initial password 136900.
TECHNICAL SPECIFICATIONS
- Some external hard disks may not be supported. Hard disks that have built-in power supply should be favoured.
Use a file system with FAT 32 format
Some models of USB storage devices or MP3 players may not be supported. - The quality and speed for reading JPEG photos depend on the resolution & the compression ratio of the photos. Some JPEG photos may not be read due to the disc quality and the format.
- JPEG files can only be displayed correctly in 16:9 format.
Some DVD+R/RW, DVD-R/RW, CD-R/RW discs may not be played due to the quality or burning conditions.
Technical characteristics are for illustrative purposes only, they may be changed without prior notice.
GENERAL
Power requirement 12 V DC (10.8~16V)
Grounding system- -negative type
Max: current consumption 15 A
Max: power output 40 W x 4
Nominal power output 22 W x 4 (R.M.S.)
Load impedance 4Ω (4-8Ω)
Fuse rating- 1.0 A
Dimensions 178 X 165 X 50 mm
Weight 2.6 kg
Video inputs Composite video
SCREEN
Size/type 7" (16:9)
Resolution 480*3 (RGB) x 234
Brightness (cd/m²) 300cd/m²
Contrast- 250:1
View angle V- 150
View angle H 160
TECHNICAL SPECIFICATIONS
DVD PLAYER
SN ratio - more than 70 dB (1kHz)
Dynamic range- more than 80 dB (1 kHz)
Distortion less than 0.2%
Video output 1.0 Vp--p ± 0.2V/75 Ω
Audio output (RCA) 1.5 Vrms ± 0.3V 10K Ω
Discs played- DVD-Video, DVD+R/RW, DVD-R/RW, MPEG4, XVID, CD-DA, CD-R/RW, MP3, JPEG, VCD 2.0
Region code
USB/SD (card)
USB port type 1.1
USB port maximum capacity 2GB
CARD type SD/MMC
CARD maximum capacity 1GB
Maximum number of (MP3) folders/sub-folders supported 999 files/16 sub-folders
FM TUNER
Frequency range -87.5\~108.0MHz
Usable sensitivity 10 dB
SN ratio 55 dB (mono)
Distortion 0.5% (mono)
Stereo separation -30 dB (65 dBu,1kHz)
MW TUNER
Frequency range 522~1620 kHz
30dB
Signal-to-noise ratio 50dB
TROUBLESHOOTING
| Symptom | Cause | Remedy |
| Power isn't switched ON. The unit doesn't operate | Leads and connectors are incorrectly connected. | Ensure that all connections are correct |
| The power cable fuse(s) has (have) blown. The vehicle fuse corresponding to the place where the car radio is has blown. | Replace the old fuse(s) with (a) new one(s) with the same capacity; try to determine the cause of the problem. | |
| Outside factors are causing the unit to operate incorrectly. | Reset the unit by pressing RESET with the tip of a pen. | |
| Operation with the remote control isn't possible. | Battery power is low. | Load new batteries. |
| Some operations are prohibited with certain discs | Check using another disc. | |
| Playback is not possible. | The disc is dirty. | Clean the disc. |
| The loaded disc is a type this unit cannot play. | Check the disc type with the Technical Specifications. | |
| Non compatible video system disc is loaded. | Change to a disc compatible to your video system. | |
| There is no sound. | The speaker connections are incorrect. | Check speaker connections (or the connection with an amplifier if used). |
| With some discs, 96 kHz output is prohibited | Switch the output setting to 48 kHz. | |
| the unit is performing as F.FWD or F.REV playback | There is no sound during F.FWD, F.REW playback. | |
| The mute function is on. | Press the MUTE button to restore the sound. | |
| The volume is too low. | Increase the volume. | |
| The prohibited mark is displayed and operation is not possible. | The operation is not available | This operation is not possible. |
| The operation is not compatible with the disc. | This operation is not possible. | |
| The pictures stops (pauses) and the unit cannot be operated. | Reading of data has become impossible during playback. | After pressing STOP once, start playback once more. |
TROUBLESHOOTING
| The player skips audio or video. | This unit is not firmly installed. The disc is dirty or damaged. | Check that the unit is installed firmly Clean the disc or change it. |
| The picture is deformed. | The aspect setting is incorrect for the display. | Select the appropriate aspect setting for your display. |
| Note: JPEG files can only be displayed in 16:9 format. |
| Symptom | Cause | Remedy |
| Playback is not possible. | The DVD has a different region code from this unit. | Replace the disc with one featuring the same region code as this unit. |
| Dialog language (and subtitle language) can not be selected. | The DVD playing does not have multiple language recordings. | You cannot select among multiple languages if they aren't recorded on the disc. |
| You can only select between options indicated in the disc menu. | Select using the disc menu. | |
| No subtitle is displayed. | The DVD playing does not have subtitles. | Subtitles are not displayed if they are not recorded on the disc. |
| You can only select between options indicated in the disc menu. | Select using the disc menu. | |
| Playback is not with the audio language and subtitle language settings selected in SET UP MENU. | The DVD playing does not have audio or subtitles in the language selected in the SET UP MENU. | Switching to a selected language is not possible if the language selected in the SET UP MENU is not recorded on the disc. |
| The picture is extremely unclear/distorted and dark during playback. | The disc features a signal to prohibit copying (some discs may have this). | Since this unit is compatible with the copy guard analogy copy protect system, when playing a disc that has a signal prohibiting copying, the picture may suffer from horizontal stripes or other imperfections when viewed on some displays. This does not mean this unit is malfunctioning. |
| No display in video mode | The brown wire is not connected to the parking brake. | Connect the brown wire to the parking brake. |
| No display from the reversing camera when the reverse gear is engaged. | The orange wire is not linked to the reversing sensor or to the reversing light. | Connect the orange wire to the reversing sensor or the reversing light. |
| Problems | Causes | Solutions |
| Impossible to receive stations. | The antenna is not properly connected | Connect the antenna properly. |
| Poor quality reception. | The antenna is damaged or is not completely extended. | Extend the antenna fully. If it is broke, replace it. |

If at any time in the future you should need to dispose of this product, please note that waste electrical products should not be disposed of with household waste. Please recycle where facilities exist. Check with Your Local Authority or retailer for recycling advice. (Waste Electrical and Electronic Equipment Directive)