
SUNGOO MOBILE NAVIGATION 35.01 - Gps NAVIGON - Free user manual and instructions
Find the device manual for free SUNGOO MOBILE NAVIGATION 35.01 NAVIGON in PDF.
| Product type | Mobile navigation GPS |
| Brand | NAVIGON |
| Model | SUNGOO MOBILE NAVIGATION 35.01 |
| Dimensions (L x W x H) | 108.7 x 83.5 x 22.3 mm |
| Weight | Approx. 145 g |
| Screen type | 3.5-inch color LCD display with resistive touchscreen |
| Screen resolution | 320 x 240 pixels (WQVGA) |
| Processor | Samsung 2440 - 400 MHz |
| Operating system | Microsoft Windows CE Net 5.0 |
| ROM memory | 256 MB |
| RAM memory | 64 MB |
| GPS receiver | Built-in (SiRF GPS III, 20 channels) |
| GPS antenna | Built-in + connector for external antenna |
| TMC receiver | Built-in (GNS FM6) |
| Battery type | Li-Ion 1200 mAh |
| Battery life | Up to 4 hours |
| Charging time | Approx. 4 to 5 hours |
| Power supply | 12V car charger (mini-USB cable) |
| Map storage | SD/MMC memory card (included) |
| Connectivity | USB 1.1, 3.5 mm headphone jack |
| Main functions | Road navigation, route planning, TMC (traffic info), POI (points of interest), logbook, route simulation |
| Operating temperature | -10°C to 60°C |
| Maintenance and cleaning | Clean with a damp cloth only |
| Safety | Do not use while driving, observe traffic rules, do not expose to moisture |
| Spare parts and repairability | Do not open the case, use only the provided or approved charger |
Frequently Asked Questions - SUNGOO MOBILE NAVIGATION 35.01 NAVIGON
User questions about SUNGOO MOBILE NAVIGATION 35.01 NAVIGON
0 question about this device. Answer the ones you know or ask your own.
Ask a new question about this device
Download the instructions for your Gps in PDF format for free! Find your manual SUNGOO MOBILE NAVIGATION 35.01 - NAVIGON and take your electronic device back in hand. On this page are published all the documents necessary for the use of your device. SUNGOO MOBILE NAVIGATION 35.01 by NAVIGON.
USER MANUAL SUNGOO MOBILE NAVIGATION 35.01 NAVIGON
natural_image
Symbol of a trash bin with crossed x and y lines, no text or numbers presentThis symbol showing a crossed-through refuse container signifies that, within the European Union, the product must be disposed of as sorted waste. This applies both to the product itself, as well as to all accessories that carry this symbol. This product may not be disposed of with unsorted household waste.
Table of Contents
1 Introduction......6
1.1 About this manual....6
1.1.1 Conventions....6
1.1.2 Symbols....6
1.2 Legal notice 6
1.2.1 Liability....6
1.2.2 Trademarks....6
2 Before you begin....7
2.1 Scope of Delivery....7
2.2 Description of the SUNGOO Mobile Navigation 35.01 8
2.3 Preparing SUNGOO Mobile Navigation 35.01 for use....8
2.3.1 Charging the rechargeable battery 8
2.3.2 Memory card....9
2.3.3 Preparing the navigation system for use 9
2.4 Navigation with GPS....11
2.5 Important safety information 12
2.5.1 Navigation safety information 12
2.5.2 Safety information for the navigation device....12
2.5.3 Safety guidelines when installing in your car 13
3 Operating the navigation software....14
3.1 Volume....14
3.2 Information....14
3.3 Software keyboard....16
3.4 Lists....16
3.5 Options....17
3.6 Menus....17
3.7 Switching on SUNGOO Mobile Navigation 35.01....17
4 Navigation ....17
4.1 Starting SUNGOO Mobile Navigation 35.01....18
4.1.1 Initialising the GPS-receiver 18
4.2 Specifying a new destination 19
4.2.1 Specifying the destination country....19
4.2.2 Destination address....19
4.2.3 Special destinations....20
4.2.4 Quick access to special destinations....22
4.2.5 Information about the destination 23
4.3 Selecting a saved destination....24
4.3.1 Last Destinations 24
4.3.2 Favourites....24
4.4 Navigating homewards 24
4.5 Determining destinations on the map 25
4.6 Starting navigation 25
5 Managing Destinations....27
5.1 Saving a destination 27
5.2 Defining a destination as home address....27
6 Routes with stages 27
6.1 Route planning....28
6.1.1 Entering the starting point....28
6.1.2 Entering route points....28
6.1.3 Editing route points....29
6.2 Managing routes....29
6.2.1 Saving routes....30
6.2.2 Loading routes....30
6.3 Navigation....30
6.3.1 Calculating and displaying routes....30
6.3.2 Simulating routes 30
6.3.3 Starting navigation....31
7 Options 32
8 Working with the map....34
8.1 Maps 34
8.2 Map in Preview mode 34
8.3 Map in Navigation mode 35
8.4 Reality View 38
8.5 Map in Destination search mode 39
8.5.1 Operating in Destination search mode 40
9 Useful functions....41
9.1 GPS status, storing the current location 41
9.2 Turn-by-Turn List 41
9.2.1 Blocking route sections....42
9.2.2 Removing blocks and using original routes 42
9.3 TMC (Traffic Information)....42
9.3.1 Displaying traffic messages 42
9.3.2 TMC Settings 43
9.4 Logbook....44
10 Configuring SUNGOO Mobile Navigation 35.01 ....44
11 Appendix ....46
11.1 Technical data 46
11.2 Declaration of Conformity 47
12 Index 48
1 Introduction
1.1 About this manual
1.1.1 Conventions
For better legibility and clarification, the following styles are used in this manual:
Bold and italics: Registered names, company and product descriptions.
SMALL CAPITALS: Window and dialogue box titles.
Bold: Highlighting of important parts in the text.
Underlined: Descriptions of buttons, input fields and other elements on the user interface.
1.1.2 Symbols
The following symbols refer to specific passages of text:

Instructions and tips for operating the software

More detailed information and explanations

Warnings
1.2 Legal notice
1.2.1 Liability
The software and the manual are subject to change without notice. NAVIGON AG is not liable for the accuracy of the information contained in this manual or for damages resulting from the use of this manual.
We always appreciate any suggestions that will allow us to offer improved performance of our products in the future, or information regarding malfunction.
1.2.2 Trademarks
All brands and trademarks mentioned in this document are possibly registered by third parties and are subject to the current legislation and
to the rights of their respective owners without reservation. All mentioned names of products, societies, or brands may be registered trademarks of their respective owners. Every right that is not explicitly accorded is reserved.
The absence of the explicit labelling of registered trademarks used in this manual does not imply that the brand is not subject to the rights of a third party.
- Windows and ActiveSync are trademarks of the Microsoft Corporation.
▶ NAVIGON is a registered trademark of NAVIGON AG
▶ Sungoo is a registered trademark of Media-Saturn-Holding GmbH.
2 Before you begin
2.1 Scope of Delivery
Please check that the contents of the delivery are complete. If the contents are incomplete, please notify us within 14 days of purchasing. The purchased product includes the following:
▶ SUNGOO Mobile Navigation 35.01 navigation device
Car cradle
▶ Car charger cable ( 12V-adapter for the vehicle's cigarette lighter)
USB cable
▶ TMC antenna
▶ SD-card containing software and navigation maps
▶ Manual
▶ CD with manuals (PDF, including languages not printed)
2.2 Description of the SUNGOO Mobile Navigation 35.01
text_image
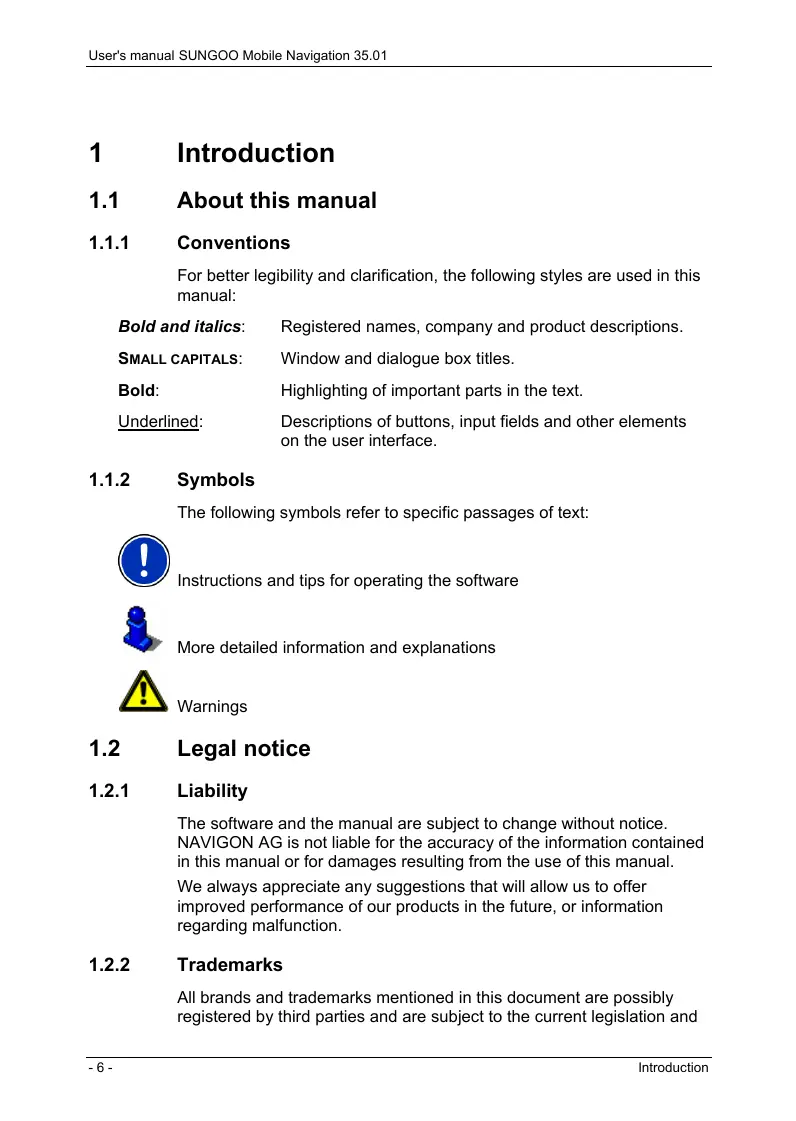
7 6 1 5 4 2 3 Sungoo1 Touch screen
2 Mini-USB-socket for car charger cable / USB cable
3 LED
4 /TMC Headset socket (also used to connect TMC-antenna)
5 SD Slot for SD-memory card
6 On/Off/Standby
7 Connection for external GPS-antenna
2.3 Preparing SUNGOO Mobile Navigation 35.01 for use
2.3.1 Charging the rechargeable battery
- Connect the car charger cable to the navigation device and to the vehicle's cigarette lighter. (see also "Supplying power to the navigation device", on page 11)
The LED of the SUNGOO Mobile Navigation lights orange during charging.
The LED lights green when the SUNGOO Mobile Navigation is fully charged.

Note: It takes approx. 4-5 hours to charge the device when the battery is flat.
A fully charged battery enables 4 hours of use.
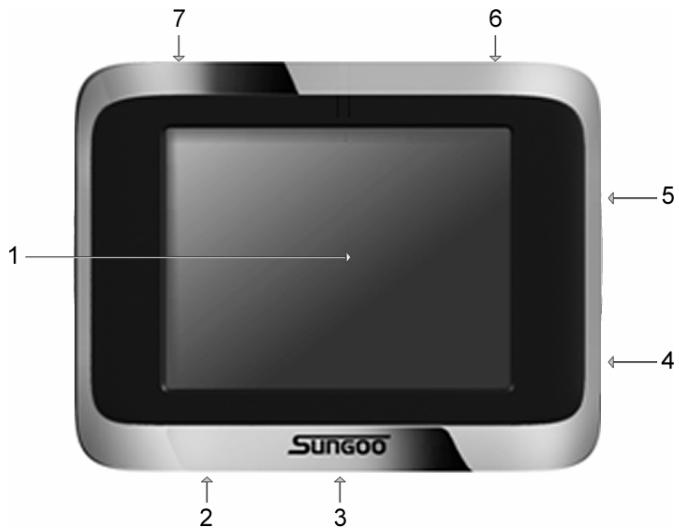
2.3.2 Memory card
natural_image
Simple line drawing of a door and a control panel (no text or symbols)You will find the memory card containing the navigation software inserted in the device.
Inserting a memory card
- Insert the memory card provided into the device (see image). Press the card into the device until it locks into place.
Removing the memory card
Should it be necessary to remove the memory card from the device, please proceed as follows:
- Switch the navigation device off by pressing the ⏻(On/Off/Standby) switch for at least 6 seconds.
- Press the memory card gently into the device until the lock disengages.
2.3.3 Preparing the navigation system for use

Caution! Please be sure to refer to the safety information in chapter "Important safety information" on page 12.
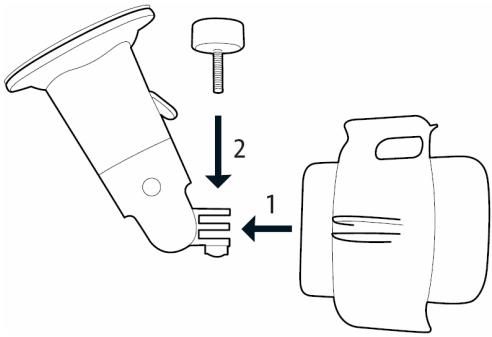
Assembling the cradle
text_image
Technical diagram showing mechanical assembly steps with labeled components and directional arrows- Assemble the cradle as shown in the diagram. No tools are required for this.
Securing the cradle
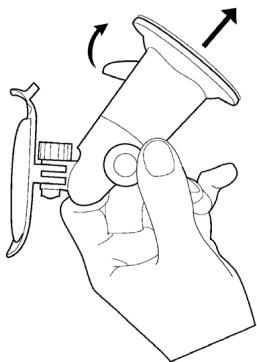
natural_image
Line drawing of a hand holding a mechanical clamp or tool, with directional arrows indicating rotation (no text or symbols)- Clean that part of the windscreen to which you would like to secure the cradle. The windscreen must be dry and free of dirt and grease.
- Place the suction cup of the cradle provided against the windscreen.
- Press the lever on the suction cup towards the windscreen.
Securing the navigation device to the cradle
▶ Insert the navigation device into the cradle by first placing it on the lower projections and then tilting it backward slightly until the latch clicks into place.
Supplying power to the navigation device
Included in delivery of the SUNGOO Mobile Navigation is a car charger cable with which power can be supplied to the navigation device via the vehicle's cigarette lighter.
The car charger cable is connected to the
SUNGOO Mobile Navigation via the mini-USB-socket 📋 on the bottom of the device.

Caution! The car charger cable is to be connected to cigarette lighters with an operating voltage of 12V only.
Connecting the TMC-antenna
The SUNGOO Mobile Navigation has an integrated TMC-receiver. For optimal reception, you should use the TMC-antenna provided.
- Connect the TMC-antenna to the headset socket /TMC on the right hand side of the SUNGOO Mobile Navigation.
- Secure the antenna to the windscreen using the suction cups.
2.4 Navigation with GPS
GPS is based on a total of 24 satellites that circle the earth and, in doing so, are constantly transmitting their position and time. The GPS receiver receives this data and calculates its own geographical position on the basis of the information transmitted by the various satellites.
For a sufficiently precise positioning it is necessary to obtain the data from at least three satellites. With the data from 4 or more satellites the altitude above sea level can also be ascertained. The determination has an accuracy of about 3 yards.
Once the navigation device has determined your position, this position can be used as a starting point for route calculation.
The map data on your navigation device includes the geographical coordinates of all digitally recorded points of interest, streets and places. This enables the device to calculate a route between a starting point and a destination.
The calculation of the current position and its representation on the map takes place once every second. So your current position is always shown on the map.
2.5 Important safety information
In your own interest, please read the following notices and safety information carefully before starting up your navigation system.
2.5.1 Navigation safety information
Use navigation system at your own risk.

Caution! To prevent accidents, do not operate the navigation system while driving.

Caution! Do not look at the display unless it is absolutely safe to do so!

Caution! Traffic regulations have priority over any instructions from the navigation system.

Caution! Only follow the instructions of the navigation system when the circumstances and the road traffic regulations allow you to do so! The navigation system will guide you to your destination even if you deviate from the calculated route.

Caution! Check that the cradle is secured and adjusted properly before each journey.

Note: If you have not understood the spoken instructions, or you're not sure about what to do next, you can refer briefly to the map or arrow view of your navigation system.
2.5.2 Safety information for the navigation device

Caution! Protect the device from moisture. The device is neither waterproof nor is it protected against splash water.

Caution! Do not run cables directly next to safety-relevant devices and supply lines.

Caution! After installation, check all safety-relevant equipment in the car.

Caution! Unplug the navigation device's power supply when you park the vehicle. The navigation device requires power in standby-modus, and may drain the vehicle's battery.

Caution! Do not open the navigation device's casing under any circumstances.

Caution! Do not expose the navigation device to extreme heat or cold. This may damage the device or impair its function.

Caution! Use only the charger provided or one that has been approved of by the manufacturer.
Connect the charger to a suitable power supply. The voltage requirements can be found on the device case and/or the packaging.

Note: Ensure that there are no kinks in the cable and that it will not be damaged by any sharp objects.

Note: To clean the navigation device, use a moist cloth only.

Note: Do not unplug by pulling on the cable. Doing so could damage the cable!

Note: Create a backup of the data contained on the memory card provided.

Note: The memory card must remain inserted in the device during operation of the navigation system.

Note: Use SD- or MMC-memory cards only! Ensure that memory card contacts are clean and undamaged.
2.5.3
Safety guidelines when installing in your car

Caution! Secure the cradle and the TMC-antenna in such a way that the driver's visibility is not impaired.

Caution! Do not attach the cradle within the deployment zone of airbags.

Caution! When installing the cradle, ensure that it does not represent a risk in the event of an accident.

Caution! Do not run cables directly next to safety-relevant devices and power supplies.

Caution! After installation, check all safety-relevant equipment in the car.

Caution! The car charger cable is to be connected to cigarette lighters with an operating voltage of 12V only.
3 Operating the navigation software
3.1 Volume
The volume of the spoken driving instructions can be adjusted during navigation.
You have started navigation. The map is open in Navigation or Destination search mode.
1. Tap the

(Volume) button.
The volume bar opens. It contains three buttons for adjusting the volume:

(Louder),

(Quieter),

(Volume on/off).
2. Tap the

(Volume) button again.
The volume bar closes.
3.2 Information
Symbols located at the top of the screen are used to display information.
GPS
The GPS symbol can show the following GPS-reception status:
No GPS: The built-in GPS receiver is not operational. Contact customer service if the problem persists.

No Signal: Data is being received from less than three satellites. Position cannot be calculated.

GPS Ready: Data is being received from at least three satellites. Position can be calculated.

For more detailed information regarding GPS status, please refer to chapter "GPS status" on page 41.
Energy
The Energy symbol can display the following conditions of the built-in battery:

The device is being supplied by an external power source. The battery is being charged.

The device is being supplied by its internal battery. The battery charge is sufficient.

The device is being supplied by its internal battery. The battery charge is low.
Direction
The Direction symbol shows you in which direction you are currently heading. It can show the following points of the compass: N, NE, E, SE, S, SW, W and NW.
TMC (Traffic Information)
The SUNGOO Mobile Navigation has an integrated TMC-receiver which provides the navigation system with up to date traffic messaging. If necessary, it can alter the route dynamically in order to avoid a traffic jam for example.

Note: This function is only available if TMC traffic messages are being transmitted in the country in which you are travelling. This is not the case in all countries.
The TMC symbol can display the following TMC-reception status:
No Symbol: There is no TMC receiver connected, or the connected or built-in TMC receiver is not operational.

Tuning: The TMC-receiver is operational, but cannot find a station that is transmitting TMC signals.

TMC on Standby: Traffic messages can be received.

For details on TMC functionality, please refer to chapter "TMC (Traffic Information)" on page 42.
3.3 Software keyboard
A software keyboard appears on the screen when text entries are necessary.
All entries can be made on the software keyboard using the fingertips. Only capital letters can be entered.
When entering town or street names you need not enter any special characters or umlauts. The navigation system fills in these characters for you automatically. If, for example, you are searching for "Würzburg", then simply enter "WURZBURG". Special characters may be helpful when naming saved destinations and itineraries, however.
Special keys

enters a space character.

deletes the character in front of the cursor.

opens the numeric keypad.

opens the letter keyboard.

opens the special character keyboard. As soon as you have special character, the letter keyboard reappears ly.
3.4 Lists
Often, lists appear from which you can select an entry. This is the case, for example, when you enter a location.
As soon as you enter the first letter, the largest city in the country specified which begins with this letter appears.
As soon as you enter the second letter, a list appears with all locations that begin with the letters entered.
If you enter additional letters, the list adapts to your entries. It only contains entries that begin with the text that has been entered or contain the text in the name. The more letters you enter, the shorter the list will become.
You can toggle the list by means of the buttons.

(Up) and

(Down)
In order to accept an entry from the list, simply tap on it.
The list closes as soon as you have accepted an entry.
3.5 Options
Some windows offer options that lead to further functions.

A description of all available options can be found in chapter "Options" on page 32.
3.6 Menus
Some buttons have menus which open when activated.
Tap on a menu button to execute its function.
If you would like to quit the options list without selecting a function, tap on the button you used to open the menu.
3.7 Switching on SUNGOO Mobile Navigation 35.01
▶ Press the ⏻ (On/Off/Standby) switch for at least 6 seconds.
4 Navigation
Use navigation system at your own risk.

Caution! Please be sure to refer to the safety information in chapter "Important safety information" on page 12.
Impaired GPS reception
If GPS reception is impaired, navigation will be interrupted. The navigation software remains active.
As soon as GPS reception is restored, the navigation system calculates any change of position which has occurred in the meantime. Navigation may simply be continued.
Arriving at your destination
When you have reached the specified destination, a message to this effect will be displayed.
Only your current position (triangle in orange) will now be shown on the map.
4.1 Starting SUNGOO Mobile Navigation 35.01
- Switch your navigation device on.
Each time the navigation device has been switched off completely (by pressing the ⏻(On/Off/Standby) switch for at least 6 seconds) the following message appears when the software is started again:
"Please note that the road traffic regulations are prior to the instructions of the navigation system. Please do not operate the device while driving."
-
After you have read and fully understood the text, tap the OK button.
-
If you do not accept these instructions, then tap the Cancel button in order to quit the navigation software.
The MAIN WINDOW will open. You can reach all of the navigation software functions via the MAIN WINDOW.
4.1.1 Initialising the GPS-receiver

Note: It can take up to 20 minutes to initialise the integrated GPS receiver for the first time.
Each time you switch on the receiver after this, the GPS reception will start within one minute.
If the navigation device has been switched off for more than a week, the next initialisation can take up to 10 minutes.
As soon as the navigation device has been switched on, initialisation of the GPS-receiver will begin.
In the right-hand top corner of the display, you will see the GPS symbol. As soon as data from at least 3 satellites is received, the symbol
changes to

GPS Ready.

Note: If the GPS symbol displays GPS Ready after considerably less than 20 minutes, it is advisable to leave the receiver switched on for at least a further 15 minutes so as to ensure reliable operation.

Caution! If you have connected the navigation device to the power supply via the vehicle's cigarette lighter, remove the connector before you leave the vehicle standing for a longer period of time.
As the GPS receiver requires a constant supply of power, it could drain the vehicle's battery.
Opening the Main Window
The MAIN WINDOW opens when the navigation software starts.
If another window is open, tap the Back button. The previous window will open.
Tap the (Back) button repeatedly, until the MAIN WINDOW opens.
4.2 Specifying a new destination
New destinations for the SUNGOO Mobile Navigation are all destinations that you have not yet navigated, or you have not yet stored.
You can enter an address here, select a special destination, or select a destination from the quick search function.
When you enter a new destination for the first time, the COVERED COUNTRIES list opens.
Tap on the country in which your destination lies.
4.2.1 Specifying the destination country
Above the right-hand upper corner of the uppermost entry field of the ADDRESS, POI IN A CITY, and POI OF NATIONAL SIGNIFICANCE windows, is the Country button. It shows the country code of the country from which navigation destinations can currently be entered.
If your destination is in a different country, then proceed as follows:
- Tap the Country button.
The COVERED COUNTRIES list opens. - Tap on the country in which your destination lies.
The COVERED COUNTRIES list closes again.
The symbol will display the country code of the destination country.

Note: Only countries of which at least a part is represented on the currently loaded map may be selected.
4.2.2 Destination address
- In the MAIN WINDOW, tap on New Destination > Enter an Address. The INPUT SEQUENCE menu opens when you enter addresses for the USA or Canada (and the corresponding map has been selected).
1a Select whether you would like to enter the street first and then the location (Street First), or first the location and then the street (City First).

Note: For the following instructions, it is assumed that you have selected City First as the order for entering addresses.
The ADDRESS window opens.
-
Enter the name or the postal code of the destination location.
-
Enter the name of the destination street. You can also enter the name of a well-known object, e.g. "Olympic stadium" or "Eiffel tower".
-
Enter the house number. If you don't know the number of the house, or you specified an object in the preceding step, then leave the field empty.
If you don't know the house number, but know the name of a nearby side street, then tap on the Cross Street field and enter the name of this street. The navigation system will calculate a route to the intersection of the streets you have specified.

Note: It is not necessary to enter all the address details.
If you specify the town only, the navigation system will calculate a route to the town centre.
If you specify the town and street without specifying a house number or side street, the navigation system will calculate a route to the centre of the street specified.
- Tap the Start Navigation button.
The map opens in Preview mode.

Note: For detailed information on how to start navigation, please refer to chapter "Starting navigation" on page 25.
4.2.3 Special destinations
Special destinations, also called POIs (Points Of Interest) for short, are useful addresses that are catalogued according to particular criteria.
Special destinations include ports, airports, restaurants, hotels, petrol stations, public buildings, doctor's surgeries, hospitals, shopping centres, etc.
Special destinations can be displayed on the map by means of a symbol. In the MAIN WINDOW, tap on Options > Settings > POI to select the categories to be displayed on the map.
Special destinations nearby
Special destinations nearby, are special destinations that are located within a given radius of your current location. This means you can always find the nearest petrol station for example, no matter where you are.

Note: GPS-reception must be sufficient for determining position. You
can see if GPS-reception is sufficient by looking at the ^3 (GPS Ready) symbol. For more detailed information, please refer to chapter "GPS status" on page 41.

Note: In quick access mode, there are three categories of special destinations available from the current vicinity, which can be searched for quickly and without additional entry. For more detailed information, please refer to chapter "Quick access to special destinations" on page 22.
- In the MAIN WINDOW, tap on New Destination > Search for POI > Nearby.
The POI NEARBY window opens. - Specify a category from which you would like to select a special destination.
If sub-categories exist for the category you have selected, the Sub Category list will open. - Specify a sub-category from which you would like to select a special destination.
The Name of the Destination list opens. It contains the nearest special destinations in the specified category, sorted by distance. - Tap on the name of the destination.
- Tap the Start Navigation button.
The map opens in Preview mode.

For detailed information on how to start navigation, please refer to chapter "Starting navigation" on page 25.
Special destinations of nationwide significance
Special destinations of nationwide significance are airports, places of interest, national monuments, large ports etc. This enables you to find places of interest, for example, without having to know the name of the location.
- In the MAIN WINDOW, tap on New Destination > Search for POI > Nationwide.
The POI OF NATIONAL SIGNIFICANCE window opens.
- Specify a category from which you would like to select a special destination.
The Name of the Destination list opens. It contains the nearest special destinations in the specified category, sorted by distance. - Tap on the name of the destination.
- Tap the Start Navigation button.
The map opens in Preview mode.

For detailed information on how to start navigation, please refer to chapter "Starting navigation" on page 25.
Special destinations in a given location
Special destinations in a given location can be useful when navigating in an unfamiliar town.
- In the MAIN WINDOW, tap on New Destination > Search for POI > in a City.
The POI IN A CITY window opens. - Enter the name or the postal code of the destination location.
- Specify a category from which you would like to select a special destination.
If sub-categories exist for the category you have selected, the Sub Category list will open. - Specify a sub-category from which you would like to select a special destination.
The Name of the Destination list opens. It contains special destinations from the specified category, sorted alphabetically. - Tap on the name of the destination.
- Tap the Start Navigation button.
The map opens in Preview mode.

For detailed information on how to start navigation, please refer to chapter "Starting navigation" on page 25.
4.2.4 Quick access to special destinations
The quick access system contains three categories of special destinations. Destinations in your vicinity that correspond to these categories can be listed quickly, without the need for additional entry.
In the MAIN WINDOW, tap on Options > Settings > POI to select the categories available in the quick access system.

Note: GPS-reception must be sufficient for determining position. You
can see if GPS-reception is sufficient by looking at the ^3 (GPS Ready) symbol. For more detailed information, please refer to chapter "GPS status" on page 41.
- In the MAIN WINDOW, tap the New Destination button.
The NEW DESTINATION menu opens.
The symbols of the categories which have been selected for quick access can be seen in the menu at the bottom.
- Tap on a category from which you would like to select a special destination.
The Name of the Destination list opens. It contains the nearest special destinations in the specified category, sorted by distance.
- Tap on the name of the destination.
The map opens in Preview mode.

For information on how to start navigation, please refer to chapter "Starting navigation" on page 25.
4.2.5 Information about the destination
For many destinations that you specify, there will be further information available, stored in the navigation system's database.
For example, for many restaurants there is a telephone number available. You can then call the restaurant in order to reserve a table, for example.
One of the destination entry windows described is open.
Tap the (Destination Info) button.
The DESTINATION INFO window opens. It contains all the information about the specified destination that is stored in the navigation system's database.
Tap the Cancel button to close the DESTINATION INFO window.
Tap the (Show on Map) button to show the destination on the map.
4.3 Selecting a saved destination
The following lists of destinations and addresses are available for selection in SUNGOO Mobile Navigation under My Destinations.
▶ LAST DESTINATIONS: destinations that you have previously navigated to.
▶ FAVOURITES: all destinations that you have stored in SUNGOO Mobile Navigation.
4.3.1 Last Destinations
SUNGOO Mobile Navigation saves the last 30 destinations to which you have navigated in the LAST DESTINATIONS list.
- In the MAIN WINDOW, tap on My Destinations > Last Destinations.
- Tap the destination to which you would like to navigate.
- Tap the Start Navigation button.
The map opens in Preview mode.

For detailed information on how to start navigation, please refer to chapter "Starting navigation" on page 25.
4.3.2 Favourites
Destinations to which you often travel can be saved in the FAVOURITES list.
In the FAVOURITES list, up to 300 destinations can be saved.

Information on how to store a destination can be found in chapter "Saving a destination" on page 27.
- In the MAIN WINDOW, tap on My Destinations > Favourites.
- Tap the destination to which you would like to navigate.
- Tap the Start Navigation button.
The map opens in Preview mode.

For detailed information on how to start navigation, please refer to chapter "Starting navigation" on page 25.
4.4 Navigating homewards
In SUNGOO Mobile Navigation you can save your address as home address. You can navigate to your home address at anytime by activating a single button.
The first time you tap the Take Me Home button, you will be requested to enter your address.

Further information about entering your home address can be found in chapter "Defining a destination as home address" on page 27.
In the MAIN WINDOW, tap the Take Me Home button.
If you have not yet entered your home address, a dialog window will notify you of this.
Navigation starts. The route profile used for the previous navigation applies.
4.5 Determining destinations on the map
You may indicate a destination directly on the map. In addition to towns and streets, you may also select special destinations quickly.
- In the MAIN WINDOW, tap on Show Map.

- Tap the (Destination search) button.
The map opens in Destination search mode.
- Tap on the point to which you wish to navigate.

Note: Please refer to chapter "Map in Destination search mode" on page 39 for information about how to change the map view so that your destination can easily be seen on it.
The destination that you have selected appears under the cross hairs.
The geographical coordinates of the destination and the corresponding address are shown in the bottom third of the screen.

- Tap the (OK) button.
The DESTINATION ON MAP window opens. The detailed address data of the selected destination is displayed in the left-hand upper corner.
- Tap the Take Me There button.
The map opens in Preview mode.

For detailed information on how to start navigation, please refer to chapter "Starting navigation" on page 25.
4.6 Starting navigation
The map is open in Preview mode.
The navigation destination is depicted by a small flag. The route and the estimated trip time are displayed.
Route Profile
A so called route profile forms the basis of the route calculation.
Tap the Route Profile button if you want to view or change the route profile.

Note: If you change the route options, these remain valid for subsequent navigation.
Information about how to change individual route profile settings can be
obtained by tapping on the corresponding 📄 (Help) button.

Turn-by-Turn List
If you would like to see detailed directions for the route, tap on Options > Show Turn-by-Turn List.

For detailed information about the functions in the TURN-BY-TURN LIST window, please refer to chapter "Turn-by-Turn List" on page 41.
Starting navigation
Tap the Start Navigation button or simply start driving.
No GPS reception
If the received GPS signal is insufficient, the following message will appear: "GPS reception is currently not sufficient. Navigation starts automatically as soon as GPS-reception is OK again."
You have the following options:
▶ Wait until GPS reception is sufficient for determining position, the route will be recalculated and you can begin navigation.
Tap the Cancel button. The MAIN WINDOW opens. Your destination is saved in the LAST DESTINATIONS list.
- Tap the Demo button. The route will be calculated using the centre of the specified location as starting point. Subsequently, navigation of the route will be simulated.
Tap

(Back) to end the demonstration.
5 Managing Destinations
Every destination that you enter, and the destinations from the LAST DESTINATIONS list may be saved to the FAVOURITES list. This makes sense if you frequently navigate to a particular destination.
5.1 Saving a destination
- Enter a destination as described in "Specifying a new destination" on page 19. Do not tap the Start Navigation button!
- Tap on Options > Save Destination.
- OR -
- Select a destination from the LAST DESTINATIONS list as described in chapter "Last Destinations" on page 24. Do not tap the Start Navigation button!
- Tap on Options > Save as Favourite.
- Enter a name for the destination.
- If you want to define the destination as your home address, tap on
the (Toggle) button so that the value Yes is highlighted in white. - Tap the Save button.
5.2 Defining a destination as home address
Only one destination from the FAVOURITES list can be defined as your home address.
You can then begin navigation to this destination very quickly by tapping the Take Me Home button in the MAIN WINDOW.
-
Select the destination which you want to define as your home address from the FAVOURITES list. (See chapter "Favourites" on page 24)
-
Tap on Options > Home Address.
The selected destination has now been saved as your home address. Your home address now appears in the FAVOURITES list marked by a house symbol.
6 Routes with stages
It is possible to plan routes without GPS-reception, in the comfort of your home for example. Planned routes can be saved for later use, this allows you to plan as many routes as you like e.g. for your holidays.
6.1 Route planning
- In the MAIN WINDOW, tap the Options button.
The options list opens. - Tap the Route Planning option.
The ROUTE PLANNING window opens.
6.1.1 Entering the starting point
The starting point of a route, is the point at which you want to begin your trip. This need not necessarily be the current location. If you are at home planning a route for your holidays, you could, for example, enter your hotel as the starting point.
The starting point is only important if you want to see a planned route on the map, but currently have no GPS reception, or you are not currently at the planned starting point. The starting point that you enter therefore has the flow number "0".
As soon as you begin navigation, your current location will be used as the starting point for the route calculation.
The first stage is therefore the trip to the route point with the flow number "1".
- Tap on the Specify Starting Point field.
The STARTING POINT menu opens.
If you want to enter your current location as the starting point:
- Tap on the Current Position menu item.
If you want to enter a different starting point:
- Tap the corresponding button.
- Enter the starting point. (See the corresponding section of chapter "Navigation" on page 17 ff.)
- Tap the Set Starting Point button.
The selected starting point will now be displayed next to the 0°(Starting Point) button.
Changing the starting point
▶ Tap the Specify Starting Point field.
The STARTING POINT menu opens. You can now enter a different starting point. Proceed as described above.
6.1.2 Entering route points
Route points are destinations on the route that you want to navigate to.
The flow number for each route point can be found on a button in front of it.
- Tap the Add Route Point field.
The ROUTE POINT menu opens. - Tap on the button for the desired destination entry type.
- Enter the route point. (See the corresponding section of chapter "Navigation" on page 17 ff.).
- Tap the Add button.
The selected route point will now be shown next to its flow number.
Repeat these steps for each additional destination that you want to add to your route.
6.1.3 Editing route points
Route points can be deleted from a route. The order of the route points can be varied as you wish.

Note: The start point (flow number "0") can neither be moved nor deleted.
▶ Tap on the route point that you want to edit.
The context menu contains the following buttons:

Route Point Up: Moves the selected route stage forwards.
(Example: route point 2 becomes route point 1).

Route Point Down: Moves the selected route point backwards.
(Example: route point 2 becomes route point 3).

Delete: Deletes the selected route point. A dialog window prompts to confirm deletion.
6.2 Managing routes
You can save each planned route under a particular name.

Note: Only the start point and route points will be saved, not, however, the calculated route. If you load a route that has been saved, it must be recalculated before navigation can begin.
You can load, rename or delete stored routes.
6.2.1 Saving routes
The ROUTE PLANNING window is open. You have entered the starting point and at least one route point.
- Tap on Options > Save Route.
- Enter a name for the route.
- Tap the Save button.
The destination is now saved to the SAVED ROUTES list. The dialog window closes.
6.2.2 Loading routes
- Tap on Options > Saved Routes.
- Tap the route that you want to load.
- Tap the Load Route button.
The ROUTE PLANNING window opens. The starting point and the route points of the loaded route have been entered.
6.3 Navigation
The route must be calculated first. You may then begin navigation or just simulate it.
6.3.1 Calculating and displaying routes
It is possible to calculate and display a planned route on the map even without GPS reception in order to get an impression of the journey.
The ROUTE PLANNING window is open. The starting point and at least one route point have been entered.
- Tap the Show Route button.
The map window opens in Preview mode.
The starting point and the route points are marked by flags. For each stage, the distance and the estimated trip time is given. This data is also displayed for the entire route.
6.3.2 Simulating routes
It is also possible to simulate navigation.

Note: The reception of GPS-signals is not necessary for simulation.
Simulation is restricted to routes of 60 mi max.
You have calculated and displayed a route.
▶ Tap on Options > Simulation.
The route will be recalculated for simulation purposes. Simulation starts when calculation has finished.
Ending simulation
You may end simulation at any time.
Tap the

(Back) button.
The ROUTE PLANNING window opens.
6.3.3 Starting navigation
You have calculated and displayed a route.
Route Profile
The calculation of a route is based on so called route options.
If you want to view or change these options, tap the Route Profile button.

Note: If you change the route options, these remain valid for subsequent navigation.
You can get information regarding changing individual route profiles by
tapping the corresponding

(Help) button.
Turn-by-Turn List
If you would like to see detailed directions for the route, tap on Options > Show Turn-by-Turn List.

For detailed information about the functions in the TURN-BY-TURN LIST window, please refer to chapter "Turn-by-Turn List" on page 41.
Starting navigation
Tap the Start Navigation button or simply start driving.
No GPS reception
If the received GPS signal is insufficient, the following message will appear:
"GPS reception is currently not sufficient. Navigation starts automatically as soon as GPS-reception is OK again."
You have the following options:
▶ Wait until GPS reception is sufficient for determining position, the route will be recalculated and you can begin navigation.
Tap the Cancel button. The MAIN WINDOW opens. The destination is saved to the LAST DESTINATIONS list.
7 Options
Some windows offer options that lead to further functions.
▶ Tap the Options button to open the options list.
▶ Tap the option you would like to execute.
▶ If you would like to quit the options list without selecting an option, tap the Options button again.
Delete All: Deletes all destinations from the LAST DESTINATIONS list. The list is then empty. A dialog window prompts you to confirm deletion.
Save as Favourite: Saves the specified destination to the FAVOURITES list.
For more detailed information, please refer to chapter "Saving a destination" on page 27.
Show on Map: Shows the specified address on the map.
Settings: Opens the SETTINGS window. Here you can configure the navigation system.
For more detailed information, please refer to chapter "Configuring" on page 44.
Logbook: Opens the LOGBOOK window. Here you can begin and end logbook recording.
For detailed information, please refer to chapter "Logbook" on page 44.
Saved Routes: Opens a dialog window in which you can load a stored route.
GPS status: Opens the GPS STATUS window. Here you can see details regarding GPS reception. You can also save data regarding the current location.
For more detailed information, please refer to chapter "GPS status" on page 41.
Home Address: Saves the selected destination as your home address. You can then begin navigation to this destination very quickly by tapping the Take Me Home button in the MAIN WINDOW.
Touchscreen Calibration: Opens a window in which you can recalibrate the touchscreen (realign) should it react imprecisely to touch.
Show Map: Opens the map in Destination search mode. Here you can determine your navigation destination directly on the map.
For more detailed information, please refer to chapter "Determining destinations on the map" on page 25.
Delete: Deletes the selected destination from the FAVOURITES list or the selected route from the SAVED ROUTES list. A dialog window prompts you to confirm deletion.
New Route: Deletes the starting point and all route points from the ROUTE PLANNING window, so that you can plan a new route. If necessary, save the previously planned route!
Product Information: Opens a window in which you can obtain information regarding the installed software.
Save Route: Opens a window in which you can save the planned route under a specific name. For more detailed information, please refer to chapter "Saving routes" on page 30.
Route Planning: Opens the ROUTE PLANNING window. Here you can plan routes, manage planned routes and start navigation to a planned route. For more detailed information, please refer to chapter "Routes with stages" on page 27.
Route Profile: Opens the ROUTE PROFILE window. Here you can view the options for route planning and, if necessary, change them.
Simulation: Simulates a navigation based on the displayed route. This simulation can be performed without GPS reception. Simulation is, however, restricted to routes of max 60 mi.
Rename: Opens a window in which you can change the name for the selected destination or route.
Traffic: Opens the TRAFFIC INFORMATION window in which pending reports are listed. For detailed information, please refer to chapter "TMC (Traffic Information)" on page 42.
Show Turn-by-Turn List: Shows detailed directions for the route, including all points at which you must turn. For more detailed information, please refer to chapter "Turn-by-Turn List" on page 41.
Factory Settings: Opens a window in which you can reset all settings to the original factory settings.
Delete Destination: Deletes the highlighted destination from the list (LAST DESTINATIONS or FAVOURITES). A dialog window prompts you to confirm deletion.
Save Destination: Saves the specified address in the FAVOURITES list.
For more detailed information, please refer to chapter "Saving a destination" on page 27.
Add to Route: Opens route planning. The address specified will be added as the first route point of a new route.
For more detailed information, please refer to chapter "Routes with stages" on page 27.
8 Working with the map
8.1 Maps
Even if you have stored several navigation maps on the navigation system's memory card, SUNGOO Mobile Navigation can only operate with one map at a time.
Tap on Options > Settings > Current Map to see which map is currently being used. You can also select another map here.
8.2 Map in Preview mode
You have entered a destination and tapped the Start Navigation button. - OR -
You have planned or loaded a route and tapped the Show Route button.
The map opens in Preview mode. The entire route is visible.
text_image
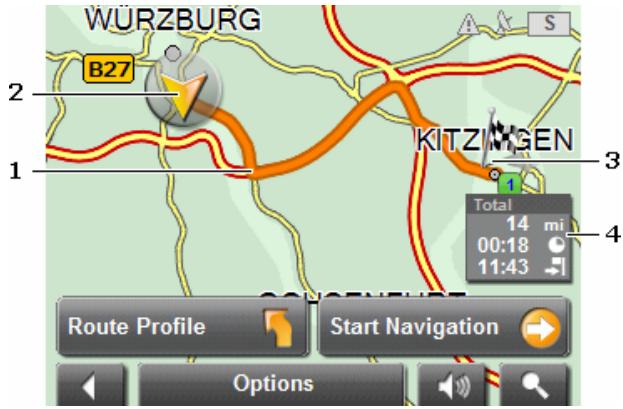
WÜRZBURG B27 KITZIMGEN 1 2 3 4 Total 14 mi 00:18 11:43 Route Profile Start Navigation Options1 The route is highlighted in orange.
2 A triangle in orange shows your current position.
If you display a planned or loaded route and the specified starting point is not the same as your current location, then the current position may or may not be shown on the preview.
3 The destination is marked with a little flag.
When you have planned or loaded a route and displayed it, the starting point and each route point will be marked with a little flag.
4 You will see the total distance for the route in a small info box, together with the estimated trip time and the estimated time of arrival.
This information can be displayed or hidden by tapping on Options > Settings > Basic Settings.
If you display a route with several stages, you will see this information for each stage.
- Tap the Route Profile button to view or change the settings on which the route calculation is based.
Tap the Start Navigation button to begin the journey.
When you display a planned or loaded route, the route may be recalculated. Starting point for the calculation is your current location. You will now be guided to the first route point entered.
Tap on Options > Show Turn-by-Turn List to view detailed directions for the route. (See "Turn-by-Turn List" on page 41)
Tap the (Destination search) button to view the map in Destination search mode. (See "Map in Destination search mode" on page 39).
8.3 Map in Navigation mode
After the route has been viewed in Preview mode, navigation will start. The map opens in Navigation mode.
text_image
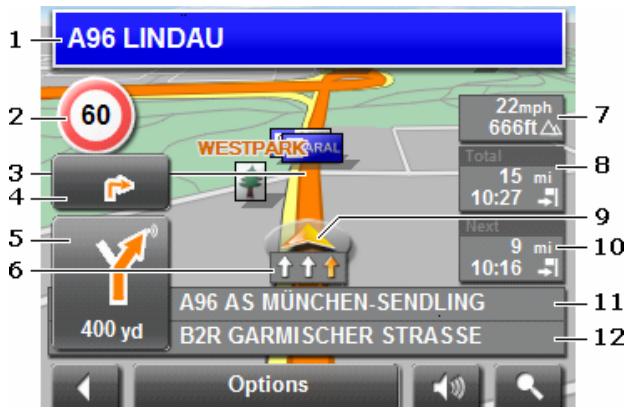
A96 LINDAU 60 22mph 666ft WESTPARKARAL Total 15 mi 10:27 Next 9 mi 10:16 A96 AS MÜNCHEN-SENDLING B2R GARMISCHER STRASSE 400 yd Options1 Signposting to be followed is displayed here.
2 Effective speed limits are displayed here (where available).
3 The route is marked by the colour orange.
4 When two manoeuvres need to be executed in quick succession, the small arrow field indicates the second manoeuvre to be executed.
5 The large arrow field shows a schematic depiction of the next junction which you should turn on to. The remaining distance to this junction is displayed beneath.
As you get closer to the junction, you will see a spot diagram instead of the distance.

text_image
1.7 miThe nearer you get to the junction, the more yellow spots are displayed.
If you don't have to change direction for a longer period, you will see only a forward-facing arrow. The distance for which you are to follow the road you are on is displayed beneath the arrow.
▶ Tap the large arrow field to hear current route instructions.
6 The traffic lanes to be followed to your destination are depicted in the colour orange.
7 The height above sea level and the current speed are displayed here.
8 The remaining distance to the destination, the estimated duration of the trip, and the estimated time of arrival can be seen in the Total field.
9 A triangle in orange shows your current position on the map. The map sector displayed changes continually so that your current position is always more or less centred on the map.
10 If you are navigating a route with several stages, you will see the remaining distance, estimated duration of the trip, and the estimated time of arrival for the next interim destination in the Next field.
11 The name of the next stretch of road that you must travel on is displayed in the upper street field.
12 The name of the street you are currently travelling on is displayed in the lower street field.

Note: The displays for many of the above mentioned fields can be configured via Options > Settings > Basic Settings. Some displays only function if the corresponding information is available on the map.

Note: If you tap on the large arrow field, the current route instruction will be repeated.
Tap on Options > Show Turn-by-Turn List to view detailed directions for the route. (See "Turn-by-Turn List" on page 41)
Tap the (Destination search) button to view the map in Destination search mode. (See "Map in Destination search mode" on page 39).
Quitting navigation
Tap the (Back) button to quit navigation. A dialog window prompts you to confirm.
Map functions in Navigation mode
When the map is open in Navigation mode, tap any point on the map. Buttons with various functions will be displayed.
2D/3D: Changes between 2D and 3D mode. The symbol for the mode that is currently set is marked orange.
Day/Night: Changes between "day" and "night" display modes. The symbol for the mode that is currently set is marked orange.
Interim Destination: Opens a menu for entering an interim destination.
The navigation system will first guide you to this interim destination. Afterwards, you may simply continue navigation to your original destination.
Skip Route Point: Tap this button to omit the next route point. This button is inactive when less than 2 route points are pending.
Block: Tap this button in order to block a section of the route that lies in front of you, i.e. to recalculate the route in order to avoid this section of the route, e.g. if you have heard of a traffic jam relating to this section on the radio.
Tap this button again to remove the block.
POI on Your Route: Tap this button to display special destinations on your route. This enables you to find out, for example, how far it is to the nearest services. A destination shown here can be added as an interim
destination by tapping the of its entry in the list.

(Interim Destination) button to the right
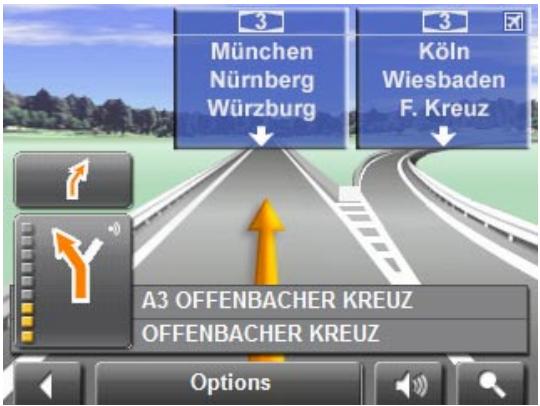
8.4 Reality View
When, during navigation, you approach a motorway junction, the map will change to Reality View mode.
text_image
München Nürnberg Würzburg Köln Wiesbaden F. Kreuz A3 OFFENBACHER KREUZ OFFENBACHER KREUZ OptionsThe Reality View mode shows very clearly, the signposting and lanes you must follow.
This display remains unchanged until you have passed the motorway junction. The map will then change back to Navigation mode.
If you want to change to Navigation mode before you have passed the junction, just tap any point on the map.

Note: Reality View mode is not available for every motorway junction.
Availability is dependent on the map data in use.
8.5 Map in Destination search mode
The map is always in Destination search mode when a pair of cross hairs can be seen.
When you are driving, the map's orientation does not change. It is always oriented with north at the top.
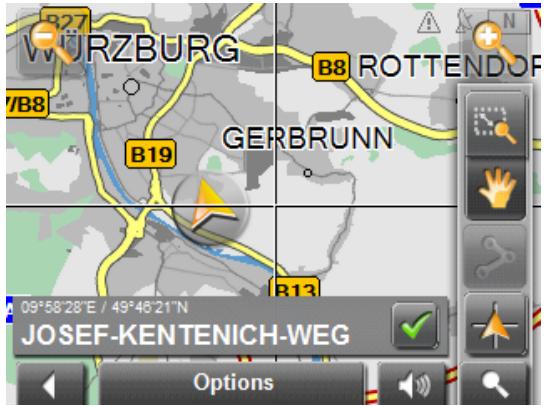
text_image
WURZBURG B27 B8 ROTTENDOF 7/B8 GERBRUNN B19 B13 09°58'28"E / 49°46'21"N JOSEF-KENTENICH-WEG Options
Zoom Out: The map section shown becomes larger, but you will see fewer details.

Zoom In: The map section becomes smaller, but you will see more details.

Zoom Mode: When this button is active, you can plot a map section with the pen or with your finger.
Plot the map section from upper left to bottom right and it will then zoom to fit the size of the screen.
Plot the map section from bottom right to top left, and the map will zoom out.

Pan Mode: When this button is active, you can move the map section with the pen or with your finger. Simply push the map in the desired direction.

Entire Route: Zooms the map so that the entire route is visible.

Current Position: Selects the map section shown so that the current location is centred.
8.5.1 Operating in Destination search mode
- Tap on the point to which you wish to navigate.
The destination that you have selected appears under the cross hairs.
The geographical coordinates of the destination and the corresponding address are shown in the bottom third of the screen.
- Tap the (OK) button.

Buttons with various functions will appear.
Take Me There: Begins navigation to the selected point. If you are currently navigating, navigation will be aborted.
Interim Destination: Sets the selected point as an interim destination. The navigation system will first guide you to this interim destination.
Afterwards, you may simply continue navigation to your original destination.
This function is only active during navigation.
Add to Route: Adds the selected point as the last point in the route plan. If no route plan was open, the selected point will become the first point in a new route plan.
Save: Opens the SAVE DESTINATION AS... window. You can enter a name under which the selected point will be stored in the FAVOURITES list.

For more detailed information, please refer to chapter "Saving a destination" on page 27.
Search Nearby: Opens the POI NEARBY window. Here you can search for destinations near the specified point. (See "Special destinations nearby" on page 21)
Tap the (Destination search) button to quit the Destination search mode. You will be returned to the window from which you started this mode.
Tap the (Back) button to return to the MAIN WINDOW. If you are currently navigating, you will be prompted to confirm your decision to quit navigation.
9 Useful functions
9.1 GPS status, storing the current location
In the GPS STATUS window, you will find an overview of the data the navigation system calculates from the received GPS signals.
GPS status is available via the options of several windows.
- Tap on Options > GPS status.
The current location can be stored in the FAVOURITES list. - Tap the Save Position button.
The SAVE DESTINATION AS... dialog window opens. The cursor blinks in the Name field. - Enter a name for the destination.
- Specify whether your current position should be stored as the home address.
- Tap the Save button.
9.2 Turn-by-Turn List
You can display detailed directions of the calculated route before starting navigation or at any time during navigation. This list displays all of the driving instructions in table form.
The map is open in Preview mode, Navigation mode or Reality View mode.
▶ Tap on Options > Show Turn-by-Turn List.
The TURN-BY-TURN LIST window opens.
1 Schematic depiction of the next junction where you must turn.
2 Distance to this junction.
3 Name of the street onto which you must turn.
4 Indicates whether you want to travel on the relevant route section or not.

(Allow): The relevant section may be included on the route.

(Forbid): The relevant section may not be included on the route.
9.2.1 Blocking route sections
-
Tap on the route sections that you do not want to travel on, so that the (Forbid) symbol appears next to them.
-
Tap the (Modify Route) button.
The navigation system calculates an alternative route avoiding the route sections selected. The new driving instructions are displayed in the TURN-BY-TURN LIST window.
- Tap the (Back) button to close the TURN-BY-TURN LIST window.
9.2.2 Removing blocks and using original routes
Section blocks can be removed at anytime.
In the TURN-BY-TURN LIST window, tap on Options > Calculate original route.
9.3 TMC (Traffic Information)
The integrated TMC receiver enables the navigation system to make use of current traffic messaging. If necessary, it can change your route dynamically in order to avoid a traffic jam, for example.
9.3.1 Displaying traffic messages
The traffic reports that are currently valid are available via the options of several windows.
- Tap on Options > Traffic.
The TRAFFIC INFORMATION window opens.
Above the list, the Traffic information button shows the type of traffic messaging listed and how many messages of this type are listed.
- Tap the Traffic information button to select the messages to be displayed.
For each traffic message in the list, information about the location and type of traffic obstruction will be displayed if in the TMC SETTINGS window, the value for Recalculate Route is set to On request.
▶ Tap a message to display detailed information.
The navigation system can Avoid ( ) or Ignore ( ) obstructions on the route. The Avoid / Ignore button shows the corresponding status.
▶ Tap the button to select the alternative setting.
- Tap the (Back) button to close the TRAFFIC INFORMATION window.


9.3.2 TMC Settings
In the TRAFFIC INFORMATION window, tap on Options > TMC Settings.
In the TMC SETTINGS window, you can set and configure the TMC-sender, this will determine the effect a received traffic message concerning your route will have on consequent routing.
Tuning Mode
Tap the Tuning Mode button to determine the settings for the station you have chosen to receive traffic information.
▶ Automatically: Use the arrow buttons in the station section to tune into another station. The system will search for another station if reception becomes poor.
▶ Hold station: Use the arrow buttons in the station section to tune into another station. The system will search for the same station on a different frequency if the signal becomes poor.
▶ Hold frequency: Use the arrow buttons in the station section to tune into another frequency. The system will not search for another station if reception becomes poor.
Recalculate Route
Tap on Recalculate Route to determine the effect new messages concerning your route have on route calculation.
▶ Automatically: An alternative route avoiding the traffic obstruction will be calculated.
On request: The message will be displayed. In this window, you can determine whether or not an alternative route should be calculated.
9.4 Logbook
You can use SUNGOO Mobile Navigation to record a logbook. The logbook is recorded in the "Logbook.xls" file. You can open the file with Microsoft Excel. Each recorded trip is added at the bottom of the table as a new entry.
During the first recording of a trip, the "Logbook.xls" file is created in the "MN6 Logbook" directory on the navigation device's memory card. If you delete or move this file, a new file will be created when you next record a trip.

Note: Trips are recorded simultaneously in an additional file. This file is compatible with the WISO Sparbuch 2007 program and is called "MN6DriversLog.bin". It can also be found in the "MN6 Logbook" directory on the navigation devices memory card.

Note: When logbook recording is started, every movement of the vehicle will be recorded, even when you are not navigating.
Starting a recording
- Tap on Options > Logbook.
- Enter the required details.
- Tap the Start button.
Stopping the recording
- Tap on Options > Logbook.
- Tap the Stop button.

Note: A dialog window opens when you have reached your destination. Specify whether you would like to end logbook recording or not.
10 Configuring SUNGOO Mobile Navigation 35.01
The SETTINGS window is where you can adapt SUNGOO Mobile Navigation to suit your personal requirements.
The settings can be reached via the options of several windows.
▶ Tap on Options > Settings.
The SETTINGS window has several buttons: Current Map, POI, Basic Settings and Route Profile.
▶ Tap a button to open the corresponding settings window.
The settings of the individual windows are distributed on several windows. You can toggle between these windows with the

(To the Left) and

(To the Right) buttons.
Some settings can only accept two or three different values. These
settings can be recognised by the Toggle (Toggle) button. All potential values are visible. The value that is currently valid is highlighted in white.
Tap the
Tap the values.
(Toggle) button to alternate between the potential
Some settings can accept several different values. These settings can
be recognised by the (List) button. The value that is currently valid is visible.
- Tap the (List) button.
A list with all potential values opens. The value that is currently valid is marked.
-
Tap the desired value. It is now marked.
-
Tap the OK button.
The list closes again. The new value will be displayed.
For each setting there is a 📄 (Help) button. When you tap it, you will see a precise explanation of the corresponding setting.
You can close the settings windows in two ways:
Tap the Done button.
Any changes you have made will be adopted.
▶ Tap the Cancel button.
Any changes you have made will not be adopted.
The SETTINGS window is open again.

11 Appendix
11.1 Technical data
| Dimensions | 108,7x 83,5 x 22,3mm | |
| Weight | approx. 145 g | |
| Operating conditions | Operating temperature | -10°C bis 60°C |
| Storage temperature | -20°C bis 70°C | |
| Humidity | 0% bis 90%, non-precipitating | |
| CPU | Samsung 2440-400Mhz | |
| Operating System | Microsoft Windows® CE Net 5.0 | |
| Display | 3.5"-LCD-Colour display with resistive Touch-Panel320 x 240 pixels (WQVGA)landscape format, permeable | |
| Memory | ROM | 256 MB |
| RAM | 64 MB | |
| GPS | built-in (SiRF GPS III, 20 channels)Built-in antennaSocket for external antenna | |
| TMC | built-in (GNS FM6) | |
| I/O | Keyboard | Software keyboard |
| Loudspeaker | built-in | |
| Headset | 3.5 mm phone jack | |
| Memory card | SD, MMC | |
| USB | USB 1.1 | |
| Rechargeable battery | Type | Li-Ion, 1200 mAh |
| Period of operation | up to 4 hours | |
| Charging | Electronic | built-in |
| Duration | approx. 4-5 hours | |
| Car charger cable | Input | 12V = (Direct current, DC) |
| Output | 5V =, 1A (Direct current, DC) | |
11.2 Declaration of Conformity
Products with the CE marking comply with Radio & Telecommunication Terminal Equipment Directive (R&TTE) (1999/5/ECC), the Electromagnetic Compatibility Directive (89/336/ECC) and the Low Voltage Directive (73/23/ECC) – as amended by Directive 93/68/ECC - issued by the European Community Commission.
Accordance with these directives implies conformity with the following European Standards:
EN301489-1
EN301489-3
EN55022
EN55024
EN61000-3-2
EN61000-3-3
EN60950 / IEC 60950
The manufacturer is not liable for modifications made by the user which may alter the device's conformity with the CE label, nor the consequences thereof.
12 Index
B
Block.... 38, 42
C
Calibration 32
Configuration 44
Current Position Save....41
D
Data entry.... 16
Destination
Direct Access 22
Enter an Address 19
Favourites 24
From Map 25
Home Address 24, 27
Input Sequence.... 19
Last Destinations 24
My Destinations 24
New Destination.... 19
Save....27
Search for POI 20
in a City 22
Nationwide....21
Nearby 21
Start Navigation 25
Take Me Home 24, 27
Turn-by-Turn List 26
E
Energy 11, 15
Entering data 16
F
Factory Settings 33
G
GPS
Faulty reception 17
Initialise.... 18
Signals 11
Symbols.... 14
GPS status 41
H
Home Address 24, 27
|
Input Sequence 19
Interim Destination 37
K
Keyboard...... 16
L
Logbook 32,44
M
Main Window.... 18
Manual
Symbols 6
Map
Destination search 39
Navigation 35
Preview 34
Reality View 38
Memory card 9
Menu 17
My Destinations.... 24
N
Navigation
Block 38,42
Interim Destination.... 37
No GPS reception.... 26, 31
POI on Your Route 38
Route Profile 26, 31
Skip Route Point 38
Start 25,31
Turn-by-Turn List 26, 31
New Destination 19
0
Options.... 17, 32
P
POI
Direct Access 22
in a City 22
Nationwide 21
Nearby 21
POI on Your Route 38
Product Information 33
R
Reality View...... 38
Recalculate Route 43
Route Planning....27
Route points
Delete 29
Indicate 28
Order 29
Route Profile.... 26, 31
Routes
Calculate 30
Manage 29
Planning 28
Route points....28
Route Profile 31
Save....30
Simulation 30
Start Navigation 31
Starting Point 28
Turn-by-Turn List 31
S
Safety information 12
Scope of Delivery 7
Search for POI
Direct Access.... 22
in a City 22
Nationwide 21
Nearby 21
Settings
Calibration 32
Configuration 44
Factory Settings.... 33
Product Information 33
Volume 14
Simulation
Quit 31
Start 30
Skip Route Point 38
Software keyboard 16
SUNGOO Mobile Navigation 35.01
Description......8
Energy 11
Installation 9
Memory card....9
Scope of Delivery 7
Start 18
TMC 11
Symbols used in this manual 6
T
Take Me Home.... 24, 27
TMC
Recalculate Route 43
Show 42
Symbols 15
Tuning Mode 43
TMC Settings
Recalculate Route 43
TMC 43
Traffic Information 43
Tuning Mode 43
Trade marks 6
Traffic Information
Recalculate Route 43
Show 42
Tuning Mode 43
Tuning Mode 43
Turn-by-Turn List
Block 42
Show....26, 31, 41
V
Volume 14
W
Warranty....6
Imprint
NAVIGON AG
The information contained herein may be changed at any time without prior notification. This manual nor any parts thereof may not be reproduced for any purpose whatsoever without the express written consent of NAVIGON AG, nor transmitted in any form either electronically or mechanically, including photocopying and recording. All technical specifications, drawings etc are subject to copyright law.
© 2007, NAVIGON AG
All rights reserved.