
V250 - Cordless phone ZYXEL - Free user manual and instructions
Find the device manual for free V250 ZYXEL in PDF.

User questions about V250 ZYXEL
0 question about this device. Answer the ones you know or ask your own.
Ask a new question about this device
Download the instructions for your Cordless phone in PDF format for free! Find your manual V250 - ZYXEL and take your electronic device back in hand. On this page are published all the documents necessary for the use of your device. V250 by ZYXEL.
USER MANUAL V250 ZYXEL
3 Quick Reference - Basic Operations
Make a call
Lift the V-250 from the charger and press Off-hook (8). Dial a number. To end the call, place the V-250 on the charger or press On-hook (9).
- Receive a call
When the V-250 rings, lift the handset or press Off-hook (8). To end the call, place the V-250 on the charger or press On-hook (9).
- Make a call using speakerphone
Press Speaker Phone (12). Dial a number. Speak into the microphone. To switch to earpiece, press Speaker Phone (12) again. To end the call, place the V-250 on the charger or press On-hook (9).
- Receive a call with speakerphone
When the V-250 rings, press Speaker Phone (12). Speak into the microphone. To end the call press On-hook (9).
- Transfer a call to another handset
Press Internal Call (15) during a call. Dial the number of another handset (1-5) registered with the base station. Press On-hook (9) when the other party answers.
- Change the earpiece or speakerphone volume
During a call, press Right Softkey (5) to lower/raise the volume.
- Mute a call
During a call, press and hold Right Softkey (5) for two seconds. You can hear the other caller, but they cannot hear you.
4 Install and Charge the Batteries

1 Insert the included batteries. Make sure that the polarities (+/-) are facing the right direction.
2 Slide the back cover closed. You should hear a click.
3 Connect the RJ-11 jack of the included power adaptor cable to the back of the charger base.
4 Connect the other end of the power cable to a wall socket.
5 Place the handset in the base station for charging.
4.1 Important Notes About Charging the Batteries
Note: Make sure to charge the batteries for 16 hours before using your V-250 for the first time.
- After initial charging, the power adaptor must remain connected to the main power supply and the base unit with the main power switched on. It is recommended to leave the handset charging overnight to ensure the maximum usable time.
- The batteries should hold their charge for up to 120 hours, depending on use. The batteries need replacing if the batteries do not hold a charge for more than two hours.
- If the phone is not to be used for a substantial period of time, for example during holidays, disconnect the main power adaptor. When power is reconnected it is necessary to recharge the handset for 16 hours.
5 Basic Setup and Operations
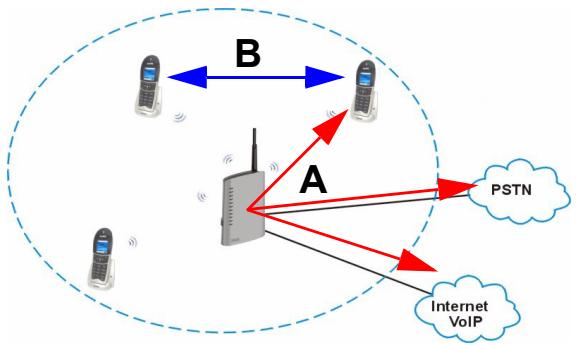
You must have a DECT GAP base station already set up with a phone connection (VoIP, PSTN or ISDN) to make external calls (A). You can also use the V-250 to make internal calls (B).
5.1 Register with a Base Station
1 Put your base station in registration mode. On ZyXEL base stations, press the base station button for 6 to 11 seconds. See your base station documentation for details.
2 Make sure the LCD is on (press any key).
3 Press the Right Softkey to enter the main menu.
4 Navigate to the PHONE SETTING screen by using the Navigator-right button, then press the Right Softkey to select OK and enter the PHONE SETTING menu.
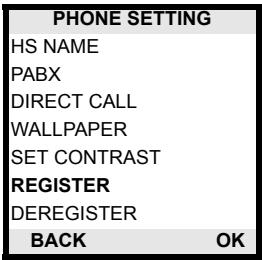
5 Use the Navigator-up button to scroll to REGISTER and press the Right Softkey to select OK and enter the base registration screen.
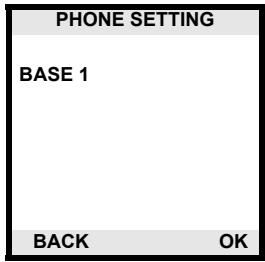
6 Use the Navigator-up and Navigator-down buttons to scroll and select which base station you want to register with (1-4). You can register with up to 4 base stations. Press the Right Softkey to select OK and enter the screen to enter the base station PIN (password).
7 Use the numbers on the V-250's keypad to enter the base station PIN. This is a 4 digit number you configure on the base station. Press the Right Softkey to select OK and enter the screen to enter the base station PIN (password). Default on ZyXEL base stations is 1234.
| PHONE SETTING | |
| PIN:**** | |
| LONG PRESS BASE | |
| PAGE KEY | |
| 22/11/2006 | 12:23 |
| BACK | OK |
Your handset attempts to register with the base station. Once registration is successful the Signal Strength indicator stops blinking.
Note: The Signal Strength indicator blinks if the V-250 is not registered with any base stations or if there are no base stations within range.
8 After a successful registration the LCD displays the handset's internal number and VoIP status.
- Internal Number - "3" here. This number can be used to call the V-250 from other handsets registered with this base station.
- VOIP OFF/ON - This indicates whether the base station this phone is registered with has a VoIP connection.
| 3 ZYXEL VOIP OFF 22/11/2006 | 12:24 MENU |
5.2 Last Number Redial
The V-250 stores the last 10 numbers you dialed in memory.
1 Select one of the last numbers dialed by pressing the Navigator-down button when the V-250 is in stand-by mode (not in any configuration screen).
2 Dial one of the recently dialed numbers by pressing the Off-hook button when the phone number is selected.
Note: The V-250 stores phone numbers up to 24 digits long (longer phone numbers will be truncated).
You can clear all of the recently dialed phone numbers.
1 Select one of the last numbers dialed.
2 Press and hold the On-hook button for about 2 seconds or until a YES / NO prompt appears on the LCD.
3 Use the navigator buttons to select YES and press the Right Softkey to select OK and clear all the recently dialed numbers from the V-250's memory.
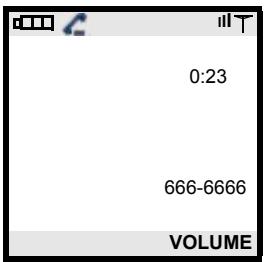
5.3 Call Timer
The LCD displays the time of your ongoing phone calls. The timer starts when you press the Off-hook button and stops when you press the On-hook button.
5.4 Adjust the Volume
The volume of the V-250 earpiece and speaker can be adjusted into three levels. They are low: I, medium: II and high: III.
Adjust the volume level during a call by using the Right Softkey to select VOLUME. The V-250 alternates between the three levels of volume. Stop pressing the Right Softkey when you have selected the level you want.
In our example the volume is at high level (III).
5.5 Flash Function
Press the R/INT button on the V-250 to put an existing call on hold and pick up a second call. Press the R/INT button again to switch back to the original call.
Note: You must subscribe to call waiting with your phone service provider in order to place external calls on hold.
5.6 Make Intercom Calls
If multiple V-250s are registered to the same base station, it is possible to make calls from one handset to another. This kind of call is referred to as an intercom call.
1 Press and hold the R/INT button for 2 seconds, a short beep sounds.
2 Enter the handset number of the handset you wish to call. This number is displayed on the handset next to the handset name.
3 "PAGING" and the handset number of the person calling is displayed on the V-250 receiving the intercom call.
"INTERCOM" and the handset number is displayed on the V-250 during the conversation.
4 Press the On-hook button to terminate the call.
5 If an external call comes in during an intercom call, the V-250 plays a tone to indicate that an external call is coming in during an intercom call.
Press the On-hook button to terminate the intercom call and when you hear the ring signal in the handset you can answer the incoming call by pressing the Off-hook button.
Note: You can set up different melody to play for intercom calls and external calls. See Ring Type Menu section on page 18 for more information.
5.7 Call All Phones
You can use the V-250 to call all handsets registered with the base station as well as all the analog phones connected to the phone ports of the base station.
1 Dial ### on the V-250 keypad.
2 Press the Off-hook button to connect the call.
3 All the handsets registered to the base station and all the analog phones physically connected to the base station ring.
6 Menu Features
The V-250 has four menus:
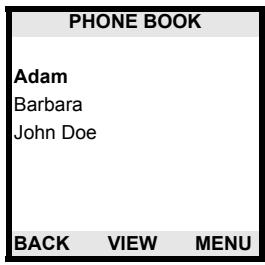
1 Phone Book - Use this menu to add, edit or delete stored numbers. The V-250 can store up to 90 telephone number entries of up to 24 digits in length. The names associated with the phone numbers can be up to 15 characters in length.
2 Phone Setting - Use this menu to set the time and date on the V-250, register to a base station, change the dial mode and display and enable other features.
3 Call History - Use this menu to view up to 10 of the most recent received and/or missed calls to the V-250.
4 Ring Type - Use this menu to set the ringer volume and select the melody to use for incoming calls. You can set different settings for incoming external and internal calls.
7 Phone Book Menu
Enter the Phone Book:
1 Press the Right Softkey button.
2 Use the Navigator-up/down/ right/left buttons to select the

icon. Press the Right
Softkey button and the Phone Book opens.
Note: The first time you enter this menu it will not contain any names. "Adam", "Barbara" and "John Doe" are just examples.
7.1 Phone Book Menu Features
1 In the Phone Book menu, press the Right Softkey to select MENU. The Phone Book menu opens.
2 Use the Navigator-up and Navigator-down keys to scroll through the options on this screen (do the same on any other screen with multiple choices).
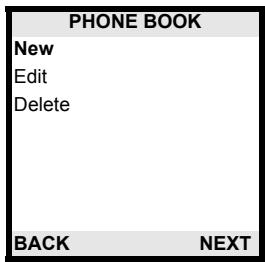
The phone book allows you to add new entries and edit or delete existing entries.
Note: Use the # key on the handset to alternate between capital and lowercase characters.
Press the number keys repeatedly to rotate through the letter options when typing characters. For example, press 2 twice to type the letter B.
8 Phone Setting Menu
Enter the Phone Setting menu:
1 Press the Right Softkey button.
2 Use the Navigator-up/down/ right/left buttons to select the

icon. Press the Right
Softkey button and the Phone Setting menu opens.
Use the Navigator-up and
Navigator-down keys to scroll
through the options on this screen (do the same on any other screen
with multiple choices). The
following table describes the Phone Setting menu functions.
PHONE SETTING
ALARM
CALLER ID
SET KEYTONE
SET KEYLOCK
SET DIALMODE
BABY MODE
SETTIME
BACK OK
| FUNCTION | DESCRIPTION |
| Alarm | Turn the alarm on and off and specify the type of melody to play. |
| Caller ID | Activate or deactivate the caller ID feature. You must subscribe to this feature from your service provider. |
| Set Keytone | Activate or deactivate the tone you hear when pressing keys on the V-250. |
| Set Keylock | Activate or deactivate keypad lock. You must unlock your phone when you want to make calls. You can also turn this feature on by pressing the Left Softkey for 2 seconds. Use the Left Softkey followed by the * key to temporarily unlock the keypad. The phone keypad locks again after 15 seconds of inactivity. Turn the Keylock off permanently via the Phone Setting menu. |
| Set Dialmode | Use this to select either tone or pulse dialing. |
| Baby Mode | Activate and configure the Baby Mode feature. When Baby Mode is on, the handset automatically picks up an internal call and the caller can listen. Use this function to monitor a baby room. Leave the V-250 in the baby room. When you call the V-250 from another handset registered to the same base station, the V-250 picks up automatically. You can listen to the sounds near the V-250 without the baby hearing you. |
| Set Time | Enter the current time. This information is displayed on the LCD of the V-250. |
| HS Name | Enter a handset name for the V-250. This name is displayed on the LCD. |
| PABX | Enter an identification code for a PABX. (Only necessary for a PABX that does not automatically recall the identification code.) |
| Direct Call | Activate and configure the Direct Call feature on the V-250. You can program a phone number which is dialed automatically when any key is pressed on the V-250. Note: You can only use the direct call feature with another handset registered to the same base station as the V-250. Press the On-hook button to end a direct call. Press and hold the On-hook button for 2 seconds to turn the Direct Call mode off. |
| Wallpaper | Select from one of 2 wallpapers. |
| Set Contrast | Change the contrast on the LCD display. |
| Register | Register the V-250 with a base station. |
| Deregister | Unregister the V-250 from a base station. |
| Select Base | Connect to different base stations that you have registered with. You can only communicate with one base station at a time. |
| Base Pin | The V-250 cannot change the base station's PIN. Note: Use the web configurator to change the base station PIN. |
| Handset Version | Use this to view the V-250's firmware version number as well as the RFPI number. The RFPI number is a factory assigned number (unique to each handset) used to identify the V-250. |
| Default | Use this to reset the phone settings to the factory defaults. This does not affect the phone numbers saved on your phone or the base station registration. |
9 Call History Menu
Enter the Call History menu:
1 Press the Right Softkey button.
2 Use the Navigator-up/down/ right/left buttons to select the

icon. Press the Right
Softkey button and the Call History menu opens.
3 Use the Right Softkey to select NEXT and view the 10 most recent calls received by the V-250.
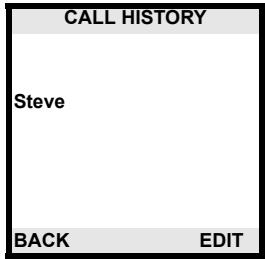
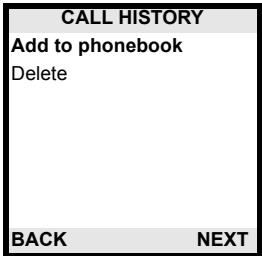
4 Use the Navigator-up button to scroll through the received calls. Press the Right Softkey to select EDIT with one of the numbers highlighted.
The Call History menu allows you to add recently dialed phone numbers to the V-250s phonebook or delete single entries from recently received calls memory.
10 Ring Type Menu
Enter the Ring Type menu:
1 Press the Right Softkey button.
2 Use the Navigator-up/down/ right/left buttons to select the

icon. Press the Right
Softkey button and the Ring Type menu opens.
RING TYPE
External Call
Internal Call
BACK
OK
3 Use the Navigator-up and Navigator-down keys to select internal or external call settings. Press the Right Softkey to select OK with one of the types of calls selected (for example External Call). The LCD displays as shown.
This menu allows you to specify the ring volume and select a melody for calls coming in from external lines.
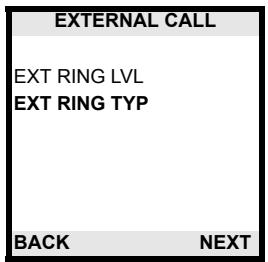
Note: The same functions are available for internal calls (calls between V-250s registered to the same base station). They are called INT RING LVL and INT RING TYP.
Specifications
Values are accurate at the time of writing.
Table 1 Device Specifications
| Feature | Specification |
| Handset Batteries | 2 x AAA Rechargeable NiMH batteries (1.2V, 750 mA) |
| Power Supply | 6 Volt DC @ 300 mA |
| Operating Requirements | Operating Temperature: 0 to 50°C Storage Temperature: -30 to 60°C Operating Humidity: 20 to 85% RH Storage Humidity: 20 to 95% RH |
SafetyWarnings
- Do NOT use this product near water, for example, in a wet basement or near a swimming pool.
- Do NOT expose your device to dampness, dust or corrosive liquids.
- Do NOT store things on the device.
- Do NOT install, use, or service this device during a thunderstorm. There is a remote risk of electric shock from lightning.
- Connect ONLY suitable accessories to the device.
- ONLY qualified service personnel should service or disassemble this device.
- Use ONLY an appropriate power adaptor or cord for your device.
- Connect the power adaptor or cord to the right supply voltage (for example, 110V AC in North America or 230V AC in Europe).
- Do NOT allow anything to rest on the power adaptor or cord and do NOT place the product where anyone can walk on the power adaptor or cord.
- Do NOT use the device if the power adaptor or cord is damaged as it might cause electrocution.
- If the power adaptor or cord is damaged, remove it from the power outlet.
- Do NOT attempt to repair the power adaptor or cord. Contact your local vendor to order a new one.
- Make sure you insert the batteries with correct polarities.
Related Documentation
Please go to http://www.zyxel.com for product news, firmware, documentation, and other support materials.
ZyXEL Limited Warranty
ZyXEL warrants to the original end user (purchaser) that this product is free from any defects in materials or workmanship for a period of up to two years from the date of purchase. During the warranty period, and upon proof of purchase, should the product have indications of failure due to faulty workmanship and/or materials, ZyXEL will, at its discretion, repair or replace the defective products or components without charge for either parts or labor, and to whatever extent it shall deem necessary to restore the product or components to proper operating condition. Any replacement will consist of a new or re-manufactured functionally equivalent product of equal or higher value, and will be solely at the discretion of ZyXEL. This warranty shall not apply if the product has been modified, misused, tampered with, damaged by an act of God, or subjected to abnormal working conditions.
Note
Repair or replacement, as provided under this warranty, is the exclusive remedy of the purchaser. This warranty is in lieu of all other warranties, express or implied, including any implied warranty of merchantability or fitness for a particular use or purpose. ZyXEL shall in no event be held liable for indirect or consequential damages of any kind to the purchaser.
To obtain the services of this warranty, contact ZyXEL's Service Center for your Return Material Authorization number (RMA). Products must be returned Postage Prepaid. It is recommended that the unit be insured when shipped. Any returned products without proof of purchase or those with an out-dated warranty will be repaired or replaced (at the discretion of ZyXEL) and the customer will be billed for parts and labor. All repaired or replaced products will be shipped by ZyXEL to the corresponding return address, Postage Paid. This warranty gives you specific legal rights, and you may also have other rights that vary from country to country.
Registration
Register your product online to receive e-mail notices of firmware upgrades and information at www.zyxel.com for global products, or at www.us.zyxel.com for North American products.
Customer Support
Please have the following information ready when you contact customer support.
Product model and serial number.
Warranty Information.
- Date that you received your device.
- Brief description of the problem and the steps you took to solve it.
Corporate Headquarters (Worldwide)
- Support E-mail: support@zyxel.com.tw
Sales E-mail: sales@zyxel.com.tw
Telephone: +886-3-578-3942
Fax: +886-3-578-2439
Web Site: www.zyxel.com, www.europe.zyxel.com
FTP Site: ftp.zyxel.com, ftp.europe.zyxel.com - Regular Mail: ZyXEL Communications Corp., 6 Innovation Road II, Science Park, Hsinchu 300, Taiwan
Costa Rica
- Support E-mail: soporte@zyxel.co.cr
Sales E-mail: sales@zyxel.co.cr
Telephone: +506-2017878
Fax: +506-2015098
Web Site: www.zyxel.co.cr
FTP Site: ftp.zyxel.co.kr
Regular Mail: ZyXEL Costa Rica, Plaza Roble Escazú, Etapa El Patio, Tercer Piso, San José, Costa Rica
Czech Republic
E-mail: info@cz.zyxel.com
Telephone: +420-241-091-350
Fax: +420-241-091-359
Web Site: www.zyxel.cz
Regular Mail: ZyXEL Communications, Czech s.r.o., Modranska 621, 143 01 Praha 4 - Modrany, Ceska Republika
Denmark
- Support E-mail: support@zyxel.dk
Sales E-mail: sales@zyxel.dk
Telephone: +45-39-55-07-00
Fax: +45-39-55-07-07
Web Site: www.zyxel.dk
Regular Mail: ZyXEL Communications A/S, Columbusvej, 2860 Soeborg, Denmark
Finland
Support E-mail: support@zyxel.fi
Sales E-mail: sales@zyxel.fi
Telephone: +358-9-4780-8411
Fax: +358-9-4780 8448
Web Site: www.zyxel.fi
- Regular Mail: ZyXEL Communications Oy, Malminkaari 10, 00700 Helsinki, Finland
France
E-mail: info@zyxel.fr
Telephone: +33-4-72-52-97-97
Fax: +33-4-72-52-19-20
Web Site: www.zyxel.fr
Regular Mail: ZyXEL France, 1 rue des Vergers, Bat. 1 / C, 69760 Limonest, France
Germany
- Support E-mail: support@zyxel.de
Sales E-mail: sales@zyxel.de
Telephone: +49-2405-6909-0
Fax: +49-2405-6909-99
Web Site: www.zyxel.de - Regular Mail: ZyXEL Deutschland GmbH., Adenauerstr. 20/A2 D-52146, Wuerselen, Germany
Hungary
- Support E-mail: support@zyxel.hu
Sales E-mail: info@zyxel.hu
Telephone: +36-1-3361649
Fax: +36-1-3259100
Web Site: www.zyxel.hu
Regular Mail: ZyXEL Hungary, 48, Zoldlomb Str., H-1025, Budapest, Hungary
Kazakhstan
- Support: http://zyxel.kz/support
Sales E-mail: sales@zyxel.kz
Telephone: +7-3272-590-698
Fax: +7-3272-590-689
Web Site: www.zyxel.kz - Regular Mail: ZyXEL Kazakhstan, 43, Dostyk ave., Office 414, Dostyk Business Centre, 050010, Almaty, Republic of Kazakhstan
North America
Support E-mail: support@zyxel.com
Sales E-mail: sales@zyxel.com
Telephone: +1-800-255-4101, +1-714-632-0882
Fax: +1-714-632-0858
Web Site: www.us.zyoxel.com
FTP Site: ftp.us.zyxel.com
Regular Mail: ZyXEL Communications Inc., 1130 N. Miller St., Anaheim, CA 92806-2001, U.S.A.
Norway
- Support E-mail: support@zyxel.no
Sales E-mail: sales@zyxel.no
Telephone: +47-22-80-61-80
Fax: +47-22-80-61-81
Web Site: www.zyxel.no - Regular Mail: ZyXEL Communications A/S, Nils Hansens vei 13, 0667 Oslo, Norway
Poland
E-mail: info@pl.zyxel.com
Telephone: +48 (22) 333 8250
Fax: +48 (22) 333 8251
Web Site: www.pl.zyxel.com
Regular Mail: ZyXEL Communications, ul. Okrzej 1A, 03-715 Warszawa, Poland
Russia
- Support: http://zyxel.ru/support
Sales E-mail: sales@zyxel.ru
Telephone: +7-095-542-89-29
Fax: +7-095-542-89-25
Web Site: www.zyxel.ru
Regular Mail: ZyXEL Russia, Ostrovityanova 37a Str., Moscow, 117279, Russia
Spain
- Support E-mail: support@zyxel.es
Sales E-mail: sales@zyxel.es
Telephone: +34-902-195-420
Fax: +34-913-005-345
Web Site: www.zyxel.es - Regular Mail: ZyXEL Communications, Arte, 21 5^a planta, 28033 Madrid, Spain
Sweden
- Support E-mail: support@zyxel.se
Sales E-mail: sales@zyxel.se
Telephone: +46-31-744-7700
Fax: +46-31-744-7701
Web Site: www.zyxel.se
Regular Mail: ZyXEL Communications A/S, Sjöporten 4, 41764 Göteborg, Sweden
Ukraine
Support E-mail: support@ua.zyxel.com
Sales E-mail: sales@ua.zyxel.com
Telephone: +380-44-247-69-78
Fax: +380-44-494-49-32
Web Site: www.ua.zyxel.com
Regular Mail: ZyXEL Ukraine, 13, Pimonenko Str., Kiev, 04050, Ukraine
United Kingdom
- Support E-mail: support@zyxel.co.uk
Sales E-mail: sales@zyxel.co.uk
Telephone: +44-1344 303044, 08707 555779 (UK only)
Fax: +44-1344 303034
Web Site: www.zyxel.co.uk
FTP Site: ftp.zyxel.co.uk - Regular Mail: ZyXEL Communications UK, Ltd., 11 The Courtyard, Eastern Road, Bracknell, Berkshire, RG12 2XB, United Kingdom (UK)
+” is the (prefix) number you enter to make an international telephone call.
User Guide Feedback
- Help us help you. E-mail all User Guide-related comments, questions or suggestions for improvement to techwriters@zyxel.com.tw or send regular mail to The Technical Writing Team, ZyXEL Communications Corp., 6 Innovation Road II, Science-Based Industrial Park, Hsinchu, 300, Taiwan. Thank you.