
DMA-2500 - Digital media player ZYXEL - Free user manual and instructions
Find the device manual for free DMA-2500 ZYXEL in PDF.
| Product Type | Digital Media Player |
| Brand | ZYXEL |
| Model | DMA-2500 |
| Dimensions (L x W x H) | 20 x 15 x 4 cm |
| Weight | 0.8 kg |
| Power | 5 V DC, 2 A via mains adapter |
| Supported video formats | MPEG-2, MPEG-4, H.264, AVI, MKV |
| Supported audio formats | MP3, WMA, AAC, FLAC, OGG |
| Supported image formats | JPEG, PNG, BMP, GIF |
| Connectivity | HDMI, USB 2.0, Ethernet RJ45, Wi-Fi 802.11 b/g/n |
| Audio output | HDMI, optical digital audio, stereo RCA |
| Key functions | Play media from USB, local network, online streaming (YouTube, Netflix) |
| Care and cleaning | Clean with a soft dry cloth; avoid liquids and aerosols |
| Safety | Do not expose to moisture; use the supplied adapter; avoid shocks |
| Spare parts and repairability | Remote control and mains adapter available; repair by authorized center |
| General information | Class B digital device compliant with Canadian NMB-003 standard |
Frequently Asked Questions - DMA-2500 ZYXEL
User questions about DMA-2500 ZYXEL
0 question about this device. Answer the ones you know or ask your own.
Ask a new question about this device
Download the instructions for your Digital media player in PDF format for free! Find your manual DMA-2500 - ZYXEL and take your electronic device back in hand. On this page are published all the documents necessary for the use of your device. DMA-2500 by ZYXEL.
USER MANUAL DMA-2500 ZYXEL
About This User's Guide
Intended Audience
This manual is intended for people who want to use and configure the DMA. You should have at least basic computer usage knowledge.
Related Documentation
- Quick Start Guide
The Quick Start Guide is designed to help you get up and running right away. It contains information on setting up your network and configuring for Internet access.
- Supporting Disc
Refer to the included CD for software and support documents.
ZyXEL Web Site
Please refer to www.zyxel.com for additional support documentation and product certifications.
User Guide Feedback
Help us help you. Send all User Guide-related comments, questions or suggestions for improvement to the following address, or use e-mail instead. Thank you!
The Technical Writing Team,
ZyXEL Communications Corp.,
6 Innovation Road II,
Science-Based Industrial Park,
Hsinchu, 300, Taiwan.
E-mail: techwriters@zyxel.com.tw
Customer Support
In the event of problems that cannot be solved by using this manual, you should contact your vendor. If you cannot contact your vendor, then contact a ZyXEL office for the region in which you bought the device. See www.zyxel.com/web/contact_us.php for contact information. Please have the following information ready when you contact an office.
- Product model and serial number.
Warranty Information. - Date that you received your device.
- Brief description of the problem and the steps you took to solve it.
Document Conventions
Warnings and Notes
These are how warnings and notes are shown in this User's Guide.
Warnings tell you about things that could harm you or your device.
Note: Notes tell you other important information (for example, other things you may need to configure or helpful tips) or recommendations.
Syntax Conventions
- The DMA may be referred to as the "DMA", the "device", the "system" or the "product" in this User's Guide.
- Product labels, screen names, field labels and field choices are all in bold font.
- A key stroke is denoted by square brackets and uppercase text, for example, [ENTER] means the "enter" or "return" key on your keyboard.
- "Enter" means for you to type one or more characters and then press the [ENTER] key. "Select" or "choose" means for you to use one of the predefined choices.
- A right angle bracket ( > ) within a screen name denotes a mouse click. For example, Maintenance > Log > Log Setting means you first click Maintenance in the navigation panel, then the Log sub menu and finally the Log Setting tab to get to that screen.
- Units of measurement may denote the "metric" value or the "scientific" value. For example, "k" for kilo may denote "1000" or "1024", "M" for mega may denote "1000000" or "1048576" and so on.
Icons Used in Figures
Figures in this User's Guide may use the following generic icons. The DMA icon is not an exact representation of your device.
| DMA | Computer | Notebook computer |
| Server | Television (TV) | USB Hard Drive |
| ZyXEL Wireless .11n USB Adapter | Firewall | Router |
| Switch | NSA-220 Plus | Wireless Access Point (AP) |
SafetyWarnings
- Do NOT use this product near water, for example, in a wet basement or near a swimming pool.
- Do NOT expose your device to dampness, dust or corrosive liquids.
- Do NOT store things on the device.
- Do NOT install, use, or service this device during a thunderstorm. There is a remote risk of electric shock from lightning.
- Connect ONLY suitable accessories to the device.
- Do NOT open the device or unit. Opening or removing covers can expose you to dangerous high voltage points or other risks. ONLY qualified service personnel should service or disassemble this device. Please contact your vendor for further information.
- Make sure to connect the cables to the correct ports.
- Place connecting cables carefully so that no one will step on them or stumble over them.
- Always disconnect all cables from this device before servicing or disassembling.
- Use ONLY an appropriate power adaptor or cord for your device. Connect it to the right supply voltage (for example, 110V AC in North America or 230V AC in Europe).
- Do NOT allow anything to rest on the power adaptor or cord and do NOT place the product where anyone can walk on the power adaptor or cord.
- Do NOT use the device if the power adaptor or cord is damaged as it might cause electrocution.
- If the power adaptor or cord is damaged, remove it from the device and the power source.
- Do NOT attempt to repair the power adaptor or cord. Contact your local vendor to order a new one.
- Do not use the device outside, and make sure all the connections are indoors. There is a remote risk of electric shock from lightning.
- Do NOT obstruct the device ventilation slots, as insufficient airflow may harm your device.
Your product is marked with this symbol, which is known as the WEEE mark. WEEE stands for Waste Electronics and Electrical Equipment. It means that used electrical and electronic products should not be mixed with general waste. Used electrical and electronic equipment should be treated separately.

Table of Contents
About This User's Guide 3
Document Conventions 4
SafetyWarnings 6
Table of Contents 7
Chapter 1 Introducing the DMA. 11
1.1 Overview 11
1.2 LEDs 12
Chapter 2 The Remote Control. 13
Chapter 3 DMA Menus 15
3.1 Overview 15
3.2 Menu Description 16
3.3 Playing Video File Examples 17
3.3.1 Playing a Video File from the Media Server 17
3.3.2 Playing a YouTube Video 20
3.4 Controlling the Video Playback 22
3.4.1 Displaying Information During Playback 22
3.4.2 A-B 22
3.4.3Resume 23
Chapter 4 Music Menu 25
4.1 Overview 25
4.2 Playing Audio Files Example 25
4.3 Background Music 28
Chapter 5 Pictures Menu 31
5.1 Overview 31
5.2 Viewing Pictures Example 31
5.3 Slideshow 34
Chapter 6
My iMedia Menu 35
6.1 My iMedia Menu 35
6.2 Live365.com (My iMedia) Example 35
6.3 Playing Another My iMedia Internet Channel 39
6.4 Adding a My iMedia Internet Channel 41
Chapter 7
Setup 45
7.1 Overview 45
7.2 Network Settings 46
7.2.1 Network Wizard 47
7.2.2 Network Setup Menu 51
7.2.3 Wireless Setup Menu 52
7.3 Language Settings 53
7.4 TV Mode Setup 53
7.4.1 Configuring the TV Mode Setup 55
7.5 Audio Setup 56
7.5.1 S/PDIF 56
7.6 Video Setup 57
7.7 Other Settings 58
7.8 Advance Setting 59
7.9 Version 60
7.10 Reset to Default 60
7.11 Firmware Upgrade 61
Chapter 8
Media Server 63
8.1 Overview 63
8.2 Media Server 63
8.3 Media List 64
8.4 System 65
8.4.1 DMA List 67
8.4.2 DMA Configuration 67
8.4.3 DMA Folder Add or Edit 68
8.4.4 DMA Internet Station Add or Edit 69
8.5 Options 70
Chapter 9
Troubleshooting 71
9.1 Overview 71
9.2 Power, Hardware Connections, and LEDs 71
9.3 DMA Usage 72
9.4 Configuring the Windows Vista Firewall 77
Chapter 10
Product Specifications 85
10.1 General Specifications 85
10.2 Supported Content Formats and Codes 87
10.2.1 Video File Formats Supported 87
10.2.2 Music File Formats Supported 90
10.2.3 Photo File Formats Supported 91
10.3 Cable Pin Assignments 92
10.4 Power Adaptor Specifications 92
Appendix A Windows Vista Media Server 93
Appendix B Legal Information 103
Appendix C Open Software Announcements 107
Index 111
Introducing the DMA
1.1 Overview
The DMA-2500 plays digital audio, video, and photo files on your TV (instead of your computer). The DMA has HDMI for high quality digital video and audio output. The remote control lets you use your TV screen to browse and play your digital content files and configure the DMA. The DMA includes built-in Microsoft Windows Media Digital Rights Management for Network Devices (WMDRM-ND) to enable the playback of protected streamed digital content.
Here, the DMA lets the TV play files stored on a connected USB hard drive. A wired Ethernet connection lets the DMA play files on an NSA-220 Plus storage appliance and a computer using the included media server software. The media server software also lets the DMA play streaming Web content such as YouTube videos and Internet TV and radio.
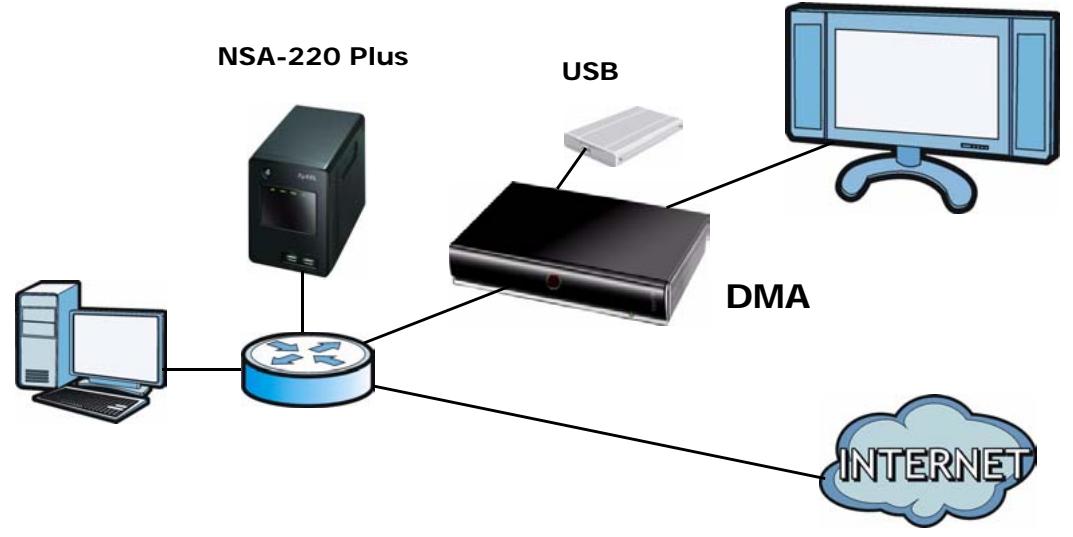
Figure 1 DMA with Wired Ethernet Connection
See the Quick Start Guide for how to connect the DMA and install the included media server software on your Windows computers.
The DMA can also act as a wireless LAN client when you connect a compatible ZyXEL IEEE 802.11n wireless USB adapter to the DMA's USB port.
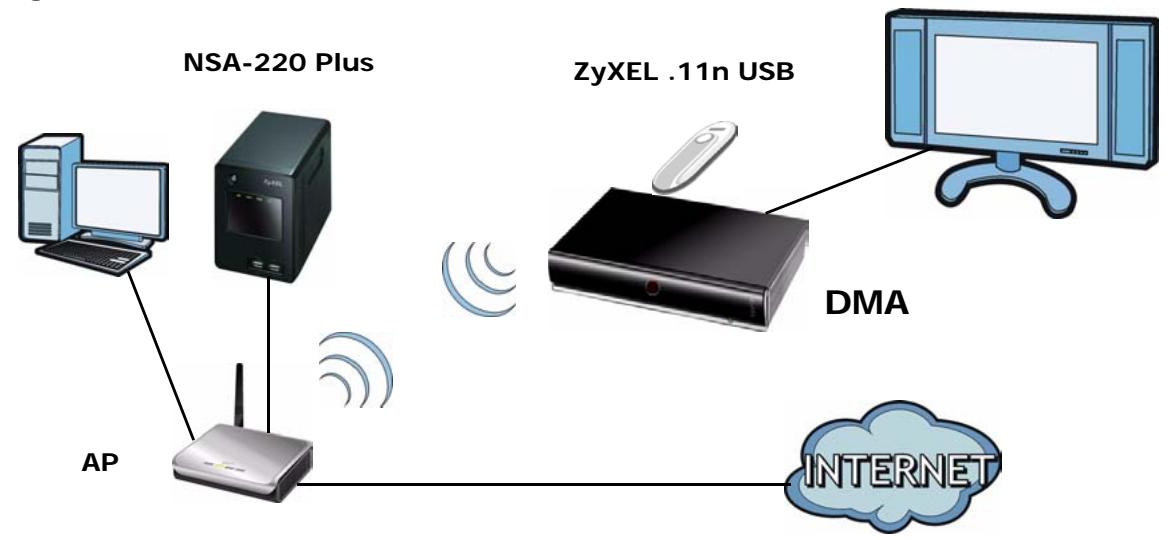
Figure 2 DMA with Wireless Connection
1.2 LEDs
The LEDs (lights) tell you about the current status of the DMA. The following table describes the DMA LEDs.
Table 1 LEDs
| LED | COLOR | STATUS | DESCRIPTION |
| POWER | Green | On | The DMA is receiving power and in operation mode (on). |
| Red | On | The DMA is off. | |
| Off | The DMA is not receiving power. | ||
| Network Activity | Green | Blinking | The DMA is receiving media traffic through the Ethernet connection. The network activity LED is also known as the network media traffic LED. |
| Off | The DMA is not receiving media traffic through the Ethernet connection. |
The Remote Control
Use the remote control to navigate the menus, play files, and configure the DMA. Point the remote control at the black dot on the front of the DMA. Here are the button functions.
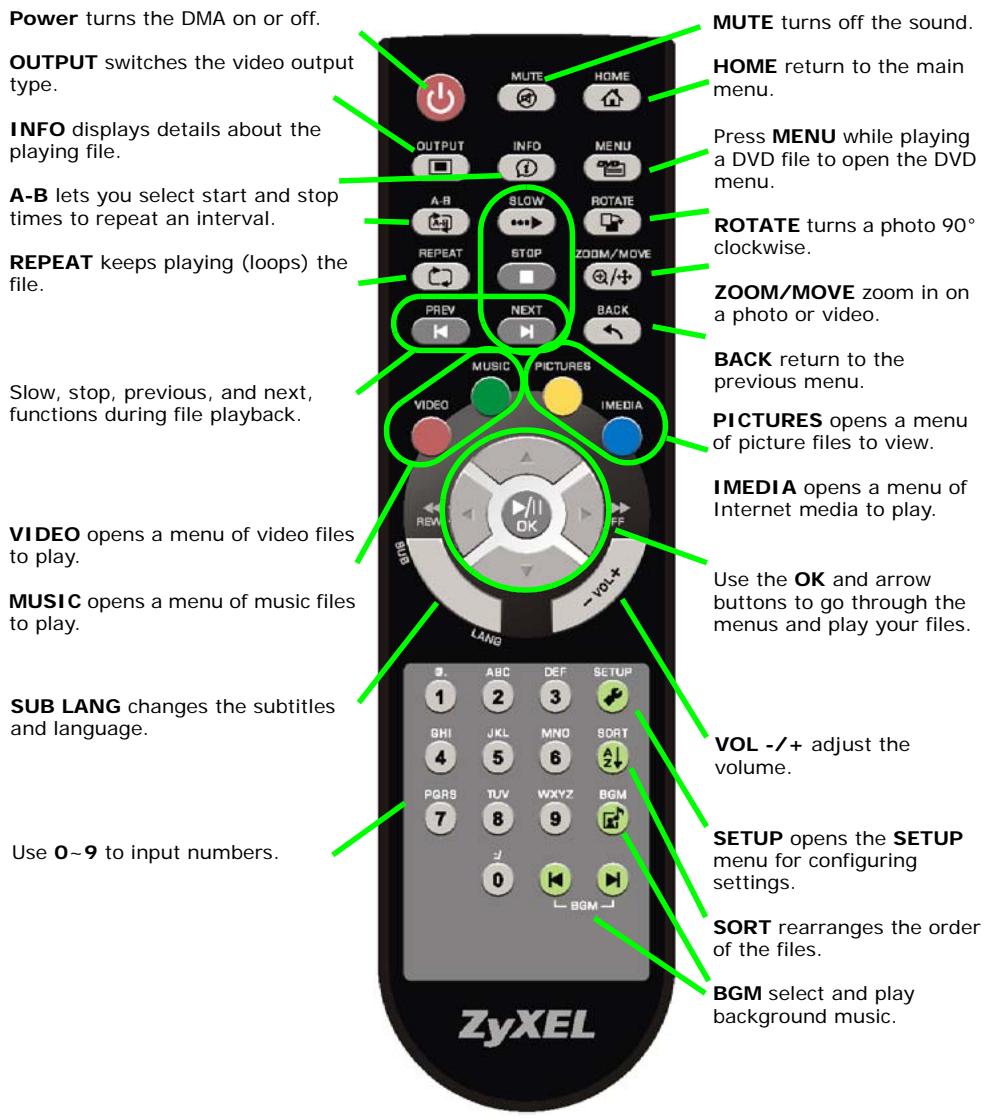
Figure 3 Remote Control
DMA Menus
3.1 Overview
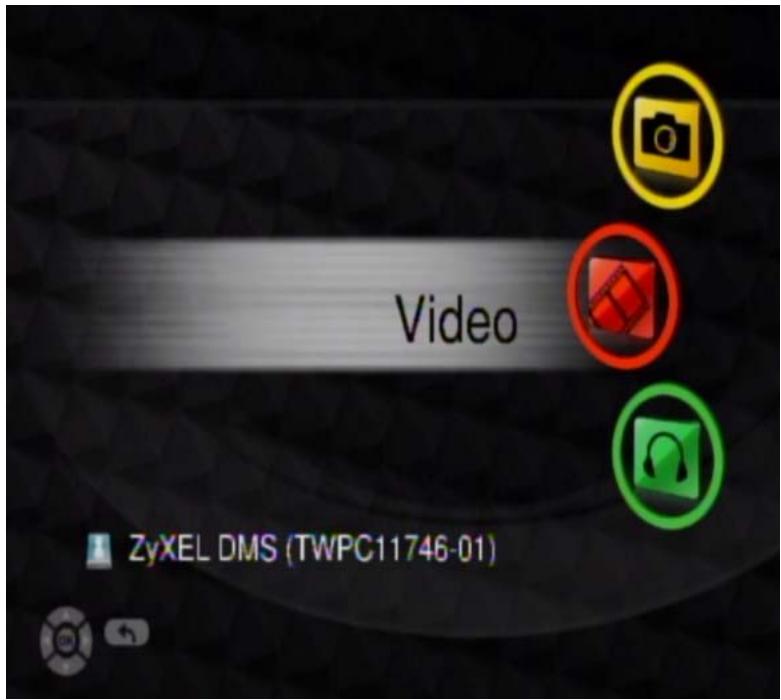
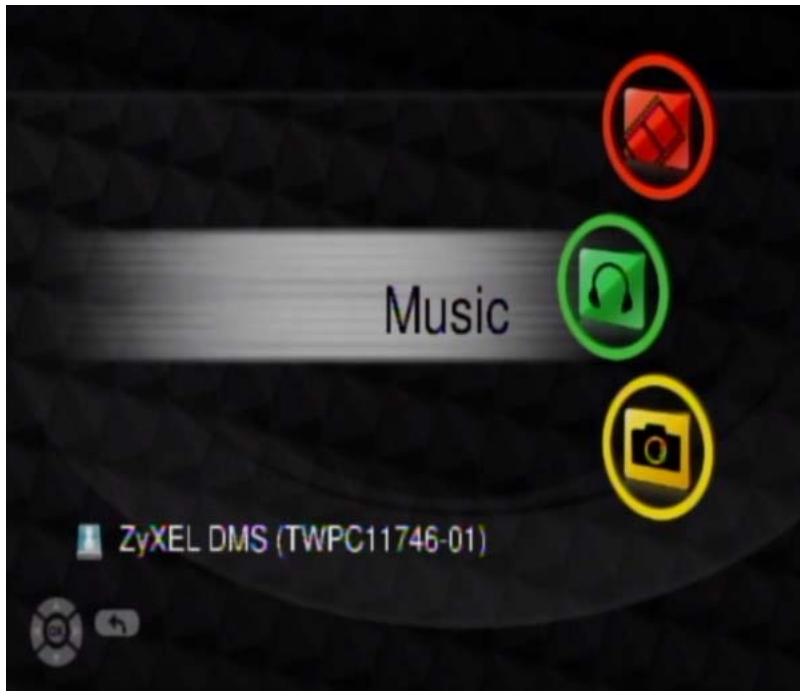
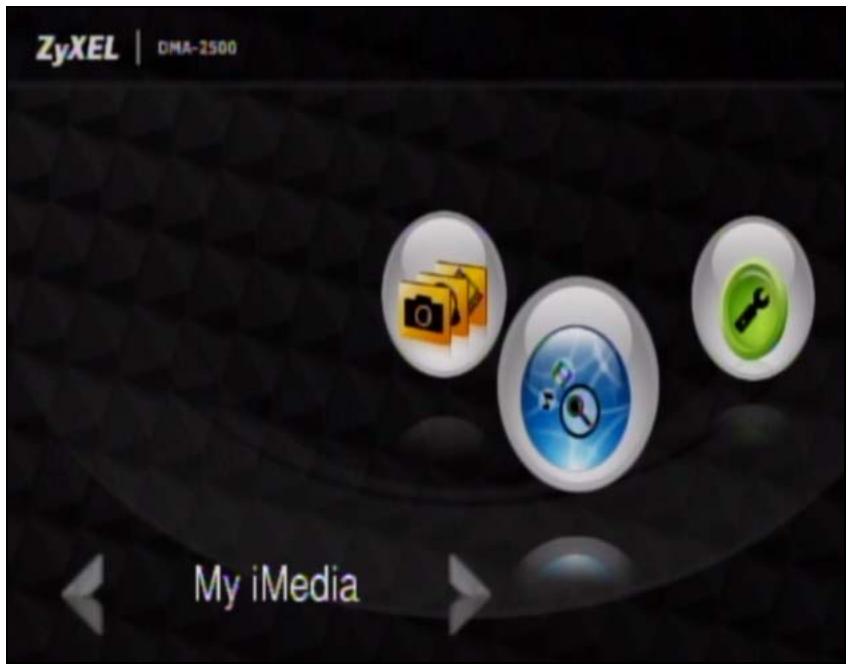
The DMA uses menus that display on your television screen. The HOME (main) menu is the first menu you see when you turn on the DMA.
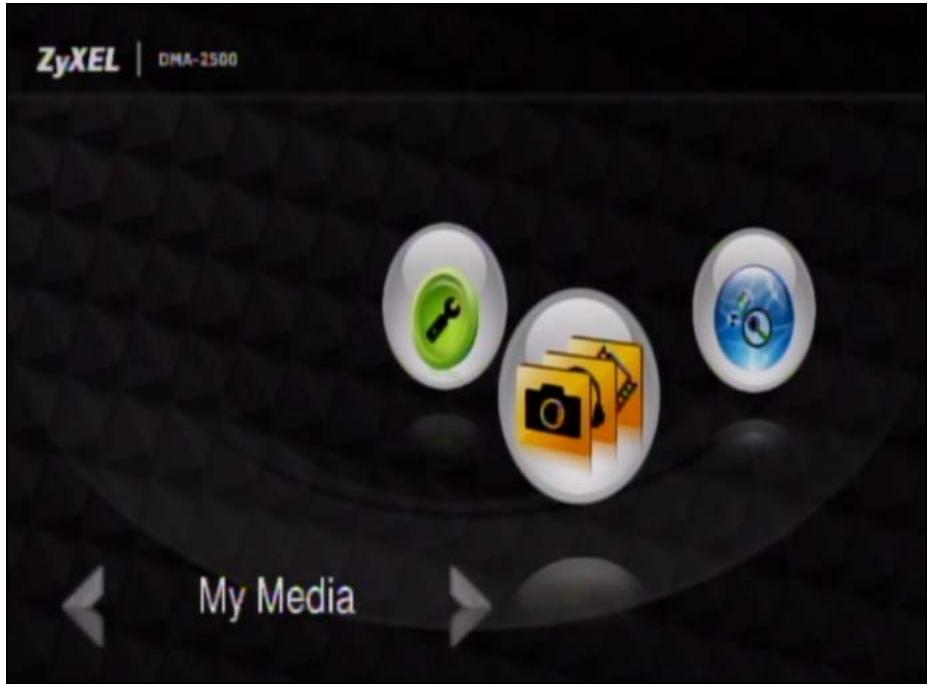
Figure 4 HOME Menu
Use the remote control's OK, BACK and arrow buttons to navigate the menus, configure the DMA and play your files.
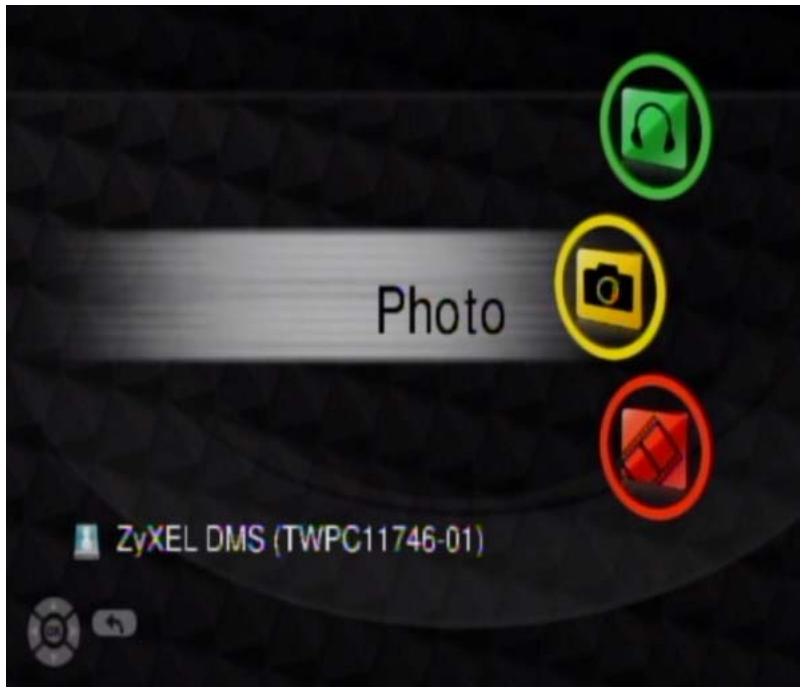
- Use My Media (see this chapter, Chapter 4 on page 25, and Chapter 5 on page 31) to select and play files from a media server or connected USB stick.
- Use My iMedia (see Chapter 6 on page 35) to play files located on the Internet.
- Use Setup (see Chapter 7 on page 45) to configure the DMA.
3.2 Menu Description
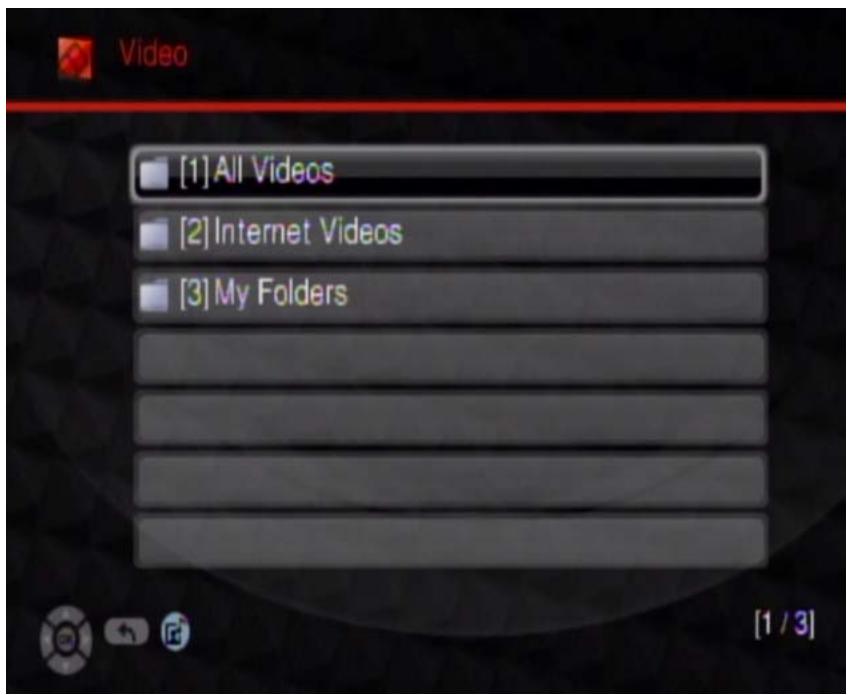
Here are some general menu screen descriptions. A video menu is shown here as an example. Other menus work in a similar way.
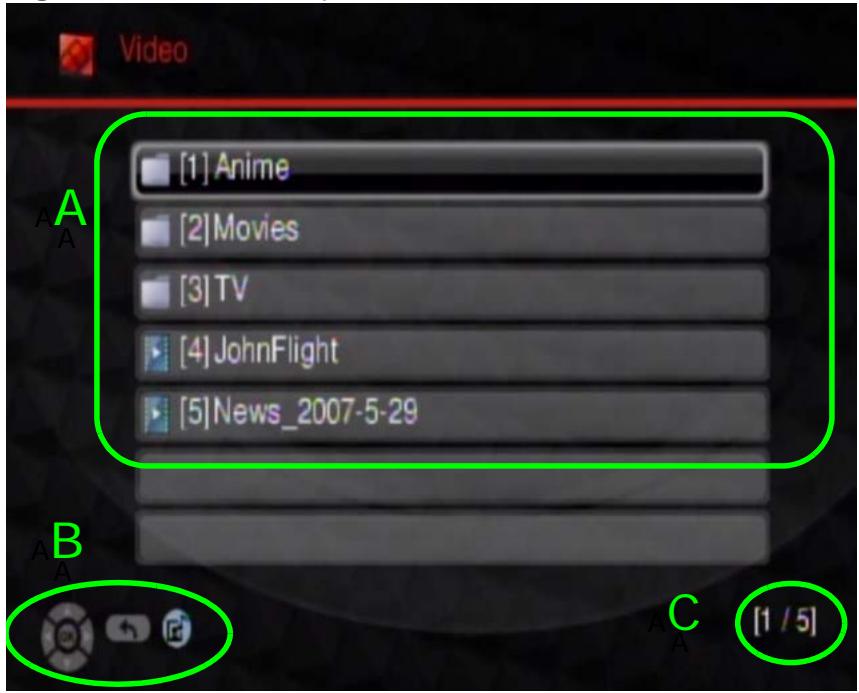
Figure 5 Menu Description
This table describes the main video menu.
Table 2 Main Menu Description
| AREA | DESCRIPTION |
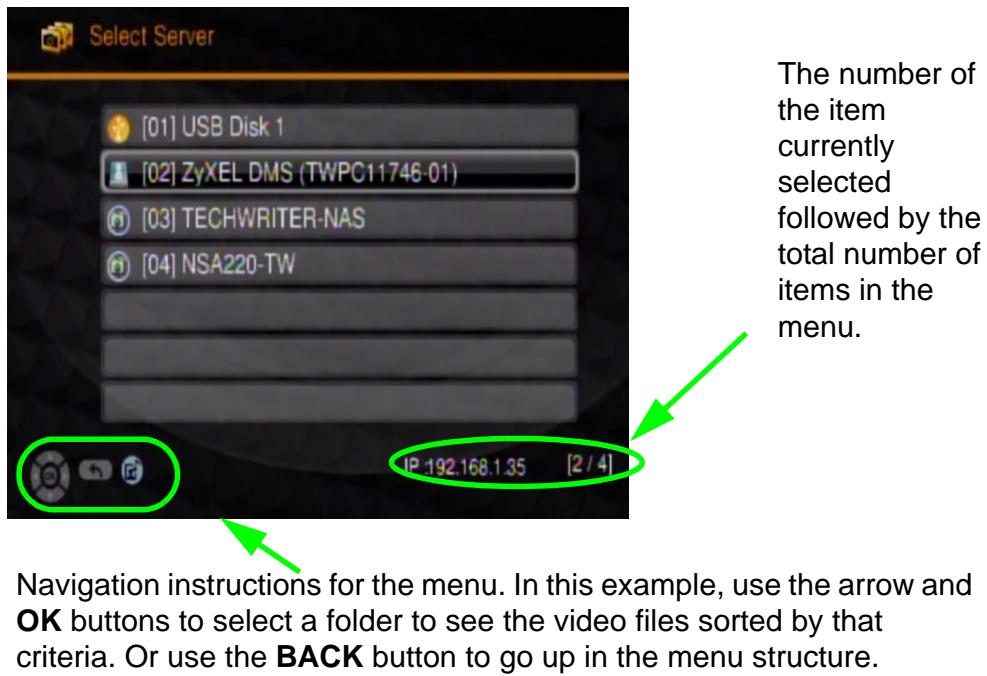
| A | List of the file folders. The currently selected item is white. The arrows show that you can move up or down in the menu.The DMA categorizes files into genre and actor folders according to the information stored in your files. Files may not appear in the proper folders if they have missing, incorrect or incomplete information.All Video - All of the menu's files display here.Genre - Search for videos by album.Actor - Search for videos by actor or actress.Folders - Search for videos by folder. |
| B | This shows which remote control buttons to use in the menu. For example, in this menu, use the remote control's arrow and OK buttons to select a folder to see the files sorted by that criteria. Or use the BACK button to go up in the menu structure (return to the HOME screen). Use the BGM (Back Ground Music) button to select and play background music. |
| C | This displays the number of the selected menu item followed by the total number of items. In this example menu, the first of four items is selected. |
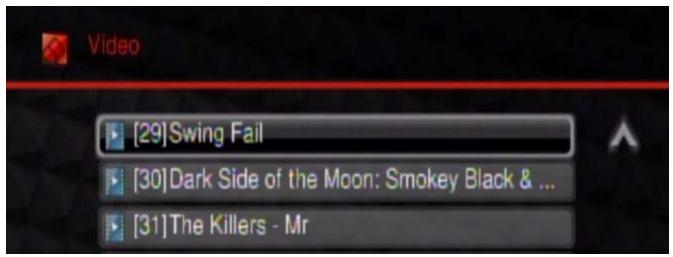
3.3 Playing Video File Examples
Here are examples of how to play a video file. Playing music files works in a similar way. The first example shows how to play a file stored on a computer that is running the included media server software. The second example shows how to play a YouTube video. See the Quick Start Guide for an example of playing a video file from an attached USB device.
3.3.1 Playing a Video File from the Media Server
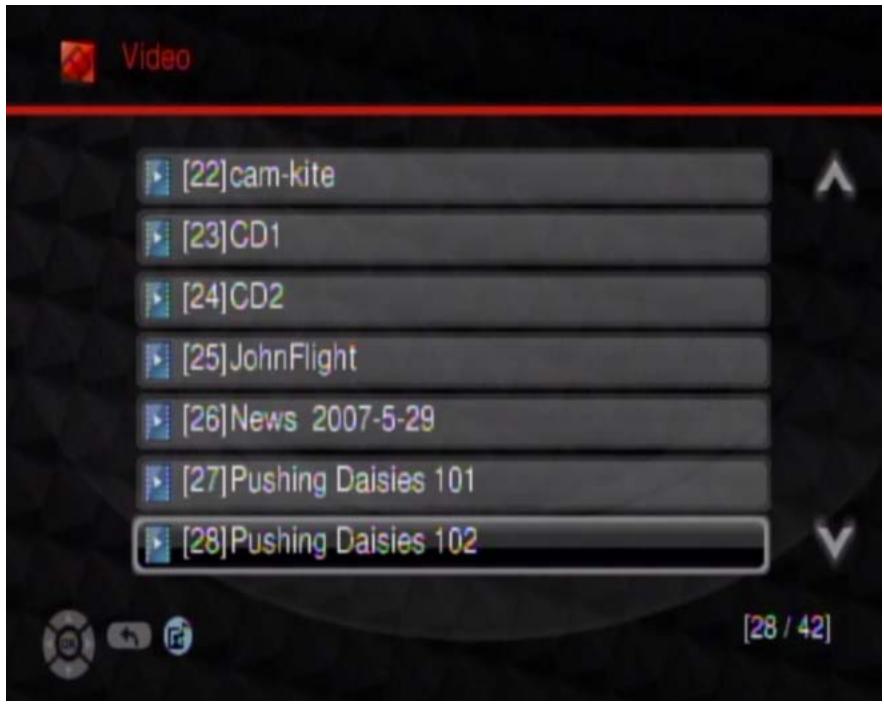
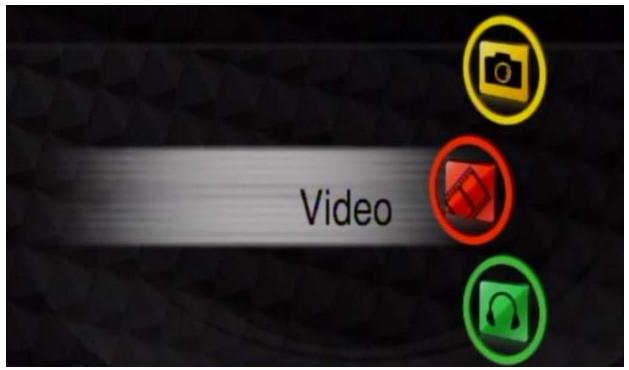
1 Press the VIDEO button on the remote control or use the arrow and OK buttons to select the My Media icon in the HOME menu and then the Video menu.
2 The DMA searches for a USB device, computers with sharing enabled, and media servers and lists them here. Use the remote control's arrow and OK buttons to select one to access.
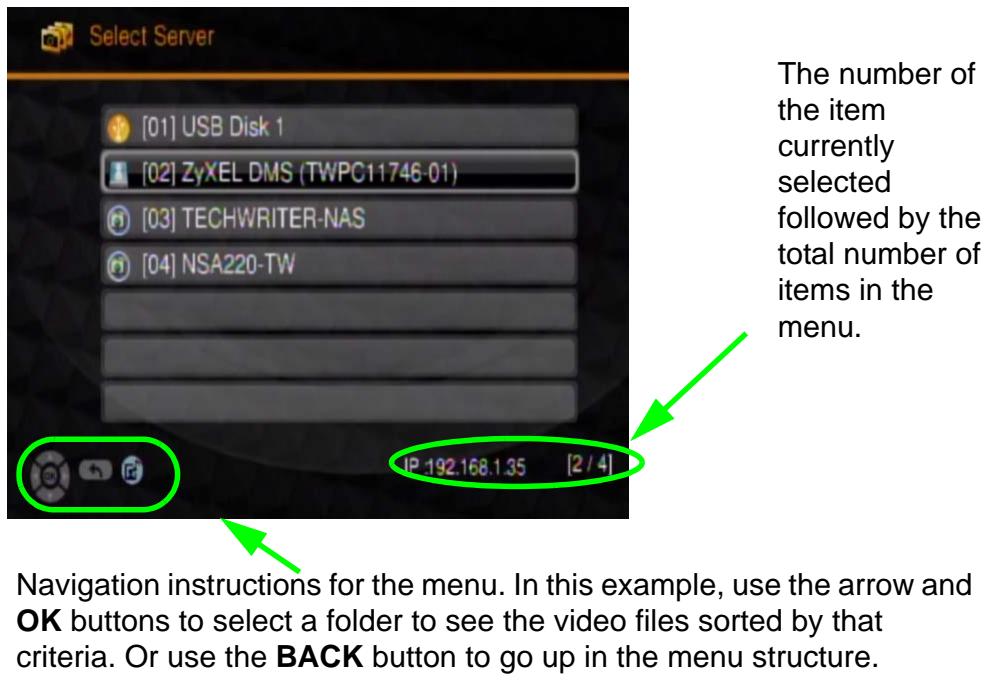
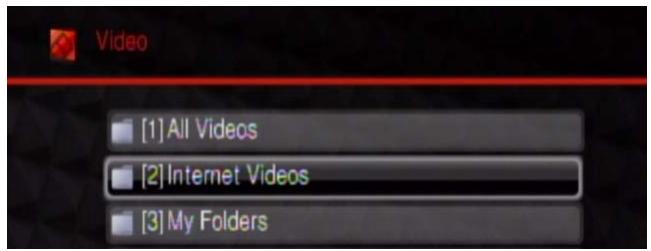
3 Press the remote control's OK button to select Video.
4 Select the folder containing the media you want to play (Video in this example). You may need to go through multiple layers of folder.
5 Use the remote control's arrow and OK buttons to select and play a video file. Use the remote control's arrow and OK buttons to select and play a video file. Use the REW or FF button to go to the previous or next page of entries.
3.3.2 Playing a YouTube Video
Install and enable the included media server software on a Windows computer to let the DMA play YouTube videos.
1 Press the VIDEO button on the remote control or use the arrow and OK buttons to select the My Media icon in the HOME menu and then the Video menu.
2 The DMA searches for USB devices, computers, and media servers and lists them here. Use the remote control to select one to access. This example uses the media server installed on a computer.
3 Select Video and press the remote control's OK button.
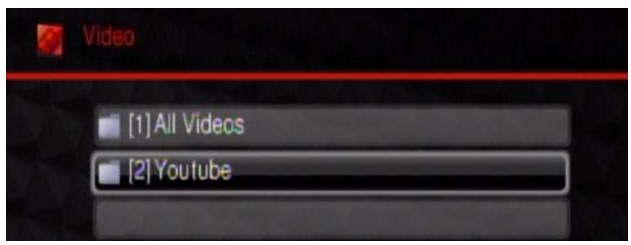
4 Select the folder containing the media you want to play. This example uses Internet Videos. Use the included media server software to be able to play Internet files.
5 You may need to go through multiple layers of folders. This example uses Youtube.
6 Use the remote control's arrow and OK buttons to select and play a video file. Use the REW or FF button to go to the previous or next page of entries.
3.4 Controlling the Video Playback
During playback, use the remote control's buttons for fast forward, reverse and pause.
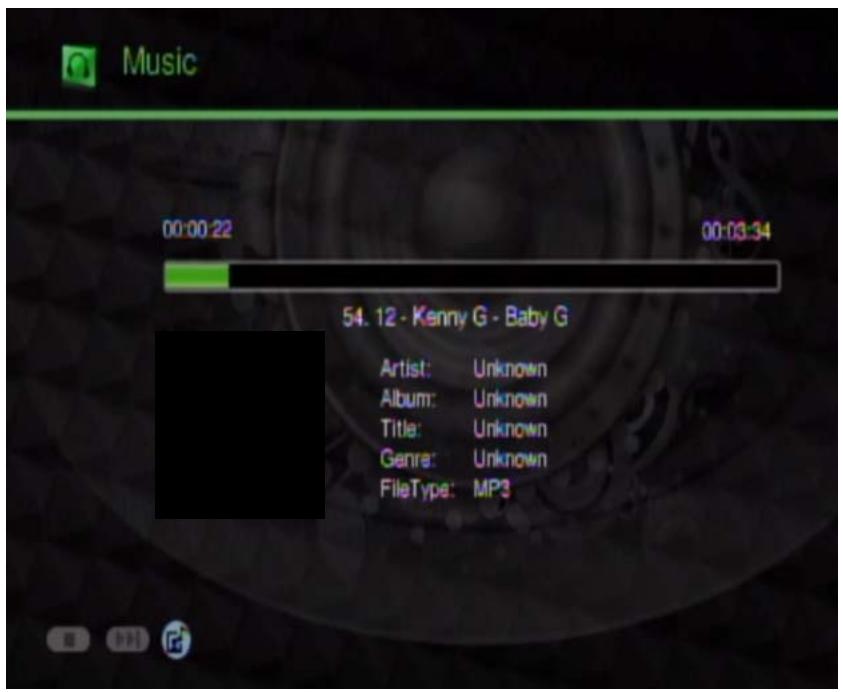
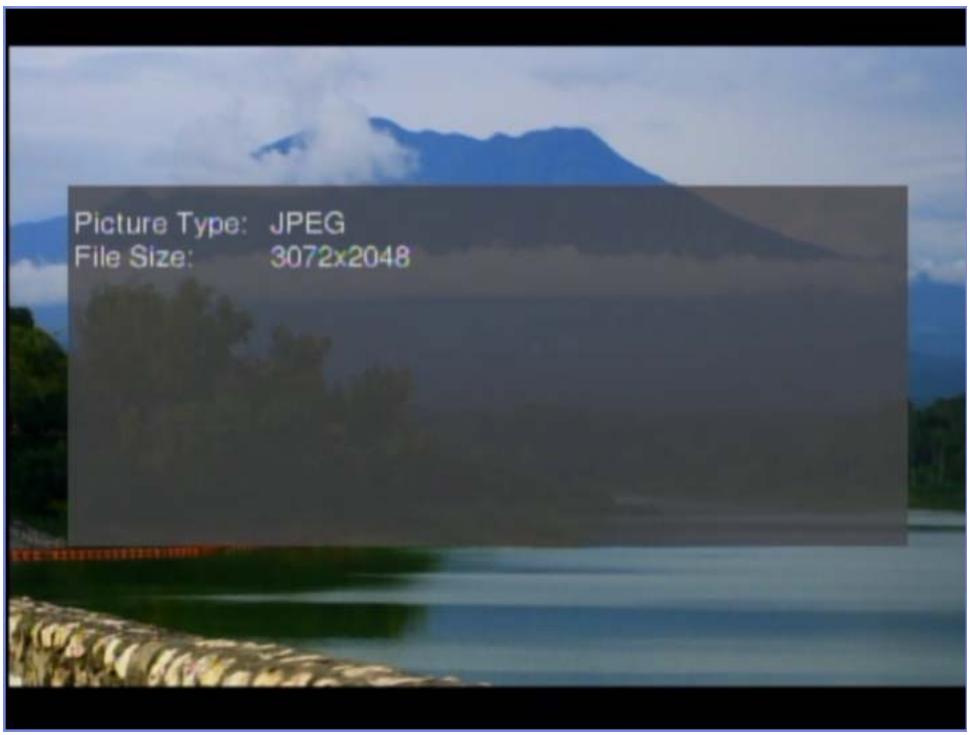
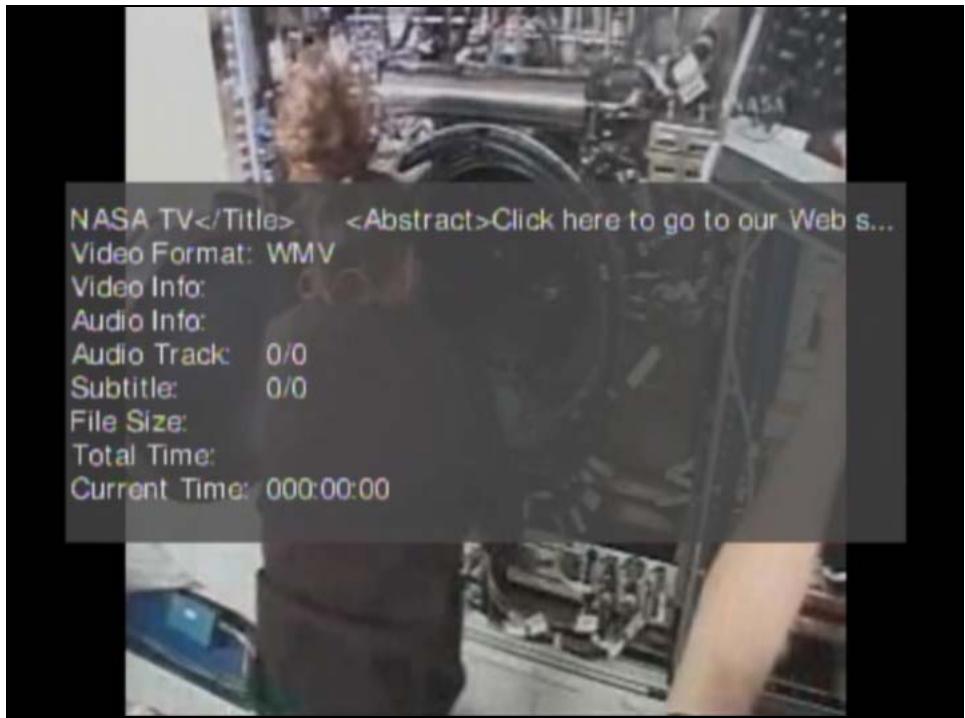
3.4.1 Displaying Information During Playback
Press the remote control's INFO button to display the name of the file and the playback duration on the screen as shown in the following figure. Press the remote control's INFO button again to display more details about the file as shown in the following figure.
3.4.2 A-B
Use the remote control's A-B button to have the DMA repeat a section of a video or music file. The following example uses the A-B function to set the DMA to keep repeating a section of the video starting at ten seconds into the video and ending at 30 seconds into the video.
1 Play a video file.
2 Press A-B at 0:10. The "A-" part of the A-B icon on the screen lights up.
3 Press A-B at 0:30. The rest of the A-B icon on the screen lights up.
4 The video or music repeats playing from A to B (0:10 to 0:30).
3.4.3 Resume
If the video playback is interrupted, the next time you use the DMA it offers to continue playing the file from where it stopped. See Section 7.7 on page 58 for how to enable or disable video resume. Video playback resume does not apply if you turn off the DMA or it loses power.
Music Menu
4.1 Overview
Use the Music menu to play audio files.
4.2 Playing Audio Files Example
1 Press the MUSIC button on the remote control or use the arrow and OK buttons to select the My Media icon in the HOME menu and then the Music menu.

2 If you are not already connected to a media source, the DMA searches for a USB device, computers with sharing enabled, and media servers and lists them here. Use the remote control's arrow and OK buttons to select one to access.

3 Press the remote control's OK button to select Music.
4 Select the folder containing the audio files you want to play (All Music in this example).
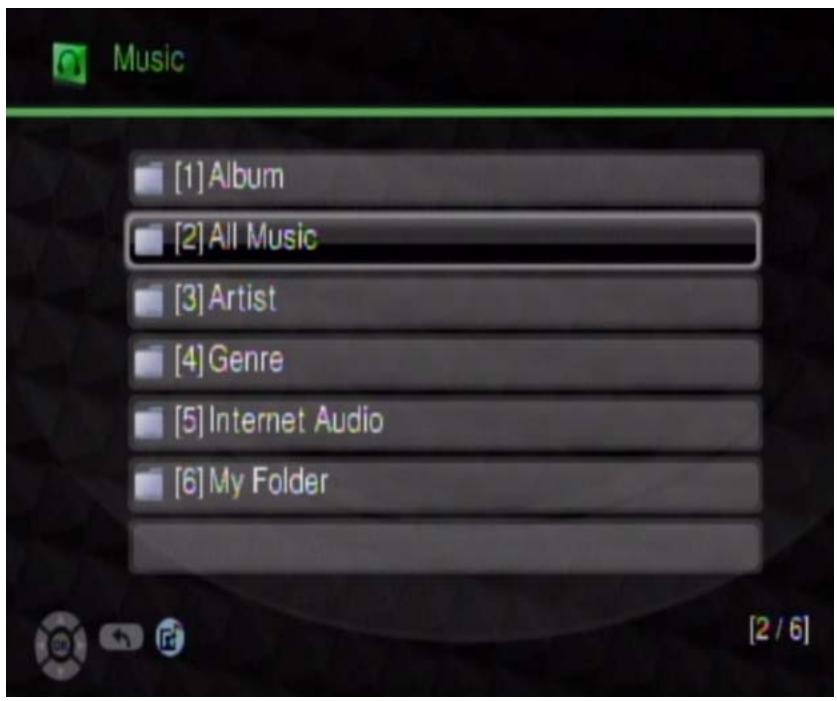
5 You may need to go through multiple folders. Use the remote control's arrow and OK buttons to select and play an audio file. Use the REW or FF button to go to the previous or next page of entries.
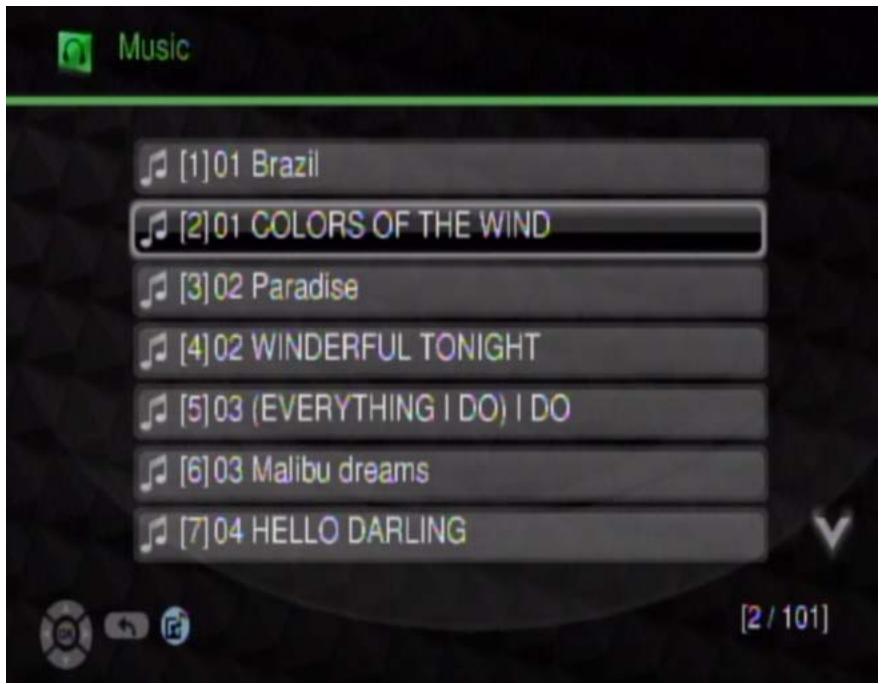
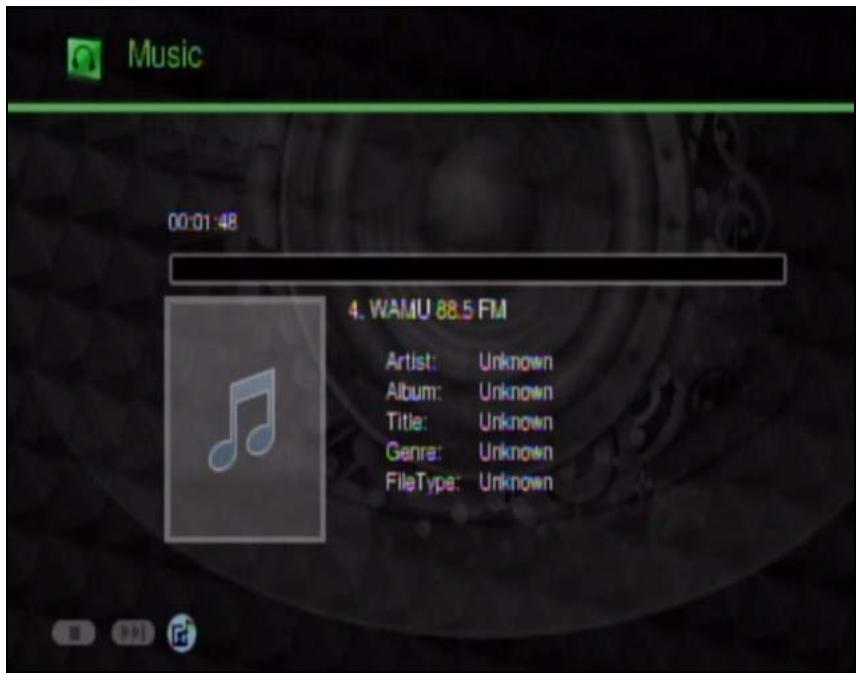
6 During playback, the screen displays information about the file and the current play time.
Playing music files is similar to playing video files. One key difference is that you can play music files as background music while you use the DMA's menus or play photo files or slideshows. When playing a file as background music, use the remote control's MUSIC button to identify a music file and use the PREV or NEXT buttons to play the previous or next file. The icon for a currently playing background music audio file is blue.
4.3 Background Music
You can play audio files (including Internet audio files and My iMedia Internet radio channels) as background music while you use the DMA's menus or play photo files or slideshows. While in a menu of audio files (or folders of audio files), select an audio file and press the remote control's BGM button to open the background music menu.
When you browse the music file menus, audio files that have already been added to the background music list display a green folder behind the file's icon.
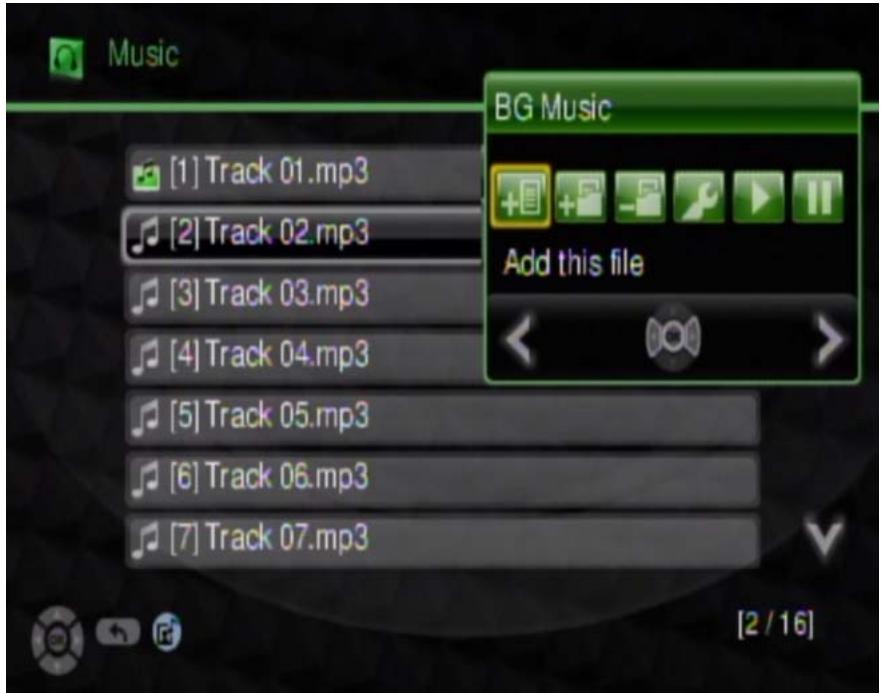
Table 3 Background Music Menu
The following table describes the fields in this menu.
Table 4 Background Music Menu
| LABEL | DESCRIPTION |
| Add this file | Select this to add the selected audio file to the background music list. |
| Delete this file | This option displays if the audio file is already included in the background music list. Select this to remove the selected audio file from the background music list. |
| Add all files | Select this to add all audio files in the currently displayed menu to the background music list. |
| Delete all files | Select this to remove all of the audio files in the currently displayed menu from the list of background music. |
| Edit | Select this to view and edit the background music list. |
| Play/Next | Select this to start playing the background music files or go to the next background music file. |
| Stop | Select this to stop playing the background music files or go to the next background music file. |
Pictures Menu
5.1 Overview
Use the Pictures menu to view image files.
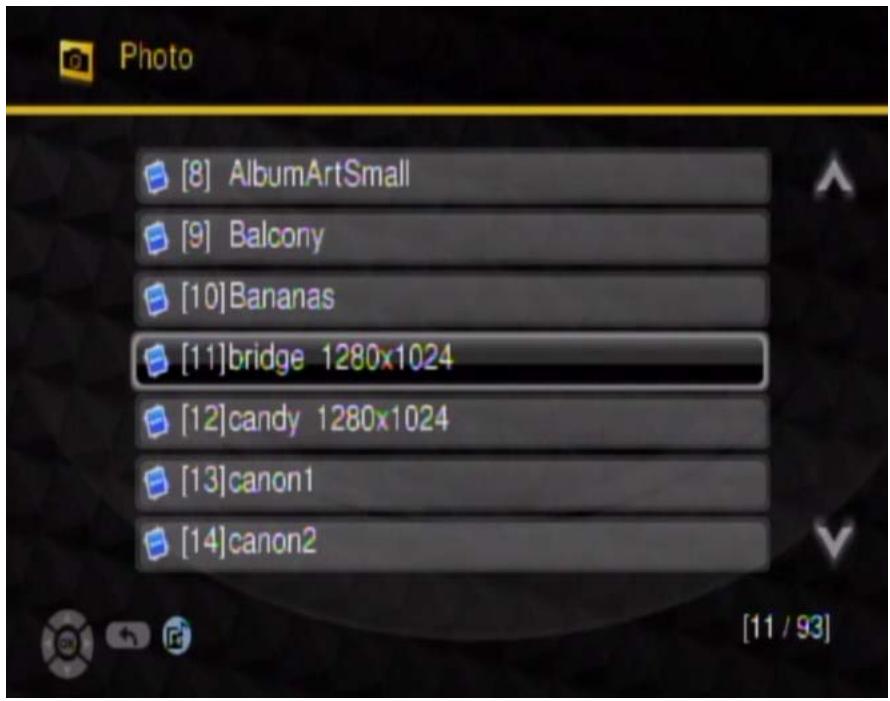
5.2 Viewing Pictures Example
1 Press the PICTURES button on the remote control or use the arrow and OK buttons to select the My Media icon in the HOME menu and then the Pictures menu.

2 If you are not already connected to a media source, the DMA searches for a USB device, computers with sharing enabled, and media servers and lists them here. Use the remote control's arrow and OK buttons to select one to access.

3 Press the remote control's OK button to select Photo.
4 Select the folder containing the images you want to view (All Images in this example).

5 You may need to go through multiple layers of folders to get to the file you want. Use the remote control's arrow and OK buttons to select and play an audio file. Use the REW or FF button to go to the previous or next page of entries.
6 Press the OK button again to display the photos as a slideshow. During playback, use the remote control's INFO button to display information about the file and the current play time.
5.3 Slideshow
To start a slideshow from within a Pictures sub-menu: use the arrow buttons to choose a picture file and then press the OK button. After the file displays, press the OK button again to start the slideshow. A play icon displays briefly and the photos display in order starting from the selected photo. During a slideshow:
- Use the OK button to pause and restart file playback.
- Press the ROTATE button to rotate a photo 90 degrees clockwise.
- Use the OK button or the STOP button to stop playback.
- Press the INFO button to see details about the displayed image.
- Press the ZOOM button and use the right arrow button to enlarge an image display.
- If you zoom to where the image display is larger than the screen, press ZOOM again and use the direction arrows to move the image.
- Press the ZOOM button and use the left arrow button to zoom out.
If a slideshow is interrupted, when you return to the Pictures menu the DMA takes you to the menu and filename where the slideshow stopped. This does not apply if you turn off the DMA or it loses power.
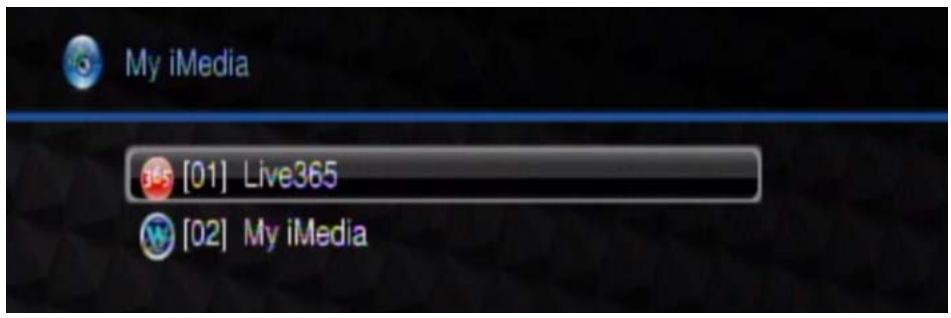
My iMedia Menu
6.1 My iMedia Menu
Use the My iMedia menus to play Internet stations (audio and video channels). Playing Internet channels is similar to playing video or music files. Like music files, you can play an Internet audio channel as background music while you use the DMA's menus or play photo files or slideshows (see Section 4.3 on page 28 for more on background music).
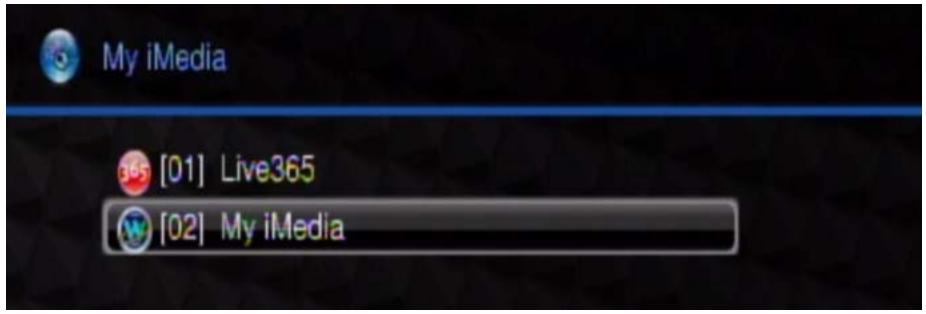
- Use the Live365 menus (see Section 6.2 on page 35) to play Internet radio channels from LIVE365.COM.
- Use the My iMedia menus (see Section 6.3 on page 39 and Section 6.4 on page 41) to add and play other Internet channels.
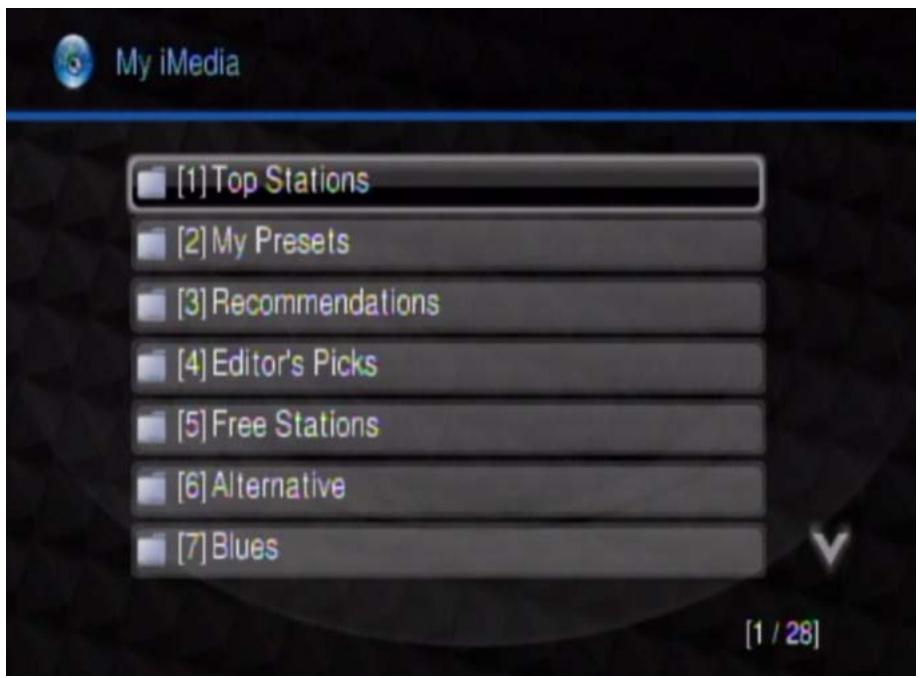
6.2 Live365.com (My iMedia) Example
Here is how to play Internet radio channels from LIVE365.COM.
1 Press the IMEDIA button on the remote control or use the arrow and OK buttons to select the My iMedia icon in the HOME menu.

2 Select Live365 for Internet radio.
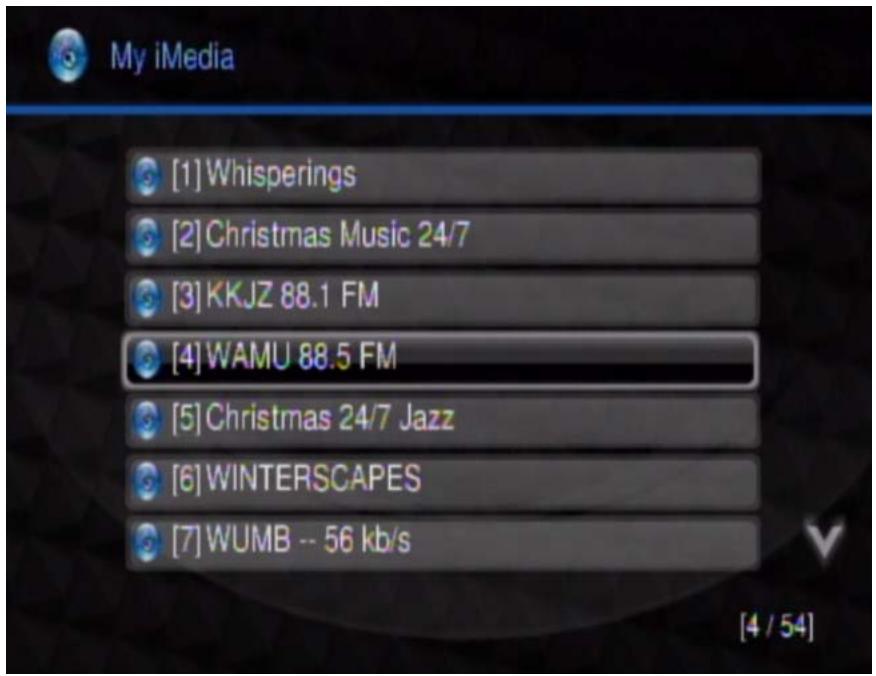
3 Use the remote control's arrow and OK buttons to select a station category. Use the REW or FF button to go to the previous or next page of entries.
4 Use the remote control's arrow and OK buttons to select and play a channel. Use the REW or FF button to go to the previous or next page of entries.
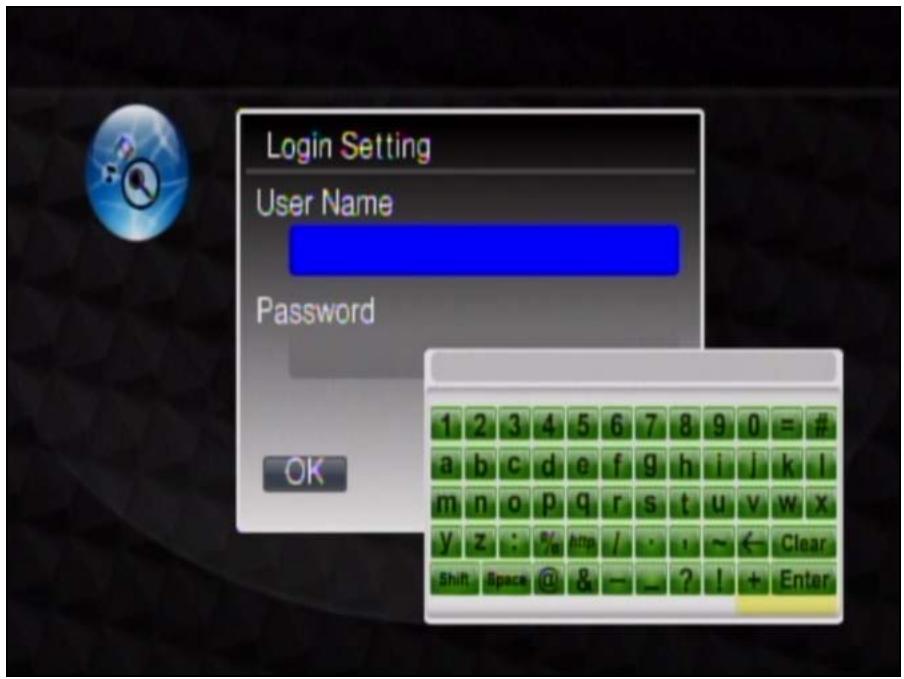
5 If it is a subscription channel, you'll need to enter your username and password. Press the OK button to open a key-input screen. Use the arrow and OK buttons to select the characters you need. Select Enter when you are done.
6 During playback, the DMA displays information about the file and the current play time.
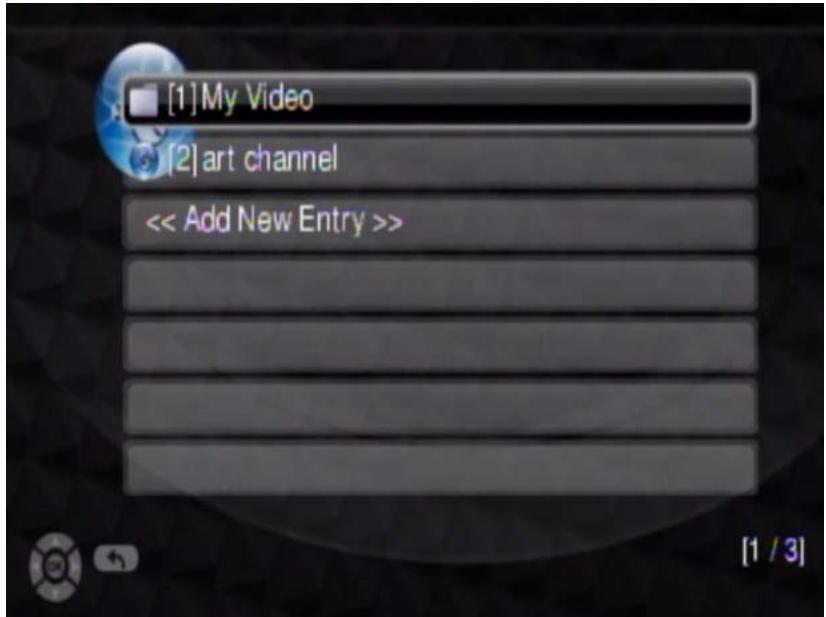
6.3 Playing Another My iMedia Internet Channel
Here is an example of playing an Internet video channel from the DMA's My iMedia list.
1 Press the IMEDIA button on the remote control or use the arrow and OK buttons to select the My iMedia icon in the HOME menu.
2 Select My iMedia.

3 Use the remote control's arrow and OK buttons to select a station to view. You may need to go through multiple folders. If you have many entries, use the REW or FF button to go to the previous or next page. In this example, select My Video > Education > NASA 1. If it were a subscription channel, you would need to enter your username and password (see page 38). In this example they are not necessary.
4 During playback, use the remote control's buttons for fast forward, reverse and pause.
- Press the remote control's INFO button to display information on the screen as shown in the following figure
6.4 Adding a My iMedia Internet Channel
Here is how to add an Internet video channel to the DMA's My iMedia list.
1 Press the IMEDIA button on the remote control or use the arrow and OK buttons to select the iMedia icon in the HOME menu.
2 Select My iMedia.
3 Select Add New Entry.

4 You can add a new station or a folder. In this case you select Add New Station.
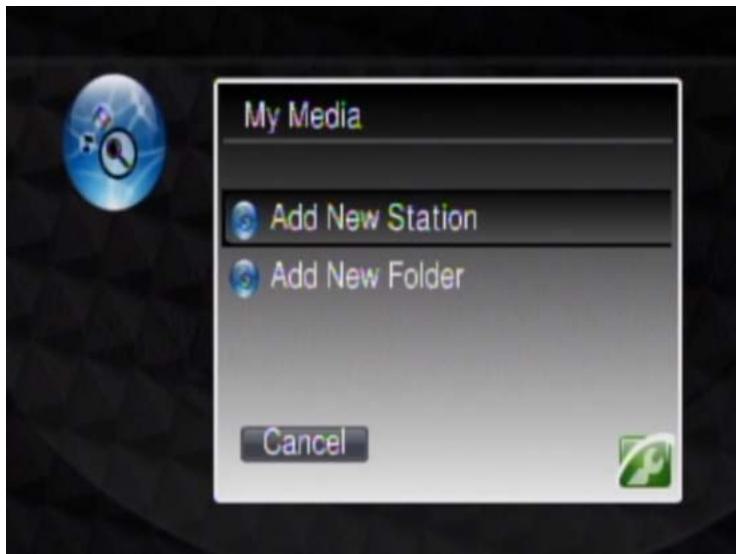
5 Press the OK button to open a key-input screen. Use the arrow and OK buttons to select the characters you need. Select Enter when you are done.

7.1 Overview
Use the Setup menu to configure the DMA. To open the Setup menu, press the SETUP button on the remote control or use the arrow and OK buttons to select the Setup icon in the HOME screen.

Figure 6 Setup Icon
Use the remote control's arrow and OK buttons to select an option sub-menu to configure.
- Use Network Wizard (see Section 7.2.1 on page 47) to configure your DMA's network settings.
- Use Network Setup (see Section 7.2.2 on page 51) to configure your DMA's network settings.
- Use Wireless Setup (see Section 7.2.3 on page 52) to configure settings for an installed USB wireless adapter.
- Use System Setup (see Section 7.3 on page 53 through Section 7.8 on page 59) to configure your DMA's menu language, TV mode, audio, video, and other settings.
- Use Version (see Section 7.9 on page 60 through Section 7.11 on page 61) to reset the DMA to its default settings and upgrade the firmware. You can also see the DMA's firmware version, MAC address, and serial number.
7.2 Network Settings
IP Address
The DMA needs an IP address to communicate with the media servers on your network. The DMA can get an IP address automatically if you have a device on your network that gives them out. Or you can assign the DMA a static (fixed) IP address.
DNS Server Address
A DNS (Domain Name System) server maps domain names (like www.zyxel.com) to their corresponding IP addresses (204.217.0.2 in the case of www.zyxel.com). This lets you use domain names to access web sites without having to know their IP addresses. The DMA can receive the IP address of a DNS server automatically (along with the DMA's own IP address). You can also manually enter a DNS server IP address in the DMA.
MAC Address
Every Ethernet device has a unique MAC (Media Access Control) address. The MAC address is assigned at the factory and consists of six pairs of hexadecimal characters, for example, 00:A0:C5:00:00:02.
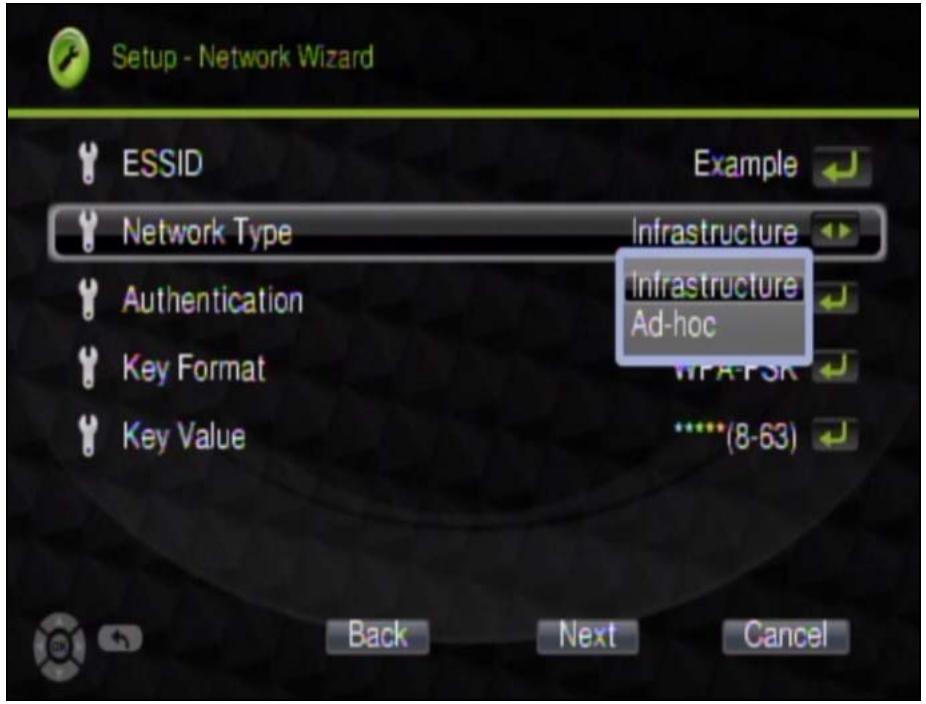
Network Type (Wireless)
The DMA can act as a wireless LAN client when you connect a compatible ZyXEL IEEE 802.11n wireless USB adapter to the DMA's USB port. You can set the network type to Infrastructure or Ad-Hoc mode. In Infrastructure mode the DMA connects to the wired network through an Access Point (AP).
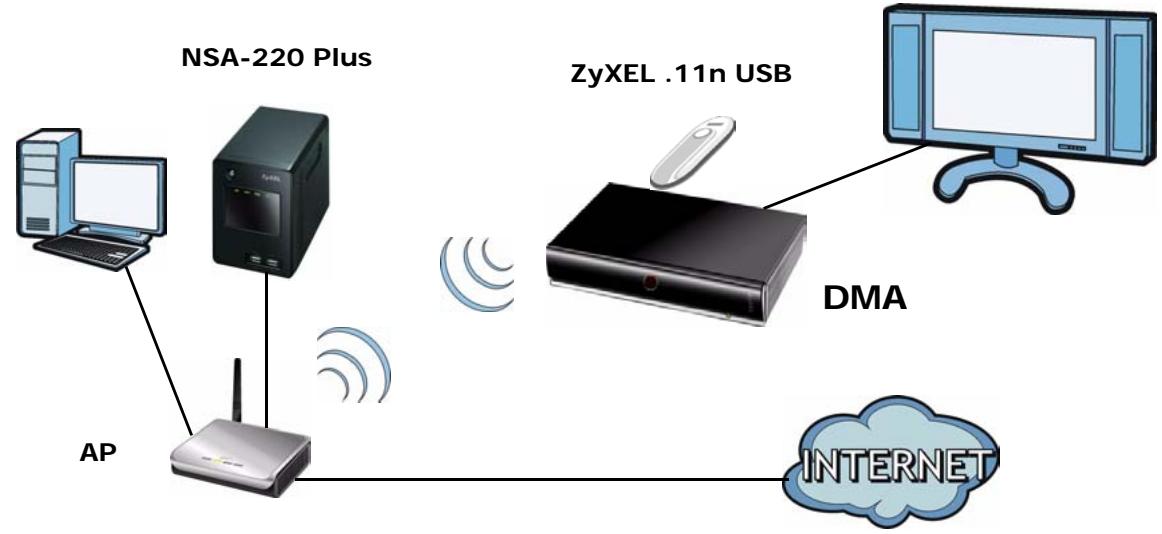
Figure 7 Infrastructure Mode
In Ad-Hoc mode the DMA connects to a computer that is a wireless client without using an AP.
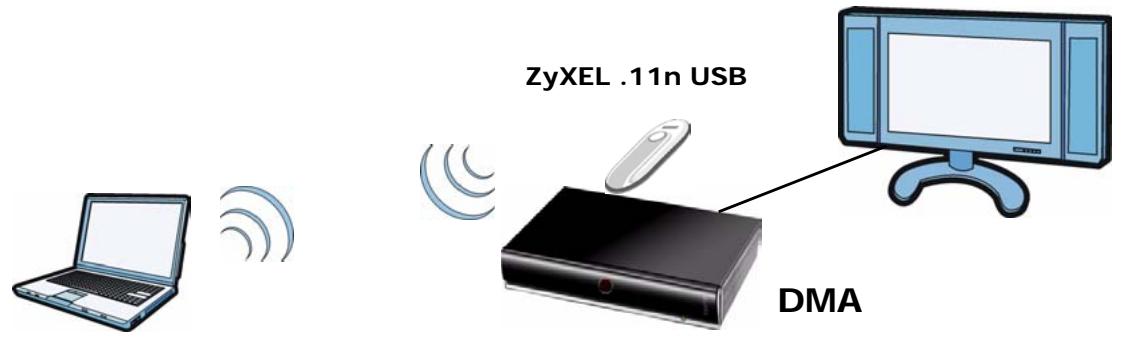
Figure 8 Ad-Hoc Mode
7.2.1 Network Wizard
The Network Wizard option is available when you connect a compatible ZyXEL IEEE 802.11n wireless USB adapter to the DMA's USB port. Use the Network Wizard to configure your DMA's network settings.
1 Select Setup > Network Wizard to open the Network Wizard.
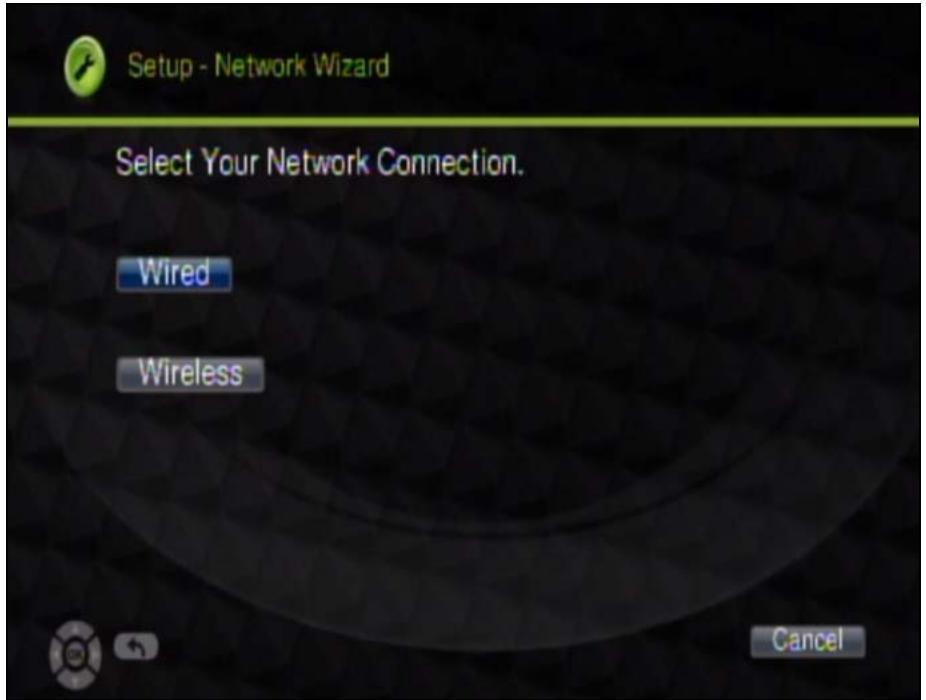
- Select Wired to configure your DMA to connect to your wired Ethernet network. The next screen shows that your setup is complete (go to step 6 on page 50).
-
Select Wireless to configure your DMA to connect to your wireless Ethernet network.
-
Use BACK or Cancel to quit the wizard without saving your changes.
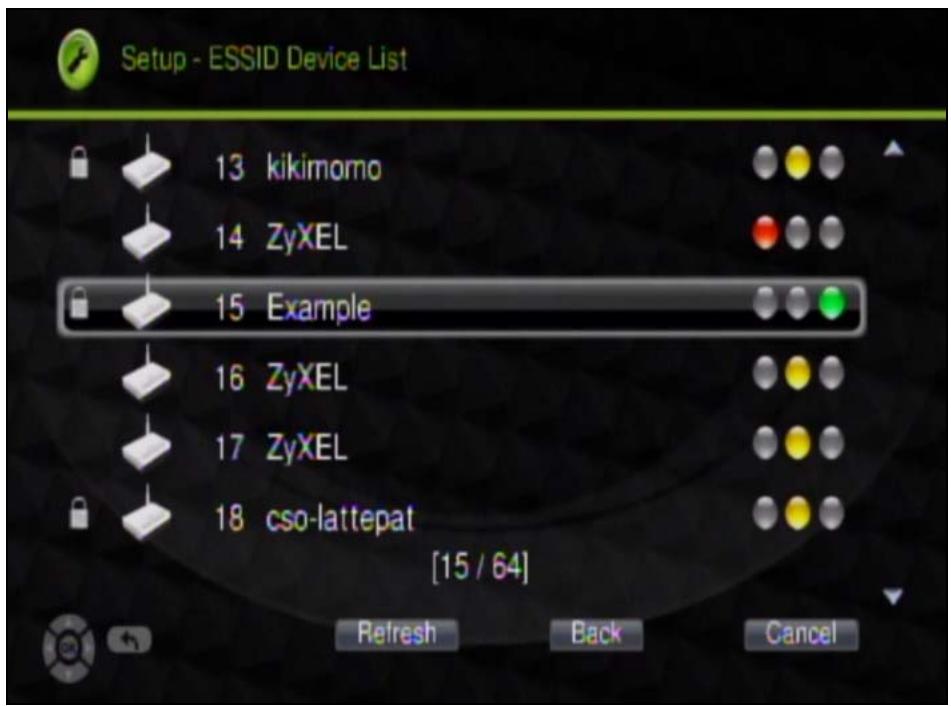
2 The DMA scans and lists the wireless networks in the area. A lock icon appears next to a wireless network that uses security. The illuminated dot to the right indicates the signal strength.
- Red (the first dot) indicates a weak signal.
- Yellow (the second dot) indicates a fair signal.
- Green (the third dot) indicates a strong signal.
Select the wireless network to which you want to connect and press OK. Use Refresh if you want to scan again, Back to return to the previous screen, or Cancel to quit the wizard without saving your changes.
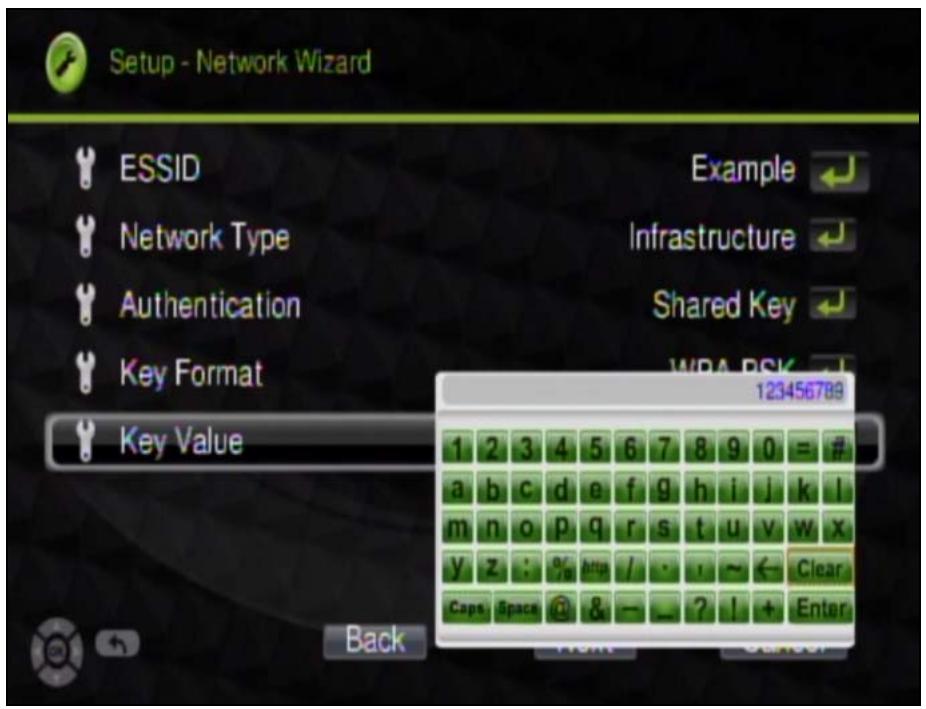
3 The DMA lists the selected wireless network's key settings. If the wireless network uses security, select Key Value and input the password.
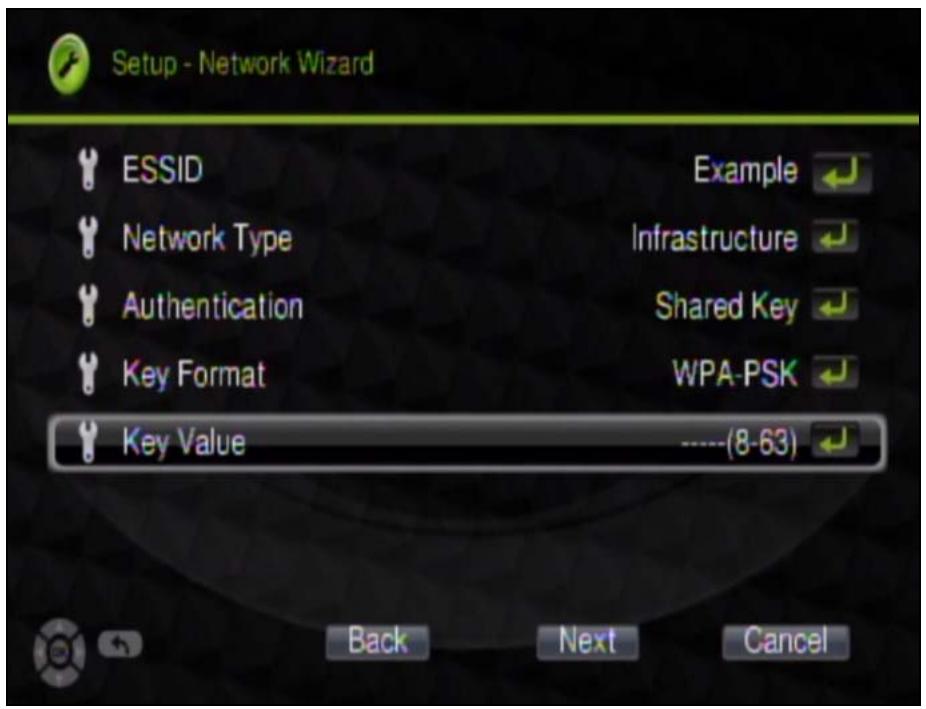
4 Use the screen and the remote control's number keys to input the password and then select Enter.
5 If needed, select other fields and configure their settings. Then select Next.
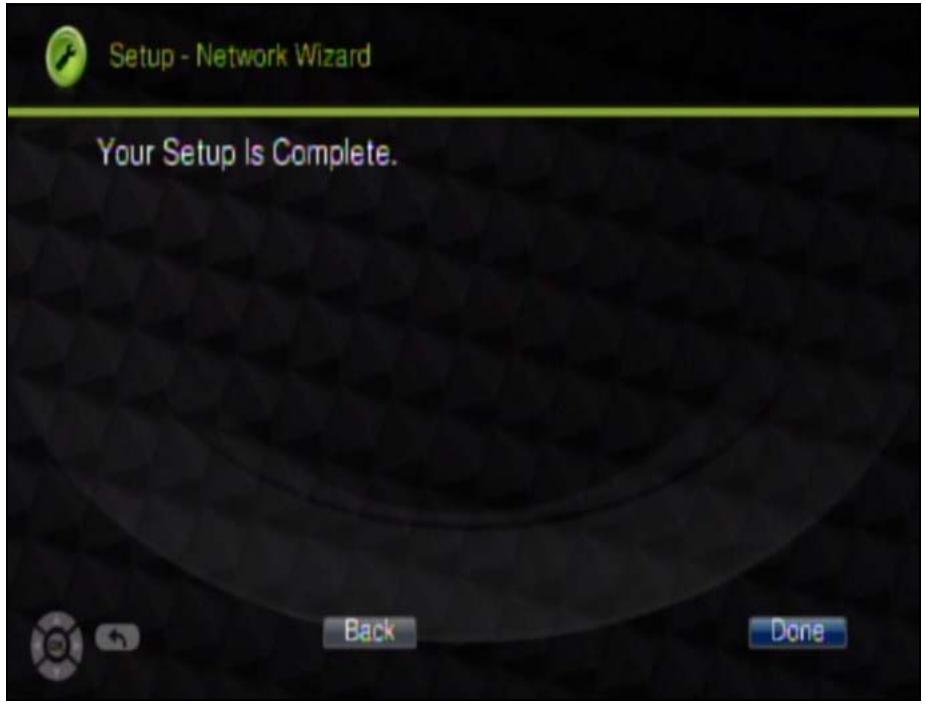
6 The DMA applies your settings and your DMA's network setup is complete. Select Done to return to the Network menu.
7.2.2 Network Setup Menu
Select Setup > Network Setup to open the Network Setup menu. Use this menu to configure your DMA's settings for connecting to your Ethernet network.
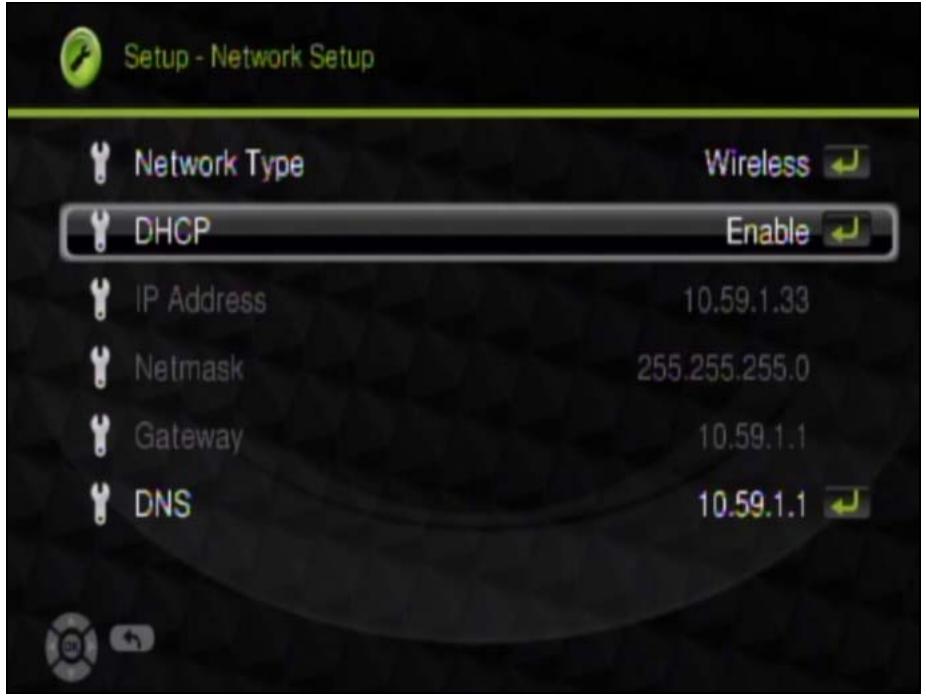
Figure 9 Setup > Network Setup
The following table describes the fields in this menu.
Table 5 Setup > Network Setup
| LABEL | DESCRIPTION |
| Network Type | This field is available when a compatible ZyXEL IEEE 802.11n wireless USB adapter is connected to the DMA's USB port. • Select Wired to configure your DMA to connect to a wired Ethernet network. • Select Wireless to configure your DMA to connect to a wireless Ethernet network. |
| DHCP | Use the arrow and OK buttons to select this field and then an option. Select Enable to have the DMA get IP address information automatically. If no IP address information is assigned, the DMA uses Auto-IP to assign itself an IP address and subnet mask. For example, you could connect the DMA directly to your computer. If the computer is also set to get an IP address automatically, the computer and the DMA will choose addresses for themselves and be able to communicate. Select Disable if you want to assign the DMA a static (fixed) IP address. |
| IP Address | Enter the IP address in this field if you selected Disable in the DHCP field. |
| Netmask | Enter the IP subnet mask in this field if you selected Disable in the DHCP field. |
| Gateway | Enter the default gateway IP address in this field if you selected Disable in the DHCP field. |
| DNS | Enter the DNS server IP address (if your ISP gave you one) in this field if you selected Disable in the DHCP field. |
7.2.3 Wireless Setup Menu
Select Setup > Wireless Setup to open the Wireless Setup menu. Use this menu to configure your DMA's settings for connecting to a wireless network.
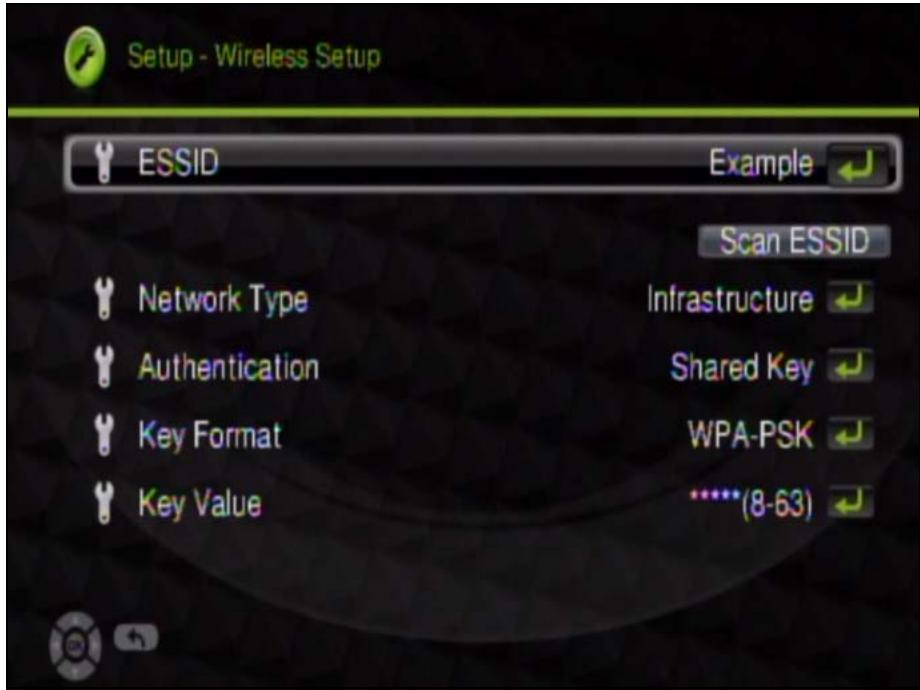
Figure 10 Setup > Wireless Setup
The following table describes the fields in this menu.
Table 6 Setup > Wireless Setup
| LABEL | DESCRIPTION |
| ESSID | This field displays the name of the currently selected wireless network. You can use the remote control with the on-screen keyboard to manually input another name or select Scan ESSID to select from a list of nearby wireless networks. |
| Network Type | Select Infrastructure to connect to an AP (and configure the rest of the wireless settings to match the AP's). Select Ad-Hoc to connect to another wireless client (and configure the rest of the wireless settings to match the other wireless client's). |
| Authentication | Select Open System if the wireless network does not use encryption. Select Shared Key if the wireless network uses encryption. |
| Key Format | Select the type of encryption and key format that the wireless network uses. The options are Off, WEP64(ASCII), WEP64(Hex), WEP128(ASCII), WEP128(Hex), WPA-PSK, and WPA2-PSK. |
| Key Value | Select this and use the remote control with the on-screen keyboard to manually input the encryption key. The key must be exactly the same on all wireless devices in the same wireless LAN.A 64-bit WEP key can be 5 ASCII characters or 10 hexadecimal characters ("0-9", "A-F").A 128-bit WEP key can be 13 ASCII characters or 26 hexadecimal characters ("0-9", "A-F").Note: An ASCII WEP key is case sensitive.A WPA-PSK or WPA2/PSK key can be 8 to 63 case-sensitive ASCII characters (including spaces and symbols) or 64 hexadecimal characters. |
7.3 Language Settings
Select Setup > System Setup > Language Settings to open the Language menu. Use the arrow and OK buttons to select the language that the DMA menus to use.
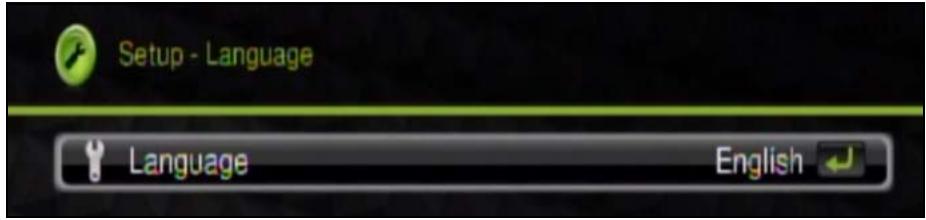
Figure 11 Setup > System Setup > Language Settings
7.4 TV Mode Setup
Letterbox (LB) and Pan and Scan (PS) in the DMA
Letterbox (LB) and pan and scan (PS) control how the DMA has a 4:3 aspect ratio television (standard-definition video format) display wider aspect video such as 16:9 (high-definition video format).
Letterbox displays the wider video with bars at the top and bottom of the screen. This maintains the video's original aspect ratio, although the picture is smaller. Here is an example:

Figure 12 Letterboxed Video Display
Pan and scan cuts off the sides of wider aspect video and just shows the center portion. This fills the whole screen with a larger picture, although the sides are missing. Here is an example:

Figure 13 Pan and Scan Video Display
7.4.1 Configuring the TV Mode Setup
Select Setup > System Setup > TV Mode Setup to open the TV Mode Setup menu. Use this menu to configure the video output that the DMA sends to your television.
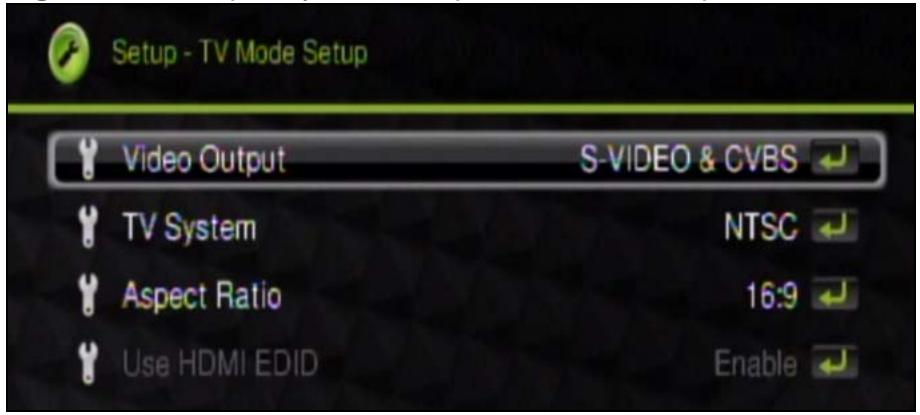
Figure 14 Setup > System Setup > TV Mode Setup
The following table describes the fields in this menu.
Table 7 Setup > System Setup > TV Mode Setup
| LABEL | DESCRIPTION |
| Video Output | Select S-VIDEO & CVBS if you connect to S-video or composite (AV) input on your television. |
| Select P-SCAN YPbPr if you connect to YPbPr input on your television. | |
| Select HDMI if you connect to HDMI (High Definition Multimedia Interface) input on your television. | |
| TV System | Select your TV's type (NTSC or PAL). |
| Aspect Ratio | Select 4:3 LB or 4:3 PS for a 4:3 aspect ratio (standard-definition) television. Use LB (letterbox) to display wider aspect video with bars at the top and bottom of the screen. This shows a smaller version of the whole picture with its original shape. Use PS (pan and scan) to cut off the sides of wider aspect video and just show the center portion. This fills the whole screen with a larger picture, although the sides are missing. |
| Select 16:9 if you have a 16:9 aspect ratio (high-definition or widescreen) television. | |
| Use HDMI EDID | This option is available when the video output is set to HDMI. Select this to have the DMA get information about the TV's video capabilities from the TV itself. If you use this but it does not work, your TV may not be able to provide this information to the DMA. In this case disable this feature. |
7.5 Audio Setup
Select Setup > System Setup > Audio Setup to open the Audio Setup menu. Use this menu to configure the DMA's audio output for music playback. You can turn the DMA's digital output (for the HDMI or S/PDIF connector) on or off. The analog output is always on.
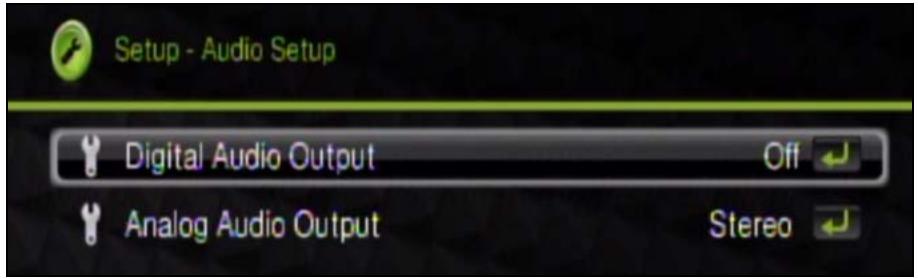
Figure 15 Setup > System Setup > Audio Setup
The following table describes the fields in this menu.
Table 8 Setup > System Setup > Audio Setup
| LABEL | DESCRIPTION |
| Digital Audio Output | Turn this off if your television or audio system does not accept digital audio input. Select SPDIF/RAW if your audio system can decode the raw S/PDIF signal. Switch to SPDIF/PCM if you cannot hear anything. Select SPDIF/PCM (Pulse Code Modulation) if your audio system cannot decode the raw S/PDIF signal. Switch to SPDIF/RAW if you cannot hear anything. See Section 7.5.1 on page 56 for details on S/PDIF. |
| Analog Audio Output | Select Stereo to have the DMA send two channel (left and right) audio output through the LEFT and RIGHT audio connectors. Select Mono L to send single channel audio output through the LEFT audio connector. Select Mono R to send single channel audio output through the RIGHT audio connector. Select Mono mix to send single channel audio output through the LEFT and RIGHT audio connectors. |
7.5.1 S/PDIF
S/PDIF (Sony/Philips Digital Interface Format) is also IEC 958 type II, part of IEC-60958. S/PDIF is a collection of low-level protocol and hardware specifications for carrying digital audio signals between devices and stereo equipment.
7.6 Video Setup
Select Setup > System Setup > Video Setup to open the Video Setup menu. Use this menu to adjust how the picture looks for video playback.
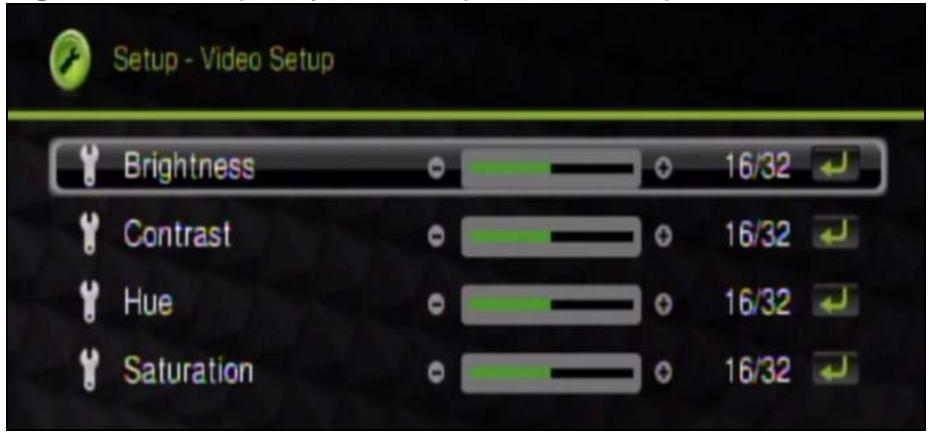
Figure 16 Setup > System Setup > Video Setup
The following table describes the fields in this menu.
Table 9 Setup > System Setup > Video Setup
| LABEL | DESCRIPTION |
| Brightness | Brightness controls the black levels in the television picture. This means it controls how black the dark sections of the picture look. When adjusting the brightness, use an appropriate calibration pattern image or a still image that has black objects. You can even refer to the black letterbox bars at the top and bottom of the screen. ·The right brightness level keeps blacks looking black without losing shadow details. ·If the blacks look gray or washed out, decrease the brightness level. ·If you cannot see detail in the picture's shadows, increase the brightness. |
| Contrast | Contrast controls the white levels in the television picture. When adjusting the contrast, use an appropriate calibration pattern image or a still image that has white objects (like snow or white clothing) with visible shades of white. ·You want the picture as bright as possible while still being able to see the details. ·If whites appear gray or the picture looks dim, increase contrast. ·If you cannot see any details in whites, decrease the contrast. |
| Hue | Hue adjusts the color mix of Red, Green, and Blue (RGB).Only adjust the hue if you are using calibration images and the appropriate color filters. |
| Saturation | Saturation adjusts the color intensity. Adjust calibration to make skin tones look natural. When adjusting the saturation, use an appropriate calibration pattern image or a close up image of a face.If the person's skin looks red or sun-burnt, decrease the saturation.If the person looks pale, increase the saturation. |
7.7 Other Settings
Select Setup > System Setup > Other Settings to open the Other Settings menu. Use this menu to configure settings that control the DMA's operation.
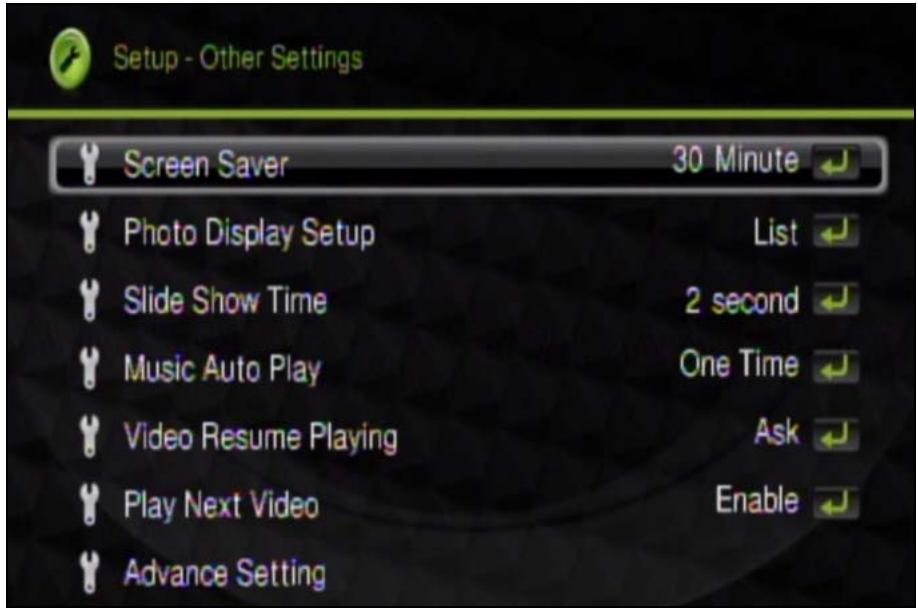
Figure 17 Setup > System Setup > Other Settings
The following table describes the fields in this menu.
Table 10 Setup > System Setup > Other Settings
| LABEL | DESCRIPTION |
| Screen Saver | Set after how many minutes of in-activity the screen saver displays. You can also turn the screen saver off. |
| Photo Display Setup | Set how lists of photo files display in the DMA's menus. Set them to display as a list of file names (List) or thumbnail images (Thumbnail). |
| Slide Show Time | Set how long individual files display in a slideshow. |
| Music Auto Play | When you play music files, you can have the DMA keep repeating all of the files in the folder (Repeat), only play the file for which you pressed play (Off), or play all of the files in the folder once (One Time). |
| Video Resume Playing | When you stop playing a video before it finishes and use the DMA again later, the DMA can continue from where you left off. You can have the DMA display a window asking if you want to continue (Ask) or automatically continue (Always). You can also turn this feature off (Off). |
| Play Next Video | When you play video files, you can have the DMA play all of the files in the folder (Enable) or only play the file for which you pressed play (Disable). |
| Advance Setting | Use this menu to turn the network activity (LAN) LED off or on. |
7.8 Advance Setting
Select Setup > System Setup > Other Settings > Advance Setting to open the Advance Setting menu. Use this menu to turn the network activity LED (also known as the network media traffic LED) off or on.
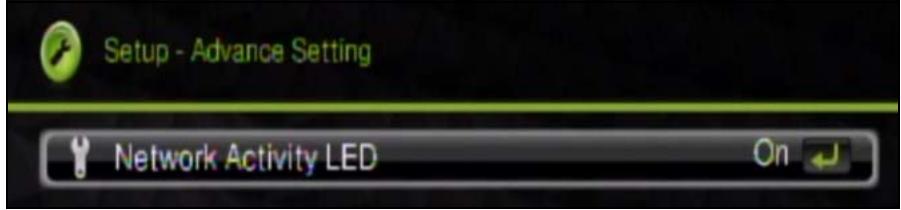
Figure 18 Setup > System Setup > Other Settings > Advance Setting
The following table describes the fields in this menu.
Table 11 Setup > System Setup > Other Settings > Advance Setting
| LABEL | DESCRIPTION |
| Network Activity LED | Turn the network activity LED off or on. |
7.9 Version
Select Setup > Version to open the Version menu. This menu displays information about the DMA.
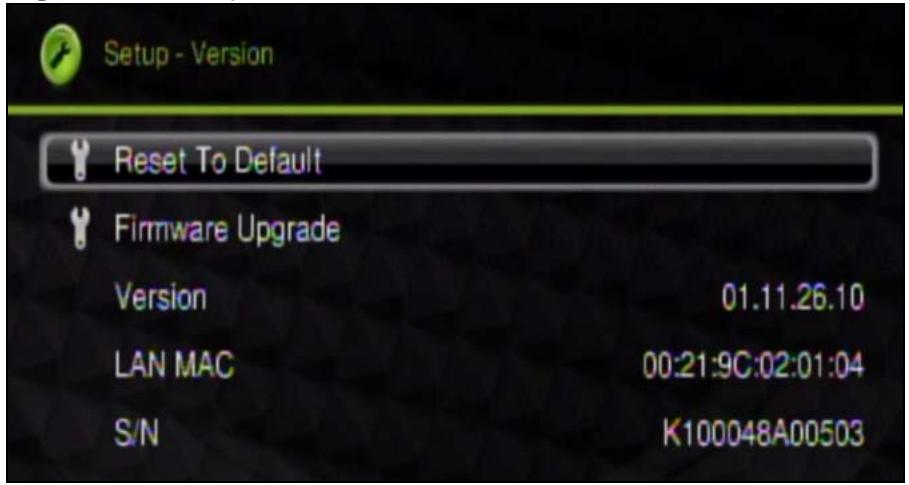
Figure 19 Setup > Version
The following table describes the fields in this menu.
Table 12 Setup > Version
| LABEL | DESCRIPTION |
| Reset to Default | Use this menu to set the DMA back to the factory default settings. See Section 7.10 on page 60 for details. |
| Firmware Upgrade | Use this menu to upload new firmware to the DMA. See Section 7.11 on page 61 for details. |
| Version | This is the version of the firmware currently on the DMA. |
| LAN MAC | This field displays the MAC address of the DMA's wired Ethernet interface. |
| S/N | This is this piece of hardware's Serial Number. |
7.10 Reset to Default
Select Setup > Version > Reset Settings to open the Reset Settings menu. Use this menu to set the DMA back to the factory default settings.
Note: You will lose all of your changes when you reset to the default settings.
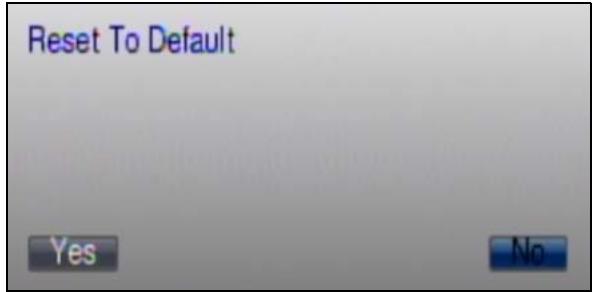
Figure 20 Setup > Version > Reset Settings
Select Yes to restore all of the DMA's settings to the factory defaults or select No to keep the current settings and exit the screen.
7.11 Firmware Upgrade
Select Setup > Version > Firmware Upgrade to open the Firmware Upgrade menu. Use this menu to upload new firmware to the DMA.
Only use firmware for your device's specific model. Refer to the label on the bottom of your DMA.
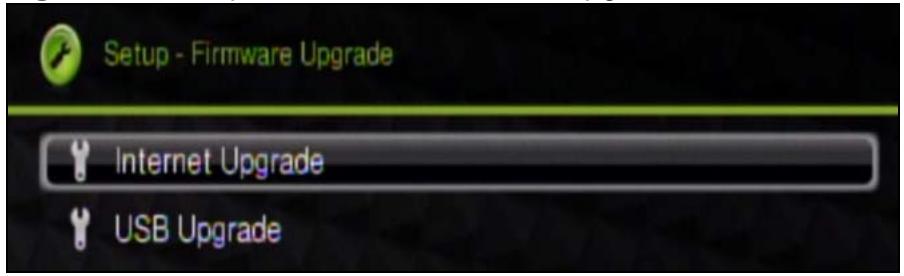
Figure 21 Setup > Version > Firmware Upgrade
The following table describes the fields in this menu.
Table 13 Setup >Version > Firmware Upgrade
| LABEL | DESCRIPTION |
| Internet Upgrade | Select this option and follow the on-screen instructions to have the DMA check for and download new firmware from a server. The DMA must be connected to the Internet in order to do this.A check mark appears next to the option if it is selected. |
| USB Upgrade | Select this option and follow the on-screen instructions to have the DMA download new firmware from a USB drive. You must first download the firmware file, unzip it, and put it on a USB drive. Download firmware from www.zyxel.com and unzip it. Copy the "upgrade.bin" file to the USB device's root directory and connect the USB drive to the DMA.Note: The "upgrade.bin" file must be in the USB device's root directory (it cannot be inside any folders).A check mark appears next to the option if it is selected. |
| OK | Select this to save your changes back to the DMA. |
| CANCEL | Select this to exit this screen without saving your changes. |
Do not turn off the DMA while firmware upload is in progress!
The upload process may take up to two minutes. After a successful upload, the system will reboot. See Section 7.9 on page 60 for how to check the firmware version to know if the new firmware upload was successful.
Media Server
8.1 Overview
Install the included DLNA (Digital Living Network Alliance) compliant ^1 media server software on your Windows computers to let the DMA play files stored on the computers, YouTube videos, and Internet TV and radio.
- The software requires Windows.
If you do not have Windows or do not want to install software, you can put your files on a USB device. The USB device connects directly to the DMA without need of the media server software
- Install the media server software on each computer that should share files with the DMA.
See the Quick Start Guide for how to install the media server software and the requirement details.
8.2 Media Server
Use the media server to let the DMA play files stored on your computer or the Internet.
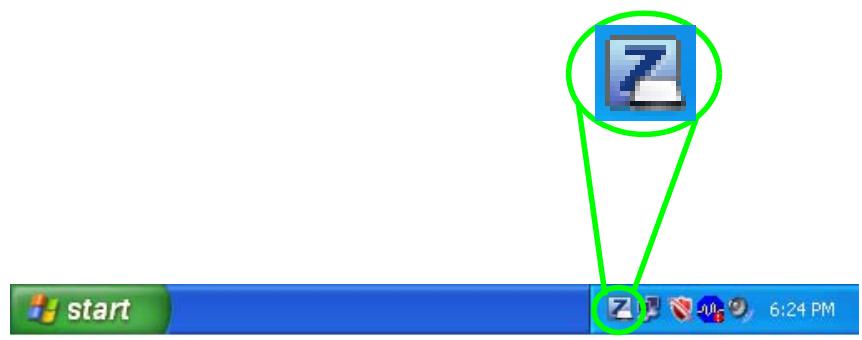
1 Click Start > All Programs > ZyXEL > HD Media Server. > DigitalMediaServer.exe.
2 This icon displays in the system tray (usually in the bottom right corner) after the installation is done. Double-click the icon to open the server configuration screens.
8.3 Media List
Use the Media List screen to turn the media server service off and on and select the folders and files that your computer shares with the DMA. You must stop the service to be able to edit the shared media list.
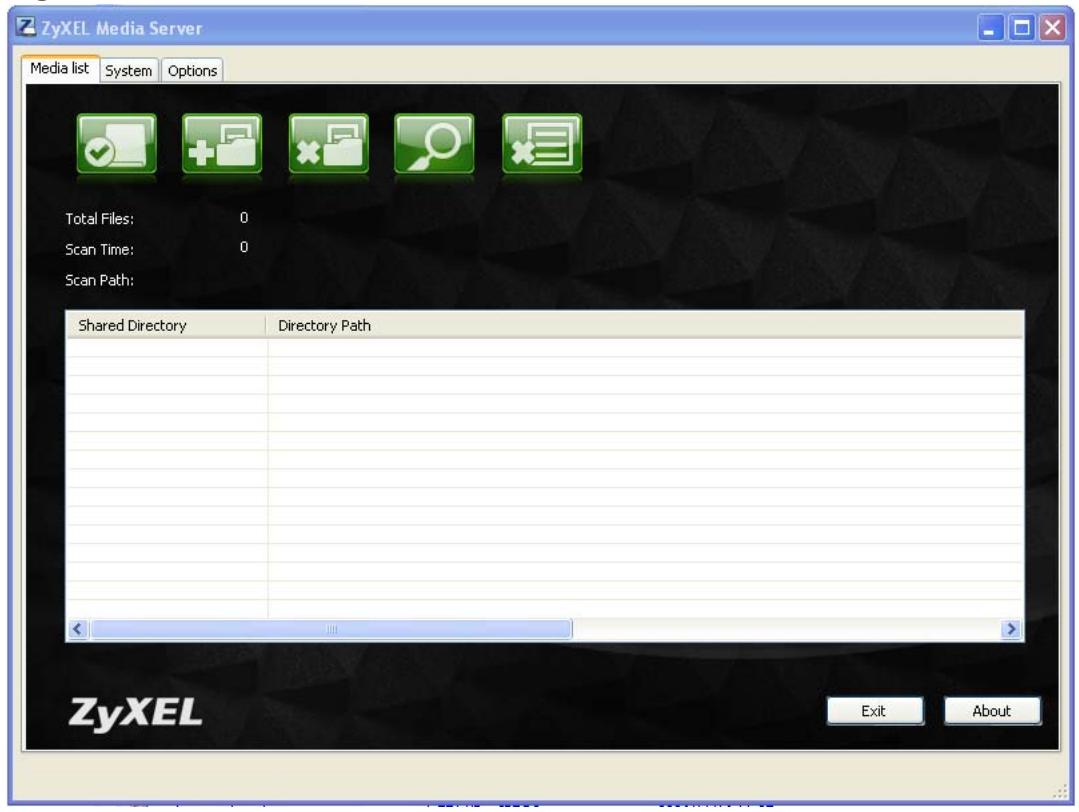
Figure 22 Media List
The following table describes the fields in this menu.
Table 14 Media List
| LABEL | DESCRIPTION |
| Start Service | Click Start Service to have the media server share files with media clients. |
| Stop Service | This icon displays when the media server service is on. Click Stop Service to have the media server not share files with media clients. |
| Add a Folder | To share files, click the Add a Folder icon and browse to select a folder that you want to share. |
| Remove a Folder | To remove a folder from the list of shared folders, select it and then click the Remove a Folder icon. Hold down the [SHIFT] key to select a range of folders. Use the [CTRL] key to select multiple individual folders. |
| Refresh the Folder list | Click Refresh the Folder list to update the display of folders (of files) to share with the media clients. |
| Remove All | Click Remove All to remove all of the folders from the list of shared folders. |
| Total Files | This is the total number of files in the list of folders of shared contents. |
| Scan Time | This is how long it took the media server to check the list of folders of shared contents. |
| Scan Path | When you add files in the media list or click Refresh the Folder list, this field displays the names of the files. |
| Shared Directory | These are the names of folders of media files which the media server is to share. |
| Directory Path | This is the path of each folder of media files which the media server is to share. |
| Exit | Click Exit to close the media server program. |
| About | Click About to display the version of the (digital) media server. |
8.4 System
Click System to open the System screen. Use this screen to configure the server name or manage an individual DMA's list of Internet video or radio channels. For
example, you might add some channels for the DMA in the parents room and other channels for the DMA in the kids' rooms.
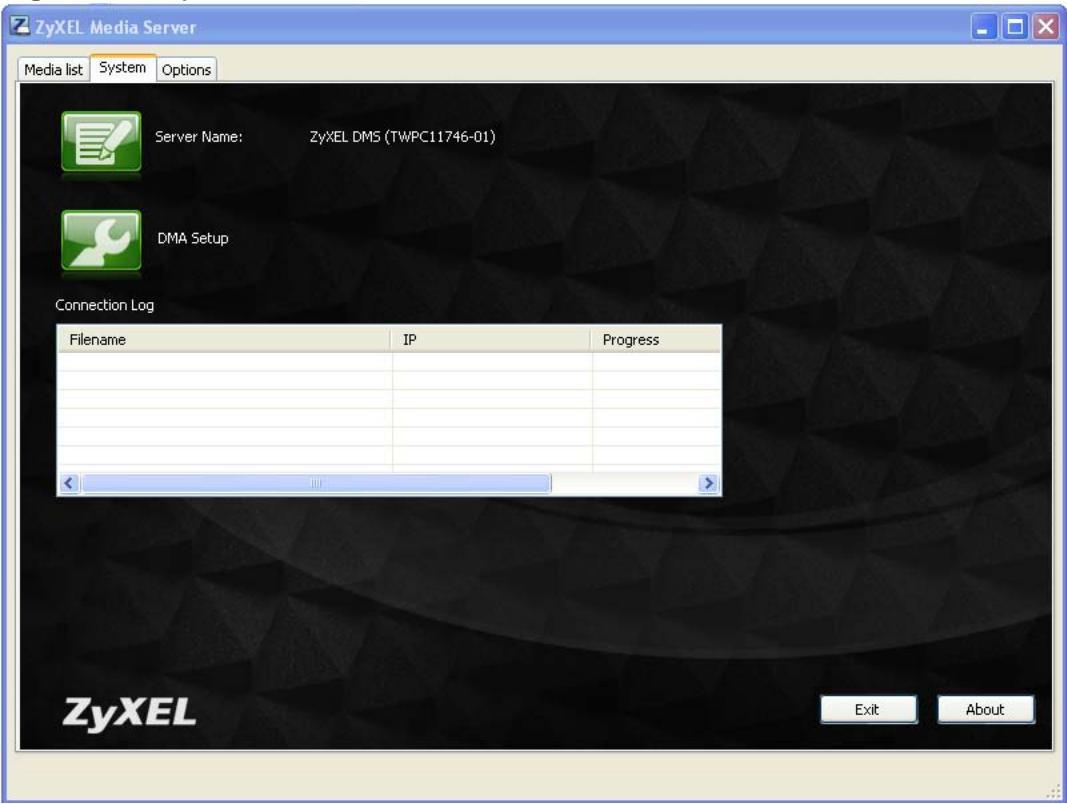
Figure 23 System
The following table describes the fields in this menu.
Table 15 System
| LABEL | DESCRIPTION |
| Server Name | This displays the media server's name for identifying it on the network. Click the button to edit the name. |
| DMA Setup | Click this button to connect to a DMA on your network and edit the DMA's list of Internet media channels (see Chapter 6 on page 35 for how to play Internet media channels). |
| Connection Log | This table lists the files that DMAs have played from or through the media server. The file could have been stored on the media server or on the Internet. |
| Filename | This is the name of a file on the media server that a DMA has accessed. |
| IP | This is the IP address of the DMA that accessed the file. |
| Progress | This is the percent of a file on the media server that a DMA has played. |
| Exit | Click Exit to close the media server program. |
| About | Click About to display the version of the digital media server. |
8.4.1 DMA List
Click System > DMA Setup to open the following screen. Use this screen to select a DMA to configure.
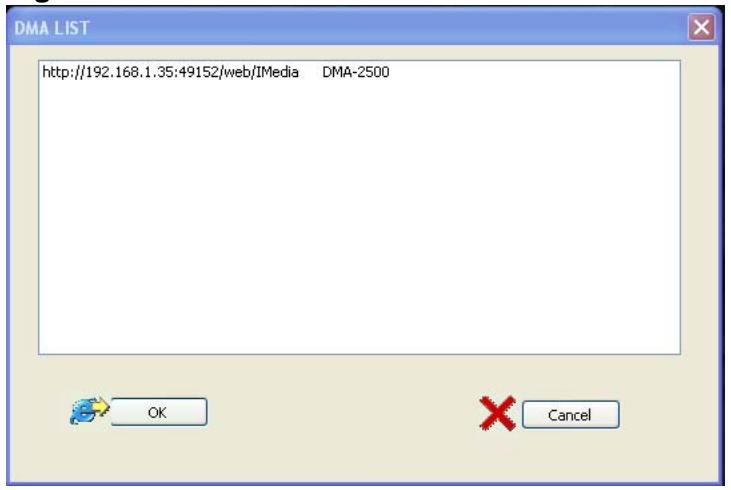
Figure 24 DMA List
The following table describes the fields in this menu.
Table 16 DMA List
| LABEL | DESCRIPTION |
| DMA LIST | This list displays the DMAs detected on your network. Select the DMA that you want to configure. |
| OK | Click this button to use Internet Explorer to connect to the selected DMA and edit the DMA's list of Internet media channels. |
| Cancel | Click Cancel to close the screen. |
8.4.2 DMA Configuration
Click System > DMA Setup and select a DMA and click OK to open the following screen. Use this screen to edit the DMA's list of Internet media channels.

Figure 25 DMA Configuration
The following table describes the labels in this screen.
Table 17 DMA Configuration
| LABEL | DESCRIPTION |
| New Folder | Click this to create a new folder for Internet media channels. |
| New Station | Click this to open a screen where you can add an Internet media channel. |
| Current folder | This is the name of the displayed folder. Click the name to return to the top level of the folders. |
| Objects | This is the number of items displayed in the list of Internet channels and folders below. It does not include the contents of any folders in the list. |
| Refresh | Click Refresh to update the display. |
| Execute | Select Delete Selected Objects and click Execute to remove the checked Internet channels and folders. |
| Name | These are the names of the Internet channels and folders. Click a folder's name to go into the folder. Click an Internet channel's name to edit the entry. |
| Edit | Click an entry's Edit icon to edit the entry. |
| Delete | Click an entry's Delete icon to remove the entry. |
8.4.3 DMA Folder Add or Edit
Use this screen to add or edit a folder in the DMA setup screen.
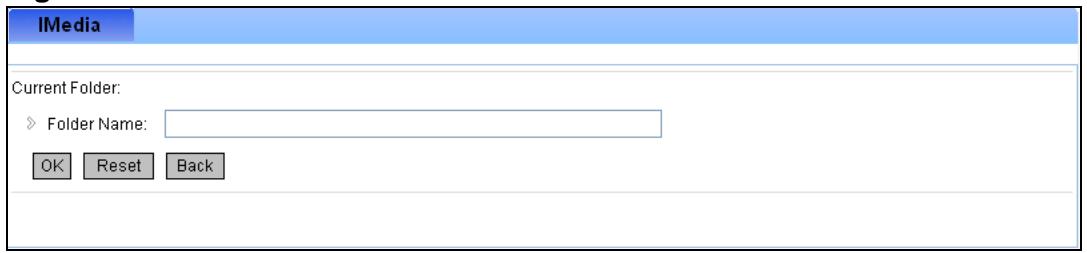
Figure 26 DMA Folder Add
The following table describes the labels in this screen.
Table 18 DMA Folder Add
| LABEL | DESCRIPTION |
| Folder | Enter a name for the folder. |
| OK | Click this to save your settings. |
| Reset | Click this to return the screen to its previously saved settings. |
| Back | Click this to exit the screen without saving changes. |
8.4.4 DMA Internet Station Add or Edit
Use this screen to add or edit an Internet channel in the DMA setup screen. See Section 6.4 on page 41 for how to add an Internet channel using the remote control.
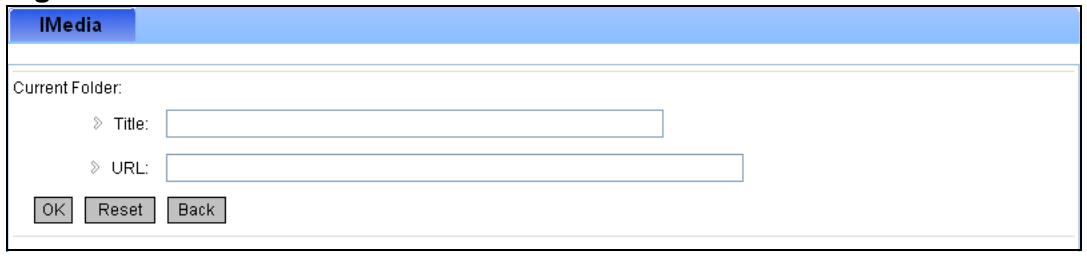
Figure 27 DMA Internet Station Add
The following table describes the labels in this screen.
Table 19 DMA Internet Station Add
| LABEL | DESCRIPTION |
| Title | Enter a name to identify the Internet channel. |
| URL | Enter the URL of the Internet channel. |
| OK | Click this to save your settings. |
| Reset | Click this to return the screen to its previously saved settings. |
| Back | Click this to exit the screen without saving changes. |
8.5 Options
Click Options to configure the language and have the media server start automatically when the computer turns on.
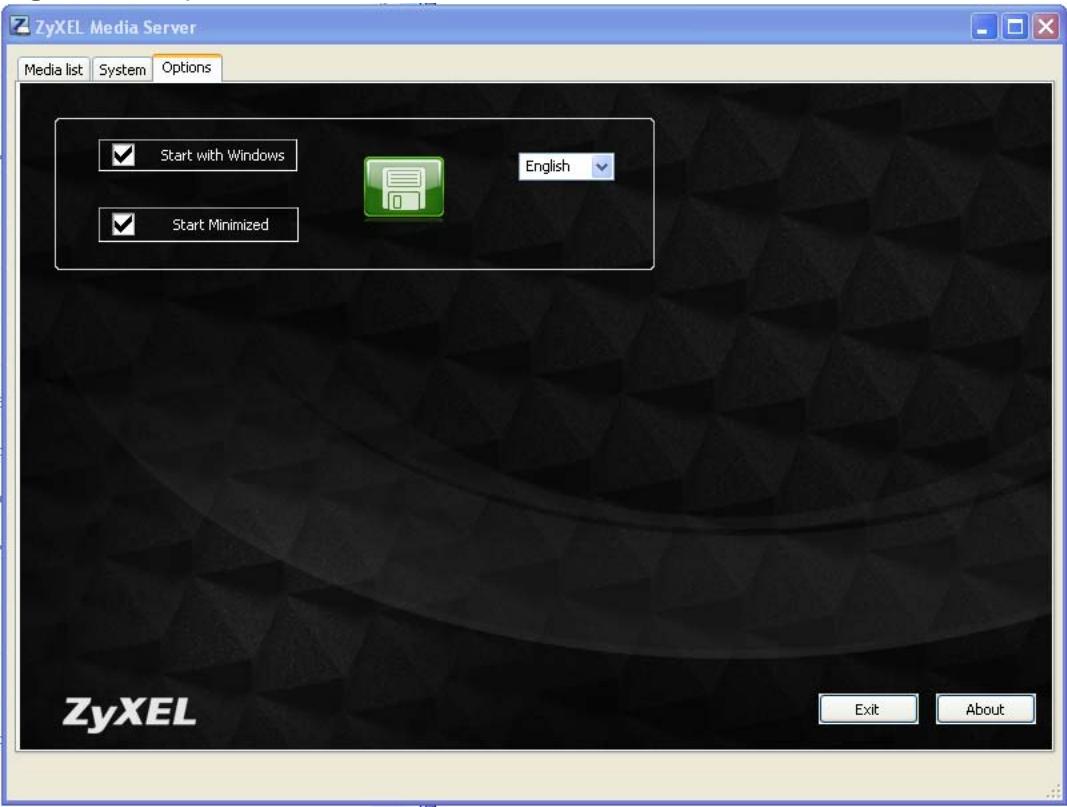
Figure 28 Options
The following table describes the fields in this menu.
Table 20 Options
| LABEL | DESCRIPTION |
| Start with Windows | Select this to have the media server automatically start when Windows starts up. |
| Start Minimized | Select this to have the media server automatically start in minimized mode when Windows starts up. Minimized mode means the media server's icon displays in the system tray but the configuration screens do not display. |
| English | Select the display language for the DMA screens. |
| Exit | Click Exit to close the media server program. |
| About | Click About to display the version of the digital media server. |
Troubleshooting
9.1 Overview
This chapter offers some suggestions to help solve problems you might encounter. The potential problems are divided into the following categories.
- Power, Hardware Connections, and LEDs
DMA Usage
9.2 Power, Hardware Connections, and LEDs
None of the LEDs turn on.
1 Make sure the DMA is turned on.
2 Make sure you are using the power adaptor included with the DMA.
3 Make sure the power adaptor is connected to the DMA and plugged in to an appropriate power source. Make sure the power source is turned on.
4 Turn the DMA off and on using the power switch on the rear panel (instead of the Power button on the remote control).
5 If the problem continues, contact the vendor.
One of the LEDs does not behave as expected.
1 Make sure you understand the normal behavior of the LED (see Section 1.2 on page 12).
2 Check the hardware connections. See the Quick Start Guide and Section 9.2 on page 71.
3 Inspect your cables for damage. Contact the vendor to replace any damaged cables.
4 Turn the DMA off and on using the power switch on the rear panel (instead of the Power button on the remote control).
5 If the problem continues, contact the vendor.
9.3 DMA Usage
I cannot see the DMA menus on the television screen.
1 Check the hardware connections, and make sure the LEDs are behaving as expected. See the Quick Start Guide and Section 9.2 on page 71.
2 Make sure your television is on and set to display the input from the DMA. For example, if you used an HDMI connection between the television and the DMA, make sure the television input is set to HDMI. If you used a S-Video connection between the television and the DMA, make sure the television input is set to S-Video.
3 Use the OUTPUT key on the DMA's remote control to change the TV mode. You can cycle through the possible TV modes until you get the correct one. Wait a few seconds during each mode. When you get to the correct mode, use the remote control's arrow and OK buttons to select OK.
4 Turn the DMA off and on using the power switch on the rear panel (instead of the Power button on the remote control).
5 If the problem continues, contact the vendor.
I can only see the DMA menus on one television at a time.
Even though it is possible to connect the DMA to more than one television at a time, the DMA can only output one TV mode at a time. Use the remote control's OUTPUT button or the TV Mode Setup menu (see Section 7.4 on page 53) to change the DMA's output.
I cannot see or access the media server folders on the television screen.
1 If the DMA does not list any media servers for you to select from, try pressing the HOME button and selecting My Media.
1 Try turning the DMA off and on using the power switch on the rear panel (instead of the Power button on the remote control).
2 Check the hardware connections, and make sure the LEDs are behaving as expected. See the Quick Start Guide and Section 9.2 on page 71.
3 Make sure the media server computer is on and has an IP address in the same subnet as the DMA. (If you know that there is a router between your computer and the DMA, skip this step.)
4 If you are using the media server software, make sure the computer is running the media server program, the files or folders are in the media server program's Media List, and the media service is enabled. If you have to change these settings, turn the DMA off and on again afterwards.
5 Make sure that any software firewalls on the media server computer are configured to allow the DMA to access the media server. See the The DMA cannot access the media server. If you have to change any firewall settings, turn the DMA off and on again afterwards.
The DMA cannot access the files on a connected USB device.
Make sure the USB device uses the NFS or SAMBA network file system. You may need to use a computer to reformat the USB device or try another USB device.
The DMA's wireless connection is not working.
Use the Network configuration menus to set the DMA to use the wireless connection instead of the wired connection (see Section 7.2 on page 46).
The DMA cannot access the media server.
Configure or disable any software firewalls on the media server computer to allow access to the "lightpdf" and "ZyXEL Media Server" programs. Your software firewall may automatically prompt you to allow or deny access when it detects the DMA's access attempts.
Use the following information to manually configure your software firewall's settings if the firewall does not automatically prompt you to allow or deny access. See also Section 9.4 on page 77.
Table 21 Software Firewall Configuration
| APPLICATION | PROGRAM FILE NAME | FUNCTION | PORT NO. | PROTOCOL |
| Media Server Software | dmsf.exeA | SSDPB Discovery | 1900 | UDP |
| Media Server Device | 30000 | TCP | ||
| Media Server HTTP | 30001 | TCP |
A. This file will be installed into the C:\Program Files\ZyXEL\digital Media Server folder by default during the installation.
B. The DMA uses SSDP (Simple Service Discovery Protocol) to find the media server.
The media server can only be seen for a short time.
Firewall or antivirus software on the media server may cause the UPnP communications between the DMA and the media server to fail. Make sure that any software firewalls on the media server computers are configured to allow the DMA to access the media server. See Table 21 on page 74 for details.
The number of items in a menu does not match the number of files in a media server folder.
1 Files with unsupported formats or codecs may not display in the menus. See Section 10.2 on page 87 for details on the supported file formats and codecs.
2 You may have Windows Media Center (WMC) and the media server software on the same computer and be sharing out the same folder. Either uninstall one of the media servers or set them to share out different folders.
Some of the files in my media server folder do not display in the DMA's menus.
Files with unsupported formats or codecs may not display in the menus. See Section 10.2 on page 87 for details on the supported file formats and codecs.
Some filenames do not display properly in the DMA's menus.
Filenames in a language other than the language to which the DMA menus are set may not display properly. If you know what language the filenames are in, you can try setting the DMA's menus to use the same language (see Section 7.3 on page 53).
Some of the files in my DMA's list do not play or do not play properly.
Files with unsupported formats or codecs may not play or may not play properly. See Section 10.2 on page 87 for details on the supported file formats and codecs.
Some of my photo files do not display thumbnails.
Some files do not support thumbnails and thus will not display them.
I cannot see the files on my USB device.
1 Make sure you have the USB device properly connected to the USB port. Make sure you use the USB device's external power supply if it has one.
2 Files with unsupported formats or codecs may not play or may not play properly. See Section 10.2 on page 87 for details on the supported file formats and codecs.
3 Turn the DMA off and on using the power switch on the rear panel (instead of the Power button on the remote control)
4 Try using a different USB device.
There are no subtitles when playingmpeg2 files.
1 After the video's conversation starts, press the remote control's SUB button to turn on the subtitles. Do this separately for eachmpeg2 video file.
2 Thempeg2 video file must support subtitles.
I cannot add music files to the background music list.
See Table 23 on page 85 for the number of music files you can have in the background music list.
The A-B function does not work on some files.
Some files do not have time tags and cannot support the A-B function.
I have the DMA connected to more than on television but it only displays on one.
The DMA provides output for one connection at a time. Use the remote control's OUTPUT button or see Section 7.4 on page 53 to select the type of video output to use.
The DMA menu display does not fill my television screen.
Check the DMA's video output settings (see Section 7.4 on page 53).
The content playback does not fill my television screen.
1 Check the DMA's video output settings (see Section 7.4 on page 53).
2 The content may be a different format from your television. For example, a 4:3 format video file will not fill the width of a 16:9 (widescreen) format television.
The DMA does not respond to input from the remote.
1 Make sure you are pointing the remote at the black dot on the front of the DMA (not your television).
2 Check the remote control's batteries.
The navigation jumps from menu to menu faster than expected.
The remote control is very sensitive to input. Pressing a button on the remote control for too long may be registered as multiple pushes.
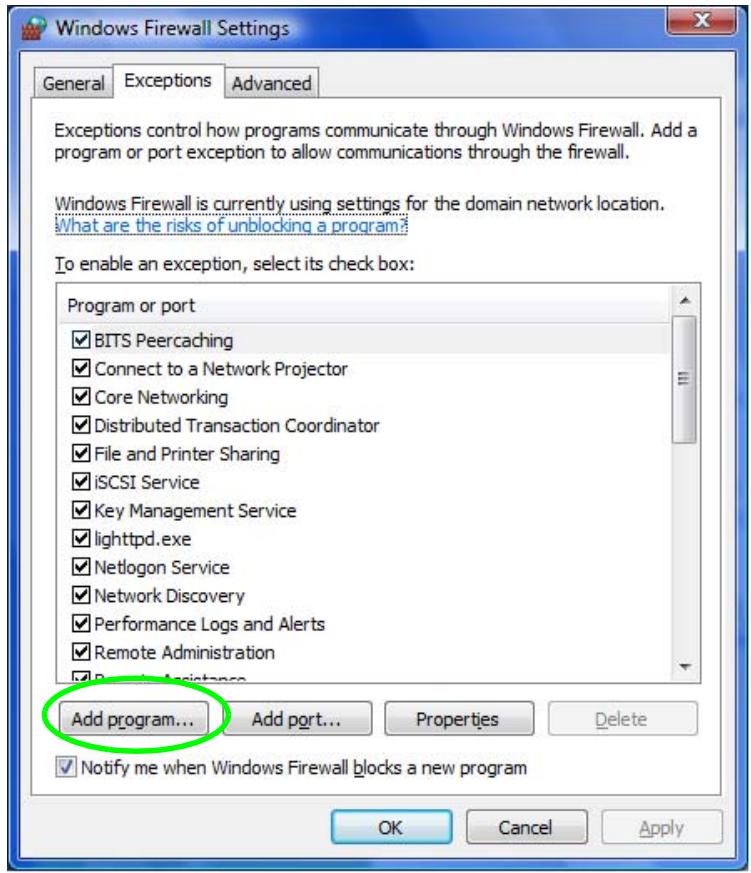
9.4 Configuring the Windows Vista Firewall
Here is how to configure the Windows Vista firewall to allow the DMA to access the ZyXEL media server installed on the computer. These instructions cover how to add the "lightpdf" and "ZyXEL Media Server" programs that the ZyXEL media server uses to the list of the Windows Vista firewall's exceptions. You do not need to do this if you already used a pop-up firewall window to stop blocking the "lightpdf" and "ZyXEL Media Server" programs.
1 Click start > Control Panel.
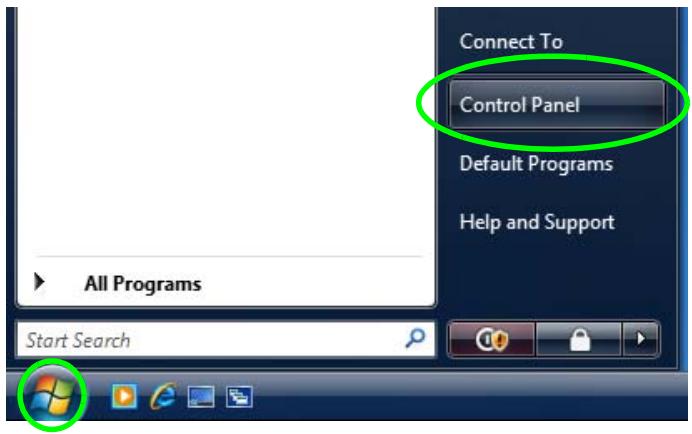
2 Click > Security > Allow a program through Windows Firewall.
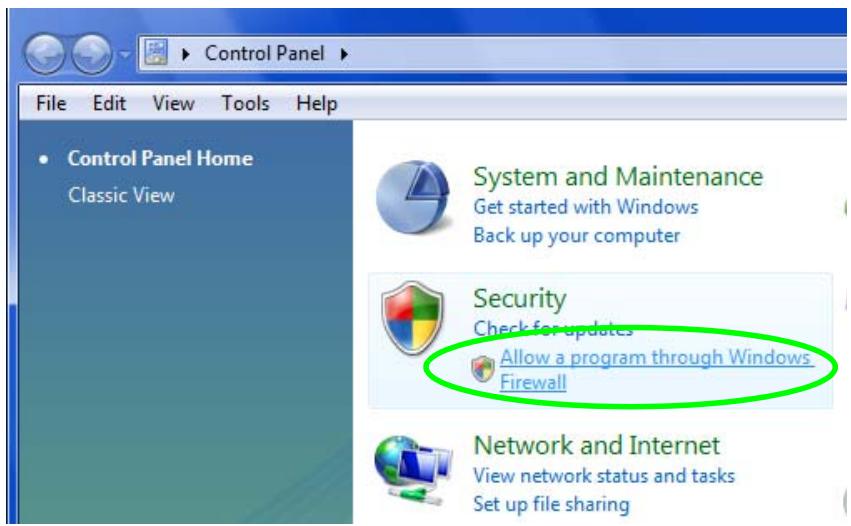
3 In the Exceptions tab, click Add program....
4 Click Browse....
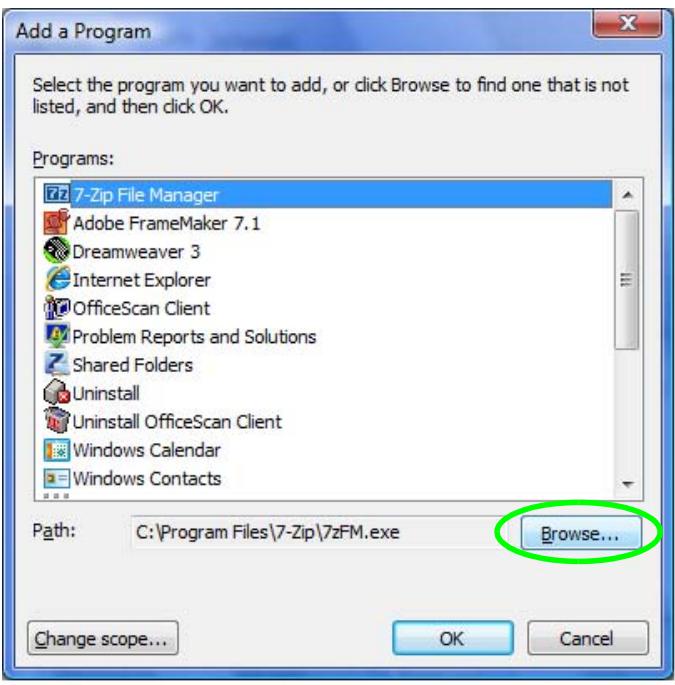
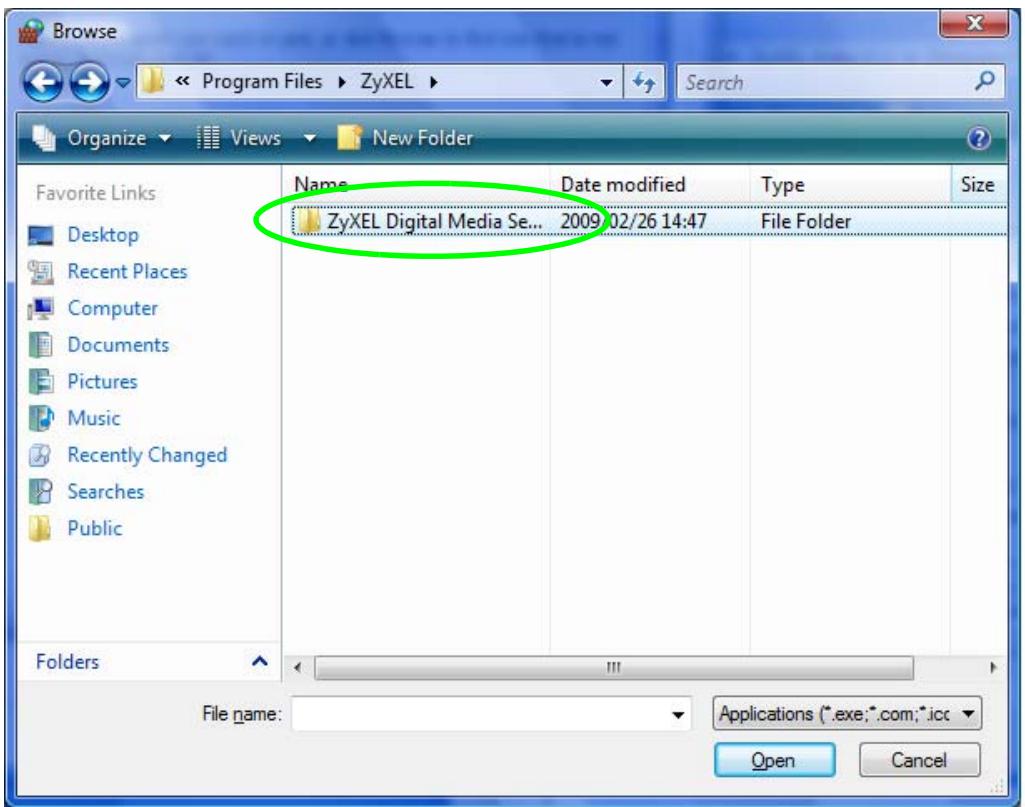
5 Click Computer > Program Files.
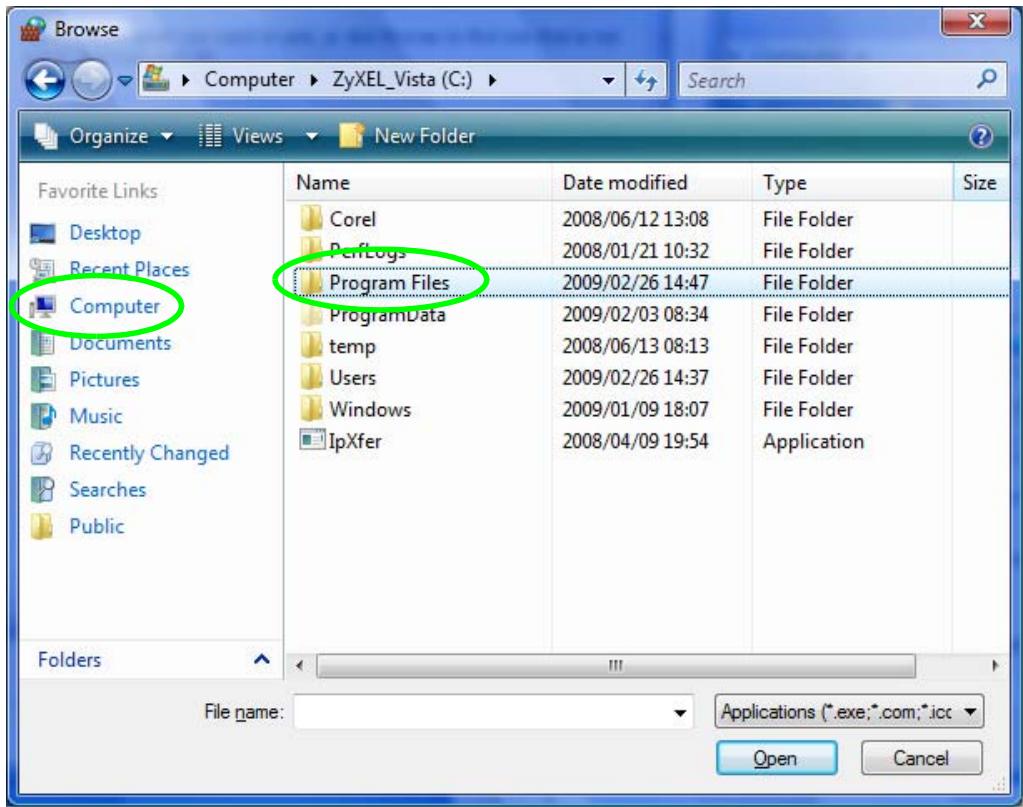
6 Click ZyXEL.
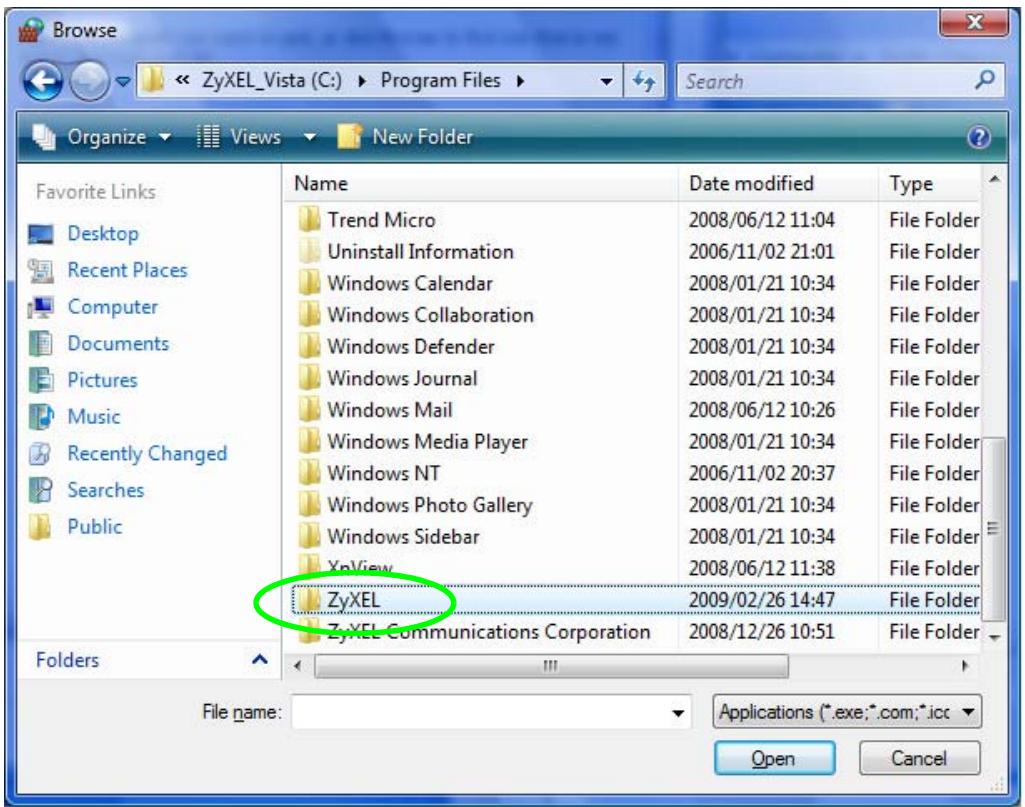
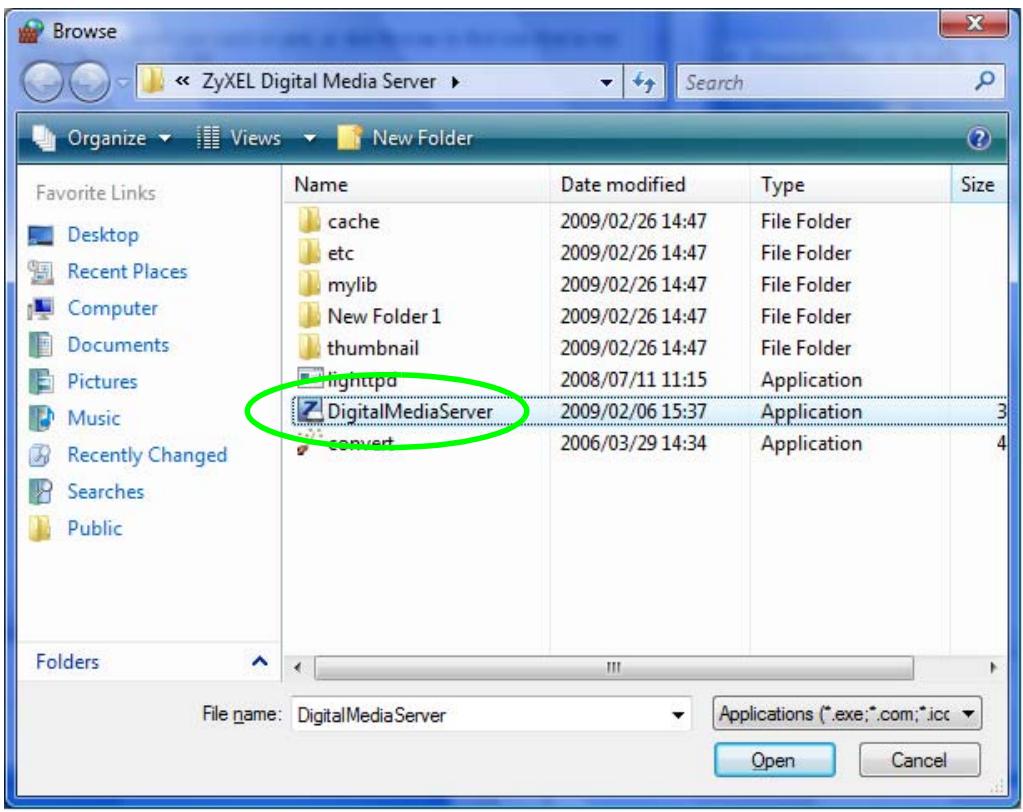
7 Click ZyXEL Digital Media Server.
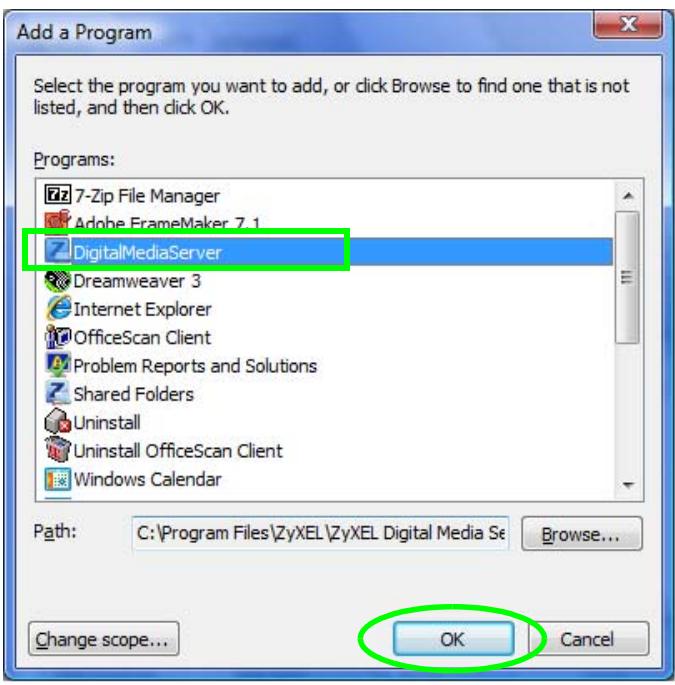
8 Select DigitalMediaServer and click Open.
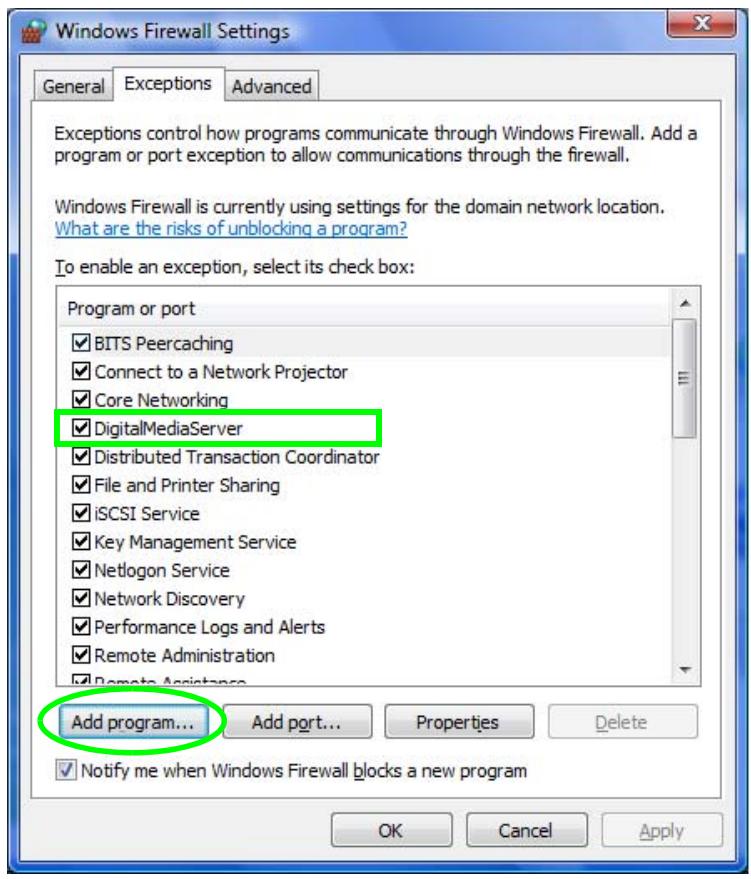
9 The Programs list now includes DigitalMediaServer. Click OK.
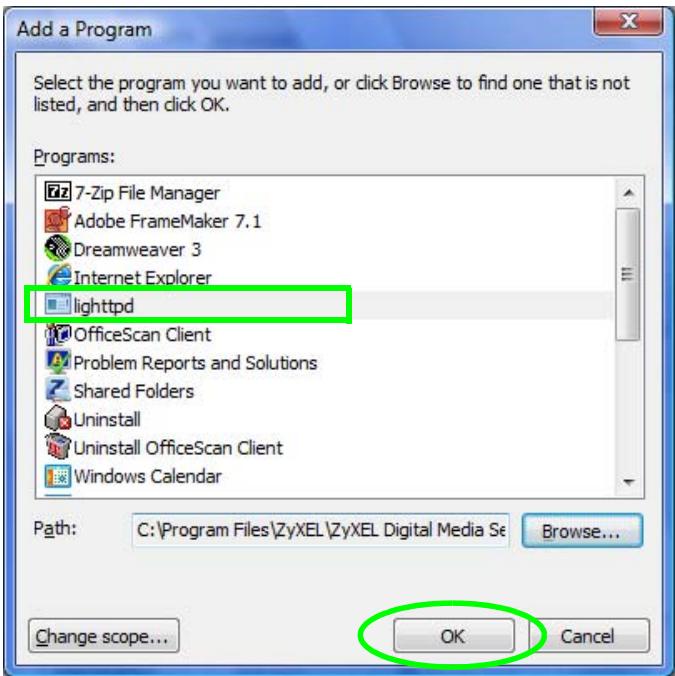
10 The exceptions list now includes the DigitalMediaServer. You also need to allow the lighttpd program, so click Add program....
11 Select lighttpd and click Open.
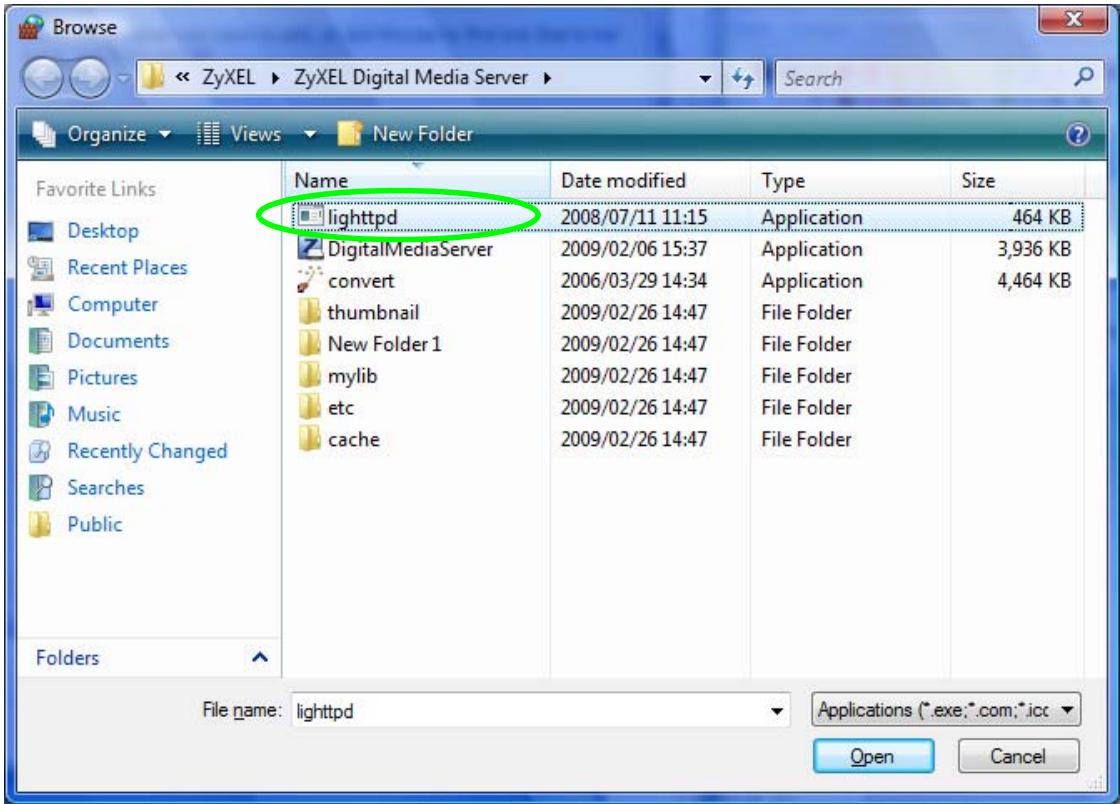
12 The Programs list includes lighttpd. Click OK.
13 The list of exceptions includes both digitalmediaServer.exe and lightpdf.exe. Click OK.
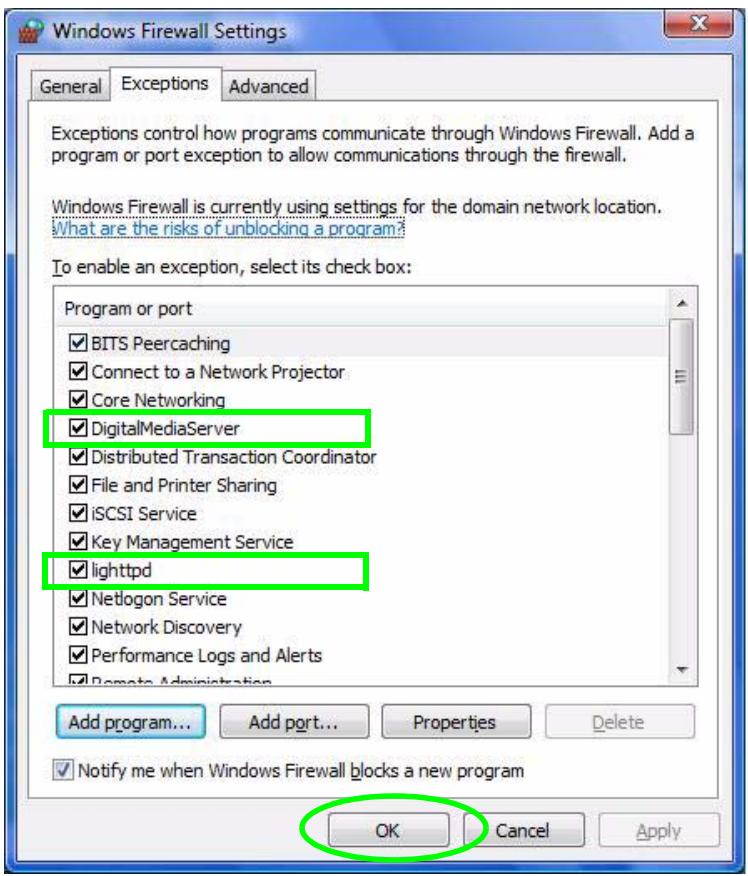
14 The DMA should now be able to access the media server.
Product Specifications
10.1 General Specifications
The following tables summarize the DMA's hardware and firmware features.
Table 22 Hardware Specifications
| Dimensions | 186 mm W x 114.4 mm D x 38.7 mm H |
| Device Weight | 0.4 kg |
| Power Consumption | 5 V DC 1.3 A, 12.5 watt maximum |
| Ethernet Port | Auto-negotiating: 10 or 100 Mbps in either half-duplex or full-duplex mode. |
| Television Connectors | HDMI 1.1 S-Video / YPbPr component CVBS RCA (composite) Right/Left RCA connectors S/PDIF coaxial RCA connector |
| Remote Control | Recommended operating range up to 8 m. Point the remote control at the front of the DMA at an angle of no less than 45 degrees. |
| USB Port | USB version 2.0, type A |
| Operation Temperature | 0°C ~ 50°C |
| Storage Temperature | -40°C ~ 70°C |
| Operation Humidity | 10% ~ 90% RH non-condensing |
| Storage Humidity | 5% ~ 90% RH non-condensing |
Table 23 Firmware Specifications
| FEATURE | DESCRIPTION |
| Default IP Address | DHCP client. If no DHCP server is found, the DMA uses Auto-IP to choose an IP address in the 169.254.X.X subnet (where X is a number from 1 to 254). |
| Default Subnet Mask | DHCP client by default. If no DHCP server is found, the subnet mask defaults to 255.255.0.0 (16 bits). |
| Device Management | On (television) screen using the remote control |
Table 23 Firmware Specifications
| FEATURE | DESCRIPTION |
| Firmware Upgrade | Upload new firmware (when available) from the ZyXEL web site. Or download the new firmware (when available) from the ZyXEL web site and use a USB stick to put it on the DMA. Note: Only upload software for your specific model! |
| Configuration Reset | The DMA provides an option for restoring the default settings. |
| DHCP (Dynamic Host Configuration Protocol) Client | The DMA can receive IP addresses, an IP default gateway and DNS servers via DHCP. |
| Universal Plug and Play (UPnP) | A UPnP-enabled device can dynamically join a network, obtain an IP address and convey its capabilities to other devices on the network. |
| Media Sharing | DLNA 1.5 certified. |
| Audio Input Formats Supported | Dolby Digital, DVD-Audio, MPEG-1 and MPEG-2 Layers I, II and III(MP3), MPEG-2 BC multi-channel Layers I, II and III, MPEG-2 and MPEG-4 AAC-LC, WMA9. See page 87 for details. |
| Video Input Formats Supported | MPEG-1, MPEG-2 MP@ML, MPEG-4 simple and advanced simple profile, MPEG-4 AVI files and WMV version 9. See page 87 for details. |
| Photo Input Formats Supported | TIFF, PNG, GIF, BMP, and JPEG. See page 87 for details. |
| Streaming Web Content Protocols Supported | MMS, HTTP, UDP, and RTSP |
| Video Output Formats | Digital, analog NTSC, PAL 4:3, 16:9 480p, 576p, 720p, 1080i, and 1080p |
| Audio Output Formats | Digital audio output: SPDIF/OFF/RAW/PCM Analog audio output: Stereo, Mono, Mix mono, |
| Background Music | Create a list of up to 500 music files to play as background music during photo slideshows or menu navigation. |
| Compatible ZyXEL IEEE 802.11n Wireless USB Adapters | • NWD-210N • NWD-211AN • NWD-270N |
The following list, which is not exhaustive, illustrates the standards supported in the DMA.
Table 24 Standards Supported
| STANDARD | DESCRIPTION |
| UPnP 1.0 and AV | UPnP allows devices to dynamically join a network, obtain IP addresses and convey their capabilities to other devices on the network. |
| Microsoft WM DRM 10 ND | Microsoft's Windows Media Digital Rights Management for Network Devices streams protected content to networked devices on a home network while letting the content owner control how you use the content. |
| IEEE 802.3x | This Ethernet standard defines Full Duplex and flow control and incorporates DIX framing.t |
| IEEE 802.2ac | This Ethernet standard increases the maximum frame size to 1522 bytes. |
| DLNA v1.5 Client | The DLNA (Digital Living Network Alliance) group of personal computer and electronics companies works to make products compatible and able to work in a home network in order to make digital living easy and seamless. |
| HDMI 1.1 | HDMI (High Definition Multimedia Interface) is an interface that allows high quality, all-digital video and audio streams. |
| USB 2.0 | USB (Universal Serial Bus) version 2.0 allows for interfacing devices. |
10.2 Supported Content Formats and Codec
The following describes the details about the files that the DMA can play. Files with specifications lower or higher than the listed ranges may not play or may not play properly.
10.2.1 Video File Formats Supported
Table 25 MPEG PS Video File Specifications
| Extensions | mpg |
| mpeg | |
| Video Stream | MPEG-1, MPEG-2 Profile Level: up to MP@HL Resolution: Maximum 1920 x 1080 Bit rate: VBR/CBR, Maximum 15 Mbps |
| Audio Stream | MPEG-1/2 Layer-II Sample Frequency: Maximum 48 kHz Channels: Maximum 2 Channels Bit rate: VBR/CBR, Maximum 384 kbps LPCM Sample Frequency: Maximum 48 kHz Bits per sample: Maximum 16 bit Channels: Maximum 2 Channels AC3 Sample Frequency: Maximum 48 kHz Channels: Maximum 6 Channels Bit rate: Maximum 640 kbps |
Table 26 MPEG-2 TS Video File Specifications
| Extensions | The DMA supports the playback of mpg, mpg, and mpe MPEG-2 TS video files. |
| Video Stream | MPEG-2Profile Level: up to MP@HLResolution: Maximum 1920 x 1080Bit rate: VBR/CBR, Maximum 25 Mbps |
| Audio Stream | MPEG-1/2 Layer-IISample Frequency: Maximum 48 kHzChannels: Maximum 2 ChannelsBit rate: VBR/CBR, Maximum 448 kbpsAC3Sample Frequency: Maximum 48 kHzChannels: Maximum 6 ChannelsBit rate: Maximum 448 kbpsMPEG-2/4 AAC LCSample Frequency: Maximum 48 kHzChannels: Maximum 6 ChannelsBit rate: VBR/CBR, Maximum 384 kbps |
Table 27 WMV Video File Specifications
| Extensions | asf wmv |
| Video Stream | WMV9 Profile Level: up to MP@HL Resolution: Maximum 1920 x 1080 Bit rate: VBR/CBR, Maximum 10 Mbps |
| Audio Stream | WMA8 Sample Frequency: Maximum 48 kHz Channels: Maximum 2 Channels Bit rate: Maximum 320 kbps WMA9, WMA9 Professional (WMA Lossless and Voice formats are not supported.) Sample Frequency: Maximum 48 kHz Channels: Maximum 6 Channels Bit rate: VBR/CBR, Maximum 768 kbps |
| Notes | Combination of WMV HD and WMA Pro may result in frames being dropped. Depending on some WMV HD contents, noise may be generated in the audio signal when starting playback or during the seek operation. Contents with a Complex decoder complexity are not supported. |
Table 28 AVI Video File Specifications
| Extensions | avi |
| Video Stream | XviD, Resolution: Maximum 1280 x 720 |
| Audio Stream | MPEG-1/2 Layer-III Sample Frequency: Maximum 48 kHz Channels: Maximum 2 Channels Bit rate: VBR/CBR, Maximum 320 kbps AC3 Sample Frequency: Maximum 48 kHz Channels: Maximum 6 Channels Bit rate: Maximum 640 kbps |
Table 29 MPEG4 Video File Specifications
Table 30 IFO Video File Specifications
| Extensions | mp4 |
| Video Stream | MPEG-4 ASPResolution: Maximum 1920 x 1080Bit rate: VBR/CBR, Maximum 5 mbps |
| Audio Stream | MPEG-4 AAC LCSample Frequency: Maximum 48 kHzChannels: Maximum 6 ChannelsBit rate: Maximum 448 kbps |
The DMA can play IFO files as defined by the DLNA 1.0 Errata.
10.2.2 Music File Formats Supported
Table 31 Music File Specifications
| TYPE | EXTENSIONS | DETAILS |
| MP3 | mp3 | Audio Stream: MPEG-1/2 Layer-III Sample Frequency: Maximum 48 kHz Channels: Maximum 2 Channels Bit rate: VBR/CBR, Maximum 320 kbps ID3 tag: ID3 version 1.x, 2.4 tags MP3 file ID3 tags provide information like the title, name of the artist, album name, and track number. The USB browse screens can retrieve and display ID3 tag information. |
| LPCM | Ipcm | The DMA can play LPCM files from a USB device or a media server that supports them. Audio Stream: LPCM Sample Frequency: Min. 8 kHz, Maximum 64 kHz Bits per sample: Maximum 16 bit Channels: Maximum 2 Channels |
| WAV | wav | Audio Stream: PCM Sample Frequency: Min. 8 kHz, Maximum 64 kHz Bits per sample: Maximum 16 bit Channels: Maximum 2 Channels |
Table 31 Music File Specifications
| TYPE | EXTENSIONS | DETAILS |
| WMA | asf | Audio Stream: WMA8 |
| wma | Sample Frequency: Maximum 48 kHz Channels: Maximum 2 Channels Bit rate: Maximum 320 kbps | |
| Audio Stream: WMA9, WMA9 Professional (Contents with a Complex decoder complexity are not supported.) | ||
| Sample Frequency: Maximum 48 kHz Channels: Maximum 6 Channels Bit rate: VBR/CBR, Maximum 768 kbps | ||
| With EM8620, L2 profile WMA content must meet the following conditions. Bit rate: 48 kbps ~ 192 kbps Sample Rate: 32 kHz ~ 48 kHz | ||
| Ogg | ogg | Audio Stream: Vorbis |
| Sample Frequency: Maximum 48 kHz Channels: Maximum 2 Channels Bit rate: ABR/CBR, Maximum 496 kbps | ||
| M4A | m4a | Audio Stream: MPEG-2/4 AAC LC |
| Sample Frequency: Maximum 48 kHz Channels: Maximum 5.1 Channels Bit rate: CBR/VBR, Maximum 640 kbps |
10.2.3 Photo File Formats Supported
Table 32 Photo File Specifications
| TYPE | EXTENSIONS | DETAILS |
| JPEG | jpg | Maximum Resolution: When displaying JPEG images that meet the conditions below, the maximum resolution is 67108864 pixels (8192 x 8192). It may get smaller when the following conditions are not met. |
| jpeg | Color Space: YCbCr Not progressive mode The format is YUV420, YUV422 or YUV444 | |
| When a JPEG image's color space is RGB or grayscale, the max resolution is 983040 pixels (1280 x 768). | ||
| BMP | bmp | Maximum Resolution: 2097152 pixels (2048 x 1024) |
| PNG | png | Maximum Resolution: 2097152 pixels (2048 x 1024) Although transparent PNG files can be played, they will be displayed as non-transparent images. |
Table 32 Photo File Specifications
| TYPE | EXTENSIONS | DETAILS |
| TIFF | tif | Maximum Resolution: 2097152 pixels (2048 × 1024) |
| tiff | Compression: No compression, ZIP, LZW, Packbits, Huffman RLE, CCITT Fax 3, CCITT Fax 4 | |
| GIF | gif | Maximum Resolution: 2097152 pixels (2048 × 1024) |
| Animation GIF formats are not supported. |
10.3 Cable Pin Assignments
Table 33 Ethernet Cable Pin Assignments
| LAN ETHERNET CABLE PIN LAYOUT | ||
| Straight-through | ||
| (Switch) | (Adapter) | |
| 1 | IRD + | 1 OTD + |
| 2 | IRD - | 2 OTD - |
| 3 | OTD + | 3 IRD + |
| 6 | OTD - | 6 IRD - |
10.4 Power Adaptor Specifications
Table 34 Power Adaptor Specifications
| AC Power Adaptor Model | STD-05026U |
| Input Power | AC 100~240 Volts/47~63Hz/0.31 A |
| Output Power | DC 5 Volts/ 2.5 A 12.5 W |
| Power Consumption | 5 V DC 1.3 A, 12.5 watt maximum |
Windows Vista Media Server
Note: This appendix is provided for your information only. The DMA is not Vista certified.
Playing Media Files From Your Windows Vista Computer
This appendix covers using the media server included in Windows Vista to let the DMA play media files on the computer. This way you do not need to install media server software. In the following figure, the DMA and your Windows Vista computer (A) are both connected to your home network.
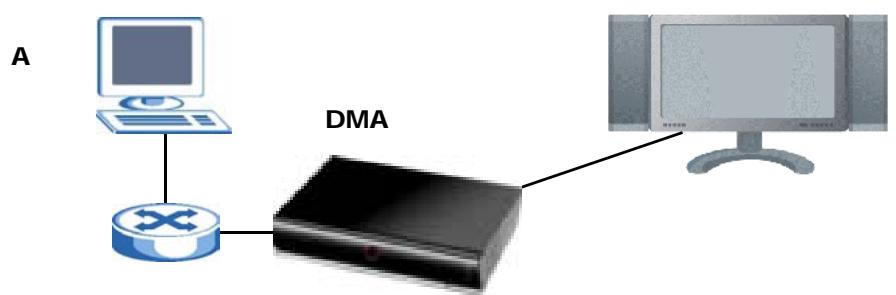
Figure 29 DMA with Windows Vista Computer
This appendix walks you through the following tasks:
- Starting the Windows Media Player
- Setting Your Computer to Trust Your Network
- Setting Your Computer to Share Files With the DMA
- Selecting Files to Share
Complete the sections in sequence. The DMA and the computer must be on the same home network (private LAN). This appendix shows screens from Windows Vista Enterprise Version 6.0.
Starting the Windows Media Player Network Sharing Service
If you are using Windows Vista, do the following to turn on the Windows Media Player.
1 Follow the Quick Start Guide Instructions to connect the DMA to your computer.
2 Right-click the Computer icon and click Manage.
Note: During this procedure, click Continue whenever Windows displays a screen saying that it needs your permission to continue.
3 In the following screen, click Services and Applications > Services > Windows Media Player Network Sharing Service > Start.
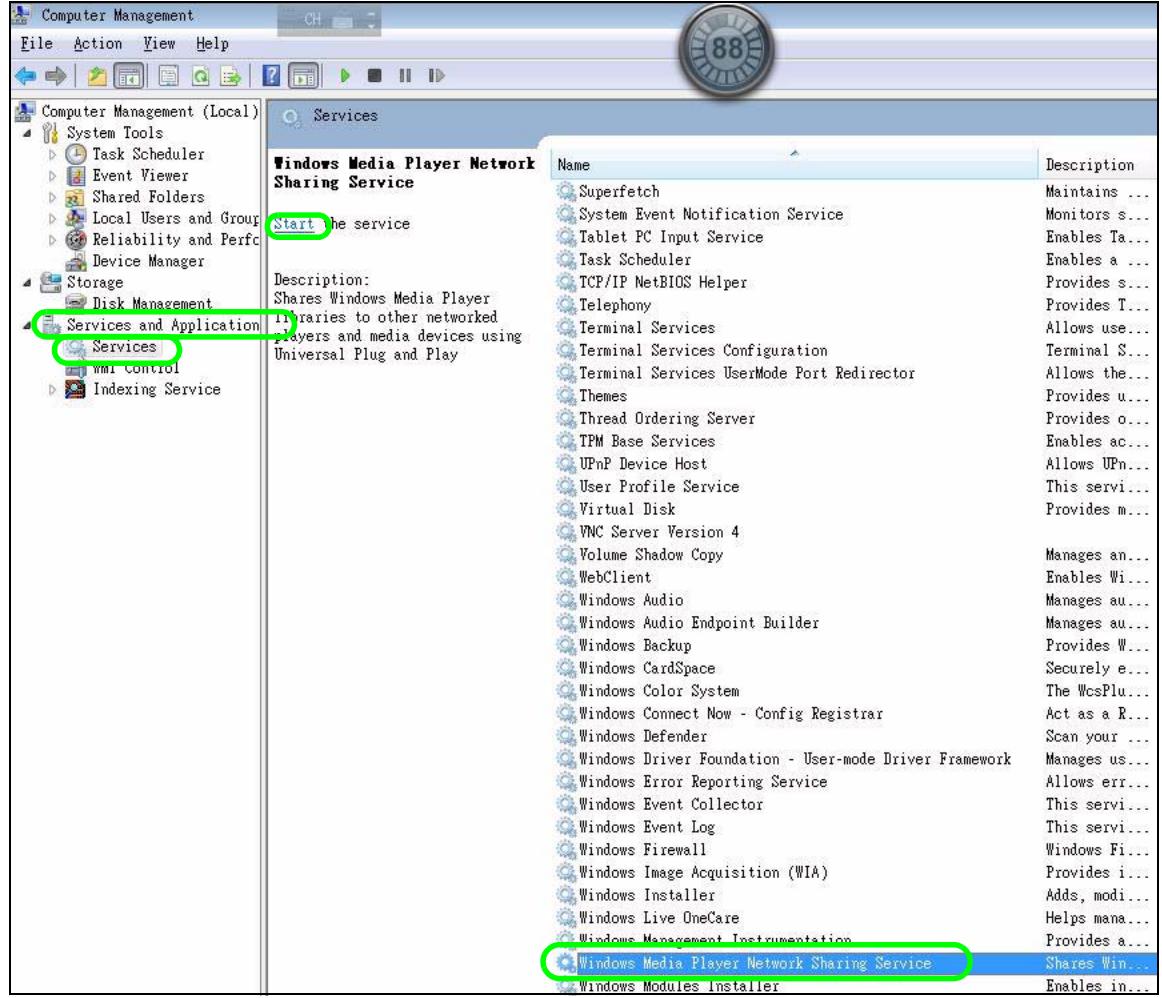
Figure 30 Start Windows Media Player
Setting Your Computer to Trust Your Network
The DMA and your computer are both on your home network, so you use this section to configure your computer to treat the network connection as a trusted
private network. Make sure the DMA has a network connection to your computer before using this section.
1 Click the Windows Media Player icon in the system tray.

Figure 31 Start Windows Media Player
2 Right-click in the menu bar and click Tools > Options.
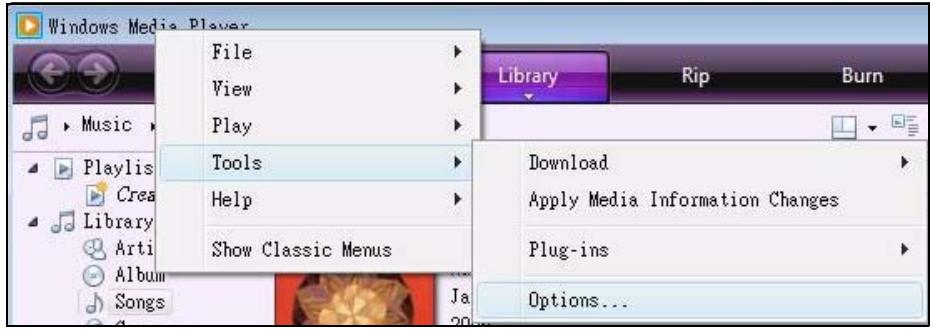
Figure 32 Windows Media Player Tools> Options
3 In the Library tab, click Configure Sharing.
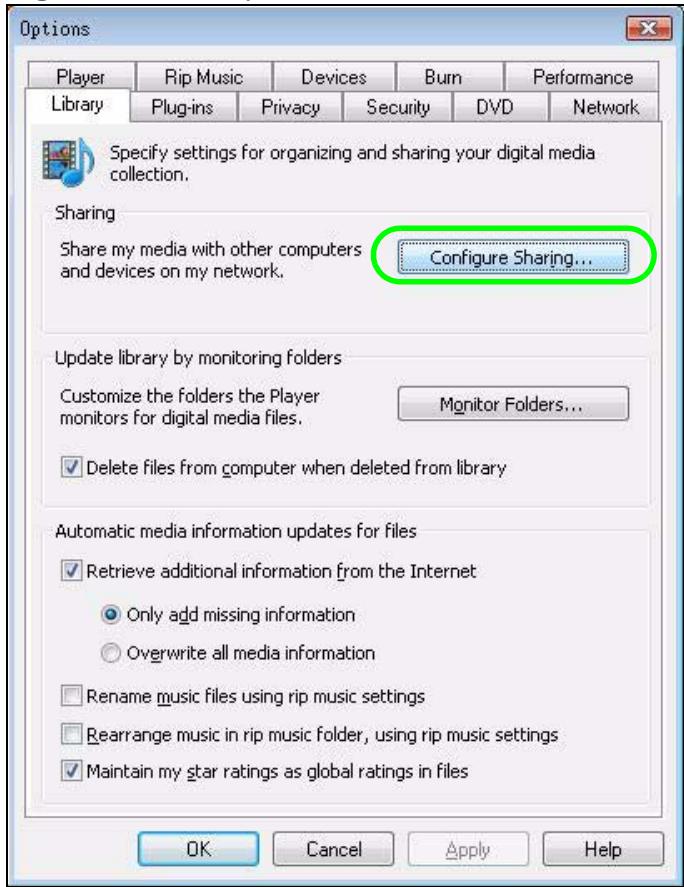
Figure 33 Library
4 Click Networking.
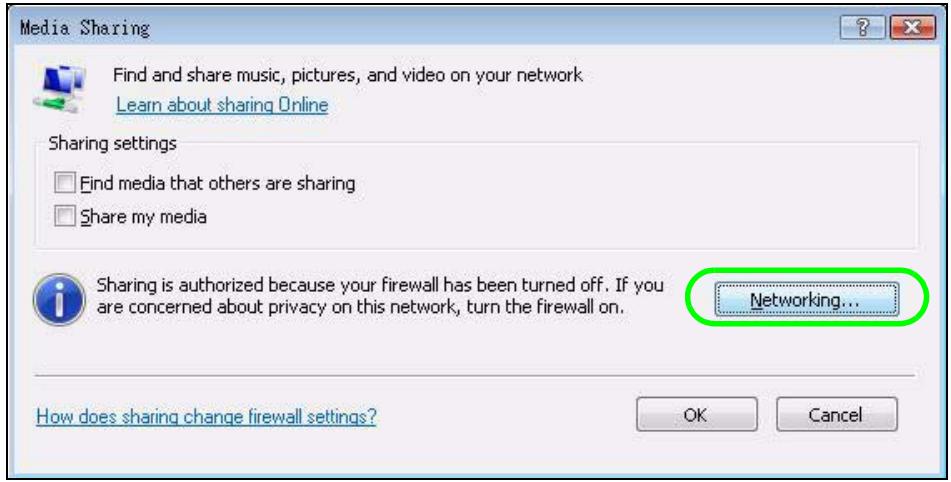
Figure 34 Media Sharing
5 Windows searches for your network connections and displays them in the following window. Click Customize.
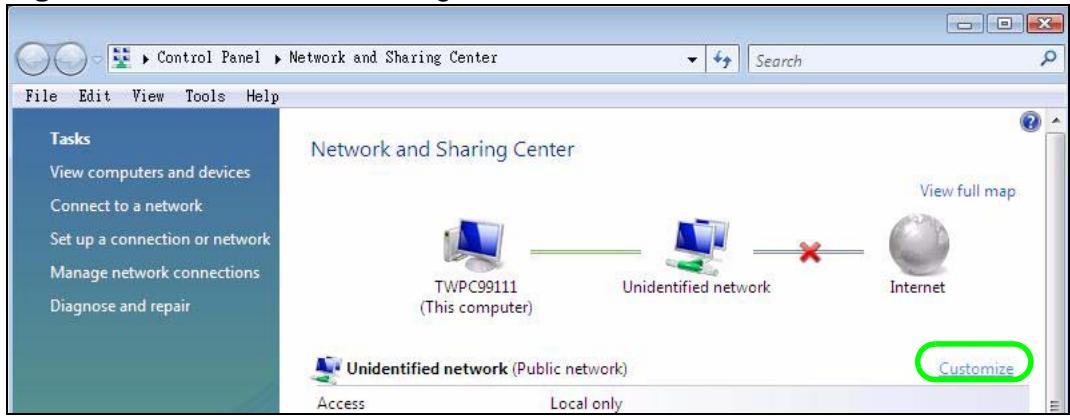
Figure 35 Network and Sharing Center
6 Select Private and click Next to have the computer trust the network connection to the DMA.
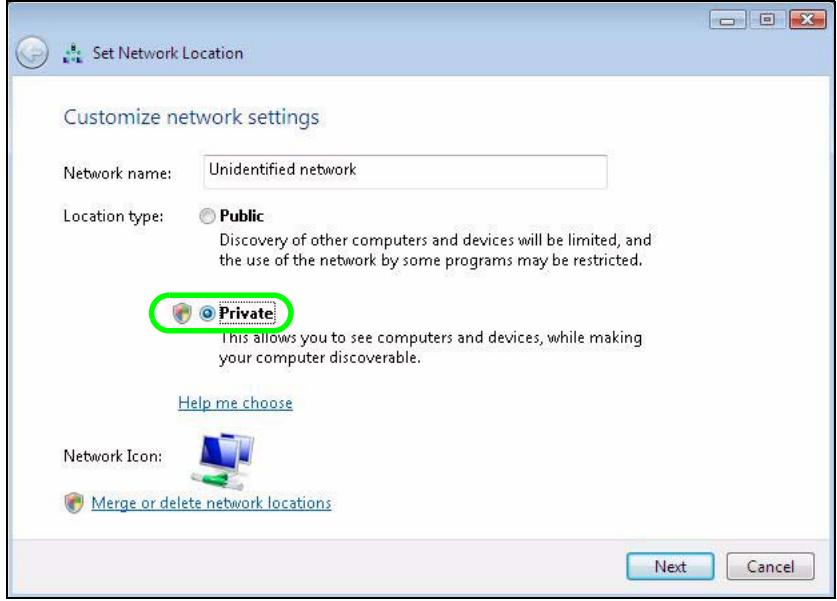
Figure 36 Set Network Location: Customize network settings
Setting Your Computer to Share Files With the DMA
This section covers how to set Windows Media Player to allow the DMA to play media files.
1 Click View computers and devices on the network.
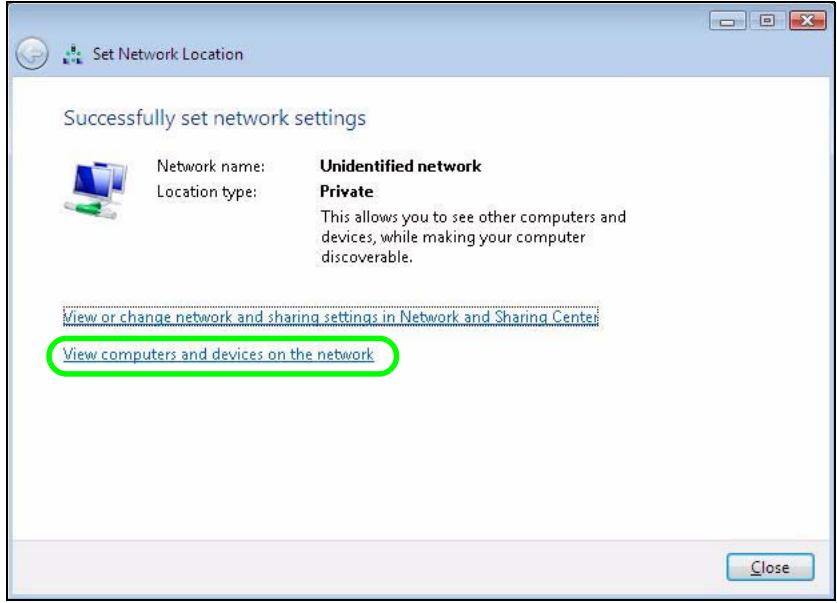
Figure 37 Set Network Location: Successfully set network settings
2 Right-click the DMA icon and click Open Media Sharing.
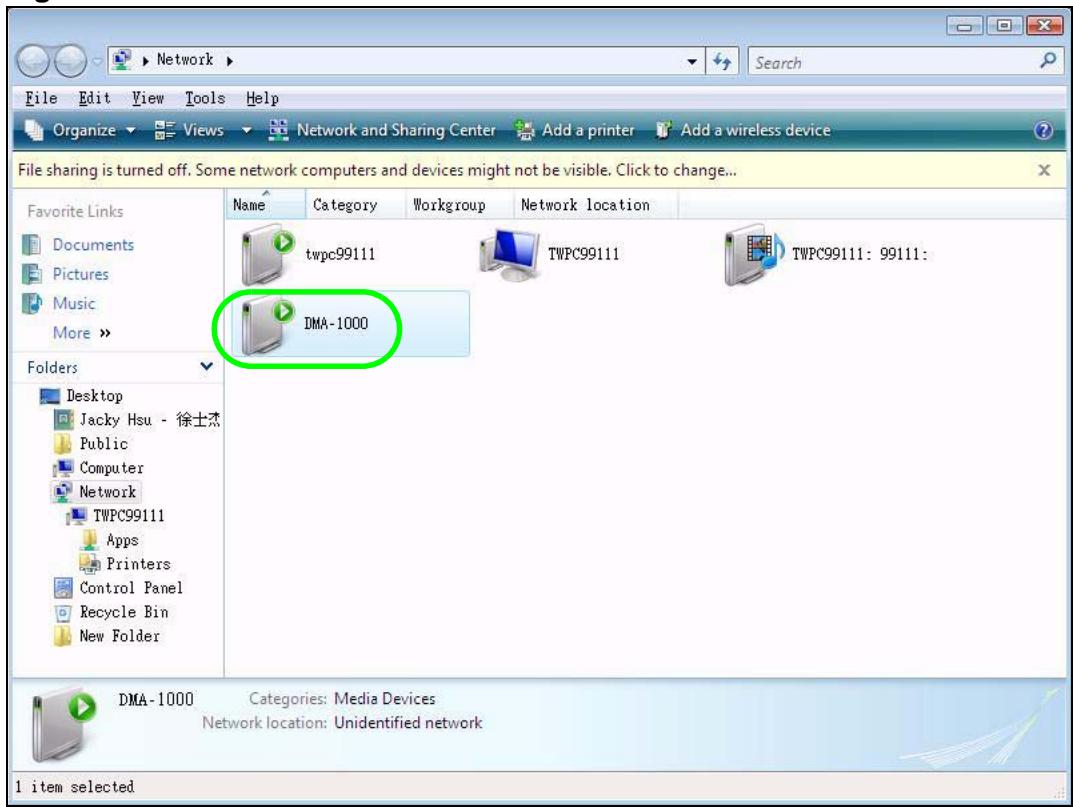
Figure 38 Network
3 Select Share my media and click OK.
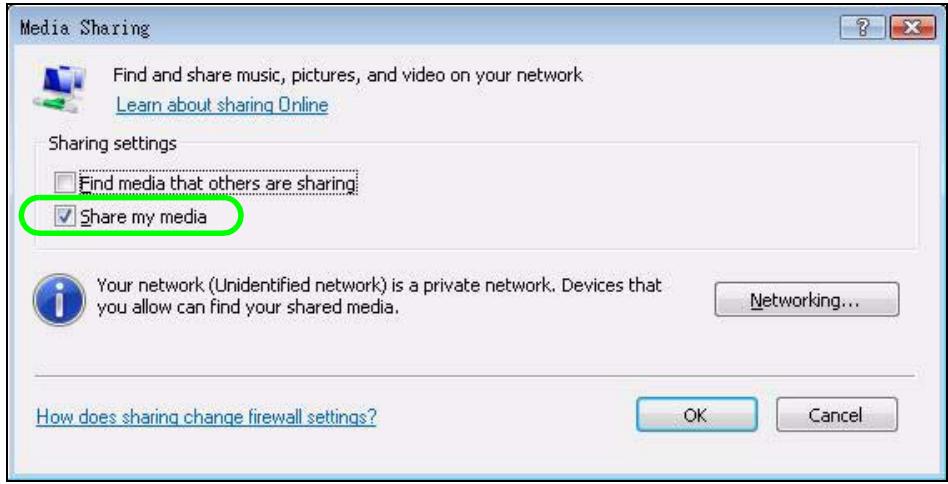
Figure 39 Media Sharing
4 Identify the device that the computer should share media files with. Select the DMA icon and click Allow > OK.
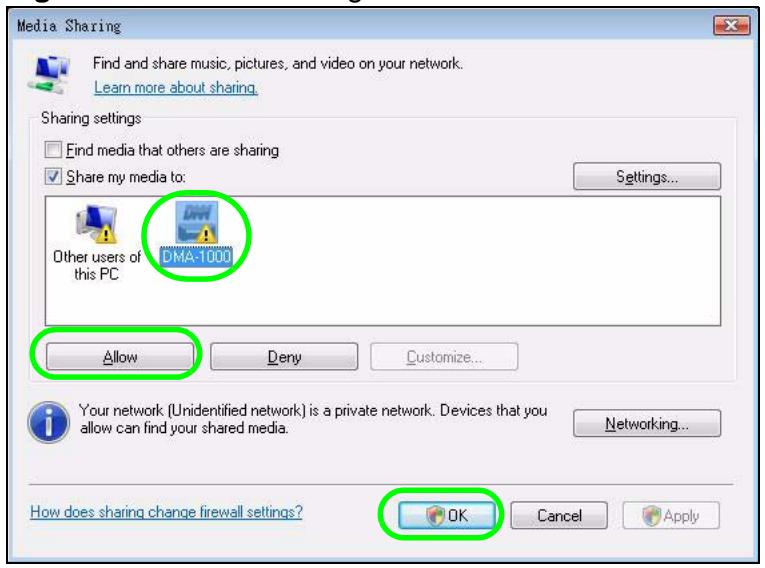
Figure 40 Media Sharing: Select DMA
Selecting Files to Share
This section covers how to select the media files that the DMA is allowed to play.
1 In the Library tab, click Monitor Folders.
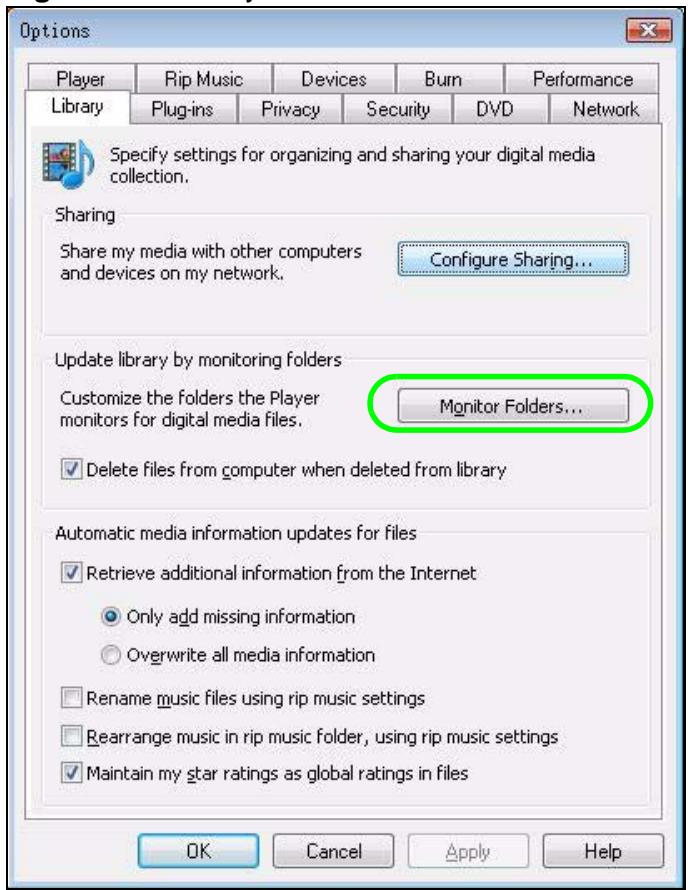
Figure 41 Library
2 Click Advanced Options.
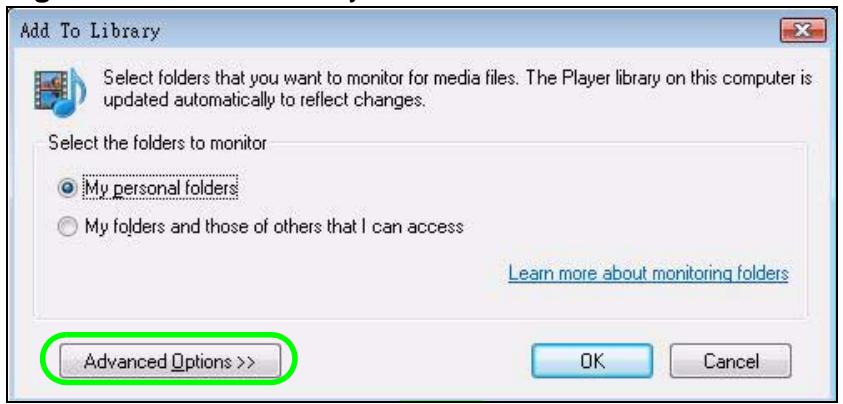
Figure 42 Add To Library
3 Select the folders to share and click OK when you are done.
Figure 43 Add To Library > Advanced
4 Click OK after the computer finds the files to share.
Figure 44 Add To Library Search
Legal Information
Copyright
Copyright © 2009 by ZyXEL Communications Corporation.
The contents of this publication may not be reproduced in any part or as a whole, transcribed, stored in a retrieval system, translated into any language, or transmitted in any form or by any means, electronic, mechanical, magnetic, optical, chemical, photocopying, manual, or otherwise, without the prior written permission of ZyXEL Communications Corporation.
Published by ZyXEL Communications Corporation. All rights reserved.
Disclaimer
ZyXEL does not assume any liability arising out of the application or use of any products, or software described herein. Neither does it convey any license under its patent rights nor the patent rights of others. ZyXEL further reserves the right to make changes in any products described herein without notice. This publication is subject to change without notice.
Trademarks
ZyNOS (ZyXEL Network Operating System) is a registered trademark of ZyXEL Communications, Inc. Other trademarks mentioned in this publication are used for identification purposes only and may be properties of their respective owners.
Certifications
Federal Communications Commission (FCC) Interference Statement
The device complies with Part 15 of FCC rules. Operation is subject to the following two conditions:
-
This device may not cause harmful interference.
-
This device must accept any interference received, including interference that may cause undesired operations.
This device has been tested and found to comply with the limits for a Class B digital device pursuant to Part 15 of the FCC Rules. These limits are designed to provide reasonable protection against harmful interference in a residential installation. This device generates, uses, and can radiate radio frequency energy, and if not installed and used in accordance with the instructions, may cause harmful interference to radio communications. However, there is no guarantee that interference will not occur in a particular installation.
If this device does cause harmful interference to radio/television reception, which can be determined by turning the device off and on, the user is encouraged to try to correct the interference by one or more of the following measures:
1 Reorient or relocate the receiving antenna.
2 Increase the separation between the equipment and the receiver.
3 Connect the equipment into an outlet on a circuit different from that to which the receiver is connected.
4 Consult the dealer or an experienced radio/TV technician for help.
Notices
Changes or modifications not expressly approved by the party responsible for compliance could void the user's authority to operate the equipment.
This Class B digital apparatus complies with Canadian ICES-003.
Viewing Certifications
1 Go to http://www.zyxel.com.
2 Select your product on the ZyXEL home page to go to that product's page.
3 Select the certification you wish to view from this page.
ZyXEL Limited Warranty
ZyXEL warrants to the original end user (purchaser) that this product is free from any defects in materials or workmanship for a period of up to two years from the
date of purchase. During the warranty period, and upon proof of purchase, should the product have indications of failure due to faulty workmanship and/or materials, ZyXEL will, at its discretion, repair or replace the defective products or components without charge for either parts or labor, and to whatever extent it shall deem necessary to restore the product or components to proper operating condition. Any replacement will consist of a new or re-manufactured functionally equivalent product of equal or higher value, and will be solely at the discretion of ZyXEL. This warranty shall not apply if the product has been modified, misused, tampered with, damaged by an act of God, or subjected to abnormal working conditions.
Note
Repair or replacement, as provided under this warranty, is the exclusive remedy of the purchaser. This warranty is in lieu of all other warranties, express or implied, including any implied warranty of merchantability or fitness for a particular use or purpose. ZyXEL shall in no event be held liable for indirect or consequential damages of any kind to the purchaser.
To obtain the services of this warranty, contact ZyXEL's Service Center for your Return Material Authorization number (RMA). Products must be returned Postage Prepaid. It is recommended that the unit be insured when shipped. Any returned products without proof of purchase or those with an out-dated warranty will be repaired or replaced (at the discretion of ZyXEL) and the customer will be billed for parts and labor. All repaired or replaced products will be shipped by ZyXEL to the corresponding return address, Postage Paid. This warranty gives you specific legal rights, and you may also have other rights that vary from country to country.
Registration
Register your product online to receive e-mail notices of software upgrades and information at www.zyxel.com for global products, or at www.us.zyxel.com for North American products.
Open Software Announcements
End-User License Agreement for “DMA-2500”
WARNING: Zyxel Communications Corp. IS WILLING TO LICENSE THE ENCLOSED SOFTWARE TO YOU ONLY UPON THE CONDITION THAT YOU ACCEPT ALL OF THE TERMS CONTAINED IN THIS LICENSE AGREEMENT. PLEASE READ THE TERMS CAREFULLY BEFORE COMPLETING THE INSTALLATION PROCESS AS INSTALLING THE SOFTWARE WILL INDICATE YOUR ASSENT TO THEM. IF YOU DO NOT AGREE TO THESE TERMS, THEN Zyxel, INC. IS UNWILLING TO LICENSE THE SOFTWARE TO YOU, IN WHICH EVENT YOU SHOULD RETURN THE UNINSTALLED SOFTWARE AND PACKAGING TO THE PLACE FROM WHICH IT WAS ACQUIRED, AND YOUR MONEY WILL BE REFUNDED.
1.Grant of License for Personal Use
ZyXEL Communications Corp. ("ZyXEL") grants you a non-exclusive, non-subs license, non-transferable license to use the program with which this license is distributed (the "Software"), including any documentation files accompanying the Software ("Documentation"), for internal business use only, for up to the number of users specified in sales order and invoice. You have the right to make one backup copy of the Software and Documentation solely for archival, back-up or disaster recovery purposes. You shall not exceed the scope of the license granted hereunder. Any rights not expressly granted by ZyXEL to you are reserved by ZyXEL, and all implied licenses are disclaimed.
2. Ownership
You have no ownership rights in the Software. Rather, you have a license to use the Software as long as this License Agreement remains in full force and effect. Ownership of the Software, Documentation and all intellectual property rights therein shall remain at all times with ZyXEL. Any other use of the Software by any other entity is strictly forbidden and is a violation of this License Agreement.
3.Copyright
The Software and Documentation contain material that is protected by United States Copyright Law and trade secret law, and by international treaty provisions. All rights not granted to you herein are expressly reserved by ZyXEL. You may
not remove any proprietary notice of ZyXEL or any of its licensors from any copy of the Software or Documentation.
4. Restrictions
You may not publish, display, disclose, sell, rent, lease, modify, store, loan, distribute, or create derivative works of the Software, or any part thereof. You may not assign, sublicense, convey or otherwise transfer, pledge as security or otherwise encumber the rights and licenses granted hereunder with respect to the Software. Certain components of the Software, and third party open source programs included with the Software, have been or may be made available by ZyXEL on its Open Source web site (ftp://opensource.zyxel.com) (collectively the "Open-Sourced Components") You may modify or replace only these Open-Sourced Components; provided that you comply with the terms of this License and any applicable licensing terms governing use of the Open-Sourced Components. ZyXEL is not obligated to provide any maintenance, technical or other support for the resultant modified Software. You may not copy, reverse engineer, decompile, reverse compile, translate, adapt, or disassemble the Software, or any part thereof, nor shall you attempt to create the source code from the object code for the Software. Except as and only to the extent expressly permitted in this License, by applicable licensing terms governing use of the Open-Sourced Components, or by applicable law, you may not market, co-brand, private label or otherwise permit third parties to link to the Software, or any part thereof. You may not use the Software, or any part thereof, in the operation of a service bureau or for the benefit of any other person or entity. You may not cause, assist or permit any third party to do any of the foregoing. Portions of the Software utilize or include third party software and other copyright material. Acknowledgements, licensing terms and disclaimers for such material are contained in the online electronic documentation for the Software (ftp:// opensource.zyxel.com), and your use of such material is governed by their respective terms. ZyXEL has provided, as part of the Software package, access to certain third party software as a convenience. To the extent that the Software contains third party software, ZyXEL has no express or implied obligation to provide any technical or other support for such software. Please contact the appropriate software vendor or manufacturer directly for technical support and customer service related to its software and products.
5. Confidentiality
You acknowledge that the Software contains proprietary trade secrets of ZyXEL and you hereby agree to maintain the confidentiality of the Software using at least as great a degree of care as you use to maintain the confidentiality of your own most confidential information. You agree to reasonably communicate the terms and conditions of this License Agreement to those persons employed by you who come into contact with the Software, and to use reasonable best efforts to ensure their compliance with such terms and conditions, including, without limitation, not
knowingly permitting such persons to use any portion of the Software for the purpose of deriving the source code of the Software.
6.No Warranty
THE SOFTWARE IS PROVIDED "AS IS." TO THE MAXIMUM EXTENT PERMITTED BY LAW, Zyxel DISCLAIMS ALL WARRANTYES OF ANY KIND, EITHER EXPRESSED OR IMPLIED, INCLUDING, WITHOUT LIMITATION, IMPLIED WARRANTYES OF MERCHANTABILITY AND FITNESS FOR A PARTICULAR PURPOSE. Zyxel DOES NOT WARRANTY THAT THE FUNCTIONS CONTAINED IN THE SOFTWARE WILL MEET ANY REQUIREMENTS OR NEEDS YOU MAY HAVE, OR THAT THE SOFTWARE WILL OPERATE ERROR FREE, OR IN AN UNINTERTUPTED FASHION, OR THAT ANY DEFECTS OR ERRORS IN THE SOFTWARE WILL BE CORRECTED, OR THAT THE SOFTWARE IS COMPATIBLE WITH ANY PARTICULAR PLATFORM. SOME JURISDICTIONS DO NOT ALLOW THE WAIVER OR EXCLUSION OF IMPLIED WARRANTYES SO THEY MAY NOT APPLY TO YOU. IF THIS EXCLUSION IS HELD TO BE UNENFORCEABLE BY A COURT OF COMPETENT JURISDICTION, THEN ALL EXPRESS AND IMPLIED WARRANTYES SHALL BE LIMITED IN DURATION TO A PERIOD OF THIRTY (30) DAYS FROM THE DATE OF PURCHASE OF THE SOFTWARE, AND NO WARRANTYES SHALL APPLY AFTER THAT PERIOD.
7. Limitation of Liability
IN NO EVENT WILL ZyxEL BE LIABLE TO YOU OR ANY THIRD PARTY FOR ANY INCIDENTAL OR CONSEQUENTIAL DAMAGES (INCLUDING, WITHOUT LIMITATION, INDIRECT, SPECIAL, PUNITIVE, OR EXEMPLARY DAMAGES FOR LOSS OF BUSINESS, LOSS OF PROFITS, BUSINESS INTERRUPTION, OR LOSS OF BUSINESS INFORMATION) ARISING OUT OF THE USE OF OR INABILITY TO USE THE PROGRAM, OR FOR ANY CLAIM BY ANY OTHER PARTY, EVEN IF ZyxEL HAS BEEN ADVISED OF THE POSSIBILITY OF SUCH DAMAGES. ZyxEL's AGGREGATE LIABILITY WITH RESPECT TO ITS OBLIGATIONS UNDER THIS AGREEMENT OR OTHERWISE WITH RESPECT TO THE SOFTWARE AND DOCUMENTATION OR OTHERWISE SHALL BE EQUAL TO THE PURCHASE PRICE, BUT SHALL IN NO EVENT EXCEED THE PRODUCT'S PRICE. BECAUSE SOME STATES/COUNTRIES DO NOT ALLOW THE EXCLUSION OR LIMITATION OF LIABILITY FOR CONSEQUENTIAL OR INCIDENTAL DAMAGES, THE ABOVE LIMITATION MAY NOT APPLY TO YOU.
8. Export Restrictions
THIS LICENSE AGREEMENT IS EXPRESSLY MADE SUBJECT TO ANY APPLICABLE LAWS, REGULATIONS, ORDERS, OR OTHER RESTRICTIONS ON THE EXPORT OF THE SOFTWARE OR INFORMATION ABOUT SUCH SOFTWARE WHICH MAY BE IMPOSED FROM TIME TO TIME. YOU SHALL NOT EXPORT THE SOFTWARE, DOCUMENTATION OR INFORMATION ABOUT THE SOFTWARE AND DOCUMENTATION WITHOUT COMPLYING WITH SUCH LAWS, REGULATIONS, ORDERS, OR OTHER RESTRICTIONS. YOU AGREE TO INDEMNIFY Zyxel AGAINST ALL CLAIMS, LOSSES, DAMAGES, LIABILITIES, COSTS AND EXPENSES,
INCLUDING REASONABLE ATTORNEYS' FEES, TO THE EXTENT SUCH CLAIMS ARESE OUT OF ANY BREACH OF THIS SECTION 8.
9.Audit Rights
ZyXEL SHALL HAVE THE RIGHT, AT ITS OWN EXPENSE, UPON REASONABLE PRIOR NOTICE, TO PERIODICALLY INSPECT AND AUDIT YOUR RECORDS TO ENSURE YOUR COMPLIANCE WITH THE TERMS AND CONDITIONS OF THIS LICENSE AGREEMENT.
10. Termination
This License Agreement is effective until it is terminated. You may terminate this License Agreement at any time by destroying or returning to ZyXEL all copies of the Software and Documentation in your possession or under your control. ZyXEL may terminate this License Agreement for any reason, including, but not limited to, if ZyXEL finds that you have violated any of the terms of this License Agreement. Upon notification of termination, you agree to destroy or return to ZyXEL all copies of the Software and Documentation and to certify in writing that all known copies, including backup copies, have been destroyed. All provisions relating to confidentiality, proprietary rights, and non-disclosure shall survive the termination of this Software License Agreement.
12.General
This License Agreement shall be construed, interpreted and governed by the laws of Republic of China without regard to conflicts of laws provisions thereof. The exclusive forum for any disputes arising out of or relating to this License Agreement shall be an appropriate court or Commercial Arbitration Association sitting in ROC, Taiwan. This License Agreement shall constitute the entire Agreement between the parties hereto. This License Agreement, the rights granted hereunder, the Software and Documentation shall not be assigned by you without the prior written consent of ZyXEL. Any waiver or modification of this License Agreement shall only be effective if it is in writing and signed by both parties hereto. If any part of this License Agreement is found invalid or unenforceable by a court of competent jurisdiction, the remainder of this License Agreement shall be interpreted so as to reasonably effect the intention of the parties.
Note: Some components of the Vantage CNM 2.3 incorporate source code covered under the Apache License, GPL License, LGPL License, Sun License, and Castor License. To obtain the source code covered under those Licenses, please check ftp://opensource.zyxel.com to get it.
Index
Numerics
16 by 9 format 55
4 by 3 format 55
A
A-B button 22
A-B function 22, 76
application 11, 12, 93
B
button
A-B 22
Fast Forward 34
PHOTO 31
ROTATE 34
VIDEO 17, 20
C
certifications 103, 104
notices 104
viewing 104
codecs 87
copyright 103
D
default settings 60
Digital Living Network Alliance, See DLNA 87
dimensions 85
disclaimer 103
display information 60
display photos 34
DLNA 87
DNS server
address assignment 46
Domain Name System. See DNS.
F
factory defaults 60
Fast Forward button 34
FCC interference statement 103
firmware
upload 60, 61, 62
version 60
firmware update 60, 61
formatssupported87
function
A-B 22
H
HDMI 55,87
High Definition Multimedia Interface, See HDMI 55, 87
HOME menu 17, 20, 31, 45
home networks 87
humidity 85
1
icon
A-B 22
OPTION 45
PHOTO 31
Video 17, 20
IEC 958 type II 56
IEC-60958 56
information 60
interval repeat 22
L
language settings 53
LEDs12
troubleshooting 71
lights 12
M
MAC address 46, 60
Media Access Control. See MAC address.
media server 87
access 73
software 87
tool 63
menu 15
item number 16
navigation 15
OPTION 45
PHOTO 31
music
play 28, 35
N
network settings 47, 51
number
menu item 16
0
OPTION
icon 45
menu 45
output type 55
P
PHOTO
button 31
icon 31
menu 31
photo 34
display 34
rotation 34
play
music 28, 35
photos 34
video file 17
power adaptor specifications 92
power specification 85
problems 71
product registration 105
R
registration
product 105
related documentation 3
remote control 17, 20
repeat interval 22
reset 60
ROTATE button 34
s
S/PDIF 56
safety warnings 6
Settings For Ease of Use 58, 59
slideshow 34
Sony/Philips Digital Interface Format, See S/ PDIF 56
specifications 92
power adaptor 92
STATUS LED 12
supported
codes 87
forms 87
syntax conventions 4
T
Windows Media Center 74
temperature 85
trademarks 103
troubleshooting 71
A-B function 76
DMA usage 72
files 74, 75
files not in proper folders 16
files on USB devices 75
LEDs 71
media server access 73
number of files 74
thumbnails 75
TV display 72
U
updating firmware 60, 61
uploading firmware 60, 61
USB
for firmware upload 62
troubleshooting 75
V
version 60
firmware 60
VIDEO
button 17, 20
Video
icon 17, 20
video
playback 17
video output 55
W
warranty 104
note 105
weight 85
widescreen format 55