
HDD PHOTO CUBE - External hard drive EMTEC - Free user manual and instructions
Find the device manual for free HDD PHOTO CUBE EMTEC in PDF.
| Product Type | External hard drive with memory card reader |
| Internal hard drive capacity | 40, 80 or 120 GB (depending on model) |
| Supported card formats | SD/MMC, Memory Stick, Memory Stick Pro, CompactFlash Type I/II, MicroDrive, Mini-SD (with adapter), RS-MMC (with adapter), MS Duo (with adapter), MS Pro Duo (with adapter) |
| Interface | USB 2.0 high-speed |
| Power supply | Built-in rechargeable lithium-ion battery + 5V DC power adapter |
| Battery life | Approximately 60 seconds of inactivity before auto power-off |
| Screen | LCD displaying copy status, capacity, battery level |
| Main functions | Autonomous copy from memory cards to hard drive, external USB disk mode, firmware update, partitioning (FAT32, max 4 partitions) |
| Compatible operating systems | Windows 2000 SP3, Windows ME/XP |
| Operating temperature | 0°C to 50°C |
| Storage temperature | -20°C to 55°C |
| Maximum humidity | 90% |
| Maintenance and cleaning | Clean with a soft dry cloth. Do not use solvents. Avoid water and moisture. |
| Safety | Do not disassemble, shock, or expose to water. Disconnect properly in USB mode. |
| Spare parts and repairability | Built-in battery not user-replaceable. No spare parts available. Contact customer service. |
Frequently Asked Questions - HDD PHOTO CUBE EMTEC
User questions about HDD PHOTO CUBE EMTEC
0 question about this device. Answer the ones you know or ask your own.
Ask a new question about this device
Download the instructions for your External hard drive in PDF format for free! Find your manual HDD PHOTO CUBE - EMTEC and take your electronic device back in hand. On this page are published all the documents necessary for the use of your device. HDD PHOTO CUBE by EMTEC.
USER MANUAL HDD PHOTO CUBE EMTEC
Please read these instructions carefully before using this product.
> C O N T E N T
I. FEATURES 4
2. PRODUCT OVERVIEW 5
3. GETTING STARTED 8
4. IN STAND-ALONE MODE 9
5. IN USB MODE IO
6. PARTITION THE HARDDISK II
7. BACKUP OF FLASH CARD DATA 12
8. POWER SAVING FUNCTION 12
9. BATTERY CHARGE 12
IO. ERROR SIGNAL 13
II. OPERATIONAL NOTES 13
12. TROUBLESHOOTING 14
13. SPECIFICATION 16
I4. APPENDICES 17
I. Features :
- Supporting the following flash cards: SD/MMC, Memory Stick, Memory Stick Pro and Compact Flash Type I/II, MicroDrive, Mini-SD(with adapter), RS-MMC(with adapter), MS Duo(with adapter), MS Pro Duo(with adapter)
Fast copy of flash memory cards to the built-in harddisk of the unit at any time, no computer needed.
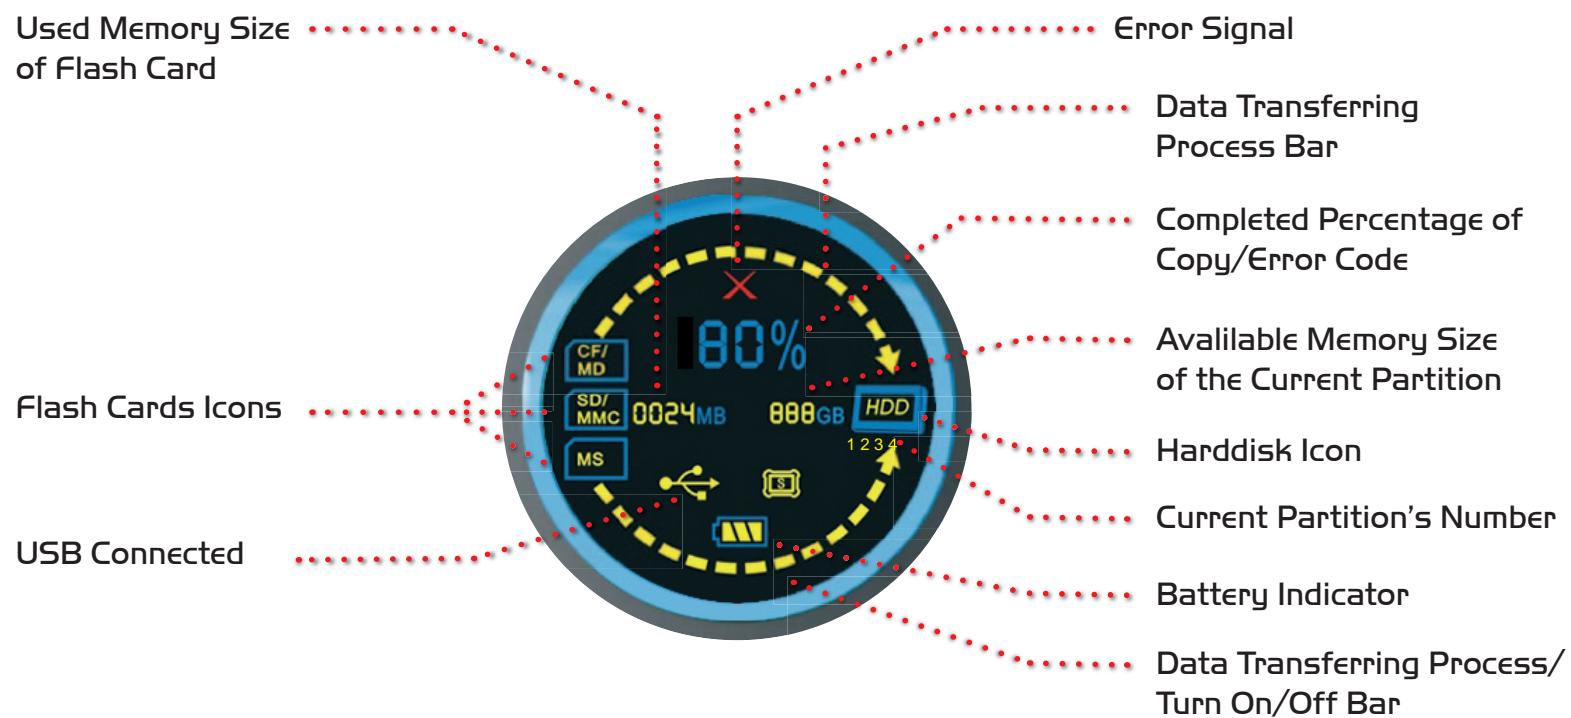
-LCD screen gives status of copy, memory size and battery level, and so on.
-Build-in rechargeable lithium ion battery
-Supports firmware update
-USB 2.0 high speed port
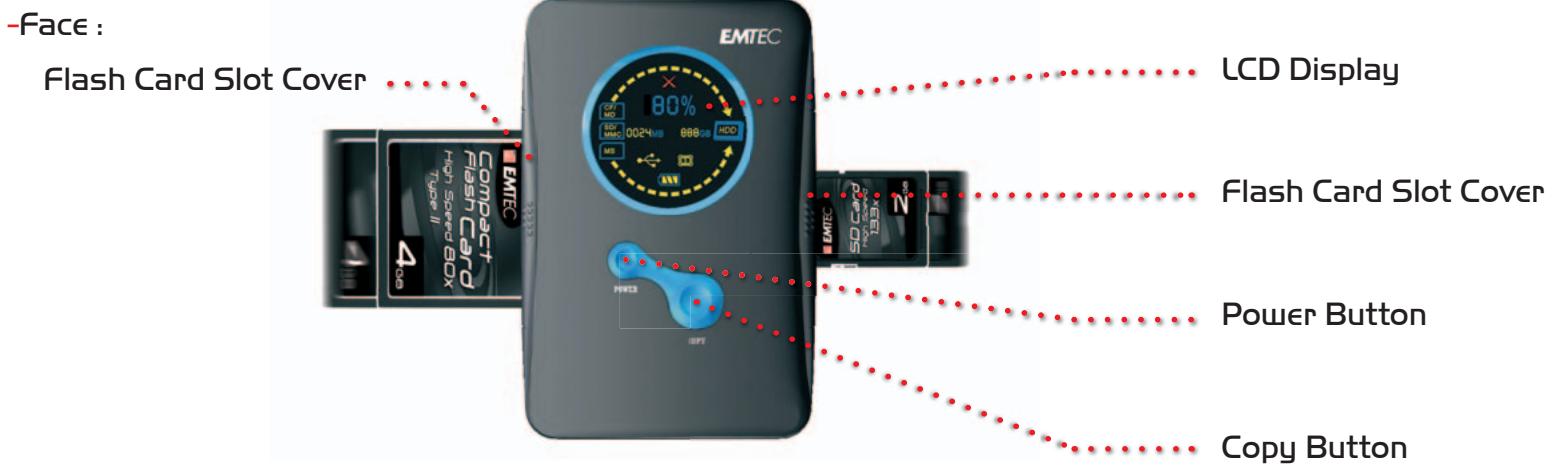
2. Product Overview :
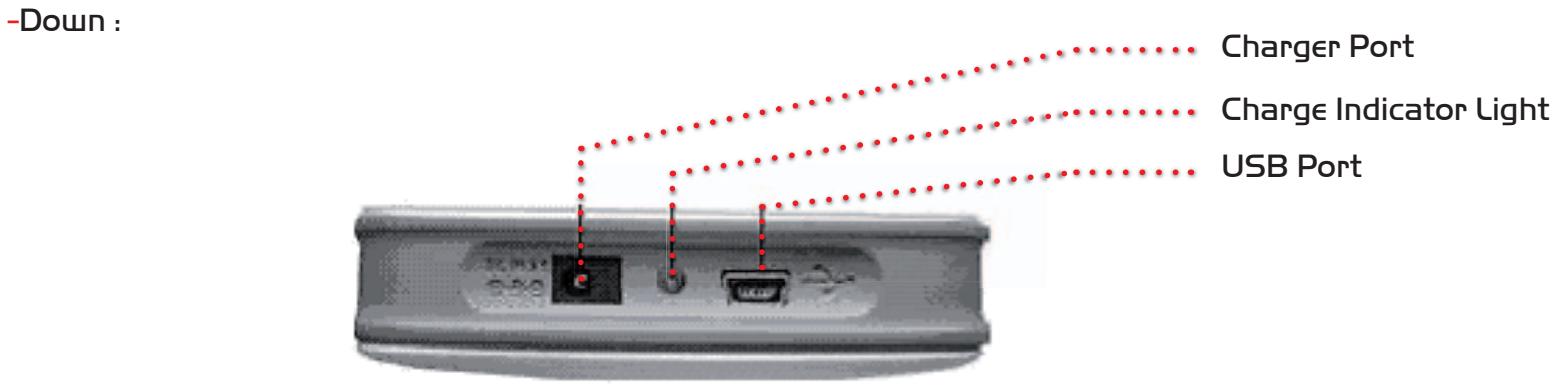
-Please insert the plug of appropriate DC power adapter into the charger port if the portable harddisk needs to be charged.
The charge indicator light is red when the battery is charging. It will turn to be green when the battery charge is finished.
-Please use appropriate USB cable to connect the unit to computer for transferring data in USB mode. After the connection, you need to turn on the unit for further operation.
Note:
-Do not disconnect the unit to computer when it is reading or writing data.
-Do not remove the unit from USB cable or remove USB cable from computer directly just after transferring. Please consult the reference of operating in USB mode in the latter part of this instruction.
-LeftSide:
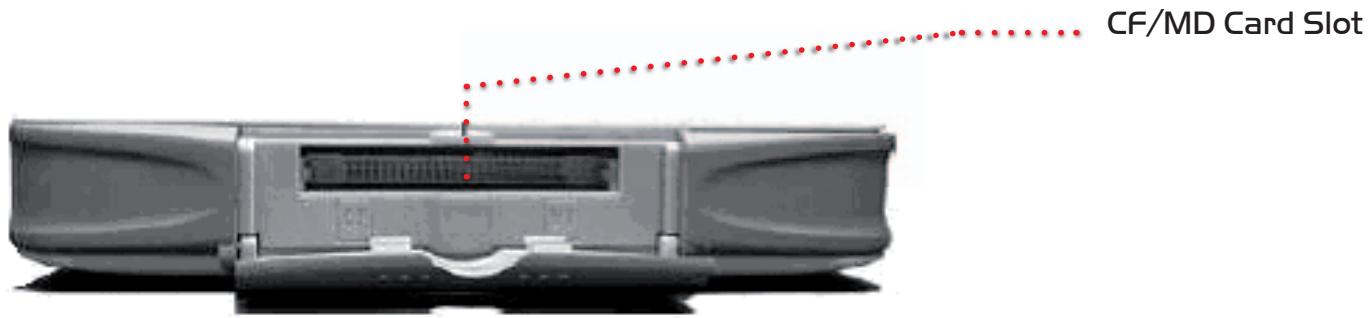
If you want to copy the data within CF/MD flash card, please open the card slot cover on left side and insert the flash card with face upward carefully.
Note:
-Please push the card slot cover to the direction of arrow on it carefully. To avoid breakage of the cover, please push it without violence.
-Right Side :
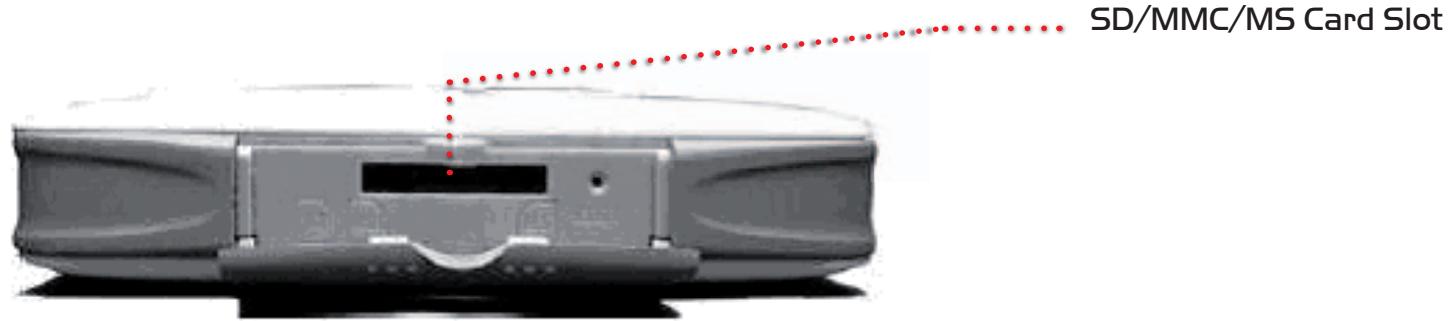
-If you want to copy the data within SD/MMC/MS card, please open the card slot cover on right side and insert the flash card under the guidance on the faceplate carefully.
Note:
Please push the card slot cover to the direction of arrow on it carefully. To avoid breakage of the cover, please push it without violence.
3. Getting Started :
I) Charging the battery :
When you use this unit for the first time or when it indicates that the battery is low, you need to charge the built-in battery by DC power adapter. Please charge the battery at least 4 hours for the first time.
2) Power On/Off :
-In Stand-alone mode:
- To turn on the unit, press and hold the [Power] button and release it until the Turn On/Off Bar is finished. If the Turn On/Off Bar is not finished yet before you release, the unit will not be turned on.
- To turn off the unit, press and hold the [Power] button and release it until the Turn On/Off Bar is finished. If the Turn On/Off Bar is not finished yet before you release, the unit will not be turned off.
-In USB mode:
- To turn on the unit when it is connected to computer, press the [Power] button once and it will be turned on. The process will not be displayed.
- To turn off the unit when it is connected to computer, please safely remove the harddisk first (please consult the instruction of operating in USB mode in the latter part). Then press and hold the [Power] button for about 2 seconds and it will be turned off. Or you can unplug the USB cable directly after the unit has been safely removed.
4. In Stand-alone Mode:
I) After you insert the flash card into the appropriate slot and turn on the unit, please do not start copying data from flash card into the unit until the capacity of flash card has been displayed on the LCD. Then you can press the [Copy] button to start copy. The Data Transferring Process Bar and the Completed Percentage of Copy will show you the progress of copy.
2) The Completed Percentage of Copy will not disappear until you remove the flash card.
3) If there is any error occurred during the copying or turning on process, an icon will blink on the LCD screen and the corresponding error code will be displayed in place of the Completed Percentage of Copy. (Please consult the reference of Error Code List in the appendices to get further knowledge about the error code.)
4) You can insert two different flash cards into the unit at the same time. It will automatically copy both cards from CF/MD to SD/MMC/MS in turn. Please turn on the unit after inserting cards. Then two icons will be displayed on the LCD corresponding to these two cards. Now you only need to press the [Copy] button, the data within these cards will automatically be copied to the built-in harddisk orderly.
5. In USB Mode – worked as an external hard disk :
1) Connect the unit to the computer using the USB cable and press the [Power] button to turn on the unit afterwards. The LCD will display "USB connected" and the unit enters into USB mode.
2) Double click "MY COMPUTER" and enter into MY COMPUTER folder, you will find three removable disk icons and two local disk icons, which indicating three kinds of flash cards and two partitions of built-in harddisk. Now you can access your files on built-in harddisk and flash cards through your computer.
3) To avoid the damage to the unit or data loss, please follow the procedure listed below to disconnect the unit from the USB port on your computer.

- Double click "Safely Remove Hardware" icon on the task bar.
- From the "Safely Remove Hardware" window, select "USB Mass Storage Device" and click "Stop". The "Stop a Hardware Device" window will pop up.
- Click "OK". When the "Safe to Remove Hardware" window is displayed, you can turn off the unit and remove it from the USB cable or remove it without turning off.
Note:
-Do not unplug the USB cable or remove the flash card from the unit when the computer is detecting for the hardware or copy is in process. Otherwise, the computer and the unit may be hanging as well as the data within the harddisk may be damaged and lost.
-In USB mode, the unit will be charged by the aid of USB cable when it is off. However, it will only be supported with electronic power but not be charged through USB cable when it is on. To avoid lack of power when the unit is used in USB mode, please connect the DC power adapter during your usage.
6. Partition the Harddisk - supposed under WINDOWS 2000/XP system :
1) Click "START" menu on the task bar and select " SETTINGS" / "CONTROL PANEL" / "ADMINISTRATIVE TOOLS" / "COMPUTER MANAGEMENT". Then Computer Management Window is opened.
2) Click on "DISK MANAGEMENT", and disk drives currently connected to the system will be listed on the right side. Find out the disk that indicates the portable harddisk.
3) To delete an existing partition, right click on the drive and select "DELETE PARTITION".
4) To create a new partition, right click on the drive and select "NEW PARTITION". This will open the New Partition Wizard.
5) Select "PRIMARY PARTITION" or other types as you want and click "NEXT".
6) Because you can only create FAT32 partition, set the partition size to 32000MB or less and click "NEXT" ("Disk Management" can not create FAT32 partitions larger than this).
7) Assign a drive letter and click "NEXT".
8) Set the file system to FAT32 and click "NEXT". (If FAT32 is not listed as an option, go back to step6 and reduce the size to 32000MB or less.)
9) Click "NEXT" to confirm settings.
IO) Click "FINISH" to close the wizard and start the partition and format process.
Note:
-Only FAT32 is supported for harddisk formatting and maximum 4 partitions. Each partition memory can not be over 32GB.
- To avoid the unit being shut down when it is working with not enough power, please connect DC power adapter to it during the process of partition.
7. Backup of Flash Card Data :
1) Insert flash card into card slot.
2) Press on [Copy] button and the unit begins to back up the data.
3) When the LCD displays 100% , backup is finished.
4) All copied files will be saved in the respective folders in the built-in harddisk, namely corresponding to the card, such as CF, MS, SD and MMC.
5) The copies of the same card will not be overwritten with each other since they will be saved in different folders, which are under the same folder named after flash card. It can support maximally 99999999 folders under that folder. If there are more than 99999999 folders, please reformat the harddisk.
6) Data will be copied to the second partition when the first one is full. Meanwhile, the number “2” will be displayed on the LCD, indicating the current fixed disk driver is the second one. Analogically, number “3” and “4” will be displayed when the former one is full. The maximum number of partitions is 4.
7) Please do the harddisk cleanup at time to keep enough memory for copy.
8. Power Saving Function :
This unit will be shut down automatically after about 60 seconds' inactivity to save power.
9. Battery Charge :
1) Charging the battery by 5V DC power adapter or connect the unit to computer by USB cable when it is off.
- The charge indicator light will be red when the battery is charging.
- The charge indicator light signal will turn to be green when the battery charge is finished.
2) This unit can only support rechargeable lithium ion battery.
IO. Error Signal :
1) The data or the flash card may have been damaged when the error icon X appears. Please format the flash card or replace it.
2) If the unit is hanging for incorrect operations, please press the [Reset] button on the right side of the unit to shut it down.
3) In USB mode, if the unit's power is too low, icon X will appear. Please press [Reset] button to shut it down and connect with a DC power adapter. Then turn on the unit and continue your work.
II. Operational Notes :
1) If the unit can not be recognized by computer in USB mode, or the unit can not recognize the built-in harddisk, please pay attention to these:
- Is there any problem of the installation of harddisk?
- This unit only supports FAT32 format. Under WINDOWS 2000/XP system, the built-in harddisk can not be recognized if the memory size of partition is more than 32GB.
2) Install the harddisk carefully to keep from damage.
3) To keep the efficiency of the unit, it is suggested to do disk defragmenter periodically.
4) The built-in harddisk must be FAT32 format.
5) Carefully insert and remove flash cards.
6) Do not give shock or collision on the unit when the data is transferring.
7) Do not remove the cover of the unit because it is easy to damage the circuitry.
8) Do not leave the unit in a location subject to water or a humid environment.
9) Use DC power adapter when the unit is connected to the computer on work.
IO) Back up and clean up the data within the harddisk at time to keep enough memory for copy.
I2. Troubleshooting :
If you experience a problem with this unit, please consult the following instruction firstly. Do not disassemble, repair or remodel the product by yourself. Doing so may result in damage to the unit that is not covered under warranty.
1) The problems occurred in USB mode :
- If you use the USB port in the front of the computer but the computer can not recognize the unit, please try the USB port behind. The signal of data transferring may be weakened because of the lengthening of cable, which causes this problem.
- If the data can not be read after the transferring in USB mode, please make sure whether the unit is removed under the guidance of "safely remove harddisk". Otherwise, the data may have been damaged and lost.
2) The data has been damaged and other error messages are informed :
- If the file allocation table of flash card has been damaged, the data has been back up to the unit will be damaged as well. Then you need to back up the data within the flash card and reformat it or revised it by disk defragmenter.
3) Format or partition the harddisk :
- In Stand-alone mode, harddisk must be formatted as FAT32 and flash card as FAT16/FAT32.
- This unit can be partitioned under WINDOWS 2000/XP system for 4 partitions maximally.
4) Delete files :
- In USB mode, you can delete files within the unit. Removing files into Recycle Bin can not release the used memory. Consequently, you'd better empty the Recycle Bin or press [Shift] and [Delete] button on your keyboard at the same time to delete files. If you only remove files to Recycle Bin but not empty Recycle Bin, you should format the harddisk to get more available memory.
5) Note for flash card's usage :
- When the flash card can not be inserted into card slot completely, make sure it is inserted by the correct side. To avoid card distortion, please insert it carefully without force.
6) Getting no respondence to copy :
- When you are copying large data from flash cards to the unit, the unit may require dozens of seconds for initialization and the LCD displays nothing. Please wait for a while. If the unit has no responsiveness yet for more than a minute, please press [Reset] button and redo it again.
7) The available memory is not used up but LCD displays the available memory is OGB :
- Because the LCD screen can minimally display O.IGB, it will display OGB when the available memory is less than O.IGB.
8) The data within the flash card will be transferred to the second partition though the first one is not full yet :
- To keep the data complete and centralized, the unit will transfer data to the second partition automatically when the transferring data is larger than the available memory of the first partition. When you turn on the unit next time, the LCD will still display the available memory size of the first partition.
13. Specification :
| Subjects | Details |
| Build-in harddisk | Supports 40/80/120GB harddisk |
| Power sources | Inner: rechargeable lithium ion battery Outer: DC power adapter |
| USB | USB 2.0 high speed |
| Supported format | Harddisk: FAT32 Flash memory card: FAT16/FAT32 |
| Supported OS | Windows 2000 SP3 or above Windows ME/XP |
| Operating temperature | 0°C~50°C |
| Storing temperature | -20°C~55°C |
| Humidity | Maximum 90% |
14. Appendices: Error Code List :
Error Code Details
Harddisk's Error
OI Fail to recognize the harddisk.
02 Fail to initialize the harddisk.
03 Fail to recognize the memory size of harddisk.
04 Fail to read or write the harddisk.
Copying Error
51 The copying card is empty.
52 The free memory of harddisk is not enough.
53 Other errors.
Flash Card's Error
61 Fail to recognize the files in flash card.
62 Fail to read or write the data in flash card.
Photo Cube™
Portable Hard Disc / Disque Dur Portable / Portable Festplatte
DEXXON DATA MEDIA
79, avenue Louis Roche 92238 Gennevilliers Cedex
Importer:
DEXXON Poland Sp. z o.o.
Janki, Al. Krakowska 38
05-090 Raszyn
DEXXON ECE Sucursala
Romania
Str Aviator Mircea
Zoirleanu, 26
Sector I, Bucuresti, OI2053
DEXXON ECE GmbH.
maguarorszagi fioktelepe
HU-I047 Budapest,
Fotiut 56