
3LVF-625 - Dishwasher FAGOR - Free user manual and instructions
Find the device manual for free 3LVF-625 FAGOR in PDF.


| Product type | Dishwasher |
| Brand | FAGOR |
| Model | 3LVF-625 |
| Installation type | Under counter |
| Capacity | 13 place settings |
| Energy class | E |
| Dimensions (height x width x depth) | 85 cm x 60 cm x 60 cm |
| Net weight | 45 kg |
| Noise level | 44 dB(A) |
| Wash programs | Eco, Intensive, Quick, Glass, Automatic |
| Special functions | Delayed start, Half load, AquaStop, Automatic shutdown |
| Control type | Electronic with digital display |
| Water consumption per cycle | 9 liters |
| Annual energy consumption | 260 kWh |
| Water pressure | 0.04 - 1.0 MPa |
| Wash temperatures | 40 °C - 70 °C |
| Basket material | Stainless steel |
| Self-cleaning filter | Yes |
| Child safety | Yes (safety lock) |
| Drying class | A |
| Electrical connection | 230 V / 50 Hz |
| Cable length | 1.5 m |
| Drain hose length | 1.5 m |
| Repairability | Spare parts available for 10 years |
Frequently Asked Questions - 3LVF-625 FAGOR
User questions about 3LVF-625 FAGOR
0 question about this device. Answer the ones you know or ask your own.
Ask a new question about this device
Download the instructions for your Dishwasher in PDF format for free! Find your manual 3LVF-625 - FAGOR and take your electronic device back in hand. On this page are published all the documents necessary for the use of your device. 3LVF-625 by FAGOR.
USER MANUAL 3LVF-625 FAGOR
CONOCE SU APARATO....16
DISPOSAL OF OLD APPLIANCE....74
BASICINFORMATION....75
MANUFACTURER'S DECLARATION....75
SAFETY INSTRUCTIONS FOR USE 76
FEATURES AND COMPONENTS....85
PREPARE THE APPLIANCE FOR OPERATION....88
LOAD DISHES INTO DISHWASHER....93
TURN ON THE APPLIANCE AND SELECT PROGRAMME....97
CLEANING AND MAINTENANCE....98
ERROR CODES AND TROUBLESHOOTING....101
ECOLOGÍA EN PRÁCTICA
CONOCE SU APARATO

7


8

NOTA:
1

2
2

*opcional
4
Sistema de filtrado
dd

3
Cuidado del lavavajillas

RECURSOS E COMPONENTES

7

8
Função Detergente

NOTA:

2
| Cesto inferior | |
| Tipo Item | |
| E Tigela | de sobre-mesa |
| H Pratos | de sopa |
| I Pratos | de jantar |
| J Prato | de sobre-mesa |
| K Prato | oval |
| F Pote | pequeno |
| M Prato | desobremesa emmelamina |
| N Tigela | de mela-mina |
3
*para opcional
4
Cesto de Talheres
Remova as sobras grandes


3
For many years, Fagor has consistently pursued pro-ecological policy.
Concern for the environment is as important for us as the use of modern technology.
The development of technology has enabled our factories to become more environmentally friendly – we use less and less water, electricity and less waste water and solid waste is generated in the production.
A lot of attention is paid to materials used in production. We strive to use only those that do not contain harmful substances and make recycling and safe disposal possible after use.
UNPACKING

During transportation, protective packaging was used to protect the appliance against any damage. After unpacking, please dispose of all elements of packaging in a way that will not cause damage to the environment.
All materials used for packaging the appliance are environmentally friendly; they are 100% recyclable and are marked with the appropriate symbol.
Important! Packaging materials (bags, polyethylene, polystyrene, etc.) should be kept away from children during unpacking.
DISPOSAL OF OLD APPLIANCE

In accordance with European Directive 2012/19/EU and local legislation regarding used electrical and electronic goods, this appliance is marked with the symbol of the crossed-out waste container. This marking indicates that the appliance must not be disposed of together with other household waste after it has been used.
The user is obliged to hand it over to waste collection centre collecting used electrical and electronic goods. The collectors, including local collection points, shops and local authority departments provide recycling schemes.
Proper handling of used electrical and electronic goods helps avoid environmental and health hazards resulting from the presence of dangerous components and the inappropriate storage and processing of such goods.
BASIC INFORMATION
Carefully read the operating instructions before plugging dishwasher to a power outlet and using the appliance. Operating instruction include tips that will help you avoid the risk of injury and damage to the appliance. Keep dishwasher documentation in a safe place for possible future use.
These operating instructions have been prepared for a range of appliances and some features described herein may not apply to your appliance.
MANUFACTURER'S DECLARATION
Manufacturer's Declaration
The manufacturer hereby declares that this product meets the requirements of the following European directives:
• Low Voltage Directive 2014/35/EU
• Electromagnetic Compatibility (EMC) Directive 2014/30/EU
• ErP Directive 2009/125/EC
• Directive RoHS 2011/65/EU
and has thus been marked with the symbol and been issued with a declaration of compliance made available to market regulators.
SAFETY INSTRUCTIONS FOR USE
| Before you install the appliance | Check the appliance for transport damage. Never install or use a damaged appliance. If in doubt, contact your seller. |
| Before first use See inst | stallation notes (below). |
| Refer the grounding system installation to a qualified electrician. | |
| The manufacturer shall not be liable for any damage arising from the use of a non-grounded appliance. | |
| Before using the appliance, verify that the data given on the rating plate matches that of local power outlets. | |
| Do not plug in the appliance before and during installation. | |
| Always use the original plug that came with the appliance. | |
| Do not use an extension cord to connect the appliance to the wall outlet. Extension cords are not sufficiently safe (e.g. they may overheat). | |
| Make sure the plug is easily accessible after installing the appliance. | |
| Before first use This appliance can be used by children aged 8 years and older or persons with physical, mental or sensory handicaps, or those who are inexperienced or unfamiliar with the appliance, provided they are supervised or have been instructed how to safely use the appliance and are familiar with the associated risks. Ensure that children do not play with the appliance. Children should not be allowed to clean or maintain the appliance. | |
| Children less than 3 years of age shall be kept away unless continuously supervised. | |
| Child safety Do not allow children to play with the appliance. | |
| Dishwashing detergents can be caustic and irritate the eyes, mouth and throat. Read the safety notes from detergent manufacturer. | |
| Never leave children unsupervised when the appliance is open. It can contain residue detergent. | |
| Washing tableware in a house-hold dishwasher usually uses less energy and water than washing up by hand. | |
| Child safety Dishwasher water is not suitable for drinking. Danger of injury from the caustic chemicals. | |
| When you open the door during a programme, be careful as water temperature is high. | |
| To avoid injury always place long and sharp/pointed items (e.g. forks, knives) in the cutlery basket, pointing down, or flat on the top basket. | |
| Daily maintenance Use the appliance for household dishwashing only. | |
| Do not use solvents in the appliance as there is a risk of explosion. | |
| Do not sit or stand on the open door and do not place any objects on it. The device may overturn. | |
| Do not open the door when the appliance is operating. Hot water or steam can be released. | |
| Do not leave the door open, because they it can pose a hazard. | |
| Loading the dishwasher to the capacity indicated by the manufacturer will save energy and water. | |
| It is not recommended to pre-rin-se the tableware, as this leads to an increase in water and energy consumption. |
| Dishes and utensils that are not suitable for dishwashers. | Ashtrays, candles, cleaning pastes, paints, chemicals, ferro-alloys; |
| Forks, spoons and knives with a handle made of wood, ivory or Nacre, glued items, items contaminated with abrasive powders, acid or base | |
| Plastic dishes that are not resistant to high temperature, containers made of copper or tin; | |
| Aluminium and silver items (may be stained or loose lustre) | |
| Some delicate types of glass, porcelain with decorative prints, as prints may fade even after the first wash; some crystal dishes as they may lose their transparency, glued silverware sensitive to high temperatures, lead crystal glass, chopping boards, items made with synthetic fibres; | |
| Absorbent objects such as a sponge or kitchen cloths are not suitable for the dishwasher. | |
| Before buying dishes in the future make sure they are dishwasher safe. | |
| RECYCLING Packaging and | some parts of the appliance are made of materials suitable for recycling. They are marked with the recycling symbol and information about the type of material. |
| Before using the appliance remove all packaging and dispose of it in accordance with the regulations. | |
| Warning!The packaging can be dangerous for children.Recyclable materials can be taken to local waste collection. Additional information can be obtained from local authorities and at waste disposal points. | |
| SCRAPPING OF AN OLD APPLIANCE | The materials used in making of this appliance can be reused, as indicated. By reusing or recycling the materials or parts, you will be playing an important part in protecting our environment. |
| Information about the relevant disposal points for worn-out electrical goods is available from your local authorities. | |
| Thank you for your contribution to environmental protection. | |
| To avoid risks, prevent the appliance pending transport from being used. | |
| Disconnect the plug and cut the power cord. Also damage the door lock. |
INSTALL THE APPLIANCE
PLACE YOUR APPLIANCE
When choosing the place of installation, make sure you will be able to easily load and remove dishes and utensils from the dishwasher.
Do not place the appliance in a room where the temperature can fall below 0° C.
Before installing unpack the appliance following the instructions on the packaging.
- When you move the appliance do not handle it by the door or control panel.
Leave some room on all sides to have convenient access to the dishwasher when cleaning.
■ Make sure that when you set the dishwasher you do not crush the water supply and drain hose. Also, make sure that the appliance is not places on the power cord.
Level the appliance using the adjustable legs. Proper level ensures trouble-free opening and closing the dishwasher doors.
If the dishwasher door will not close properly, check that the appliance stands firmly on the floor, if not, adjust using the adjustable legs.
WATER SUPPLY CONNECTION
Make sure that domestic water supply system is suitable for the dishwasher. It is recommended to install a filter in the water supply line to avoid damage to the appliance due to impurities (such as sand, clay, rust, etc.) that occasionally occur in water. This will also prevent accumulation of sediment after dishwashing.
WATER SUPPLY HOSE

Do not use the water supply hose from the old dishwasher. Use the new water supply hose provided with the appliance. Before connecting, rinse the hose with water. Connect the water supply hose directly to the water feed valve. The domestic water system pressure should be at least 0.04 MPa and up to 1 MPa. If the water pressure exceeds 1 MPa, install pressure reducing valve.
When the connection is ready, open the valve completely and check for leaks.
For safety reasons, close the water supply tap after every wash.

NOTE: Aquastop water supply is used in some dishwasher models. Dangerous voltage could occur with Aquastop. Do not cut the Aquastop water supply. Do not allow it to bend or twist


Note: For safety reasons, close the water tap after every wash
THE DRAIN HOSE
The drain hose can be connected directly to a water drain or kitchen sink stub pipe. You can also drain the water directly into the sink using the special bracket (if available), placing the drain hose outlet on the kitchen sink edge. The drain hose connection should be made at least 50 cm and up to 110 cm from the floor.


If the drain hose is longer than 4 m, dishes may not be washed properly. The manufacturer will not be held responsible.
ELECTRICAL CONNECTION
Grounded plug must be connected to a grounded power outlet with a proper voltage. If there is no grounding, refer this to a qualified electrician. If you operate the appliance without proper grounding, the manufacturer does not assume any liability for the possible resulting damage.

Domestic electrical system must be protected with a 10-16A fuse. The appliance must be supplied with 220-240 V AC. If the supply voltage is 110 V, use 3000W, 110/220 V set-up transformer to connect the appliance. Do not connect the appliance during installation.

Always use the plug provided with the appliance. When you operate the appliance at lower voltage the dishwashing efficiency will deteriorate and may damage the appliance.
The power cord may only be replaced by authorized service or a qualified electrician. Failure to comply with these rules may lead to an accident.
For safety reasons, you should always unplug the appliance after you have finished using it.
In order not to avoid electric shock, do not remove the plug from the wall outlet with wet hands.
When you unplug the appliance from the wall outlet, always pull the plug. Never pull the power cord.

FEATURES AND COMPONENTS
DESCRIPTION OF THE APPLIANCE
The features and components of the appliance (fig. 1):

1 Upper Basket
2 Spray Arms
3 Lower Basket
4 Water Softener
5 Filters
6 Detergent Dispenser
7 Rinse Aid Dispenser
8 Cutlery basket

NOTE:
Figures are for illustrative purposes only Individual models may vary.

| 1. Power Press this button to turn on your dishwasher, the screen lights up. | |
| 2. Program Press the button to select the program. | |
| 3. Half_Load/Dry+ Button | Half_Load/Dry+ Button: Press this button you can choose the additional function Half_Load, Dry+, Half_Load and Dry+. |
| 4. Delay button/Child lock button | The START DELAY will allow you to delay the start time of any cycle automatically up to 24hours. The “child lock”will be available when you press the button 3 seconds, and “LO” flashes 6 times on digital displays. |
| 5. Start \ Pause button The appliance will start or pause the expected washing cycle. | |
| 6. Program indicator light | When you select a washing programme, the corresponding light will display.IntensiveFor the heaviest soiled loads, such as pots, pans, casserole dishes and dishes that have been sitting with dried food on them for a while.ECO ECOFor normally soiled loads, such as pots, plates, glasses and lightly soiled pans standard daily cycle.90 Min90For lightly and normally soiled plates and pans for every day. (Run cycle immediately after use).30 Min30A shorter wash for lightly soiled loads that do not need drying.SoakTo rinse dishes that you plan to wash later that day. |


NOTE:
Figures are for illustrative purposes only Individual models may vary.
NOTA:
*on selected models: When you open the dishwasher door, the interior light will turn on automatically. The appliance interior is well lit.
| 7. Half_Load indicator H | Half load indicator lights up when the Half Load additional function be selected. |
| 8. Dry+ indicator the Dry+ | Indicator lights up when the Dry+ additional function be selected. |
| 9. Rinse aid refill indicator | The indicator lights up when dispenser needs to be refilled. |
| 10. Salt refill indicator: The | indicator lights up when the softener needs to be refilled. |
| 11. Digital display To display the running time remain, malfunction codes and delay time. | |
PREPARE THE APPLIANCE FOR OPERATION
1
Before using your dishwasher for the first time
A. Set the water softener
B. Pour 500ml of water inside the salt container and then fill with dishwasher salt
C. Fill the rinse aid dispenser
D. Function of detergent
2
Set the Water Softener
The water softener is designed to remove minerals and salts from the water, which would have a detrimental or adverse effect on the operation of the appliance. The higher the content of these minerals and salts, the harder the water is. The softener should be adjusted according to the hardness of the water in your area. Your local Water Authority can advise you on the hardness of the water in your area.
3
Setting
The amount of salt dispensed can be set from H0 to H7.
Salt is not required at the set value H0.
- Find out about the hardness value of your tap water. Your water utility company will help you with this.
- Set value can be found in the water hardness table.
- Close the door.
- Switch on „Power“ switch.
- Hold down „Delay“ button and then press „Program“ button for 5 seconds. The buzzer rings one time and H. flashes on the digital display. (factory setting is H4).
4
To change the setting
Each time the button is pressed, the set value increases by one level; when the value of H7 has been reached, the display jumps back to H0 (off).
- Press „Program „button. The chosen setting has now been stored.
Contact your local water board for information on the hardness of your water supply.
Every cycle with a regeneration operation consumes additional 2.0 litres of water, the energy consumption increases by 0.001 kWh.
| Water hardness Mmo | /1 Set value on the machine | Regeneration occurs every x programme sequence | |
| Clark Range | |||
| 0-8 soft | 0-1.1 H0 off | ||
| 9-10 soft | 1.2-1.4 H1 | 13 | |
| 11-12 medium | 1.5-1.8 H2 9 | ||
| 13-15 medium | 1.9-2.1 H3 7 | ||
| 16-20 medium | 2.2-2.9 | H4 5 | |
| 21-26 hard | 3.0-3.7 | H5 4 | |
| 27-38 hard | 3.8-5 .4 | H6 2 | |
| 39-62 hard | 5.5-3 .9 | H7 1 | |
5
Add special salt
Always use salt intended for use with dishwasher.
NOTE: If your model has no water softener, you may skip this section.
WATER SOFTENER
The hardness of the water varies from place to place. If hard water is used in the dishwasher, deposits will form on the dishes and utensils. The appliance is equipped with a special softener that uses salts specifically designed to eliminate lime and minerals from the water.
The salt container is located beneath the lower basket and should be filled as follows:
Attention
Only use salt specifically designed for use in dishwashers! All other types of salt not specifically designed for use in a dishwasher, especially table salt, will damage the water softener. In case of damages caused by the use of unsuitable salt the manufacturer does not give any warranty nor is liable for any caused damages. Only fill with salt just before starting one of the complete washing programmes. This will prevent any grains of salt or salty water, which may have been split, remaining on the bottom of the machine for any period of time, which may cause corrosion. After the first wash cycle the control panel light expires.


A. Remove the lower basket and then unscrew and remove the cap from the salt container (1).
B. If you are filling the container for the first time, fill the container with about 500 ml of water (2).
C. Place the end of the funnel (supplied) into the hole and introduce about 2kg of salt. It is normal for a small amount of water to come out of the salt container.
D. Carefully screw the cap back on.
E. Usually, the salt warning light will be off in 2-6 days after the salt container is filled with salt.
NOTE:
- The salt container must be refilled when the salt warning light in the control panel comes on. Though the salt container is filled enough, the indicator light may not black out before the salt fully dissolve. If there is no salt warning light in the control panel (for some models), you can judge when to load the salt into the softener by the cycles that the dishwasher had run (see the following schema).
- If there are spills of the salt, a soak program could be run to wipe them out.
Fill the Rinse Aid Dispenser
Function of Rinse Aid
Rinse aid is automatically added during the last rinse, ensuring thorough rinsing, spot and streak free drying.
Attention! Only use branded rinse aid for dishwasher. Never fill the rinse aid dispenser with any other substances (e.g. dishwasher cleaning agent, liquid detergent). This would damage the appliance.
When to Refill the Rinse Aid Dispenser
If there is no rinse-aid warning light on the control panel, you can judge the amount of rinse-aid by the color of the optical level indicator "D" located next to the cap. When the rinse-aid container is full, the whole indicator will be dark .As the rinse aid diminishes, the size of the dark dot decreases. You should never let the rinse aid get below 1 / 4 full.
6
As the rinse aid diminishes, the size of the black dot on the rinse aid level indicator changes, as illustrated below.

Full

3 / 4 full

1 / 2 full

1 / 4 full - Should refill to eliminate spotting

Empty

7
Rinse aid dispenser
- To open the dispenser, turn the cap to the "open" (left) arrow and lift it out.
- Pour the rinse aid into the dispenser, be careful not to overfill.
- Replace the cap by inserting it aligned with "open" arrow and turning it to the "closed" (right) arrow.
The rinse aid is released during the final rinse to prevent water from forming droplets on your dishes that can leave spots and streaks. It also improves drying by allowing water to sheet off the dishes. Your dishwashers are designed to use liquid rinse aids. The rinse aid dispenser is located inside the door next to the detergent dispenser. To fill the dispenser, open the cap and pour the rinse aid into the dispenser until the level indicator turns completely black. The volume of the rinse aid container is about 140 ml. Be careful not to overfill the dispenser, because this could cause over sudsing. Wipe away any spills with a damp cloth. Don't forget to replace the cap before you close dishwasher door.
Attention!
Clean up any rinse aid split during filling with an absorbent cloth to avoid excess foaming during the next wash.


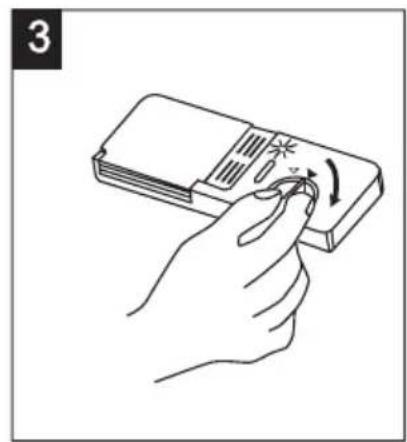
Adjusting Rinse Aid Dispenser
The rinse aid dispenser has six or four settings. Always start with the dispenser set on "5". If spots and poor drying are problems, increase the amount of rinse aid dispensed by removing the dispenser lid and rotating the dial to "6". The dose is factory set in position 5 or 4.
NOTE: Increase the dose if there are drops of water or lime spots on the dishes after washing.
Reduce it if there are sticky whitish streaks on the dishes or a bluish film on glassware or knife blades.

8
Function of Detergent
Detergents with its chemical ingredients are necessary to remove dirt, crush dirt and transport it out of the dishwasher. Most of commercial quality detergents are suitable for this purpose.
Concentrated Detergent
Based on their chemical composition, dishwasher can be split in two basic types:
conventional, alkaline detergents with caustic components low alkaline concentrated detergents with natural enzymes
The use of “Eco” washing programme in conjunction with concentrated detergents reduces pollution and is good for your dishes; these washing programmes are specially matched to the dirt-dissolving properties of the enzymes of the concentrated detergent. For this reason“Eco” washing programme in which concentrated detergents are used can achieve the same results that can otherwise only be achieved using“intensive” programme.
Detergent Tablets
Detergent tablets of different brands dissolve at different speeds. For this reason some detergent cannot dissolve and develop their full cleaning power during short programmes. Therefore please use long programmes when using detergent tablets, to ensure the complete removal of detergent residuals.
Detergent Dispenser
The dispenser must be refilled before the start of each washing cycle following the instructions provided in the Wash Cycle Table. Your dishwashers use less detergent and rinse aid than conventional dishwashers. Generally, only one tablespoon of detergent is needed for a normal wash load. Also, more heavily soiled items need more detergent. Always add the detergent just before starting dishwasher, otherwise it could get damp and will not dissolve properly.
Amount of Detergent to Use


NOTE:
- If the lid is closed: press release button. The lid springs open.
- Always add the detergent just before starting each wash cycle. Only use branded detergent aid for dishwasher.
WARNING!
Dishwasher detergent is corrosive! Take care to keep it out of reach of children.
Use only detergent specifically made for use in dishwashers. Keep your detergent fresh and dry. Don't put powder detergent into the dispenser until you're ready to wash dishes.
Fill in the detergent
Fill the detergent dispenser with detergent. The marking indicates the dosing levels, as illustrated on the right:
- The place of main wash cycle detergent placed, MIN means approximately 20g of detergent.
- The place of pre-wash cycle detergent placed, approximately 5g of detergent.

Please observe the manufacturer's dosing and storage recommendations as stated on the detergent packaging.
Close the lid and press until it locks in place.
If the dishes are heavily soiled, place an additional detergent dose in the pre-wash detergent.
Chamber. This detergent will take effect during the pre-wash phase.
NOTE:
You can find information on the amount of detergent used for individual programs on page 16. Please be aware that according to the level soiling and the specific hardness of water, differences are possible.
Please observe the manufacturer's recommendations on the detergent packaging.
Detergents
There are 3 sorts of detergents
-
With phosphate and with chlorine
-
With phosphate and without chlorine
-
Without phosphate and without chloride
Normally new pulverized detergent is without phosphate. The water softener function of phosphate is not given. In this case we recommend to fill salt in the salt container even when the hardness of water is only 6 dH. If detergents without phosphate were used in case of hard water often white spots appear at dishes and glasses. In this case please add more detergent to reach better results. Detergents without chlorine do only bleach a little. Strong and coloured spots will not remove completely. In this case please choose a programme with higher temperature.
Tips:
- All washing procedures are compatible with 3in1 wash blocks or beads except the pre-washing.
LOAD DISHES INTO DISHWASHER
For best performance of the dishwasher, follow these loading guidelines. Features and appearance of baskets and silverware baskets may vary from your model.
Attention before or after Loading the Dishwasher Baskets
Scrape off any large amounts of leftover food. It is not necessary to rinse the dishes under running water.
Place objects in the dishwasher in the following way:
1.Items such as cups, glasses, pots/pans, etc. are stood upside down.
2.Curve items, or those with recesses, should be at a slant so that water can run off.
-
They are stacked securely and can not tip over.
-
They do not prevent the spray arms from rotating while washing takes place.
Very small items should not be washed in the dishwasher as they could easily fall out of the baskets.
Removing the Dishes
To prevent water dripping from the upper basket into the lower basket, we recommend that you empty the lower basket first and then the upper basket.
1
Loading the Upper Basket
The upper basket is designed to hold more delicate and lighter dishware such as glasses, coffee and tea cup and saucers, as well as plates, small bowls and shallow pans (as long as they are not too dirty). Position the dishes and cookware so that they do not get moved by the spray of water.

| Upper basket | |
| Type Item | |
| A Cup | |
| B Glass | |
| C Saucer | |
| D Mug | |
| E Dessert bowl | |
| G Oven pot | |
| L Glass bowl | |
| P Serving spoon | |
Adjusting the Upper Basket
If required, the height of the upper basket can be adjusted in order to create more space for large utensils either in the upper basket or lower basket. The upper basket can be adjusted for height by putting wheels of different height into the rails. Long items, serving cutlery, salad servers or knives should be placed on the shelf so that they do not obstruct the rotation of the spray arms. The shelf can be folded back or removed when not be required for use.

1

2
2
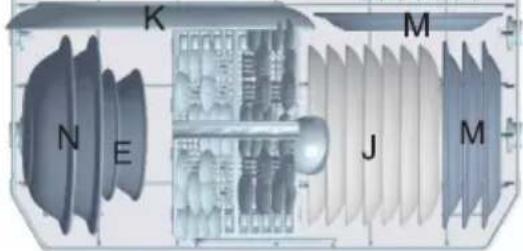
Loading the Lower Basket
We recommend that you place large items which are most difficult to clean in to the lower basket: pots, pans, lids, serving dishes and bowls, as shown in the figure below. It is preferable to place serving dishes and lids on the side of the baskets in order to avoid blocking the rotation of the top spray arm. Pots, serving bowls, etc. must always be placed top down. Deep pots should be slanted to allow water to flow out. The bottom basket features fold down tine rows so that larger or more pots and pans can be loaded.

| Lower basket | |
| Type Item | |
| E Dessert bowl | |
| H Soup plate | |
| I Dinner plate | |
| J Dessert plate | |
| K Oval plate | |
| F Small pot | |
| M Melamine dessert plate | |
| N Melamine bowl | |
3
*Upper and Lower basket Folding racks
Folding racks consisting of two parts that are located on the upper and lower basket of your machine are designed in order to let you place big items easier as pots, pans, etc. If requested, each part can be folded separately, or all of them can be folded and larger can be obtained. You can use folding racks by rasing then upwards, or by folding.

*for optional
4
Cutlery Basket
Cutlery should be placed in the cutlery basket with handles at the bottom: If the basket has side baskets, the spoon should be loaded individually into the appropriate slots, especially long utensils should be placed in the horizontal position at the front of the upper basket.


| Cutlery basket | |
| Type Item | |
| 1 Tea spoons | |
| 2 Dessert spoons | |
| 3 Soup spoons | |
| 4 Gravy ladle | |
| 5 Serving fork | |
| 6 Forks | |
| 7 Knives | |

For washing in the dishwasher the following cutlery/dishes

Are not suitable
Cutlery with wooden, horn china or mother-of-pearl handles
Plastic items that are not heat resistant
Older cutlery with glued parts that is not temperature resistant
Bonded cutlery items or dishes
Pewter or cooper items
Lead crystal glass
Steel items subject to rusting
Wooden platters
Items made from synthetic fibre
Do not let any item extend through bottom.

Are of limited suitability
Some types of glasses can become dull after a large number of washes
Silver and aluminium parts have a tendency to discolour during washing
Glazed patterns may fade if machine washed frequently

NOTE: Do not put in items that are dirty of cigarette ash, candle wax, lacquer or paint. If you buy new dishes please make sure that they are suitable for dishwashers.

NOTE: Please do not overload your dishwasher. There is only space for 9 standard dishes. Do not use dish that is not suitable for dishwashers. This is important for good results and for reasonable energy consumption.
5
Loading Cutlery and Dishes
Before loading the dishes, you should:
Remove large left-over
Soften remnants of burnt food in pans
When Loading the Dishes and Cutlery, Please Note:
Dishes and cutlery must not impede the rotation of the spray arms.
Load hollow items such as cups, glasses, pans etc. with the opening downwards so that water cannot collect in the container or a deep base.
Dishes and items of cutlery must not lie inside one another, or cover each other
To avoid damage to glasses, they must not touch
- Load large items which are most difficult to clean into the lower basket
The upper basket is designed to hold more delicate and lighter dishware such as glas ses, coffee and tea cups
Long bladed knives stored in an upright position are a potential hazard!
Long and/or sharp items of cutlery such as carving knives must be positioned horizontally in the upper basket.
6
Damage to Glassware and other Dishes
Possible causes:
■ Type of glass or manufacturing process. Chemical composition of detergent.
■ Water temperature and duration of dishwasher programme.
Suggested remedy:
Use glassware or porcelain dishes that have been marked dishwasher-proof by the manufacturer.
Use a mild detergent that is described as kind of dishes. If necessary, seek further information from detergent manufacturers.
■ Select a programme with a low temperature.
To prevent damage, take glass and cutlery out of the dishwasher as soon as possible after the programme has ended.
7
At the End of the Wash
When the working cycle has finished, the buzzer of dishwasher will ring for 6 times, then stop. Turn off the appliance using the ON/OFF button, shut off the water supply and open the door of the dishwasher. Wait a few minutes before unloading the dishwasher to avoid handling the dishes and utensils while they are still hot and more susceptible to breakage. They will also dry better.
8
Turning on the Appliance
Starting a wash cycle.
Draw out the lower and upper basket, load the dishes and
- push them back. It is recommended to load the lower basket first, then the upper one (see the section entitled „Loading the Dishwasher”). Pour in the detergent (see the section entitled „Salt, Detergent and Rinse Aid”).
- Insert the plug into the socket. The power supply is 220-240V AC 50 Hz, the specification of the socket is 12 A 250 VAC.50 Hz. Make sure that the water supply is turned on to full pressure. Close the door, press the "Power" button, Press the "Program" button to select a desired "Wash cycle". (See the section entitled "Wash Cycle Table"). With a little force to ensure the door is properly closed.
NOTE: A click could be heard when the door is closed perfectly. When the washing is over, you can shut off the switch by pressing "Power" button.

Switching on
- Open the tap, if it is closed.
- Close the door.
- Make sure the spray arms are not obstructed.
- Switch the dishwasher on using the "Start/Pause" button.
Select a program
Choose your program according to the type of load and how dirty it is.
The different programs and their uses are described in the programme chart later on in this booklet. Use the program button to select the expected program.
9
Change the Programme
Premise: A cycle that is underway can only be modified if it has only been running for a short time. Otherwise, the detergent may have already been released, and the appliance may have already drained the wash water. If this is the case, the detergent dispenser must be refilled (see the section entitled „Fill in the Detergent „).
1: Press the „Power” button to cancel the program.
2: Turn on it again and restart a new washing cycle (see the section entitled „Starting a wash cycle. . . , ) or press program button to change the programme.

NOTE: If you open the door when the washing cycle underway, the appliance will pause and emit warning signals, the digital display show „E1” and flash. When you close the door, the machine will keep on working after 10 seconds.
10
Forget to Add Dish
A forgotten dish can be added any time before the detergent cup opens.
1 Open the door a little to stop the washing.
2 After the spray arms stop working, you can open the door completely.
3 Add forgotten dishes.
4 Close the door, the dishwasher will work after ten seconds.

It is dangerous to open the door when washing, because the hot water may scald you.
Switch Off the Dishwasher
The digital display appears “---”, only in this case the program has ended.
-
Switch off the dishwasher by pressing the Power button.
-
Turn off the water tap!
Open the door carefully. Hot steam may escape when the door is opened!
Hot dishes are sensitive to knocks. The dishes should therefore be allowed to cool down around 15 minutes before removing from the appliance.
Open the dishwasher's door, leave it ajar and wait a few minutes before removing the dishes. In this way they will be cooler and the drying will be improved.
Unloading the dishwasher
It is normal that the dishwasher is wet inside.
Empty the lower basket first and then the upper one. This will avoid water dripping from the upper basket onto the dishes in the lower one.
MAINTENANCE AND CLEANING


Filtering System
The filter is used to avoid the big remnants and other sundries getting inside the pump. The residue can obstruct the filter in sometime.
The filter system consists of a coarse filter, a flat (Main filter) and a micro filter (fine filter).
1 Flat filter
Food and debris will be trapped by a special jet on the lower spray arm.
2 Coarse filter
Big debris, such as bone and glass that could clog the drain will be trapped in the coarse filter. To remove an item caught in this filter, gently squeeze the taps on the top of this filter and lift it out.
3 Micro filter
This filter holds soil and food residue in the sump area and prevents it from being redeposit on the dishes during a cycle.
- Inspect the filters for obstructions every time the dishwasher has been used.
- By unscrewing the coarse filter, you can remove the filter system. Remove any food remnants and clean the filters under running water.
Step 1 contrarotate the Coarse filter, and then lift it up;
Step 2 lift the Flat filter up
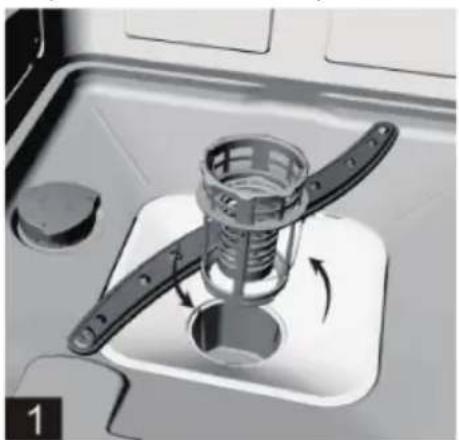
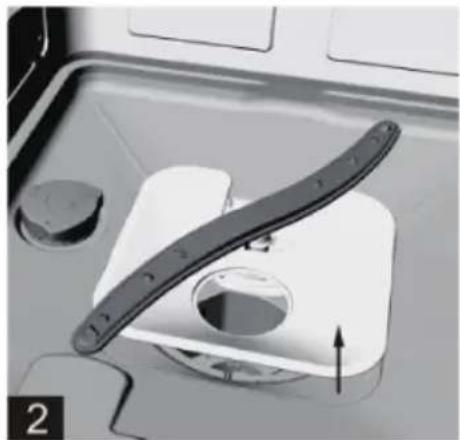

NOTE: If operate from step 1 to step 2, the filter system will be removed; while operate from step 2 to step 1, the filter system will be installed.
Filter assembly
For best performance and results, the filter assembly must be cleaned. The filter efficiently removes food particles from the wash water, allowing it to be recirculated during the cycle. For this reason, it is a good idea to remove the larger food particles trapped in the filter after each wash cycle by rinsing the semicircular filter and cup under running water. To remove the filter assembly, pull on the cup handle in the upward direction. The entire filter assembly should be cleaned once a week. To clean the coarse filter and the micro filter, use a cleaning brush. Then, reassemble the filter parts as shown in the figures above and reinsert the entire assembly in the dishwasher, positioning in its seat and pressing downward. The dishwasher must never be used without the filters. Improper replacement of the filter may reduce the performance level of the appliance and damage dishes and utensils.

Never run the dishwasher without the filters in place. When cleaning the filters, don't knock on them. Otherwise, the filters could be contorted and the performance of dishwasher could be debased.
2
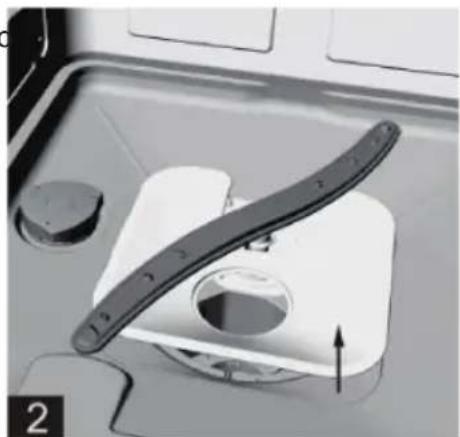
Cleaning the Spray Arms
It is necessary to clean the spray arms regularly for hard water chemicals will clog the spray arm jets and bearings. To remove the spray arms, screw off the nut clockwise to take out the washer on top of the spray arm and remove the arm. Wash the arms in soapy and warm water and use a soft brush to clean the jets. Replace them after rinsing thoroughly.

3
Caring for the Dishwasher
To clean the control panel, use a lightly dampened cloth then dry thoroughly. To clean the exterior, use a good appliance polish wax. Never use sharp objects, scouring pads or harsh cleaners on any part of the dishwasher.
4
Protect Against Freezing
If your dishwasher is left in an unheated place during the winter, ask a service technical to:
- Cut off electrical power to the dishwasher.
- Turn off the water supply and disconnect the water inlet pipe from the water valve.
3.Drain water from the inlet pipe and water valve. (Use a pan to catch the water) - Reconnect the water inlet pipe to the water valve.
- Remove the filter in the tub and the bottom and use a sponge to use up water in sump.
5
Cleaning the Door
To clean the edge around the door, you should use only a soft warm, damp rag. To prevent penetration of water into the door lock and electrical components, do not use a spray cleaner of any kind. Also, never use abrasive cleaners or scouring pads on the outer surfaces because they will scratch the finish. Some papers towels can also scratch or leave marks on the surface.

Never use a spray cleaner to clean the door panel for it could damage the door lock and electrical components. It is not allowed to use the abrasive agent or some paper towel because of the risk of scratching or leaving spots on the stainless steel surface.
How to Keep Your Dishwasher in Shape:
After Every Wash
After every wash, turn off the water supply to the appliance and leave the door slightly ajar so that moisture and odors are not trapped inside.
Remove the Plug
Before cleaning or performing maintenance, always remove the plug from the socket. Do not run risks.
No Solvents or Abrasive Cleaning
To clean the exterior and rubber parts of the dishwasher, do not use solvents or abrasive cleaning products. Use only a cloth and warm soapy water. To remove spots or stains from the surface of the interior, use a cloth dampened with water and a little white vinegar, or a cleaning product made specifically for dishwashers.
When You Go on holiday
When you go on holiday, it is recommended that you run a wash cycle with the dishwasher empty and then remove the plug from the socket, turn off the water supply and leave the door of the appliance slightly ajar. This will help the seals last longer and prevent odors from forming in the appliance.
■ Moving the Appliance
If the appliance must be moved, try to keep it in the vertical position. If absolutely necessary, it can be positioned on its back.
Seals
One of the factors that cause odors to form in the dishwasher is food that remains trapped in the seals. Periodic cleaning with a damp sponge will prevent this.
Attention:
The installation of the pipes and electrical equipments should be done by professionals.
Electrical Shock Hazard! Disconnect electrical power before installing dishwasher. Failure to do so can result in death or electrical shock.
ERROR CODES AND TROUBLESHOOTING
When some malfunctions happen, the appliance will display error codes to warn you.
| CODES MEANINGS POSSIBLE CAUSES | ||
| E1 Door open | The door is opened when the dishwasher is operating | |
| E2 Water inlet Water inlet malfunction | ||
| E4 Temperature sensor Temperature sensor malfunction | ||
| E5 Overflow/leakage | Overflow occurs/Water leakage occurs | |
| E7 Heating element Abnormal heating | ||

If overflow occurs, turn off the main water supply before calling a service. If there is water in the base pan because of an overfill or small leak, the water should be removed before restarting the dishwasher.
| Dishwasher doesn't run | Fuse blown, or the circuit breaker acted | Replace fuse or reset circuit breaker. Remove any other appliances sharing the same circuit with the dishwasher. |
| Power supply is not turned on M | Make sure the dishwasher is turned on and the door is closed securely. Make sure the power cord is properly plugged into the wall socket. | |
| Water pressure is low The system | em is designed to detect an overflow. When it does, it shuts off the circulation pump and turns on the drain pump. | |
| Drain pump doesn't stop | Overflow The system is designed | to detect an overflow. When it does, it shuts off the circulation pump and turns on the drain pump. |
| Noise Some audible sounds are normal | Sound from detergent cup opening. | |
| Utensils are not secure in the baskets or something small has dropped into the basket | ||
| Motor hums Dishwasher has not been used regularly. If you do not use it often, remember to set it to fill and pump out every week, which will help keep the seal moist. | ||
| Suds in the tub Improper detergent Use only the special dishwasher detergent to avoid suds. If this occurs, open the dishwasher and let suds evaporate. Add 1 gallon of cold water to the tub. Close and latch the dishwasher, then start the "pre-rinse" wash cycle to drain out the water... Repeat if necessary. | ||
| Stained tub interior | Detergent with colorant was used | Make sure that the detergent is the one without colorant. |
| Dishes and flatware not clean | Improper programImproper basket loading | Select a stronger programme.Make sure that the action of the detergent dispenser and spray arms are not blocked by large dishware. |
| Spots and filming on glasses and flatware | 1 Extremely hard water2 Low inlet temperature3 Overloading the dishwasher4 Improper loading5 Old or damp powder detergent6 Empty rinse agent dispenser7 Incorrect dosage of detergent | To remove spots from glassware:1 Take out all metal utensils out of the dishwasher.2 Do not add detergent.3 Choose the longest cycle.4 Start the dishwasher and allow it to run for about 18 to 22 minutes, then it will be in the main wash.5 Open the door to pour 2 cups of white vinegar into the bottom of the dishwasher.6 Close the door and let the dishwasher complete the cycle. If the vinegar does not work: Repeat as above, except use 1/4 cup (60 ml)of citric acid crystals instead of vinegar. |
| Cloudiness on glassware | Combination of soft water and too much detergent | Use less detergent if you have soft water and select a shortest cycle to wash the glassware and to get them clean. |
| Yellow or brown film on inside surfaces | Tea or coffee stains Using a solution of 1/2 cup of bleach and 3 cups of warm water to remove the stains by hand.WARNINGYou have to wait for 20 minutes after a cycle to let the heating elements cool down before cleaning interior; otherwise, burns will happen. | |
| Iron deposits in water can cause an overall film | You have to call a water softener company for a special filter. | |
| White film on inside surface | Hard water minerals To clean the interior, use a damp sponge with dishwasher detergent and wear rubber gloves. Never use any other cleaner than dishwasher detergent for the risk of foaming or suds. | |
| The Detergent dispenser lid cannot be closed prop -erly | Clogged detergent re -sidue is blocking the catch | Clean the detergent from the catch. |
| Detergent left in dispenser cups | Dishes block detergent Cups | Re-loading the dishes properly. |
| Steam Normal phenomenon There is some steam coming through the vent by the door latch during drying and water draining. | ||
| Black or gray marks on dishes | Aluminum utensils have rubbed against dishes | Use a mild abrasive cleaner to eliminate those marks. |
| Water standing on the bottom of the tub | This is normal A small amount of clean water around the outlet on the tub bottom keeps the water seal lubricated. | |
| Dishwasher leaks | Overfill dispenser or rinse aid spills | Be careful not to overfill the rinse aid dispenser.Spilled rinse aid could cause oversuding and lead to overflowing. Wipe away any spills with a damp cloth. |
| Dishwasher isn't level Make sure the dishwasher is level. | ||
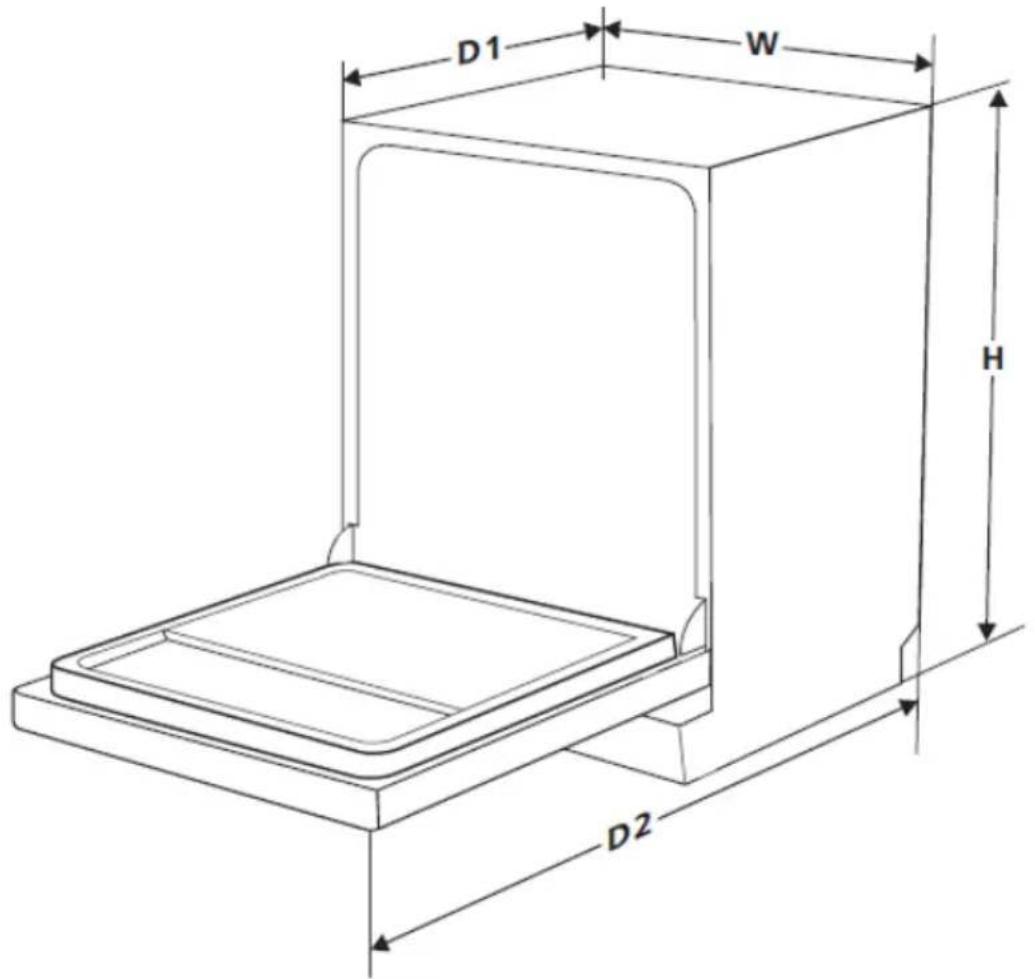
| Height [mm] [H] 845 mm | |
| Width [mm] [W] 600 mm | |
| Depth [mm] [D1] 600 mm (with the door closed) | |
| Depth [mm] [D2] 1150 mm (with the door opened 90°) | |
For more information about the product, please refer to the EU EPREL Product Database at https://eprel.ec.europa.eu. For more information, please use your mobile device to scan the QR code on the energy label or enter the product model listed on the energy label in the EPREL search engine https://eprel.ec.europa.eu/
WARRANTY AND AFTER SALES SERVICE
Warranty
Warranty service as stated on the warranty card. The manufacturer shall not be held liable for any damage caused by improper use of the product.
Service
- The manufacturer recommends that all repairs and adjustments be carried out by the Factory Service Technician or the Manufacturer's Authorized Service Point. For safety reasons, repairs should be referred to professionals.
- Repairs carried out by unqualified persons may seriously endanger the appliance user.
- Pursuant to Commission Regulation (EU) 2019/2022, the minimum availability period for spare parts necessary to repair the appliance is 7 or 10 years depending on the type and purpose of the spare part.
- The list of spare parts and the ordering procedure are available on the websites of the manufacturer, importer or an authorized representative.
- The minimum warranty period for the appliance offered by 'the manufacturer, importer or authorized representative is given in the warranty card.
- The warranty shall be void if you make any independent adaptations or alterations, tamper with seals or other appliance safety devices or its parts or interfere with the appliance contrary to operating instructions.
In the event of appliance malfunction, request assistance or repair.
If your appliance needs repair, please contact the service centre. Please see warranty card for address and contact details of our service centre. Before contacting us, please have ready the appliance serial number, which can be found on the identification sticker: For your convenience, please write it down below:
FAGOR
ELECTRODOMÉSTICO

- ECOLOGÍA EN PRÁCTICA
- CONOCE SU APARATO
- NOTA
- SISTEMA DE FILTRADO
- CUIDADO DEL LAVAVAJILLAS
- RECURSOS E COMPONENTES
- FUNÇÃO DETERGENTE
- CESTO DE TALHERES
- UNPACKING
- DISPOSAL OF OLD APPLIANCE
- BASIC INFORMATION
- MANUFACTURER'S DECLARATION
- SAFETY INSTRUCTIONS FOR USE
- INSTALL THE APPLIANCE
- PLACE YOUR APPLIANCE
- WATER SUPPLY CONNECTION
- WATER SUPPLY HOSE
- THE DRAIN HOSE
- ELECTRICAL CONNECTION
- FEATURES AND COMPONENTS
- DESCRIPTION OF THE APPLIANCE
- NOTE
- PREPARE THE APPLIANCE FOR OPERATION
- SET THE WATER SOFTENER
- SETTING
- TO CHANGE THE SETTING
- ADD SPECIAL SALT
- WATER SOFTENER
- ATTENTION
- FILL THE RINSE AID DISPENSER
- RINSE AID DISPENSER
- ADJUSTING RINSE AID DISPENSER
- FUNCTION OF DETERGENT
- CONCENTRATED DETERGENT
- DETERGENT TABLETS
- DETERGENT DISPENSER
- AMOUNT OF DETERGENT TO USE
- WARNING
- FILL IN THE DETERGENT
- DETERGENTS
- LOAD DISHES INTO DISHWASHER
- ATTENTION BEFORE OR AFTER LOADING THE DISHWASHER BASKETS
- REMOVING THE DISHES
- LOADING THE UPPER BASKET
- ADJUSTING THE UPPER BASKET
- LOADING THE LOWER BASKET
- UPPER AND LOWER BASKET FOLDING RACKS
- CUTLERY BASKET
- ARE NOT SUITABLE
- ARE OF LIMITED SUITABILITY
- LOADING CUTLERY AND DISHES
- WHEN LOADING THE DISHES AND CUTLERY, PLEASE NOTE
- DAMAGE TO GLASSWARE AND OTHER DISHES
- POSSIBLE CAUSES
- SUGGESTED REMEDY
- AT THE END OF THE WASH
- TURNING ON THE APPLIANCE
- SWITCHING ON
- SELECT A PROGRAM
- CHANGE THE PROGRAMME
- FORGET TO ADD DISH
- UNLOADING THE DISHWASHER
- MAINTENANCE AND CLEANING
- FILTERING SYSTEM
- FLAT FILTER
- COARSE FILTER
- MICRO FILTER
- FILTER ASSEMBLY
- CLEANING THE SPRAY ARMS
- CARING FOR THE DISHWASHER
- PROTECT AGAINST FREEZING
- CLEANING THE DOOR
- HOW TO KEEP YOUR DISHWASHER IN SHAPE
- AFTER EVERY WASH
- REMOVE THE PLUG
- NO SOLVENTS OR ABRASIVE CLEANING
- WHEN YOU GO ON HOLIDAY
- MOVING THE APPLIANCE
- SEALS
- ERROR CODES AND TROUBLESHOOTING
- WARRANTY AND AFTER SALES SERVICE
- WARRANTY
- SERVICE
- IN THE EVENT OF APPLIANCE MALFUNCTION, REQUEST ASSISTANCE OR REPAIR
Brand : FAGOR
Model : 3LVF-625
Category : Dishwasher