
3MI-21BC - Cooker FAGOR - Free user manual and instructions
Find the device manual for free 3MI-21BC FAGOR in PDF.


| Product Type | Freestanding Cooker |
| Brand | FAGOR |
| Model | 3MI-21BC |
| Energy Type | Gas (Natural / LPG) |
| Number of Gas Burners | 3 |
| Oven Type | Conventional |
| Oven Capacity | 65 L |
| Total Power Input | 7.2 kW |
| Height | 85 cm |
| Width | 50 cm |
| Depth | 60 cm |
| Weight | 45 kg |
| Ignition | Automatic electronic ignition |
| Safety Features | Flame failure device on all burners |
| Oven Cleaning | Easy-clean enamel interior |
| Control Knobs | Front-side ergonomic controls |
| Oven Door | Double-glazed, removable for cleaning |
| Adjustable Feet | Yes, for leveling |
| Spare Parts Availability | Genuine FAGOR spare parts available |
| Warranty | 2 years manufacturer warranty |
Frequently Asked Questions - 3MI-21BC FAGOR
User questions about 3MI-21BC FAGOR
0 question about this device. Answer the ones you know or ask your own.
Ask a new question about this device
Download the instructions for your Cooker in PDF format for free! Find your manual 3MI-21BC - FAGOR and take your electronic device back in hand. On this page are published all the documents necessary for the use of your device. 3MI-21BC by FAGOR.
USER MANUAL 3MI-21BC FAGOR
EN - Table of contents
NOTES ON SAFETY 33
TIPS ON SAVING ELECTRICITY 36
UNPACKING 37
DISPOSAL OF OLD APPLIANCE 37
BASIC INFORMATION ABOUT YOUR APPLIANCE 38
OPERATE YOUR INDUCTION HOB 38
COOKWARE CHARACTERISTICS 38
PAN DETECTOR 39
BEFORE USING THE APPLIANCE FOR THE FIRST TIME 40
YOUR APPLIANCE 41
CONTROL PANEL 41
OPERATION 42
CONTROL PANEL 42
TURN ON THE APPLIANCE 42
ACTIVATE COOKING ZONE AND SET THE HEAT SETTING. 42
DEACTIVATE COOKING ZONES 42
TURN OFF THE APPLIANCE 43
BOOSTER FUNCTION 43
RESIDUAL HEAT INDICATOR 43
CONNECT APPLIANCE TO ELECTRICAL MAINS 50
CLEANING AND CARE 51
CLEANING AFTER EACH USE 51
REMOVE DIRT 51
TROUBLESHOOTING 52
ERROR CODES 53
SPECIFICATION 54
WARRANTY AND AFTER-SALES SERVICE 54
WARRANTY 54
PT- Índice
INSTRUÇÕES DE SEGURANÇA 56
COMO POUPAR ENERGIA 59
DESEMPACOTAMENTO 60


Panel de control


From now on, your daily housework will be easier than ever before. Your appliance is exceptionally easy to use and extremely efficient. After reading these Operating Instructions, operating the appliance will be easy.
Before being packaged and leaving the manufacturer, the appliance was thoroughly checked with regard to safety and functionality.
Before using the appliance, please carefully read these Operating Instructions. By following these instructions carefully you will be able to avoid any problems in using the appliance. It is important to keep these Operating Instructions and store them in a safe place so that they can be consulted at any time.
Follow these instructions carefully in order to avoid possible accidents.
Sincerely,
FAGOR
ELECTRODOMÉSTICO

NOTES ON SAFETY
- Before using the induction hob for the first time, carefully read its Operating Instructions. This will ensure user safety and prevent damage to the appliance.
- The appliance is intended for household use only. Any other use (e.g. heating) is incompatible with the appliance's intended purpose and can pose a risk to the user.
- The manufacturer reserves the right to introduce changes which do not affect the operation of the appliance.
- The appliance and its accessible parts become hot during use. Care should be taken to avoid touching heating elements. Children less than 8 years of age shall be kept away unless continuously supervised.
- This appliance can be used by children aged from 8 years and above and persons with reduced physical, sensory or mental capabilities or lack of experience and knowledge if they have been given supervision or instruction concerning use of the appliance in a safe way and understand the hazards involved. Children shall not play with the appliance. Cleaning and user maintenance shall not be performed by children without supervision.
- Unattended cooking on a hob with fat or oil can be dangerous and may result in fire.
- NEVER attempt to extinguish fire with water. Unplug the appliance and cover flame with lid or non-combustible blanket.
- Risk of fire: do not store anything on the cooking surface.
- Note. If the cooking surface is cracked, turn off the power to avoid the risk of electric shock.
- Metallic objects such as knives, forks, spoons and lids should not be placed on the hob surface since they can get hot.
-
After use, turn off the hob element with its control sensor or button and do not rely solely on the pan detector.
-
The appliance is not intended to be operated by means of an external timer or separate remote-control system.
- Do not use steam cleaning equipment to clean the hob.
- Note. Do not use unsuitable hob guards that prevent children from accessing the induction hob. Use of unsuitable hob guards can cause accidents.
- If the induction hob is operated in immediate vicinity to the radio, television set or other radio-frequency-emitting device, make sure that the hob's touch sensor controls operate correctly.
- The hob must be connected by an electrician or an authorised installer. This requirement does not apply to hobs with a factory-installed single-phase electrical wall plug.
- Furniture, where the hob is installed must be resistant to temperatures up to 100°C. This applies to veneers, edges, surfaces made of plastics, adhesives and paints.
- The hob should only be used after it has been built in, in accordance with this operating instructions.
- Repairs to electrical appliances may only be conducted by specialists. Improper repairs can be dangerous to the user.
- The appliance is not connected to mains when it is unplugged or the main circuit breaker is switched off.
- The power cord wall plug must be accessible after induction hob has been installed for easy disconnection.
• Children shall not play with the appliance. - Persons with implanted devices, which support vital functions (eg, pacemaker, insulin pump, or hearing aids) must ensure that these devices are not affected by the induction hob (the frequency of the induction hob is 20-50 kHz).
- Once power is disconnected all settings and indications are erased. When electric power is restored caution is advisable. As long as the heating zones are hot, the display will show the “H” residual heat indicator.
- If the mains socket is near the cooking zone, make sure
the cord does not touch any hot areas.
- Do not use plastic containers and aluminium foil. They melt at high temperature and may damage the cooking surface.
- Make sure that food (especially sugar, citric acid, salt) and plastic utensil do not get in contact with hot cooking zones.
- When cooking on induction hob only use pots and pans with a flat base having no sharp edges or burrs as these can permanently scratch the cooking surface.
- The induction hob's cooking surface is durable and resistant to thermal shock. It can withstand cold or hot temperature.
- Avoid dropping objects on the cooking surface. In some circumstances, point impacts such as dropping a bottle of spices, may lead to cracks and chipping of the cooking surface.
- If any damage to ceramic surface occurs, seething food can get into the live parts of the induction hob through damaged areas.
- Do not use the cooking surface as a cutting board or work table.
- Do not install the hob over a heater lacking a fan, a dishwasher, a refrigerator, a freezer or a washing machine.
- If there is a drawer or cabinet with kitchen utensils under the induction hob, they may become warm from the air expelled by the hob's cooling fan.
- Please follow the instructions for care and cleaning of ceramic surface.
- In the event of misuse or mishandling warranty may be void.
TIPS ON SAVING ELECTRICITY

Using energy in a responsible way not only saves money but also helps the environment. So let's save energy! And this is how you can do it:
- Use cookware with a base that matches the size of the cooking zone.
-
Cover your pans when possible to reduce energy consumption.
-
Always keep the cooking zones and cookware bases clean.
- Soiled surface can prevent heat transfer – and repeatedly burnt-on spillages can often only be removed by products which cause damage to the environment.
- When cooking on induction hob only use pots and pans with a flat base having no sharp edges or burrs as these can permanently scratch the cooking surface.
- Do not install the hob in the immediate vicinity of refrigerator / freezer.
UNPACKING

During transportation, protective packaging was used to protect the appliance against any damage. After unpacking, dispose of all packaging materials responsibly to minimise environmental impact.
All materials used for packaging the appliance are 100% recyclable and are marked
with the appropriate symbol.
Note! Packaging materials, including bags, polyethylene, and polystyrene, present a choking hazard and should be kept away from children at all times during and following unpacking.
DISPOSAL OF OLD APPLIANCE

In accordance with European Directive 2012/19/EU this appliance is marked with the crossed-out waste bin symbol. This symbol indicates that the appliance must not be disposed of with household waste after use.
The user is obligated to dispose of this appliance at an authorised collection point for waste electrical and electronic equipment. Local collection points, shops, and local authority departments together provide a recycling scheme.
Properly disposing of old electrical and electronic equipment prevents environmental and health risks caused by hazardous components and improper handling.
BASIC INFORMATION ABOUT YOUR APPLIANCE
Operate your induction hob
Under the surface glass, there are induction coils that produce pulsing magnetic field. This electromagnetic field penetrates a pot placed on the hob surface causing the pot to heat up. It is important to use cookware with a suitable base.

Depending on the cookware used and heat setting during cooking, the appliance produces a distinctive whiz. This is normal and does not constitute grounds for a complaint.
Cookware characteristics
- To check that the cookware is suitable for your induction hob, make sure that a magnet strongly attracts its base. The greater the attraction force, the better the cookware.
- Always use high-quality cookware with a perfectly flat base. The use of this kind of cookware prevents hot spots that may result in food sticking to the pot. Pots and pans with thick steel walls provide superior heat distribution. The concave base or deep embossed logo of the manufacturer interfere with the temperature induction control module and can cause overheating of the pot or pan.
- Do not use damaged cookware such as cookware with deformed base due to excessive heat.
- When you use large ferromagnetic base cookware (where the magnet is attracted), whose diameter is less than the total diameter of the cookware, only the ferromagnetic base heats up. This results in a situation where it is not possi-

ble to uniformly distribute the heat in the cookware. If the ferromagnetic area is reduced due to inclusion of aluminium parts then the effective heated area can be reduced. Problems with the detection of the cookware could arise or cookware may not be detected at all. To achieve optimum cooking results, the diameter of the ferromagnetic base should match that of the cooking zone. If cookware is not detected in a given cooking zone, it is advisable to try it in a smaller cooking zone.
Pan detector
Induction hobs feature a pan detector. The hob will detect the presence of a suitable pan placed on a cooking zone and automatically activate it. This helps save electricity.
- If a suitable cookware is placed on the cooking zone, the set power level is shown on the corresponding display.
- The induction hob requires the use of suitable cookware with ferromagnetic base (see Table on page 40).
If cookware is not placed on a cooking zone or the cookware is unsuitable, the symbol shown beside is displayed. The cooking zone does not operate.
If cookware is not detected within 90 seconds, the cooking zone will be switched off.
Use the control panel to turn off a cooking zone and do not rely just on removing the cookware from the hob.


The high-quality cookware is essential for efficient induction cooking. Using empty cookware on the cooking zones may cause them to overheat.

It is not recommended to use external induction adapters.
- For induction cooking use only ferromagnetic base materials such as:
- enamelled steel
- cast iron
-
special stainless steel cookware designed for induction cooking.
-
Lid prevents heat from escaping and thus reduces heating time and lowers energy consumption.
- Make sure that cookware base is dry. When filling cookware or when using cookware taken out of the refrigerator make sure its base is completely dry before placing it on the cooking zone. This is to avoid soiling the surface of the induction hob.

| Kitchen cookware marking | Check for marking indicating that the cookware is suitable for induction cooking. |
| Stainless Steel | Cookware made of this material will not be detectedWith the exception of the ferromagnetic steel cook-ware |
| Aluminum Cookware made of this material will not be detected | |
| Cast iron | High efficiencyNote: cookware can scratch the hob surface |
| Enamelled steel | High efficiencyCookware with a flat, thick and smooth base is recommended |
| Glass Cookware made of this material will not be detected | |
| Porcelain Cookware made of this material will not be detected | |
| Cookware with copper base | Cookware made of this material will not be detected |
The smallest useful diameter of cookware for a cooking zone:
| Cooking zone diameter [mm] | Minimum diameter of the cookware base [mm] |
| 160 120 | |
| 210 180 |
The minimum diameter of cookware made of materials other than enamelled steel may vary.
Before using the appliance for the first time
- Thoroughly clean the induction hob. The induction hob has a glass surface, therefore handle it with care.
- Odours may be released when you first start your appliance. If this happens, turn on exhaust hood or open the window in the room. Emission of odour is temporary.
YOUR APPLIANCE

Control Panel
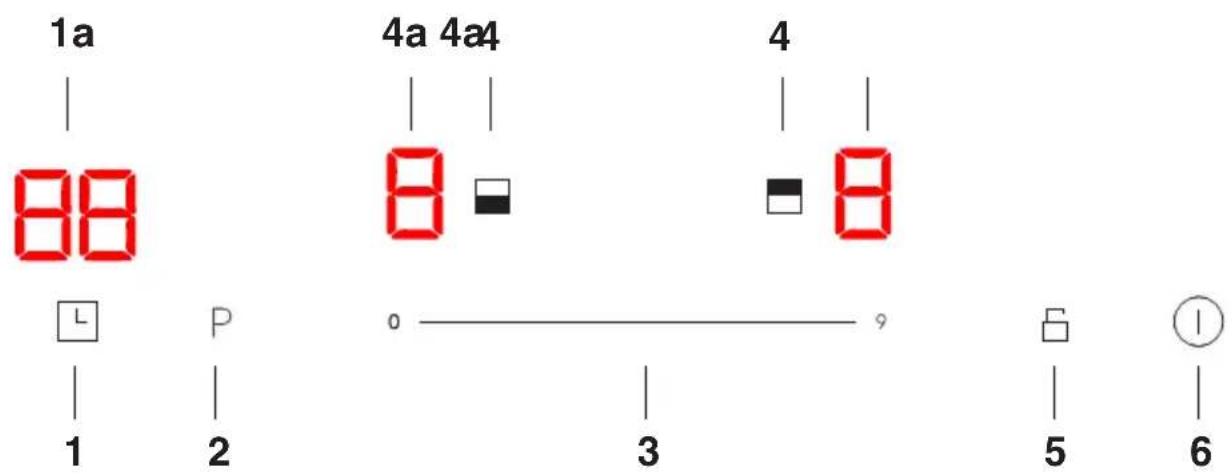
1 - Timer sensor
1a - Timer display
2 - Booster control touch sensor
3 - Power / time selection sensor - slider
4 - Cooking zone selection sensor
4a - Cooking zone indicator
5 - Child Lock touch sensor
6 - On/Off
OPERATION
Control Panel
- Upon connection to the mains, the induction hob will beep, and all indicators will briefly illuminate for one second before turning off, signalling standby mode.
- The induction hob is equipped with electronic touch control sensors, which are operated by touching with a finger for at least 1 second.
- Each time you touch the sensor, you will hear a beep. It is not possible to turn off the acoustic beeps.

Do not place any objects on the sensors of the control panel. Make sure that cookware is not placed beyond the outline of the cooking zone. If you place cookware too close to the control panel or you cover any sensors, the induction hob will automatically turn off for safety.
Turn on the appliance
Touch and hold the on/off \$ensor for at least 3 seconds. All indicators will show “-” and the induction hob will be in standby mode.
Activate cooking zone and set the heat setting.
- Turn on the induction hob with the sensor.
- Place the cookware on the selected cooking zone, then touch the corresponding sensor.
- The cookware will be automatically detected and the relevant display will show flashing "0." This means that the selected cooking zone is active and you can set the power.
- Use the slider sensor to select your preferred heat setting. Adjust the power by sliding your finger across the sensor and the selected heat setting appears on the relevant cooking zone indicator.
• The cooking zone operates.

If you do not set the desired heat setting of the cooking zone within 1 minute of activating the appliance, it will turn off automatically.
Deactivate cooking zones
Deactivate cooking zone by doing one of the following:
- Turn off the induction hob with the sensor.
- Touch the sensor of the active cooking zone and then, by moving your finger on the slider sensor, set the heat setting to "0." The indicator of the selected cooking zone should show "0."
Turn off the appliance

The induction hob operates when at least one cooking zone is on.
- Touch and hold the sensor to turn off the appliance.

If a cooking zone is still hot, the relevant display will show the letter "H" or "h" to indicate residual heat. For description of the symbol, see below.
Booster function
The Booster function temporarily increases the power of the cooking zone. The power level can be set from 1 to P, where P is the highest possible power level.
Enable the Booster function:
- Place the cookware on a cooking zone that has the Booster function.
- Touch the sensor of the desired cooking zone to activate it.
- Touch the "P" sensor to activate the Booster function. The letter "P" will appear on the cooking zone indicator.
Disable the Booster function:
- Touch the sensor of the cooking zone with the Booster function activated.
- Press the Booster function sensor "P" or change the heat setting using the slider sensor.
- The function has been disabled.

The Booster function is limited to 5 minutes of continuous operation, at which point the heat setting automatically drops to 9.
Child lock
The Child Lock function disables all induction hob controls for cleaning or to prevent children from using the appliance. When the Child Lock function is enabled, all controls are disabled except the sensor. To activate the Child lock, press sensor; to deactivate it, press and hold it. When the Child Lock function is activated, the timer indicator will display “Lo.”

When the induction hob is turned on and locked, you can turn it off immediately by touching the Isensor.
Residual heat indicator
When you have finished cooking, the cooking zones' glass is still hot and this is known as residual heat.
If the glass surface is hot, the "H" is shown on the cooking zone display.


When the residual heat indicator is on, do not touch the cooking zone! There's a serious risk of burns. Also, avoid placing any heat-sensitive items on it until the residual heat indicator turns off.
Limit the operating time
The cooking zone will turn off automatically after a certain period of time, which depends on the heat setting set. This is a safety feature that cannot be disabled.
The maximum operating time is determined individually depending on the heat setting when cooking. If you only use one heat setting for an extended period of time, the maximum cooking time is given in the table:
After reaching the maximum cooking time, the induction zone deactivates automatically, and the display shows residual heat symbol. The maximum working time applies to a single cooking zone.
| Cooking heat setting | Maximum operating time |
| 1 | 8h |
| 2 | 8h |
| 3 | 8h |
| 4 | 4h |
| 5 | 4h |
| 6 | 4h |
| 7 | 2h |
| 8 | 2h |
| 9 | 2h |
Automatic safety feature
A temperature sensor installed in the induction hob measures its surface temperature. If the temperature is too high, the hob will turn off automatically.
Once the hob surface cools down, you can use the induction hob again.
Cooking Duration Timer
Timer function makes cooking easier by making it possible to set Duration.
You can activate the Timer function only when cooking (when heat setting is greater than "0"). The Timer function can be used for several cooking zones simultaneously.
To set the timer:
- To set the timer, touch the sensor for your desired cooking zone.
- Touch the timer sensor and the display will show "00" and the right digit will flash.
- Use the slider sensor to set the value of the flashing digit.
- Touch the timer sensor again and the left digit will flash.
- Use the slider sensor to set the value of the flashing digit.
- Once the time is set, the countdown will begin immediately. The display will show the remaining time.

Once timer is activated, a red dot will appear in the lower right corner of the cooking zone heat setting indicator.
- When the set cooking time elapses, the cooking zone will automatically turn off, a short beeping will sound, and the timer indicator will show “ - - ”. Other cooking zones will continue to operate if they are already on.
- To set the Timer for the next cooking zone, follow the above steps by selecting a different cooking zone. The Timer function can be set for each cooking zone.
- You can adjust the programmed time at any point by touching the L timer sensor, then using the slider sensor to set the new time.

If multiple zones have a timer set, the display shows only the shortest time and the dot next to that cooking zone's indicator will flash. After the set time has elapsed, the corresponding cooking zone will turn off and the new shortest remaining time of the timer will be displayed and the dot of the corresponding cooking zone will flash.

Touch any cooking zone sensor and the corresponding time will be displayed on the timer indicator.
To deactivate the Timer immediately:
- To deactivate the timer, touch the sensor for your desired cooking zone.
- Touch the timer sensor – the indicator will start flashing.
- To turn off the timer use the slider to set the time to "00."
Minute Minder
Use Minute Minder to count down time. The Minute Minder does not affect the operation of cooking zones.
To set minute minder:
- Make sure that the induction hob is turned on and the cooking zone sensor is not active (the “-” zone indicator is not flashing).

You can set the timer before or after you have finished setting the cooking zone heat setting.
- Touch the timer sensor and the display will show "00" and the right digit will flash.
- Use the slider sensor to set the value of the flashing digit.
- Touch the timer sensor again and the left digit will flash.
- Use the slider sensor to set the value of the flashing digit.
- Once the time is set, the countdown will begin immediately. The display will show the remaining time.
- When the set time elapses, a 30-second beeping will sound, and the timer indicator will show “ - - ”.
- You can adjust the programmed Minute Minder time at any point by touching the timer sensor, then using the slider sensor to set the new time.
INSTALLATION INSTRUCTIONS
Make the worktop recess
- The worktop must be flat and level. Edge of the worktop near the wall must be sealed to prevent ingress of water or other liquids.
• Worktop must be made of materials, including veneer and adhesives, resistant to a temperature of 100° C. Otherwise, veneer could come off or surface of the worktop become deformed. - Edge of the opening should be sealed with suitable materials to prevent ingress of water.
- Worktop opening must be cut to dimensions as shown on figure below (measurement unit [mm]):

Install the induction hob flush with the worktop
• Worktop opening must be cut to dimensions as shown on figure below.
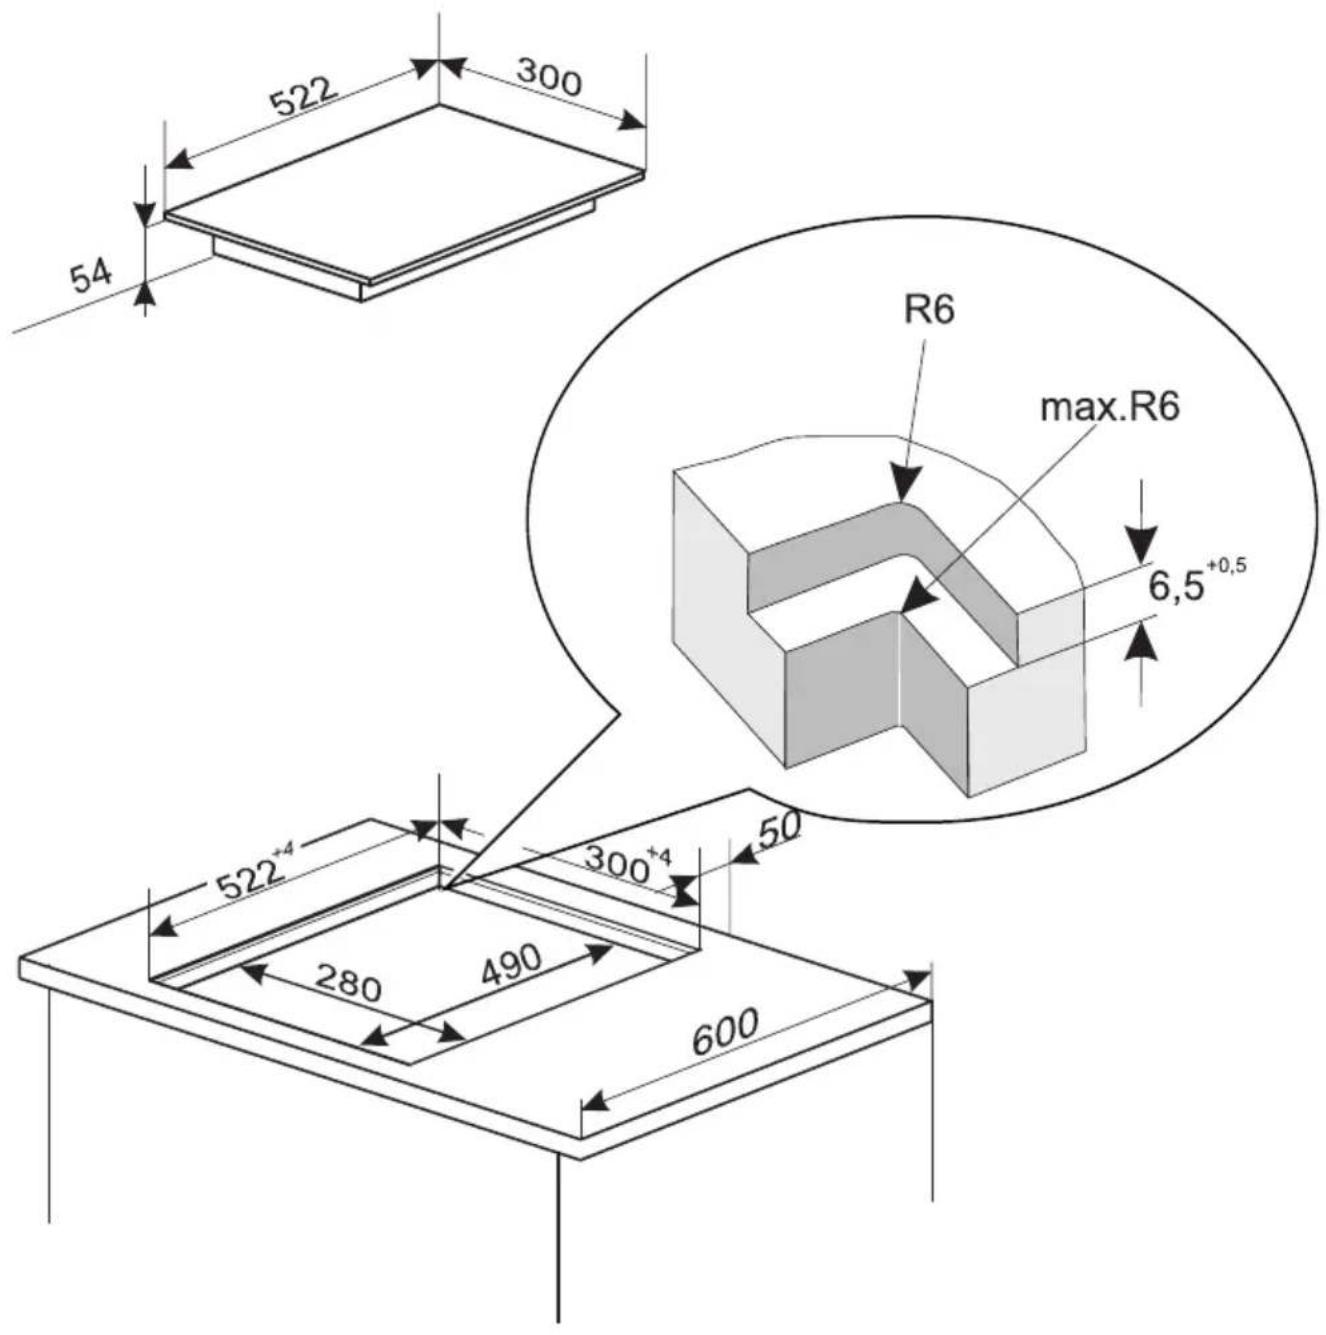

Note! The manufacturer is not liable for damage caused by incorrect hob installation, especially damage resulting from permanently gluing the hob to the worktop from below.
Tips for the installer
- It is best to install the hob flush with the kitchen worktop made of stone or ceramic tiles.
- The seal on the induction hob's underside edge prevents silicone from getting under the rim. If you need to lift the hob out of the opening, you must first cut the silicone seal around the rim using a sharp knife. If silicone is gets past the seal and under the hob's glass, it will be impossible to cut out, and any attempt to remove the hob may crack the ceramic glass.
- The silicone used to seal the edges must be resistant to temperature of at least 160°C .
- To prevent moisture penetration, seal the exposed worktop edges using a suitable coating, such as a silicone-based varnish.
- Some silicones may cause discolouration of natural stone.
- The dimensions provided in the assembly drawing must be strictly followed.
- If your induction hob fails, please ensure it is safely removed from the worktop before the service technician arrives for the repair.
Option 1 Option 2
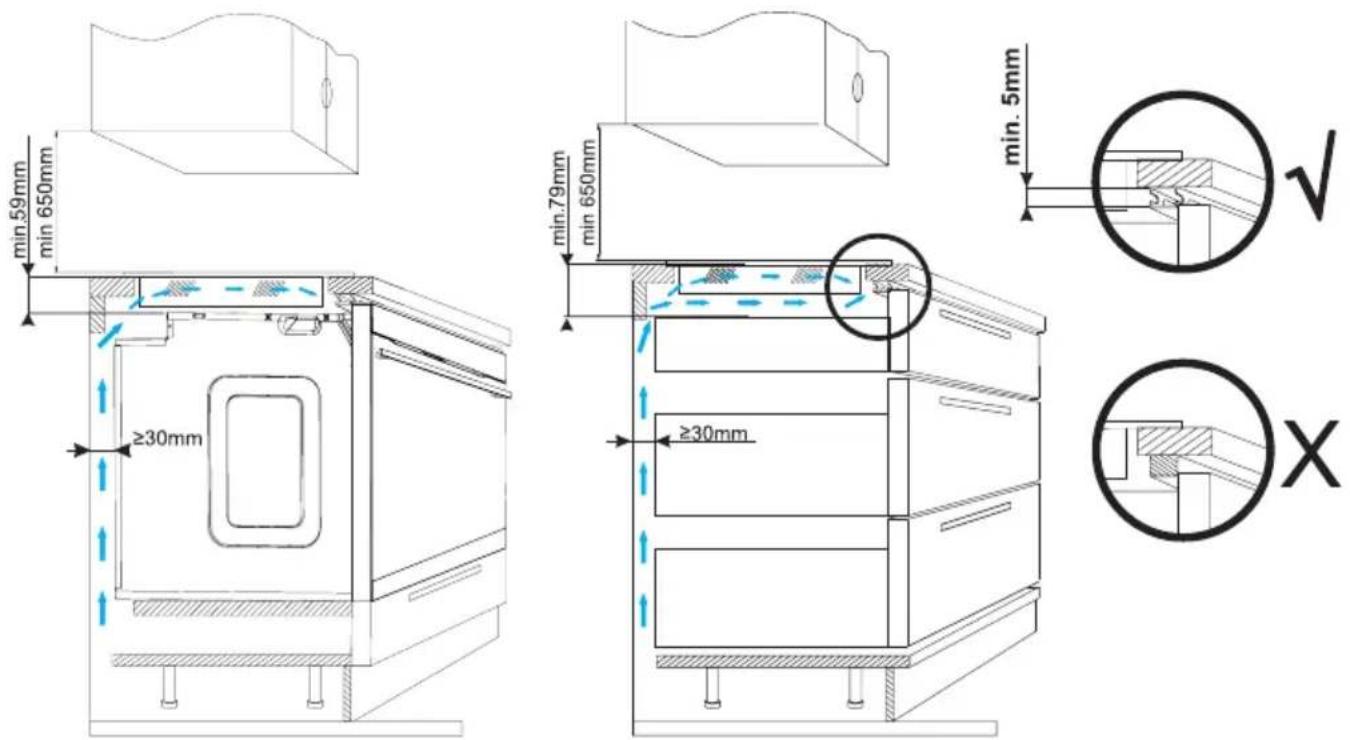

Do not install the hob above the oven without ventilation
Install the gasket
Depending on the model, the gasket is installed by the manufacturer (Fig. 1) If the gasket has not been installed by the manufacturer, proceed as follows: Before installing the appliance in the worktop opening, apply the gasket provided underneath the appliance rim (Fig. 2). To do this, first remove the protective film from the gasket and then apply it as close as possible to the edge of the appliance rim (Fig. 3, 4).


Do not install the appliance without the seal.
Place the hob symmetrically in the opening in such a way that the gaps between the hob and the edge of the worktop are equal on all sides (fig. 5).

Install the hob in the opening
- Remove dust from the worktop, insert hob into the opening and press in firmly.

1 - worktop
2 - hob flange gasket
3 - ceramic glass
Connect appliance to electrical mains

The induction hob has a permanently attached power cord with protective earth contact, and can only be connected to a 220-240 V \~ 50/60 Hz outlet with protective earthing pin. Wall power outlet circuit should be protected with a 16 A fuse.
CLEANING AND CARE
Proper routine maintenance and cleaning of the appliance can significantly extend its trouble-free operation.

When cleaning ceramic surface, the same principles apply as for glass surfaces. Do not use under any circumstances any abrasive or caustic cleaners or scouring powders or pads! Do not use steam cleaning appliances.
Cleaning after each use
- Unburned, light food residues
Wipe off with a damp cloth without a detergent. The use of dishwashing liquid may cause a bluish surface discolouration. These persistent stains cannot always be removed right away, even using a special cleaner.
• Dry sticking food residues
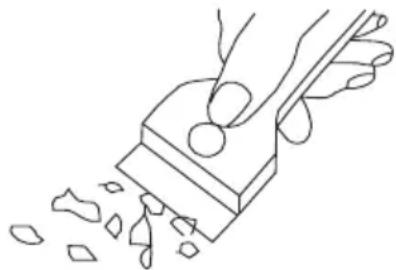
Remove with a sharp scraper. Then wipe the ceramic glass with a damp cloth.
Remove dirt
- Bright stains of pearl colour (residual aluminium) can be removed from the cool hob using a special detergent. Limestone residue (e.g. after evaporated water) can be removed by vinegar or a special detergent.
- Special cleaners are available in supermarkets, electrical and home appliance shops, drug stores, as well as retail food shops and kitchen showrooms. Scrapers can be purchased in DIY and construction equipment stores, as well as in shops carrying painting accessories.
- Never apply a detergent on the hot cooking zone.
- After applying the cleaner let it dry and then wipe it wet. Any traces of the detergent should be wiped off clean with a damp cloth before re-heating. Otherwise, these may be corrosive and permanently damage the surface of the hob.

Improper handling of the ceramic glass is not covered by the warranty.

Scratches and surface discolouration do not affect proper operation of the induction hob.
TROUBLESHOOTING
In the event of any fault:
- If possible, turn off the hob with the on/off a sensor
- Disconnect the power supply by switching off the fuse or unplugging the appliance from the electrical outlet
- Call a Service Centre to have the appliance repaired
- By following the instructions given in the table below, you can correct some minor issues. Please check all points in the table before you refer the repair to customer service.
| PROBLEM POSSIBLE CAUSE REMEDY | ||
| The appliance does not turn on | No power | Check the fuse, replace if blown. |
| Sensors do not respond to touch | The appliance is not turned on. | Turn on the appliance. |
| You touch the sensor too briefly, less than one second | Touch and hold the sensor | |
| Multiple sensors touched at the same time | Always touch only one sensor, except when the cooking zone is turned off. | |
| The appliance does not respond and emits an extended beep | Incorrect use, ie touching the wrong sensor or touching it too briefly | Reconnect the hob |
| The sensors are covered or dirty. | Remove items from the sensors or clean the sensors | |
| The appliance turns off automatically | No sensors were touched for 10 seconds after the appliance was activated. | Turn on the appliance and immediately set the heat setting |
| The sensors are covered or dirty. | Remove items from the sensors or clean the sensors | |
| The individual cooking zone turns off and the residual heat indicator “H” is displayed. | The appliance automatically shuts off after the set cooking time has elapsed. | Turn on the cooking zone again |
| The sensors are covered or dirty. | Remove items from the sensors or clean the sensors | |
| Electronic components are overheated | ||
| The residual heat indicator has gone out even though the cooking zones are hot. | Power outage or the appli-ance is disconnected from the power supply | The residual heat indica-tor will be displayed again the next time the appli-ance is turned on. |
| The ceramic glass of the induction hob is cracked. | Danger! Unplug the appliance immediately or turn off the main circuit breaker. Have the appliance repaired at your nearest service centre. | |
| The induction hob emits beeps | This is normal. The cooling fan operates to cool the internal electronics. | |
| The induction hob makes hissing and whistling sounds. | This is normal. When using multiple cooking zones at full power, the hob produces hissing and whistling sounds due to the frequencies used to power the induction coils. | |
| When the problem is still not resolved. | Unplug the appliance immediately or turn off the main circuit breaker (fuse). Have the appliance repaired at your nearest service centre.Important! You are responsible for the proper opera-tion and maintenance of the appliance. The user is liable for service costs incurred due to operating the appliance incorrectly, even if the unit is under war-ranty.The manufacturer is not liable for any damage caused by failure to follow these instructions. | |
ERROR CODES
An error code may appear on the display while the appliance is operating. Detailed information on error codes can be found in the table below:
| CODE: POSSIBLE CAUSE REMEDY | |
| E4/E5 T | Temperature sensor damaged |
| E7/E8 T | Transistor temperature sensor dam- aged |
| E2/E3 In | correct supply voltage Check and ensure that the supply voltage is correct. |
| E6/E9 H | ob overheated Wait for the hob to cool down before using it again. |
SPECIFICATION
Rated voltage 220-240V\~ 50/60Hz
Rated power: 3,6 kW
Model: 3MI-21BC
Induction cooking zone power:
- induction cooking zone: Booster 160 mm 1200 / 1500 W
- induction cooking zone: Booster 210 mm 1800 / 2100 W
Dimensions [mm]: 300 x 522 x 59
Weight [kg]: ca. 5,5 kg
Power consumption in standby mode [W] -
Power consumption in off -mode [W] 0,5
Power consumption in networked standby mode [W] -
Warranty service as stated on the warranty card. The manufacturer shall not be held liable for any damage caused by improper use of the product.

The manufacturer recommends that all repairs and adjustments be carried out by the Factory Service Technician or the Manufacturer's Authorised Service Point. Repairs should be carried out by a qualified technician only.
Prezado Cliente



Painel de controlo


- EN - TABLE OF CONTENTS
- NOTES ON SAFETY
- TIPS ON SAVING ELECTRICITY
- UNPACKING
- DISPOSAL OF OLD APPLIANCE
- BASIC INFORMATION ABOUT YOUR APPLIANCE
- YOUR APPLIANCE
- OPERATION
- CLEANING AND CARE
- TROUBLESHOOTING
- ERROR CODES
- SPECIFICATION
- WARRANTY AND AFTER-SALES SERVICE
- PT- ÍNDICE
- INSTRUÇÕES DE SEGURANÇA
- COMO POUPAR ENERGIA
- DESEMPACOTAMENTO
- PANEL DE CONTROL
- OPERATE YOUR INDUCTION HOB
- COOKWARE CHARACTERISTICS
- PAN DETECTOR
- BEFORE USING THE APPLIANCE FOR THE FIRST TIME
- CONTROL PANEL
- TURN ON THE APPLIANCE
- ACTIVATE COOKING ZONE AND SET THE HEAT SETTING
- DEACTIVATE COOKING ZONES
- TURN OFF THE APPLIANCE
- BOOSTER FUNCTION
- CHILD LOCK
- RESIDUAL HEAT INDICATOR
- LIMIT THE OPERATING TIME
- AUTOMATIC SAFETY FEATURE
- COOKING DURATION TIMER
- TO SET THE TIMER
- MINUTE MINDER
- INSTALLATION INSTRUCTIONS
- MAKE THE WORKTOP RECESS
- INSTALL THE INDUCTION HOB FLUSH WITH THE WORKTOP
- TIPS FOR THE INSTALLER
- OPTION 1 OPTION
- INSTALL THE GASKET
- INSTALL THE HOB IN THE OPENING
- CONNECT APPLIANCE TO ELECTRICAL MAINS
- CLEANING AFTER EACH USE
- UNBURNED, LIGHT FOOD RESIDUES
- DRY STICKING FOOD RESIDUES
- REMOVE DIRT
- PREZADO CLIENTE
- PAINEL DE CONTROLO
Brand : FAGOR
Model : 3MI-21BC
Category : Cooker