Ironhero 2000 Vertical Station Z - Iron CECOTEC - Free user manual and instructions
Find the device manual for free Ironhero 2000 Vertical Station Z CECOTEC in PDF.


User questions about Ironhero 2000 Vertical Station Z CECOTEC
0 question about this device. Answer the ones you know or ask your own.
Ask a new question about this device
Download the instructions for your Iron in PDF format for free! Find your manual Ironhero 2000 Vertical Station Z - CECOTEC and take your electronic device back in hand. On this page are published all the documents necessary for the use of your device. Ironhero 2000 Vertical Station Z by CECOTEC.
USER MANUAL Ironhero 2000 Vertical Station Z CECOTEC
Centro de planchado vertical / Vertical steam station
Safety instructions 7
-
Parts and components 37
-
Before use 37
-
Operation 38
-
Cleaning and maintenance 39
-
Troubleshooting 40
-
Technical specifications 41
-
Disposal of old electrical
and electronic appliances 41
-
Technical support and warranty 41
-
Copyright 42
SOMMAIRE
Read these instructions thoroughly before using the device. Keep this instruction manual for future reference or new users.
- Ensure that the mains voltage matches the voltage specified on the device rating label and that the plug is earthed.
- This device is designed for domestic use only and is not intended for bars, restaurants, farmhouses, hotels, motels, and offices.
- Be careful when using the appliance: the steam emission can be dangerous if used improperly. Do not aim steam at people or animals and do not apply steam to worn clothes to avoid risk of burns.
- Unplug the appliance from the mains before filling or emptying the water tank and before cleaning it.
- Do not leave the appliance unattended while it is hot, plugged into an outlet, or on the ironing board.
- Do not operate the appliance if it has been dropped, shows visible damage, or is leaking.
- Keep the garment steamer and its cord out of reach of children under 8 years of age when the appliance is plugged into a mains socket or when it is cooling down.
- This appliance can be used by children aged 8 years and above and persons with reduced physical, sensory, or mental capabilities or lack of experience and knowledge if they have been given supervision or instruction concerning the use of the appliance in a safe way and understand the hazards involved. Children must not play with the appliance. Cleaning and maintenance should not be carried out by children without supervision.
This symbol means “caution, hot surface”. The accessible surfaces of the appliance may reach high temperatures during operation. Be careful not to burn yourself. Do not touch hot surfaces during operation or immediately after.
- Check the power cable regularly for visible damage. If the cable is damaged, it must be replaced by the official Cecotec Technical Support Service to avoid any danger.
- Do not twist, bend, pull, or damage the power cable. Protect it from sharp edges and heat sources. Do not allow the cable to touch hot surfaces. Do not let the cable hang over the edge of the working surface or worktop.
- Do not immerse the cable, plug, or any other non-removable part of the device in water or any other liquid or expose electrical connections to water. Make sure your hands are dry before handling the plug or switching on the device.
- Do not use the device with perfume, vinegar, or other liquids. It is designed to operate only with water.
- Do not exceed the MAX mark on the water tank when filling the appliance with water.
- Unplug the appliance before attaching any of its accessories.
- Place the device on a flat, even, and heat-resistant surface. Keep it away from wet surfaces.
- Make sure the product is properly assembled before use and use only attachments or accessories provided by Cecotec.
- Do not try to repair the device by yourself. Contact the official Cecotec Technical Support Service for advice.
- Cleaning and maintenance must be carried out according to this instruction manual to make sure the appliance
functions properly. Turn off and unplug the appliance before moving and cleaning it. Make sure the garment steamer has completely cooled down before storing or cleaning it.
- Cecotec takes no responsibility for any damage caused by misuse of the machine. Any misuse or non-compliance with these instructions voids the warranty and Cecotec's liability.
- Warning: all our ironing range products have undergone quality control tests previous to their commercialisation
- These tests consist of filling the water tank in order to check tightness and to ensure the correct operation of the appliance.
- Once the test has been carried out, the tank is emptied and dried, but some water may still remain inside.
INSTRUCTIONS DE SÉCURITÉ
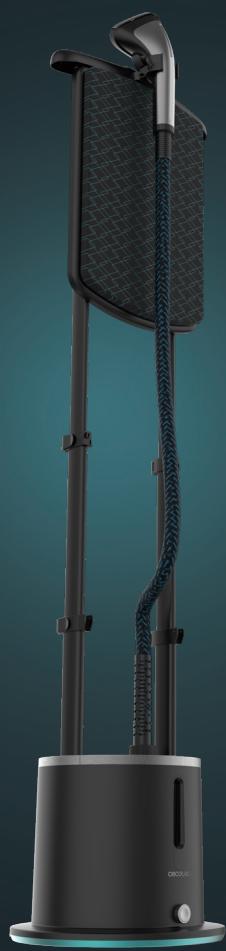
- Drain outlet
- Main body
- Control panel
- Telescopic tube
- Hanger
- Ironing board
- Steam iron head
- Steamer
- Telescopic tube fastening
- Water tank level gauge
- Base
NOTE:
the graphics in this manual are schematic representations and may not exactly match the device.
2. BEFORE USE
- This appliance is packaged in a way as to protect it during transport. Take the device out of its box and remove all packaging materials. You can keep the original box and other packaging elements in a safe place. This will help you prevent damage to the device when transporting it in the future. In case the original packaging is disposed of, make sure all packaging materials are recycled accordingly.
- Make sure all parts and components are included and in good conditions. If there is any piece missing or in bad conditions, contact the official Cecotec Technical Support Service immediately.
Product assembly
1. Assembly and disassembly of the telescopic tubes
Assembly: remove the telescopic tubes from the box. Extend the tubes to the desired height; then, insert them into the holes in the main body until they snap into position.
Fig. 2
Disassembly: designed with a concealed locking mechanism to remove the vertical tubes, first adjust them to their minimum height, this will open the lock and allow you to remove the tubes easily.
ENGLISH
2. Assembly of the ironing board
Remove the ironing board and hanger from the packaging; insert the hanger into the top of the ironing board (as shown in picture 1). Then, fit the brush hooks onto the telescopic tubes behind the ironing board and insert the ironing board already mounted on the telescopic tubes.
Fig. 3
3. Accessories assembly
To fix the clothes brush, press it lightly until it locks into the iron head. To remove the accessory, follow the instructions in reverse order. If you have just finished ironing, be careful, the iron will be hot. It is advisable to wear a protective glove before use.
Fig. 4
4. How to use the ironing board
To adjust the inclination of the ironing board, simply pull down the handle behind the ironing board (as shown in the picture). It has 3 angles ( 45° , 90° , 180° ).
Fig. 5
5. How to put the iron in the main body
Hold the iron head by the handle and place it on the hook/bracket by pushing the lower part down until it locks into place.
Fig. 6
3. OPERATION
- Place the assembled steam station on a flat and stable surface. Adjust the height and angle of the ironing board so that you can comfortably iron and hang your clothes on it.
- Remove the water tank and unscrew the cap to fill it with water. Make sure that there is enough water in the tank and that it is properly installed.
Fig. 7
- Plug the power cord into the mains and switch on the appliance by pressing the power button. When the indicator light comes on, the iron enters the preheating phase. After about 45 seconds, preheating will be finished and the steam will come out automatically. Adjust the different steam levels according to the type of garment material using the buttons on the control panel. You can choose from five different fabrics: silk, rayon, wool, cotton, and linen.
Fig. 8
Fig. 9
Using the iron
- Before ironing, put on the protective glove.
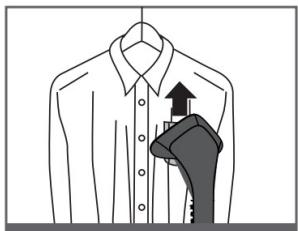
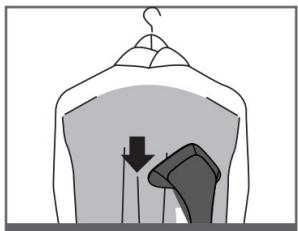
- Start ironing at the widest part of the garment, holding the hem lightly in your hand to stretch the creased part and better iron the creases with the hot steam (as shown in pictures 1-4).
- Press the head onto the garment without exerting too much pressure, and slowly iron the desired area from top to bottom to allow the steam to penetrate the fibres of the fabric better and thus remove wrinkles.

When moving the head from side to side, water droplets may fall the handle of the iron (danger of burns).
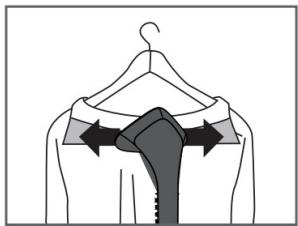
After ironing the main part, iron the other parts from top to bottom. To iron the collar, you can fold it all the way back. Hold one end of the collar with your hand and move the head from side to side with the other hand (as shown in picture 5). Be careful not to burn yourself.
- To iron the sleeves, stretch them completely and move the head from one end of the sleeve to the other (as shown in picture 6).
Fig. 10
4. CLEANING AND MAINTENANCE
Important
It is recommended to use purified or distilled water to avoid contaminating garments.
The concentration of minerals varies according to the type of water. If you use hard water for ironing, it may contain sediment, which can cause the steam flow to diminish, the iron to drip or even stop working. Therefore, to avoid contaminating garments, it is recommended to use purified or distilled water.
- To prolong the life of the appliance, it is recommended to clean it regularly as follows:
- Steps for cleaning and maintenance:
- Before each cleaning, switch off the appliance, unplug it from the mains and allow it to cool down for at least half an hour.
- Unscrew the cap and empty the remaining water in the tank.
Fig. 11
-
Remove and clean the water tank.
-
Use the drain outlet to clean the inside of the steam chamber (as shown in pictures 1-3).
Fig. 12
- Use a cloth to clean and dry all parts and components.
WARNING: before each cleaning, switch off the appliance, unplug it from the mains and allow it to cool down.
5. TROUBLESHOOTING
| Troubleshooting | ||
| Problem | Possible causes | Solution |
| The appliance does not work or the indicator light on the panel does not light up | The appliance is off. | Check that it is on. |
| The appliance is not connected or plugged in correctly. | Connect it to the mains and make sure it is properly plugged in. | |
| The plug does not make good contact. | Check the plug for any defects. | |
| You have not pressed the power button. | Press the power button. | |
| The light indicator is on, but no steam is coming out | There is not enough water in the tank. | Fill up the water tank. |
| The water tank is not correctly installed. | Install the tank correctly in position. | |
| The steamer is clogged. | Straighten the steamer. | |
| Water does not reach the steam chamber. | Shake or reposition the water tank. | |
| The head accessories are not fixed | They are not well placed. | Remove the attachment and reinsert it until it clicks into place in the head. |
| No, little or intermittent steam comes out | There is not enough water in the tank. | Fill up the water tank. |
| The water tank is not properly assembled. | Install the tank correctly in position. | |
| The steamer is bent. | Straighten the steamer. | |
| The appliance produces very little steam | The filter is clogged. | Clean the drain outlet thoroughly. |
| The water tank is clogged. | Clean the water tank filter. | |
| Water does not reach the steam chamber | Water inlet is clogged. | Wash the water inlet. |
| The water tank is not properly assembled. | Install the tank correctly in position. | |
| The water tank is deformed | Hot water use | Replace the water tank. |
| Water leaks out of the tank | The water tank has some cracks. | Replace the water tank. |
| The sealing ring of the plug is broken. | Replace the relevant components. | |
If the above problems persist, please contact our customer service staff by mail and do not carry out unauthorised repairs.
6. TECHNICAL SPECIFICATIONS
Product reference: 01866
Product: IronHero 2000 Vertical Station
Rated power: 2000 W
Voltage: 220 V \~ 50/60 Hz
Technical specifications may change without prior notification to improve product quality.
Made in China | Designed in Spain
7. DISPOSAL OF OLD ELECTRICAL AND ELECTRONIC APPLIANCES

This symbol indicates that, according to the applicable regulations, the product and/or batteries must be disposed of separately from household waste. When this product reaches the end of its shelf life, you should dispose of the cells/batteries/accumulators and take them to a collection point designated by the local authorities.
Consumers must contact their local authorities or retailer for information concerning the correct disposal of old appliances and/or their batteries.
Compliance with the above guidelines will help protecting the environment.
8. TECHNICAL SUPPORT AND WARRANTY
Cecotec shall be liable to the end user or consumer for any lack of conformity that exists at the time of delivery of the product under the terms, conditions, and deadlines established by the applicable regulations.
It is recommended that repairs be carried out by qualified personnel.
ENGLISH
If at any moment you detect any problem with your product or have any doubt, do not hesitate to contact the official Cecotec Technical Support Service at +34 963 210 728.
9. COPYRIGHT
The intellectual property rights over the texts in this manual belong to CECOTEC INNOVACIONES, S.L. All rights reserved. The contents of this publication may not, in whole or in part, be reproduced, stored in a retrieval system, transmitted, or distributed by any means (electronic, mechanical, photocopying, recording or similar) without the prior authorization of CECOTEC INNOVACIONES, S.L.
1. PIÈCES ET COMPOSANTS
Img. 1
5. PROBLEEMOPLOSSING
Product: IronHero 2000 Vertical Station

Fig./Img./Abb./Afb./Rys.4


Fig./Img./Abb./Afb./Rys.5
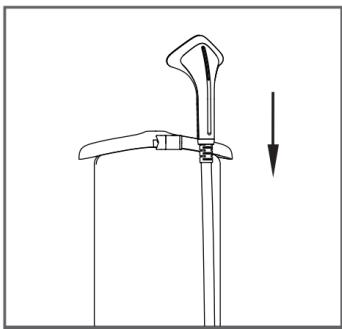
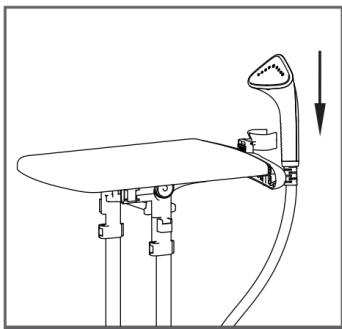
Fig./Img./Abb./Afb./Rys. 6


Fig./Img./Abb./Afb./Rys.7

Fig./Img./Abb./Afb./Rys 8

Silk
MIX

Wool

Cotton

Linen
Fig./Img./Abb./Afb./Rys 9
1

2
3
4

5
6

Fig./Img./Abb./Afb./Rys 10


Fig./Img./Abb./Afb./Rys 11


Fig./Img./Abb./Afb./ Rys 12
www.cecotec.es
- SOMMAIRE
- INSTRUCTIONS DE SÉCURITÉ
- NOTE
- BEFORE USE
- PRODUCT ASSEMBLY
- ASSEMBLY AND DISASSEMBLY OF THE TELESCOPIC TUBES
- ENGLISH
- ASSEMBLY OF THE IRONING BOARD
- ACCESSORIES ASSEMBLY
- HOW TO USE THE IRONING BOARD
- HOW TO PUT THE IRON IN THE MAIN BODY
- OPERATION
- USING THE IRON
- CLEANING AND MAINTENANCE
- IMPORTANT
- TROUBLESHOOTING
- TECHNICAL SPECIFICATIONS
- DISPOSAL OF OLD ELECTRICAL AND ELECTRONIC APPLIANCES
- TECHNICAL SUPPORT AND WARRANTY
- COPYRIGHT
- PIÈCES ET COMPOSANTS
- IMG. 1
- PROBLEEMOPLOSSING
Brand : CECOTEC
Model : Ironhero 2000 Vertical Station Z
Category : Iron