
TK-CS200 - Water filter PANASONIC - Free user manual and instructions
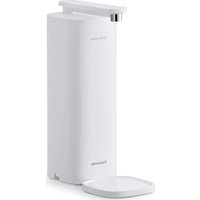
Find the device manual for free TK-CS200 PANASONIC in PDF.
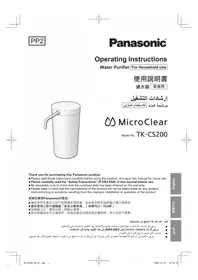


| Product Type | Water Filter (Water Purifier) |
| Brand | Panasonic |
| Model | TK-CS200 |
| Filtration Technology | Activated Carbon + Hollow Fiber Membrane |
| Filtration Capacity | 200 liters |
| Replacement Cartridge | TK-CS200C |
| Flow Rate | 2.0 L/min |
| Installation Type | Faucet-mounted |
| Operating Water Pressure | 100 - 400 kPa |
| Operating Water Temperature | 4 - 35 °C |
| Dimensions (W x D x H) | 120 x 100 x 270 mm |
| Weight | 300 g |
| Power Supply | None (water pressure only) |
| Main Functions | Removes chlorine, turbidity, and harmful impurities |
| Maintenance and Cleaning | Wipe exterior with a soft cloth; replace cartridge every 3 months |
| Safety | Complies with Japanese JIS S3201 standards |
| Materials | Food-grade plastics |
| Color | White |
| Included Components | Main unit, instruction manual, warranty card |
| Spare Parts and Repairability | Replaceable filter cartridge; available online or at electronics stores |
| Warranty | 1 year |
| Country of Origin | Japan |
Frequently Asked Questions - TK-CS200 PANASONIC
User questions about TK-CS200 PANASONIC
0 question about this device. Answer the ones you know or ask your own.
Ask a new question about this device
Download the instructions for your Water filter in PDF format for free! Find your manual TK-CS200 - PANASONIC and take your electronic device back in hand. On this page are published all the documents necessary for the use of your device. TK-CS200 by PANASONIC.
USER MANUAL TK-CS200 PANASONIC
Operating Instructions
Water Purifier For Household Use
使用說明書
濾水器 家庭用
إرشادات التشفيل

MicroClear
Model No. TK-CS200
Thank you for purchasing this Panasonic product.
■ Please read these instructions carefully before using this product, and save this manual for future use.
■ Please carefully read the "Safety Precautions" (P.EN3-EN4) of this manual before use.
■ Be absolutely sure to check that the purchase date has been entered on the warranty.
■ Please keep in mind that the manufacturer of the product will not be responsible for any product malfunctioning or accidents resulting from the improper installation or operation of the product.
感謝您購買Panasonic的產品。
Operating Precautions ......EN2
Safety Precautions ......EN3
Installation 1
Names of the Parts and Check the supplied accessories ....EN5
Installation 2
Checking the faucet ......EN6
Installation 3
Attaching the bypass selector ......EN7
Installation 4
Installing the Water Purifier ......EN9
Installation 5
Checks after installation ......EN10
How to Use ...... EN11
Maintenance ......EN12
Replacing the Cartridge ......EN14
When the water supply is cut off .....EN15
When not in use for a long time ......EN15
When Moving the Water Purifier ......EN16
Q&A EN17
Before Requesting a Repair Service .....EN18
Optional Accessories ......EN19
Specifications ......EN19
Operating Precautions
Water supply
- Do not use water in case of the following conditions.
- Water which is very turbid, or water containing a great deal of red rust (Doing so may shorten the service life of the cartridge.)
Installation
- Do not install the Water Purifier in any of the following locations.
- Near hot areas such as heating appliances (above 60 °C) (Doing so may cause it to become deformed.)
- In an area in direct sunlight or where it may be exposed to wind and rain (Doing so may cause incorrect operation or malfunctions.)
- Where it may freeze ( Doing so may cause cracking in the water pipes or cartridge.)
- Where it may be covered with oil (Doing so may cause cracking in the main unit.)
- In a bathroom or where the Water Purifier will be exposed to water or steam (Doing so may cause incorrect operation or malfunctions.)
- Do not connect the Water Purifier to a hot water-only faucet.
( Doing so may cause malfunction.)
- Do not extend the main spout using a commercially sold hose, etc. (Doing so may cause malfunction.)
- Do not disassemble, repair or remodel the unit. (Doing so may cause malfunction.) → Please contact a dealer or subordinate service station of Panasonic for inspection or maintenance.
- In an unstable location (Doing so may cause malfunction.)
Usage
- Do not place this main unit upside down. (Doing so may cause malfunction.)
● The table below shows the temperatures of water that can be used. Use water at these temperatures. (Failure to do so may cause malfunction.)

| Position of bypass selector | Water temperature |
| When using purified water: Purified | Under 35 °C |
| When using tap water: Unpurified (Foam straight) | Under 80 °C |
EN2
Safety Precautions
Please make sure to follow these instructions
In order to prevent accidents to people or damage to property, always follow the instructions below.
■ The following is an explanation of danger and damage caused due to incorrect usage according to severity.

WARNING
Indicates serious injury or death.

CAUTION
Indicates risk of injury or property damage.
■ The symbols are classified and explained as follows. (The following are examples of symbols.)

This symbol indicates prohibition.

This symbol indicates requirement that must be followed.

WARNING
Water supply

- Do not use water sources other than qualified drinking water.
(Doing so may cause health problems.)
- The Water Purifier cannot sterilize water or remove other substances than those that are removal.

CAUTION
Installation location

- Do not block the main spout or bend, twist, flatten, pull or clamp the hose.
( Doing so may cause water to leak, prevent the output of water or cause other malfunctioning.)
- Do not connect a hose or any other appliances to main spout.
( Doing so may cause water leaks or malfunctions.)
- Do no use the product with the outlet pipe loosened.
( Doing so may cause water leaks or damage.)
- If it has come loose, push in securely.
Storing purified water

- Use purified water immediately after it is produced. When storing it for future consumption, pour into a clean sealed container, and consume it within 1 day if it is kept at room temperature or within 2 days if it is kept in the refrigerator.
(The Water Purifier removes sterilizers (such as chlorine) so the water may go bad over time, possibly causing health problems.)
Safety Precautions
Please make sure to follow these instructions
(continued)

CAUTION
When using purified water

- Do not use purified water for the care of fish, etc. (The environment may change as a result, and the fish, etc. may die.)


- At the beginning of daily use, run water about 1.5 liters (about 15 seconds) before using.
- If 2 days or more have passed after the last use, run water about 18 liters (about 3 minutes) before using.
( Using residual water inside the main unit may cause ill health.)
Accidental ingestion

- Do not leave the supplied accessories within reach of infants or toddlers. ( Doing so may result in accessories being swallowed by mistake.)
- Consult a doctor immediately if you suspect that an accessory has been swallowed.
- Do not allow infants or toddlers to play with packaging material. (Doing so may cause suffocation.)
EN4
Installation 1
Names of the Parts and Check the supplied accessories
Overall figure

Items in the package
If any are missing, contact your dealer.
■ Main unit

■ Outlet pipe

■ Bypass selector

Supplied Accessories
■ Installation Adaptor (with 4 screws)

■ Bushing (with gasket)

■ Cartridge replacement label
- Enter the date, and affix it to the main body. (P. E N 9)
CARTRIDGE REPLACEMENT Install ____ Recommendation 1 year
Installation 2 Checking the faucet
Water faucet which cannot install the Water Purifier
Faucet without a metal lip end

Faucet with an end of 10 mm or less

Shower nozzle

Faucet with sensor

Note
Faucet with a flaring end
• Water faucet which can attach the Water Purifier using options.

Diameter of faucet end : 24 - 32 mm

OPTION
Large-diameter Faucet Fitting
Model No.:WTK7205X7378 (P. EN19)
EN6
Installation 3 Attaching the bypass selector
Keep all parts that are not used during installation, as they may be needed later if the unit is moved or the faucet is changed.
Outside-screwed faucet Inside-screwed faucet


1 Remove the nut and adaptor.

Do not remove the gasket and the filter inside the bypass selector. If these are moved, return to the original position. Make sure foreign matter is not attached to the filter and the gasket is not inclined.

2 Attach the nut and adaptor.

3 Attach the bypass selector and tighten the nut until the bypass selector does not turn.
- Do not use any tools. (This may damage the nut.) - Make sure the bypass selector is not inclined.

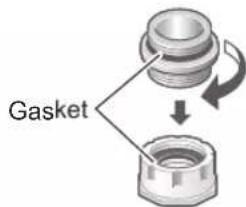
2 Screw in the bushing. Insert into the adaptor.
3 Attach the nut and adaptor.
● The adaptor should be screwed on straight. Screwing it on tilted may strip the threads, resulting in water leaks.

4 Attach the bypass selector and tighten the nut until the bypass selector does not turn.
- Do not use any tools. (This may damage the nut.) - Make sure the bypass selector is not inclined.

Installation 3 Attaching the bypass selector (continued)
Faucet without an aerator
- Water faucet which can attach the bypass selector with accessory.
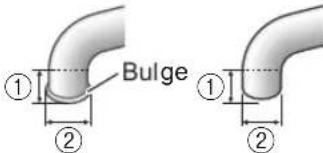
①11 mm or more
② 13 mm or more, less than 24 mm
1 Remove the nut and adaptor.
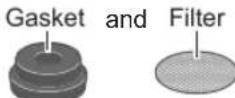
Do not remove the gasket and the filter inside the bypass selector. If these are moved, return to the original position. Make sure foreign matter is not attached to the filter and the gasket is not inclined.
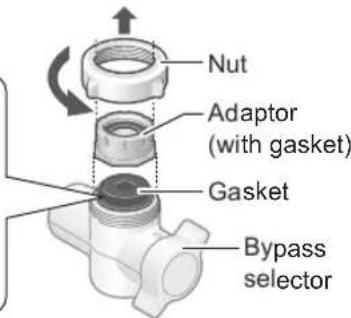
2 Insert the installation adaptor, and tighten it with the nut.

3 Tighten the 4 screws temporarily and loosen the nut to leave a 3 - 4 mm gap.

4 Push the bypass selector against the faucet and install the 4 screws as shown below.

- Top view

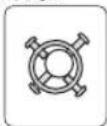
① Water faucet
② Installation adaptor
③ Screws
5 Tighten the nut until the bypass selector does not turn.
- Do not use any tools. (This may damage the nut.)
- Make sure the bypass selector is not inclined.

EN8
Installation 4
Installing the Water Purifier

1 Choose a stable, level surface.

2 Determine the most convenient location for the main unit, and then decide the direction to extend the hose (using the opening section).

3 After completing the preparations, connect the hose.
① Remove the hose fastening nut from the bypass selector, and pass the hose through the nut.
② Insert the hose into the bypass selector as far as it will go.
③ Tighten up the hose fastening nut securely.
- Do not use any tools for this assembly (since the hose fastening nut may be damaged).

4 Attach the outlet pipe.
- Push it in firmly as far as it will go. - Ensure that the gasket does not come off or protrude from the groove, preventing it from twisting (since this may cause the water to leak).
- Do not lift the main unit by taking hold of the outlet pipe (Doing so damage may result).

5 Affix the cartridge replacement label.
- Enter the use start date with an oil-based pen, and affix it to the main body.

EN9
Installation 5 Checks after installation
1 Run purified water for about 5 minutes to expel the air inside the main unit.
① Set the bypass selector to “·”
② Turn on the water faucet to let the water flow.
Note
- Purified water may contain some black powder (activated carbon). The amount will decrease as more water flows, so continue checking the water condition for a while.
2 Check the items on P. EN10-EN11 for any malfunctions.
| Check item | Trouble inspection location and remedial action | Reference page |
Is water coming out of the main spout?Ma | Is the hose bent or flattened?→ If it is, straighten it out. | EN9 |
Is any water leaking from where the bypass selector is connected? | Has the bypass selector been installed securely on the faucet?→ Check again the instructions for “Attaching the bypass selector”, and install it securely.Have the parts inside the bypass selector been inserted properly?→ If not, install them properly.Are there any cracks at the end of the faucet (in the insulating cap, for instance)?→ Consult a plumber. | EN7-EN8EN7-EN8— |
Is there any water leaking from where the hose is connected? | Has the hose been attached securely to the bypass selector?→ Insert it as far as it will go, and use the hose fastening nut to secure it.    | EN9 |
EN10
Installation 5 Checks after installation(continued)
| Check item | Trouble inspection location and remedial action | Reference page |
Is there any water leaking from where the outlet pipe is connected? | Has the outlet pipe been attached securely to the main unit?→ Insert it securely as far as it will go.Is the gasket installed on the outlet pipe or is it twisted?→ Install the gasket properly. | EN9EN9 |
Is water leaking from the faucet?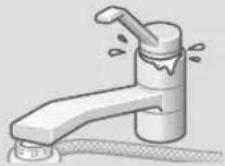 | Is the gasket on the faucet old?→ Consult a plumber.Are there any cracks in the faucet (in the insulating cap, for instance)?→ Consult a plumber. | —— |
How to Use
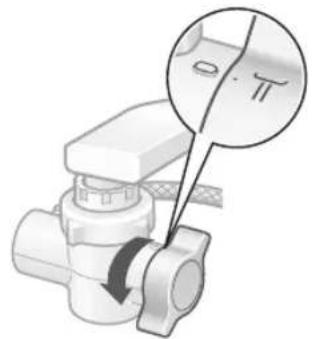
1 Set the bypass selector to
“.”: Purified water “”: Tap water

How to Use (continued)
2 Open the faucet.
- At the beginning of daily use, run water about 1.5 liters (about 15 seconds) before using. (P. EN4)


3 After use, close the faucet.
● Water may come out slightly from the main spout even after the water flow is stopped. It is not a malfunction. (This is water remaining in the outlet pipe.)
Maintenance
Important
- Do not use detergents, cleansers, paint thinners, benzine, alcohol or kerosene for cleaning purposes. If, for instance, a detergent has been used by mistake, wipe the surface with a damp cloth to remove all traces of the detergent.
Otherwise,
• The detergent may get mixed in with the water running through the Water Purifier.
• The plastic parts may become damaged, discolored or deformed.
- Use of cleansers may also impair the workings of the outlet pipe and cause trouble.
- Do not use brushes or other implements made of metal (since they may leave scratch marks).
- Do not use a tool to tighten up the nut (since the nut may be damaged).
Main unit, bypass selector and outlet pipe
Soak a soft cloth in water, wring it out well, and use it to wipe the units and parts.

EN12
Maintenance (continued)
Bypass selector mounting part
Remove the bypass selector, then rinse the filter and water intake.
- The water flow may decrease when the filter in the bypass selector connection area becomes clogged with impurities.

Water intake

Once a year
■ How to remove
① Set the bypass selector to “·”

② Loosen the nut, remove the bypass selector, and take out the gasket and filter.

■ How to attach
Be sure to follow this order.
① Reinstall

② Securely tighten the nut.
③ After mounting the bypass selector, set the lever to “·” and allow water to flow for about 5 seconds.

Replacing the Cartridge
When the service life of the cartridge is to be expired or the purified water ability is reduced, please replace the cartridge with a new one.

Replacement cartridge Model No: TK-CS200C (P. EN19)
Cartridge replacement standard
There are 4 kinds of change standards. If 1 of the following conditions is met, please replace the cartridge.
The using time is about 1 year.
The total run through water volume reaches 12 000 L.*
The flow of purified water decreases extremely. (The cartridge is blocked.)
When there is unpleasant smell or taste, or turbidness.
* Purification capacity (P. EN19)
- The cartridge's life will be shortened when the Water Purifier is used with a quality of water containing many clogging substances.
Replacing method
- Before replacing the cartridge, turn off the faucet. Do not run water through the Water Purifier with the cartridge removed.
(Doing so will cause the water to overflow.) - Dispose of the used cartridge in accordance with the applicable ordinances in the area concerned. (The material of the cartridge cover is ABS. For the type of the filter materials, refer to P. EN19.)
Please turn off the faucet, and pull out the outlet pipe.
1 Remove the cover.
- Do not take the outlet pipe to turn the cover. (Doing so may cause damage.)
① Turn the cover until it stops.
② Give the cover several turns more powerfully. (About 2 turns)
If it is hard to open in ②, turn it with a finger placed on the part between outlet pipe connector (A) and case projection (B).


③ Raise the cover.
2 Remove old cartridge.

3 Install the new cartridge.
① Insert a new cartridge into the cover.
② Fit ① into the case.
New cartridge

Proceed to Step 4 on the next page
Case

EN14
Replacing the Cartridge (continued)
4 Attach the cover.
① Tighten the cover.

- Until there is no more gap between cover and case

Gap

- Until the outlet pipe connector aligns with the case projection

② Attach the outlet pipe (P. EN9).
5 Affix the cartridge replacement label.
- Write the date of replacement on the label included with the new cartridge. (P. E N 9)
CARTRIDGE REPLACEMENT
Install
Recommendation 1 year
6 Open the faucet, and run purified water through the Water Purifier. (for about 5 minutes)

Note
● Purified water may contain some black powder (activated carbon). The amount will decrease as more water flows, so continue checking the water condition for a while.
When the water supply is cut off
● The Water Purifier cannot be used. If the water is cut off during use, turn off the faucet.
- When the water supply is restored, set the bypass selector to “·” and first run tap water into the sink to run out the air and turbid water inside the pipes.
The Water Purifier may then be used again as usual.
(This is because the cartridge life will be significantly reduced.)
When not in use for a long time
■ When not used for about 1 week or longer
- Remove the cartridge (P. EN14-EN15), and store it sealed in a vinyl bag in a refrigerator.
- Remove air from the bag, and close the opening.
Note
- Storing the cartridge for a prolonged period may alter the quality of the water within the cartridge, so replacing the cartridge is recommended.
■ To use this unit again
① Install the cartridge (P. EN14-EN15)
② Run water for about 3 minutes, and check before using that there is no water leak.

When Moving the Water Purifier
Remove water from the main unit with the following steps before moving the product.
- Stand the main unit while moving. After removing the water, a small amount of water may remain, so put the main unit in a bag, etc.
1 Disconnect the hose.

● After disconnecting the hose, attach the hose fastening nut to the original position of the bypass selector (loss prevention).
2 Remove the cartridge. (P. E N14)
3 Put the tip of the hose at a position lower than the main unit, and discharge the water remaining in the hose.

4 Attach the cartridge and cover to the original position. (P.EN14-EN15)
5 Loosen the nut, remove the bypass selector, and remove the water inside.

■ When the joint is difficult to remove
After tightening the nut firmly with hand, rotate it together with the bypass selector. Then it can be removed easily.
- If it still cannot be removed, use a tool such as a plier to nip the foam joint, and remove it.

- When using a tool such as a plier, protect the joint with cloth, etc. not to damage it, and pay attention to the rotation direction.
EN16
Q&A
| Question Answer | ||
| Cartridge | What is the part number of the cartridge for replacement? | TK-CS200C (P. EN19) |
| Tap water | Can I use underground water or well water? | Only the water that has passed a test for drinking can be used. |
| Up to what temperature can I use for hot water? | Water with a temperature of less than 35 °C can be used.(P. EN2)When the bypass selector is adjusted to “·”, water with a temperature of less than 80 °C can be used. | |
| Purified water | How long do the purified water “keep”? | Use it within 1 day at room temperature.When purified water is produced, the chlorine (sterilizer) in the tap water is removed off, making it easier for bacteria to proliferate.Even when storing purified water in the refrigerator, keep it in a clean sealed container, and use it within 2 days. |
| Others | White powder is attached on the kettle or electric thermos flask. | It is the calcium from the water.There is no problem if you drink the water, but if it bothers you, clean the containers concerned.If the white powder is not removed by cleaning, obtain some citric acid from a pharmacy, mix 50 g with 1 liter of water, leave to soak in the containers for 2 or 3 days, and then rinse the deposit off. (Buy citric acid at a pharmacy.) |
Before Requesting a Repair Service
If the problem is not solved after the following contents are checked, please contact a dealer or subordinate service station of Panasonic for handling.
| Problem Check point | ||
| Water leakage | Faucet and connection parts of bypass selector, hose, and outlet pipe | See P. EN10-EN11. |
| Bypass selector (location other than the water outlet selected with the bypass selector) Though the bypass selector is adjusted to “·” water drips from the source water opening. | The cause seems to be calcium, etc. depositing inside the bypass selector.→ Dissolve about 50g of citric acid in 1 liter of water.Remover the bypass selector (P. EN13) and hose, soak them in the citric acid water for about 12 hours, and wash them with water.(Buy citric acid at a pharmacy.) | |
| Main spout | Water drips or trickles out of the main spout even when the water is cut off | This is not a malfunction.(The water flows out is the water residing in the piping.) |
| No water or very little is discharged | Is the faucet fully open?Is the filter of the bypass selector clogged?→ Perform maintenance. (P. EN12-EN13)Has the water supply been cut off ? (P. EN15)Is the hose bent or flattened?If the problem is still not solved after all of the above are checked, the cartridge may be clogged. Replace the cartridge. (P. EN14-EN15) | |
| Not much water comes out of the Water Purifier after the cartridge has been replaced | Did you run water for about 5 minutes after replacement?(P. EN15)(It is necessary to remove the air inside the cartridge) | |
| Odor, taste, turbidity, and change in color | The water produced by the Water Purifier has an odor or unpleasant taste or is turbid | Purification performance of the cartridge is deteriorated.→ Replace the cartridge. (P. EN14-EN15) |
EN18
Optional Accessories
Obtain all optional accessories from your dealer.
For details on how they are used, refer to the accompanying instructions.
Consumables For use with
Replacement cartridge
Model No: TK-CS200C
arge faucet
Large-diameter Faucet Fitting
(inside diameter 32.5 mm)
Model No : WTK7205X7378
- For faucets whose end diameter is 24 - 32 mm
Mark position of the manufacturing number

Specifications
| Main materials | Main unit ABS resin | |
| Bypass selector | ABS resin | |
| Hose | Vinyl chloride | |
| Main unit | Dimensions About 133(W) × 145(D) × 251(H) mm | |
| Weight | About 1.0 kg (about 2.6 kg when full of water) | |
| Temperature of water used by Water Purifier Under | 35 °C (under 80 °C for bypass selector) | |
| The lowest applicable dynamic water pressure 40 kPa | ||
| Pressure of water used by Water Purifier (dynamic pressure) | 40 kPa to 350 kPa | |
| Usable water service pressure (static pressure) 40 kPa to 750 kPa | ||
| Filtering capacity 6.0 L/min. [at 100 kPa water pressure] | ||
| Cartridge Installed In the unit TK-CS200C | ||
| Purification capacity | Free residual chlorine 12 000 L (*1)Turbidity 12 000 L (*2) | |
| Removable substances Iron (particulate form) Can be removed (*3) | ||
| Guide for time to replace cartridge | About 1 year (*4) | |
| Filter material | Non-woven fabric, activated carbon | |
| Components which cannot be filtered out | Iron dissolved in water, heavy metals (silver, copper, etc.), salt (seawater) | |
- All figures given are for a water temperature of 20°C .
- This product cannot convert hard water into soft water.
(*1) This value is for a removal rate of 80 % based on JIS S 3201 tests
(*2) This value is for a filtration flow volume of 50 % based on JIS S 3201 tests
(*3) This substance is for a removal rate of 80 % based on specification standard tests (JWPAS B standards) stipulated by the Japan Water Purifier Association (JWPA) Note that it is not stipulated as part of purification capacity.
(*4) This period applies when 30 liters of water are used a day. If 60 liters are used a day, the cartridge usage limit will be approximately 1/2. The period may also be significantly less depending on the amount of water used and on its quality and pressure.
EN19
Printed in China
中國印刷
باناسونيك كوربوریشن
Panasonic Corporation
https://www.panasonic.com
© Panasonic Corporation 2023

ZGS0TKCS2000Z
H0423-0


- OPERATING INSTRUCTIONS
- 使用說明書
- MICROCLEAR
- THANK YOU FOR PURCHASING THIS PANASONIC PRODUCT
- 感謝您購買PANASONIC的產品。
- INSTALLATION
- OPERATING PRECAUTIONS
- WATER SUPPLY
- USAGE
- SAFETY PRECAUTIONS
- WARNING
- CAUTION
- INSTALLATION LOCATION
- STORING PURIFIED WATER
- WHEN USING PURIFIED WATER
- ACCIDENTAL INGESTION
- NAMES OF THE PARTS AND CHECK THE SUPPLIED ACCESSORIES
- ITEMS IN THE PACKAGE
- SUPPLIED ACCESSORIES
- INSTALLATION 2 CHECKING THE FAUCET
- WATER FAUCET WHICH CANNOT INSTALL THE WATER PURIFIER
- NOTE
- FAUCET WITH A FLARING END
- INSTALLATION 3 ATTACHING THE BYPASS SELECTOR
- OUTSIDE-SCREWED FAUCET INSIDE-SCREWED FAUCET
- REMOVE THE NUT AND ADAPTOR
- ATTACH THE NUT AND ADAPTOR
- ATTACH THE BYPASS SELECTOR AND TIGHTEN THE NUT UNTIL THE BYPASS SELECTOR DOES NOT TURN
- SCREW IN THE BUSHING. INSERT INTO THE ADAPTOR
- INSTALLATION 3 ATTACHING THE BYPASS SELECTOR (CONTINUED)
- FAUCET WITHOUT AN AERATOR
- INSERT THE INSTALLATION ADAPTOR, AND TIGHTEN IT WITH THE NUT
- TIGHTEN THE 4 SCREWS TEMPORARILY AND LOOSEN THE NUT TO LEAVE A 3 - 4 MM GAP
- PUSH THE BYPASS SELECTOR AGAINST THE FAUCET AND INSTALL THE 4 SCREWS AS SHOWN BELOW
- TIGHTEN THE NUT UNTIL THE BYPASS SELECTOR DOES NOT TURN
- INSTALLING THE WATER PURIFIER
- INSTALLATION 5 CHECKS AFTER INSTALLATION
- RUN PURIFIED WATER FOR ABOUT 5 MINUTES TO EXPEL THE AIR INSIDE THE MAIN UNIT
- CHECK THE ITEMS ON P. EN10-EN11 FOR ANY MALFUNCTIONS
- INSTALLATION 5 CHECKS AFTER INSTALLATION(CONTINUED)
- HOW TO USE
- HOW TO USE (CONTINUED)
- OPEN THE FAUCET
- AFTER USE, CLOSE THE FAUCET
- MAINTENANCE
- IMPORTANT
- MAIN UNIT, BYPASS SELECTOR AND OUTLET PIPE
- MAINTENANCE (CONTINUED)
- BYPASS SELECTOR MOUNTING PART
- REMOVE THE BYPASS SELECTOR, THEN RINSE THE FILTER AND WATER INTAKE
- HOW TO REMOVE
- HOW TO ATTACH
- REPLACING THE CARTRIDGE
- CARTRIDGE REPLACEMENT STANDARD
- REPLACING METHOD
- PLEASE TURN OFF THE FAUCET, AND PULL OUT THE OUTLET PIPE
- REMOVE THE COVER
- REMOVE OLD CARTRIDGE
- INSTALL THE NEW CARTRIDGE
- REPLACING THE CARTRIDGE (CONTINUED)
- ATTACH THE COVER
- AFFIX THE CARTRIDGE REPLACEMENT LABEL
- CARTRIDGE REPLACEMENT
- WHEN THE WATER SUPPLY IS CUT OFF
- WHEN NOT IN USE FOR A LONG TIME
- WHEN NOT USED FOR ABOUT 1 WEEK OR LONGER
- TO USE THIS UNIT AGAIN
- WHEN MOVING THE WATER PURIFIER
- DISCONNECT THE HOSE
- REMOVE THE CARTRIDGE. (P. E N14)
- PUT THE TIP OF THE HOSE AT A POSITION LOWER THAN THE MAIN UNIT, AND DISCHARGE THE WATER REMAINING IN THE HOSE
- ATTACH THE CARTRIDGE AND COVER TO THE ORIGINAL POSITION. (P.EN14-EN15)
- LOOSEN THE NUT, REMOVE THE BYPASS SELECTOR, AND REMOVE THE WATER INSIDE
- WHEN THE JOINT IS DIFFICULT TO REMOVE
- BEFORE REQUESTING A REPAIR SERVICE
- OPTIONAL ACCESSORIES
- CONSUMABLES FOR USE WITH
- ARGE FAUCET
- MARK POSITION OF THE MANUFACTURING NUMBER
- SPECIFICATIONS
Brand : PANASONIC
Model : TK-CS200
Category : Water filter