
BRAVIA Theater U HTAN7 - Docking Station SONY - Free user manual and instructions
Find the device manual for free BRAVIA Theater U HTAN7 SONY in PDF.
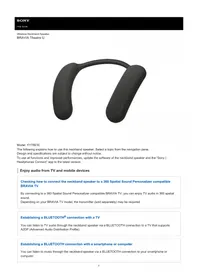


| Product Type | Wireless Neckband Speaker / Personal Theatre System |
| Brand | Sony |
| Model | BRAVIA Theater U (HTAN7) |
| Color | Black |
| Connectivity | Bluetooth 5.2, USB-C (charging only), 3.5mm aux input |
| Audio Technology | XR Surround, 360 Spatial Sound, Dolby Atmos support |
| Speaker Configuration | Full-range drivers with passive radiators for bass |
| Battery Life | Up to 12 hours (varies by volume and usage) |
| Charging Time | Approximately 3 hours with USB PD charger |
| Power Supply | Built-in rechargeable lithium-ion battery, 5V/2A USB charging |
| Dimensions (W x H x D) | Approx. 9.6 x 2.0 x 6.9 inches (24.5 x 5.0 x 17.5 cm) |
| Weight | Approx. 0.7 lbs (320 g) |
| Operating Temperature | 32°F to 95°F (0°C to 35°C) |
| Package Contents | Neckband speaker, charging cable, USB AC adapter, user manual |
| Cleaning and Maintenance | Wipe with a soft, dry cloth; avoid moisture and abrasive cleaners |
| Safety Warning | Do not expose to extreme heat; keep away from liquids; use only approved chargers |
| Spare Parts and Repairability | Replacement ear pads and cushions available; consult authorized Sony service centers |
| Repair Information | Refer to the service manual for disassembly; contact Sony support or regional repair partner |
| Warranty | 1-year limited manufacturer warranty (varies by region) |
Frequently Asked Questions - BRAVIA Theater U HTAN7 SONY
User questions about BRAVIA Theater U HTAN7 SONY
0 question about this device. Answer the ones you know or ask your own.
Ask a new question about this device
Download the instructions for your Docking Station in PDF format for free! Find your manual BRAVIA Theater U HTAN7 - SONY and take your electronic device back in hand. On this page are published all the documents necessary for the use of your device. BRAVIA Theater U HTAN7 by SONY.
USER MANUAL BRAVIA Theater U HTAN7 SONY
Wireless Neckband Speaker
BRAVIA Theatre U

Model: YY7861E
The following explains how to use this neckband speaker. Select a topic from the navigation pane.
Design and specifications are subject to change without notice.
To use all functions and improved performances, update the software of the neckband speaker and the "Sony |
Headphones Connect" app to the latest version.
Enjoy audio from TV and mobile devices
Checking how to connect the neckband speaker to a 360 Spatial Sound Personalizer compatible BRAVIA TV
By connecting to a 360 Spatial Sound Personalizer compatible BRAVIA TV, you can enjoy TV audio in 360 spatial sound.
Depending on your BRAVIA TV model, the transmitter (sold separately) may be required.
Establishing a BLUETOOTH ® connection with a TV
You can listen to TV audio through the neckband speaker via a BLUETOOTH connection to a TV that supports A2DP (Advanced Audio Distribution Profile).
Establishing a BLUETOOTH connection with a smartphone or computer
You can listen to music through the neckband speaker via a BLUETOOTH connection to your smartphone or computer.
Getting started
Included items
Parts and controls
Adjusting the width of the neckband
About the indicator on the neckband speaker
Power source/charging
Charging the neckband speaker
Turning the power on
Turning the power off
Automatic Power Off function
Making connections
BRAVIA TV compatible with 360 Spatial Sound Personalizer
Checking how to connect the neckband speaker to a 360 Spatial Sound Personalizer compatible BRAVIA TV
Connecting the neckband speaker to a 360 Spatial Sound Personalizer compatible BRAVIA TV via a BLUETOOTH connection
Connecting the neckband speaker to a 360 Spatial Sound Personalizer compatible BRAVIA TV via a BLUETOOTH connection through the transmitter (sold separately)
TV
Connecting the neckband speaker with a TV via a BLUETOOTH connection
Windows® computer
Connecting the neckband speaker with a Windows computer via a BLUETOOTH connection
Connecting the neckband speaker with a paired Windows computer via a BLUETOOTH connection
Mac computer
Connecting the neckband speaker with a Mac computer via a BLUETOOTH connection
Connecting the neckband speaker with a paired Mac computer via a BLUETOOTH connection
Smartphone/iPhone
Connecting the neckband speaker with an Android™ smartphone or an iPhone via a BLUETOOTH connection
Connecting the neckband speaker with a paired Android smartphone or a paired iPhone via a BLUETOOTH connection
Multipoint connection
Connecting the neckband speaker concurrently with 2 BLUETOOTH devices (multipoint connection)
Using 2 neckband speakers at the same time (Speaker Add)
Listening to TV audio
Listening to TV audio through the neckband speaker
Listening to music
BLUETOOTH device
Listening to music of a device via a BLUETOOTH connection
Selecting the quality for music playback via BLUETOOTH connections (Codec)
Terminating the BLUETOOTH connection (After use)
About 360 Reality Audio
Listening to a game console
Use the dedicated audio cable (supplied) to listen
Phone calls
Making a video call on a computer
Receiving a call
Making a call
Using the app
What you can do with the "Sony | Headphones Connect" app
Installing the "Sony | Headphones Connect" app
Accessing support information from the "Sony | Headphones Connect" app
Updating the neckband speaker software
Information
Specifications
Notes on use
Precautions
Notes on charging
Notes on water resistant feature
How to care for the neckband speaker
On BLUETOOTH communications
Licenses
Trademarks
Troubleshooting
What can I do to solve a problem?
Power supply
Unable to charge the neckband speaker
Unable to turn on the neckband speaker or the neckband speaker suddenly turns off
Sound
No sound/Sound from only one speaker component/Low sound level/Distorted sound/Humming or noise in the speaker output/No voice or low voice from callers
BLUETOOTH connection
Unable to pair the neckband speaker with a BLUETOOTH device
Sound skips
Unable to connect the neckband speaker concurrently with 2 devices (multipoint connection)
Reset
Resetting the neckband speaker
Initializing the neckband speaker
5-056-199-11(1) Copyright 2024 Sony Corporation
SONY
Help Guide
Wireless Neckband Speaker
BRAVIA Theatre U
Included items
If any items are missing, contact your dealer. Numbers in ( ) indicate the item amount.
• Wireless Neckband Speaker (1)

• USB Type-C® cable (USB-A to USB-C®) (1)

• Dedicated audio cable (1)
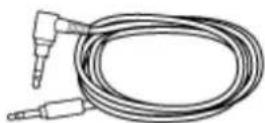
• Dedicated audio adaptor (1) (Attached to the dedicated audio cable (supplied) at the time of purchase.)

- Documents (1 set)
5-056-199-11(1) Copyright 2024 Sony Corporation
Wireless Neckband Speaker
BRAVIA Theatre U
Parts and controls

(microphone off)/ADD (Speaker Add) button1.
- (microphone off)/ADD (Speaker Add) indicator (lights in orange or white)
The states of the microphone off and Speaker Add function are indicated by the orange or white indicator.
(POWER)/*BLUETOOTH) button3.
- ⏻ (power)/×BLUETOOTH indicator (lights in orange or blue)
Stays lit in orange while battery charging is in progress. The power or communication state of the neckband speaker is indicated by the orange or blue indicator.
Microphone5.
Speaker components6.
Cap7.
USB Type-C port8.
Serial number9.
-play/call) button10.
- About the indicator on the neckband speaker
5-056-199-11(1) Copyright 2024 Sony Corporation
SONY
Help Guide
Wireless Neckband Speaker
BRAVIA Theatre U
Adjusting the width of the neckband
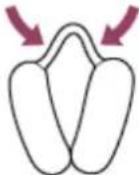
You can adjust the width of the neckband to suit the way you like to wear the neckband speaker around the base of your neck.

Adjust the width of the neckband so it feels comfortable when worn around the base of your neck.
The neckband part of the neckband speaker is made of a material that holds its shape.

Precautions when adjusting the neckband
Do not spread or bend the neckband with excessive force. Extreme deformation of the neckband will prevent it from returning to its original shape.
Failure to observe the following precautions may cause the product to malfunction or be unable to function, or may damage the internal cables and parts.
- Do not spread the neckband more than necessary

• Do not wind the neckband

- Do not twist the neckband more than necessary


5-056-199-11(1) Copyright 2024 Sony Corporation
Wireless Neckband Speaker
BRAVIA Theatre U
About the indicator on the neckband speaker
The indicator provides the following information concerning the neckband speaker.
: Lit in blue / : Lit in orange / : Lit in white / -: Unlit
(power)/ *BLUETOOTH) indicator
The neckband speaker is turned on
- (Flashes twice in blue.)
If the remaining battery power of the neckband speaker is 20% or lower (charging required), indication proceeds as follows.
- - (Flashes slowly 10 times in orange.)
The neckband speaker is being turned off
(Stays lit in blue for about 2 seconds.)
The built-in battery of the neckband speaker is running low
- - (Flashes slowly 10 times in orange.)
Information about the BLUETOOTH function
- The neckband speaker is in pairing mode:
- - - (Keeps double flashing in blue.)
- A connection attempt is on hold/in process:
- - - - - - - (Keeps flashing in blue at intervals of about 1 second for 30 seconds.)
If the remaining battery power of the neckband speaker is 20% or lower (charging required), indication proceeds as follows.
- - - - - - - (Keeps flashing in orange for at intervals of about 1 second for 30 seconds.)
• A connection is established:
(Keeps flashing quickly in blue for about 5 seconds.)
- A connection remains established/A button operation is made:
- - - - - - (Keeps flashing in blue for at intervals of about 5 seconds for about 30 seconds.)
If the remaining battery power of the neckband speaker is 20% or lower (charging required), indication proceeds as follows.
- - - - - - - - - (Keeps flashing in orange for at interval of about 5 seconds for about 30 seconds.)
• There is an incoming call:
(Keeps flashing quickly in blue.)
As for the indication that a connection attempt is on hold/in process or a connection remains established/a button operation is made, the indicator automatically goes out in a predefined period of time. When any operation is performed on the neckband speaker, the indicator, once again, keeps flashing for a predefined period of time.
Information about analog audio playback
- - - - - - (Keeps flashing in blue for at intervals of about 1 second for 30 seconds.)
If the remaining battery power of the neckband speaker is 20% or lower (charging required), indication proceeds as follows.
- - - - - - - (Keeps flashing in orange for at intervals of about 1 second for 30 seconds.)
Information about battery charging
- Charging is in progress:
(Stays lit in orange.)
Upon completion of charging, the indicator goes out.
- There is an abnormality in charging the battery (e.g. an abnormal battery temperature):
- - - (Keeps double flashing in orange.)
Other information
- The neckband speaker software is being updated:
- - - - (Keeps flashing slowly in blue.)
• Initialization is complete:
● ● (Flashes 4 times in blue.)
For details, see "Initializing the neckband speaker."

(microphone off)/ ADD (Speaker Add) indicator
When the microphone is off
(Stays lit in orange for 30 seconds.)
The indicator goes out when the microphone is on.
The indicator automatically goes out in a predefined period of time. When any operation is performed on the neckband speaker, the indicator, once again, lights for a predefined period of time.
Information about the Speaker Add function
- Connection attempt is on hold/connection failed
○--●--●- (Keeps flashing in white for at intervals of about 1 second.)
• A connection is established
(Stays lit in white for 30 seconds.)
The indicator automatically goes out in a predefined period of time. When any operation is performed on the neckband speaker, the indicator, once again, lights for a predefined period of time.
Related Topic
- Parts and controls
• Initializing the neckband speaker
Wireless Neckband Speaker
BRAVIA Theatre U
Charging the neckband speaker
The neckband speaker is equipped with a rechargeable built-in lithium ion battery. Charge the battery with a USB AC adaptor (commercially available) and the USB Type-C cable (supplied) before using the neckband speaker.
When using the neckband speaker for the first time, be sure to charge the built-in battery for more than 1 hour before turning on the neckband speaker.
1 Connect the neckband speaker to an AC outlet to charge it.
Connect one end of the USB Type-C cable (supplied) to the USB Type-C port on the neckband speaker and the other end to a USB AC adaptor (commercially available), and then connect the USB AC adaptor to an AC outlet. The neckband speaker supports USB AC adaptors capable of delivering an output current of 1.5 A.

The (power)/ (BUETOOTH) indicator stays lit in orange while charging is in progress.
The estimated charging time varies depending on the power output capacity of the connected USB AC adaptor (commercially available). In addition, it may take longer than the charging time stated below depending on the type and specification of the USB AC adaptor and USB cable. The charging time may differ from the time stated below depending on the ambient temperature as well.
The following time is stated as a reference.
- When a USB AC adaptor capable of delivering an output current of 1.5 A is connected, charging completes in about 4 hours* and the ⏻(power)/ (BLUETOOTH) indicator goes out.
- When using a USB AC adaptor (commercially available), make sure that it is capable of delivering an output current of 1.5 A or more. You can use a USB AC adaptor with an output current of 0.5 A (500 mA) or more and less than 1.5 A as well, but it may take a very long time before charging completes.
* Time required for the empty battery to be fully charged (100%) while the neckband speaker is powered off.
After you disconnect the USB cable from the neckband speaker upon completion of battery charging, be sure to close the cap securely.
The cap plays a very important role in maintenance of the water resistant performance.
Checking the charging completion
If the built-in battery is fully charged when you connect the neckband speaker to an AC outlet with a USB AC adaptor (commercially available), the (power)/ (BUETOOTH) indicator lights in orange then goes out in about 1 minute.
- When using the Android smartphone with OS 9.0 or later installed
When the neckband speaker is connected with the Android smartphone via an HFP (Hands-free Profile)
BLUETOOTH connection, tap [Settings] - [Device connection] - [Bluetooth] on the smartphone. The remaining battery power of the neckband speaker is displayed along with the connected BLUETOOTH device name. For details, refer to the operating instructions supplied with the Android smartphone.
Note that the remaining battery power displayed on the smartphone may vary from the actual remaining battery power of the neckband speaker. Consider this information as a reference.
- When using the iPhone with iOS 15.0 or later installed
While the neckband speaker is connected with the iPhone via an HFP (Hands-free Profile) BLUETOOTH connection, the remaining battery power of the neckband speaker is displayed on the widget screen of the iPhone. For details, refer to the operating instructions supplied with the iPhone.
Note that the remaining battery power displayed on the iPhone may vary from the actual remaining battery power of the neckband speaker. Consider this information as a reference.
Checking the built-in battery level of the rechargeable built-in battery by pressing the (power)/(BLUETOOTH) button

While the neckband speaker is turned on, pressing the (power)/(BUETOOTH) button triggers any of the following voice guidance in accordance with the remaining battery power.

- 81% - 100%: "Battery fully charged"
- 61% - 80%: "Battery about 80%"
- 41% - 60%: "Battery about 60%"
- 21% - 40%: "Battery about 40%"
- 1% - 20%: "Battery about 20%"
Built-in battery life
See “Specifications” for the charging time of the rechargeable built-in battery and the BLUETOOTH device playback duration.
When the built-in battery is running low
When you hear a notification sound and voice guidance (Low battery) and the (power)/(BUETOOTH) indicator starts flashing slowly in orange, the rechargeable built-in battery is running low. Charge the neckband speaker ahead of time.
When the remaining battery decreases to such a level that the neckband speaker cannot be turned on, you hear a notification sound and voice guidance (Battery is empty) and the neckband speaker automatically turns off. In such a case, charge the neckband speaker.
When you turn on the power, but the (power)/ (BUETOOTH) indicator lights in blue for about 2 seconds and then the power turns off, the rechargeable built-in battery is empty. In such a case, charge the neckband speaker.
Hint
- You can charge the neckband speaker's built-in battery by connecting the USB cable connected with the neckband speaker to a computer that comes equipped with a USB charging port as well. However, not all the computers are tested and found compatible with this procedure and the procedure is not applicable to home-built computers.
Note
- Connecting the neckband speaker to an AC outlet or a computer automatically turns off the neckband speaker. While connected with a power source, the neckband speaker does not turn on.
- The maximum power output will be lower when the built-in battery is running low.
In an extremely cold or hot environment, charging stops for safety. If charging takes a long time, it also makes charging of the neckband speaker stop. To resolve these issues, disconnect the USB cable and connect it back again in an operating temperature between 5 °C and 35 °C (41 °F and 95 °F), and then charge the neckband speaker once again. Be aware that the room temperature may fall to 5 °C (41 °F) or lower especially in wintertime. Take the ambient temperature into consideration as well for charging the neckband speaker. - Do not charge the neckband speaker's built-in battery in places where water may splash on it. The USB Type-C cable (supplied) as well as the USB port behind the cap are not designed for water resistant.
- Even if you do not intend to use the neckband speaker for a long time, charge the built-in battery to its full capacity once every 6 months to maintain its performance.
- When the Android smartphone is configured to establish BLUETOOTH connections solely for music playback (A2DP), the remaining battery power of the neckband speaker is not displayed on the smartphone.
Related Topic
- Turning the power on
Notes on charging
5-056-199-11(1) Copyright 2024 Sony Corporation
Wireless Neckband Speaker
BRAVIA Theatre U
Turning the power on

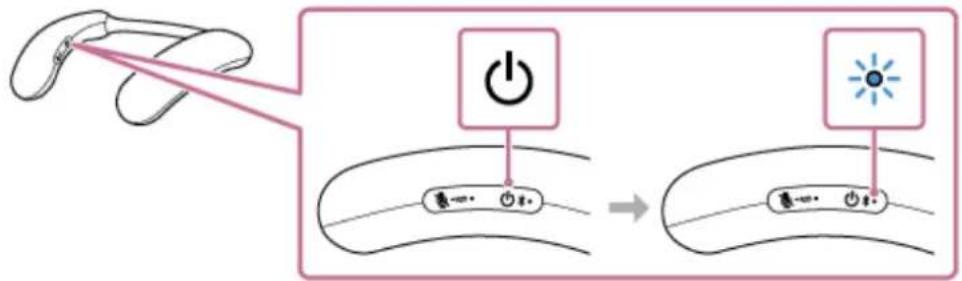
Press and hold the (power)/ (BUETOOTH) button for about 2 seconds until you hear a notification sound.
The neckband speaker turns on and the (power)/(BUETOOTH) indicator starts flashing in blue.

Note
- When you hear a notification sound and voice guidance (Low battery) and the (power)/(BUETOOTH) indicator starts flashing slowly in orange, the rechargeable built-in battery is running low. Charge the neckband speaker ahead of time.
- When the remaining battery decreases to such a level that the neckband speaker cannot be turned on, you hear a notification sound and voice guidance (Battery is empty) and the neckband speaker automatically turns off. Charge the neckband speaker.
- When you turn on the power, but the ⏻ (power)/ ✕ (BLUETOOTH) indicator lights in blue for about 2 seconds and then the power turns off, the rechargeable built-in battery is empty. In such a case, charge the neckband speaker.
Related Topic
• Turning the power off
• Charging the neckband speaker
• About the indicator on the neckband speaker
5-056-199-11(1) Copyright 2024 Sony Corporation
Wireless Neckband Speaker
BRAVIA Theatre U
Turning the power off

Press and hold the (power)/ (BUETOOTH) button for about 2 seconds until you hear a notification sound.
The neckband speaker turns off and the (power)/(BUETOOTH) indicator is lit for about 2 seconds and then goes out.
![graph TD A["Input"] --> B["Power Supply"] B --> C["Activation State"] C --> D["Output"]](/content/2026/08/1622291/images/dc80235b10a0c601a6621fbd8cce355cf66a56f656c07bb191e3953c9fe7d945.jpg)
Related Topic
• Automatic Power Off function
5-056-199-11(1) Copyright 2024 Sony Corporation
Wireless Neckband Speaker
BRAVIA Theatre U
Automatic Power Off function
Under the settings at the time of purchase, the neckband speaker will automatically turn off if no buttons on the neckband speaker are operated for 15 minutes in any of the following conditions.
- No audio input signal from a BLUETOOTH device connected for music playback (A2DP)
- No BLUETOOTH device is connected
- No audio input signal from a device connected by the dedicated audio cable (supplied)
Hint
The Automatic Power Off function does not operate during a hands-free call on the neckband speaker.
With the "Sony | Headphones Connect" app, you can change the period of time before the neckband speaker automatically turns off. For details, refer to the Help Guide for the "Sony | Headphones Connect" app at: https://rd1.sony.net/help/mdr/hpc/h_zz/
Related Topic
- Receiving a call
- Making a call
- What you can do with the "Sony | Headphones Connect" app
5-056-199-11(1) Copyright 2024 Sony Corporation
Wireless Neckband Speaker
BRAVIA Theatre U
Checking how to connect the neckband speaker to a 360 Spatial Sound Personalizer compatible BRAVIA TV
Check whether your BRAVIA TV is compatible with 360 Spatial Sound Personalizer.
Even if your BRAVIA TV is compatible with 360 Spatial Sound Personalizer, the transmitter (sold separately) may be required, depending on the model.
1 Check whether your BRAVIA TV is compatible with 360 Spatial Sound Personalizer.
- Check the following website for supported BRAVIA TV.
https://www.sony.net/hav_faq
2 Connect the BRAVIA TV according to the results of checking in step 1
(A) For direct BLUETOOTH connection to enjoy a spatial sound on a BRAVIA TV
See the following procedure.
Connecting the neckband speaker to a 360 Spatial Sound Personalizer compatible BRAVIA TV via a BLUETOOTH connection
(B) For connection via the transmitter (sold separately) to enjoy a spatial sound on a BRAVIA TV
See the following procedure.
Connecting the neckband speaker to a 360 Spatial Sound Personalizer compatible BRAVIA TV via a BLUETOOTH connection through the transmitter (sold separately)
Hint
- You can make a direct BLUETOOTH connection without the transmitter (sold separately) even when using the BRAVIA TV, as in (B). For details, see "Connecting the neckband speaker with a TV via a BLUETOOTH connection." In this case, you can listen to your BRAVIA TV through the neckband speakers, but you cannot enjoy the 360 spatial sound.
5-056-199-11(1) Copyright 2024 Sony Corporation
Wireless Neckband Speaker
BRAVIA Theatre U
Connecting the neckband speaker to a 360 Spatial Sound Personalizer compatible BRAVIA TV via a BLUETOOTH connection
This section describes the procedure to connect a 360 Spatial Sound Personalizer compatible BRAVIA TV via a BLUETOOTH connection directly to your neckband speaker.
Note
- Even if your BRAVIA TV is compatible with 360 Spatial Sound Personalizer, the transmitter (sold separately) may be needed to connect the neckband speaker to your BRAVIA TV. See "Checking how to connect the neckband speaker to a 360 Spatial Sound Personalizer compatible BRAVIA TV" to confirm the connection method that is suitable for your BRAVIA TV.
1 Make the necessary preparations for a BLUETOOTH connection to the neckband speaker.
• Fully charge the rechargeable built-in battery.
- To avoid any sudden loud sound output from the neckband speaker, turn down the volume of both the BRAVIA TV and the neckband speaker before connecting them.
- Bring the neckband speaker within a distance of 1 m (3.2 ft) from the BRAVIA TV.
2 Set the neckband speaker to pairing mode.
To pair the first time after purchase*
While the power is off, press and hold the (power)/(BUETOOTH) button for about 2 seconds until you hear a notification sound. The power turns on and the neckband speaker enters pairing mode, and the (power)/(BLUETOOTH) indicator double flashes in blue.
* Do this procedure if the neckband speaker has been initialized (pairing information has been erased) also.

To pair a second and subsequent BLUETOOTH devices (if the neckband speaker has pairing information for other devices)
While the power is off, press and hold the (power)/(BLUETOOTH) button for about 5 seconds until you hear a notification sound and voice guidance (Pairing). The neckband speaker enters pairing mode, and the (power)/(BLUETOOTH) indicator double flashes in blue.

![graph TD A["Input Signal"] --> B["Power Switch"] B --> C["Output Signal"] style A fill:#f9f,stroke:#333 style B fill:#ccf,stroke:#333 style C fill:#cfc,stroke:#333](/content/2026/08/1622291/images/464cb4107cd418a86da96b0e6c42ff6340e2478f1a5e460baafd66e6dfb20d0f.jpg)
Note
- Press and hold the (power)/(BUETOOTH) button for about 2 seconds, and continue pressing the button when the power turns on and you hear a notification sound.
Operate the BRAVIA TV to connect the neckband speaker via a BLUETOOTH connection.
For instructions on operating the BRAVIA TV, refer to the operating instructions supplied with your BRAVIA TV. When the BLUETOOTH connection is complete, you hear a notification sound from the neckband speaker and the (power)/BLUETOOTH indicator flashes in blue.

Confirm that the audio output has switched from the BRAVIA TV to the neckband speaker.
When the BLUETOOTH connection to the BRAVIA TV is complete, the audio output switches from the BRAVIA TV to the neckband speaker, and you can use the 3D surround functions.
For details about 3D surround functions, refer to the operating instructions supplied with your BRAVIA TV.
Hint
The operation of registering a device you want to connect via a BLUETOOTH connection is called pairing.
Pairing must be done to connect to a BRAVIA TV via a BLUETOOTH connection to listen to audio through the neckband speaker.
As long as the BLUETOOTH function is activated on a BLUETOOTH device that has previously been connected with the neckband speaker, the neckband speaker is reconnected with the device right after the neckband speaker is turned on.
Note
- The neckband speaker comes out of pairing mode in about 5 minutes and the (power)/ (BLUETOOTH) indicator on the neckband speaker turns to slow blue flashing. However, when the speaker has no pairing information, for example when you use the BLUETOOTH function for the first time after purchase, the pairing mode is not released. If the neckband speaker comes out of pairing mode before you complete the procedure, repeat the procedure all over again from step 2
- Once the neckband speaker is paired with the BLUETOOTH device, there is no need to pair them again, except in the following cases:
— Pairing information is deleted in the course of repair work, etc.
— The neckband speaker is already paired with 8 devices and another device is to be paired.
The neckband speaker can be paired with up to 8 BLUETOOTH devices. When a new device is paired in addition to 8 paired devices, the pairing information of the earliest device connected via a BLUETOOTH connection is replaced by the information of the new one.
— The pairing information of the neckband speaker has been deleted from the paired BLUETOOTH device.
— The neckband speaker is initialized.
All the pairing information is deleted. Once the neckband speaker is initialized, it may fail to establish a BLUETOOTH connection with the BRAVIA TV. In such a case, delete the pairing information of the neckband speaker from the BRAVIA TV, and then pair the neckband speaker with the BRAVIA TV all over again.
- Depending on the BRAVIA TV you are using, audio may not be output from the BRAVIA TV when the neckband speaker is connected to the BRAVIA TV via a BLUETOOTH connection. If you want to output audio from the BRAVIA TV, either turn off the neckband speaker or select [BRAVIA Theatre U] from the BRAVIA TV BLUETOOTH settings to disconnect the BLUETOOTH connection between the neckband speaker and the BRAVIA TV.
For details about the BRAVIA TV settings, refer to the operating instructions supplied with the BRAVIA TV you are using.
- When using the Speaker Add function, you cannot use the multipoint connection capability.
- If the dedicated audio adaptor (supplied) and the dedicated audio cable (supplied) are connected to the neckband speaker, then the BLUETOOTH function and the call function cannot be used.
Related Topic
- Connecting the neckband speaker concurrently with 2 BLUETOOTH devices (multipoint connection)
- Listening to TV audio through the neckband speaker
5-056-199-11(1) Copyright 2024 Sony Corporation
Wireless Neckband Speaker
BRAVIA Theatre U
Connecting the neckband speaker to a 360 Spatial Sound Personalizer compatible BRAVIA TV via a BLUETOOTH connection through the transmitter (sold separately)
This section describes the procedure to connect a 360 Spatial Sound Personalizer compatible BRAVIA TV via a BLUETOOTH connection through the transmitter (sold separately) to your neckband speaker.
The neckband speaker and transmitter (sold separately) must be connected via a BLUETOOTH connection.
Note
- If your BRAVIA TV is compatible with 360 Spatial Sound Personalizer, depending on the model, you can enjoy 360 spatial sound with the neckband speaker without using the transmitter (sold separately).
See "Checking how to connect the neckband speaker to a 360 Spatial Sound Personalizer compatible BRAVIA TV" to confirm the connection method that is suitable for your BRAVIA TV.
1
Connect the optical digital audio output port of the BRAVIA TV and the DIGITAL IN (optical digital audio input) port of the transmitter (sold separately) with an optical digital cable (supplied with the transmitter (sold separately)).
Confirm the shape of the plug of the optical digital cable (B) and the port of the BRAVIA TV and the transmitter (sold separately) (A), align the long sides and insert the plugs in the correct orientation.

![graph TD A["Device"] -->|Digital IN| B["Monitor"] B -->|A| C["Device 1"] B -->|B| D["Device 2"]](/content/2026/08/1622291/images/df7513869ee5feae66aff0bb338b7203203794f74c14331c71c5e8aab6a55cb5.jpg)
2
Connect the USB port of the BRAVIA TV and DC IN port of the transmitter (sold separately) with the USB Type-C cable (supplied with the transmitter (sold separately)).
The indicator (orange) on the transmitter (sold separately) flashes when the power is on and there is no audio signal.
![graph TD A["Sun Icon"] --> B["DC IN"] B --> C["Computer Monitor"] C --> D["Output"]](/content/2026/08/1622291/images/e0b9f85fe5526eec3cb05274d27761980d0188a4e67632a40798e2910e516613.jpg)
When a device is paired for the first time after purchase or after the transmitter (sold separately) is initialized (if the transmitter (sold separately) has no pairing information), then the transmitter (sold separately) enters pairing mode automatically when it is turned on and the indicator double flashes in blue.

Hint
- If the BRAVIA TV you are using has no USB port, then use a USB AC adaptor (commercially available) to connect the transmitter (sold separately) to a power outlet.
Turn on the BRAVIA TV and operate the BRAVIA TV to do the settings.
Follow the instructions on the BRAVIA TV screen and use the remote control to set the 3D surround functions. For details about the operations, refer to the operating instructions supplied with your BRAVIA TV.

Make the necessary preparations for a BLUETOOTH connection to the neckband speaker.
• Fully charge the rechargeable built-in battery.
- To avoid any sudden loud sound output from the neckband speaker, turn down the volume of both the BRAVIA TV and the neckband speaker before connecting them.
- Bring the neckband speaker within a distance of 1 m (3.2 ft) from the transmitter (sold separately).
Press and hold the XBLUETOOTH) button on the transmitter (sold separately) for about 5 seconds.
The indicator (blue) on the transmitter (sold separately) double flashes and enters pairing mode.
![graph LR A["Computer monitor"] --> B["Switch icon"] B --> C["Server with sun icon"]](/content/2026/08/1622291/images/cf2ab48b5cef4bb2f563bba184c3f141caee803147dee009d0a9bf07bf4de5fd.jpg)
6
Set the neckband speaker to pairing mode.
To pair the first time after purchase*
While the power is off, press and hold the (power)/(BUETOOTH) button for about 2 seconds until you hear a notification sound. The power turns on and the neckband speaker enters pairing mode, and the (power)/(BUETOOTH) indicator double flashes in blue.
* Do this procedure if the neckband speaker has been initialized (pairing information has been erased) also.

To pair a second and subsequent BLUETOOTH devices (if the neckband speaker has pairing information for other devices)
While the power is off, press and hold the (power)/(BUETOOTH) button for about 5 seconds until you hear a notification sound and voice guidance (Pairing). The neckband speaker enters pairing mode, and the (power)/(BUETOOTH) indicator double flashes in blue.


Note
- Press and hold the (power)/ (BUETOOTH) button for about 2 seconds, and continue pressing the button when the power turns on and you hear a notification sound.
7
Confirm that the neckband speaker and the transmitter (sold separately) are connected via a BLUETOOTH connection.
When the BLUETOOTH connection is complete, a notification sound is output from the neckband speaker and the (power)/BLUETOOTH indicator flashes in blue.
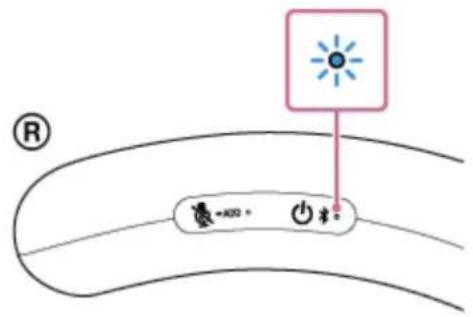
Also, the indicator (blue) on the transmitter (sold separately) stops flashing and stays lit.
Hint
- If the BRAVIA TV's 3D surround functions are on, you can enjoy 360 spatial sound from the next time you connect the neckband speaker and the transmitter (sold separately).
Hint
- The operation of registering a device you want to connect via a BLUETOOTH connection is called pairing. Pairing must be done to connect to a BRAVIA TV via a BLUETOOTH connection to listen to audio through the neckband speaker.
Note
- The neckband speaker comes out of pairing mode in about 5 minutes and the (power)/ (BLUETOOTH) indicator on the neckband speaker turns to slow blue flashing. However, when the speaker has no pairing information, for example when you use the BLUETOOTH function for the first time after purchase, the pairing mode is not released. If the neckband speaker comes out of pairing mode before you complete the procedure, repeat the procedure all over again from step 5
- Once the neckband speaker is paired with the BLUETOOTH device, there is no need to pair them again, except in the following cases:
- Pairing information is deleted in the course of repair work, etc.
— The neckband speaker is already paired with 8 devices and another device is to be paired.
The neckband speaker can be paired with up to 8 BLUETOOTH devices. When a new device is paired in addition to 8 paired devices, the pairing information of the earliest device connected via a BLUETOOTH connection is replaced by the information of the new one.
— The pairing information of the neckband speaker has been deleted from the paired BLUETOOTH device.
— The neckband speaker is initialized.
All the pairing information is deleted. Once the neckband speaker is initialized, it may fail to establish a BLUETOOTH connection with the BRAVIA TV. In such a case, delete the pairing information of the neckband speaker from the BRAVIA TV, and then pair the neckband speaker with the BRAVIA TV all over again.
- Depending on the BRAVIA TV you are using, audio may not be output from the BRAVIA TV when the neckband speaker is connected to the BRAVIA TV via a BLUETOOTH connection through the transmitter (sold separately). If you want to output audio from the BRAVIA TV, turn off the neckband speaker. For details about the BRAVIA TV settings, refer to the operating instructions supplied with the BRAVIA TV you are using.
- When using the Speaker Add function, you cannot use the multipoint connection capability.
- If the dedicated audio adaptor (supplied) and the dedicated audio cable (supplied) are connected to the neckband speaker, then the BLUETOOTH function and the call function cannot be used.
Related Topic
- Connecting the neckband speaker concurrently with 2 BLUETOOTH devices (multipoint connection)
5-056-199-11(1) Copyright 2024 Sony Corporation
Wireless Neckband Speaker
BRAVIA Theatre U
Connecting the neckband speaker with a TV via a BLUETOOTH connection
If the TV you are using supports the BLUETOOTH profiles for music playback (A2DP), then you can connect the neckband speaker to your TV via a BLUETOOTH connection and listen to the TV audio on the neckband speaker.
Hint
- If your TV is a BRAVIA TV that supports 360 Spatial Sound Personalizer, you can enjoy audio from the TV as 360 spatial sound on your neckband speaker. For details, see "Checking how to connect the neckband speaker to a 360 Spatial Sound Personalizer compatible BRAVIA TV."
1 Make the necessary preparations for a BLUETOOTH connection to the neckband speaker.
• Fully charge the rechargeable built-in battery.
- To avoid any sudden loud sound output from the neckband speaker, turn down the volume of both the TV and the neckband speaker before connecting them.
- Bring the neckband speaker within a distance of 1 m (3.2 ft) from your TV.
2 Set the neckband speaker to pairing mode.
To pair the first time after purchase*
While the power is off, press and hold the (power)/(BUETOOTH) button for about 2 seconds until you hear a notification sound. The power turns on and the neckband speaker enters pairing mode, and the (power)/(BLETOOTH) indicator double flashes in blue.
Do this procedure if the neckband speaker has been initialized (pairing information has been erased) also.

To pair a second and subsequent TVs (if the neckband speaker has pairing information for other devices)
While the power is off, press and hold the (power)/(BUETOOTH) button for about 5 seconds until you hear a notification sound and voice guidance (Pairing). The neckband speaker enters pairing mode, and the (power)/(BUETOOTH) indicator double flashes in blue.

Note
- Press and hold the (power)/ (BUETOOTH) button for about 2 seconds, and continue pressing the button when the power turns on and you hear a notification sound.
Operate the TV to connect the neckband speaker via a BLUETOOTH connection.
For instructions on operating the TV, refer to the operating instructions supplied with your TV.
When the BLUETOOTH connection is complete, you hear a notification sound from the neckband speaker and the ⏻(power)/ BLUETOOTH indicator flashes in blue.
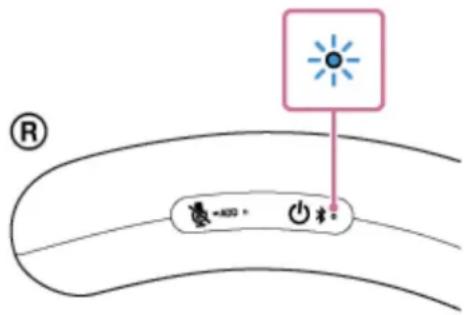
Hint
The operation of registering a device you want to connect via a BLUETOOTH connection is called pairing.
Pairing must be done to connect to a TV via a BLUETOOTH connection to listen to audio through the neckband speaker.
As long as the BLUETOOTH function is activated on a BLUETOOTH device that has previously been connected with the neckband speaker, the neckband speaker is reconnected with the device right after the neckband speaker is turned on.
Note
- The neckband speaker comes out of pairing mode in about 5 minutes and the (power)/(BUETOOTH) indicator on the neckband speaker turns to slow blue flashing. However, when the speaker has no pairing information, for example when you use the BLUETOOTH function for the first time after purchase, the pairing mode is not released. If the neckband speaker comes out of pairing mode before you complete the procedure, repeat the procedure all over again from step 2
Once the neckband speaker is paired with the BLUETOOTH device, there is no need to pair them again, except in the following cases:
— Pairing information is deleted in the course of repair work, etc.
— The neckband speaker is already paired with 8 devices and another device is to be paired.
The neckband speaker can be paired with up to 8 BLUETOOTH devices. When a new device is paired in addition to 8 paired devices, the pairing information of the earliest device connected via a BLUETOOTH connection is replaced by the information of the new one.
— The pairing information of the neckband speaker has been deleted from the paired BLUETOOTH device.
— The neckband speaker is initialized.
All the pairing information is deleted. Once the neckband speaker is initialized, it may fail to establish a BLUETOOTH connection with the TV. In such a case, delete the pairing information of the neckband speaker from the TV, and then pair the neckband speaker with the TV all over again.
The neckband speaker can be paired with multiple devices, but can only play music from one paired device at a time.
The video and audio may get out of sync while you are watching videos on TV.
- Depending on the TV you are using, audio may not be output from the TV when the neckband speaker is connected to the TV via a BLUETOOTH connection. If you want to output audio from the TV, either turn off the neckband speaker or select [BRAVIA Theatre U] from the TV's BLUETOOTH settings to disconnect the BLUETOOTH connection between the neckband speaker and the TV.
For details about the settings of the TV, refer to the operating instructions supplied with the TV you are using.
- When using the Speaker Add function, you cannot use the multipoint connection capability.
- If the dedicated audio adaptor (supplied) and the dedicated audio cable (supplied) are connected to the neckband speaker, then the BLUETOOTH function and the call function cannot be used.
Related Topic
- Connecting the neckband speaker concurrently with 2 BLUETOOTH devices (multipoint connection)
- Listening to TV audio through the neckband speaker
5-056-199-11(1) Copyright 2024 Sony Corporation
Wireless Neckband Speaker
BRAVIA Theatre U
Connecting the neckband speaker with a Windows computer via a BLUETOOTH connection
Pair the neckband speaker and a computer, then connect them by a BLUETOOTH connection.
Supported operation systems
Windows 11, Windows 10
1 Make the necessary preparations for a BLUETOOTH connection to the neckband speaker.
- Charge the built-in battery sufficiently.
- To avoid any sudden loud sound output from the neckband speaker, turn down the volume of both the computer and the neckband speaker before connecting them. Or, stop playing the music.
- Bring the neckband speaker within a distance of 1 m (3.2 ft) from your computer.
- Bring the operating instructions supplied with your computer at hand for reference.
- Set the speaker of your computer to on.
If the speaker of your computer is set to minute), sound does not output on the neckband speaker.
— When the speaker of your computer is set to on:

2 Put the neckband speaker into pairing mode.
To pair the first time after purchase*
While the power is off, press and hold the (power)/(BUETOOTH) button for about 2 seconds until you hear a notification sound. The power turns on and the neckband speaker enters pairing mode, and the (power)/(BLUETOOTH) indicator double flashes in blue.
* Do this procedure if the neckband speaker has been initialized (pairing information has been erased) also.

To pair a second and subsequent BLUETOOTH devices (if the neckband speaker has pairing information for other devices)
While the power is off, press and hold the (power)/(BUETOOTH) button for about 5 seconds until you hear a notification sound and voice guidance (Pairing). The neckband speaker enters pairing mode, and the (power)/(BUETOOTH) indicator double flashes in blue.


Note
- Press and hold the (power)/(BUETOOTH) button for about 2 seconds, and continue pressing the button when the power turns on and you hear a notification sound.
3 Register the neckband speaker to the computer.
On Windows 11
Click the [Start] button, then [Settings].1.
Click [Bluetooth & devices].2.

- Click the [Bluetooth] switch to turn on the BLUETOOTH function, and then click [Add device].

Click [Bluetooth].4.

Select [BRAVIA Theatre U].5.

- After pairing, the BLUETOOTH connection establishes automatically and [Connected music] or [Connected voice, music] will be displayed on the screen. Proceed to step 4

On Windows 10
Click the [Start] button, then [Settings].1.
Click [Devices].2.

- Click the [Bluetooth & other devices] tab, click the [Bluetooth] switch to turn on the BLUETOOTH function, and then click [Add Bluetooth or other device].

Click [Bluetooth].4.

- Select [BRAVIA Theatre U].

If [BRAVIA Theatre U] does not appear, perform the operation again from step 2
- After pairing, the BLUETOOTH connection establishes automatically and [Connected music] or [Connected voice, music] will be displayed on the screen. Proceed to step 4

4
Follow the on-screen instructions to establish a BLUETOOTH connection.
When a BLUETOOTH connection is established, you hear a notification sound from the neckband speaker and the ⏻(power)/ 3 BLUETOOTH indicator starts flashing in blue.

If a BLUETOOTH connection is not established, repeat the procedure all over again from step 2
Hint
- The operation of registering a device you want to connect via a BLUETOOTH connection is called pairing.
Pairing must be done to connect to a computer via a BLUETOOTH connection to listen to audio through the neckband speaker.
As long as the BLUETOOTH function is activated on a BLUETOOTH device that has previously been connected with the neckband speaker, the neckband speaker is reconnected with the device right after the neckband speaker is turned on.
The above instructions are provided as an example. For details, refer to the operating instructions supplied with your computer. In addition, not all the computers are tested and found compatible with the above procedure and the procedure is not applicable to home-built computers. - When [BRAVIA Theatre U] and [LE_BRAVIA Theatre U] are displayed for the connection attempt, select [BRAVIA Theatre U]. Although [LE_BRAVIA Theatre U] is first displayed, wait until [BRAVIA Theatre U] is displayed. It may take about 30 seconds to 1 minute before [BRAVIA Theatre U] is displayed. If [BRAVIA Theatre U] is not displayed, repeat the procedure all over again from step ②
- If passkey entry is prompted on a computer with Windows 11 or Windows 10, enter "0000." The passkey may be called a "passcode," "PIN code," "PIN number," or "password."
Note
The neckband speaker comes out of pairing mode in about 5 minutes and the (power)/ (BLUETOOTH) indicator on the neckband speaker turns to slow blue flashing. However, when the neckband speaker has no pairing information, for example when you use the BLUETOOTH function for the first time after purchase, the pairing mode is not released. If the neckband speaker comes out of pairing mode before you complete the procedure, repeat the procedure all over again from step 2
- Once the neckband speaker is paired with the BLUETOOTH device, there is no need to pair them again, except in the following cases:
- Pairing information is deleted in the course of repair work, etc.
— The neckband speaker is already paired with 8 devices and another device is to be paired. The neckband speaker can be paired with up to 8 BLUETOOTH devices. When a new device is paired in addition to 8 paired devices, the pairing information of the earliest device connected via a BLUETOOTH connection is replaced by the information
of the new one.
— The pairing information of the neckband speaker has been deleted from the paired BLUETOOTH device.
— The neckband speaker is initialized.
All the pairing information is deleted. Once the neckband speaker is initialized, it may fail to establish a BLUETOOTH connection with the computer. In such a case, delete the pairing information of the neckband speaker from the computer, and then pair the neckband speaker with the computer all over again.
The neckband speaker can be paired with multiple devices, but can only play music from one paired device at a time.
- When using the Speaker Add function, you cannot use the multipoint connection capability.
- If the dedicated audio adaptor (supplied) and the dedicated audio cable (supplied) are connected to the neckband speaker, then the BLUETOOTH function and the call function cannot be used.
Related Topic
- Connecting the neckband speaker concurrently with 2 BLUETOOTH devices (multipoint connection)
- Listening to music of a device via a BLUETOOTH connection
• Terminating the BLUETOOTH connection (After use)
• Making a video call on a computer
5-056-199-11(1) Copyright 2024 Sony Corporation
Wireless Neckband Speaker
BRAVIA Theatre U
Connecting the neckband speaker with a paired Windows computer via a BLUETOOTH connection

Press and hold the (power)/(BUETOOTH) button for about 2 seconds until you hear a notification sound.
The neckband speaker turns on and the (power)/(BUETOOTH) indicator starts flashing in blue.
![graph LR A["Input"] --> B["Power Button"] B --> C["Light Bulb"] style A fill:#f9f,stroke:#333 style C fill:#bbf,stroke:#333](/content/2026/08/1622291/images/51f15656602d18ba67759f5ffda8d42593e9ddd49170c766c90cad5a92168ad2.jpg)
When a BLUETOOTH connection is automatically established with the previously connected device, you hear a notification sound.
On the computer, see if a BLUETOOTH connection is established with the neckband speaker. If not, proceed to step 2

On the computer, select the neckband speaker.
On Windows 11
Click the [Start] button, then [Settings].1.
Click [Bluetooth & devices].2.
Click the [Bluetooth] switch to turn on the BLUETOOTH function.3.

Select [BRAVIA Theatre U], and then click [Connect].4.

The icons displayed may differ from those on the screen.
After connecting, [Connected music] or [Connected voice, music] is displayed.
On Windows 10
Click the [Start] button, then [Settings].1.
Click [Devices].2.

- Click the [Bluetooth & other devices] tab, and then click the BLUETOOTH switch to turn on the BLUETOOTH function.

Select [BRAVIA Theatre U] from the devices listed under [Audio] and click [Connect].4.

The icons displayed may differ from those on the screen.
After connecting, [Connected music] or [Connected voice, music] is displayed.
When a BLUETOOTH connection is established, you hear a notification sound from the neckband speaker and the (power)/BLUETOOTH indicator on the neckband speaker starts flashing in blue.
Hint
- The above instructions are provided as an example. For details, refer to the operating instructions supplied with your computer. In addition, not all the computers are tested and found compatible with the above procedure and the procedure is not applicable to home-built computers.
- If the previously connected BLUETOOTH device is nearby, turning on the neckband speaker may automatically establish a BLUETOOTH connection with the device. In such a case, turn off the BLUETOOTH function on the previously connected BLUETOOTH device or turn off the device.
Note
- If sound quality of music playback is poor, make sure that your computer is configured to enable the BLUETOOTH profile for music playback (A2DP). For details, refer to the operating instructions supplied with your computer.
- If the neckband speaker fails to establish a BLUETOOTH connection with your computer, delete the pairing information of the neckband speaker from the computer and then pair them all over again. For details of operations on the computer, refer to the operating instructions supplied with your computer.
- When using the Speaker Add function, you cannot use the multipoint connection capability.
- If the dedicated audio adaptor (supplied) and the dedicated audio cable (supplied) are connected to the neckband speaker, then the BLUETOOTH function and the call function cannot be used.
Related Topic
- Connecting the neckband speaker concurrently with 2 BLUETOOTH devices (multipoint connection)
- Connecting the neckband speaker with a Windows computer via a BLUETOOTH connection
- Listening to music of a device via a BLUETOOTH connection
• Terminating the BLUETOOTH connection (After use)
5-056-199-11(1) Copyright 2024 Sony Corporation
Wireless Neckband Speaker
BRAVIA Theatre U
Connecting the neckband speaker with a Mac computer via a BLUETOOTH connection
Pair the neckband speaker and a Mac computer, then connect them by BLUETOOTH connection.
Supported operation systems
macOS 11 or later
1 Make the necessary preparations for a BLUETOOTH connection to the neckband speaker.
- Charge the built-in battery sufficiently.
- To avoid any sudden loud sound output from the neckband speaker, turn down the volume of both the Mac computer and the neckband speaker before connecting them. Or, stop playing the music.
- Bring the neckband speaker within a distance of 1 m (3.2 ft) from your Mac computer.
- Bring the operating instructions supplied with your Mac computer at hand for reference.
- Set the speaker of your Mac computer to on. If the speaker of your Mac computer is set to minute), sound does not output on the neckband speaker.
— When the speaker of your Mac computer is set to on:

2 Put the neckband speaker into pairing mode.
To pair the first time after purchase*
While the power is off, press and hold the (power)/(BUETOOTH) button for about 2 seconds until you hear a notification sound. The power turns on and the neckband speaker enters pairing mode, and the (power)/(BLUETOOTH) indicator double flashes in blue.
* Do this procedure if the neckband speaker has been initialized (pairing information has been erased) also.
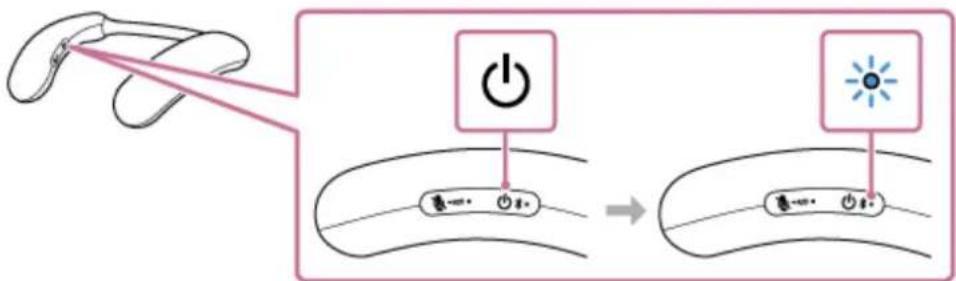
To pair a second and subsequent BLUETOOTH devices (if the neckband speaker has pairing information for other devices)
While the power is off, press and hold the (power)/(BUETOOTH) button for about 5 seconds until you hear a notification sound and voice guidance (Pairing). The neckband speaker enters pairing mode, and the (power)/(BUETOOTH) indicator double flashes in blue.


Note
- Press and hold the (power)/ (BUETOOTH) button for about 2 seconds, and continue pressing the button when the power turns on and you hear a notification sound.
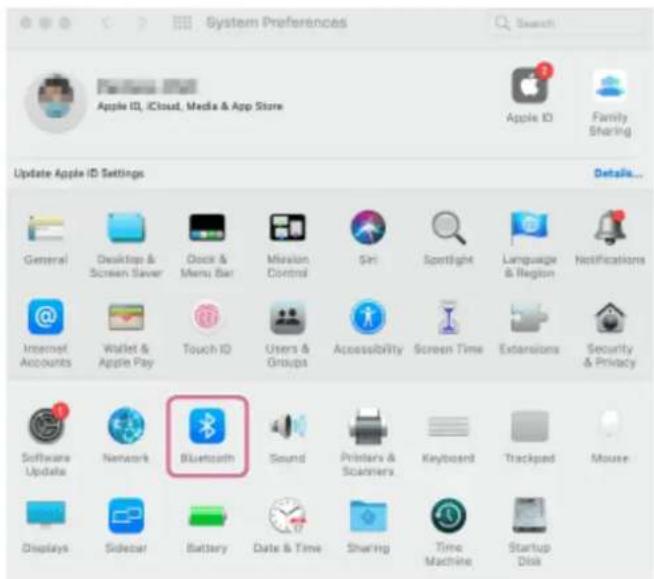
Search for the neckband speaker on your Mac computer.
- Click [ 🔒 (System Preferences)] - [Bluetooth] in the taskbar on the right-bottom of the screen.
Select [BRAVIA Theatre U] from the Bluetooth screen, then click [Connect].2.
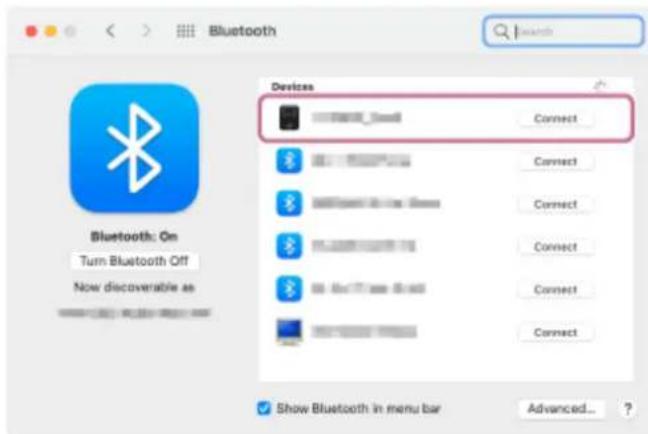
4 Follow the on-screen instructions to establish a BLUETOOTH connection.
When a BLUETOOTH connection is established, you hear a notification sound from the neckband speaker and the ⏻(power)/ BLUETOOTH indicator starts flashing in blue.

If a BLUETOOTH connection is not established, repeat the procedure all over again from step 2
5 Click the speaker icon in the top-right of the screen and select [BRAVIA Theatre U] from [Output].
You can now enjoy music, etc. playing on your Mac computer via the neckband speaker.

Hint
- The operation of registering a device you want to connect via a BLUETOOTH connection is called pairing. Pairing must be done to connect to a Mac computer via a BLUETOOTH connection to listen to audio through the neckband speaker.
As long as the BLUETOOTH function is activated on a BLUETOOTH device that has previously been connected with the neckband speaker, the neckband speaker is reconnected with the device right after the neckband speaker is turned on.
The above instructions are provided as an example. For details, refer to the operating instructions supplied with your Mac computer. In addition, not all the Mac computers are tested and found compatible with the above procedure. - When [BRAVIA Theatre U] and [LE_BRAVIA Theatre U] are displayed for the connection attempt, select [BRAVIA Theatre U]. Although [LE_BRAVIA Theatre U] is first displayed, wait until [BRAVIA Theatre U] is displayed. It may take about 30 seconds to 1 minute before [BRAVIA Theatre U] is displayed. If [BRAVIA Theatre U] is not displayed, repeat the procedure all over again from step ②
- If passkey entry is prompted on a Mac computer, enter "0000." The passkey may be called a "passcode," "PIN code," "PIN number," or "password."
Note
The neckband speaker comes out of pairing mode in about 5 minutes and the (power)/ (BLUETOOTH) indicator on the neckband speaker turns to slow blue flashing. However, when the neckband speaker has no pairing information, for example when you use the BLUETOOTH function for the first time after purchase, the pairing mode is not released. If the neckband speaker comes out of pairing mode before you complete the procedure, repeat the procedure all over again from step 2
- Once the neckband speaker is paired with the BLUETOOTH device, there is no need to pair them again, except in the following cases:
— Pairing information is deleted in the course of repair work, etc.
— The neckband speaker is already paired with 8 devices and another device is to be paired.
- Pairing information is deleted in the course of repair work, etc. - The neckband speaker is already paired with 8 devices and another device is to be paired.
The neckband speaker can be paired with up to 8 BLUETOOTH devices. When a new device is paired in addition to 8 paired devices, the pairing information of the earliest device connected via a BLUETOOTH connection is replaced by the information of the new one.
— The pairing information of the neckband speaker has been deleted from the paired BLUETOOTH device.
— The neckband speaker is initialized.
All the pairing information is deleted. Once the neckband speaker is initialized, it may fail to establish a BLUETOOTH connection with the Mac computer. In such a case, delete the pairing information of the neckband speaker from the Mac computer, and then pair the neckband speaker with the Mac computer all over again.
The neckband speaker can be paired with multiple devices, but can only play music from one paired device at a time.
- When using the Speaker Add function, you cannot use the multipoint connection capability.
- If the dedicated audio adaptor (supplied) and the dedicated audio cable (supplied) are connected to the neckband speaker, then the BLUETOOTH function and the call function cannot be used.
Related Topic
- Connecting the neckband speaker concurrently with 2 BLUETOOTH devices (multipoint connection)
- Listening to music of a device via a BLUETOOTH connection
• Terminating the BLUETOOTH connection (After use)
• Making a video call on a computer
5-056-199-11(1) Copyright 2024 Sony Corporation
Wireless Neckband Speaker
BRAVIA Theatre U
Connecting the neckband speaker with a paired Mac computer via a BLUETOOTH connection
Supported operation systems
macOS 11 or later
1 Make the necessary preparations for a BLUETOOTH connection to the neckband speaker.
Set the speaker of your Mac computer to on.
If the speaker of your Mac computer is set to minute), sound does not output on the neckband speaker.
- When the speaker of your Mac computer is set to on:

2 Press and hold the (power)/ (BUETOOTH) button for about 2 seconds until you hear a notification sound.
The neckband speaker turns on and the (power)/(BUETOOTH) indicator starts flashing in blue.

When a BLUETOOTH connection is automatically established with the previously connected device, you hear a notification sound.
On your Mac computer, see if a BLUETOOTH connection is established with the neckband speaker. If not, proceed to step 3
3 On your Mac computer, select the neckband speaker.
- Click [ Ⓧ (System Preferences)] - [Bluetooth] in the taskbar on the right-bottom of the screen.

- Select [BRAVIA Theatre U] on the Bluetooth screen, and then click [Connect].

When a BLUETOOTH connection is established, you hear a notification sound from the neckband speaker and the (power)/(BLUETOOTH) indicator starts flashing in blue.

Click the speaker icon in the top-right of the screen and select [BRAVIA Theatre U] from [Output].
You can now enjoy music, etc. playing on your Mac computer via the neckband speaker.

Hint
- The above instructions are provided as an example. For details, refer to the operating instructions supplied with your Mac computer. In addition, not all the Mac computers are tested and found compatible with the above procedure.
- If the previously connected BLUETOOTH device is nearby, turning on the neckband speaker may automatically establish a BLUETOOTH connection with the device. In such a case, turn off the BLUETOOTH function on the previously connected BLUETOOTH device or turn off the device.
Note
- If sound quality of music playback is poor, make sure that your Mac computer is configured to enable the BLUETOOTH profile for music playback (A2DP). For details, refer to the operating instructions supplied with your Mac computer.
- If the neckband speaker fails to establish a BLUETOOTH connection with your Mac computer, delete the pairing information of the neckband speaker from the Mac computer and then pair them all over again. For details of operations on the Mac computer, refer to the operating instructions supplied with your Mac computer.
- When using the Speaker Add function, you cannot use the multipoint connection capability.
- If the dedicated audio adaptor (supplied) and the dedicated audio cable (supplied) are connected to the neckband speaker, then the BLUETOOTH function and the call function cannot be used.
Related Topic
- Connecting the neckband speaker concurrently with 2 BLUETOOTH devices (multipoint connection)
- Connecting the neckband speaker with a Mac computer via a BLUETOOTH connection
- Listening to music of a device via a BLUETOOTH connection
• Terminating the BLUETOOTH connection (After use)
5-056-199-11(1) Copyright 2024 Sony Corporation
Wireless Neckband Speaker
BRAVIA Theatre U
Connecting the neckband speaker with an Android™ smartphone or an iPhone via a BLUETOOTH connection
Pair the neckband speaker and Android smartphone or iPhone, then connect them by BLUETOOTH connection.
1 Make the necessary preparations for a BLUETOOTH connection to the neckband speaker.
- Charge the built-in battery sufficiently.
- To avoid any sudden loud sound output from the neckband speaker, turn down the volume of both the Android smartphone or iPhone and the neckband speaker before connecting them. Or, stop playing the music.
- Bring the Android smartphone or iPhone within 1 m (3.2 ft) of the neckband speaker.
- Bring the operating instructions supplied with the Android smartphone or iPhone at hand for reference.
2 Put the neckband speaker into pairing mode.
To pair the first time after purchase*
While the power is off, press and hold the (power)/(BUETOOTH) button for about 2 seconds until you hear a notification sound. The power turns on and the neckband speaker enters pairing mode, and the (power)/(BLETOOTH) indicator double flashes in blue.
* Do this procedure if the neckband speaker has been initialized (pairing information has been erased) also.

To pair a second and subsequent BLUETOOTH devices (if the neckband speaker has pairing information for other devices)
While the power is off, press and hold the (power)/(BUETOOTH) button for about 5 seconds until you hear a notification sound and voice guidance (Pairing). The neckband speaker enters pairing mode, and the (power)/(BUETOOTH) indicator double flashes in blue.
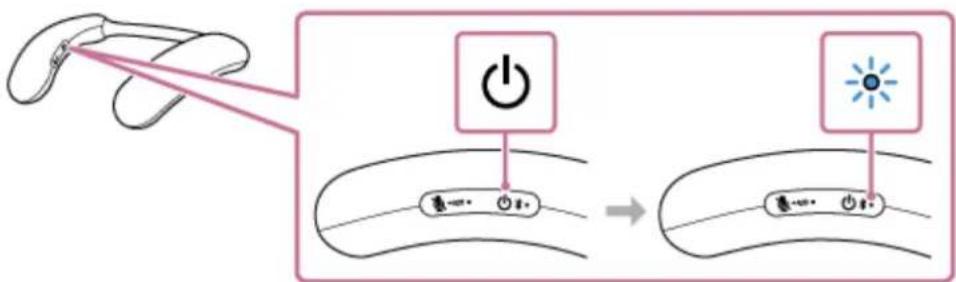
Note
- Press and hold the (power)/(BUETOOTH) button for about 2 seconds, and continue pressing the button when the power turns on and you hear a notification sound.
3
Perform the pairing procedure on the Android smartphone or iPhone to detect the neckband speaker.
On the Android smartphone:
Tap [Settings].1.
Tap [Device connection] - [Connection preferences] - [Bluetooth].2.
Tap [(off)] to change it to [(on)]

Tap [Pair new device].4.
Tap [BRAVIA Theatre U].5.

On the iPhone:
Tap [Settings].1.
Tap [Bluetooth].2.
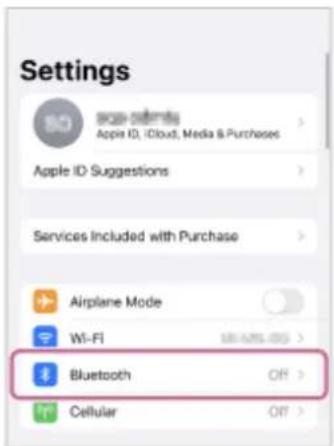
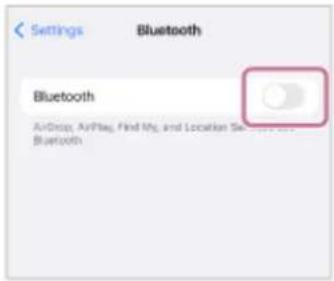
Tap [(off)] to change it to [(on)].6.
- Tap [BRAVIA Theatre U].
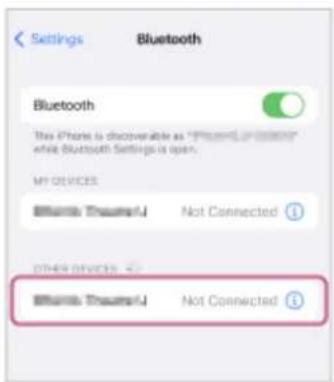
If [BRAVIA Theatre U] is not displayed on the screen, tap [(on)] to change it to [(off)], and then tap it once again to change it back to [(on)].
4 Follow the on-screen instructions to establish a BLUETOOTH connection.
When a BLUETOOTH connection is established, you hear a notification sound from the neckband speaker and the (power)/BLUETOOTH indicator starts flashing in blue.

If a BLUETOOTH connection is not established, repeat the procedure all over again from step 2
Hint
- The operation of registering a device you want to connect via a BLUETOOTH connection is called pairing. Pairing must be done to connect to an Android smartphone or iPhone via a BLUETOOTH connection to listen to audio through the neckband speaker.
- As long as the BLUETOOTH function is activated on the Android smartphone or iPhone that has previously been connected with the neckband speaker, the neckband speaker is reconnected with the Android smartphone or iPhone right after it is turned on.
- The above instructions are provided as an example. For details, refer to the operating instructions supplied with your Android smartphone or iPhone.
- When [BRAVIA Theatre U] and [LE_BRAVIA Theatre U] are displayed for the connection attempt, select [BRAVIA Theatre U]. Although [LE_BRAVIA Theatre U] is first displayed, wait until [BRAVIA Theatre U] is displayed. It may take about 30 seconds to 1 minute before [BRAVIA Theatre U] is displayed. If [BRAVIA Theatre U] is not displayed, repeat the procedure all over again from step 2
- If passkey entry is prompted on an Android smartphone or an iPhone, enter "0000." The passkey may be called a "passcode," "PIN code," "PIN number," or "password."
Note
- For Apple iOS devices, the neckband speaker is compatible with iOS 15.0 or later. BLUETOOTH connection is not available on the devices with iOS 14.x or earlier installed.
- The neckband speaker comes out of pairing mode in about 5 minutes and the (power)/(BLUETOOTH) indicator turns to slow blue flashing. However, when the neckband speaker has no pairing information, for example when you use the BLUETOOTH function for the first time after purchase, the pairing mode is not released. If the neckband speaker comes out of pairing mode before you complete the procedure, repeat the procedure all over again from step 2
Once the neckband speaker is paired with the BLUETOOTH device, there is no need to pair them again, except in the following cases:
— Pairing information is deleted in the course of repair work, etc.
— The neckband speaker is already paired with 8 devices and another device is to be paired. The neckband speaker can be paired with up to 8 BLUETOOTH devices. When a new device is paired in addition to 8 paired devices, the pairing information of the earliest device connected via a BLUETOOTH connection is replaced by the information of the new one.
— The pairing information of the neckband speaker has been deleted from the paired BLUETOOTH device.
The neckband speaker is initialized. The pairing information of all BLUETOOTH devices is deleted. Once the neckband speaker is initialized, it may fail to establish a BLUETOOTH connection with the Android smartphone or iPhone. In such a case, delete the pairing information of the neckband speaker from the Android smartphone or iPhone, and then pair the neckband speaker with the Android smartphone or iPhone all over again.
- The neckband speaker can be paired with multiple devices, but can only play music from one paired device at a time.
- When using the Speaker Add function, you cannot use the multipoint connection capability.
- If the dedicated audio adaptor (supplied) and the dedicated audio cable (supplied) are connected to the neckband speaker, then the BLUETOOTH function and the call function cannot be used.
Related Topic
- Connecting the neckband speaker concurrently with 2 BLUETOOTH devices (multipoint connection)
- Listening to music of a device via a BLUETOOTH connection
• Terminating the BLUETOOTH connection (After use)
Wireless Neckband Speaker
BRAVIA Theatre U
Connecting the neckband speaker with a paired Android smartphone or a paired iPhone via a BLUETOOTH connection

Press and hold the (power)/(BUETOOTH) button for about 2 seconds until you hear a notification sound.
The neckband speaker turns on and the (power)/(BUETOOTH) indicator starts flashing in blue.
When a BLUETOOTH connection is automatically established with the previously connected device, you hear a notification sound.
On the Android smartphone or iPhone, see if a BLUETOOTH connection is established with the neckband speaker. If not, proceed to step 2

Operate the Android smartphone or iPhone to display and select the paired devices.
On the Android smartphone:
Tap [Settings].1.
Tap [Device connection] - [Connection preferences] - [Bluetooth].2.
Tap [(off)] to change it to [(on)].

Tap [BRAVIA Theatre U].4.

On the iPhone:
Tap [Settings].1.
Tap [Bluetooth].2.

Tap [(off)] to change it to [(on)].6.

Tap [BRAVIA Theatre U].4.

When a BLUETOOTH connection is established, you hear the notification sound from the neckband speaker and the (power)/(BLUETOOTH) indicator on the neckband speaker starts flashing in blue.
Hint
- The above instructions are provided as an example. For details, refer to the operating instructions supplied with your Android smartphone or iPhone.
- If the previously connected BLUETOOTH device is nearby, turning on the neckband speaker may automatically establish a BLUETOOTH connection with the device. In such a case, turn off the BLUETOOTH function on the previously connected BLUETOOTH device or turn off the device.
Note
- If the neckband speaker fails to establish a BLUETOOTH connection with the Android smartphone or iPhone, delete the pairing information of the neckband speaker from the Android smartphone or iPhone and then pair them all over again. For details of operations on the Android smartphone or iPhone, refer to the operating instructions supplied with your Android smartphone or iPhone.
- When using the Speaker Add function, you cannot use the multipoint connection capability.
- If the dedicated audio adaptor (supplied) and the dedicated audio cable (supplied) are connected to the neckband speaker, then the BLUETOOTH function and the call function cannot be used.
Related Topic
- Connecting the neckband speaker concurrently with 2 BLUETOOTH devices (multipoint connection)
- Connecting the neckband speaker with an Android™ smartphone or an iPhone via a BLUETOOTH connection
- Listening to music of a device via a BLUETOOTH connection
• Terminating the BLUETOOTH connection (After use)
5-056-199-11(1) Copyright 2024 Sony Corporation
Wireless Neckband Speaker
BRAVIA Theatre U
Connecting the neckband speaker concurrently with 2 BLUETOOTH devices (multipoint connection)
While the neckband speaker is connected concurrently with 2 BLUETOOTH devices via a BLUETOOTH connection, you can do the following:
- Switching the music (audio) playback source between 2 devices
You can switch the music (audio) playback source from one device to the other without reestablishing the BLUETOOTH connection.
![graph TD A["Mobile Phone"] <--> B["Play Icon"] C["Mobile Device"] <--> D["Play Icon"] E["Mobile Phone"] <--> F["Play Icon"] G["Mobile Phone"] <--> H["Play Icon"] I["Mobile Phone"] <--> J["Play Icon"] K["Mobile Phone"] <--> L["Play Icon"] M["Mobile Phone"] <--> N["Play Icon"] O["Mobile Phone"] <--> P…](/content/2026/08/1622291/images/4e66867f2c399f5203526d23b96b7340540c347b859ed4e73a12ad377bced22e.jpg)
- Standing by for an incoming call to either of the 2 smartphones/iPhone devices
You can keep both of the 2 smartphones/iPhone devices on standby for an incoming call while listening to music (audio) playing on one of the smartphones/iPhone devices, and receive an incoming call to either of the smartphones/iPhone devices when it arrives.

Note
- Multipoint connections cannot be made when [Connect to 2 devices simultaneously] is set to off in the "Sony | Headphones Connect" app.
- When using the Speaker Add function, you cannot use the multipoint connection capability.
- Depending on the BLUETOOTH device, you may not be able to use the multipoint connection capability.
- If the dedicated audio adaptor (supplied) and the dedicated audio cable (supplied) are connected to the neckband speaker, then the BLUETOOTH function and the call function cannot be used.
Connecting the neckband speaker concurrently with 2 devices via BLUETOOTH connections
Before connecting, make sure that the "Sony | Headphones Connect" app is installed on one of the 2 devices.
1 Connect the neckband speaker with the first BLUETOOTH device.
2 While keeping the neckband speaker connected with the first BLUETOOTH device, press and hold the (power)/BLUETOOTH) button for about 5 seconds.
You hear a notification sound and voice guidance (Pairing) from the neckband speaker and the (power)/(BLUETOOTH) indicator double flashes in blue (pairing mode).

Note
- Press and hold the (power)/ (BUETOOTH) button for about 2 seconds, and continue pressing the button when the power turns off and you hear a notification sound.
3 Operate the second BLUETOOTH device to search for the neckband speaker.
4 Follow the on-screen instructions to establish a BLUETOOTH connection.
When a BLUETOOTH connection is established, you hear a notification sound from the neckband speaker and the ⏻(power)/ BLUETOOTH indicator flashes in blue.

Changing the BLUETOOTH devices in multipoint connection
While keeping the neckband speaker connected with 2 devices in multipoint connection, you can attempt to connect another device via a BLUETOOTH connection.
When you operate the neckband speaker and the third device in an attempt to establish a BLUETOOTH connection, the BLUETOOTH connection with one of the 2 devices used for the previous music (audio) playback or phone talking is retained and the BLUETOOTH connection with the other device is disconnected. Then, a BLUETOOTH connection is established between the neckband speaker and the third device.
Music (audio) playback while the neckband speaker is connected with 2 devices in multipoint connection
- When you play music (audio) by operating the neckband speaker, the music (audio) that plays is from the last device that was played.
- To play music (audio) on the other (second) device in multipoint connection, operate the second one to start music (audio) playback.
Depending on the condition, you may still hear music (audio) playing on the same (first) device from the neckband speaker after you operate the second device to start playback. In such a case, stop the playback on the first one. Then, you can listen to music (audio) playing on the second one.
Receiving a call while the neckband speaker is connected with 2 smartphones/iPhone devices in multipoint connection
- Connecting the neckband speaker with 2 smartphones/iPhone devices in multipoint connection places both of the devices on standby for an incoming call.
- When an incoming call arrives to one of the devices in multipoint connection, a ring tone is heard via the neckband speaker.
- When another incoming call arrives to the other (second) device while you are talking on the first call via the neckband speaker, a ring tone is heard from the second device.
By ending the call on the first device, you hear a ring tone on the second device via the neckband speaker.
Related Topic
- Connecting the neckband speaker with a paired Windows computer via a BLUETOOTH connection
- Connecting the neckband speaker with a paired Mac computer via a BLUETOOTH connection
- Connecting the neckband speaker with a paired Android smartphone or a paired iPhone via a BLUETOOTH connection
5-056-199-11(1) Copyright 2024 Sony Corporation
Using 2 neckband speakers at the same time (Speaker Add)
You need 2 BRAVIA Theatre U devices to use the Speaker Add function. Connect 2 neckband speakers via a BLUETOOTH connection so 2 people can enjoy the same audio.
Note
- You need to connect one of the neckband speakers to a BLUETOOTH device to connect 2 neckband speakers together.
- To avoid any sudden loud sound output from the neckband speaker, turn down the volume of both the BLUETOOTH device and the neckband speaker before connecting them. Or, stop playing the music (audio).
1 Connect the first neckband speaker to a BLUETOOTH device.
For details about the BLUETOOTH connection procedure, see one of the following that is applicable to your device.
- Connecting the neckband speaker to a 360 Spatial Sound Personalizer compatible BRAVIA TV via a BLUETOOTH connection
- Connecting the neckband speaker to a 360 Spatial Sound Personalizer compatible BRAVIA TV via a BLUETOOTH connection through the transmitter (sold separately)
- Connecting the neckband speaker with a TV via a BLUETOOTH connection
- Connecting the neckband speaker with a Windows computer via a BLUETOOTH connection
- Connecting the neckband speaker with a Mac computer via a BLUETOOTH connection
- Connecting the neckband speaker with an Android™ smartphone or an iPhone via a BLUETOOTH connection
2 Press and hold the microphone off)/ ADD (Speaker Add) button on the first neckband speaker for about 2 seconds.
You hear a notification sound, and the power)/ (BUETOOTH) indicator and (microphone off)/ ADD (Speaker Add) indicator slowly flash.

3 Press and hold the 📄 (microphone off)/ADD (Speaker Add) button on the second neckband speaker for about 2 seconds.
You hear a notification sound, and the power)/ (BUETOOTH) indicator and (microphone off)/ ADD (Speaker Add) indicator slowly flash.

Check the status of the indicators on the 2 neckband speakers.
When the connection is made using the Speaker Add function, you hear a notification sound from the neckband speaker and the indicators are displayed as notifications as follows.
• (power)/*BLUETOOTH) indicator
— First neckband speaker: Flashes for about 5 seconds
— Second neckband speaker: Goes out
• (microphone off)/ ADD (Speaker Add) indicator Light on both neckband speakers for 30 seconds

Hint
- If the 2 neckband speakers are immediately connected by the Speaker Add function, the (power)/(BUETOOTH) indicator and (microphone off)/ADD (Speaker Add) indicator may not flash, but the (microphone off)/ADD (Speaker Add) indicator may light.
- Set the second neckband speaker within 1 minute. If more than 1 minute passes, the first neckband speaker's settings will be deactivated.
Play the BLUETOOTH device and adjust the volume appropriately.
Adjust the volume by pressing the -/+ (volume) buttons on the neckband speaker.
To cancel a Speaker Add function connection
Do one of the following operations.
- Press and hold the microphone off)/ ADD (Speaker Add) button on one of the neckband speakers for about 2 seconds.
You hear a notification sound and the Speaker Add function is canceled.
- Turn off one of the neckband speakers.
When you turn off the first neckband speaker, the second neckband speaker also turns off.
Hint
- If another BLUETOOTH device, such as a mouse or keyboard, is connected to the BLUETOOTH device that is connected to the neckband speaker, then there may be noise or the audio being played may be interrupted. If this happens, operate the BLUETOOTH devices and separate the other BLUETOOTH devices.
- When using the Speaker Add function, the voice guidance is heard through the neckband speaker that was operated.
Note
- When using the Speaker Add function, the codec automatically switches to SBC.
- If the dedicated audio adaptor (supplied) and the dedicated audio cable (supplied) are connected to the neckband speaker, then the neckband speaker automatically changes to analog audio input mode, and the Speaker Add function is canceled.
- When using the Speaker Add function, multipoint connections and calls cannot be made.
- When using the Speaker Add function, if you have reset or initialized one of the neckband speakers, press the 📄 (microphone off)/ ●ADD (Speaker Add) button on the other neckband speaker to cancel the Speaker Add function. If you continue to use it as is, the BLUETOOTH connection may not work properly or the sound may be interrupted.
- Using the Speaker Add function may cause the video and audio to get out of sync while you are watching videos.
- If the dedicated audio adaptor (supplied) and the dedicated audio cable (supplied) are connected to the neckband speaker, then the BLUETOOTH function and the call function cannot be used.
5-056-199-11(1) Copyright 2024 Sony Corporation
Listening to TV audio through the neckband speaker
Listen to TV audio through the neckband speaker via direct BLUETOOTH connection, or through a connection to a TV via the transmitter (sold separately).
Note
- If the dedicated audio adaptor (supplied) and the dedicated audio cable (supplied) are connected to the neckband speaker, then the BLUETOOTH function and the call function cannot be used.
1 Turn on the TV.
If you want to connect to a 360 Spatial Sound Personalizer compatible BRAVIA TV and enjoy TV audio in 360 spatial sound through the neckband speaker, then activate the 3D surround functions on the BRAVIA TV.
2 Turn on the neckband speaker by pressing and holding the (power)/(BUETOOTH) button for about 2 seconds until you hear a notification sound.
When the neckband speaker is turned on, it is automatically connected via a BLUETOOTH connection to the paired TV.
When the connection is complete, the audio output switches from the TV to the neckband speaker.
Hint
- If you are using the transmitter (sold separately) to connect a 360 Spatial Sound Personalizer compatible BRAVIA TV to the neckband speaker, then when the neckband speaker is turned on, it connects automatically by BLUETOOTH connection to the paired transmitter (sold separately). If no audio comes from the neckband speaker, press the ✕BLUETOOTH button on the transmitter (sold separately) once briefly.
3 Wear the neckband speaker around the base of your neck.
Adjust the width of the neckband so it feels comfortable when worn.
For details, see "Adjusting the width of the neckband."
4 Adjust the volume with the -/+ (volume) buttons.

Hint
- If the neckband speaker is connected to a 360 Spatial Sound Personalizer compatible BRAVIA TV via a transmitter (sold separately), then the neckband speaker volume cannot be adjusted on the BRAVIA TV side.
- When the volume of the neckband speaker is maximized or minimized, you hear a notification sound.
Note
The (play/call) button cannot be used while listening to TV audio on the neckband speaker.
- Depending on the TV you are using, audio may not be output from the TV when the neckband speaker is connected to the TV via a BLUETOOTH connection. If you want to output audio from the TV, either turn off the neckband speaker or select [BRAVIA Theatre U] from the TV's BLUETOOTH settings to disconnect the BLUETOOTH connection between the neckband speaker and the TV.
For details about the settings of the TV, refer to the operating instructions supplied with the TV you are using.
Related Topic
- Adjusting the width of the neckband
- Connecting the neckband speaker to a 360 Spatial Sound Personalizer compatible BRAVIA TV via a BLUETOOTH connection
- Connecting the neckband speaker to a 360 Spatial Sound Personalizer compatible BRAVIA TV via a BLUETOOTH connection through the transmitter (sold separately)
- Connecting the neckband speaker with a TV via a BLUETOOTH connection
5-056-199-11(1) Copyright 2024 Sony Corporation
Wireless Neckband Speaker
BRAVIA Theatre U
Listening to music of a device via a BLUETOOTH connection
You can enjoy listening to music of a BLUETOOTH device and operate it by the neckband speaker via a BLUETOOTH connection if it supports the following BLUETOOTH profiles.
A2DP (Advanced Audio Distribution Profile)
Enables you to enjoy high-quality audio contents wirelessly.
AVRCP (Audio Video Remote Control Profile)
Enables you to adjust the volume and operate to play, pause or skip to the beginning of the next/current track. Operations may vary depending on your BLUETOOTH device and music playback app. Refer also to the operating instructions supplied with the BLUETOOTH device.
Note
- Make sure beforehand that the volume on the BLUETOOTH device and neckband speaker are set to a moderate level to avoid sudden loud sound output from the neckband speaker.
Depending on the BLUETOOTH device, adjusting the volume of the neckband speaker may not be possible on the BLUETOOTH device while playback on the device is stopped/paused. - If the dedicated audio adaptor (supplied) and the dedicated audio cable (supplied) are connected to the neckband speaker, then the BLUETOOTH function and the call function cannot be used.
1 Connect the neckband speaker with the BLUETOOTH device.
When a BLUETOOTH connection is established, you hear a notification sound from the neckband speaker and the ⏻ (power)/ ® BLUETOOTH indicator starts flashing in blue.

2 Start playback on the BLUETOOTH device.
3 Wear the neckband speaker around the base of your neck.
Adjust the width of the neckband so it feels comfortable when worn.
For details, see "Adjusting the width of the neckband."
4 Adjust the volume with the -/+ (volume) buttons on the neckband speaker.
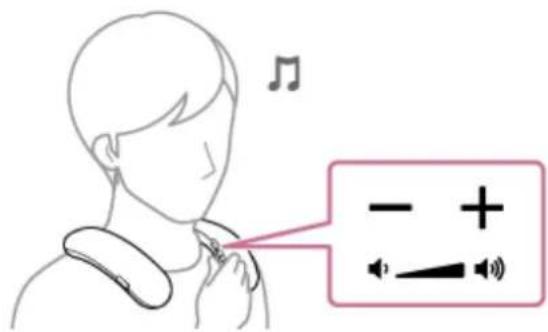
During playback, you can use the button on the neckband speaker to perform the following operations.
Pause
Press the (play/call) button during playback to pause. Press it again to cancel pause.
Skip to the beginning of the next track
Press the (play/call) button twice quickly during playback.
Skip to the beginning of the current or previous track*
Press the (play/call) button 3 times quickly during playback.
* Operations vary depending on the BLUETOOTH device in use.
Fast-forward the current track
While playback is in progress or paused, press the (play/call) button once and immediately press and hold the button. When you take your finger off the button, playback starts or remains paused at the fast-forwarded point.
Fast-reverse the current track
While playback is in progress or paused, press the (play/call) button twice in quick succession and immediately press and hold the button. When you take your finger off the button, playback resumes or remains paused.

Hint
The neckband speaker supports content protection by the SCMS-T method. You can listen to music (or audio) from the smartphone or mobile phone, which supports the SCMS-T method, through the neckband speaker.
- When the volume of the neckband speaker is maximized or minimized, you hear a notification sound.
Note
- While music playback is in progress on a BLUETOOTH device, do not connect the dedicated audio cable (supplied) to the USB Type-C port. Connecting the dedicated audio cable (supplied) to the USB Type-C port automatically switches the neckband speaker to analog audio input mode and you cannot hear music from the BLUETOOTH device.
While battery charging is in progress, the neckband speaker fails to turn on and you cannot use the BLUETOOTH function. - When using in a place with a high temperature, the volume may decrease to protect the built-in battery.
The maximum power output will be lower when the built-in battery is running low.
- Operations available with the (play/call) button may vary depending on the music playback app.
- If the communication condition is poor, the BLUETOOTH device may react incorrectly to the operations on the neckband speaker.
- Depending on the BLUETOOTH device, it may be necessary to adjust the volume or set the audio output setting on the connected device.
- Noise or sound interruption may occur depending on the BLUETOOTH device connected with the neckband speaker, the communication environment or the usage environment.
Related Topic
• Adjusting the width of the neckband
• Terminating the BLUETOOTH connection (After use)
• Charging the neckband speaker
5-056-199-11(1) Copyright 2024 Sony Corporation
Wireless Neckband Speaker
BRAVIA Theatre U
Selecting the quality for music playback via BLUETOOTH connections (Codec)
The “Prioritize Sound Quality” and “Prioritize Stable Connection” preferences are available on the neckband speaker for the quality for music playback via BLUETOOTH connections. The “Prioritize Sound Quality” preference provides compatibility not only with SBC but also with AAC and LDAC™ for music playback of high sound quality, whereas the “Prioritize Stable Connection” preference enables music playback via more stable BLUETOOTH connections. When the BLUETOOTH connection is unstable, for example when sound interruption occurs, select the “Prioritize Stable Connection” preference. “Prioritize Sound Quality” is the default setting.
With the "Sony | Headphones Connect" app, you can change the preference or check the Bluetooth Connection Quality.
- Prioritize Sound Quality (default setting): AUTO is selected. The optimal codec is automatically selected from AAC, LDAC, and SBC.
- Prioritize Stable Connection: SBC is selected.
Note
- When using the Speaker Add function, the codec automatically switches to SBC.
- Depending on your environment, selecting the "Prioritize Stable Connection" preference may not help solving the sound interruption issue.
Related Topic
- What you can do with the "Sony | Headphones Connect" app
5-056-199-11(1) Copyright 2024 Sony Corporation
Wireless Neckband Speaker
BRAVIA Theatre U
Terminating the BLUETOOTH connection (After use)
When you are finished with using the BLUETOOTH device, perform any of the following operations to terminate the BLUETOOTH connection.
When the BLUETOOTH connection is terminated, you hear a notification sound from the neckband speaker.
Note
- Depending on the BLUETOOTH device, you may not hear a notification sound from the neckband speaker.
- Turn off the BLUETOOTH function on the BLUETOOTH device. For details, refer to the operating instructions supplied with the device.
• Turn off the BLUETOOTH device.
• Turn off the neckband speaker.
Hint
- When using the Speaker Add function, if the (power)/ (BLUETOOTH) indicator is flashing and you turn off the neckband speaker, the other neckband speaker also turns off and the BLUETOOTH connection is disconnected.
- Depending on the BLUETOOTH device, ending music playback may automatically terminate the BLUETOOTH connection.
Related Topic
• Turning the power off
5-056-199-11(1) Copyright 2024 Sony Corporation
About 360 Reality Audio
What is 360 Reality Audio?
360 Reality Audio is a new music experience using Sony's 360 three-dimensional audio technology.
Positional information is attached to each sound source such as vocals, chorus, and musical instruments, and are placed in a spherical space.
Listeners can experience a three-dimensional sound field as if they are immersed in a live performance of the artists.
Conditions of use
Download and use a music streaming service (charged) app that supports 360 Reality Audio on your smartphone or tablet equipped with iOS or Android.
By optimizing the sound field and the acoustic feature of the neckband speaker with the "Sony | Headphones Connect" app, you can enjoy a more realistic sense of reality.
For details on 360 Reality Audio, refer to the following URL.
https://www.sony.net/360RA/
Note
• Service is not available in certain countries and regions.
5-056-199-11(1) Copyright 2024 Sony Corporation
Wireless Neckband Speaker
BRAVIA Theatre U
Use the dedicated audio cable (supplied) to listen
You can use the dedicated audio cable (supplied) to connect the neckband speakers to listen to analog audio from a game console or computer.
1 Insert the dedicated audio cable (supplied), connected to the dedicated audio adaptor (supplied), into the USB Type-C port on the neckband speaker.
When the dedicated audio cable (supplied) is connected, the neckband speaker automatically changes to analog audio input mode.

Note
- Be sure to insert the dedicated audio adaptor (supplied) and the dedicated audio cable (supplied) so the cable faces downward as shown in the image. Inserting it facing the other way may cause the cap or the USB Type-C port to malfunction.
2 Connect the analog audio plug of the dedicated audio cable (supplied) to the audio output port of the game console or computer.

3 Adjust the volume with the -/+ (volume) buttons.
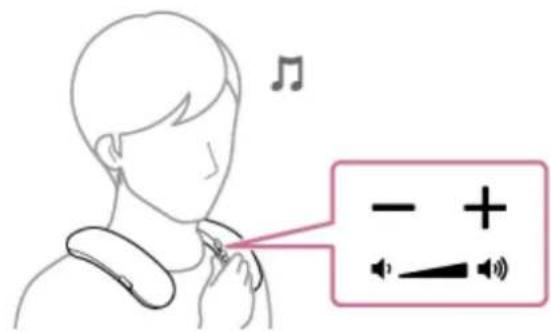
Hint
- When the dedicated audio cable (supplied) is disconnected, the mode automatically changes to BLUETOOTH audio input mode.
- When the volume of the neckband speaker is set to maximum or minimum, you hear a notification sound.
Note
- Be sure to use the dedicated audio adaptor (supplied) and the dedicated audio cable (supplied).
- Insert the analog audio plug of the dedicated audio cable (supplied) firmly all the way in.
- If the dedicated audio adaptor (supplied) and the dedicated audio cable (supplied) are connected to the neckband speaker, then the BLUETOOTH function and the call function cannot be used.
- The —(play/call) button on the neckband speaker cannot be used when the dedicated audio cable (supplied) is used to connect to a game console or computer.
Do not charge the neckband speaker's built-in battery in places where water may splash on it. The dedicated audio adaptor (supplied), dedicated audio cable (supplied), and the USB port inside the cap are not water resistant. - If the dedicated audio adaptor (supplied) and the dedicated audio cable (supplied) are connected to the neckband speaker, then the neckband speaker cannot be charged.
5-056-199-11(1) Copyright 2024 Sony Corporation
Making a video call on a computer
During a video call on a computer, you can use the neckband speaker for wireless phone talking.
1 Connect the neckband speaker with a computer via a BLUETOOTH connection.
2 Launch a video call application on the computer.
3 View the settings *1 of the video call application.
- For video calls on the computer, select the BLUETOOTH profile not for music playback (A2DP) but for phone talking (HFP/HSP connection). While the BLUETOOTH profile for music playback (A2DP connection) is selected, phone talking may not be available.
- For the speaker settings, select the profile for phone talking (HFP/HSP connection) [Headset earphone (BRAVIA Theatre U Hands-Free)] 2 . ([Speakers (BRAVIA Theatre U Stereo)] 2 is the profile for music playback.)
- For the microphone settings, select the profile for phone talking (HFP/HSP connection) [Headset microphone (BRAVIA Theatre U Hands-Free)] 2 .
- Depending on your video call application, selection of the profile for phone talking (HFP/HSP connection) [Headset earphone (BRAVIA Theatre U Hands-Free)] 2 or [Headset microphone (BRAVIA Theatre U Hands-Free)] 2 , or the profile for music playback (A2DP connection) [Speakers (BRAVIA Theatre U Stereo)] 2 may not be available for the speaker or microphone settings, and only [BRAVIA Theatre U] may be displayed. In such a case, select [BRAVIA Theatre U].
- For frequently asked questions and the answers to them, visit the customer support website.
Hint
- When you cannot view the settings of the video call application or select the BLUETOOTH profile for phone talking (HFP/HSP connection) [Headset earphone (BRAVIA Theatre U Hands-Free)] or [Headset microphone (BRAVIA Theatre U Hands-Free)], select [Headset earphone (BRAVIA Theatre U Hands-Free)] or [Headset microphone (BRAVIA Theatre U Hands-Free)] for the settings on the computer, and then establish a connection. For details, see the following:
- Connecting the neckband speaker with a paired Windows computer via a BLUETOOTH connection
- Connecting the neckband speaker with a paired Mac computer via a BLUETOOTH connection
- On a Mac computer, the BLUETOOTH profiles both for music playback (A2DP) and for phone talking (HFP/HSP connection) are used for video calls and profile selection is not required.
Note
- When the neckband speaker is connected with a Mac computer and a smartphone in multipoint connection, the video call application may fail to function properly. In such a case, terminate the BLUETOOTH connection between the neckband speaker and the smartphone.
Related Topic
- Connecting the neckband speaker with a Windows computer via a BLUETOOTH connection
- Connecting the neckband speaker with a paired Windows computer via a BLUETOOTH connection
- Connecting the neckband speaker with a Mac computer via a BLUETOOTH connection
- Connecting the neckband speaker with a paired Mac computer via a BLUETOOTH connection
- Connecting the neckband speaker concurrently with 2 BLUETOOTH devices (multipoint connection)
• Terminating the BLUETOOTH connection (After use)
• What can I do to solve a problem?
5-056-199-11(1) Copyright 2024 Sony Corporation
Wireless Neckband Speaker
BRAVIA Theatre U
Receiving a call
As long as your smartphone or mobile phone supports HFP (Hands-free Profile) or HSP (Headset Profile), you can talk hands-free on the phone through the built-in microphone of the neckband speaker.
- If your smartphone or mobile phone supports both HFP and HSP, set it to HFP.
- Operations may vary depending on the smartphone or mobile phone. Refer to the operating instructions supplied with the smartphone or mobile phone.
About ring tones
When an incoming call arrives, playback pauses and a ring tone will be heard via the neckband speaker. The ring tone varies in the following ways, depending on your smartphone or mobile phone.
• Ring tone set on the neckband speaker
- Ring tone set on the smartphone or mobile phone
- Ring tone set on the smartphone or mobile phone only for a BLUETOOTH connection
1 Connect the neckband speaker with a smartphone or mobile phone.
When a BLUETOOTH connection is established, you hear a notification sound from the neckband speaker and the ⏻ (power)/ ① BLUETOOTH indicator starts flashing in blue.

2 Press the (play/call) button when a call is received.
The neckband speaker is equipped with a built-in omnidirectional microphone. You can talk without considering the location of the microphone.
When an incoming call arrives, playback pauses and a ring tone is heard from the neckband speaker.

If no ring tone is heard via the neckband speaker
The neckband speaker may not be connected with a smartphone or mobile phone with HFP or HSP. Check the connection status on the smartphone or mobile phone.
While the phone is ringing or a phone conversation is in progress, adjust the volume by pressing the - / + (volume) buttons on the neckband speaker or operating the smartphone or mobile phone.

To turn off the microphone
Press the (microphone off)/ ADD (Speaker Add) button on the neckband speaker.

While a phone conversation is in progress, pressing the microphone off)/ ADD (Speaker Add) button triggers voice guidance (Mic Off) indicating that the microphone is turned off*. When you press the button once again, you hear voice guidance (Mic On) indicating that the microphone is turned on.
The state that the microphone is turned off is indicated by a notification sound emitted at intervals of 7 seconds.
To end a call, press the —(play/call) button.
If you were listening to music before the call, playback will resume when the call ends. If you end a call by operating the smartphone or mobile phone, playback will also resume when the call ends if you were listening to music before the call.
Hint
Some smartphones or mobile phones have handset use priority when receiving a call. In the case of the HFP or HSP connection, switch the call device to the neckband speaker by operating your smartphone or mobile phone.
The volume for music playback and the volume for phone talking are set independently on the neckband speaker. Changing the volume during a phone conversation does not affect the volume for music playback.
Note
- Depending on the smartphone or mobile phone, playback may not pause when an incoming call arrives.
-
Use a smartphone or mobile phone at least 50 cm (1.6 ft) away from the neckband speaker. Noise may result if the neckband speaker and the smartphone or mobile phone are too close.
-
Depending on the model of your smartphone or mobile phone, the operation system or applications installed, some functions of hands-free calling may not be used correctly.
- The microphone off function works for the microphone on the neckband speaker. It does not affect the microphone settings of the software on your smartphone, mobile phone, or computer.
- Depending on the quality of the caller's voice and ambient noise, the internal audio signal processing of the neckband speaker may not fully function, resulting in poor call quality.
Related Topic
- Connecting the neckband speaker with an Android™ smartphone or an iPhone via a BLUETOOTH connection
• Terminating the BLUETOOTH connection (After use)
Making a call
5-056-199-11(1) Copyright 2024 Sony Corporation
Making a call
You can enjoy hands-free calls with a smartphone or mobile phone that supports the BLUETOOTH profile HFP (Hands-free Profile) or HSP (Headset Profile) via a BLUETOOTH connection.
- If your smartphone or mobile phone supports both HFP and HSP, set it to HFP.
- Operations may vary depending on the smartphone or mobile phone. Refer to the operating instructions supplied with the smartphone or mobile phone.
1 Connect the neckband speaker with a smartphone or mobile phone.
When a BLUETOOTH connection is established, you hear a notification sound from the neckband speaker and the ⏻(power)/ BLUETOOTH indicator starts flashing in blue.

2 Operate the smartphone or mobile phone to make a call.
When you make a call, playback pauses and the dial tone is heard from the neckband speaker.
The neckband speaker is equipped with a built-in omnidirectional microphone. You can talk without considering the location of the microphone.

If no dial tone is heard via the neckband speaker
- The neckband speaker may not be connected with a smartphone or mobile phone with HFP or HSP. Check the connection status on the smartphone or mobile phone.
- Switch the call device to the neckband speaker by pressing and holding the (play/call) button for about 2 seconds.
3 While the phone is ringing or a phone conversation is in progress, adjust the volume by pressing the - / + (volume) buttons on the neckband speaker or operating the smartphone or mobile phone.
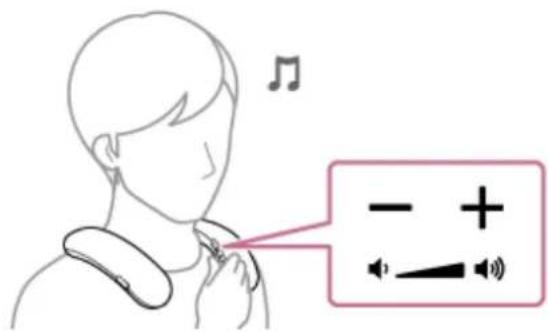
To turn off the microphone
Press the microphone off)/ ADD (Speaker Add) button on the neckband speaker.

While a phone conversation is in progress, pressing the microphone off)/ ADD (Speaker Add) button triggers voice guidance (Mic Off) indicating that the microphone is turned off. When you press the button once again, you hear voice guidance (Mic On) indicating that the microphone is turned on.
The state that the microphone is turned off is indicated by a notification sound emitted at intervals of 7 seconds.
4 To end a call, press the (play/call) button.
If you were listening to music before the call, playback will resume when the call ends. If you end a call by operating the smartphone or mobile phone, playback will also resume when the call ends if you were listening to music before the call.
Hint
The volume for music playback and the volume for phone talking are set independently on the neckband speaker. Changing the volume during a phone conversation does not affect the volume for music playback.
Note
- Depending on the smartphone or mobile phone, playback may not pause when making a call.
- Use a smartphone or mobile phone at least 50 cm (1.6 ft) away from the neckband speaker. Noise may result if the neckband speaker and the smartphone or mobile phone are too close.
- The microphone off function works for the microphone on the neckband speaker. It does not affect the microphone settings of the software on your smartphone, mobile phone, or computer.
- Depending on the quality of the caller's voice and ambient noise, the internal audio signal processing of the neckband speaker may not fully function, resulting in poor call quality.
Related Topic
- Connecting the neckband speaker with an Android™ smartphone or an iPhone via a BLUETOOTH connection
• Terminating the BLUETOOTH connection (After use)
- Receiving a call
5-056-199-11(1) Copyright 2024 Sony Corporation
Wireless Neckband Speaker
BRAVIA Theatre U
What you can do with the "Sony | Headphones Connect" app
By connecting the smartphone with the "Sony | Headphones Connect" app installed to the neckband speaker via a BLUETOOTH connection, you can:
• Make Equalizer settings
- Customize Equalizer settings
• Make 360 Reality Audio settings
- Select a BLUETOOTH codec (the quality for audio streaming playback via BLUETOOTH connections)
- Adjust the volume for playing music
- Play/pause music, skip to the beginning of the previous track/skip to the beginning of the next track
- Check the neckband speaker software version
- Update the neckband speaker software
• Make settings for the Automatic Power Off function
- Switch multipoint connections (Connect to 2 devices simultaneously) on/off
- Change devices that are multipoint connected
- Adjust volume of notification sound and voice guidance
- Initialize the neckband speaker
etc.
For details of the "Sony | Headphones Connect" app, access the following URL.
https://rd1.sony.net/help/mdr/hpc/h_zz/
Hint
The operations available with the "Sony | Headphones Connect" app vary depending on the audio device. The app specifications and screen design may change without prior notice.
Related Topic
• Automatic Power Off function
- Connecting the neckband speaker concurrently with 2 BLUETOOTH devices (multipoint connection)
- Selecting the quality for music playback via BLUETOOTH connections (Codec)
• About 360 Reality Audio
• Installing the "Sony | Headphones Connect" app
• Initializing the neckband speaker
Wireless Neckband Speaker
BRAVIA Theatre U
Installing the "Sony | Headphones Connect" app

Download the “Sony | Headphones Connect” app from Google Play (Play Store) or the App Store and install it.
For details on the "Sony | Headphones Connect" app, refer to the following URL.
https://rd1.sony.net/help/mdr/hpc/h_zz/

Sony Headphones Connect


When the installation is complete, start the "Sony | Headphones Connect" app.
Related Topic
- What you can do with the "Sony | Headphones Connect" app
5-056-199-11(1) Copyright 2024 Sony Corporation
Wireless Neckband Speaker
BRAVIA Theatre U
Accessing support information from the "Sony | Headphones Connect" app
You can access the latest support information from the "Sony | Headphones Connect" app.
1 Select [Help] on the "Sony | Headphones Connect" app screen.
2 The [Headphones Connect Help] screen appears and support information is displayed.
3 Select the desired item.
5-056-199-11(1) Copyright 2024 Sony Corporation
Wireless Neckband Speaker
BRAVIA Theatre U
Updating the neckband speaker software
Install the latest neckband speaker software using the "Sony | Headphones Connect" app to enjoy new functions or to resolve a certain number of issues with the neckband speaker.
Always use the neckband speaker with the latest software installed.
For details on the latest neckband speaker software and how to update the software, refer to the information on the support website.
When the [Automatic download of software] setting is enabled (default setting) on the "Sony | Headphones Connect" app, the download and transfer of the software will start automatically.
You can also update the neckband speaker software in the following way.
1 Download the update software from the server to the smartphone on which the "Sony | Headphones Connect" app is installed.
2 Transfer the update software from the smartphone to the neckband speaker.
3 Update the neckband speaker software following the on-screen instructions.
Related Topic
- What you can do with the "Sony | Headphones Connect" app
5-056-199-11(1) Copyright 2024 Sony Corporation
Wireless Neckband Speaker
BRAVIA Theatre U
Specifications
Wireless Neckband Speaker (YY7861E)
Speaker section
Full Range unit
Approx. 32 mm × 44 mm (1 5/16 in × 1 3/4 in) (2)
Enclosure type
Acoustic suspension model
BLUETOOTH section
Communication system
BLUETOOTH Specification version 5.2
Maximum communication range
Line of sight approx. 30 m (98.4 ft)
The actual range will vary depending on factors such as obstacles between devices, magnetic fields around a microwave oven, static electricity, cordless phone use, reception sensitivity, the operating system, software applications, etc.
Frequency band
2.4 GHz band (2.400 0 GHz - 2.483 5 GHz)
Modulation method
FHSS (Freq Hopping Spread Spectrum)
Compatible BLUETOOTH profile
A BLUETOOTH profile standardizes functions according to the characteristics of BLUETOOTH devices.
A2DP (Advanced Audio Distribution Profile)
AVRCP (Audio Video Remote Control Profile)
HSP (Headset Profile)
HFP (Hands-free Profile)
Supported codec
Codec is an audio signal compression and conversion format.
SBC (Subband Codec)
AAC (Advanced Audio Coding)
LDAC
LDAC is an audio coding technology developed by Sony that enables the transmission of High-Resolution (Hi-Res) Audio content, even over a BLUETOOTH connection.
Corresponding content protection
SCMS-T
Transmission range (A2DP)
20 Hz - 20 000 Hz (Sampling frequency 44.1 kHz)
Note
- Depending on the network environment, there may be an interruption at the high bitrate transmission.
Microphone
Type
Electret condenser
Directional characteristic
Omni directional
Effective frequency range
100 Hz - 7 000 Hz
General
Power consumption
Provided that a USB AC adaptor capable of delivering an output current of 1.5 A is used for battery charging connection.
Approx. 5 W (while charging the built-in lithium-ion battery)
Lithium-ion battery life (with playback via a BLUETOOTH connection)
- Approx. 12 hours *1
— Volume level: 20
• Approx. 5 hours *1
— Volume level: 31 (MAX.)
Time required for charging the built-in rechargeable battery
- Approx. 4 hours *2
- Approx. 60 minutes of music playback (10 minutes of charging) *1
— Volume level: 20
Operating temperature
5° C - 35 ° C (41 ° F - 95 ° F)
*1 The built-in battery life above is measured using our specified music source. Actual performance time may vary from the listed time due to the volume, songs played, surrounding temperature, and usage conditions.
*2 Time required for the empty battery to be fully charged (100%) while the neckband speaker is powered off.
System requirements for charging battery using USB
Using a commercially-available USB AC adaptor capable of feeding in DC 5 V 1.5 A.
Do not use a USB AC adapter or USB port that exceeds the maximum output of 15 W (5 V, 3 A).
Compatible iPhone/iPod models
iPhone 14 Pro Max, iPhone 14 Pro, iPhone 14 Plus, iPhone 14, iPhone SE (3rd generation), iPhone 13 Pro Max, iPhone 13 Pro, iPhone 13, iPhone 13 mini, iPhone 12 Pro Max, iPhone 12 Pro, iPhone 12, iPhone 12 mini, iPhone SE (2nd generation), iPhone 11 Pro Max, iPhone 11 Pro, iPhone 11, iPhone XS Max, iPhone XS, iPhone XR, iPhone X, iPhone 8 Plus, iPhone 8, iPhone 7 Plus, iPhone 7 (As of October 2023)
Note
- Design and specifications are subject to change without notice.
- Refer to the Reference Guide included with your product, which may contain specification information not listed above.
Precautions
On placement
- To eliminate the risk of malfunctions, avoid the following locations when placing or leaving this neckband speaker.
-
A place subject to high temperatures, such as under direct sunlight or lighting equipment, near a heat source, or in a sauna
— Inside a vehicle with the windows closed (especially in summertime)
— A place subject to excessive dust
— A place subject to strong vibration
— A place where cosmetics, such as a sunscreen, as well as chemical products, such as a bug spray, are stored -
Place this neckband speaker on a flat, level surface. When placed on a sloped surface, the neckband speaker may fall over or fall off the surface due to its own vibration, resulting in injuries, malfunctions, or performance degradation.
- Depending on the conditions where this neckband speaker is placed, it may fall off the surface. Do not leave any valuables near the neckband speaker.
- This neckband speaker is not anti-magnetic. Keep objects susceptible to magnetism (recorded tapes, watches, cash cards and credit cards with magnetic coding, etc.) away from the neckband speaker. When you carry around the neckband speaker, keep this in mind as well.
Other notes
- The neckband speaker is a precision device, so do not subject it to extreme shock, such as by dropping or hitting it.
Although the neckband speaker heats up during operation, this is not a malfunction. - If you use this neckband speaker for a long time, the temperature of this neckband speaker may rise, but it is not a malfunction.
- Do not use or leave the neckband speaker in an extremely cold or hot environment (temperature outside the range of 5°C - 35°C (41 °F - 95 °F)). If the neckband speaker is used or left in outside the above range, the neckband speaker may automatically stop to protect internal circuitry.
- If you have any questions or problems concerning the neckband speaker that are not covered in this manual, please consult your nearest Sony dealer.
Notes on charging
Life span of the built-in lithium ion battery
- Even if you do not intend to use the neckband speaker for a long time, charge the built-in battery to its full capacity once every 6 months to maintain its performance.
- If the neckband speaker is not used for a long time, it may take longer to charge the built-in battery.
- The rechargeable built-in battery has a life span. As time passes and the number of times that the built-in battery is used increases, the capacity of the rechargeable built-in battery slowly decreases. When the amount of time that the built-in battery can be used seems significantly shorter, despite having been fully charged, contact your nearest Sony dealer.
- When the amount of time that the built-in battery can be used seems significantly shorter, it could mean that the rechargeable built-in battery has expired.
- The life span of the rechargeable built-in battery differs depending on the usage, environment, and storage method.
About warnings during charging
The (power)/ (BUETOOTH) indicator double flashes in orange when the neckband speaker detects an abnormality in the internal temperature or the rechargeable built-in battery.
- The ambient temperature exceeds the range of 5°C - 35°C (41 °F - 95 °F).
There is a problem with the built-in battery. - When charging to the built-in battery continues for a long time.

When an abnormality of the built-in battery has been detected, stop charging immediately, wait for a while, and then charge the built-in battery again. If the problem persists, contact your nearest Sony dealer.
Note
- While battery charging is in progress, the neckband speaker fails to turn on and you cannot use the BLUETOOTH function.
Upon completion of battery charging and removal of dedicated audio adaptor (supplied), be sure to securely close the cap over the USB Type-C port to avoid the risk of malfunction caused by sweat or water ingress. -
Charging time varies depending on built-in battery usage conditions.
-
Charge the neckband speaker in an ambient temperature between 5 °C and 35 °C (41 °F and 95 °F). Be aware that the room temperature may fall to 5 °C (41 °F) or lower especially in wintertime.
- The neckband speaker becomes warm during charging. This is not a malfunction.
- Avoid exposure to rapid temperature change, direct sunlight, mist, sand, dust, or electrical impacts. Also, never leave the neckband speaker in a car parked in the sun.
- You can charge the neckband speaker's built-in battery by connecting the neckband speaker to a computer that comes equipped with a USB charging port as well. However, not all the computers are tested and found compatible with this procedure and the procedure is not applicable to home-built computers.
In an extremely cold or hot environment, charging stops for safety. If charging takes a long time, it also makes charging of the neckband speaker stop. To resolve these issues, disconnect the USB cable from the neckband speaker and connect it again within an operating temperature between 5 °C and 35 °C (41 °F and 95 °F). - When using in a place with a high temperature, the volume may decrease to protect the built-in battery.
- The maximum power output will be lower when the built-in battery is running low.
- Charging from a USB hub is only guaranteed when you use a self-powered USB hub that carries an authorized logo.
- While the neckband speaker is connected with a computer that is not connected to an AC outlet, the neckband speaker consumes the battery power of the computer. Do not leave the computer with the neckband speaker connected for a long period of time to prevent the computer's battery from running out of power.
Related Topic
• Charging the neckband speaker
5-056-199-11(1) Copyright 2024 Sony Corporation
Notes on water resistant feature
Water resistant performance of the neckband speaker
With the cap securely closed, this neckband speaker has a water resistant performance equivalent to IPX4 1 , which is a “protection against ingress of water” rating defined by IEC 60529 “Degrees of protection provided by enclosures (IP Code) 2 ” for electrical equipment.
Liquids that the water resistant performance specifications apply to
| Applicable fresh water, tap water | |
| Not applicable | liquids other than the above (soapy water, water with detergent or bath agents, shampoo, pool water, hot spring water, salt water, etc.) |
*1 IPX4 equivalency: The neckband speaker maintains its performance while subjected to water sprinkled from every direction. This means that no trace of water is found inside the neckband speaker after a 10-minute test with water of 10L / min sprinkled from a distance of 300 mm to 500 mm (11 7/8 in to 19 3/4 in) in every direction.
*2 The supplied accessories and the connector of this neckband speaker (USB) are not water resistant. To reduce the risk of fire or electric shocks, do not expose the neckband speaker to water or droplets while using the connector (USB). Do not place a vase or any other liquid-filled container on the neckband speaker.
The water resistant performance of the neckband speaker is based on our measurements under the conditions herein described. Note that malfunctions as a result of water immersion or dust intrusion caused by misuse by the customer are not covered by the warranty.
To maintain water resistant performance
Carefully note the precautions below to ensure proper use of the neckband speaker.
- This neckband speaker does not have a design that is resistant to water pressure. Do not put the neckband speaker in the water or directly under the water gushing out of the faucet to avoid a malfunction.
- Do not pour high-temperature water or blow hot air from a hair dryer or any other appliance on the neckband speaker directly. Also never use the neckband speaker in a place subject to high temperatures, such as in a sauna or near a heat source.
CAUTION: Handle the cap (①) with care. The cap plays a very important role in maintenance of the water resistant performance. When using the neckband speaker, make sure that the cap is closed completely. When closing the cap, be careful not to allow foreign objects inside. If the cap is not closed completely the water resistant performance may deteriorate and may cause a malfunction of the neckband speaker as a result of water entering the neckband speaker.

Wireless Neckband Speaker
BRAVIA Theatre U
How to care for the neckband speaker
You can use the neckband speaker more comfortably and for a longer period of time by following the maintenance procedure below.
- Keep the neckband speaker from being exposed to chemical ingredients of a product, such as a bug spray or a tanning oil. When the neckband speaker is soiled on the surface, remove the soil by gently dabbing at it with a dry, soft cloth or a well-wrun cloth dipped in tap or lukewarm water before the surface is stained with the soil. Depending on the type of soils, however, this may fail to remove the soil.
- Wipe off the moisture on its surface, and put the neckband speaker on a dry soft cloth to drain the collected water inside the neckband speaker. Then, dry the neckband speaker in an airy place until no moisture remains.
- The sound quality may change when water enters the speaker section of the neckband speaker. It is not malfunction. Wipe off the moisture on its surface, and put the neckband speaker on a dry soft cloth to drain the collected water inside the neckband speaker. Then, dry the neckband speaker in an airy place until no moisture remains.
Note
- If the surface of the neckband speaker gets dirty, do not use detergent, thinner, benzine, etc. to clean the neckband speaker because it will affect the water repellent function of the neckband speaker.
- Especially in cold regions, be sure to wipe off the moisture after using the neckband speaker. Leaving moisture on its surface may cause the neckband speaker to freeze and malfunction.
- If sand grains, etc. enter the fabric or other part of the neckband speaker, remove them carefully. Never use a vacuum cleaner, etc. on the neckband speaker. It may cause damage of the speaker section or other part of the neckband speaker.
5-056-199-11(1) Copyright 2024 Sony Corporation
On BLUETOOTH communications
- The BLUETOOTH wireless technology is a short-range wireless technology that enables communication between digital devices, such as smartphones and computers. The maximum communication distance may vary depending on the presence of obstacles (people, metal objects, walls, etc.) or the electromagnetic environment.
Microwaves emitting from a BLUETOOTH device may affect the operation of electronic medical devices. Turn off the neckband speaker and other BLUETOOTH devices in the following locations, as it may cause an accident:
— in hospitals, near priority seating in trains, locations where inflammable gas is present, near automatic doors, or near fire alarms.
- The neckband speaker supports security functions that comply with the BLUETOOTH standard as a means of ensuring security during communication using BLUETOOTH wireless technology. However, depending on the configured settings and other factors, this security may not be sufficient. Be careful when communicating using BLUETOOTH wireless technology.
- Sony shall assume no responsibility for any damages or loss resulting from information leaks that occur when using BLUETOOTH communications.
-
BLUETOOTH connections with all BLUETOOTH devices cannot be guaranteed.
-
BLUETOOTH devices connected with the neckband speaker must comply with the BLUETOOTH standard prescribed by Bluetooth SIG, Inc., and must be certified as compliant.
-
Even when a connected device complies with the BLUETOOTH standard, there may be cases where the characteristics or specifications of the BLUETOOTH device make it unable to connect, or result in different control methods, display, or operation.
-
Noise may occur or the audio may cut off depending on the BLUETOOTH device connected with the neckband speaker, the communications environment, or surrounding conditions.
- Depending on the device to be connected, it may require some time to start communications.
- When charging, the neckband speaker cannot be turned on and the BLUETOOTH function cannot be used.
- Since BLUETOOTH devices and wireless LAN (IEEE802.11ax/b/g/n) use the same frequency band (2.4 GHz), radio wave interference may occur during use near devices equipped with a wireless LAN, which may cause a decrease in communication speed, noise, or connection failure.
Note
- To use the BLUETOOTH function, the other BLUETOOTH device must support the same profile as the neckband speaker. However, even if the same profile is supported, the functions may differ depending on the specifications of the BLUETOOTH device.
Due to the characteristics of BLUETOOTH wireless technology, there is a slight delay between the playback of the audio and music on the transmitting side and the playback on the neckband speaker side. - Establishing a BLUETOOTH connection between the neckband speaker and a device with a built-in radio or tuner may cause noise in audio from the device. The neckband speaker should not be used with such a device via a BLUETOOTH connection.
- When using the neckband speaker, keep it away from a device such as a radio or a tuner. Use of the neckband speaker in the vicinity of such a device may cause noise in audio from the device.
5-056-199-11(1) Copyright 2024 Sony Corporation
Wireless Neckband Speaker
BRAVIA Theatre U
Licenses
- This product contains software that Sony uses under a licensing agreement with the owner of its copyright. We are obligated to announce the contents of the agreement to customers under requirement by the owner of copyright for the software. Please access the following URL and read the contents of the license.
https://rd1.sony.net/help/ht/sl/24/
- The software included in this product contains copyrighted software that is licensed under the GPL/LGPL and other licenses which may require access to source code. You may find a copy of the relevant source code as required under the GPL/LGPL (and other licenses) at the following URL.
You may obtain the source code as required by the GPL/LGPL on a physical medium from us for a period of three years after our last shipment of this product by applying through the form at the following URL.
This offer is valid to anyone in receipt of this information.
https://oss.sony.net/Products/Linux/
Please note that Sony cannot answer or respond to any inquiries regarding the content of this source code.
- Use of the Made for Apple badge means that an accessory has been designed to connect specifically to the Apple product(s) identified in the badge, and has been certified by the developer to meet Apple performance standards.
Apple is not responsible for the operation of this device or its compliance with safety and regulatory standards.
- Dolby, Dolby Atmos, and the double-D symbol are registered trademarks of Dolby Laboratories Licensing Corporation.
- Services offered by third parties may be changed, suspended, or terminated without prior notice. Sony does not bear any responsibility in these sorts of situations.
5-056-199-11(1) Copyright 2024 Sony Corporation
Wireless Neckband Speaker
BRAVIA Theatre U
Trademarks
- Android and Google Play are trademarks of Google LLC.
- Apple, the Apple logo, iPad, iPhone, iPod touch, Mac, and macOS are trademarks of Apple Inc., registered in the U.S. and other countries and regions.
- App Store is a service mark of Apple Inc., registered in the U.S. and other countries and regions.
- Microsoft and Windows are registered trademarks or trademarks of Microsoft Corporation in the United States and/or other countries.
The BLUETOOTH® word mark and logos are registered trademarks owned by Bluetooth SIG, Inc. and any use of such marks by Sony Group Corporation and its subsidiaries is under license. - USB Type-C® and USB-C® are registered trademarks of USB Implementers Forum.
- LDAC and LDAC logo are trademarks of Sony Group Corporation or its affiliates.
All other trademarks and registered trademarks are trademarks or registered trademarks of their respective holders. In this manual, ™ and ® marks are not specified.
5-056-199-11(1) Copyright 2024 Sony Corporation
SONY
Help Guide
Wireless Neckband Speaker
BRAVIA Theatre U
What can I do to solve a problem?
If the neckband speaker does not function as expected, try the following steps in order to resolve the issue.
- Make sure the neckband speaker is fully charged.

- Reset the neckband speaker.

- Initialize the neckband speaker.
This operation restores the settings such as volume, etc. to the default settings, and deletes all pairing information.

- Access the following support home page to get support information about your neckband speaker. https://www.sony.net/support/HT-AN7/

- If the operations above do not work, consult your nearest Sony dealer.
Related Topic
- Resetting the neckband speaker
• Initializing the neckband speaker
Wireless Neckband Speaker
BRAVIA Theatre U
Unable to charge the neckband speaker
- When a USB AC adaptor (commercially available) is in use, make sure that the USB cable is connected securely to the neckband speaker and the USB AC adaptor. Then, make sure that the USB AC adaptor is connected securely to an AC outlet.
- When using a USB AC adaptor (commercially available), make sure that it is capable of delivering an output current of 1.5 A or more. You can use a USB AC adaptor with an output current of 0.5 A (500 mA) or more and less than 1.5 A as well, but it may take a very long time before charging completes. Use of a USB AC adaptor with an output current of less than 0.5 A (500 mA) is not guaranteed for battery charging. The charging time may vary depending on the ambient temperature as well.
- You can charge the neckband speaker's built-in battery by connecting the USB cable connected with the neckband speaker to a computer that comes equipped with a USB charging port as well. However, not all the computers are tested and found compatible with this procedure and the procedure is not applicable to home-built computers.
- Charge the neckband speaker in an ambient temperature between 5 °C and 35 °C (41 °F and 95 °F). Be aware that the room temperature may fall to 5 °C (41 °F) or lower depending on the season, for example, especially in wintertime.
- Depending on the type of the USB AC adaptor, battery charging may fail.
- Battery charging with a computer fails when the computer enters standby (sleep) or hibernation mode. In such a case, change the power settings of the computer and charge the battery all over again.
Related Topic
• Charging the neckband speaker
- About the indicator on the neckband speaker
Notes on charging
5-056-199-11(1) Copyright 2024 Sony Corporation
Wireless Neckband Speaker
BRAVIA Theatre U
Unable to turn on the neckband speaker or the neckband speaker suddenly turns off
- If the ⏻(power)/ × BLUETOOTH indicator stays lit in blue for 2 seconds and goes out, after the neckband speaker is turned on, and then the neckband speaker turns off, the rechargeable built-in battery is empty. Charge the built-in battery.
-
The Automatic Power Off function of the neckband speaker may have worked. When the Automatic Power Off function is active, the neckband speaker will automatically turn off if no buttons on the neckband speaker are operated for 15 minutes in any of the following conditions.
-
No audio input signal from a BLUETOOTH device connected for music playback (A2DP)
- No BLUETOOTH device is connected
— No audio input signal from a device connected by the dedicated audio cable (supplied)
Hint
The Automatic Power Off function does not operate during a hands-free call on the neckband speaker.
- While charging is in progress, the neckband speaker does not turn on.
Related Topic
• Charging the neckband speaker
• Automatic Power Off function
- Receiving a call
Making a call
5-056-199-11(1) Copyright 2024 Sony Corporation
No sound/Sound from only one speaker component/Low sound level/Distorted sound/Humming or noise in the speaker output/No voice or low voice from callers
Common
- Make sure that both the neckband speaker and the connected device are turned on.
- Make sure that playback is in progress on the connected device.
- Make sure that the volume of the connected device and the neckband speaker is loud enough.
- Make sure that the neckband speaker has a BLUETOOTH connection with the BLUETOOTH device.
- Pair the neckband speaker and the device to be connected again. If there are other BLUETOOTH devices connected, then disconnect the other BLUETOOTH devices, and do pairing again.
- Select "Prioritize Stable Connection (SBC)" for the BLUETOOTH connection quality of the speaker.
- Keep the neckband speaker and the device being connected away from microwave ovens and wireless LAN, etc.
- Make sure that the equalizer function is deactivated on the connected device.
- To use the Speaker Add function to connect two neckband speakers via a BLUETOOTH connection, update the software on both neckband speakers to the latest version.
- Before playing audio on the connected devices, disconnect the dedicated audio adaptor (supplied) and the dedicated audio cable (supplied) from the USB Type-C port.
- Bring the neckband speaker close to the device you are connecting. Move any obstructions that may be between the neckband speaker and the device you are connecting.
While connected with a TV
- Make sure that the TV, the neckband speaker, and the transmitter (sold separately) are turned on.
- Disconnect the transmitter (sold separately) from the BRAVIA TV compatible with 360 Spatial Sound Personalizer and connect it back to the BRAVIA TV. Be sure to plug the cable all the way into the port.
- Move the transmitter (sold separately) away from a device such as a microwave oven and a wireless LAN access point.
- Keep the neckband speaker and the transmitter (sold separately) away from a device such as a radio or a tuner. Use of the neckband speaker and the transmitter (sold separately) in the vicinity of such a device may cause noise in audio from the device.
- If there is radio interference with another wireless device (a TV, a soundbar, etc.), change the location of the transmitter (sold separately). (For example, move the transmitter from left to right or center.)
- When using the Speaker Add function, if any other BLUETOOTH device is connected to the TV, then disconnect those other BLUETOOTH devices.
While connected with a device other than a TV
- To use a video call application on a computer, operate the computer to change the BLUETOOTH profile to HFP or HSP.
During a video call, the sound quality may deteriorate depending on the conditions of the communication link.
- Make sure that the microphone of the neckband speaker is not turned off.
- View the audio settings on the BLUETOOTH device to make sure that the neckband speaker is configured to output audio during a phone conversation.
- There are some BLUETOOTH devices that can have the BLUETOOTH connection quality changed. If your device is compatible with this function, select “Prioritize Stable Connection (SBC)” for the BLUETOOTH connection quality. For details, refer to the operating instructions supplied with the device.
- Make sure that the computer is configured to output audio through [BRAVIA Theatre U] when connected with the neckband speaker.
- When listening to music from a computer through the neckband speaker, the sound quality may be poor (e.g., difficulty in hearing the vocal sound, etc.) for the first few seconds after a connection is established. This is due to the computer specifications (priority is given to stable connection at the beginning of communication and then switched to sound quality in several seconds) and does not indicate a malfunction of the neckband speaker.
If the sound quality does not improve in a few seconds, operate the computer to establish a connection for music playback (A2DP). For operations on the computer, refer to the operating instructions supplied with your computer.
- If the neckband speaker and the source BLUETOOTH device for music playback are connected with the HFP or HSP BLUETOOTH profile, operate the connected device to switch to BLUETOOTH connection for music playback (A2DP).
- Establishing a BLUETOOTH connection between the neckband speaker and a device with a built-in radio or tuner may cause noise in audio from the device.
The neckband speaker should not be used with such a device via a BLUETOOTH connection.
- When using the neckband speaker, keep it away from a device such as a TV, a radio, or a tuner. Use of the neckband speaker in the vicinity of such a device may cause noise in audio from the device.
- When using the Speaker Add function or call function, if any other BLUETOOTH device, such as a mouse or keyboard, is connected to the BLUETOOTH device, then disconnect those other BLUETOOTH devices.
- Sound may not be output, depending on the application being used in the connected BLUETOOTH device. If this happens, turning the app off and then on again may improve the symptoms.
- When playing audio in the analog audio input mode, confirm that the dedicated audio adaptor (supplied) and the dedicated audio cable (supplied) are firmly inserted into the USB Type-C port.
- If the device connected by the dedicated audio cable (supplied) is monaural, sound may be output only from the left speaker (L side).
Related Topic
- Connecting the neckband speaker to a 360 Spatial Sound Personalizer compatible BRAVIA TV via a BLUETOOTH connection
- Connecting the neckband speaker to a 360 Spatial Sound Personalizer compatible BRAVIA TV via a BLUETOOTH connection through the transmitter (sold separately)
- Connecting the neckband speaker with a TV via a BLUETOOTH connection
- Connecting the neckband speaker with a Windows computer via a BLUETOOTH connection
- Connecting the neckband speaker with a Mac computer via a BLUETOOTH connection
- Connecting the neckband speaker with an Android™ smartphone or an iPhone via a BLUETOOTH connection
-
Listening to music of a device via a BLUETOOTH connection
-
Selecting the quality for music playback via BLUETOOTH connections (Codec)
- Listening to TV audio through the neckband speaker
- About the indicator on the neckband speaker
- Receiving a call
Making a call - What you can do with the "Sony | Headphones Connect" app
5-056-199-11(1) Copyright 2024 Sony Corporation
Unable to pair the neckband speaker with a BLUETOOTH device
Unable to pair the neckband speaker with the transmitter (sold separately)
- Bring the neckband speaker within a distance of 1 m (3.2 ft) from the transmitter (sold separately).
- Make sure that the neckband speaker and the transmitter (sold separately) are turned on and in pairing mode.
- When the indicator on the transmitter (sold separately) is not double flashing in blue, press and hold the ⚙ (BLUETOOTH) button for about 5 seconds.
This makes the indicator starts double flashing (pairing mode).
Unable to pair the neckband speaker with a BLUETOOTH device
- To use the Speaker Add function, pair with the neckband speaker in which the power/ (BUETOOTH) indicator flashes in blue.
- Bring the BLUETOOTH device within a distance of 1 m (3.2 ft) from the neckband speaker.
- For the BLUETOOTH connection with Android smartphones, the neckband speaker is compatible with the devices with OS 9.0 or later. It is not compatible with the devices with OS 8.x or earlier.
- For the BLUETOOTH connection with Apple iOS devices, the neckband speaker is compatible with the devices with iOS 15.0 or later. It is not compatible with the devices with iOS 14.x or earlier.
- If you initialize the neckband speaker, you may not be able to connect to an Android smartphone. If this happens, delete the pairing information in the Android smartphone and the neckband speaker, then try pairing again.
Once the neckband speaker is initialized, it may fail to connect with the previously paired iPhone. In such a case, delete the pairing information of the neckband speaker from the iPhone, then pair them all over again. - Make sure that the BLUETOOTH device to pair with the neckband speaker is turned on and the BLUETOOTH function is activated on the device.
- If the name of the neckband speaker is not displayed on the BLUETOOTH device to pair with the neckband speaker, turn off the BLUETOOTH function on the device, and then turn it back on. This may solve the issue.
Related Topic
- Connecting the neckband speaker to a 360 Spatial Sound Personalizer compatible BRAVIA TV via a BLUETOOTH connection through the transmitter (sold separately)
- Connecting the neckband speaker with an Android™ smartphone or an iPhone via a BLUETOOTH connection
- About the indicator on the neckband speaker
• Initializing the neckband speaker
Sound skips
Set the BLUETOOTH connection quality of the neckband speaker to “Prioritize Stable Connection (SBC).” For details, see “Selecting the quality for music playback via BLUETOOTH connections (Codec).”
The issue can be improved by changing the wireless playback quality settings on the BLUETOOTH device. For details, refer to the operating instructions supplied with the BLUETOOTH device.
BLUETOOTH communications may be disabled, or noise or audio dropout may occur under the following conditions.
When there is a human body between the neckband speaker and the BLUETOOTH device
When there is an obstacle, such as metal or a wall, between the neckband speaker and the BLUETOOTH device
In places with wireless LAN, where a microwave oven is used, electromagnetic waves are generated, etc.
Where there are other wireless communication audio devices or other people nearby, such as in train station premises or on a crowded train
If you are enjoying music with your smartphone, the situation may be improved by closing unnecessary apps or restarting your smartphone. If you are enjoying music with your computer, close unnecessary applications or windows and restart the computer.
Connect the neckband speaker and the BLUETOOTH device once again.
Turn the neckband speaker off and then on again to connect by BLUETOOTH connection.
Turning off Service Link on the "Sony | Headphones Connect" app may reduce the amount of audio dropout.
Reset the neckband speaker.
Initialize the neckband speaker, and pair the neckband speaker and the device again.
Related Topic
Resetting the neckband speaker
Initializing the neckband speaker
Wireless Neckband Speaker
BRAVIA Theatre U
Unable to connect the neckband speaker concurrently with 2 devices (multipoint connection)
- When using the Speaker Add function, you cannot use the multipoint connection capability.
- Depending on the BLUETOOTH device, you may not be able to use the multipoint connection capability.
Related Topic
- Connecting the neckband speaker concurrently with 2 BLUETOOTH devices (multipoint connection)
5-056-199-11(1) Copyright 2024 Sony Corporation
Wireless Neckband Speaker
BRAVIA Theatre U
Resetting the neckband speaker
In the event of the following, press the (power)/ (BUETOOTH) button and the (micshphone off)/ ADD (Speaker Add) button simultaneously while charging is in progress to reset the neckband speaker.
- You cannot operate the neckband speaker after you turn it on.
- You cannot operate the neckband speaker after you troubleshoot pairing issues. etc.

Note
- Resetting the neckband speaker does not delete its pairing information.
- Resetting the neckband speaker may change its volume, function, or sound settings.
5-056-199-11(1) Copyright 2024 Sony Corporation
SONY
Help Guide
Wireless Neckband Speaker
BRAVIA Theatre U
Initializing the neckband speaker
If the neckband speaker fails to operate successfully after you reset it, initialize the neckband speaker to resume its default settings.
Make sure the neckband speaker is turned off, and then press the (power)/(BUJETOOTH) button and the (play/call) button on the neckband speaker simultaneously for about 7 seconds.

Note
- While charging is in progress, you cannot initialize the neckband speaker.

Upon completion of initialization, the (power)/(BUETOOTH) indicator flashes 4 times in blue.

The settings, such as the volume settings, are restored to the default settings and the pairing information of all BLUETOOTH devices is deleted.
Related Topic
- Connecting the neckband speaker to a 360 Spatial Sound Personalizer compatible BRAVIA TV via a BLUETOOTH connection
- Connecting the neckband speaker to a 360 Spatial Sound Personalizer compatible BRAVIA TV via a BLUETOOTH connection through the transmitter (sold separately)
- Connecting the neckband speaker with a TV via a BLUETOOTH connection
- Connecting the neckband speaker with a Windows computer via a BLUETOOTH connection
- Connecting the neckband speaker with a Mac computer via a BLUETOOTH connection
- Connecting the neckband speaker with an Android™ smartphone or an iPhone via a BLUETOOTH connection
- Resetting the neckband speaker
Wireless Neckband Speaker
BRAVIA Theatre U
Connecting with a smartphone or computer via a BLUETOOTH connection
You can listen to audio through the neckband speaker via a BLUETOOTH connection to a smartphone or computer. See the explanation for the BLUETOOTH connection appropriate for your device.
Connecting the neckband speaker with a Windows computer via a BLUETOOTH connection
Connecting the neckband speaker with a Mac computer via a BLUETOOTH connection
Connecting the neckband speaker with an Android™ smartphone or an iPhone via a BLUETOOTH connection
5-056-199-11(1) Copyright 2024 Sony Corporation
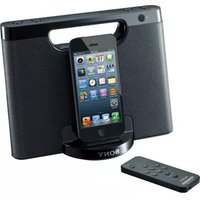
- ENJOY AUDIO FROM TV AND MOBILE DEVICES
- CHECKING HOW TO CONNECT THE NECKBAND SPEAKER TO A 360 SPATIAL SOUND PERSONALIZER COMPATIBLE BRAVIA TV
- ESTABLISHING A BLUETOOTH ® CONNECTION WITH A TV
- ESTABLISHING A BLUETOOTH CONNECTION WITH A SMARTPHONE OR COMPUTER
- GETTING STARTED
- POWER SOURCE/CHARGING
- MAKING CONNECTIONS
- BRAVIA TV COMPATIBLE WITH 360 SPATIAL SOUND PERSONALIZER
- TV
- WINDOWS® COMPUTER
- MAC COMPUTER
- SMARTPHONE/IPHONE
- MULTIPOINT CONNECTION
- BLUETOOTH DEVICE
- LISTENING TO A GAME CONSOLE
- USING THE APP
- INFORMATION
- SPECIFICATIONS
- NOTES ON USE
- TROUBLESHOOTING
- POWER SUPPLY
- SOUND
- BLUETOOTH CONNECTION
- RESET
- SONY
- INCLUDED ITEMS
- PARTS AND CONTROLS
- ADJUSTING THE WIDTH OF THE NECKBAND
- PRECAUTIONS WHEN ADJUSTING THE NECKBAND
- ABOUT THE INDICATOR ON THE NECKBAND SPEAKER
- (POWER)/ *BLUETOOTH) INDICATOR
- THE NECKBAND SPEAKER IS TURNED ON
- THE NECKBAND SPEAKER IS BEING TURNED OFF
- THE BUILT-IN BATTERY OF THE NECKBAND SPEAKER IS RUNNING LOW
- INFORMATION ABOUT THE BLUETOOTH FUNCTION
- INFORMATION ABOUT ANALOG AUDIO PLAYBACK
- INFORMATION ABOUT BATTERY CHARGING
- OTHER INFORMATION
- (MICROPHONE OFF)/ ADD (SPEAKER ADD) INDICATOR
- WHEN THE MICROPHONE IS OFF
- INFORMATION ABOUT THE SPEAKER ADD FUNCTION
- RELATED TOPIC
- CHARGING THE NECKBAND SPEAKER
- CONNECT THE NECKBAND SPEAKER TO AN AC OUTLET TO CHARGE IT
- CHECKING THE CHARGING COMPLETION
- CHECKING THE BUILT-IN BATTERY LEVEL OF THE RECHARGEABLE BUILT-IN BATTERY BY PRESSING THE (POWER)/(BLUETOOTH) BUTTON
- BUILT-IN BATTERY LIFE
- WHEN THE BUILT-IN BATTERY IS RUNNING LOW
- NOTE
- TURNING THE POWER ON
- TURNING THE POWER OFF
- AUTOMATIC POWER OFF FUNCTION
- HINT
- CHECK WHETHER YOUR BRAVIA TV IS COMPATIBLE WITH 360 SPATIAL SOUND PERSONALIZER
- CONNECT THE BRAVIA TV ACCORDING TO THE RESULTS OF CHECKING IN STEP
- FOR DIRECT BLUETOOTH CONNECTION TO ENJOY A SPATIAL SOUND ON A BRAVIA TV
- FOR CONNECTION VIA THE TRANSMITTER (SOLD SEPARATELY) TO ENJOY A SPATIAL SOUND ON A BRAVIA TV
- CONNECTING THE NECKBAND SPEAKER TO A 360 SPATIAL SOUND PERSONALIZER COMPATIBLE BRAVIA TV VIA A BLUETOOTH CONNECTION
- MAKE THE NECESSARY PREPARATIONS FOR A BLUETOOTH CONNECTION TO THE NECKBAND SPEAKER
- SET THE NECKBAND SPEAKER TO PAIRING MODE
- TO PAIR THE FIRST TIME AFTER PURCHASE
- TO PAIR A SECOND AND SUBSEQUENT BLUETOOTH DEVICES (IF THE NECKBAND SPEAKER HAS PAIRING INFORMATION FOR OTHER DEVICES)
- OPERATE THE BRAVIA TV TO CONNECT THE NECKBAND SPEAKER VIA A BLUETOOTH CONNECTION
- CONFIRM THAT THE AUDIO OUTPUT HAS SWITCHED FROM THE BRAVIA TV TO THE NECKBAND SPEAKER
- CONNECTING THE NECKBAND SPEAKER TO A 360 SPATIAL SOUND PERSONALIZER COMPATIBLE BRAVIA TV VIA A BLUETOOTH CONNECTION THROUGH THE TRANSMITTER (SOLD SEPARATELY)
- TURN ON THE BRAVIA TV AND OPERATE THE BRAVIA TV TO DO THE SETTINGS
- PRESS AND HOLD THE XBLUETOOTH) BUTTON ON THE TRANSMITTER (SOLD SEPARATELY) FOR ABOUT 5 SECONDS
- CONFIRM THAT THE NECKBAND SPEAKER AND THE TRANSMITTER (SOLD SEPARATELY) ARE CONNECTED VIA A BLUETOOTH CONNECTION
- CONNECTING THE NECKBAND SPEAKER WITH A TV VIA A BLUETOOTH CONNECTION
- TO PAIR A SECOND AND SUBSEQUENT TVS (IF THE NECKBAND SPEAKER HAS PAIRING INFORMATION FOR OTHER DEVICES)
- OPERATE THE TV TO CONNECT THE NECKBAND SPEAKER VIA A BLUETOOTH CONNECTION
- CONNECTING THE NECKBAND SPEAKER WITH A WINDOWS COMPUTER VIA A BLUETOOTH CONNECTION
- SUPPORTED OPERATION SYSTEMS
- PUT THE NECKBAND SPEAKER INTO PAIRING MODE
- REGISTER THE NECKBAND SPEAKER TO THE COMPUTER
- ON WINDOWS
- FOLLOW THE ON-SCREEN INSTRUCTIONS TO ESTABLISH A BLUETOOTH CONNECTION
- CONNECTING THE NECKBAND SPEAKER WITH A PAIRED WINDOWS COMPUTER VIA A BLUETOOTH CONNECTION
- CONNECTING THE NECKBAND SPEAKER WITH A MAC COMPUTER VIA A BLUETOOTH CONNECTION
- SEARCH FOR THE NECKBAND SPEAKER ON YOUR MAC COMPUTER
- CLICK THE SPEAKER ICON IN THE TOP-RIGHT OF THE SCREEN AND SELECT [BRAVIA THEATRE U] FROM [OUTPUT]
- CONNECTING THE NECKBAND SPEAKER WITH A PAIRED MAC COMPUTER VIA A BLUETOOTH CONNECTION
- PRESS AND HOLD THE (POWER)/ (BUETOOTH) BUTTON FOR ABOUT 2 SECONDS UNTIL YOU HEAR A NOTIFICATION SOUND
- ON YOUR MAC COMPUTER, SELECT THE NECKBAND SPEAKER
- CONNECTING THE NECKBAND SPEAKER WITH AN ANDROID™ SMARTPHONE OR AN IPHONE VIA A BLUETOOTH CONNECTION
- ON THE ANDROID SMARTPHONE
- ON THE IPHONE
- CONNECTING THE NECKBAND SPEAKER WITH A PAIRED ANDROID SMARTPHONE OR A PAIRED IPHONE VIA A BLUETOOTH CONNECTION
- CONNECTING THE NECKBAND SPEAKER CONCURRENTLY WITH 2 BLUETOOTH DEVICES (MULTIPOINT CONNECTION)
- CONNECTING THE NECKBAND SPEAKER CONCURRENTLY WITH 2 DEVICES VIA BLUETOOTH CONNECTIONS
- CHANGING THE BLUETOOTH DEVICES IN MULTIPOINT CONNECTION
- MUSIC (AUDIO) PLAYBACK WHILE THE NECKBAND SPEAKER IS CONNECTED WITH 2 DEVICES IN MULTIPOINT CONNECTION
- RECEIVING A CALL WHILE THE NECKBAND SPEAKER IS CONNECTED WITH 2 SMARTPHONES/IPHONE DEVICES IN MULTIPOINT CONNECTION
- USING 2 NECKBAND SPEAKERS AT THE SAME TIME (SPEAKER ADD)
- CONNECT THE FIRST NECKBAND SPEAKER TO A BLUETOOTH DEVICE
- PRESS AND HOLD THE MICROPHONE OFF)/ ADD (SPEAKER ADD) BUTTON ON THE FIRST NECKBAND SPEAKER FOR ABOUT 2 SECONDS
- PRESS AND HOLD THE 📄 (MICROPHONE OFF)/ADD (SPEAKER ADD) BUTTON ON THE SECOND NECKBAND SPEAKER FOR ABOUT 2 SECONDS
- CHECK THE STATUS OF THE INDICATORS ON THE 2 NECKBAND SPEAKERS
- TO CANCEL A SPEAKER ADD FUNCTION CONNECTION
- LISTENING TO TV AUDIO THROUGH THE NECKBAND SPEAKER
- TURN ON THE TV
- TURN ON THE NECKBAND SPEAKER BY PRESSING AND HOLDING THE (POWER)/(BUETOOTH) BUTTON FOR ABOUT 2 SECONDS UNTIL YOU HEAR A NOTIFICATION SOUND
- WEAR THE NECKBAND SPEAKER AROUND THE BASE OF YOUR NECK
- ADJUST THE VOLUME WITH THE -/+ (VOLUME) BUTTONS
- LISTENING TO MUSIC OF A DEVICE VIA A BLUETOOTH CONNECTION
- A2DP (ADVANCED AUDIO DISTRIBUTION PROFILE)
- AVRCP (AUDIO VIDEO REMOTE CONTROL PROFILE)
- CONNECT THE NECKBAND SPEAKER WITH THE BLUETOOTH DEVICE
- START PLAYBACK ON THE BLUETOOTH DEVICE
- ADJUST THE VOLUME WITH THE -/+ (VOLUME) BUTTONS ON THE NECKBAND SPEAKER
- PAUSE
- SKIP TO THE BEGINNING OF THE NEXT TRACK
- SKIP TO THE BEGINNING OF THE CURRENT OR PREVIOUS TRACK
- FAST-FORWARD THE CURRENT TRACK
- FAST-REVERSE THE CURRENT TRACK
- SELECTING THE QUALITY FOR MUSIC PLAYBACK VIA BLUETOOTH CONNECTIONS (CODEC)
- TERMINATING THE BLUETOOTH CONNECTION (AFTER USE)
- ABOUT 360 REALITY AUDIO
- WHAT IS 360 REALITY AUDIO
- CONDITIONS OF USE
- USE THE DEDICATED AUDIO CABLE (SUPPLIED) TO LISTEN
- MAKING A VIDEO CALL ON A COMPUTER
- RECEIVING A CALL
- ABOUT RING TONES
- CONNECT THE NECKBAND SPEAKER WITH A SMARTPHONE OR MOBILE PHONE
- PRESS THE (PLAY/CALL) BUTTON WHEN A CALL IS RECEIVED
- TO TURN OFF THE MICROPHONE
- TO END A CALL, PRESS THE —(PLAY/CALL) BUTTON
- MAKING A CALL
- OPERATE THE SMARTPHONE OR MOBILE PHONE TO MAKE A CALL
- IF NO DIAL TONE IS HEARD VIA THE NECKBAND SPEAKER
- WHILE THE PHONE IS RINGING OR A PHONE CONVERSATION IS IN PROGRESS, ADJUST THE VOLUME BY PRESSING THE - / + (VOLUME) BUTTONS ON THE NECKBAND SPEAKER OR OPERATING THE SMARTPHONE OR MOBILE PHONE
- TO END A CALL, PRESS THE (PLAY/CALL) BUTTON
- WHAT YOU CAN DO WITH THE "SONY | HEADPHONES CONNECT" APP
- INSTALLING THE "SONY | HEADPHONES CONNECT" APP
- ACCESSING SUPPORT INFORMATION FROM THE "SONY | HEADPHONES CONNECT" APP
- UPDATING THE NECKBAND SPEAKER SOFTWARE
- WIRELESS NECKBAND SPEAKER (YY7861E)
- SPEAKER SECTION
- FULL RANGE UNIT
- ENCLOSURE TYPE
- BLUETOOTH SECTION
- COMMUNICATION SYSTEM
- MAXIMUM COMMUNICATION RANGE
- FREQUENCY BAND
- MODULATION METHOD
- COMPATIBLE BLUETOOTH PROFILE
- SUPPORTED CODEC
- CORRESPONDING CONTENT PROTECTION
- TRANSMISSION RANGE (A2DP)
- MICROPHONE
- TYPE
- DIRECTIONAL CHARACTERISTIC
- EFFECTIVE FREQUENCY RANGE
- GENERAL
- POWER CONSUMPTION
- LITHIUM-ION BATTERY LIFE (WITH PLAYBACK VIA A BLUETOOTH CONNECTION)
- TIME REQUIRED FOR CHARGING THE BUILT-IN RECHARGEABLE BATTERY
- OPERATING TEMPERATURE
- SYSTEM REQUIREMENTS FOR CHARGING BATTERY USING USB
- COMPATIBLE IPHONE/IPOD MODELS
- PRECAUTIONS
- ON PLACEMENT
- OTHER NOTES
- NOTES ON CHARGING
- LIFE SPAN OF THE BUILT-IN LITHIUM ION BATTERY
- ABOUT WARNINGS DURING CHARGING
- NOTES ON WATER RESISTANT FEATURE
- WATER RESISTANT PERFORMANCE OF THE NECKBAND SPEAKER
- LIQUIDS THAT THE WATER RESISTANT PERFORMANCE SPECIFICATIONS APPLY TO
- TO MAINTAIN WATER RESISTANT PERFORMANCE
- HOW TO CARE FOR THE NECKBAND SPEAKER
- ON BLUETOOTH COMMUNICATIONS
- LICENSES
- TRADEMARKS
- WHAT CAN I DO TO SOLVE A PROBLEM
- UNABLE TO CHARGE THE NECKBAND SPEAKER
- UNABLE TO TURN ON THE NECKBAND SPEAKER OR THE NECKBAND SPEAKER SUDDENLY TURNS OFF
- NO SOUND/SOUND FROM ONLY ONE SPEAKER COMPONENT/LOW SOUND LEVEL/DISTORTED SOUND/HUMMING OR NOISE IN THE SPEAKER OUTPUT/NO VOICE OR LOW VOICE FROM CALLERS
- COMMON
- WHILE CONNECTED WITH A TV
- WHILE CONNECTED WITH A DEVICE OTHER THAN A TV
- UNABLE TO PAIR THE NECKBAND SPEAKER WITH A BLUETOOTH DEVICE
- UNABLE TO PAIR THE NECKBAND SPEAKER WITH THE TRANSMITTER (SOLD SEPARATELY)
- SOUND SKIPS
- UNABLE TO CONNECT THE NECKBAND SPEAKER CONCURRENTLY WITH 2 DEVICES (MULTIPOINT CONNECTION)
- RESETTING THE NECKBAND SPEAKER
- INITIALIZING THE NECKBAND SPEAKER
- CONNECTING WITH A SMARTPHONE OR COMPUTER VIA A BLUETOOTH CONNECTION
Brand : SONY
Model : BRAVIA Theater U HTAN7
Category : Docking Station