Bolero Flux Pt 605500 A - Refrigerator CECOTEC - Free user manual and instructions
Find the device manual for free Bolero Flux Pt 605500 A CECOTEC in PDF.


| Brand | Cecotec |
| Model | Bolero Flux Pt 605500 A |
| Product type | Combined refrigerator with freezer |
| Dimensions (H x W x D) | 180 x 60 x 65 cm (approximately) |
| Net weight | 62 kg (approximately) |
| Power supply | 220-240 V, 50 Hz |
| Total net capacity | 252 L |
| Refrigerator capacity | 180 L |
| Freezer capacity | 72 L |
| Climate class | SN-ST |
| Energy class | E |
| Noise level | 40 dB |
| Main functions | Static refrigeration, 3-star freezer, adjustable thermostat, LED lighting, tempered glass shelves |
| Defrost | Automatic in the refrigerator, manual in the freezer |
| Lighting | LED |
| Shelves | 4 adjustable tempered glass shelves |
| Bins and door shelves | 1 vegetable bin, 4 door shelves |
| Freezing | Freezing capacity 4 kg/24 h |
| Safety | Safety thermostat, hermetic cooling system |
| Care and cleaning | Clean with a soft cloth and soapy water, defrost the freezer regularly |
| Reversible doors | Yes, reversible |
| Adjustable feet | Yes |
| Spare parts and repairability | Availability of spare parts for 10 years, repairable design |
| General information | Compliant with EC directives, for domestic use only |
Frequently Asked Questions - Bolero Flux Pt 605500 A CECOTEC
User questions about Bolero Flux Pt 605500 A CECOTEC
0 question about this device. Answer the ones you know or ask your own.
Ask a new question about this device
Download the instructions for your Refrigerator in PDF format for free! Find your manual Bolero Flux Pt 605500 A - CECOTEC and take your electronic device back in hand. On this page are published all the documents necessary for the use of your device. Bolero Flux Pt 605500 A by CECOTEC.
USER MANUAL Bolero Flux Pt 605500 A CECOTEC
bolero
Safety instructions 9
-
Parts and components 53
-
Before use 53
-
Installation 54
-
Operation 55
-
Cleaning and maintenance 56
-
Troubleshooting 58
-
Technical specifications 59
-
Disposal of old electrical and electronic appliances 61
-
Technical support and warranty 61
-
Copyright 61
SOMMAIRE
EN • The coding in this manual is generic and applies to all code variants of the appliance.
Read these instructions thoroughly before using the appliance. Keep this instruction manual for future reference or new users.
- This appliance can be used by children aged 8 years and above and people with reduced physical, sensory, or mental capabilities or lack of experience and knowledge if they have been given supervision or instruction concerning use of the appliance in a safe way and understand the hazards involved. Children must not play with the appliance.
- Cleaning and user maintenance should not be carried out by unsupervised children.
- This appliance is designed for domestic use only and is not intended for bars, restaurants, farmhouses, hotels, motels, and offices.
- You must allow the appliance to be disconnected from the power supply after installation.
- The air discharge regulations must be complied with.
- Things you should never do:
I. Do not attempt to use the kitchen hood without the mesh filter or if the filter is excessively dirty or greasy!
II. Do not install the kitchen hood above a cooker with a high level grill.
III. Do not leave pans unattended during use because overheated fats or oils may catch fire.
- Accumulation of grease in the kitchen hood can cause a fire hazard. Clean the appliance according to the instructions in this manual.
- Exercise extreme caution when cleaning the appliance. Risk of burns and/or cuts. We recommend the use of gloves.
- Never leave open flames under the kitchen hood.
-
If the kitchen hood is damaged, do not attempt to use it.
-
When the kitchen hood and other non-electrically powered
- appliances are in simultaneous operation, the negative pressure in the room must not exceed 4 Pa (4 x 10⁻⁵ bar).
- Important! Always disconnect the power supply during installation and maintenance.
- The kitchen hood must be installed in accordance with the installation instructions and in compliance with all measurements.
- All installation work must be carried out by a competent person or a qualified electrician.
- Dispose of the packaging material carefully. Children are vulnerable to it.
- Pay attention to sharp edges inside the
- kitchen hood, especially during installation and cleaning.
- Make sure that the duct does not have bends sharper than 90 degrees, as this will reduce the efficiency of the kitchen hood.
- WARNING: failure to install the screws or fastening device in accordance with these instructions may result in electrical hazards.
- WARNING: before accessing the electrical terminals, all power supply circuits must be disconnected.
- There must be adequate ventilation of the room when the kitchen hood is used at the same time as gas or other fuel burning appliances.
- Caution: the appliance and its accessible parts may become hot during operation. Be careful not to touch any accessible parts. Children under 8 years old must stay away, unless they are supervised.
- Local air discharge regulations must be complied with.
- For safety reasons, only use the supplied fixing or mounting screws (if applicable, depending on the model) or screws
of the same size as those recommended in this instruction manual.
- You should not use a steam cleaner.
- Never try to put out the fire with water. Instead, turn off the appliance and smother the flame with, e.g., a fireproof lid or blanket.
- Never use extension leads, multiple socket connections or external timer connection elements.
- If the power cable is damaged, it must be replaced by the official Cecotec Technical Support Service or by similarly qualified technicians to prevent hazards.
- The appliance must not be operated if the power supply cable is damaged or cut.
- If the appliance stops working or malfunctions abnormally, disconnect it from the mains and contact the official Cecotec Technical Support Service.
- Cecotec disclaims all liability for any damage or injury caused as a result of failure to follow the installation and/or operating instructions contained in this instruction manual.
- There must be adequate ventilation of the room when the kitchen hood is used at the same time as gas or other fuel burning appliances.
- There is a risk of fire if cleaning is not carried out according to the instructions.
- Do not flambé under the kitchen hood.
- CAUTION: accessible parts can become hot when used with cooking appliances.
- Air must not be discharged into a duct that is used to exhaust fumes from appliances burning gas or other fuels.
- The minimum distance between the worktop and the lowest part of the kitchen hood, when it is located above a gas appliance, must be at least 65 cm. If the installation
instructions for the gas appliance specify a greater distance, this must be taken into account. The distance of 65 cm can be reduced for:
○ Non-combustible parts of kitchen hoods.
- Parts operating at safety extra-low voltage (provided that these parts do not give access to live parts if they are deformed).
- The air discharge regulations must be complied with.
- Cecotec disclaims all liability for any damage or injury caused as a result of failure to follow the installation and/or operating instructions contained in this instruction manual.
- The kitchen hood is intended for installation only over a hob with four cooking zones.
INSTRUCTIONS DE SÉCURITÉ
- Power icon
- Booster function icon
- Increase time/speed icon
- Display
- Decrease time/speed icon
- Delay function icon
- Light on/off icon
- Motion sensor
- Motion sensor
NOTE:
The graphics in this manual are schematic representations and may not exactly match the device.
2. BEFORE USE
- This appliance is packaged in a way as to protect it during transport. Take the appliance out of its box and remove all packaging materials. You can keep the original box and other packaging elements in a safe place to prevent damage to the device if you need to transport it in the future. In case the original packaging is disposed of, make sure all packaging materials are recycled accordingly.
- Make sure all parts and components are included and in good conditions. If there is any piece missing or in bad conditions, contact the official Cecotec Technical Support Service immediately.
- Do not remove the serial number of the appliance in order to keep a correct traceability of it in case of assistance.
Box content
- Extractor hood
- Assembly kit
- 2 carbon filters ∅176
- Instruction manual
3. INSTALLATION
Figure 2 shows the dimensions (in mm) of the kitchen hood required for installation.
- Before installing the extractor hood, make sure that the area is clean to prevent it from sucking in dust or dirt.
- Please note that the extractor hood must not share the same ventilation duct with other appliances that use gas or other fuses.
- To facilitate air outlet, the ventilation duct should have a curvature of ≥120° and should be connected to the outside wall.
- After installation, ensure that the kitchen hood is level to prevent grease build-up on the end. Fig. 3
Figure 4 shows the necessary elements to install the kitchen hood, bracket and hooks.
Fig. 4 key:
- Internal chimney bracket
- External chimney bracket
-
Wall hook
-
The kitchen hood should be placed at a distance of 65-75 cm above the cooking surface for best effect. Fig. 5
-
Install the wall hook in a suitable location and set the installation height. Keep it aligned. Use the screws to fix it to the wall. Fig. 6.
Fig. 6 key:
A Internal chimney bracket
B Wall hook
- Fix the outer bracket on the chimney, and make sure that the inner part of the chimney can be adjusted to the installation height, as well as that of the flexible connection pipe. Then, install the flexible connection pipe in the chimney of the kitchen hood and place the hood in the bracket. Fig. 7
Fig. 7 key:
A Flexible connection pipe
B Inside of the chimney
C Bracket
D Outside of the chimney
-
Place the kitchen hood on the hook on the wall. Fig. 8
-
Adjust the height of the inner part of the chimney to the position of the inner bracket and fix it with screws (ST4*8 mm). After adjusting the position of the kitchen hood, fix the body with safety screws (ST4*30 mm). Fig. 9
Note: there are two safety ventilation ducts in the back housing.
4. OPERATION
When the kitchen hood is switched on, the power icon indicator light is red.
Power icon
- Press the power icon ⏻, the kitchen hood will beep, and all icons will light up, indicating that the kitchen hood is in standby mode.
- Press the ⏻ icon again, the kitchen hood will beep and then switch off.
Booster function icon
- In standby mode, press the Booster icon >>>, the kitchen hood will beep.
- The number 4 will appear on the display, indicating that the maximum ventilation (Booster function) mode has been activated. After 5 minutes, the appliance will automatically go back to speed 3.
Increase/decrease icons
- When the appliance is in standby mode, press the increase icon △, a beep will sound. The number 1 will appear on the display, indicating that the hood is operating at low speed. Press the △ icon again, the number 2 will appear on the display, indicating that the hood is operating at medium speed. If you press the △ icon a third time, the number 3 will appear on the display, indicating that the hood is operating at the highest speed.
- To reduce the extraction power to the medium level, press the decrease icon ▼, the number 2 will reappear on the display.
- Press the ▽ icon again, the number 1 will appear on the display, indicating that the hood is operating at the lowest speed.
Delay function icon
- When the extractor hood is in operation, press the Delay icon ⏻, the hood will beep and the indicator light will flash, indicating that the kitchen hood has entered the delay switch-off mode. The delay time is 5 minutes.
- After 5 minutes, the kitchen hood will switch off.
Light on/off icon
- Press the light bulb icon - to switch on the kitchen hood light.
- Press it again to switch it off.
Gesture control
- To ensure optimum operation of this function, the hand should be placed close to the kitchen hood, at a distance of no more than 80 mm.
- Slide your hand from left to right to operate the kitchen hood at low speed. The hood will beep and the light icon will light up. Slide your hand again to increase the extraction power and so on up to the booster speed of the Booster mode >>>.
- On the other hand, by sliding your hand from right to left, the kitchen hood will go down from Booster speed to speed 3, and so on until it switches off. The light will stay on, so swipe left again to switch it off.
5. CLEANING AND MAINTENANCE
- Always disconnect the power supply before carrying out any cleaning or maintenance work on the kitchen hood. Please note that the cleaning and maintenance frequency depends on the use frequency and intensity.
- To prevent the outer surface of the kitchen hood from deteriorating over time, it is recommended that it be cleaned with hot water and a non-corrosive detergent every two months.
- Do not use abrasive detergents. Otherwise, the surface of the kitchen hood may be damaged.
- Keep the motor and other parts away from water, as water may damage the appliance.
- The carbon filter must not be exposed to heat.
Cleaning aluminium filters
Do not use corrosive detergents to clean grease from the aluminium filters. Regular cleaning of the aluminium filters will prolong the life of the appliance and keep it in good working order. Figure 10 shows how to release the filter from the kitchen hood.
Follow the instructions below:
Cleaning method
- Immerse the aluminium filters in hot water (40–50 °C), add neutral detergent and let them soak for 2 to 3 minutes. Protect yourself with gloves and clean the filters with a soft brush or scouring pad. Do not apply too much force, as filters are very delicate and can be easily damaged.
- If you wish, you can also wash the filters in the dishwasher at a temperature of approx. 60° C.
Carbon filter
This type of filter has activated carbon and purifies air and absorbs cooking odours. The activated carbon becomes saturated after a period of time, which will reduce the adsorption capacity of the filter. The carbon filter cannot be washed nor cleaned in any way. When its service life comes to an end you must replace it with a new one.
When the kitchen hood is used regularly, the activated carbon filter should be replaced according to the frequency of use. If frying more frequently, shorten this interval.
- Remove the aluminium filters.
- The carbon filters are located on both sides of the motor. Turn the filters, until they are firmly in place.
- To replace the carbon filters, proceed in reverse order. Fig. 11
Fig. 11 key:
A Closed
B Opened
C Opened
D Closed
Please note
- Always switch off the power supply before cleaning or performing any maintenance work on the kitchen hood.
- To prevent the outer surface of the kitchen hood from deteriorating over time, it is recommended that it be cleaned with hot water and a non-corrosive detergent every two months.
- Do not use abrasive detergents. Otherwise, the surface of the kitchen hood may be damaged.
- Keep the motor and other parts away from water, as water may damage the appliance.
- The carbon filter must not be exposed to heat.
Replacing the light bulb/lamp
Please note:
- The light bulb must be replaced by the official Cecotec Technical Support Service or similarly qualified technicians.
- Always disconnect the power supply before performing any operation on the appliance. When handling the bulb, make sure that it has cooled down completely before any direct contact with your hands.
- When handling the bulbs, hold them with a cloth or gloves to prevent sweat from coming into contact with the bulb, as this may reduce the bulb life.
Note:
- Before changing the light bulb, make sure that the appliance is switched off and unplugged.
- Protect yourself from danger when changing the light bulb, e.g. by wearing gloves.
- TROUBLESHOOTING
| Problem | Cause | Solution |
| The light is on, but the motor does not work | The kitchen hood is obstructed. | Remove what is obstructing the hood. |
| The condenser is damaged. | Please contact the official Cecotec Technical Support Service to replace the condenser. | |
| Motor is jammed or bearing damaged. | Please contact the official Cecotec Technical Support Service to replace the motor. | |
| Motor is burnt or gives off a bad smell. | Please contact the official Cecotec Technical Support Service to replace the motor. | |
| Neither the light bulb nor the motor work | In addition to the above, check the following: | |
| The light bulb has blown. | Please contact the official Cecotec Technical Support Service to replace the light bulb. | |
| Power cable is loose. | Please contact the official Cecotec Technical Support Service to connect the cables according to the wiring diagram. | |
| Grease falls out of the aluminium filters | The filters are very dirty. | Clean or replace the aluminium filters immediately. |
| The kitchen hood vibrates | The fan is damaged, causing the kitchen hood to vibrate when extracting air. | Please contact the official Cecotec Technical Support Service to replace the fan. |
| The motor is not securely fastened. | Fix the motor correctly. | |
| The kitchen hood is not securely fastened. | Fix the kitchen hood correctly. | |
| The kitchen hood is not sufficiently extracting | The distance between the kitchen hood and the cooking surface is too large. | Readjust the distance. |
| There is too much ventilation in the room due to open doors or windows. | Relocate and reinstall the kitchen hood. | |
| The kitchen hood is tilted | Fastening screws are not tightened properly. | Reposition the kitchen hood horizontally and tighten the screws. |
| Plastic plugs are not tightened properly. | Reposition the kitchen hood horizontally and tighten the plugs. | |
If none of these situations match your problem, do not attempt to disassemble or repair the appliance by yourself. Repairs carried out by unqualified people may result in injury or serious malfunctions. Contact the official Cecotec Technical Support Service. The repair must be carried out by an authorised technician, and you must use only original spare parts.
Unauthorised self-maintenance or maintenance will affect the safe use of the product and the application of the warranty policy.
7. TECHNICAL SPECIFICATIONS
Product reference: 02872
Product: Bolero Flux PT 605500 Inox A++
Rated voltage: 220-240 V\~
Rated frequency: 50 Hz
Total power: 73 W
Motor: 70 W
LED light: 2x1.5 W
550 m³/h air flow
Bulb type: rectangular LED light
Bulb dimensions: (120 x 33) mm
ILCOS Code D: DBL-1.5-S-120/33
| Symbol | Value | Unit | |
| Model reference | 02872 | ||
| Annual energy consumption | AEChood | 10.6 | kWh/a |
| Time increment factor | f | 1.0 | |
| Fluid dynamic efficiency | FDEhood | 27.2 | |
| Energy Efficiency Index (EEIW) | EEIhood | 36.1 | |
| Measured airflow at maximum efficiency point | QBEP | 246.1 | m3/h |
| Air pressure measured at maximum efficiency point | PBEP | 88 | Pa |
| Maximum airflow | Qmax | Highest setting: 450.9Lowest setting: 228.9 | m3/h |
| Electrical input power measured at maximum efficiency point | WBEP | 22.1 | W |
| Nominal power of the lighting system | WL | 3.5 | W |
| Measured illumination of the illumination system on the cooking surface | Emed | 110 | lux |
| Standby power consumption | PS | N/A | W |
| Power consumption in off mode | Po | 0.43 | W |
| Noise level (Highest setting) | LWA | 59 | dB |
| Noise level (Lowest setting) | LWA | 46 | dB |
| Sound level (Boost) | LWA | 62 | dB |
This appliance features a light source with an energy efficiency grade A.
The appliance power consumption when off is 0.43 W, following the guidelines of EN 50564:2011 and the European regulations 1275/2008/EC and 801/2013/EC. For this purpose, the device is connected to the mains without performing any function. The switch/knob of the appliance was set to the Off position.
Technical specifications may change without prior notification to improve product quality.
Made in China | Designed in Spain
8. DISPOSAL OF OLD ELECTRICAL AND ELECTRONIC APPLIANCES
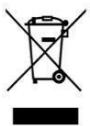
This symbol indicates that, according to the applicable regulations, the product and/or batteries must be disposed of separately from household waste. When this product reaches the end of its shelf life, you should dispose of the cells/batteries/accumulators and take them to a collection point designated by the local authorities.
Consumers must contact their local authorities or retailer for information concerning the correct disposal of old appliances and/or their batteries.
Compliance with the above guidelines will help protecting the environment.
9. TECHNICAL SUPPORT AND WARRANTY
Cecotec shall be liable to the end user or consumer for any lack of conformity that exists at the time of delivery of the product under the terms, conditions, and deadlines established by the applicable regulations.
It is recommended that repairs be carried out by qualified personnel.
If at any moment you detect any problem with your product or have any doubt, do not hesitate to contact the official Cecotec Technical Support Service at +34 96 321 07 28.
10. COPYRIGHT
The intellectual property rights over the texts in this manual belong to CECOTEC INNOVACIONES, S.L. All rights reserved. The contents of this publication may not, in whole or in part, be reproduced, stored in a retrieval system, transmitted, or distributed by any means (electronic, mechanical, photocopying, recording or similar) without the prior authorization of CECOTEC INNOVACIONES, S.L.
1. PIÈCES ET COMPOSANTS
Panneau de contrôle
Img. 1
6. PROBLEEMOPLOSSING


Fig./Img./Abb./Afb./ Rys. 7

Fig./Img./Abb./Afb./ Rys. 8
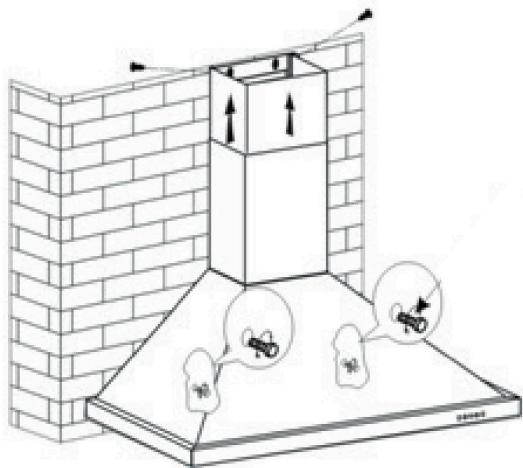
Fig./Img./Abb./Afb./Rys. 9
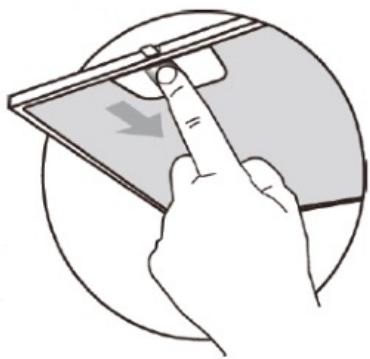
Fig./Img./Abb./Afb./Rys.10

Fig./Img./Abb./Afb./ Rys. 11
www.cecotec.es
- SOMMAIRE
- INSTRUCTIONS DE SÉCURITÉ
- NOTE
- BEFORE USE
- BOX CONTENT
- INSTALLATION
- FIG. 4 KEY
- FIG. 6 KEY
- FIG. 7 KEY
- OPERATION
- POWER ICON
- BOOSTER FUNCTION ICON
- INCREASE/DECREASE ICONS
- DELAY FUNCTION ICON
- LIGHT ON/OFF ICON
- GESTURE CONTROL
- CLEANING AND MAINTENANCE
- CLEANING ALUMINIUM FILTERS
- CLEANING METHOD
- CARBON FILTER
- PLEASE NOTE
- REPLACING THE LIGHT BULB/LAMP
- TECHNICAL SPECIFICATIONS
- DISPOSAL OF OLD ELECTRICAL AND ELECTRONIC APPLIANCES
- TECHNICAL SUPPORT AND WARRANTY
- COPYRIGHT
- PIÈCES ET COMPOSANTS
- PANNEAU DE CONTRÔLE
- PROBLEEMOPLOSSING
Brand : CECOTEC
Model : Bolero Flux Pt 605500 A
Category : Refrigerator