Bolero Squad I 3000eco - Refrigerator CECOTEC - Free user manual and instructions
Find the device manual for free Bolero Squad I 3000eco CECOTEC in PDF.


| Product type | Built-in induction hob |
| Brand | Cecotec |
| Model | Bolero Squad I 3000eco |
| Number of cooking zones | 3 cooking zones |
| Power of cooking zone 1 | 1800 W / 2000 W (boost) |
| Power of cooking zone 2 | 1200 W / 1600 W (boost) |
| Power of cooking zone 3 | 2400 W / 3000 W (boost) |
| Control type | Touch controls |
| Timer | Integrated with time increase/decrease function |
| Child safety | Yes, touch lock |
| Residual heat indicator | Yes, "H" display |
| Start/Pause function | Yes |
| Cookware detection | Yes, automatic pan detection |
| Surface | Ceramic glass |
| Power supply | 220-240 V ~ 50/60 Hz |
| Maximum total power | Approximately 6600 W (sum of boost powers) |
| Approximate dimensions (W x D x H) | 590 x 520 x 55 mm |
| Approximate net weight | 8 kg |
| Installation | Built-in, installation by a qualified professional |
| Care and cleaning | Damp cloth, avoid steam cleaners and abrasives |
| Electrical safety | Mandatory grounding, all-pole disconnection device |
| Repairability | Repair by a qualified professional, parts via Cecotec after-sales service |
| General information | Legal warranty of conformity |
Frequently Asked Questions - Bolero Squad I 3000eco CECOTEC
User questions about Bolero Squad I 3000eco CECOTEC
0 question about this device. Answer the ones you know or ask your own.
Ask a new question about this device
Download the instructions for your Refrigerator in PDF format for free! Find your manual Bolero Squad I 3000eco - CECOTEC and take your electronic device back in hand. On this page are published all the documents necessary for the use of your device. Bolero Squad I 3000eco by CECOTEC.
USER MANUAL Bolero Squad I 3000eco CECOTEC
- Parts and components 47
- Before use 48
- Installation 48
- Operation 51
- Cleaning and maintenance 57
- Troubleshooting 58
- Technical specifications 60
- Recycling of electrical and electronic devices 62
- Technical support and warranty 62
- Copyright 62
- Simplified EU Declaration of Conformity 63
SOMMAIRE
EU01_122360 - BOLERO SQUAD I 3000ECO
EU01_122361 - BOLERO SQUAD I 4000ECO
EN • The coding in this manual is generic and applies to all code variants of the appliance.
Please read these instructions carefully before using the appliance. Keep this instruction manual for future reference or new users.
- The installation and connection of the appliance must be carried out by authorised specialists. The manufacturer is not liable for damage caused by installation or connection errors.
- The appliance must be properly fitted and installed in a suitable and approved kitchen unit and worktop.
- This appliance is intended for domestic use only and is not suitable for use in commercial establishments such as bars, restaurants, farms, hotels, motels, and offices.
- Do not block the air inlets or outlets on the appliance. Keep the ventilation grilles clear.
- Children under 8 years of age should be kept away from the appliance unless continuously supervised.
- Do not clean the appliance with a steam cleaner.
- Do not place metal objects (e.g. knives, forks, spoons, lids) on the hob surface; they may become hot.
- Stop operation of the hob by means of its control device and not by means of the container detector after use.
- This appliance is not intended to be operated via an external timer or a separate remote control system.
- WARNING: unattended cooking on a greasy or oily hob can be dangerous and may result in a fire. NEVER attempt to extinguish a fire with water. Switch off the appliance and cover the flames, e.g., with a fireproof lid or blanket.
- CAUTION: always supervise the cooking process.
Continuously monitor the cooking during operation. -
WARNING: fire hazard. Do not place objects on the cooking surfaces.
-
WARNING: only use hob protectors designed by the kitchen-appliance manufacturer or found to be suitable by the latter in the instructions for use, or corresponding built-in hob protectors. The use of unsuitable protectors can cause accidents.
- Do not install the appliance behind a decorative door, to prevent overheating.
- This appliance can be used by children aged 8 years and above and people with reduced physical, sensory, or mental capabilities or lack of experience and knowledge if they have been given appropriate supervision or instruction concerning use of the appliance in a safe way and understand the hazards involved. Children must not play with the appliance. Cleaning and user maintenance must not be carried out by children without supervision.
- Remove all labels and stickers from the ceramic glass.
- Do not modify the appliance in any way.
- Do not place the appliance on top of a dishwasher or tumble dryer to avoid steam damage.
- Be careful not to burn yourself while or after using the appliance.
- Make sure that no cords of any fixed or mobile appliance touch the glass or hot cookware.
- WARNING: if the glass surface is cracked, switch off the appliance and disconnect it from the mains (switch/disconnector) to avoid the risk of electric shock.
- If the power cable is damaged, it must be replaced by the manufacturer, their technical service, or qualified personnel, to avoid a hazard.
- Magnetic objects (credit cards, calculators, etc.) must not be placed near the appliance when plugged-in.
- Cookware with worn or damaged bottoms can damage the
ceramic glass.
- This appliance must be earthed and have an accessible omnipolar disconnecting device (contact separation ≥ 3 mm). See: Installation.
- Sand or other abrasive materials may damage the ceramic glass.
- Prevent objects of any size from falling onto the ceramic-glass panel.
- Avoid hitting the edges of the hob with cookware.
- Do not place or leave empty cookware on the induction hob.
- Sugar, synthetic materials, or aluminium foil must not come into contact with the cooking zones. These may cause breakage or other damage to the ceramic-glass panel due to cooling: switch off the appliance and remove them from the cooking area immediately (being careful not to burn yourself).
- Never place hot containers on the control panel.
- Accessible parts may remain hot after the appliance has been switched off. Observe the residual heat indicator 'H' before touching the surface.
- Do not cover the hob with cloths, decorative lids or protective sheets; there is a risk of fire and overheating.
- If there is a drawer under the built-in appliance, make sure there is enough space between the contents of the drawer and the bottom of the appliance (at least 2 cm). This is essential to ensure proper ventilation.
- Never store flammable objects (e.g., aerosols) in the drawer under the induction hob. Drawers and their contents must be heat resistant.
-
Precautions in the event of a fault: if you notice a fault, switch off and unplug the appliance.
-
The appliance must be repaired by qualified professionals. Do not try to fix the appliance yourself.
- Always make sure that cookware is well centred on the cooking zone. The bottom of the cookware should cover as much of the cooking area as possible.
- People with pacemakers or other active implants should consult their doctor and the implant manufacturer before using induction hobs.
- Using poor-quality cookware or any induction adapters for non-magnetic cookware will invalidate the warranty. Cecotec accepts no liability for damage caused to the induction hob and/or its surroundings.
INSTRUCTIONS DE SÉCURITÉ
EU01_122360 – Bolero Squad I 3000Eco (3 zonas):
EU01_122361 – Bolero Squad I 4000Eco (4 zonas):
EU01_122360 – Bolero Squad I 3000Eco (3 zones):
- Zone 1 (1800 W / 2000 W)
- Zone 2 (1200 W / 1600 W)
- Zone 3 (2400 W / 3000 W)
- Start/Pause touch icon
- Child Lock touch icon
- Zone 1 selection touch icon
- Zone 2 selection touch icon
- Decrease power/time touch icon
- Timer touch icon
- Increase power/time touch icon
- Zone 3 selection touch icon
- Booster touch icon
- ON/OFF touch icon
EU01_122361 – Bolero Squad I 4000Eco (4 zones):
- Zone 1 (1800 W / 2000 W)
- Zone 2 (1200 W / 1600 W)
- Zone 3 (1800 W / 2000 W)
- Zone 4 (1200 W / 1600 W)
- Start/Pause touch icon
- Child Lock touch icon
- Zone 1 selection touch icon
- Zone 2 selection touch icon
- Decrease power/time touch icon
- Timer touch icon
- Increase power/time touch icon
- Zone 3 selection touch icon
- Zone 4 selection touch icon
- Booster touch icon
- ON/OFF touch icon
Note:
The graphics in this manual are schematic representations and may not exactly match the product.
ENGLISH
2. BEFORE USE
- This appliance comes in a packaging designed to protect it during transport. Remove the appliance from its box. You can keep the original box and other packaging materials in a safe place to prevent damage to the appliance if you need to transport it in the future. In case the original packaging is disposed of, make sure all packaging materials are recycled accordingly.
- Check that all parts and components are included and in good condition. If any of them are missing or damaged, please contact the official Cecotec Technical Support Service immediately.
Box contents:
- Product
- Instruction manual
- Do not remove the product's serial number in order to keep proper traceability if technical assistance is required.
3. INSTALLATION
Requirements for fitting and preparing the worktop
- Cut the worktop to the dimensions shown in Figure 3.
- For installation and use, ensure there is a minimum clearance of 50 mm around the cut-out.
- The worktop must be at least 30 mm thick.
- Use heat-resistant worktop material to prevent warping caused by heat radiation from the hob.
Figures 3 and 4:
- External dimensions: L = 590 mm; W = 520 mm.
- Heights: H = 63 mm; D = 59 mm.
- Cut-out dimensions: A = 560 mm; B = 490 mm.
- Minimum clearance around the edges: X = 50 mm (min.).
Ventilation and safety distances
Fig. 5
- Ensure adequate ventilation at all times. Do not block the air inlets or outlets.
- Maintain the minimum ventilation clearances indicated:
A = 50 mm (min.).
B = 20 mm (min.).
C = Air intake/inlet.
- The safety distance between the cooking surface and the cabinet above must be at least 760 mm.
Final checks
- Check that the hob is properly ventilated and that the air inlet and outlet openings remain free of obstructions.
Before installing the hob, make sure that:
- The worktop is square and level and there are no structural elements encroaching on the installation space.
- The worktop is made of heat-resistant material.
- If the hob is installed above an oven, the oven has a built-in cooling fan.
- The installation will comply with all clearance/distance requirements and applicable standards and regulations.
- A suitable circuit breaker is incorporated into the fixed wiring to allow complete disconnection from the mains supply, installed and positioned in accordance with local electrical regulations.
- The circuit breaker is of an approved type and provides an air gap of at least 3 mm between contacts on all poles (or on all live/phase conductors if local regulations permit this variant).
- The circuit breaker must be easily accessible to the user once the hob is installed.
- In case of doubt regarding the installation, consult the local authorities and the current building regulations.
- Heat-resistant and easy-to-clean finishes (e.g. ceramic tiles) must be used on the walls adjacent to the panel.
After installing the hob, check that:
- The power cable is not accessible through any doors or drawers in the cabinet.
- There is sufficient airflow from outside the unit to the base of the hob.
- If the hob is installed above a drawer or cupboard cavity, a heat shield has been placed beneath the base of the hob.
- The circuit breaker is easily accessible to the user.
Before fitting the mounting brackets:
- Place the unit on a stable, flat surface (you can use the packaging material as a support).
ENGLISH
- Do not apply force to the controls on the control panel.
Fitting the mounting brackets:
- With the unit placed on a stable, flat surface (use the packaging as a support), avoid applying force to the controls on the panel.
- Secure the hob to the worktop by screwing four brackets into the underside of the hob (see Figure 6).
- Adjust the position of the brackets to suit different worktop thicknesses. Fig. 7
Warnings:
- The hob must be installed by qualified personnel or technicians. Do not attempt to install the appliance yourself.
- Do not install the hob on top of refrigerators, dishwashers or tumble dryers.
- Install the hob in such a way as to ensure adequate heat dissipation to improve its reliability.
- The wall and the area above the worktop where heat is concentrated must be heat-resistant.
- To prevent damage, the layers of the worktop (sandwich) and the adhesives used must be heat-resistant.
- Do not use steam cleaners.
- This appliance may only be connected to a mains supply with a system impedance of no more than 0.427 Ω. If necessary, consult your electricity supplier to find out the system impedance.
Connecting the hob to the mains
- The electrical connection must be made in accordance with the relevant regulations and using a single-pole circuit breaker.
- The connection method is shown in the figure below.
Power cable and protection
Fig. 8
- If the cable is damaged or needs replacing, the work must be carried out by an after-sales service technician using the appropriate tools to prevent accidents.
- If the appliance is connected directly to the fixed mains supply, an omnipolar circuit breaker must be installed with a minimum contact gap of 3 mm.
- The installer must check that the electrical connection is correct and complies with the applicable safety regulations.
- The cable must not be bent, pinched or subjected to compression.
- The cable must be checked periodically and may only be replaced by suitably qualified personnel.
4. OPERATION
Touch control operation
- The controls are touch-sensitive; there is no need to apply pressure.
- Use the ball of your finger, not its tip.
- You will hear a beep each time a press is registered.
- Always keep the controls clean and dry, and free of any objects (e.g. utensils or cloths). Even a thin film of water can make it difficult to operate the icons.
Choosing the right cookware
- Only ferromagnetic cookware is suitable for induction hobs. Look for the induction symbol on the packaging or on the base of the pan.
- Magnet test: hold a magnet close to the base of the cookware. If it sticks firmly, the cookware is suitable for induction.
-
If you do not have a magnet:
-
Pour some water into the pan to be tested.
- Follow the steps outlined in "Setting up and starting cooking".
- If the no-cookware symbol (☐) does not flash on the display and the water begins to heat up, the cookware is suitable.
- Cookware made from the following materials is not suitable: non-magnetic “pure” stainless steel, aluminium or copper without a magnetic base, glass, wood, porcelain, ceramic or earthenware.
| Diameter (mm) | Minimum diameter (mm) |
| 160 | 120 |
| 180 | 140 |
| 210 | 160 |
| 280 | 220 |
| 180x175 | 140 |
| 180x380 | 240 |
| 190x180 | 140 |
| 180x380 | 240 |
| 210x190 | 160 |
| 210x380 | 240 |
ENGLISH
Choosing the right cookware
- Do not use cookware with serrated edges or a curved base.
- Ensure that the base of the pan is flat, sits completely on the hob and is the same size as the cooking zone. Always centre the cookware on the hob.
- Always lift pans off the hob; do not slide them, as this may scratch the glass.
- If the base of the pan is only partially ferromagnetic, only the ferromagnetic area will heat up. This may result in uneven heat distribution. The non-ferromagnetic part may not reach a temperature high enough for cooking.
- The ferromagnetic area is also reduced if the base material contains, for example, aluminium. This may prevent the cookware from reaching a high enough temperature or even from being detected by the hob.
- The materials used in the base of the cookware affect the cooking result. Using pots and pans that distribute heat evenly (e.g. stainless steel with a triple-layer base) saves time and energy. Use cookware with a flat base; if the base is uneven, it can hinder heat transfer.
Using the hob
Switching on and starting to cook
- Using the hob. Switching on and starting cooking. When the appliance is switched on, the hob emits a beep, all the indicators light up for 1 second and then go out. The appliance enters standby mode.
- Tap the ON/OFF touch icon. All the indicators show “-”.
- Place a suitable pan on the cooking zone you wish to use. Make sure the base of the pan and the surface of the cooking zone are clean and dry.
- Tap the touch icon for the relevant zone. The indicator associated with that zone will flash.
- Select the power level by tapping the touch icons for decreasing/increasing power/time. If you do not select a power level within 1 minute, the hob will switch off automatically and you will need to start again from step 1. You can change the power level at any time during cooking.
After cooking
- Select the zone you wish to switch off by tapping its zone selection touch icon.
- Reduce the power to "0" by tapping the power/time decrease touch icon "-" until the display shows "0".
- To switch off the entire hob, tap the ON/OFF touch icon.
Caution: hot surfaces. The "H" indicator shows which cooking zone is still hot. It will disappear when the surface has cooled to a safe temperature. This can be used as an energy-saving feature: to warm other pans, use the zone that still retains residual heat.
Booster function
The Booster function lasts for a maximum of 5 minutes; after that time, the zone automatically switches to level 9.
- Select the zone with the Booster function by tapping the corresponding zone selection touch icon.
- Tap the Booster function touch icon. The power level indicator for that zone will display "P".
Cancelling Booster
- Select the zone that is in Booster mode.
- Tap the power/time reduction touch icon to cancel the Booster function.
- You can then set the desired power level using the “- / +” icons.
Child lock
It prevents accidental use (for example, a child turning on the hobs).
When the child lock is activated, all controls are disabled except for the ON/OFF touch icon and the child lock touch icon.
To activate the lock
Tap the child lock touch icon. The timer display will show "LO".
To deactivate the lock
- Make sure the hob is on.
- Tap and hold the child lock touch icon for 3 seconds until the lock is released.
- The hob is now ready for use.
Warning
- If the hob switches off whilst the lock is active, the lock will remain active when it is switched on again and must be cancelled before use.
Residual heat warning
- After a period of use, residual heat may remain in the zone(s). The "H" indicator appears to warn of a hot surface. Do not touch the area or place heat-sensitive objects on it whilst "H" is lit. The indicator will go out when the surface reaches a safe temperature.
Automatic shut-off
- The hob has an automatic switch-off function. It is activated if you forget to switch off a hob.
- The default switch-off times are shown in the table below in the manual.
| Power level | 1 | 2 | 3 | 4 | 5 | 6 | 7 | 8 | 9 |
| Switch-off time (hours) | 8 | 8 | 8 | 4 | 4 | 4 | 2 | 2 | 2 |
Using the timer
- The timer can be used in two ways:
- As an alarm (timer): when it reaches zero, it does not switch off any zones; it simply emits an audible signal. - To switch off one or more cooking zones once the set time has elapsed.
- Setting range: up to 99 minutes.
Using the timer as an alarm (without selecting any zones)
- Make sure the hob is on.
Note: the timer can be set before or after the cooking zones have been configured. - Tap the timer touch icon. The timer display will show "30" and the units digit "0" will flash.
- Adjust the units by touching the power/time decrease touch icon “-” or the power/time increase touch icon “+”.
- Tap the timer touch icon again; the tens digit "3" will now flash.
- Adjust the tens digit using “− / +” until the desired time is reached.
- Once the time has been set, the countdown begins immediately. The display shows the time remaining.
- When the time has elapsed, the buzzer will beep for 20 seconds and the timer indicator will display “--”.
Timer for switching off one or more hobs
Timer set for a single zone
- Tap the touch icon for the area you wish to set a timer for.
- Tap the timer touch icon. The timer display will show "30" and the units digit "0" will flash.
- Adjust the time by tapping the “-” touch icon (to decrease power/time) or the “+” touch icon (to increase power/time). If you tap and hold the touch icon, the setting will change in 10-minute increments.
- Tap the timer touch icon again; the tens digit "3" will now flash.
- Adjust again using “- / +” until you reach the desired time. Clear the set minutes by pressing the “-” and “+” buttons simultaneously.
- Once the time is confirmed, the countdown begins immediately and the display shows the remaining time.
Note: a red dot lights up next to the power level indicator for that zone to indicate that the zone is selected.
- When the time reaches "00", the timed zone switches off automatically. The other zones will continue to operate if they were switched on.
Timer applied to multiple zones
- Timer applied to multiple zones. When times are programmed for multiple zones, the 'dots' (decimals) for the relevant zones remain lit. The timer display always shows the shortest timer. The dot for the zone associated with that shortest time flashes. Example: if one zone is set to 15 minutes and another to 45 minutes, the timer display shows "15" and the dot for the zone set to 15 minutes flashes.
- When the shortest timer expires, that zone switches off. The display then switches to show the next pending timer and the dot for the corresponding zone flashes.
At any time, tap the zone selection touch icon to view its programmed time on the timer display.
Cancelling the timer
- Tap the touch icon for the zone for which you wish to stop the timer.
- Tap the timer touch icon. The timer indicator will flash.
- Tap the power/time decrease touch icon “-” until the timer is set to “00”. The timer is now cancelled for that zone.
Using the Start/Pause function
- Tap the Start/Pause touch icon. All cooking zones will pause temporarily and the zone indicators will display "||".
- Press the Start/Pause touch icon again to resume operation. All zones will return to their previous settings (power level and, where applicable, timer).
Usage notes
- The Start/Pause function can be activated when one or more zones are in operation.
- If the pause mode is not cancelled within 30 minutes, the induction hob will switch off automatically.
Cooking tips
Warning
Take extra care when frying, as oil and fat heat up quickly, especially if you use the Booster function. At extremely high temperatures, oil and fats can catch fire spontaneously, posing a serious fire hazard.
ENGLISH
Advice on cooking
- When it starts to boil, turn down the heat.
- Cooking with the lid on reduces cooking times and saves energy by retaining the heat.
- Minimise the amount of liquid or fat to reduce cooking time.
- Start cooking on a high power setting and, once the food is hot, decrease the setting.
Simmering and cooking rice
- Simmering takes place below the boiling point, at around 85° C, when occasional bubbles appear on the surface of the liquid. It is key to flavourful soups and tender stews, as the flavours develop without overcooking the food. Sauces thickened with egg or flour should also be cooked below the boiling point.
- Some dishes, such as cooking rice using the absorption method, may require a heat setting slightly higher than minimum to ensure the food is cooked properly within the recommended time.
Searing steaks
- Leave the meat at room temperature for about 20 minutes before cooking it.
- Heat a pan with a thick base thoroughly.
- Brush both sides of the steak with oil. Add a small drizzle of oil to the hot pan, then place the steak on the hot surface.
- Turn the steak over just once during cooking. The exact time will depend on the thickness and how well done you want it: as a guide, between 2 and 8 minutes on each side. Press the steak lightly to check the doneness: the firmer it feels, the more well done it will be.
- Leave the steak to rest for a few minutes on a warm plate before serving, so that the juices redistribute and the meat becomes more tender.
Stir-frying
- Choose a flat-bottomed wok or a large frying pan that is suitable for induction hobs.
- Have all the ingredients and utensils ready. Stir-frying should be done quickly; if you're cooking large quantities, do so in several small batches.
- Briefly preheat the pan and add two tablespoons of oil.
- Cook the meat first; set aside and keep warm.
- Stir-fry the vegetables. When they are hot but still crisp, reduce the heat setting on the hob, return the meat to the pan and add the sauce.
- Stir gently so that all the ingredients heat through evenly.
- Serve immediately.
5. CLEANING AND MAINTENANCE
Everyday dirt on glass (fingerprints, smudges, food residue or non-sugary spills)
- Unplug the hob.
- Apply a specific cleaner for glass/induction hobs whilst the glass is still warm (not hot).
- Rinse and dry with a clean cloth or paper towel.
- Switch the hob back on.
Important
- When the hob is switched off, the 'hot surface' indicator will not be lit, but the cooking zone may still be very hot. Exercise extreme caution.
- Very abrasive scourers, some nylon scourers and strong/abrasive cleaners can scratch the glass. Always check the label to ensure the product or scourer is suitable for glass hobs.
- Do not leave any cleaning product residue on the hob: the glass may become stained.
Overflows, drips and hot sugar spills onto the glass
Remove them immediately using a flat spatula, a pastry spatula or a scraper suitable for use on ceramic hobs.
Warning: the hob(s) may be very hot.
- Switch off the hob at the mains switch.
- Holding the scraper or utensil at a 30° angle, scrape the residue towards a cool area of the hob.
- Remove the residue with a cloth or kitchen paper.
- Repeat steps 2 to 4 of "Everyday dirt on the glass".
Important
- Remove melted marks and sugary residues/spills as soon as possible. If they cool on the glass, they can be very difficult to remove or may even permanently damage the surface.
- Risk of cuts: when the safety cover is retracted, the scraper blade is extremely sharp. Use it with maximum caution and always store it safely and out of reach of children.
Spills on touch controls
- Unplug the hob.
- Blot the spill.
- Wipe the touch control area with a clean, slightly damp sponge or cloth.
- Dry the area completely with a paper towel.
- Switch the hob back on.
Important
- The unit may beep and switch off, and the touch controls may stop responding whilst there is liquid on them. Make sure you dry the touch control area completely before switching the hob back on.
- TROUBLESHOOTING
| Problem | Possible cause | Recommended actions |
| The appliance does not turn on. | No power supply. | Check that the hob is plugged in and that the power switch/circuit is turned on.Check whether there is a power cut in the property or the local area. If the problem persists, contact a qualified technician. |
| The touch controls are not responding. | The controls are locked (child lock). | Unlock the controls. See: Child Lock. |
| The touch controls are difficult to operate. | There is moisture/liquid on the controls or you are tapping them with your fingertip. | Dry the touch control panel thoroughly and tap the icons with the pad of your finger. |
| The glass is scratched. | Cookware with a rough base or the use of scouring pads/abrasive products. | Use cookware with a flat, smooth base.Avoid abrasive products/utensils. |
| Some pots/pans produce clicking or clacking noises. | Construction of the cookware (layers of different metals that vibrate). | This is normal behaviour for the cookware; it does not indicate a fault with the appliance. |
| A low humming noise at high power settings. | This is characteristic of induction technology. | Normal; the noise decreases or disappears when the power level is reduced. |
| The fan can be heard after switching off the hob. | The cooling fan activates to protect the electronics and may continue to run after the hob has been switched off. | Normal; no action required. Do not switch off the power at the wall socket whilst the fan is running. |
| The pans do not heat up and the symbol appears on the display. | The pan is not suitable for induction, is too small or is not centred correctly. | Use cookware suitable for induction. Centre the pan and adjust its diameter to fit the cooking zone. See: Choosing the right cookware. |
| The hob or a zone switches off unexpectedly, a beep sounds and an error code appears (alternating with one or two digits on the timer display). | Technical fault. | Note down the code (letters and numbers), switch off the power at the mains switch and contact a qualified technician. |
Fault display and inspection
If a fault is detected, the induction hob automatically switches to protection mode and displays the corresponding code:
| Code | Possible causes | Solution |
| E3 / E7 | Temperature sensor failure. | Contact the official Cecotec Technical Support Service. |
| E5 | Ceramic glass overheating protection. | Switch the power off and then on again; switch the hob back on after 30 minutes. |
| E4 / E6 | Fault in the IGBT temperature sensor. | Contact the official Cecotec Technical Support Service. |
| E1 / E2 | Abnormal power supply voltage. | Check that the power supply is correct. Switch on the hob once the power supply is back to normal. |
| Er | Fault in the printed circuit board assembly (PCBA). | Contact the official Cecotec Technical Support Service. |
| Et | Spill/overfill protection. | Wipe up any water from the surface and restart. |
Safety notes
- The codes above correspond to the most common faults.
- Do not dismantle the appliance. Tampering with the internal components by unqualified personnel may cause damage or pose a serious risk. Contact an authorised service centre for assistance.
7. TECHNICAL SPECIFICATIONS
Reference: EU01_122360
Model: Bolero Squad I 3000Eco
Cooking areas: 3 areas
Rated power: 6600 W
Voltage: 220-240 V\~
Frequency: 50-60 Hz
Hob zone 1 > Rated power / "Booster" power (W): 1800/2000
Hob zone 2 > Rated power / "Booster" power (W): 1200/1600
Hob zone 3 > Rated power / "Booster" power (W): 2600/3000
Product dimensions:
Energy consumption of the induction hob calculated per kg (EC hob): 183.85
| Symbol | Value | Unit | |
| Model reference | EU01_122360 | ||
| Type of hob | Electric | ||
| Number of cooking zones | 3 | ||
| Heating technology (induction hotplates and cooking areas, radiation hotplates, solid hotplates) | Panel heater |
| Cooking zones (areas) | Cooking zone/area diameter (mm) | Cookware diameter (mm) | Water quantity m cw (g) | Energy consumption test E cw (Wh) | Energy consumption test per kg of water (EC electric cooking) (Wh/kg) |
| 1 | 180 | min 80 | 1500 | 271.49 | 180.99 |
| 2 | 160 | min 80 | 1030 | 196.61 | 190.88 |
| 3 | 280 | min 80 | 4240 | 761.97 | 179.70 |
The appliance power consumption when off is 0.3 W, following the guidelines of EN 50564:2011 and the European regulations 1275/2008/EC and 801/2013/EC. The appliance doesn't perform any function when connected to the mains. The appliance switch/knob was set to the "off" position.
IMPORTANT: The values stated have been obtained in a laboratory environment in accordance with the relevant regulations. These values may vary depending on the environmental conditions and use of the appliance.
Reference: EU01_122361
Model: Bolero Squad I 4000Eco
Cooking areas: 4 areas
Rated power: 7200 W
Voltage: 220-240 V\~
Frequency: 50-60 Hz
Hob zone 1 > Rated power / "Booster" power (W): 1800/2000
Hob zone 2 > Rated power / "Booster" power (W): 1200/1600
Hob zone 3 > Rated power / "Booster" power (W): 1800/2000
Hob zone 4 > Rated power / "Booster" power (W): 1200/1600
Product dimensions:
Energy consumption of the induction hob calculated per kg (EC hob): 182.45
| Symbol | Value | Unit | |
| Model reference | EU01_122361 | ||
| Type of hob | Electric | ||
| Number of cooking zones and/or areas | 4 | ||
| Heating technology (induction cooking zones and areas, radiant cooking zones, solid plates) | Panel heater |
| Cooking zones (areas) | Cooking zone/area diameter (mm) | Cookware diameter (mm) | Water quantity m cw (g) | Energy consumption test E cw (Wh) | Energy consumption test per kg of water (EC electric cooking) (Wh/kg) |
| 1 | 180 | min 80 | 1500 | 278.45 | 185.63 |
| 2 | 160 | min 80 | 1500 | 273.94 | 182.62 |
| 3 | 180 | min 80 | 2050 | 366.72 | 178.88 |
| 4 | 160 | min 80 | 1030 | 188.16 | 182.67 |
The appliance power consumption when off is 0.3 W, following the guidelines of EN 50564:2011 and the European regulations 1275/2008/EC and 801/2013/EC. The appliance doesn't perform any function when connected to the mains. The appliance switch/knob was set to the "off" position.
IMPORTANT: The values stated have been obtained in a laboratory environment in accordance with the relevant regulations. These values may vary depending on the environmental conditions and use of the appliance.
ENGLISH
Technical specifications may change without prior notice to improve product quality.
Made in China | Designed in Spain
8. RECYCLING OF ELECTRICAL AND ELECTRONIC DEVICES

This symbol indicates that, according to the applicable regulations, the product and/or batteries must be disposed of separately from household waste. When this product reaches the end of its shelf life, you should dispose of the batteries/accumulators and take them to a collection point designated by the local authorities.
For detailed information on how to properly dispose of electrical and electronic appliances and/or batteries, consumers should contact their local authorities.
Information regarding national packaging recycling systems and their marking can be found on our website.
Compliance with the above guidelines will help protect the environment.
9. TECHNICAL SUPPORT AND WARRANTY
Cecotec shall be liable to the end user or consumer for any lack of conformity that exists at the time of product delivery under the terms, conditions and deadlines established by applicable regulations.
Repairs should be carried out by qualified personnel.
If at any moment you detect any problem with your product or have any doubt, do not hesitate to contact the official Cecotec Technical Support Service at +34 96 321 07 28.
10. COPYRIGHT
The intellectual property rights over the texts in this manual belong to CECOTEC
INNOVACIONES, S.L. All rights reserved. The content of this publication may not, either in part or in its entirety, be reproduced, stored in a retrieval system, transmitted or distributed by any means (electronic, mechanical, photocopying, recording or similar) without prior authorisation from CECOTEC INNOVACIONES, S.L.
11. SIMPLIFIED EU DECLARATION OF CONFORMITY
CE Cecotec Innovaciones hereby declares that this appliance complies with the essential requirements and other relevant provisions of the regulations applicable in the European Union. This appliance has been designed, manufactured and tested in compliance with required safety and quality standards. The full text of the EU Declaration of Conformity can be found on the following website: https://cecotec.es/es/information/declaration-of-conformity
FRANÇAIS
1. PIÈCES ET COMPOSANTS
Image 1
Panneau de contrôle
EU01_122360 – Bolero Squad I 3000Eco (3 foyers) :
EU01_122361 – Bolero Squad I 4000Eco (4 foyers) :
EU01_122360 – Bolero Squad I 3000Eco (3 zone):
EU01_122361 – Bolero Squad I 4000Eco (4 zone):
EU01_122360 - Bolero Squad I 3000Eco (3 zonas):
EU01_122361 – Bolero Squad I 4000Eco (4 zonas):

Fig./Img./Abb./Afb./Rys. 3

Fig./Img./Abb./Afb./Rys. 5

Fig./Img./Abb./Afb./Rys. 6

Fig./Img./Abb./Afb./Rys. 7
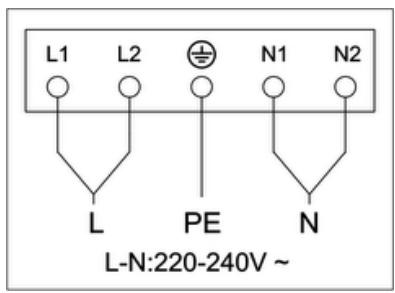

Fig./Img./Abb./Afb./Rys.8
www.cecotec.es
- SOMMAIRE
- INSTRUCTIONS DE SÉCURITÉ
- NOTE
- ENGLISH
- BEFORE USE
- BOX CONTENTS
- INSTALLATION
- FIGURES 3 AND 4
- VENTILATION AND SAFETY DISTANCES
- FIG. 5
- FINAL CHECKS
- BEFORE INSTALLING THE HOB, MAKE SURE THAT
- AFTER INSTALLING THE HOB, CHECK THAT
- BEFORE FITTING THE MOUNTING BRACKETS
- FITTING THE MOUNTING BRACKETS
- WARNINGS
- CONNECTING THE HOB TO THE MAINS
- POWER CABLE AND PROTECTION
- FIG. 8
- OPERATION
- TOUCH CONTROL OPERATION
- CHOOSING THE RIGHT COOKWARE
- USING THE HOB
- SWITCHING ON AND STARTING TO COOK
- AFTER COOKING
- BOOSTER FUNCTION
- CANCELLING BOOSTER
- CHILD LOCK
- TO ACTIVATE THE LOCK
- TO DEACTIVATE THE LOCK
- WARNING
- RESIDUAL HEAT WARNING
- AUTOMATIC SHUT-OFF
- USING THE TIMER
- TIMER FOR SWITCHING OFF ONE OR MORE HOBS
- TIMER SET FOR A SINGLE ZONE
- TIMER APPLIED TO MULTIPLE ZONES
- CANCELLING THE TIMER
- USING THE START/PAUSE FUNCTION
- USAGE NOTES
- COOKING TIPS
- ADVICE ON COOKING
- SIMMERING AND COOKING RICE
- SEARING STEAKS
- STIR-FRYING
- CLEANING AND MAINTENANCE
- EVERYDAY DIRT ON GLASS (FINGERPRINTS, SMUDGES, FOOD RESIDUE OR NON-SUGARY SPILLS)
- IMPORTANT
- OVERFLOWS, DRIPS AND HOT SUGAR SPILLS ONTO THE GLASS
- SPILLS ON TOUCH CONTROLS
- FAULT DISPLAY AND INSPECTION
- SAFETY NOTES
- TECHNICAL SPECIFICATIONS
- RECYCLING OF ELECTRICAL AND ELECTRONIC DEVICES
- TECHNICAL SUPPORT AND WARRANTY
- COPYRIGHT
- SIMPLIFIED EU DECLARATION OF CONFORMITY
- FRANÇAIS
- PIÈCES ET COMPOSANTS
- IMAGE 1
Brand : CECOTEC
Model : Bolero Squad I 3000eco
Category : Refrigerator