CHAUFFE BIBERON - Bottle warmer BABYMOOV - Free user manual and instructions
Find the device manual for free CHAUFFE BIBERON BABYMOOV in PDF.
User questions about CHAUFFE BIBERON BABYMOOV
0 question about this device. Answer the ones you know or ask your own.
Ask a new question about this device
Download the instructions for your Bottle warmer in PDF format for free! Find your manual CHAUFFE BIBERON - BABYMOOV and take your electronic device back in hand. On this page are published all the documents necessary for the use of your device. CHAUFFE BIBERON by BABYMOOV.
USER MANUAL CHAUFFE BIBERON BABYMOOV
Alimentation electrolyte:220/230V-50Hz
Puissance : 320 W
Rapide :
- 2 1/2 minutes for one bottle.
- 3 minutes for one jar.
For use in car
Power input: 12 V DC
Wattage: 100 W
Universal: for all types of baby bottle and jar
Waste Electrical and Electronic Equipment should be disposed of by selective collection. Do not throw electrical and electronic equipment away with un-sorted household waste, but dispose of it at a selective collection point.
PLEASE COMPLY WITH THESE SAFETY INSTRUCTIONS
- Never leave your child without supervision while the appliance is working.
- Check that your electrical power supply voltage is compatible with the appliance (see the details indicated beneath the appliance).
- Use this appliance solely to heat baby bottles and jars. Any other use might prove dangerous.
- Never switch on the appliance before pouring in a sufficient quantity of water.
- Never add any product of any kind (salt water, medication, detergents) to the water: this will damage the appliance.
- Never use the bottle warmer in damp surroundings and do not place directly under the tap. Never immerse the appliance in water or any other liquid.
- Never leave the appliance close to any source of heat such as radiators, sunny windows, etc.
Always use the bottle warmer on a completely flat and dry surface, out of the reach of children. - Do not use the bottle warmer out of doors.
Always use the baskets to heat bottles and jars, because failure to do so could damage the appliance. - Don't leave the bottle or jar to heat too long, this could encourage the development of germs in the milk or food.
- The bottles will be very hot when they come out of the warmer. Take care when removing them.
- Do not move the appliance while it is in operation or if it contains hot water.
- During the heating process the appliance can get very hot. Never touch anything other than the "On" button.
- Leave the bottle warmer to cool for about 15 minutes before using it again. Never touch the inside of the tank while the appliance is in use, or immediately after use.
-
Always unplug the appliance before cleaning or filling and after each use.
-
Do not leave the power cable at the edge of a table or work-surface. Do not place it on a hot surface. Do not leave the power cable dangling where a child could reach it.
- In the interests of safety, only use Babymoov accessories and spare parts and never dismantle the appliance.
- Avoid using your appliance if it is not working properly or if it is damaged. If this happens, contact the Babymoov after-sales service.
For using in car :
- Never use the bottle warmer while the vehicle is in motion. Leave your engine running when using the bottle warmer to avoid draining your battery.
- The car adapter cord is specially designed for this bottle warmer: never use it with other appliances.
- Regularly check that the cigarette lighter socket in your car. Clean it if necessary.
- If you have just used your car's cigarette lighter, allow it to cool for five minutes in the open position before plugging in with the bottle warmer.
WARNING
- The quantities given in the table are an indication only; if you think the result is too hot or not hot enough for your baby, don't hesitate to reduce or increase the quantities of water. N.B.: the material and the thickness of the bottle and the presence of a detachable base are elements that can affect the bottle's temperature.
-
ATTENTION: to eliminate the risk of burns, always check the temperature of the food before giving it to your baby. For a bottle, shake it well to mix the milk. Pour a drop onto the inside of your wrist to check its temperature. For a jar, mix the contents and try it in order to check it is not too hot.
-
If the power supply cable gets damaged it must be replaced by the manufacturer, the after-sales service or people with similar qualifications, in order to avoid any risk of danger.
- This appliance is not intended for use by persons (including children) with impaired physical, mental, or sensory abilities, or by persons lacking in experience or knowledge, unless the person responsible for their safety has supervised and instructed them in the use of this appliance.
- Children should be supervised to ensure that they do not play with the appliance.
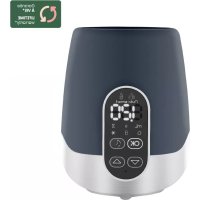
OPERATING INSTRUCTIONS
a - Measuring cup
b - Heating chamber
c-Bottle tray
d - Baby Food Jar Tray
e - Adaptor ring
f - Indicator light
g - ON button
h - Mains power cord
i-Car adaptor plug
Points to respect for trouble-free use:
- always check that the bottle is slightly open (not screwed down too tightly).
- always remove the lid from the jar.
- optimum heating will be guaranteed provided operation is not interrupted.
- use tap water only, with no added product.
NB: always use the large basket to heat bottles and jars.
By using the amounts of water indicated in the tables below, a baby bottle or jar will be heated to 30^ / 33^ , which is the temperature paediatricians recommend.
The quantities given are an indication only; if you think the result is too hot or not hot enough for your baby, don't hesitate to reduce or increase the quantities of water.
For using at home:
Place the Bottle Warmer on a flat and stable surface. Be sure the warmer and the cord are out of the reach of children.
Plug the power cord into wall outlet.
- Fill the measuring cup with water, following the instructions shown above, then pour the water into the heating chamber. Your can then place the cup back to the holder.
- Place the bottle tray into the heating chamber.
- Place the bottle into the bottle tray. If you are using standard/small bottle, place the adaptor ring around the bottle for better warming result.
- For warming baby food jar, remove the lid and place the jar in the Food Jar Tray and then put into the heating chamber. Please note the bottle tray should be placed inside the heating chamber first.
| Amount of content in bottle | Amount of water to be put in the measuring cup for BW for bottle content in room temperature | Amount of water to be put in the measuring cup for BW for bottle content in fridge temperature |
| 60 ml | 7 ml | 9 ml |
| 90 ml | 8,5 ml | 9,5 ml |
| 120 ml | 9 ml | 10 ml |
| 150 ml | 9,5 ml | 10,5 ml |
| 180 ml | 9,5 ml | 11 ml |
| 210 ml | 10 ml | 11 ml |
| 240 ml | 10 ml | 11,5 ml |
| 270 ml | 10 ml | 12 ml |
| 300 ml | 10 ml | 13 ml |
| 330 ml | 10,5 ml | 13 ml |
| Weight of baby jar | Amount of water to be put in the measuring cup for BW for baby jar in room temperature | Amount of water to be put in the measuring cup for BW for baby jarin fridge temperature |
| 120 g | 11 ml | 17 ml |
| 200 g | 20 ml | 25 ml |
| 250 g | 22 ml | 32 ml |
- Press the ON button to start warming cycle. The indicator light illuminates in red color. CAUTION! The steam given off during the warming cycle is very hot. Keeps your hand off the appliance when operation.
- When the heating cycle finished, bottle warmer will switch off automatically. At the same time, there will be a "beeping" sound to remind you the bottle is done.
- Then you can take out the bottle. For baby food jar, use the handle of Food Jar Tray to take it out. You can then unplug the unit.
For using in car:
Stop the car / vehicle and keep the engine running.
- Place the Bottle Warmer on a flat and stable surface inside your car and vehicle. Connect the Car Adaptor Plug on to the power cord of the bottle warmer.
- Plug the Car Adaptor Plug into the cigarette socket. Fill the measuring cup with water, following the instructions shown above, then pour the water into the heating chamber. Your can then place the cup back to the holder.
Repeat steps 2 - 7 as above.
| Amount of content in bottle | Quantity of water to be put in the measuriong cup |
| 60 ml | 4 ml |
| 90 ml | 5 ml |
| 120 ml | 5 ml |
| 150 ml | 5 ml |
| 180 ml | 5 ml |
| 210 ml | 5,5 ml |
| 240 ml | 5,5 ml |
| 270 ml | 6 ml |
| 300 ml | 6,5 ml |
| 330 ml | 6,5 ml |
| Weight of baby jar | Quantity of water to be put in the measuriong cup |
| 120 g | 9 ml |
| 200 g | 12 ml |
| 250 g | 14 ml |
CLEANING THE BOTTLE WARMER
Cleaning the bottle warmer:
- Always unplug the appliance and wait until it is cool before cleaning it.
- Use a damp cloth to clean the inside and outside of the unit.
- Never immerse the unit in water.
- Do not use abrasive products to clean.
- Adapter ring, trays and measuring cup can be washed using a sponge with soap and water or can be cleaned in the dishwasher in the top tray.
Descending the tank:
According to the quality of the water used, a limescale deposit can build up on the bottom of the heating chamber over time. You should regularly descale your bottle warmer by pouring a mixture of 100ml of hot water + 100ml of white vinegar into the heating chamber.
Leave this to act for approximately 30 minutes before emptying the chamber and wipe with a damp cloth. Do not use detergent to clean.
IN CASE OF ANY LITTLE PROBLEMS
- The bottle warmer doesn't heat up:
- check that the appliance is plugged in.
- check the "On" button to make sure it is properly switched on.
- The warming cycles are too short or too long:
- there is not enough or too much water; adapt the amount of water.
TECHNISCHE DATEN
Hausgebrauch
Stromversorgung:220/230V-50Hz
Leistung : 320 W