
PLFY-P-NBMU-E - Air-conditioner MITSUBISHI - Free user manual and instructions
Find the device manual for free PLFY-P-NBMU-E MITSUBISHI in PDF.

| Product Type | Ceiling-mounted cassette air conditioner |
| Brand | Mitsubishi |
| Model | PLFY-P-NBMU-E (series) |
| Power Supply | Single-phase 208/230 V, 60 Hz |
| Cooling Capacity | 12,000 to 36,000 BTU/h depending on model |
| Heating Capacity | 13,500 to 40,000 BTU/h depending on model |
| Dimensions (W × H × D) | 33-1/16 × 10-3/16 × 33-1/16 inches (with panel) |
| Net Weight | 49 to 60 lb (approx. 22 to 27 kg) |
| Airflow (Dry) | 390 to 1060 CFM depending on fan speed and model |
| Sound Level | 27 to 43 dB(A) depending on fan speed and model |
| Operating Modes | Auto, Cooling, Heating, Dehumidification, Ventilation |
| Filter Type | Long-life filter with cleaning indicator (2,500 hours) |
| Timer | Weekly, simple on/off, or auto shutoff |
| Airflow Direction | Adjustable vertically (5 positions) |
| Remote Control Lock | Yes (all buttons or except On/Off) |
| Error Display | Error code on remote control |
| Filter Maintenance | Clean with lukewarm water (max 50°C) or vacuum cleaner |
| Safety | Protective shutoff in case of malfunction, automatic defrost |
| Repairability | Parts available through authorized dealer, do not repair yourself |
Frequently Asked Questions - PLFY-P-NBMU-E MITSUBISHI
User questions about PLFY-P-NBMU-E MITSUBISHI
0 question about this device. Answer the ones you know or ask your own.
Ask a new question about this device
Download the instructions for your Air-conditioner in PDF format for free! Find your manual PLFY-P-NBMU-E - MITSUBISHI and take your electronic device back in hand. On this page are published all the documents necessary for the use of your device. PLFY-P-NBMU-E by MITSUBISHI.
USER MANUAL PLFY-P-NBMU-E MITSUBISHI
Air-Conditioners For Building Application INDOOR UNIT
PLFY-P·NBMU-E
OPERATION MANUAL
FOR USER
For safe and correct use, please read this operation manual thoroughly before operating the air-conditioner unit.
MANUEL D'UTILISATION
POUR L'UTILISATEUR
- Safety Precautions 2
- Parts Names 3
- Screen Configuration 4
- Setting the Day of the Week and Time 4
- Operation 4
-
Timer 9
-
Other Functions 12
- Function Selection 13
9.Care and Cleaning. 17 - Trouble Shooting 18
- Specifications 19
1. Safty Precautions
Before installing the unit, make sure you read all the "Safety Precautions".
The "Safety Precautions" provide very important points regarding safety. Make sure you follow them.
Please report to or take consent by the supply authority before connection to the system.
Symbols used in the text
Warning:
Describes precautions that should be observed to prevent danger of injury or death to the user.
Caution:
Describes precautions that should be observed to prevent damage to the unit.
Symbols used in the illustrations
(12) :Indicates a part which must be grounded.
Warning:
- For appliances not accessible to the general public.
- The unit must not be installed by the user. Ask the dealer or an authorized company to install the unit. If the unit is installed improperly, water leakage, electric shock or fire may result.
- Do not stand on, or place any items on the unit.
- Do not splash water over the unit and do not touch the unit with wet hands. An electric shock may result.
- Do not spray combustible gas close to the unit. Fire may result.
- Do not place a gas heater or any other open-flame appliance where it will be exposed to the air discharged from the unit. Incomplete combustion may result.
- Do not remove the front panel or the fan guard from the outdoor unit when it is running.
-
Never repair the unit or transfer it to another site by yourself.
-
When you notice exceptionally abnormal noise or vibration, stop operation, turn off the power switch, and contact your dealer.
- Never insert fingers, sticks etc. into the intakes or outlets.
- If you detect odd smells, stop using the unit, turn off the power switch and consult your dealer. Otherwise, a breakdown, electric shock or fire may result.
- This air conditioner is NOT intended for use by children or infirm persons without supervision.
- Young children must be supervised to ensure that they do not play with the air conditioner.
- If the refrigeration gas blows out or leaks, stop the operation of the air conditioner, thoroughly ventilate the room, and contact your dealer.
Caution:
- Do not use any sharp object to push the buttons, as this may damage the remote controller.
- Never block or cover the indoor or outdoor unit's intakes or outlets.
- Never wipe the remote controller with benzene, thinner chemical rags, etc.
-
Do not operate the unit for a long time in high humidity, e.g. leaving a door or window open. In the cooling mode, if the unit is operated in a room with high humidity (80% RH or more) for a long time, water condensed in the air conditioner may drop and wet or damage furniture, etc.
-
Do not touch the upper air outlet vane or the lower air outlet damper during operation. Otherwise, condensation may form and the unit may stop operating.
Disposing of the unit
When you need to dispose of the unit, consult your dealer.
■ Wired Remote-Controller
Note:
- "PLEASE WAIT" message
This message is displayed for approximately 3 minutes when power is supplied to the indoor unit or when the unit is recovering from a power failure.
Operation mode blinking display
When multiple indoor units are connected to a single outdoor unit and an operation mode is selected for one indoor unit that is different from the current operation mode of another indoor unit, the operation mode displays flashes. Select the same operation mode of the other indoor unit.
- "NOT AVAILABLE" message
This message is displayed if a button is pressed to operate a function that the indoor unit does not have.
When the same remote controller is used to operate multiple indoor units, this message is displayed if the main indoor unit is not equipped with the selected function.
- Room temperature display
The indoor unit temperature sensors or the remote controller temperature sensor can be selected to measure the room temperature. The indoor unit temperature sensors are the initial setting. When the indoor unit temperature sensors are selected to measure the room temperature, the room temperature measured at the main indoor unit is displayed on the remote controller that operates multiple indoor units.
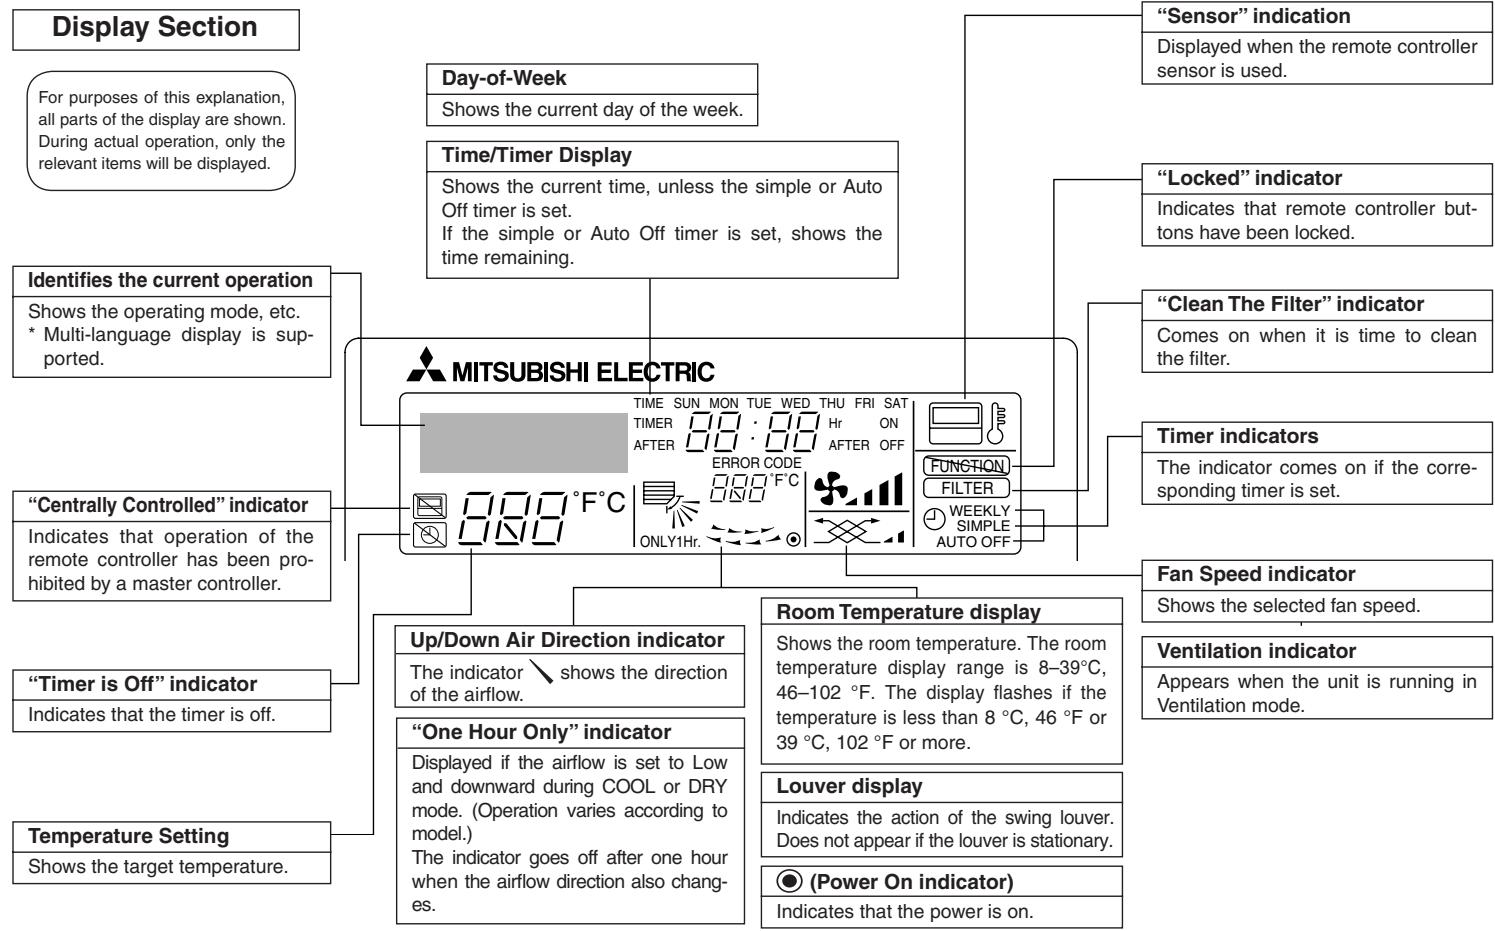
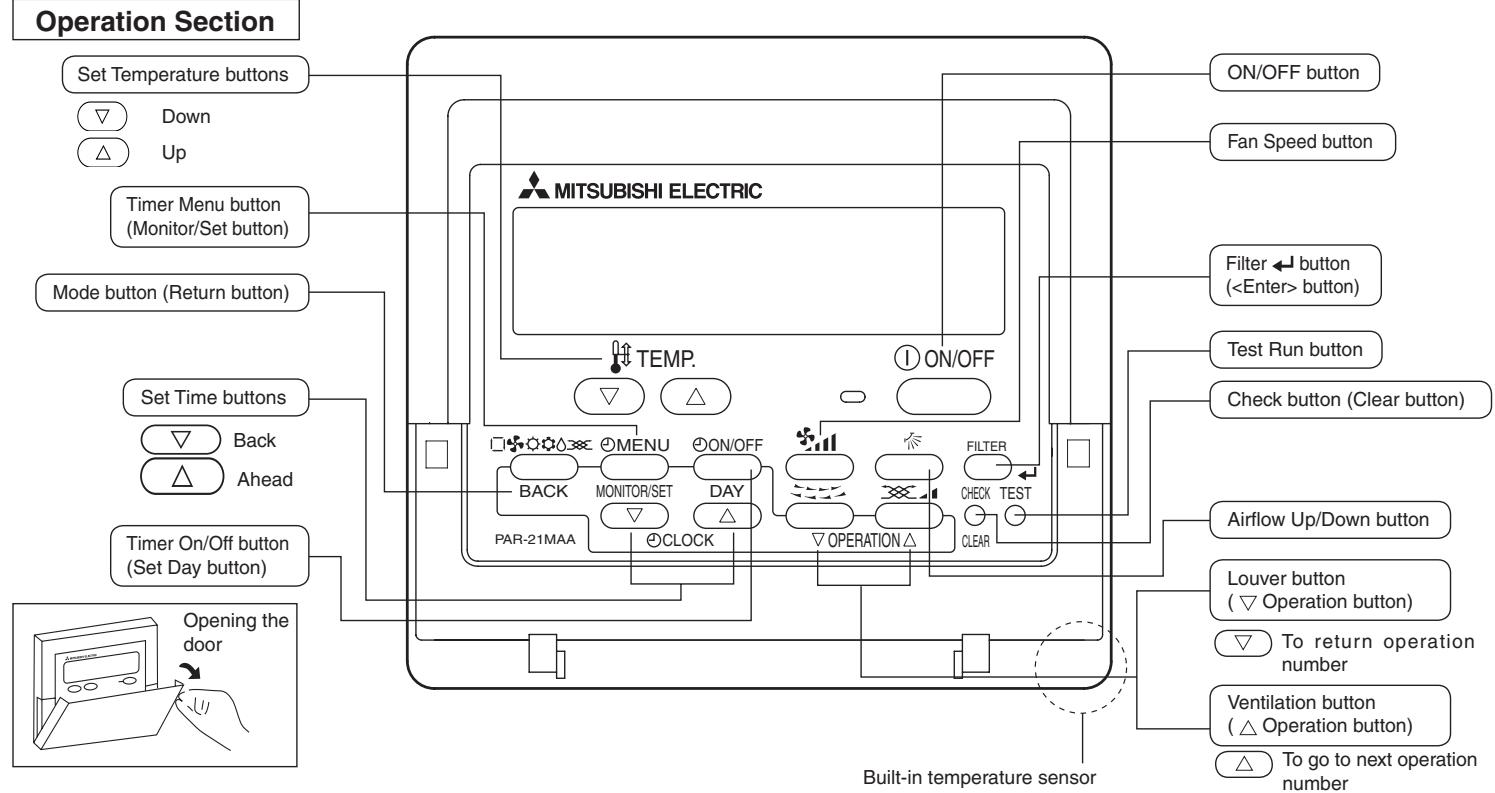
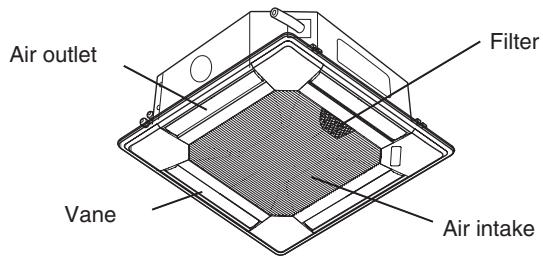
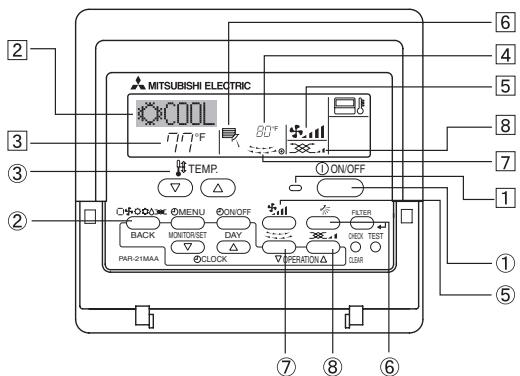
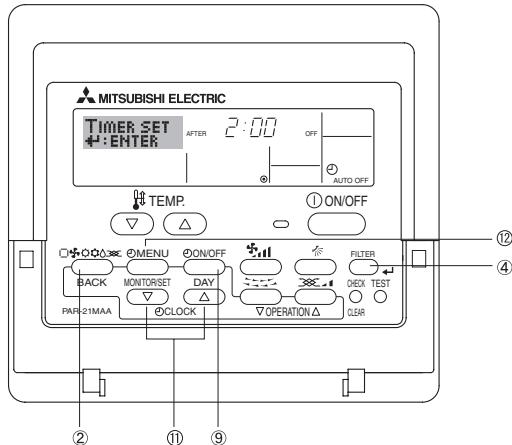
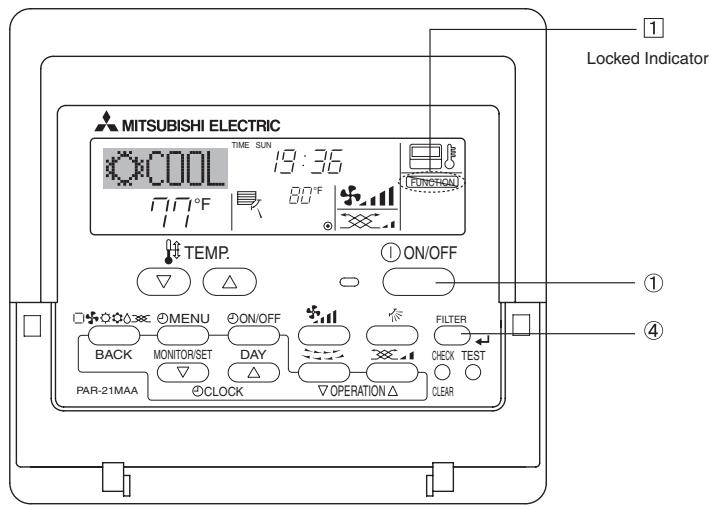
2. Parts Names
Indoor Unit
| PLFY-P·NBMU-E | |
| Fan steps | 4 steps |
| Vane | Auto with swing |
| Louver | - |
| Filter | Long-life |
| Filter cleaning indication | 2,500 hr |
3. Screen Configuration
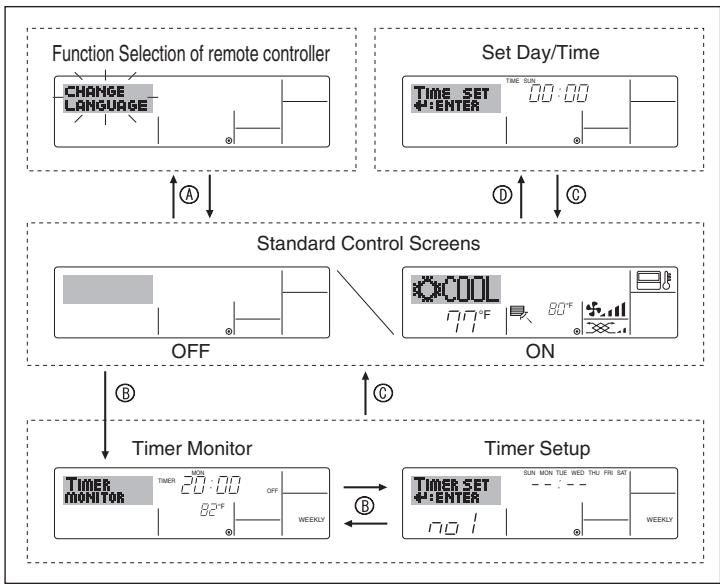
For details on setting the language for the remote controller display, refer to section 8. Function Selection.
The initial language setting is English.
- Function Selection of remote controller:
Set the functions and ranges available to the remote controller (timer functions, operating restrictions, etc.)
- Set Day/Time: Set the current day of the week or time.
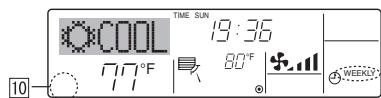
Standard Control Screens:
View and set the air conditioning system's operating status
- Timer Monitor: View the currently set timer (weekly timer, simple timer, or Auto Off timer)
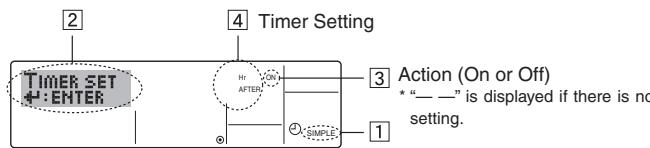
- Timer Setup: Set the operation of any of the timers (weekly timer, simple timer or Auto Off timer).
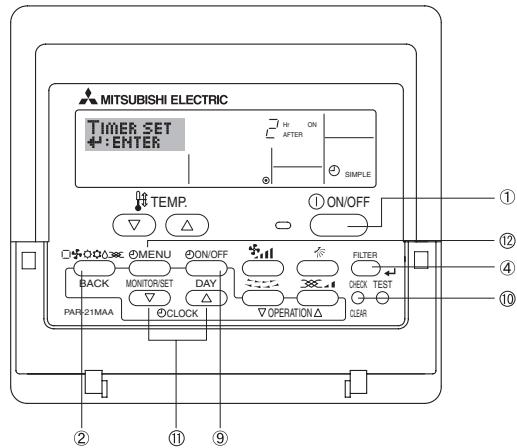
A: Hold down both the Mode button and the Timer On/Off button for 2 seconds.
包 :Press the Timer Menu button.
: Press the Mode (Return) button.
⑩: Press either of the Set Time buttons ( or ).
4. Setting the Day of the Week and Time

Note:
The day and time will not appear if clock use has been disabled at Function Selection of remote controller.
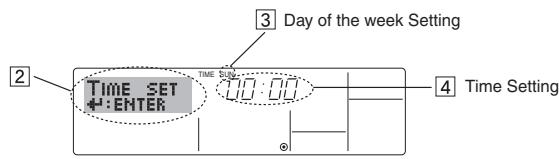
- Press the or Set Time button ⑪ to show display ②.
- Press the Timer On/Off (Set Day) button ⑨ to set the day.
*Each press advances the day shown at 3 :
Sun Mon ... Fri Sat.
- Press the appropriate Set Time button 11 as necessary to set the time.
- As you hold the button down, the time (at 4) will increment first in one-minute intervals, then in ten-minute intervals, and then in one-hour intervals.
- After making the appropriate settings at Steps 2 and 3, press the Filter button ④ to lock in the values.
5. Operation
5.1. Turning ON/OFF
Press the ON/OFF button ①.
- The ON lamp 1 and the display area come on.
Note:
- When the unit is restarted, initial settings are as follows.
| Remote Controller settings | |
| Mode | Last operation mode |
| Temperature setting | Last set temperature |
| Fan speed | Last set fan speed |
| Airflow up/down | Last setting |
Press the ON/OFF button ① again.
- The ON lamp and the display area go dark.
Note:
Even if you press the ON/OFF button immediately after shutting down the operation is progress, the air conditioner will not start for about three minutes. This is to prevent the internal components from being damaged.
5.2. Mode select
Press the operation mode (□) button ② and select the operation mode ②.
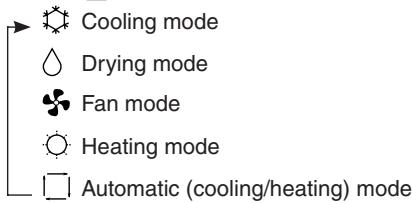
Automatic operation
- According to a set temperature, cooling operation starts if the room temperature is too hot and heating operation starts if the room temperature is too cold.
During automatic operation, if the room temperature changes and remains 1.5^ , 3^ or more above the set temperature for 3 minutes, the air conditioner switches to cooling mode. In the same way, if the room temperature remains 1.5^ , 3^ or more below the set temperature for 3 minutes, the air conditioner switches to heating mode.
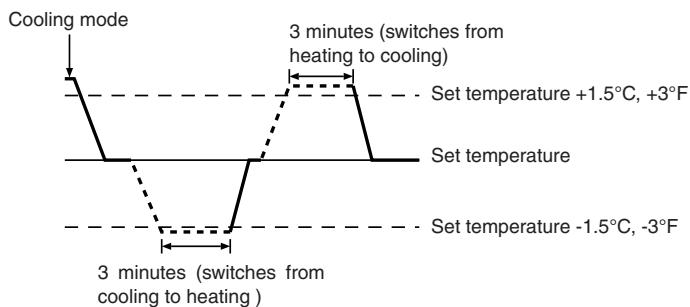
Because the room temperature is automatically adjusted in order to maintain a fixed effective temperature, cooling operation is performed a few degrees warmer and heating operation is performed a few degrees cooler than the set room temperature once the temperature is reached (automatic energy-saving operation).
5.3. Temperature setting
To decrease the room temperature:
Press l button ③ to set the desired temperature.
The selected temperature is displayed 3.
To increase the room temperature:
Press l button ③ to set the desired temperature.
The selected temperature is displayed 3.
Available temperature ranges are as follows:
Cooling/Drying: 19 - 30°C, 67 - 87°F
Heating: 17 - 28 °C, 63 - 83 °F
Automatic: 19 - 28 °C, 67 - 83 °F
- The display flashes either 8^ - 39^, 46^ - 102^ to inform you if the room temperature is lower or higher than the displayed temperature.
5.4. Fan speed setting
Press the Fan Speed button ⑤ as many times as necessary while the system is running.
Each press changes the force. The currently selected speed is shown at 5.
- The change sequence and the available settings are as follows.
| FAN SPEED | Display | ||||
| 4-speed + Auto | Speed 1 | Speed 2 | Speed 3 | Speed 4 | Auto |
| → | → | → | → | → | |
Note:
- In the following cases, the actual fan speed generated by the unit will differ from the speed shown on the remote controller display.
- While the display is showing "STAND BY" or "DEFROST".
- When the temperature of the heat exchanger is low in the heating mode. (e.g. immediately after heating operation starts)
- In HEAT mode, when room temperature is higher than the temperature setting.
- When the unit is in DRY mode.
5.5. Airflow direction setting
■ With the unit running, press the Airflow Up/Down button 6 as necessary.
Each press changes the direction. The current direction is shown at [6].
- The change sequence and the available settings are as follows.

*Note that during swing operation, the directional indication on the screen does not change in sync with the directional vanes on the unit.
Note:
- In the following cases, the actual air direction will differ from the direction indicated on the remote controller display.
- While the display is showing "STAND BY" or "DEFROST".
- Immediately after starting heater mode (while the system is waiting for the mode change to take effect).
- In heat mode, when room temperature is higher than the temperature setting.
5.6. Ventilation
For LOSSNAY combination
5.6.1. For Wired Remote-controller
- To run the ventilator together with the indoor unit:
Press the ON/OFF button ①.
-
The Vent indication appears on the screen (at 8). The ventilator will now automatically operate whenever the indoor unit is running.
-
To run the ventilator only when the indoor unit is off:
Press the Ventilation button ⑧ while the indoor unit is off. - The On lamp (at 1) and the Vent indication (at 8) come on.
- To change the ventilator force:
Press the Ventilation button 8 as necessary.
Each press toggles the setting, as shown below.

Note:
With some model configurations, the fan on the indoor unit may come on even when you set the ventilator to run independently.
< How to set the fixed up/down air direction (Only for wired remote controller) >
- For PLFY-BM, only the particular outlet can be fixed to certain direction with the procedures below. Once fixed, only the set outlet is fixed every time air conditioner is turned on. (Other outlets follow UP/DOWN air direction setting of remote controller.)
Explanation of word
- "Address No. of indoor unit" is the number given to each air conditioner.
- "Outlet No." is the number given to each outlet of air conditioner. (Refer to the right.)
- "Up/Down air direction" is the direction (angle) to fix.
Horizontal airflow
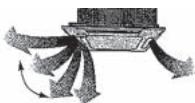
Downward
Remote controller setting The airflow direction of this outlet is controlled by the airflow direction setting of remote contoller.
Fixing
The airflow direction of this outlet is fixed in particular direction.
※ When it is cold because of direct airflow, the airflow direction can be fixed horizontally to avoid direct airflow.
Note: "0" indicates all outlets.
Operation buttons (During the fixed airflow direction mode)

Changes the selection(No.).
Pressing the button with either Address No. of indoor unit or outlet No. blinking, ...
Only the air conditioner with the No. on remote controller and its outlet are set to the setting 5. (Other outlets are closed.) It is used to identify the air conditioner and outlet to set.
Pressing the button with Up/Down air direction indicator blinking
attention
Only the air conditioner with the No. on Remote controller and its outlet are fixed at "Up/Down air direction" blinking.
This is used only to decide direction conclusively. Attention: Be careful not to set wrong air conditioner.
< Process for setting >
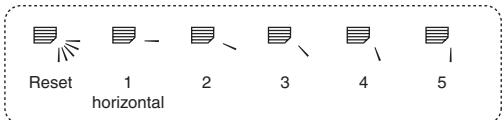
[1] To turn off air conditioner and change the remote controller to "Fixed airflow direction mode"
- Press ON/OFF button ① to turn off the air conditioner.
- Press Fan Speed button ② and Filter button ③ for more than 2 seconds simultaneously and it becomes the fixed airflow direction mode after a while.
"Fixed airflow direction mode" display
![MITSUBISHI PLFY-P-NBMU-E - [1] To turn off air conditioner and change the remote controller to "Fixed airflow direction mode" - 1](/content/2019/07/158883/images/1a8d82c60c2a5bb830591f25ed80be49f087fe18cc6ffaf8223df1b5d2724c1b.jpg)
※ Air blows downward after it becomes
"fixed airflow direction mode"
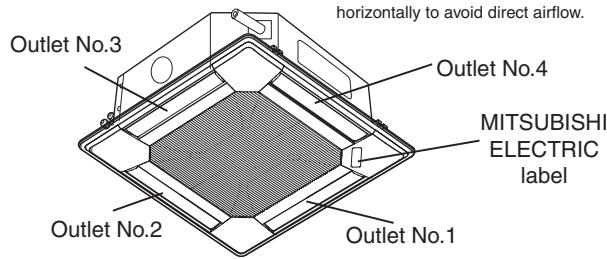
[2] To select and identify the outlet to set
- Press Set Temperature button ⑤ to change number with the outlet No. blinking. Select outlet No. to set.
![MITSUBISHI PLFY-P-NBMU-E - [2] To select and identify the outlet to set - 1](/content/2019/07/158883/images/7a6721d73ec831fc098e270f6e46427b3c50ed97be81ffd783e7e2f26e2cd7ab.jpg)
- Press Filter button ③ to send the information on remote controller.
- Wait for 15 seconds. How does the air conditioner run?
Only the air from the selected outlet blows downward.
Go to step[3].
Air from the wrong outlet blows downward.
Repeat 1 and set again.
All outlets are closed.
→ The number of the air conditioner (Address No. of indoor unit) is wrong. Refer to How to find air conditioner No..
[3] To fix air direction
- Press Mode button (Return button) ④ to blink Up/Down air direction indicator.
- Press Set Temperature button ⑤ until the direction to set is chosen.
- Press Filter button ③ to send the information on remote controller to air conditioner.
4.Wait for 15 seconds. How does the air conditioner run?
Airflow direction is set in the selected direction.
The fixed setting is completed (Go to step [4].)
Airflow direction is set in the wrong direction.
Repeat 2. and set again.
![MITSUBISHI PLFY-P-NBMU-E - [3] To fix air direction - 1](/content/2019/07/158883/images/c6f653a77511f8ebc1f7ba74004c7a1a13d6e032d9e2832123cbae912d2d0073.jpg)
[4] To cancel "Fixed airflow direction mode"
- Press ON/OFF button ① to cancel "Fixed airflow direction mode". It is also canceled by pressing Fan Speed button ② and Filter ← button ③ for more than 2 seconds simultaneously.
2.Do not operate remote controller for 30 seconds after the "Fixed airflowdirection mode" is canceled. It does not accept even if it is operated.
How to find air conditioner No.
- Each air conditioner has its own Address No. of indoor unit (Example below).
- Address No. of indoor unit can be set ranging from "01" to "50".
- To find air conditioner No. to set, refer to the procedures below. Air conditioner No. is found by its airflow direction with Address No. of indoor unit changed one after the other.

Example) Structure of the system
When the Switch setting of the address is "00", address No. of indoor unit is given automatically
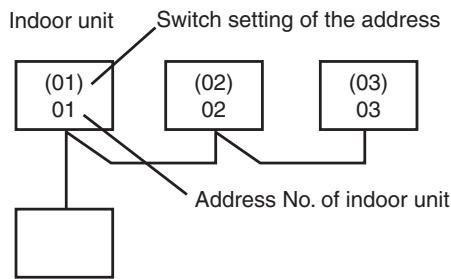
MA remote controller
When the Switch setting of the address is not "00", switch setting of the address is also address No. of indoor unit.
[1] To check Address No. of indoor unit
- Press Mode button (Return button) ④ and Address No. of indoor unit blinks.
Adjust address No. of indoor unit to "01" with Set Temperature button ⑤.
![MITSUBISHI PLFY-P-NBMU-E - [1] To check Address No. of indoor unit - 1](/content/2019/07/158883/images/4f5d0f25a4e8cd02699b3514081b3f1f780a3b0c1b7990213870aa24c9595321.jpg)
-
Press Filter button ③ to send the information on remote controller.
-
Wait for 15 seconds. How does the air conditioner run?
Only air from the outlet which No. displayed on remote controller blows downward.
Address No.01 of indoor unit is the air conditioner No..
All outlets are closed.
Go to step [2].
[2] To check by changing Address No. of indoor unit one after the other (Maximum unit No. is 50)
- Press Mode button (Return button) ④ and Address No. of indoor unit blinks.
![MITSUBISHI PLFY-P-NBMU-E - [1] To check Address No. of indoor unit - 2](/content/2019/07/158883/images/61047f834175489f9b5ef3c77bebcebbfad62ab7b8ed23764202132e89ca6767.jpg)
Adjust to the next address No.with Set Temperature button ⑤.
- Press Filter button ③ to send the information on remote controller.
- Wait for 15 seconds after sending. How does the air conditioner run? Only air from the outlet which No. displayed on remote controller blows downward.
No. displayed in remote controller is air conditioner No. (Checking completed)
All outlets are closed.
Repeat [1] and continue this procedure.
"Err" is displayed on remote controller.
→This groupe does not have this address No. of indoor unit.(Go back to [1] and continue.)
![MITSUBISHI PLFY-P-NBMU-E - [1] To check Address No. of indoor unit - 3](/content/2019/07/158883/images/d585927b7a69ddf444b157db1ba5ec68a70b564b93d842928052d8d0114a5226.jpg)
To clear fixed setting
To clear all fixed setting(reset to factory default), press check button(clear botton) ⑥ for more than 3 seconds in fixed airflow direction mode.
Display of remote controller blinks and the set information is cleared.
Note:
This operation clears the fixed setting information of all air conditioner connected to the remote controller.
6.1. For Wired Remote-controller
You can use Function Selection of remote controller to select which of three types of timer to use: ① Weekly timer, ② Simple timer, or ③ Auto Off timer.
6.1.1. Weekly Timer
The weekly timer can be used to set up to eight operations for each day of the week.
- Each operation may consist of any of the following: ON/OFF time together with a temperature setting, or ON/OFF time only, or temperature setting only.
- When the current time reaches a time set at this timer, the air conditioner carries out the action set by the timer.
Time setting resolution for this timer is one minute.
Note:
1. Weekly Timer/Simple Timer/Auto Off Timer cannot be used at the same time.
2. The weekly timer will not operate when any of the following conditions is in effect.
The timer feature is off; the system is in an malfunction state; a test run is in progress; the remote controller is undergoing self-check or remote controller check; the user is in the process of setting a function; the user is in the process of setting the timer; the user is in the process of setting the current day of the week or time; the system is under central control. (Specifically, the system will not carry out operations (unit on, unit off, or temperature setting) that are prohibited during these conditions.)

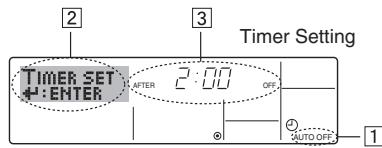
- Be sure that you are at a standard control screen, and that the weekly timer indicator 1 is shown in the display.
- Press the Timer Menu button ② , so that the "Set Up" appears on the screen (at 2). (Note that each press of the button toggles the display between "Set Up" and "Monitor".)
- Press the Timer On/Off (Set Day) button ⑨ to set the day. Each press advances the display at 3 to the next setting, in the following sequence: "Sun Mon Tues Wed Thurs Fri Sat" "Sun" ... "Fri" "Sat" "Sun Mon Tues Wed Thurs Fri Sat"...
-
Press the or Operation button (⑦ or ⑧) as necessary to select the appropriate operation number (1 to 8) [4].
-
Your inputs at Steps 3 and 4 will select one of the cells from the matrix illustrated below.
(The remote-controller display at left shows how the display would appear when setting Operation 1 for Sunday to the values indicated below.)
Setup Matrix
| Op No. | Sunday | Monday | ... | Saturday | ||
| No. 1 | • 8:30 • ON • 73 °F | |||||
| No. 2 | • 10:00 • OFF | • 10:00 • OFF | • 10:00 • OFF | • 10:00 • OFF | ||
| ... | ||||||
| No. 8 | ||||||
| <Operation 1 settings for Sunday>Start the air conditioner at 8:30, with the temperature set to 73 °F. | <Operation 2 settings for every day> Turn off the air conditioner at 10:00. | |||||
Note:
By setting the day to "Sun Mon Tues Wed Thurs Fri Sat", you can set the same operation to be carried out at the same time every day.
(Example: Operation 2 above, which is the same for all days of the week
Shows the time setting
Shows the temperature setting
- Does not appear if temperature is not set.
Shows the selected operation (ON or OFF)
*Does not appear if operation is not set.
-
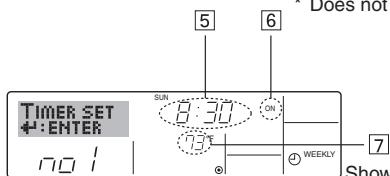
Press the appropriate Set Time button ① as necessary to set the desired time (at [5]).
-
As you hold the button down, the time first increments in one-minute intervals, then in ten-minute intervals, and then in one-hour intervals.
-
Press the ON/OFF button ① to select the desired operation (ON or OFF), at ⑥.
-
Each press changes the next setting, in the following sequence: No display (no setting) → “ON” → “OFF”
-
Press the appropriate Set Temperature button ③ to set the desired temperature (at 7).
-
Each press changes the setting, in the following sequence: No display (no setting) ⇌ 75 ⇌ 77 ⇌ ... ⇌ 84 ⇌ 87 ⇌ 53 ⇌ ... ⇌ 73 ⇌ No display.
(Available range: The range for the setting is 12^ , 53^ to 30^ , 87^ . The actual range over which the temperature can be controlled, however, will vary according to the type of the connected unit.)
- After making the appropriate settings at Steps 5, 6 and 7, press the Filter button ④ to lock in the values.
To clear the currently set values for the selected operation, press and quickly release the Check (Clear) button ⑩ once.
- The displayed time setting will change to “—:—”, and the On/Off and temperature settings will all disappear.
(To clear all weekly timer settings at once, hold down the Check (Clear) button ⑩ for two seconds or more. The display will begin blinking, indicating that all settings have been cleared.)
Note:
Your new entries will be cancelled if you press the Mode (Return) button ② before pressing the Filter button ④.
If you have set two or more different operations for exactly the same time, only the operation with the highest Operation No. will be carried out.
- Repeat Steps 3 to 8 as necessary to fill as many of the available cells as you wish.
- Press the mode (Return) button ② to return to the standard control screen and complete the setting procedure.
- To activate the timer, press the Timer On/Off button ⑨ , so that the "Timer Off" indication disappears from the screen. Be sure that the "Timer Off" indication is no longer displayed.
- If there are no timer settings, the "Timer Off" indication will blink on the screen.
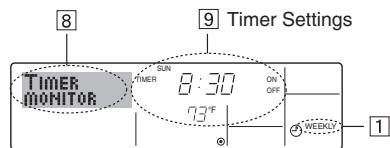
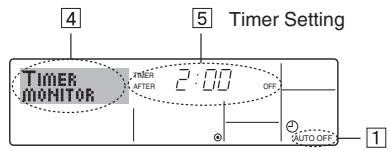
- Be sure that the weekly timer indicator is visible on the screen (at ①).
- Press the Timer Menu button ② so that "Monitor" is indicated on the screen (at 8).
- Press the Timer On/Off (Set Day) button ⑨ as necessary to select the day you wish to view.
-
Press the or Operation button (⑦ or ⑧) as necessary to change the timer operation shown on the display (at 9).
-
Each press will advance to the next timer operation, in order of time setting.
- To close the monitor and return to the standard control screen, press the Mode (Return) button ②.
Press the Timer On/Off button ⑨ so that "Timer Off" appears at 10.
Press the Timer On/Off button ⑨ so that "Timer Off" appears (at 10) and goes dark.
6.1.2. Simple Timer
You can set the simple timer in any of three ways.
- Start time only:
The air conditioner starts when the set time has elapsed. - Stop time only:
The air conditioner stops when the set time has elapsed. - Start & stop times:
The air conditioner starts and stops at the respective elapsed times.
The simple timer (start and stop) can be set only once within a 72-hour period.
The time setting is made in hour increments.
Note:
1. Weekly Timer/Simple Timer/Auto Off Timer cannot be used at the same time.
2. The simple timer will not operate when any of the following conditions is in effect.
The timer is off; the system is in malfunction state; a test run is in progress; the remote controller is undergoing self-check or remote controller check; the user is in the process of selecting a function; the user is in the process of setting the timer; the system is under central control. (Under these conditions, On/Off operation is prohibited.)
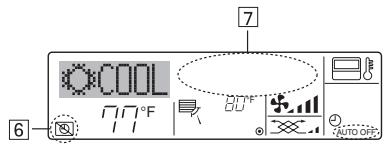
- Be sure that you are at a standard control screen, and that the simple timer indicator is visible in the display (at 1).
When something other than the Simple Timer is displayed, set it to SIMPLE TIMER using the function selection of remote controller (see 8.[4]-3 (3)) timer function setting.
- Press the Timer Menu button ② , so that the "Set Up" appears on the screen (at ② ). (Note that each press of the button toggles the display between "Set Up" and "Monitor".)
-
Press the ON/OFF button ① to display the current ON or OFF simple timer setting. Press the button once to display the time remaining to ON, and then again to display the time remaining to OFF. (The ON/OFF indication appears at ③).
-
"ON" timer:
The air conditioner will start operation when the specified number of hours has elapsed. - "OFF" timer:
The air conditioner will stop operation when the specified number of hours has elapsed.
- With "ON" or "OFF" showing at 3: Press the appropriate Set Time button 1 as necessary to set the hours to ON (if "ON" is displayed) or the hours to OFF (if "OFF" is displayed) at 4.
Available Range: 1 to 72 hours - To set both the ON and OFF times, repeat Steps 3 and 4.
Note that ON and OFF times cannot be set to the same value.
-
To clear the current ON or OFF setting: Display the ON or OFF setting (see step 3) and then press the Check (Clear) button ⑩ so that the time setting clears to “—” at ④ . (If you want to use only an ON setting or only an OFF setting, be sure that the setting you do not wish to use is shown as “—.”.)
-
After completing steps 3 to 6 above, press the Filter button ④ to lock in the value.
Note:
Your new settings will be cancelled if you press the Mode (Return) button ② before pressing the Filter button ④.
- Press the Mode (Return) button ② to return to the standard control screen.
- Press the Timer On/Off button ⑨ to start the timer countdown. When the timer is running, the timer value is visible on the display. Be sure that the timer value is visible and appropriate.
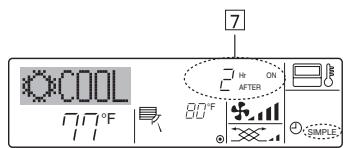
- Be sure that the simple timer indicator is visible on the screen (at [1]).
-
Press the Timer Menu button ②, so that the "Monitor" appears on the screen (at 5).
-
If the ON or OFF simple timer is running, the current timer value will appear at [6].
-
If ON and OFF values have both been set, the two values appear alternately.
-
Press the Mode (Return) button ② to close the monitor display and return to the standard control screen.
Press the Timer On/Off button ⑨ so that the timer setting no longer appears on the screen (at 7).
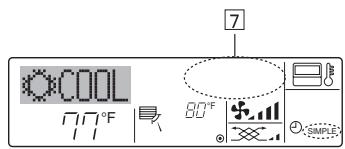
Press the Timer On/Off button ⑨ so that the timer setting becomes visible at ⑦.
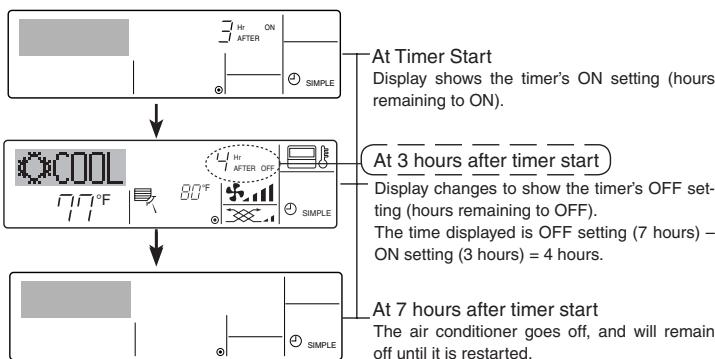
Examples
If ON and OFF times have both been set at the simple timer, operation and display are as indicated below.
Example 1:
Start the timer: ON time is set earlier than OFF time.
ON Setting : 3 hours
OFF Setting : 7 hours
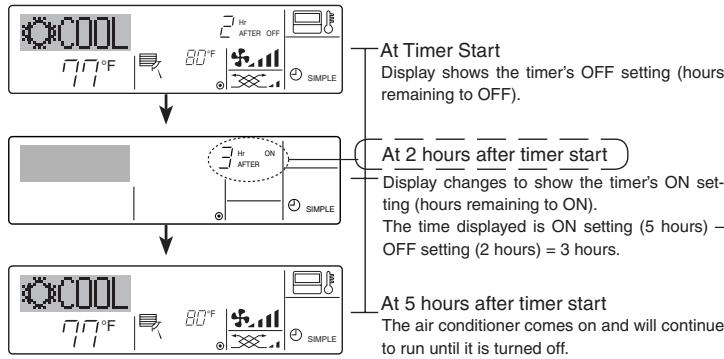
Example 2:
Start the timer : OFF time is set earlier than ON time.
ON Setting : 5 hours
OFF Setting : 2 hours
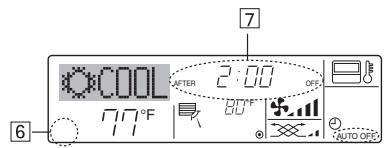
6.1.3. Auto Off Timer
This timer begins countdown when the air conditioner starts and shuts the air conditioner off when the set time has elapsed.
Available settings run from 30 minutes to 4 hours in 30-minute intervals.
Note:
1. Weekly Timer/Simple Timer/Auto Off Timer cannot be used at the same time.
2. The Auto Off timer will not operate when any of the following conditions is in effect.
The timer is off; the system is in malfunction state; a test run is in progress; the remote controller is undergoing self-check or remote controller check; the user is in the process of selecting a function; the user is in the process of setting the timer; the system is under central control.
(Under these conditions, On/Off operation is prohibited.)
- Be sure that you are at a standard control screen, and that the Auto Off timer indicator is visible in the display (at [1]).
When something other than the Auto Off Timer is displayed, set it to AUTO OFF TIMER using the function selection of remote controller (see 8.[4]-3 (3)) timer function setting.
- Hold down the Timer Menu button ⑫ for 3 seconds so that the "Set Up" appears on the screen (at ②).
(Note that each press of the button toggles the display between "Set Up" and "Monitor".) - Press the appropriate Set Time button A as necessary to set the OFF time (at 3).
- Press the Filter button ④ to lock in the setting. Note:
Your entry will be cancelled if you press the Mode (Return) button ② before pressing the Filter button ④.
- Press the Mode (Return) button ② to complete the setting procedure and return to the standard control screen.
- If the air conditioner is already running, the timer starts countdown immediately. Be sure to check that the timer setting appears correctly on the display.
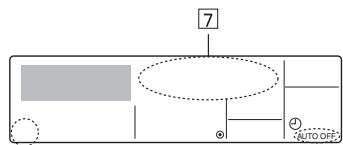
1.Be sure that the "Auto Off" is visible on the screen (at 1).
2. Hold down the Timer Menu button ② for 3 seconds so that "Monitor" is indicated on the screen (at 4 ).
- The timer remaining to shutdown appears at [5].
3. To close the monitor and return to the standard control screen, press the Mode (Return) button ②.
- Hold down the Timer On/Off button ⑨ for 3 seconds so that "Timer Off" appears (at 6) and the timer value (at 7) disappears.
7. Other Functions
7.1. Locking the Remote Controller Buttons (Operation function limit controller)
If you wish, you can lock the remote controller buttons. You can use the Function Selection of remote controller to select which type of lock to use. (For information about selecting the lock type, see section 8, item [4] -2 (1)).
Specifically, you can use either of the following two lock types.
① Lock All Buttons:
Locks all of the buttons on the remote controller.
② Lock All Except ON/OFF:
Locks all buttons other than the ON/OFF button.
Note:
The "Locked" indicator appears on the screen to indicate that buttons are currently locked.
- Alternatively, turn off the air conditioner itself. The timer value (at 7) will disappear from the screen.
- Hold down the Timer On/Off button ⑨ for 3 seconds. The "Timer Off" indication disappears (at [6] ), and the timer setting comes on the display (at [7] ).
- Alternatively, turn on the air conditioner. The timer value will appear at 7.
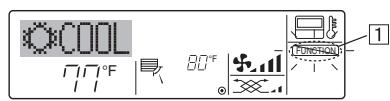
-
While holding down the Filter button ④ , press and hold down the ON/OFF button ① for 2 seconds. The "Locked" indication appears on the screen (at [1] ), indicating that the lock is now engaged.
-
If locking has been disabled in Function Selection of remote controller, the screen will display the "Not Available" message when you press the buttons as described above.
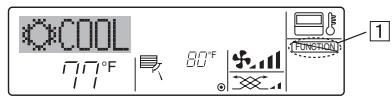
- If you press a locked button, the "Locked" indication (at 1) will blink on the display.
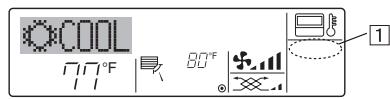
- While holding down the Filter button ④, press and hold down the ON/OFF button ① for 2 seconds so that the "Locked" indication disappears from the screen (at ①).
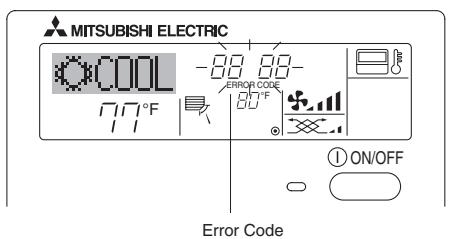
7.2. Error Codes indication
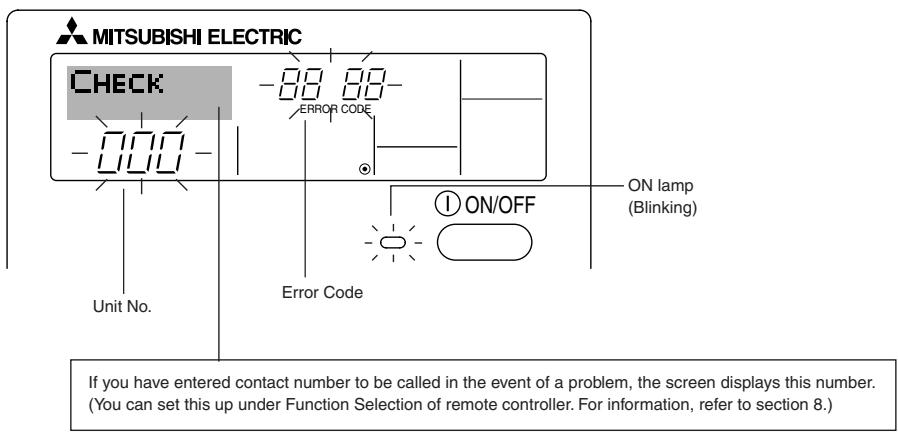
- If the ON lamp and error code are both flashing: This means that the air conditioner is out of order and operation has been stopped (and cannot resume). Take note of the indicated unit number and error code, then switch off the power to the air conditioner and call your dealer or servicer.
When the Check button is pressed:
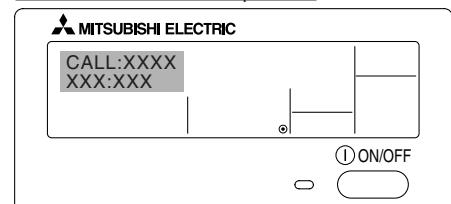
- If only the error code is flashing (while the ON lamp remains lit): Operation is continuing, but there may be a problem with the system. In this case, you should note down the error code and then call your dealer or servicer for advice.
- If you have entered contact number to be called in the event of a problem, push the Check button to display it on the screen. (You can set this up under Function Selection of remote controller. For information, refer to section 8.)
8. Function Selection
Function selection of remote controller
The setting of the following remote controller functions can be changed using the remote controller function selection mode. Change the setting when needed.
| Item 1 | Item 2 | Item 3 (Setting content) |
| 1. Change Language ("CHANGE LANGUAGE") | Language setting to display | • Display in multiple languages is possible |
| 2. Function limit ("FUNCTION SELECTION") | (1) Operation function limit setting (operation lock) ("LOCKING FUNCTION") | • Setting the range of operation limit (operation lock) |
| (2) Use of automatic mode setting ("SELECT AUTO MODE") | • Setting the use or non-use of "automatic" operation mode | |
| (3) Temperature range limit setting ("LIMIT TEMP FUNCTION") | • Setting the temperature adjustable range (maximum, minimum) | |
| 3. Mode selection ("MODE SELECTION") | (1) Remote controller main/sub setting ("CONTROL-LER MAIN/SUB") | • Selecting main or sub remote controller * When two remote controllers are connected to one group, one controller must be set to sub. |
| (2) Use of clock setting ("CLOCK") | • Setting the use or non-use of clock function | |
| (3) Timer function setting ("WEEKLY TIMER") | • Setting the timer type | |
| (4) Contact number setting for error situation ("CALL.") | • Contact number display in case of error • Setting the telephone number | |
| 4. Display change ("DISP MODE SETTING") | (1) Temperature display °C/°F setting ("TEMP MODE °C/°F") | • Setting the temperature unit (°C or °F) to display |
| (2) Room air temperature display setting ("ROOM TEMP DISP SELECT") | • Setting the use or non-use of the display of indoor (suction).air temperature. | |
| (3) Automatic cooling/heating display setting ("AUTO MODE DISP C/H") | • Setting the use or non-use of the display of "Cooling" or "Heating" display during operation with automatic mode |
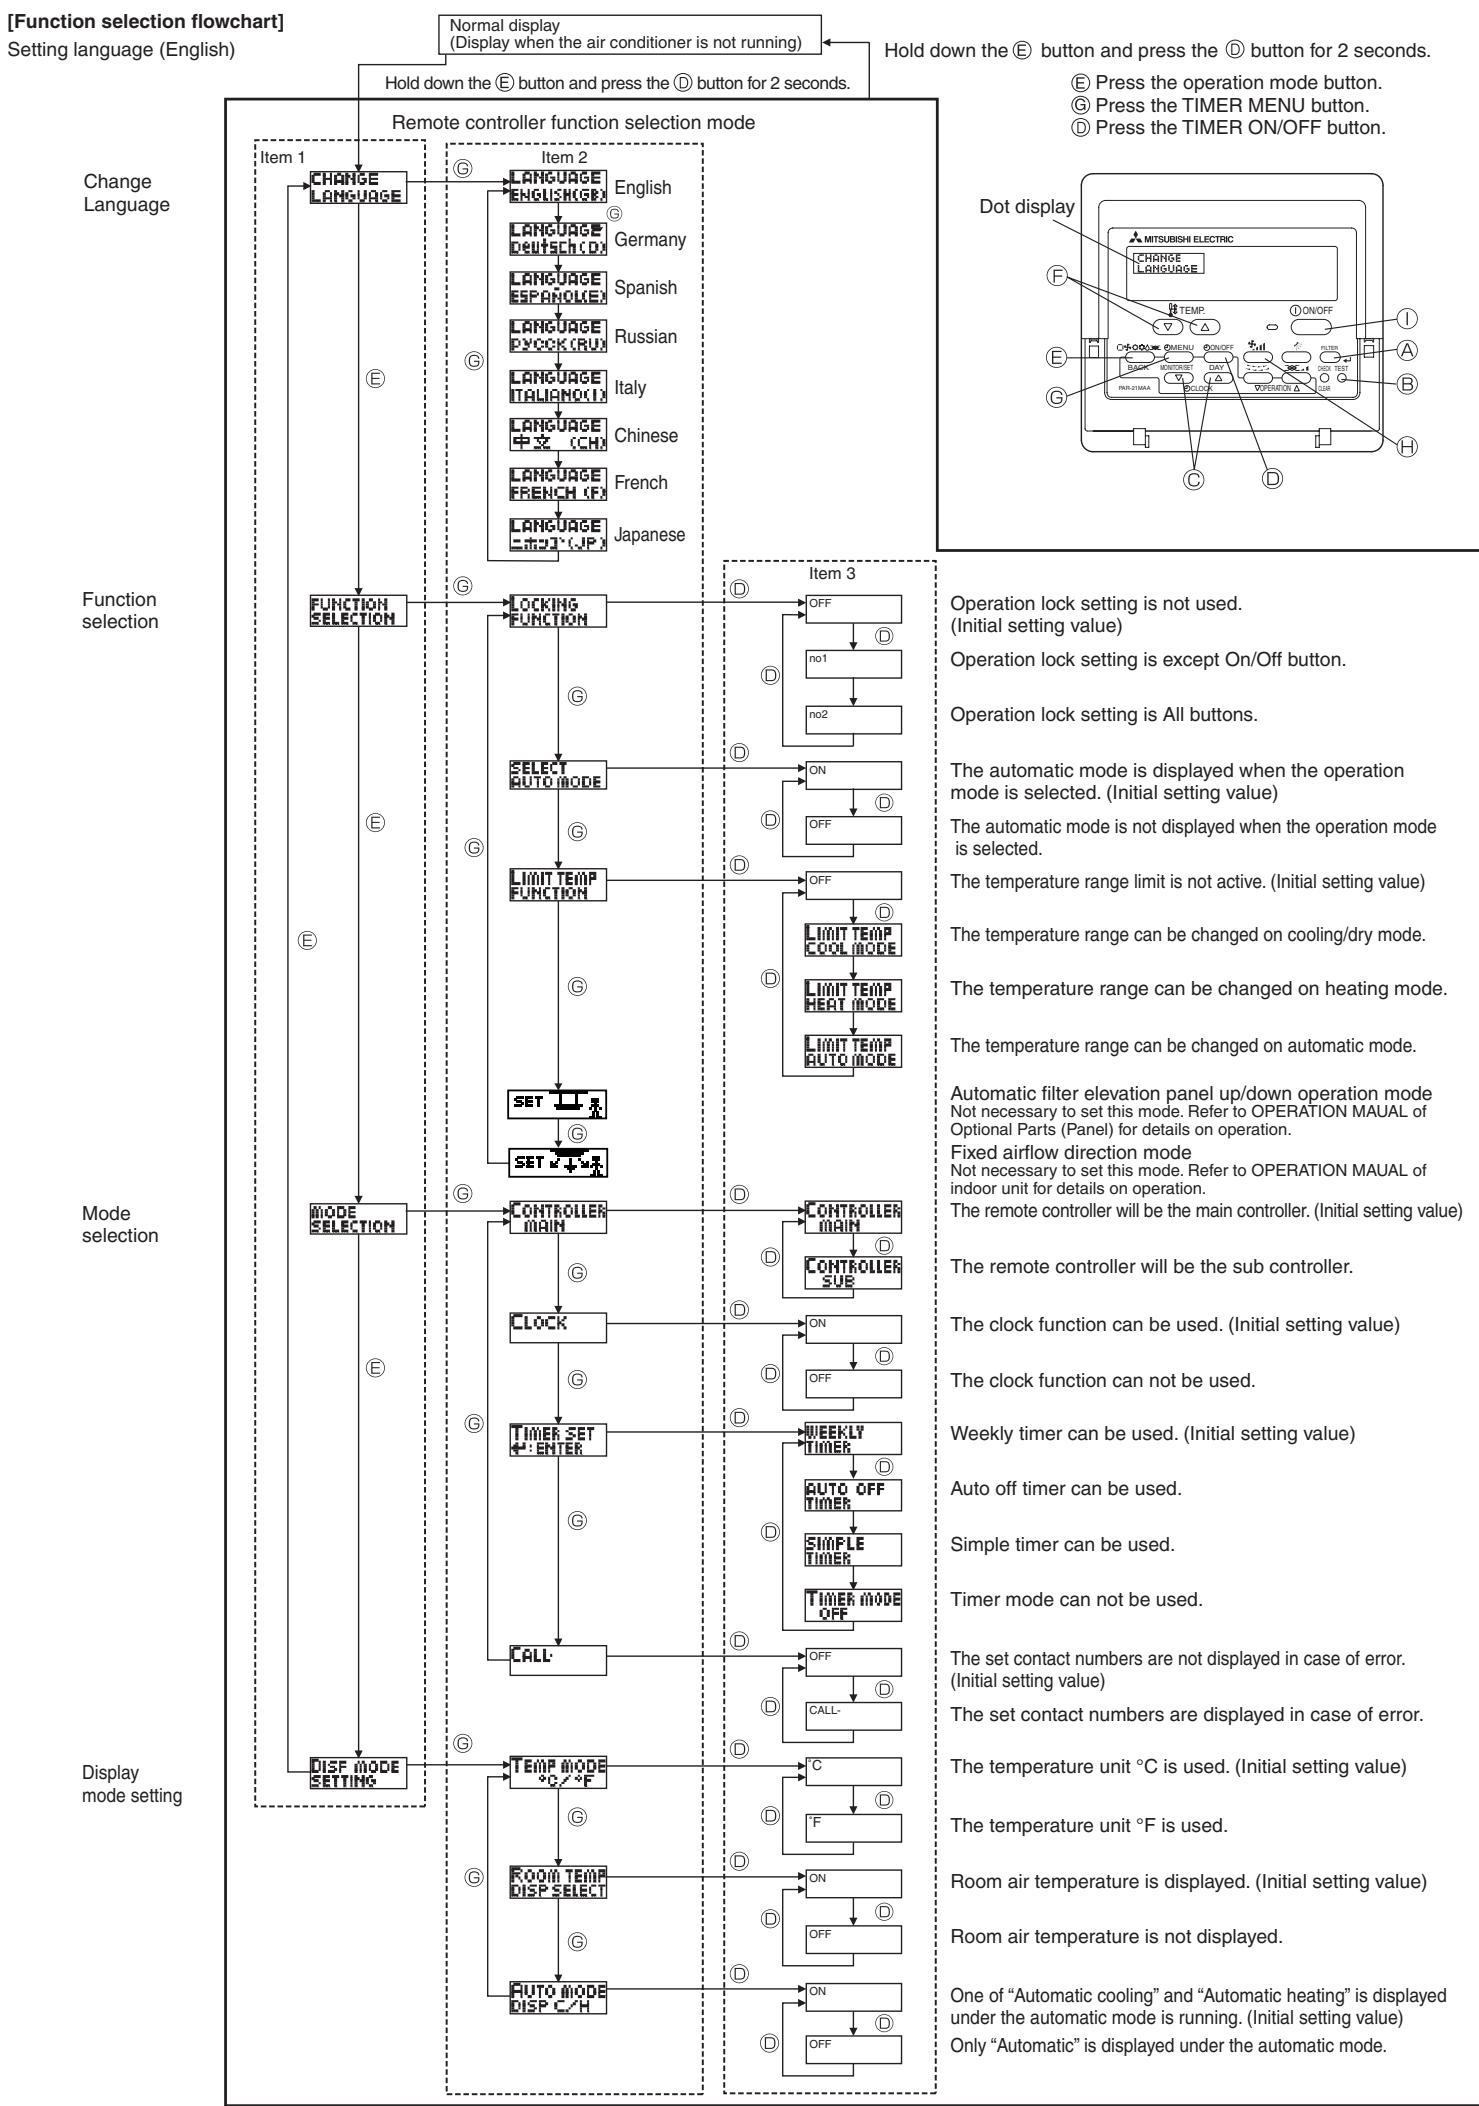
[Detailed setting]
[4]-1. CHANGE LANGUAGE setting
The language that appears on the dot display can be selected.
- Press the [①MENU] button to change the language.
① English (GB), ② German (D), ③ Spanish (E), ④ Russian (RU),
⑤ Italian (I), ⑥ Chinese (CH), ⑦ French (F), ⑧ Japanese (JP)
Refer to the dot display table.
[4]-2. Function limit
(1) Operation function limit setting (operation lock)
-
To switch the setting, press the [ON/OFF] button.
① no1 : Operation lock setting is made on all buttons other than the [① ON/OFF] button.
② no2 :Operation lock setting is made on all buttons.
③ OFF (Initial setting value): Operation lock setting is not made. -
To make the operation lock setting valid on the normal screen, it is necessary to press buttons (Press and hold down the [FILTER] and [① ON/OFF] buttons at the same time for two seconds.) on the normal screen after the above setting is made.
(2) Use of automatic mode setting
When the remote controller is connected to the unit that has automatic operation mode, the following settings can be made.
- To switch the setting, press the [ON/OFF] button.
① ON (Initial setting value):
The automatic mode is displayed when the operation mode is selected.
② OFF:
The automatic mode is not displayed when the operation mode is selected.
(3) Temperature range limit setting
After this setting is made, the temperature can be changed within the set range.
- To switch the setting, press the [ON/OFF] button.
① LIMIT TEMP COOL MODE:
The temperature range can be changed on cooling/dry mode.
② LIMIT TEMP HEAT MODE:
The temperature range can be changed on heating mode.
③ LIMIT TEMP AUTO MODE:
The temperature range can be changed on automatic mode.
④ OFF (initial setting): The temperature range limit is not active.
- When the setting other than OFF is made, the temperature range limit setting on cooling, heating and automatic mode is made at the same time. However, the range cannot be limited when the set temperature range has not changed.
To increase or decrease the temperature, press the [TEMP. (△) or (△] button - To switch the upper limit setting and the lower limit setting, press the [3.1] button . The selected setting will flash and the temperature can be set.
- Settable range
Cooling/Dry mode:
Lower limit: 19^ - 30^, 67^ - 87^
Upper limit: 30^ - 19^, 87^ - 67^
Heating mode:
Lower limit: 17^ - 28^, 63^ - 83^
Upper limit: 28^ - 17^,83^ - 63^
Automatic mode:
Lower limit: 19^ - 28^, 67^ - 83^
Upper limit: 28^ - 19^,83^ - 67^
[4]-3. Mode selection setting
(1) Remote controller main/sub setting
- To switch the setting, press the [ON/OFF] button.
① Main: The controller will be the main controller.
② Sub: The controller will be the sub controller.
(2) Use of clock setting
To switch the setting, press the [ON/OFF] button ①.
① ON: The clock function can be used.
② OFF: The clock function cannot be used.
(3) Timer function setting
- To switch the setting, press the [ON/OFF] button (Choose one of the following.).
① WEEKLY TIMER (initial setting value):
The weekly timer can be used.
② AUTO OFF TIMER:
The auto off timer can be used.
③ SIMPLE TIMER:
The simple timer can be used.
④ TIMER MODE OFF:
The timer mode cannot be used.
- When the use of clock setting is OFF, the "WEEKLY TIMER" cannot be used.
(4) Contact number setting for error situation
- To switch the setting, press the [ON/OFF] button ①.
① CALL OFF:
The set contact numbers are not displayed in case of error.
② CALL * ***
The set contact numbers are displayed in case of error.
CALL:
The contact number can be set when the display is as shown above.
- Setting the contact numbers
To set the contact numbers, follow the following procedures. Move the flashing cursor to set numbers. Press the [TEMP () and ()] button to move the cursor to the right (left). Press the [CLOCK () and ()] button to set the numbers.
[4]-4. Display change setting
(1) Temperature display ^ C / ^ setting
- To switch the setting, press the [ON/OFF] button.
① ^ C : The temperature unit ^ C is used.
② ^ : The temperature unit ^ is used.
(2) Suction air temperature display setting
- To switch the setting, press the [ON/OFF] button.
① ON: The room air temperature is displayed.
② OFF: The room air temperature is not displayed.
(3) Automatic cooling/heating display setting
- To switch the setting, press the [ON/OFF] button.
① ON:
One of "Automatic cooling" and "Automatic heating" is displayed under the automatic mode is running.
② OFF:
Only "Automatic" is displayed under the automatic mode.
[Dot display table]
| Selecting language | English | Germany | Spanish | Russian | Italy | Chinese | French | Japanese | |
| Waiting for start-up | PLEASE WAIT | ← | ← | ← | ← | ← | ← | ← | |
| Operation mode | Cool | ○COOL | ○Kuhlen | ○FRIIO | ○XoJIoA | ○COOL | ○制冷 | ○FROID | ○冷房 |
| Dry | ○DRY | ○Trocknen | ○DESHUMI-ODIFKATION | ○CyuKa | ○DRY | ○除湿 | ○DESHU | ○DLaI | |
| Heat | ○HEAT | ○Heizen | ○CALOR | ○Tennno | ○HEAT | ○制热 | ○CHAUD | ○暖房 | |
| Auto | ○AUTO | ○AUTO | ○AUTO | ○ABTo | ○AUTO | ○自动 | ○AUTO | ○自動 | |
| Auto(Cool) | ○COOL | ○Kuhlen | ○FRIIO | ○XoJIoA | ○COOL | ○制冷 | ○FROID | ○冷房 | |
| Auto(Heat) | ○HEAT | ○Heizen | ○CALOR | ○Tennno | ○HEAT | ○制热 | ○CHAUD | ○暖房 | |
| Fan | ○FAN | ○Lüfter | ○VENTILATION | ○BeHT | ○VENTIONE | ○送风 | ○VENTION | ○送風 | |
| Ventilation | ○VENTION | ○Geläse | ○VENTII-CLACION | ○BEHTH-ESTERN | ○ARIA ESTERN | ○换气 | ○VENTION | ○换気 | |
| Stand by (Hot adjust) | STAND BY | STAND BY | CALENTANDO | ○ERPPEB:MON | STAND BY | 准备中 | PRE CHUFFAGE | 準備中 | |
| Defrost | DEFROST | Altauen | DESCONGE -LACION | OTTAHBAHME | SERINA MENTO | 除霜中 | DEGREE | 露取中 | |
| Set temperature | SET TEMP | TEMP EINSTEIN | TEMP CONSIGA | UEICERA TEMIPENDPA | IMPACTZIONE TEMPERATURE | 设定温度 | REGLAGE TEMPERATURE | 設定温度 | |
| Fan speed | FAN SPEED | Lüftergesch windigheit | VELOCIDAD VENTILADOR | CKODOCTB BEHTURNOTA | VELOCITA' VENTILATORE | 风速 | VITESS DE VENTILATION | 風速 | |
| Not use button | NOT AVAILABLE | Nicht Verfusbar | NO DISPONIBLE | HE AOCTYNHO | NON DISPONIBLE | 无效按钮 | NON DISPONIBLE | 無效的 | |
| Check (Error) | CHECK | Prifen | COMPROBAR | ΠΟEBPKA | CHECK | 检查 | CONROLE | 点検 | |
| Test run | TEST RUN | Testbetrieb | TEST FUNCIO NAMEITO | TECTOBIL 3ANTEK | TEST RUN | 试运转 | TEST | 試力効 | |
| Self check | SELF CHECK | Selbst-dinahse | AUTO REVISION | LAMOAHAI-NOCTHKA | SELF CHECK | 自我诊断 | AUTO CONTROL | 自己が | |
| Unit function selection | FUNCTION SELECTION | FUNCTION SALLSUHAI | SELECTION DE FUNCION | BbIEOP ΦYHKUHAI | SELECTION FUNZIONI | 功能选择 | SELECTION FONCS | カフ連控 | |
| Setting of ventilation | SETTING OF VENTILATION | Litterstufen WAHLEN | CONFIG. VENTILATION | HAATTPOHKA BEHTSYETAH. | IMPASTZIONE ARIA ESTERN | 换气设定 | SELECTION VENTILATION | 換気設定 | |
| Selecting language | English | Germany | Spanish | Russian | Italy | Chinese | French | Japanese |
| CHANGE LANGUAGE | CHANGE LANGUAGE | ← | ← | ← | ← | ← | ← | ← |
| Function selection | FUNCTION SELECTION | Funktion QUSWCHEN | SELECTION DE FUNKTIONES | BIEOP Φ3KUH | SELECTION FUNZIONI | 功能限制 | SELECTION FONCTIONS | 卡力制限 |
| Operation function limit setting | LOCKING FUNCTION | Spart - Functional | FUNCI ON BLOCUEADA | ФУКUMA MOHIFORIN | BLOCCO FUNZIONI | 操作限制 | BLOCAGE FONCS | 操作电- |
| Use of automatic mode setting | SELECT AUTO MODE | AUSUMHAI AUTO BETTIEB | SELECTION MODE AUTO | BIEOP PEXHHA BO | SELECTION MODE AUTO | 自动模式 | SELECTION DU MODE AUTO | 自動式 |
| Temperature range limit setting | LIMIT TEMP FUNCTION | Limit Temp Function | LIMIT TEMPO CONSIGNA | QIPAHYENGE YTTTEMPEAT | LIMITAZIONE TEMPERATURA | 温度限制 | LIMITATION TEMPERATURE | 温度制限 |
| Limit temperature cooling/day mode | LIMIT TEMP COOL MODE | Limit Kuhl Temp | LIMIT TEMPO MODE FRIO | QIPAHYENG OXXAKAENHE | LIMITAZIONE MODE COOL | 制冷范围 | LIMITTEMP MODE FROID | 排冷房 |
| Limit temperature heating mode | LIMIT TEMP HEAT MODE | Limit H42 Temp | LIMIT TEMPO MODE CALOR | QIPAHYEN G601PBE | LIMITAZIONE MODE HEAT | 制热范围 | LIMITTEMP MODE CHAUD | 排热暖房 |
| Limit temperature auto mode | LIMIT TEMP AUTO MODE | Limit AUTO Temp | LIMIT TEMPO MODE AUTO | QIPAHYENG PEXHHA BO | LIMITAZIONE MODE AUTO | 自动范围 | LIMITTEMP MODE AUTO | 排自动 |
| Mode selection | MODE SELECTION | Betriebsart WAHLEN | SELECTION DE MODE | BIEOP PEXHHA | SELECTION MODE | 基本模式 | SELECTION DU MODE | 基本卡力 |
| Remote controller setting MAIN | CONTROLLER MAIN | HAUP T CONTROLLER | CONTROL PRINCIPAL | OINOHON IYALNT | CONTROLLO MODE | 遥控主 | TECOMMANDATE | 田径 |
| Remote controller setting SUB | CONTROLLER SUB | Neben Contiroller | CONTROL SECUNDARIO | AMOOHHTE- ANMHNYALT | CONTROLLO SUB | 遥控辅 | TECOMMANDATE ESCLAVE | 田村主 |
| Use of clock setting | CLOCK | Uhr | RELOJ | YACBI | ORLOGIO | 时钟 | AFFICHAGE HORLOGE | 時計 |
| Setting the day of the week and time | TIME SET ENTER | Uhrstellen 4: Einstellen | CONFIG RELOJ 4: CONHG | YACBLYCT. 4: BBOA | ORLOGIO 4: ENTER | 时间 ENTER | HORLOGE 4: ENTER | トーナスフリ 4: イフロー |
| Timer set | TIMER SET ENTER | Zeitschaltluhr 4: Einstellen | TEMPORIZ A - DOR # CONFIG | TARMEP YIT. 4: BBOA | TIMER 4: ENTER | 定时器 ENTER | PROG HORIRE 4: ENTER | SHAY-OKYAN 4: 4:27 |
| Timer monitor | TIMER MONITOR | Uhrzeit Anzeide | VISUALIZE TRAP ORIZAD. | IPOCMOTP TAHIMEPA | VISUALIZ TIMER | 定时器状态 | AFFICHAGE PROG HORIRE | 917-12-1 |
| Weekly timer | WEEKLY TIMER | Wochenzeit Schalt UH | TEMPORIZ A - DOH SEMANAL | HEARABNBIA TARMEP | TIMER SETTINGANALGE | 每周定时器 | PROG NEEDO MRAPINE | 週間 |
| Timer mode off | TIMER MODE OFF | Zeitschaltluhr US | TEMPORIZ A - DOR APAGAO | TARMEP BBKIA | TIMER OFF | 定时器无效 | PROG HORIRE INACTIF | 無功 |
| Auto off timer | AUTO OFF TIME | AUTO Zeit FUKTKHUS | APOGADO AUTOMATICO | OPTOMAN, IO TAHMEPY | AUTO OFF TIMER | 解除定时 | PROG HORIRE ARRET AUTO | SHAY-OKYAN 4: 4:27 |
| Simple timer | SIMPLE TIMER | Einflüche ZERFUNTION | TEMPORIZ A - DOR SIMPLE | IPOCTON TARMEP | TIMER SEMPLIFICATO | 简易定时器 | PROG HORIRE SIMP LIF | カロリ |
| Contact number setting of error situation | CALL | ← | ← | ← | ← | ← | ← | ← |
| Display change | DISP MODE SETTING | Anzeige Betriebsart | MOSTRAF MODE | HMCTPOKKA HNAPEXNMA | IMPACTZIONE MODE DISPLAY | 转换表示 | AFFICENCE SOUS MENU | 表示切替 |
| Temperature display °C/°F setting | TEMP MODE °C/°F | Wechsel 4°C/°F | TEMPEROS 4°C/°F | EAMNTMEMBER °C/°F | TEMPERATURE °C/°F | 温度% | TEMPERATURE °C/°F | 温度% |
| Room air temperature display setting | ROOM TEMPS DISP SELECT | RALIM TEMPS 3EWOH | MOSTRAF TEMPE | NOVERLEBATB TEMPLE ROMN. | TEMPERATURE AMBIENTE | 吸入温度 | TEMPERATURE AMIEIANTE | スロナス E300 |
| Automatic cooling/heating display setting | AUTO MODE DISP C/H | Auto Betriebe C/H | MOSTRAF F/C EN AUTO | HNA.T/X B PEXNHE BTO | AUTO C/H | 自动表示 | AFFICENCE AUTO F/C | 自動化 |
![MITSUBISHI PLFY-P-NBMU-E - [4]-4. Display change setting - 1](/content/2019/07/158883/images/9b8442a3a5e93c02842ecbb65f905ad4b7c384a32a5bf8a9e95248e501668507.jpg)
9.1. Cleaning the filters and the indoor unit
Caution:
- Ask authorized people to clean the filter.
Cleaning the filters
- Clean the filters using a vacuum cleaner. If you do not have a vacuum cleaner, tap the filters against a solid object to knock off dirt and dust.
- If the filters are especially dirty, wash them in lukewarm water. Take care to rinse off any detergent thoroughly and allow the filters to dry completely before putting them back into the unit.
Caution:
- Do not dry the filters in direct sunlight or by using a heat source, such as an electric heater: this may warp them.
- Do not wash the filters in hot water (above 50^, 122^ ), as this may warp them.
- Make sure that the air filters are always installed. Operating the unit without air filters can cause malfunction.
Caution:
- Before you start cleaning, stop operation and turn OFF the power supply.
- Indoor units are equipped with filters to remove the dust of sucked in air. Clean the filters using the methods shown in the following sketches.
Filter removal
Caution:
- In removing the filter, precautions must be taken to protect your eyes from dust. Also, if you have to climb up on a stool to do the job, be careful not to fall.
- When the filter is removed, do not touch the metallic parts inside the indoor unit, otherwise injury may result.
PLFY-P-NBMU-E Series
① Pull the knob on the intake grille in the direction indicated by the arrow and it should open.
② Open the intake grille.
③ Release the knob on the center edge of the intake grille and pull the filter forward to remove the filter.
Knob ⑥Grille ⑤Intake Grille ①Filter
10. Trouble Shooting
| Having trouble? | Here is the solution. (Unit is operating normally.) |
| Air conditioner does not heat or cool well. | ■ Clean the filter. (Airflow is reduced when the filter is dirty or clogged.)■ Check the temperature adjustment and adjust the set temperature.■ Make sure that there is plenty of space around the outdoor unit. Is the indoor unit air intake or outlet blocked?■ Has a door or window been left open? |
| When heating operation starts, warm air does not blow from the indoor unit soon. | ■ Warm air does not blow until the indoor unit has sufficiently warmed up |
| During heating mode, the air conditioner stops before the set room temperature is reached. | ■ When the outdoor temperature is low and the humidity is high, frost may form on the outdoor unit. If this occurs, the outdoor unit performs a defrosting operation. Normal operation should begin after approximately 10 minutes. |
| Airflow direction changes during operation or airflow direction cannot be set. | ■ During cooling mode, the vanes automatically move to the horizontal (down) position after 1 hour when the down (horizontal) airflow direction is selected. This is to prevent water from forming and dripping from the vanes.■ During heating mode, the vanes automatically move to the horizontal airflow direction when the airflow temperature is low or during defrost-ing mode. |
| When the airflow direction is changed, the vanes always move up and down past the set position before finally stopping at the position. | ■ When the airflow direction is changed, the vanes move to the set position after detecting the base position. |
| A flowing water sound or occasional hissing sound is heard. | ■ These sounds can be heard when refrigerant is flowing in the air conditioner or when the refrigerant flow is changing. |
| A cracking or creaking sound is heard. | ■ These sounds can be heard when parts rub against each due to expansion and contraction from temperature changes. |
| The room has an unpleasant odor. | ■ The indoor unit draws in air that contains gases produced from the walls, carpeting, and furniture as well as odors trapped in clothing, and then blows this air back into the room. |
| A white mist or vapor is emitted from the indoor unit. | ■ If the indoor temperature and the humidity are high, this condition may occur when operation starts.■ During defrosting mode, cool airflow may blow down and appear like a mist. |
| Water or vapor is emitted from the outdoor unit. | ■ During cooling mode, water may form and drip from the cool pipes and joints.■ During heating mode, water may form and drip from the heat exchanger.■ During defrosting mode, water on the heat exchanger evaporates and water vapor may be emitted. |
| The operation indicator does not appear in the remote controller display. | ■ Turn on the power switch. "●" will appear in the remote controller display. |
| The air conditioner does not operate even though the ON/OFF button is pressed. The operation mode display on the remote controller disappears. | ■ Is the power switch of the indoor unit turned off? Turn on the power switch. |
| "●" appears in the remote controller display. | ■ During central control, "●" appears in the remote controller display and air conditioner operation cannot be started or stopped using the remote controller. |
| When restarting the air conditioner soon after stopping it, it does not operate even though the ON/OFF button is pressed. | ■ Wait approximately three minutes. (Operation has stopped to protect the air conditioner.) |
| Air conditioner operates without the ON/OFF button being pressed. | ■ Is the on timer set? Press the ON/OFF button to stop operation.■ Is the air conditioner connected to a central remote controller? Consult the concerned people who control the air conditioner.■ Does "●" appear in the remote controller display? Consult the concerned people who control the air conditioner.■ Has the auto recovery feature from power failures been set? Press the ON/OFF button to stop operation. |
| Air conditioner stops without the ON/OFF button being pressed. | ■ Is the off timer set? Press the ON/OFF button to restart operation.■ Is the air conditioner connected to a central remote controller? Consult the concerned people who control the air conditioner.■ Does "●" appear in the remote controller display? Consult the concerned people who control the air conditioner. |
| Remote controller timer operation cannot be set | ■ Are timer settings invalid? If the timer can be set, WEEKLY, SIMPLE, or AUTO OFF appears in the remote controller display. |
| "PLEASE WAIT" appears in the remote controller display. | ■ The initial settings are being performed. Wait approximately 3 minutes. |
| An error code appears in the remote controller display. | ■ The protection devices have operated to protect the air conditioner.■ Do not attempt to repair this equipment by yourself. Turn off the power switch immediately and consult your dealer. Be sure to provide the dealer with the model name and information that appeared in the remote controller display. |
| Draining water or motor rotation sound is heard. | ■ When cooling operation stops, the drain pump operates and then stops. Wait approximately 3 minutes. |
10. Trouble Shooting
| Having trouble? | Here is the solution. (Unit is operating normally.) | |||
| Noise is louder than specifications. | ■ The indoor operation sound level is affected by the acoustics of the particular room as shown in the following table and will be higher than the noise specification, which was measured in an echo-free room. | |||
| High sound absorbing rooms | Normal rooms | Low sound absorbing rooms | ||
| Location examples | Broadcasting studio, music room, etc. | Reception room, hotel lobby, etc. | Office, hotel room | |
| Noise levels | 3 to 7 dB | 6 to 10 dB | 9 to 13 dB | |
| Nothing appears in the wireless remote controller display, the display is faint, or signals are not received by the indoor unit unless the remote controller is close. | ■ The batteries are low. Replace the batteries and press the Reset button. ■ If nothing appears even after the batteries are replaced, make sure that the batteries are installed in the correct directions (+,-). | |||
| The operation lamp near the receiver for the wireless remote controller on the indoor unit is flashing. | ■ The self diagnosis function has operated to protect the air conditioner. ■ Do not attempt to repair this equipment by yourself. Turn off the power switch immediately and consult your dealer. Be sure to provide the dealer with the model name. | |||
| Warm air blows from the indoor unit intermittently when heating mode is off or during fan mode. | ■ When another indoor unit is operating in heating mode, the control valve opens and closes occasionally to maintain stability in the air conditioning system. This operation will stop after a while. * If this will cause an undesirable rise in the room temperature in small rooms, etc., stop the operation of the indoor unit temporarily. | |||
Range of application
The range of working temperatures for both the indoor and outdoor units of the series Y, R2, Multi-S is as below.
Caution:
The use of your air conditioner outside the range of working temperature and humidity can result in serious failure.
| Mode | Indoor unit | Outdoor unit |
| PUHY | ||
| Cooling | 15 °C - 24 °C WB, 59 °F - 75 °F WB | -5 °C - 43 °C DB, 23 °F - 110 °F DB |
| Heating | 15 °C - 27 °C DB, 59 °F - 81 °F DB | -15 °C - 15.5 °C WB, 5 °F - 60 °F WB |
Note: As an applicable humidity standard for both indoors and outdoors, we recommend use within a range of 30 - 80% relative humidity.
Warning:
If the air conditioner operates but does not cool or heat (depending on model) the room, consult your dealer since there may be a refrigerant leak. Be sure to ask the service representative whether there is refrigerant leakage or not when repairs are carried out.
The refrigerant charged in the air conditioner is safe. Refrigerant normally does not leak, however, if refrigerant gas leaks indoors and comes into contact with the fire of a fan heater, space heater, stove, etc., harmful substances will be generated.
11. Specifications
PLFY-P.NBMU-E Series
| Model | PLFY-P12NBMU-E | PLFY-P15NBMU-E | PLFY-P18NBMU-E | PLFY-P24NBMU-E | PLFY-P30NBMU-E | PLFY-P36NBMU-E | |
| Power source | Single 208/230 V 60 Hz | ||||||
| Capacity | Cooling <BTU/h> | 12,000 | 15,000 | 18,000 | 24,000 | 30,000 | 36,000 |
| Heating <BTU/h> | 13,500 | 17,000 | 20,000 | 27,000 | 34,000 | 40,000 | |
| Dimension | Height <inch> | 10-3/16 (1-3/8) | 11-3/4 (1-3/8) | ||||
| Width <inch> | 33-1/16 (37-3/8) | ||||||
| Depth <inch> | 33-1/16 (37-3/8) | ||||||
| Net weight <lbs> | 49 (13) | 51 (13) | 60 (13) | ||||
| Fan Airflow range (Low-Middle2-Middle1-High) | DRY <CFM> | 390-420-460-490 | 420-460-490-570 | 490-530-570-640 | 530-570-640-710 | 570-640-710-730 | 780-880-990-1060 |
| WET <CFM> | 350-390-420-460 | 390-420-460-530 | 460-490-530-600 | 490-530-600-670 | 530-600-670-740 | 740-850-950-1030 | |
| Noise level (Low-Middle2-Middle1-High) <dB> | 27-28-29-31 | 27-28-30-31 | 28-29-30-32 | 28-30-32-34 | 30-32-35-37 | 35-38-41-43 | |
1 Cooling/Heating capacity indicates the maximum value at operation under the following condition.
Cooling: Indoor 27 °C DB, 81 °F DB/19 °C WB, 66 °F WB, Outdoor 35 °C DB, 95 °F DB
Heating: Indoor 20 °C DB, 68 °F DB, Outdoor 7 °C DB, 45 °F DB/6 °C WB, 43 °F WB
2 This figure ( ) indicates panel's.
- Message "NOT AVAILABLE" (NON DISPONIBLE)
This product is designed and intended for use in the residential, commercial and light-industrial environment.
Please be sure to put the contact address/telephone number on this manual before handing it to the customer.
- Air-Conditioners For Building Application INDOOR UNIT
- PLFY-P·NBMU-E
- OPERATION MANUAL
- FOR USER
- MANUEL D'UTILISATION
- POUR L'UTILISATEUR
- Safty Precautions
- Symbols used in the text
- Symbols used in the illustrations
- Warning:
- Caution:
- Disposing of the unit
- Parts Names
- Screen Configuration
- Setting the Day of the Week and Time
- Operation
- Turning ON/OFF
- Note:
- Mode select
- Automatic operation
- Temperature setting
- Fan speed setting
- Airflow direction setting
- Ventilation
- For LOSSNAY combination
- For Wired Remote-controller
- < How to set the fixed up/down air direction (Only for wired remote controller) >
- Explanation of word
- Fixing
- Operation buttons (During the fixed airflow direction mode)
- < Process for setting >
- [1] To turn off air conditioner and change the remote controller to "Fixed airflow direction mode"
- [2] To select and identify the outlet to set
- [3] To fix air direction
- How to find air conditioner No.
- [1] To check Address No. of indoor unit
- To clear fixed setting
- For Wired Remote-controller
- Weekly Timer
- Simple Timer
- Examples
- Auto Off Timer
- Other Functions
- Locking the Remote Controller Buttons (Operation function limit controller)
- Error Codes indication
- Function Selection
- Function selection of remote controller
- [Detailed setting]
- [4]-1. CHANGE LANGUAGE setting
- [4]-2. Function limit
- [4]-4. Display change setting
- Cleaning the filters and the indoor unit
- Cleaning the filters
- Filter removal
- PLFY-P-NBMU-E Series
- Trouble Shooting
- Range of application
- Specifications
Brand : MITSUBISHI
Model : PLFY-P-NBMU-E
Category : Air-conditioner