
TALKING CHESS TRAINER - Board games SAITEK - Free user manual and instructions
Find the device manual for free TALKING CHESS TRAINER SAITEK in PDF.


| Product type | Electronic chess game with sensitive board and LCD screen |
| Brand | SAITEK |
| Model | TALKING CHESS TRAINER |
| Category | Board games |
| Dimensions | 314 x 252 x 34 mm |
| Power supply | 3 AA (AM3/R6) 1.5 V batteries, alkaline batteries recommended |
| Power consumption | 40 mW |
| Game levels | 64 levels (including Entertainment, Amateur, Blitz, Bronstein, Extra Time, Tournament, Fixed Depth, Tactics) + 11 teaching modes = 768 combinations |
| Main functions | Play against computer, Non-Automatic mode (referee), built-in chess clock, opening training (16 sequences), voice function with comments, position verification, take back (14 half-moves), game memory (up to 550 h) |
| Screen | LCD display with symbols for pieces, squares, time, messages |
| Available languages | French, English, German (selection by switch) |
| Sound | Piezoelectric buzzer; 3 modes: beep + voice, beep only, silent |
| Piece storage | Integrated compartment for chess pieces |
| Care and cleaning | Clean with a soft dry cloth; remove batteries before cleaning; do not use chemical products |
| Safety | Use only alkaline or carbon-zinc batteries; do not mix different types or new and used batteries; observe polarity; remove used batteries promptly; do not short-circuit; do not recharge non-rechargeable batteries |
| Spare parts and repairability | Standard AA batteries; reset via ACL hole (paper clip); in case of malfunction, contact local dealer |
| General information | Operates at room temperature; avoid humidity and extreme temperatures |
Frequently Asked Questions - TALKING CHESS TRAINER SAITEK
User questions about TALKING CHESS TRAINER SAITEK
0 question about this device. Answer the ones you know or ask your own.
Ask a new question about this device
Download the instructions for your Board games in PDF format for free! Find your manual TALKING CHESS TRAINER - SAITEK and take your electronic device back in hand. On this page are published all the documents necessary for the use of your device. TALKING CHESS TRAINER by SAITEK.
USER MANUAL TALKING CHESS TRAINER SAITEK
Talking Chess Trainer
Instructions
Bedienungsanleitung
Mode d'emploi
QUICK START
To play a game of chess right away, without reading the entire manual first, simply follow these Quick Start steps!
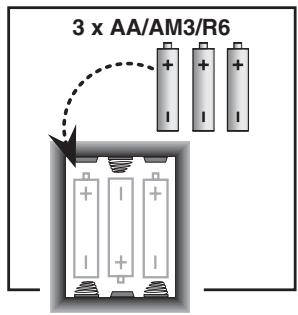
1 Open the battery compartment at the back of the computer by sliding it in the direction of the arrow. Insert 3 "AA" (Type AM3/ R6) batteries into the computer, making sure that you observe the correct polarity. Then, reinstall the battery door.
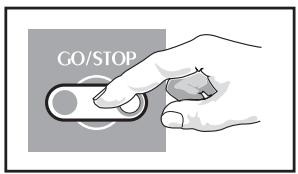
2 Press GO/STOP to turn the game on. If the computer does not respond, press a paper clip or similar sharp object into the hole marked ACL in the base of the unit, as described in Section 4.1.
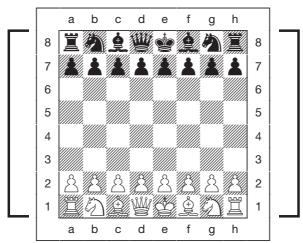
3 Set up the chess pieces in the initial starting position for a new game, with the White pieces closest to you.
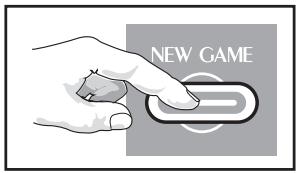
4 Press the NEW GAME key to reset the computer for a new game of chess.
5 Enter moves by executing them on the board, pressing the chess pieces down gently on the from and to squares for each move.
As soon as the computer makes a move, that move is shown in the display window. Press the computer's piece lightly onto the indicated from and to squares to complete the computer's move. That's all there is to it!
Make your next move as described above. Press GO/STOP at any time to turn the computer off. Enjoy your game!
Note: The computer will automatically switch off to conserve power if no keys are pressed for about 20 minutes and the computer is not currently thinking. For details, see Section 2.9.
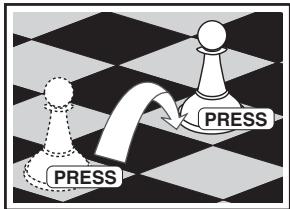
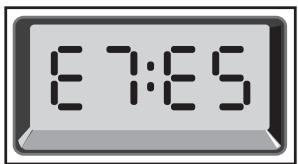
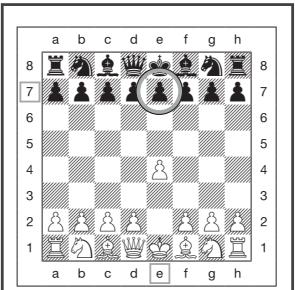
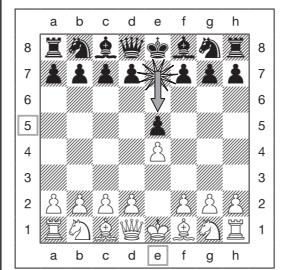
TABLE OF CONTENTS
QUICK START
KEYS AND FEATURES
INTRODUCTION
- USING YOUR CHESS COMPUTER
1.1 Battery Installation
1.2 Making Moves
1.3 The Computer's Move
1.4 Change Your Mind? Take Back!
1.5 Check, Mate, or Draw!
1.6 Start a New Game
1.7 Change Levels
1.8 Openings Coach
- ADDITIONAL COMPUTER FEATURES
2.1 Language Selection
2.2 Chess Clocks
2.3 Capturing and Special Moves
2.4 Illegal Moves
2.5 Interrupting the Computer's Search
2.6 Changing Sides with the Computer
2.7 Getting Hints from the Computer
2.8 The Computer Plays Against Itself
2.9 Game Memory and Automatic Power Down
2.10 Openings Library
- LEVELS AND SPECIAL MODES
3.1 Levels of Play
3.2 Fun Levels
3.3 Casual Levels
3.4 Blitz Levels
3.5 Bronstein Levels
3.6 Bonus Timer Levels
3.7 Tournament Levels
3.8 Fixed Depth Levels
3.9 Tactical Level
3.10 Teach Modes
3.11 Selecting Levels and Teach Modes
3.12 Openings Coach Mode
3.13 Verify Mode. Check Piece Positions!
3.14 Non Auto Mode
- TECHNICAL DETAILS
4.1 The ACL Function
4.2 Care and Maintenance
4.3 Technical Specifications
TROUBLESHOOTING GUIDE
KEYS AND FEATURES
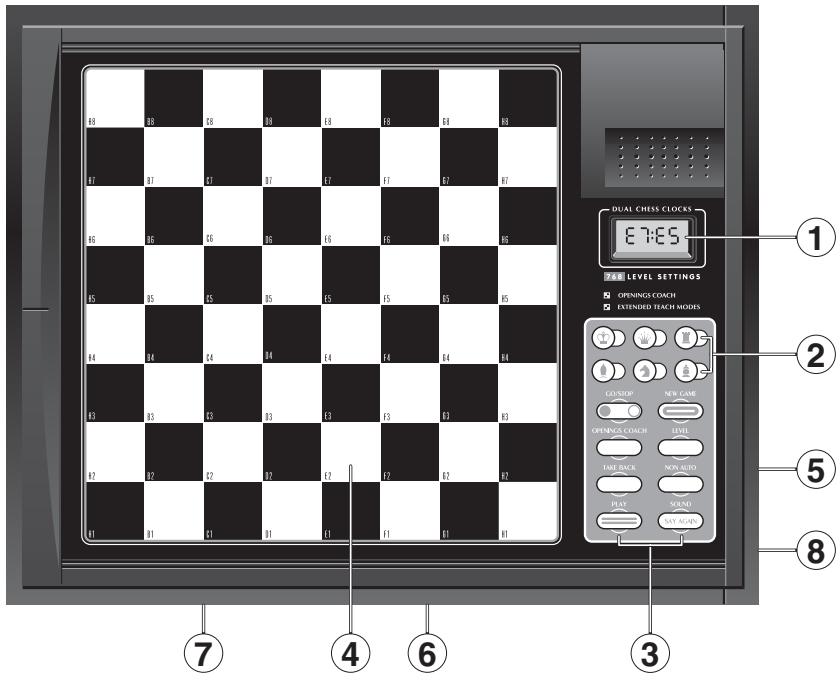
3. Game Keys
- LCD Display Window: The Liquid Crystal Display (LCD) is used to show moves, game information, and chess clocks for both players. For a complete list of the symbols, refer to Figure 1.
- Piece Symbol Keys (King), (Queen), (Rook), (Bishop), (Knight), (Pawn): Used to verify positions, select various Teach Modes, and underpromote pawns.
a. GO/STOP Key: Press to turn the computer on; press again to turn the unit off. The current game is retained in memory for up to 550 hours.
b. NEW GAME Key: Press to reset the computer for a new game of chess.
c. OPENINGS COACH Key: Press to enter Openings Coach Mode for training on opening gambits and responses.
d. LEVEL Key: Press to enter Level Mode to adjust the level of play to the complexity and type of game you desire. Also used to select the Teach Modes.
e. TAKE BACK Key: Press to take back the last individual move made. You may take back up to 14 individual moves. Note that an individual move is a move for one side.
f. NON AUTO Key: Press to enter Non Auto Mode, which allows moves to be entered manually. Here, the computer monitors the game, but makes no moves.
g. PLAY Key: Press to exchange sides with the computer. Press while the computer is thinking to force it to move, or press during your own turn to get a move suggestion from the computer.
h. SOUND Key: Pressing this key causes the sound option to cycle through three levels of operation. You can tell which level you have selected by the number of high tone beeps you hear, as indicated below:
SOUND LEVEL SIGNAL WHEN SELECTED
Beep and Voice 3 high tones
Beep only 2 high tones
Silent 1 high tone
With Voice selected, you'll get helpful coaching remarks, and the buzzer will beep to show the computer's response to your actions. See Figure 1 for the meanings of the beeps. Pressing and holding SOUND for a second or more activates the "Say Again" feature, causing the last message to be repeated.
- Sensory Chessboard: Each square contains a highly sensitive sensor that registers piece movement. The squares are identified by file (letters) and rank (numbers).
- ACL (Reset): Recessed reset switch is located in the base of the unit, and used to eliminate static discharge after inserting a new set of batteries.
- Battery Compartment: In base of unit. The computer uses 3 "AA" (Type AM3/R6) alkaline batteries.
- Piece Storage Area: Handy storage compartment for your chess pieces.
- Language Selection Switch: In base of unit. Used to select either English, German, or French.
Figure 1. Display Symbols and Sounds
| SYMBOLS | ||
| 1......... 1 | R......... A | E..... King |
| 2......... 2 | b......... B | 9.... Queen |
| 3......... 3 | c......... C | r..... Rook |
| 4......... 4 | d......... D | b.... Bishop |
| 5......... 5 | E......... E | n..... Knight |
| 6......... 6 | F......... F | P..... Pawn |
| 7......... 7 | G......... G | Sb.... Standard board |
| 8......... 8 | H......... H | |
| 9......... 9 | ||
| 0......... 0 | ||
| PM.......... Indicates player to move. | ||
| S.......... Indicates black to move. | ||
| :.......... Steady colon indicates that figures are Minutes and Seconds | ||
| *.......... Flashing colon indicates that figures are Hours and Minutes | ||
| ch:-.......... Black in check | ||
| ch:-.......... White in check | ||
| End-.......... Checkmate - black wins | ||
| End-.......... Draw | ||
| t8:.......... Teach Mode | ||
| o:-3.......... Openings Coach (Spanish Opening) - computer plays both sides | ||
| o:-3.......... Openings Coach (Spanish Opening) - computer plays white | ||
| o:-3.......... Openings Coach (Spanish Opening) - computer plays black | ||
| o:-3.......... Openings Coach (Spanish Opening) - computer plays neither | ||
| SOUNDS | ||
| 1 high tone...... Acknowledge operation of any key or sensory square | ||
| 1 low tone...... Error: Wrong move or wrong key pressed | ||
| 2 low tones...... Warning from Coach | ||
| 3 high tones .... New Game or Beep and Voice set | ||
| 3 low tones...... In games against the clock, time has run out | ||
INTRODUCTION
Your new electronic chessboard is a powerful computer that will play chess at whatever level of complexity you choose! Or, if you prefer, you can play a game with a friend and the computer will act as referee. The large range of 64 playing levels, combined with 11 extended Teach Modes, make up a total of 768 combinations—enough to satisfy anyone with an interest in chess, both young and old. The Teach Modes and Openings Coach are superb learning features at any level of play, and the various modes of timed competition are well-suited for the intermediate player. This particular model also offers vocal encouragement and coaching whenever its special Voice Mode is selected!
1. USING YOUR CHESS COMPUTER
1 Battery Installation ■ Your chess computer runs on 3 "AA" (AM3/R6) batteries. For longer battery life, we recommend using fresh alkaline batteries. Slide open the battery compartment cover on the back of the unit, and insert the batteries as shown in Figure 1-1. Then, reinstall the cover and press GO/STOP to turn the computer on. If the computer does not respond, use a paper clip or another sharp object to press into the hole marked ACL in the base of the unit for at least one second. This will reset the computer. After the batteries are inserted or ACL is pressed, the computer will go through a self-test. Three beeps tell you that the test has passed, while a buzz or silence indicates a problem that should be checked with your local distributor.
Note that inserting new batteries or pressing ACL will reset the computer's memory, causing any current game to be lost.
Making Moves
Follow the steps below to start a game.
a. If necessary, press GO/STOP to turn the computer on.
b. Set up the chess pieces in their starting positions with the White pieces nearest to you, as shown in Figure 1-2, and press NEW GAME. The computer will say "Let's play," and indicate on the display that you should play a White piece.
0 0: 0 0 PM
Note: If NEW GAME is pressed while certain modes are selected (Teach Mode, Openings Coach, or Non Auto Mode), these modes will automatically be cancelled.
c. To make a move, lightly press down on the piece you want to move until you hear a beep (see Figure 1-3). The computer's sensory board registers your move, and the left side of the display will show the from square that was pressed.
e 2:..
d. Take the piece and lightly press it down on the square you want to move to. A second beep sounds, and the computer briefly shows the to square on the right-hand side of the display.
E 2 : E 4
As soon as your move is finished (if you have Voice selected), the display will show Coch while it evaluates your move. You also hear a spoken comment relating to the move you executed.
e. Next, it is the computer's turn, and the computer will start thinking about its move. Note that in the early stages of a game, the computer's response is often virtually instantaneous. This is because it is playing moves already stored in its openings library (see Section 2.10).
The Computer's Move
- When the computer is ready, it beeps and displays the from and to coordinates of its move, as shown in Figure 1-4. For an example of a move, see Figures 1-5a and b. Press the indicated piece down on its from square (E7, in this case), until you hear a beep and the from side of the display changes to show the color and symbol for that piece. For a chart of the symbols, see Figure 1.
Next, press that same piece down on the second square in the display—the square the computer wants to move to (E5, here). Once you press E5, the display clears and you have completed the computer's move! The display then indicates that it is once again your turn to move.
A Change Your Mind? Take Back!
If you change your mind about a move, you can take it back. Press TAKE BACK while it is still your turn to move, and the display shows the to square. Press the piece down on that square. You now see the piece symbol and the square that piece came from. Press the piece down on the from square to finish the take-back. If the move taken back was a capture, the computer reminds you to put the captured piece back on the board by displaying the piece type and its square location. Press this piece down on the indicated square. To take back another move, press TAKE BACK again. You can take back up to 14 individual moves (or 7 moves for each side), allowing you to experiment and try out various "What if...?" approaches. To continue the game, either make your next move or press PLAY to have the computer make a move for you.
Figures 1-6 a and b show an example of taking back a Knight move from G8 to F6. After pressing TAKE BACK, the display shows F6, the square the Knight moved to (Figure 1-6a). Press
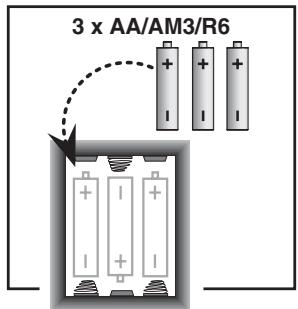
Fig. 1-1
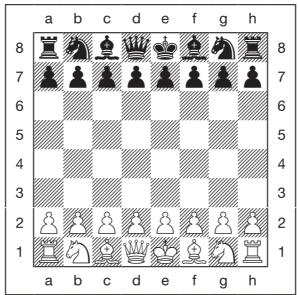
Fig. 1-2
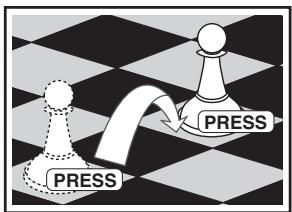
Fig. 1-3
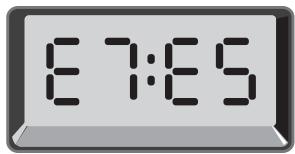
Fig. 1-4
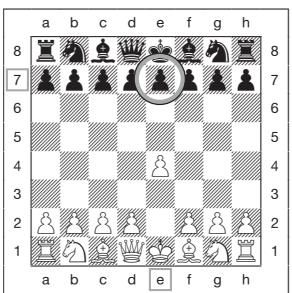
Fig. 1-5a
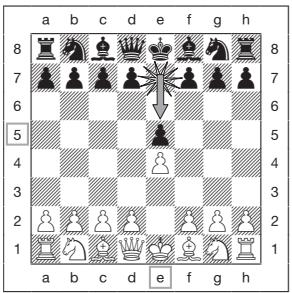
Fig. 1-5b
down on F6, and the display changes to show the piece color and symbol (Black Knight) and the square that piece came from (Figure 1-6b). Press the Knight back down on G8.
Note that en passant captures cannot be replayed if the take back of the previous move was not allowed.
Check, Mate, or Draw!
- When a King is in check, the display shows the check symbol (alternately with the clock display, if the clock is running). When the game ends in checkmate or a draw (by stalemate, immediate 3-fold repetition, or the 50-move rule), various End symbols are displayed. These symbols are shown in Figure 1.
Start a New Game
Press NEW GAME to start a new game at any time, using the currently selected level and sound/voice settings. Since pressing NEW GAME clears your current game from the computer's memory, be very careful not to press this key by mistake.
7 Change Levels
- Your chess computer offers you 64 levels of play, each of which corresponds to one of the 64 board squares. Together with the 11 built-in Extended Teach Modes, you have a choice of 768 level settings! Press LEVEL to enter Level Mode, and the current level is displayed (e.g., the level equivalent to board square A3 shows L:R3 alternately with Fun3). To change the level, simply press a board square, and that level will show in the display. Press LEVEL again to exit Level Mode. For more information on the playing levels, see Section 3.
Openings Coach
O. Your computer has 16 opening sequences for you to study, such as the Italian Opening and the Queen's Gambit. Press OPENINGS COACH, and then press one of the squares from A1 to B8 to select one of the openings. Press the square again to choose how much help you would like to get from the computer, and then press OPENINGS COACH once more to start practicing or to test your knowledge. For more details, see Section 3.12.
2. ADDITIONAL COMPUTER FEATURES
2.1 Language Selection
With your chess computer switched off, turn the board upside down and locate the Language Selection Switch in the bottom left-hand corner. Select your chosen language by moving the switch to either Eng (English), Fr (French), or De (German). Then, turn the board over and switch on the unit.
2.2 Chess Clocks
Built in chess clocks keep track of the time for your side and the computer's side, with a four-digit display showing the total elapsed time or remaining time for each player alternately during his turn. After you have entered the computer's move, the display shows your chess clock until a key or square is pressed, keeping track of your time until the to square is pressed. After you make your move, the display immediately switches to the computer's clock while it thinks, until the computer indicates that it is ready to move.
Note that the computer may also display Coch after your move has been made, while it analyzes whether you have made a good move or a bad one. If the Sound Level is set to Beep and Voice, and the computer concludes that you have made a good move, it encourages you with "Mm...Good Move!" On the other hand, if it thinks your move is not a good one, it will say "Uh-uh."
For the first hour of the game, or whenever the remaining time is less than a hour, the display will show MINUTES:SECONDS, with a steady colon. If the total elapsed time exceeds one hour or the remaining time exceeds one hour, the display will show HOURS:MINUTES, and the colon will flash while the clock is showing.
Please also note the following:
- The clock stops if you verify the level, verify the board, or turn the computer off. In each of these cases, however, the times are retained in memory, and the clock display resumes when play is continued.
- The clock resets if you change the level or press a square while in Level Mode.
- When your King is in check, the display shows check alternately with the chess clock.
- If you are playing on a level which is against the clock, the clock counts down from your selected time to show time remaining. When the first clock reaches zero, three low tone beeps will signal that time has run out. The clock will then begin counting time up from zero. On levels where time is not part of the competition, the clock counts upwards to show the total elapsed time.
- If you take back while playing against the clock, the clock does not reverse for each take back. It simply stops until you start making a move again.
2.3 Capturing and Special Moves
a. CAPTURES: To capture, press down lightly on the piece you want to move, take the captured piece off the board, and press your piece on the square of the captured piece. The computer will announce the capture.
b. EN PASSANT: In an en passant capture, the computer reminds you to remove the captured pawn from the board by displaying the pawn's location. Press down on the captured
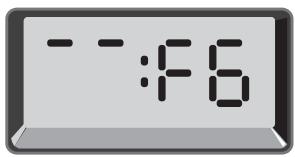
Fig. 1-6a
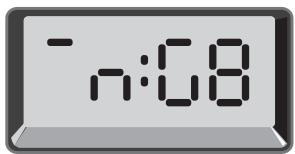
Fig. 1-6b
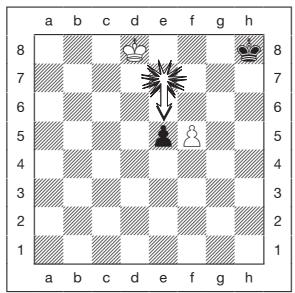
Fig. 2-1a
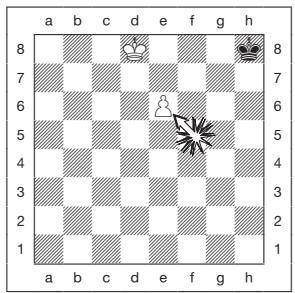
Fig. 2-1b
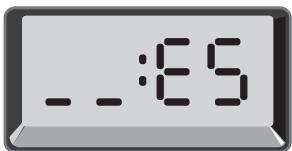
Fig. 2-1c
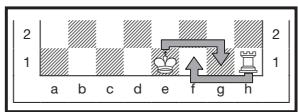
Fig. 2-2
pawn before removing it from the board. For an example, see Figures 2-1a, b, and c.
c. PAWN PROMOTION AND UNDERPROMOTION:
When you promote a pawn, first press your pawn down on its from square, as usual. The computer displays your from square and the Queen symbol (alternately with the clock display). As soon as you press your pawn down on the to square, it automatically becomes a Queen. Remember to change your piece on the board! If you wish to underpromote your pawn to a Rook, Bishop, or Knight, simply press the appropriate Piece Symbol Key between pressing the from and to squares. When the computer promotes a pawn, it will show its from and to squares as usual. After you press its from square, the display indicates the promotion piece type by showing the piece symbol and the to square. Press down on the to square with the indicated new piece to complete the computer's promotion move.
d. CASTLING: The computer automatically recognizes castling after the King is moved. After you have pressed the King down on its from and to squares, the computer displays the Rook's from square and the voice announces the move. Press down on this square, and the computer then displays the Rook symbol, along with the square the Rook should move to. Press down on the Rook's to square to complete the move (see Figure 2-2).
2.4 Illegal Moves
Your computer will never accept an illegal move. If you attempt an illegal move, the computer gives a low tone error beep or says "illegal move!" and the display keeps showing the from square. Press on that square to clear the illegal move, and then move again.
If you should move the computer's piece incorrectly, you will also hear an error beep. This can occur if you move the wrong piece or move a piece to the wrong square. Check the display and move again.
If you press a piece and the from square shows in the display, but you decide not to make that move, press that same square once again to cancel. Be careful not to make mistakes when the sound is off, as you will not be able to hear the error beeps.
2.5 Interrupting the Computer's Search
To interrupt the computer while it is thinking, press PLAY, and the computer will play the best move it has found so far. This can be very useful in games at higher levels of play, when an exhaustive search for the best move can be quite time consuming.
2.6 Changing Sides with the Computer
To change sides with the computer, press PLAY when it is your turn to move. The computer will then make the next move for your side. Change sides as often as you wish!
2.7 Getting Hints from the Computer
Whenever Voice is selected, the computer is likely to make encouraging remarks like "Mm...Good Move!" when you make a good move, as well as indicating disapproval with "Uh-uh!" if you make a bad move. If you need more help, however, you can also have the computer show you what it would do in your position! Simply press PLAY on your turn, and the computer will make the next move for you.
To keep this move as your own, make the displayed move on the board. Then, press PLAY again and the computer will make its next move. Continue the game by making your own next move. If you do not want to use the computer's move, first make the displayed move on the board, and then take it back. Once you have cleared the move in this way, you can make your own move.
2.8 The Computer Plays Against Itself
To watch the computer play a game against itself, press PLAY for every move. Study the computer's playing strate-
gies to learn more about chess!
2.9 Game Memory and Automatic Power Down
You may interrupt a game by pressing GO/STOP to turn the computer off. The computer will "remember" your position for up to 550 hours (with fresh alkaline batteries). When you switch on again, simply continue where you left off!
If you do not press a key or make a move for about 20 minutes (when the computer is not thinking), the computer will switch off to conserve power, while retaining your game in memory. Press GO/STOP to turn the computer back on and resume your unfinished game.
2.10 Openings Library
At the beginning of a game, the computer's reply is usually instantaneous because the computer is playing moves which are stored in its openings library. If the current board position is in its openings library, the computer plays a response to that position from its collection of moves, instead of thinking about the move.
3. LEVELS AND SPECIAL MODES
3.1 Levels of Play
With 768 level settings to choose from (including the Extended Teach modes), you can learn and grow with this chess computer! As shown in the playing level charts in the following sections, each level corresponds to one of the 64 board squares. The basic levels are categorized into 8 groups, intended to suit users of different abilities.
- Fun Levels: A1 to A8. For the early beginner, with A1 being the easiest.
- Casual Levels: B1 to C8. For games not played against the clock. Full range of difficulty, from easy (B1) to extremely challenging (C8). When you first power up the computer, B4 will be the selected level.
- Blitz Levels: D1 to D8. Also known as Sudden Death. Game must be concluded within the selected time.
- Bronstein Levels: E1 to E4. The game must be concluded within the selected time, which is then increased by an amount to compensate for each move. The compensation is the actual time used or the allowed time, whichever is shorter.
- Bonus Timer Levels: E5 to E8. The game must be concluded within the selected time, which is increased by a prescribed amount to compensate for each move before the move is made.
- Tournament Levels: F1 to F8. A certain number of moves must be made within the given amount of time.
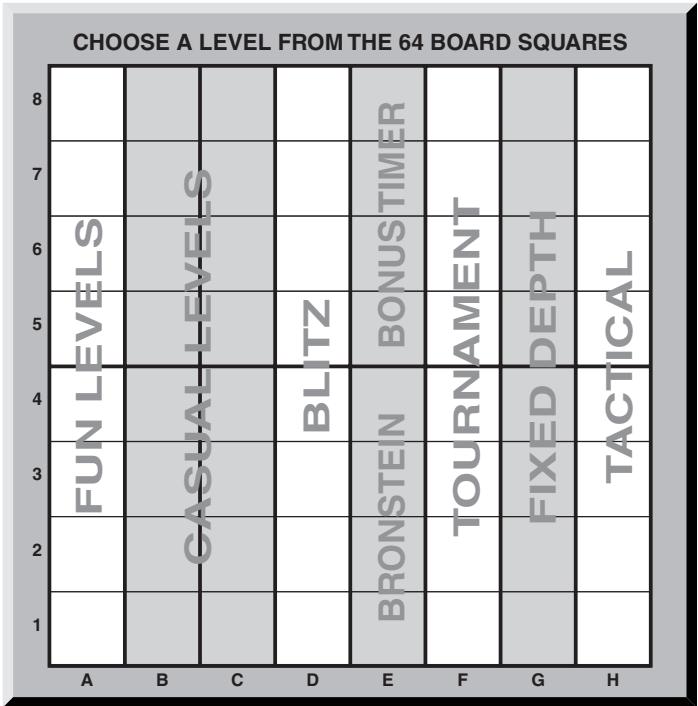
- Fixed Depth Levels: G1 to G8. Computer skill is limited by not being able to look ahead more than the selected number of moves.
- Tactical Levels: H1 to H8. Computer skill is limited by not being able to look ahead more than the selected number of moves, and by not evaluating strategic advantage.
Whenever you set the level, bear in mind that when the computer has more time to think about its moves, it gets stronger and plays better—just like a human player! Sharpen your chess skills—as you beat the computer on each level, graduate to the next. Keep challenging yourself and learn more about the game!
3.2 Fun Levels
Selecting any square from A1 to A8 will give you one of the Fun Levels. In this range, the computer does not make an exhaustive search for the best available move. Instead, it disregards scores, and the program also makes use of randomizers which cause the computer to occasionally make a move that is not the best one it has found. This introduces an interesting variability in the computer's responses, and sometimes it will seem to make quite human errors of judgement. A1 is the lowest skill level, and A8 is somewhat higher.
3.3 Casual Levels
When the Casual Levels are selected, you are controlling the skill level of the computer by limiting the average amount of time it can take to select its move. As the skill level is increased, the computer will think ahead progressively more deeply, and consequently play a more skillful game. When one of these levels is selected from the B or C squares, the display will alternate between the level selection and the computer's average response time, as shown below:
Chessboard Square Time per Move Display
B1 1 second Lb /00:01
B2 2 seconds Lb2/00:02
B3 3 seconds Lb3/00:03
B4 5 seconds Lb/00:05
B5 10 seconds Lb5/00:10
B6 15 seconds Lb6/00:15
B7 20 seconds Lb7/00:20
B8 30 seconds Lb8/00:30
C1 45 seconds L/c 1/00:45
C2 1 minute Lc2/0:00
C3 2 minutes Lc 3/02:00
C4 3 minutes Lc4/03:00
C5 4 minutes L:c5/04:00
C6 5 minutes Lc6/05:00
C7 10 minutes ..Lc/10:00
C8 15 minutes LcB/15:00
3.4 Blitz Levels
The levels on the D squares are the Blitz Levels. If you wish to play speed chess, or instant death, you can select from a range of times allowed for the game to be completed. You may choose between a 5-minute "pressure cooker" of a game, up to a more relaxed 1-1/2 hour game. When you select one of these squares, the display will alternate between the square you have selected and the corresponding time limit for the game.
Chessboard Square Time per Move Display
D1 5 minutes L/d 05:00
D2 10 minutes Ld2/10:00
D3 15 minutes Ld3/15:00
D4 25 minutes Ld/25:00
D5 30 minutes Ld5/30:00
D6 45 minutes Ld6/45:00
D7 60 minutes Ld7/100
D8 90 minutes L:d8/130
3.5 Bronstein Levels
By selecting a square from E1 to E4, you can choose a time limit for the game following the Bronstein system. A basic time is selected for the game, and an increment of a
few seconds is then added to that time whenever a move is made. The increment is either the free time shown in the table below, or the actual time taken to move, whichever is shorter. When you choose one of these levels, the display cycles through three different pieces of information, each of which is shown for one second. For example, if you choose E2 you would see:
The selected square
L:E2
and then...
The base time in minutes
10:00
and then...
The free time in seconds
00:05
Chessboard Time for Free Time Display Square Game per Move
| Chessboard Square | Time for Game | Free Time per Move | Display |
| E1 ... 5 minutes | 3 seconds | L:E/05:00/00:03 | |
| E2 ... 10 minutes | 5 seconds | L:E2/ 0:00/00:05 | |
| E3 ... 15 minutes | 10 seconds | L:E3/ 15:00/00:10 | |
| E4 ... 20 minutes | 10 seconds | L:E4/20:00/00:10 |
3.6 Bonus Timer Levels
Selection of a square from E5 to E8 gives you the Bonus Timer Levels. These levels are similar to the Bronstein Levels, except the time increment is always 2 seconds, and it is added to the time before the move is made.
E5....3 minutes.....2 seconds....L:E5/03:00/00:02
E6 ... 10 minutes ....2 seconds .... L:E6/ I0:00/00:02
E7 ... 20 minutes ....... 2 seconds ....... L:E 7/20:00/00:02
E8 ... 50 minutes ....... 2 seconds ....... L:EB/50:00/00:02
3.7 Tournament Levels
The F1-F8 squares provide 8 Tournament Levels. When one of these is selected, you and the computer are each required to make a prescribed number of moves within a given amount of time. For example: If you select Level F3, you will be required to make 40 moves within 2 hours under the Primary Time Control. If the game is not finished within that time, the Secondary Time Control period will begin, and you will be required to make 20 moves within 1 hour. If this secondary period does not produce a result, it is repeated until a conclusion is reached.
In accordance with tournament regulations, any time remaining at completion of the moves of the Primary Time Control is carried forward and added to the time allowed for the Secondary Time Control. For example: If you selected Level F3 and completed the first 40 moves in just one hour, you would be allowed 2 hours for the next 20 moves. Surplus time, if any, is carried forward and accumulated in this way throughout the game.
When you select one of these Tournament Levels, the display will cycle through three pieces of information, each of
| Chess-board Square | Primary Time Control | Secondary Time Control | Display | ||
| Moves | Time | Moves | Time | ||
| F1 | 30 | 30 min | 30 | 30 min | L:F1/30/0:30 |
| F2 | 30 | 1 hr30 min | remaining | 1 hr | L:F2/30/1:30 |
| F3 | 40 | 2 hr | 20 | 1 hr | L:F3/40/2:00 |
| F4 | 40 | 2 hr | remaining | 1 hr | L:F4/40/2:00 |
| F5 | 40 | 2 hr30 min | 16 | 1 hr | L:F5/40/2:30 |
| F6 | 45 | 1 hr30 min | 15 | 30 min | L:F6/45/1:30 |
| F7 | 50 | 2 hr30 min | 20 | 1 hr | L:F7/50/2:30 |
| F8 | 60 | 1 hr | 30 | 30 min | L:F8/60/1:00 |
which shows for one second. For example, if square F4 is selected, the display will show:
The selected square
L:F4 and then...
The number of moves in the Primary Time Control
and then...
The duration of
2:00
3.8 Fixed Depth Levels
The Fixed Depth Levels in file G limit the skill of the computer—not by the time to search for its next move, but by the number of moves it searches ahead. At the lower levels, it behaves like a novice player. At the lowest level, G1, where the computer looks ahead only one individual move, it does not anticipate the game at all, and could even miss a mate that you might make in one more move. At the other end of the scale, on Level G8, the computer will review all the possibilities within the next 8 individual moves.
On these levels, the display alternates between the level you have selected and how many individual moves (ply) ahead the computer searches:
The selected square
L:65 and then...
The number of individual moves
SPLy
3.9 Tactical Levels
The Tactical Levels are found on squares H1 through H8. These levels limit how many individual moves ahead the computer looks, but in this case the computer does not evaluate strategic advantages, and looks only for material gain such as checkmate or draws. The number of individual moves the computer looks ahead is equivalent to the chessboard square, e.g., H1 equals one individual move ahead, and H8 equals 8 moves ahead.
On the Tactical Levels, the display alternates between the level you have selected, and how many individual moves (ply) ahead the computer will search.
The selected square
L:H8 and then...
- The number of individual moves the computer is looking ahead
8PLy
3.10 Teach Modes
Your chess computer contains 11 built-in Extended Teach Modes. This feature allows you to learn basic moves and master the tactics of the pieces, one at a time! For each individual Teach Mode, the only pieces on the board will be Kings and Pawns, or Kings and Pawns and one or two selected piece types. This allows beginners to concentrate on one or two pieces at a time, without losing focus and being distracted by other pieces on the board. More developed players can use this feature to practice playing with selected combinations of pieces.
Note the following, in regard to Level and Teach Modes:
- If NEW GAME is pressed during a game, the computer will exit Teach Mode and switch back to the standard 32-piece game, with the current level still in effect.
- If you press LEVEL and then decide not to change the current playing level or Teach Mode, simply press LEVEL again—and the current status will remain as is.
- You may select a new level at any time during your turn. If you do so, however, note that the clock will be reset.
- If you press more than 2 Piece Symbol Keys during a Teach Mode selection, only the last 2 symbol selections will be valid when you exit Level Mode.
- If you accidentally press a Piece Symbol Key in Level Mode, you will lose your current game after exiting Level Mode. To continue with the current game, press the square corresponding to the current level of play before exiting Level Mode. Note, however, that the clock will have been reset.
3.11 Selecting Levels and Teach Modes
Press LEVEL to enter Level Mode, and the current level is displayed. For example, Level A3 shows as L:R3, alternating with Fun3 (the level selected by pressing board square A3).
To change the level, simply press a board square, and the display will show the new level, alternating with the level details. Press LEVEL again to exit Level Mode.
Note the following key sequences and effects:
| LEVEL, LEVEL | No change; previous level remains selected. |
| LEVEL, Square, LEVEL | New level selected, clock resets. |
| LEVEL, Piece Symbol, LEVEL | Starting position of selected Teach Mode is set at previously selected level. |
| LEVEL, Square, Piece Symbol, LEVEL | Starting position of selected Teach Mode is set at new level. |
| LEVEL, Piece Symbol, Square, LEVEL | New level is set, previous Teach Mode selection is canceled, existing game is retained. |
To select Teach Mode, press LEVEL. The display will show the skill level, as indicated by the equivalent chessboard square, alternating with the level details. To select a Teach Mode, press one or two of the Piece Symbol Keys (X, 1, 2 or 3) you would like to use. The display will then show the selected pieces. For example, if you want to play with Kings, Bishops, Knights, and Pawns, after pressing LEVEL, you should press 1 and 2. The display will show your selection. Then, press LEVEL to exit Level Mode and enter your selection into the computer, and you can begin your game. Since the King is always required for the game, you do not need to select this piece for the Teach Mode. In fact, pressing 1 is how you select a normal, 32-piece game.
Note that Non Auto is automatically canceled whenever a Teach Mode is selected in the existing Level Mode.
The 11 Teach Modes and the normal game are indicated by the following displays:
TEACH MODE DISPLAY
Kings and Pawns 18:P
Kings, Knights and Pawns 88
Kings, Bishops and Pawns 12
Kings, Rooks and Pawns
Kings, Queens and Pawns 88:9
Kings, Knights, Bishops and Pawns .
Kings, Knights, Rooks and Pawns .
Kings, Knights, Queens and Pawns 89
Kings, Bishops, Rooks and Pawns
Kings, Bishops, Queens and Pawns 18:69
Kings, Rooks, Queens and Pawns 18:9
All Pieces (standard board-normal game) ... E8:5b
3.12 Openings Coach Mode
Your computer has 16 different opening sequences in memory, all of which can be played through so that you may learn them. Press OPENINGS COACH, and, when first selected, the computer will beep and the display will flash
0
You can then choose which opening game you want to review by pressing one of the squares from A1 to B8. Figure 3-1 lists the available openings. For example, to select the third Openings Coach, press square A3, and - will flash in the display to confirm that the third Openings Coach has been selected. The two bars indicate that the computer will display moves for both sides, so you can watch and learn. Press the same square again and the display will change to - indicating that the computer will play the white side and let you work out the moves for black. Another press on the square changes the bar to show that the computer will play black while you play white. One more press will remove the bars altogether, indicating that the computer will leave all the moves to you while it monitors your moves for legality. Press
Figure 3-1. Moves in Openings Coach
| Square | Name | Moves |
| A1 | Italian Opening | e2e4, e7e5, g1f3, b8c6, f1c4, f8c5 |
| A2 | Two Knights Defense | e2e4, e7e5, g1f3, b8c6, f1c4, g8f6 |
| A3 | Spanish Opening | e2e4, e7e5, g1f3, b8c6, f1b5, a7a6, b5a4, g8f6, e1g1, b7b5 |
| A4 | Sicilian Defense | e2e4, c7c5, g1f3, d7d6, d2d4, c5d4, f3d4, g8f6, b1c3 |
| A5 | French Defense | e2e4, e7e6, d2d4, d7d5 |
| A6 | Caro-Kann Defense | e2e4, c7c6, d2d4, d7d5, b1c3, d5e4 |
| A7 | Scandinavian Defense | e2e4, d7d5, e4d5, d8d5, b1c3, d5a5 |
| A8 | Alekhine's Defense | e2e4, g8f6, e4e5, f6d5 |
| B1 | Queen's Gambit | d2d4, d7d5, c2c4, e7e6, b1c3, g8f6, c1g5, f8e7 |
| B2 | Queen's Gambit Accepted | d2d4, d7d5, c2c4, d5c4 |
| B3 | Nimzo-Indian Defense | d2d4, g8f6, c2c4, e7e6, b1c3, f8b4 |
| B4 | Queen's Indian Defense | d2d4, g8f6, c2c4, e7e6, g1f3, b7b6 |
| B5 | King's Indian Defense | d2d4, g8f6, c2c4, g7g6, b1c3, f8g7, e2e4, d7d6 |
| B6 | Gruenfeld Defense | d2d4, g8f6, c2c4, g7g6, b1c3, d7d5 |
| B7 | Dutch Defense | d2d4, f7f5, c2c4, g8f6, b1c3, e7e6 |
| B8 | English Opening | c2c4, e7e5, b1c3, g8f6, g1f3 |
OPENINGS COACH once again, and the display will indicate that you should move.
While you are playing, you can press PLAY to have the computer remind you of the next move. Every time you make a correct move, the computer will confirm the move with a single beep. If you are wrong, however, it will sound a double beep and prevent the from square from being displayed. The computer's voice will also indicate the coach's disapproval with "Uh-uh." Press the correct to square to end the move or the from square to cancel it. At the end of the opening sequence, you may continue to play the game if you wish. Note that the clock is not used during this mode, and Non Auto Mode, if selected, is only in effect after the opening moves are finished.
Note that your current Openings Coach selection is retained in memory until another selection is made.
When you want to get back to playing a normal game, simply press NEW GAME, and you will be returned to the standard board.
3.13 Verify Mode: Check Piece Positions!
If the pieces get knocked over, or you think some might be in the wrong positions, you can ask the computer to run a check for you. Simply press the Piece Symbol Key for the piece you are questioning. The computer will then show you the symbol for that color and piece type, along with the square on which it should be placed. Pressing the key again shows the position of the next piece of that type, and so on, until all the pieces of that type on the board have been shown. The display shows white pieces first, and then the black pieces. When there are no more pieces of that type on the board, the display reverts to showing the side to move, and the computer sounds two beeps to get your attention. An example of the sequence of displays is shown below.
This example indicates that one of the white Knights has been captured, and it is now white's turn to move. To verify
| Key Press | Display Shows | Meanings |
| Press ↑ first time | - n:b! | White Knight on B1 |
| Press ↑ second time | - n:b8 | Black Knight on B8 |
| Press ↑ third time | - n:F6 | Black Knight on F6 |
| Press ↑ fourth time | - n:-- (beep, beep) | No more Knights, white to move |
other pieces, repeat the same steps using the other Piece Symbol Keys. When you are finished, make your next move. Note that the clock stops temporarily during piece verification, and the computer automatically exits Verify Mode if no Piece Symbol Keys are pressed for about 5 seconds.
3.14 Non Auto Mode
Normally, the computer automatically answers with a countermove whenever you enter a move. If you press NON AUTO, however, the computer responds with a beep and you can then enter all the moves for both sides, one by one, without allowing the computer to answer! This special feature can be used in a number of different ways:
- Play through master chess games. Try pressing PLAY to see what the computer would do in any position!
- Study opening book lines by entering them manually.
- Play chess against a friend, with the computer acting as referee, checking the legality of all moves and keeping track of the time for both sides! If you need help with a move, simply press PLAY and the computer will make the next move. After the move, Non Auto Mode remains in effect, and you can continue your game.
- Replay to any board position for further study.
To exit Non Auto Mode and return to normal play, press NON AUTO once again. A double beep will verify that the mode has been canceled.
Note that Non Auto Mode is automatically canceled whenever you press NEW GAME or select a Teach Mode upon exiting Level Mode.
4. TECHNICAL DETAILS
4.1 The ACL Function
Computers can sometimes "lock up" due to static discharge or other electrical disturbances. If this should happen, use a pin or a similar sharp object to press into the hole marked ACL in the base of the unit for at least one second. This resets the computer.
4.2 Care and Maintenance
Your chess computer is a precision electronic device, and should not be subjected to rough handling or exposed to extreme temperatures or moisture. Be sure to remove the batteries before cleaning the unit. Do not use chemical agents or liquids to clean your unit, as they may damage the plastic.
Weak batteries should be replaced promptly, since they can leak and damage the computer. Please also note the following regarding the use of batteries. Warning: Use only alkaline or zinc carbon batteries. Do not mix different types of batteries or new and used batteries. Do not recharge non-rechargeable batteries. Use only the recommended batteries or equivalent. Be sure to observe the correct polarity when inserting batteries. Worn out batteries should be removed from the unit promptly. Do not short circuit the supply terminals.
4.3 Technical Specifications
Keys: 14
LCD Display: Viewing area 30 × 13 mm
Sound: Mylar speaker
Batteries: 3 AA/AM3/R6 (1.5V) cells
Power Consumption: 40 mW
Dimensions: 314 × 252 × 34 mm
Saitek reserves the right to make technical changes without notice in the interest of progress.
CONDITIONS OF WARRANTY
- Warranty period is 2 years from date of purchase with proof of purchase submitted.
- Operating instructions must be followed.
- Product must not have been damaged as a result of defacement, misuse, abuse, neglect, accident, destruction or alteration of the serial number, improper electrical voltages or currents, repair, alteration or maintenance by any person or party other than our own service facility or an authorized service center, use or installation of non-Saitek replacement parts in the product or the modification of this product in any way, or the incorporation of this product into any other products, or damage to the product caused by accident, fire, floods, lightning, or acts of God, or any use violative of instructions furnished by Saitek plc.
- Obligations of Saitek shall be limited to repair or replacement with the same or similar unit, at our option. To obtain repairs under this warranty, present the product and proof of purchase (e.g., bill or invoice) to the authorized Saitek Technical Support Center (listed on the separate sheet packaged with this product) transportation charges prepaid. Any requirements that conflict with any state or Federal laws, rules and/or obligations shall not be enforceable in that particular territory and Saitek will adhere to those laws, rules, and/or obligations.
- When returning the product for repair, please pack it very carefully, preferably using the original packaging materials. Please also include an explanatory note.
- IMPORTANT: To save yourself unnecessary cost and inconvenience, please check carefully that you have read and followed the instructions in this manual.
- This warranty is in Lieu of all other expressed warranties, obligations or liabilities. ANY IMPLIED WARRANTYES, OBLIGATIONS, OR LIABILITIES, INCLUDING BUT NOT LIMITED TO THE IMPLIED WARRANTYES OF MERCHANTABILITY AND FITNESS FOR A PARTICULAR PURPOSE, SHALL BE LIMITED IN DURATION TO THE DURATION OF THIS WRITTEN LIMITED WARRANTY. Some states do not allow limitations on how long an

implied warranty lasts, so the above limitations may not apply to you. IN NO EVENT SHALL WE BE LIABLE FOR ANY SPECIAL OR CONSEQUENTIAL DAMAGES FOR BREACH OF THIS OR ANY OTHER WARRANTY, EXPRESS OR IMPLIED, WHATSO-EVER Some states do not allow the exclusion or limitation of special, incidental or consequential damages, so the above limitation may not apply to you. This warranty gives you specific legal rights, and you may also have other rights which vary from state to state.
Information for Customers in the United States: FCC Compliance and Advisory Statement
Warning: Changes or modifications to this unit not expressly approved by the party responsible for compliance could void the user's authority to operate the equipment.
This device complies with Part 15 of the FCC Rules. Operation is subject to the following two conditions:
- This device may not cause harmful interference, and
- This device must accept any interference received, including interference that may cause undesired operation
NOTE: This equipment has been tested and found to comply with the limits for a Class B digital device, pursuant to Part 15 of the FCC Rules. These limits are designed to provide reasonable protection against harmful interference in a residential installation. This equipment generates, uses and can radiate radio frequency energy and, if not installed and used in accordance with the instructions, may cause harmful interference to radio communications. However, there is no guarantee that interference will not occur in a particular installation. If this equipment does cause harmful interference to radio or television reception, which can be determined by turning the equipment off and on, the user is encouraged to try to correct the interference by one or more of the following measures:
- Reorient or relocate the receiving antenna.
- Increase the separation between the equipment and receiver.
- Connect the equipment into an outlet on a circuit different from that to which the receiver is connected.
- Consult the dealer or an experienced radio/TV technician for help.
Saitek Industries, 2295 Jefferson Street, Torrance, CA 90501, USA
TROUBLESHOOTING GUIDE
| SYMPTOMS | POSSIBLE CAUSES | WHAT YOU SHOULD DO |
| The computer doesn’t react or “ freezes” during a game. | · The batteries are not inserted properly. · The batteries are weak or bad. · Static discharge has caused a lockup. | · Re-install the batteries, as noted in Section 1.1. · Replace the batteries. · Use the ACL reset feature, as described in 4.1. |
| The display is dim. | · The batteries are weak. | · Replace the batteries. |
| The computer will not play a move. | · Non Auto Mode is activated. · The computer is still thinking. | · Press NON AUTO to de-select. · You may force the computer to make a move by pressing PLAY. |
| The computer will not accept your move. | · Is it your turn? Is your King in check? Will your move leave your King in check? Did you move the Rook first to initiate castling? Are you moving to an illegal square? · The computer is thinking. · You have entered the computer's last move incorrectly (pressed the wrong squares). | · A low tone/“illegal move” indicates you are making an error. Check the chess rules. Use TACK BACK to reconstruct the last move. · To interrupt the computer, press PLAY. · Check the displayed move. Press the correct square to complete the move. |
| The computer seems to be making illegal moves. | · The computer has made a special move, such as en passant, castle, or pawn promotion. · Your board position is incorrect. | · Check the chess rules. · Verify the board, as described in Section 3.13. |
| The computer is silent. | · The SOUND Key has been pressed to turn the sound off. | · Press SOUND to turn the sound back on. |
SCHNELLSTART

- Talking Chess Trainer
- QUICK START
- TABLE OF CONTENTS
- KEYS AND FEATURES
- Game Keys
- SOUND LEVEL SIGNAL WHEN SELECTED
- INTRODUCTION
- USING YOUR CHESS COMPUTER
- Making Moves
- The Computer's Move
- A Change Your Mind? Take Back!
- Check, Mate, or Draw!
- Start a New Game
- Change Levels
- Openings Coach
- ADDITIONAL COMPUTER FEATURES
- Language Selection
- Chess Clocks
- Please also note the following:
- Capturing and Special Moves
- c. PAWN PROMOTION AND UNDERPROMOTION:
- Illegal Moves
- Interrupting the Computer's Search
- Changing Sides with the Computer
- Getting Hints from the Computer
- The Computer Plays Against Itself
- Game Memory and Automatic Power Down
- Openings Library
- LEVELS AND SPECIAL MODES
- Levels of Play
- Fun Levels
- Casual Levels
- Blitz Levels
- Bronstein Levels
- Bonus Timer Levels
- Tournament Levels
- Fixed Depth Levels
- Tactical Levels
- Teach Modes
- Note the following, in regard to Level and Teach Modes:
- Selecting Levels and Teach Modes
- TEACH MODE DISPLAY
- Openings Coach Mode
- Verify Mode: Check Piece Positions!
- Non Auto Mode
- TECHNICAL DETAILS
- The ACL Function
- Care and Maintenance
- Technical Specifications
- CONDITIONS OF WARRANTY
- Information for Customers in the United States: FCC Compliance and Advisory Statement
- SCHNELLSTART
Brand : SAITEK
Model : TALKING CHESS TRAINER
Category : Board games