
TRIGGER FINGER - MIDI Controller M-AUDIO - Free user manual and instructions
Find the device manual for free TRIGGER FINGER M-AUDIO in PDF.

| Product Type | MIDI Controller |
| Brand | M-AUDIO |
| Model | TRIGGER FINGER |
| Dimensions (approx.) | 320 x 220 x 50 mm |
| Weight (approx.) | 1.5 kg |
| Power Supply | USB bus-powered (USB cable included) |
| Connectivity | USB MIDI, compatible USB 1.1/2.0 |
| System Compatibility | Windows XP/Vista/7/8/10, Mac OS X (class-compliant) |
| Pads | 16 velocity-sensitive pads (8x8) |
| Potentiometers / Buttons | 8 rotary potentiometers, 6 transport buttons, 1 wheel |
| Main Functions | MIDI control for music production software, customizable mapping |
| Installation | Plug-and-play class-compliant; optional driver for multi-application Windows |
| Care and Cleaning | Clean with a soft, dry cloth. Do not use liquid or abrasive products. |
| Safety | Avoid exposure to moisture, extreme temperatures and shocks. Disconnect if not used for extended periods. |
| Spare Parts and Repairability | Contact M-AUDIO after-sales service for repairs. No spare parts available at retail. |
| General Information | Compact MIDI controller for studio and live. Requires a computer with USB port and compatible software. |
Frequently Asked Questions - TRIGGER FINGER M-AUDIO
User questions about TRIGGER FINGER M-AUDIO
0 question about this device. Answer the ones you know or ask your own.
Ask a new question about this device
Download the instructions for your MIDI Controller in PDF format for free! Find your manual TRIGGER FINGER - M-AUDIO and take your electronic device back in hand. On this page are published all the documents necessary for the use of your device. TRIGGER FINGER by M-AUDIO.
USER MANUAL TRIGGER FINGER M-AUDIO
This guide is intended to help get you started quickly. In order to achieve optimal usage of your new Trigger Finger, we recommend that you carefully study the enclosed product manual, either after completing the process described in this guide or before.
ENGLISH·FRANÇAIS·DEUTSCH·ESPÁÑOL·ITALIANO·日本語
Installation Procedure
Basic Installation
Because it is a class-compliant device, installing the Trigger Finger on your Windows XP or Mac OS X computer is simple and straightforward:
Use the supplied USB cable to connect the Trigger Finger to a USB port on your computer and you'll be ready to go! You can do this while the computer is on or off, and no further driver installation will be necessary.
Installing the Windows Multi-client Driver
While class-compliance offers easy setup and connection of the Trigger Finger, the Windows class driver is deficient in that only a single application, or program, can use the Trigger Finger at any given time. For many users this is perfectly acceptable, as they will be using the Trigger Finger to communicate with their host audio application only.
However, if you use multiple applications at once, including applications that are "ReWired" together (such as using Ableton Live as a host application and simultaneously running Propellerhead Reason as a slave), you'll need to install the Windows Trigger Finger MIDI driver so both the host and ReWired application can be controlled from the Trigger Finger simultaneously.
PLEASE NOTE: Do NOT connect your new MIDI controller to your computer until the appropriate driver files have been installed onto your computer.
- Insert the MIDI Controller Driver CD-ROM into your computer's CD-ROM drive.
- The computer will automatically display the interactive install screen shown below. If your computer fails to launch the installer, manually start the installer by clicking on Start > My Computer > MIDI Controller Series.
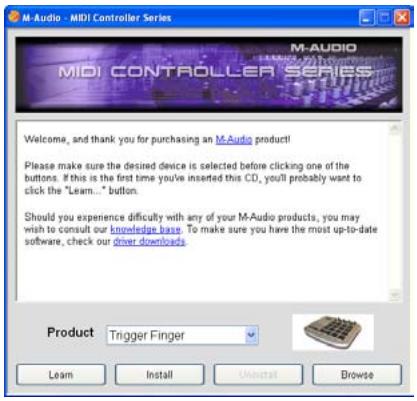
-
Follow the on-screen directions to choose your language and product. Once you select your product, click "Install Drivers" to begin copying files.
-
Follow the driver installer's on-screen directions.
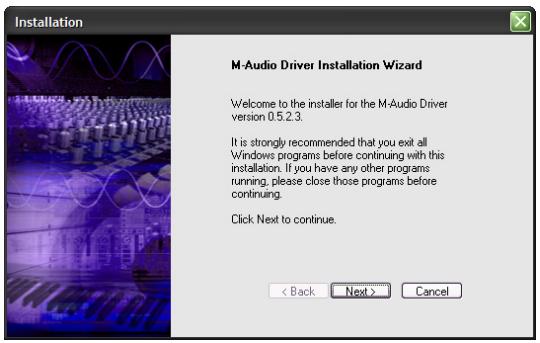
- At various points in this installation process, you may be notified that the driver being installed has not passed Windows Logo Testing. Click "Continue Anyway" to proceed with the installation.
- Click "Finish" once the installer is complete.
- Connect your new MIDI controller to an available USB port and switch it on.
- Windows will identify the new MIDl controller and will display a "Found New Hardware Wizard." If you have Service Pack 2 installed on your computer, you will be asked if you'd like to search the Internet for a driver. Please select "No, not this time" and press "Next." You'll then see a screen like the one seen below:
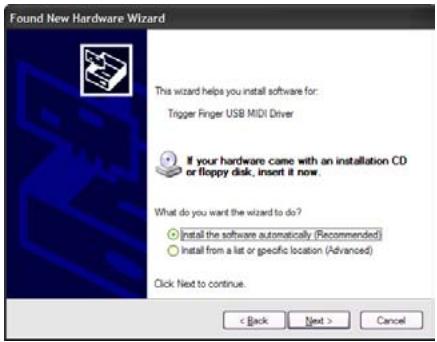
- Choose "Install software automatically" and click "Next."
- Once the final "Found New Hardware" wizard is complete, you will see a message pop up that says "Your new hardware is installed and ready to use."
Additional Information and Support
We recommend checking the M-Audio website regularly for driver updates and additional information. The web address for the site is www.m-audio.com. You'll find links to drivers, news stories, FAQs, additional products, and tech support.

Brand : M-AUDIO
Model : TRIGGER FINGER
Category : MIDI Controller