
CBT700E - Blender CUISINART - Free user manual and instructions
Find the device manual for free CBT700E CUISINART in PDF.
| Product Type | Electric Blender |
| Brand | Cuisinart |
| Model | CBT700E |
| Bowl Capacity | 1.75 L (graduated glass bowl) |
| Bowl Material | Glass |
| Blade Type | 6-prong star blade in stainless steel |
| Speeds | 2 speeds (Low and High) + Pulse function |
| Automatic Programs | Smoothie, Crushed Ice, Soups & Sauces, Puree |
| Timer | Digital display of preparation time |
| Power Supply | 220-240 V, 50/60 Hz |
| Dimensions (approx.) | 40 x 20 x 20 cm (height x width x depth) |
| Weight (approx.) | 4 kg |
| Safety | Resettable thermal protection, safety lugs on the locking ring, automatic shutdown in case of overload |
| Maintenance and Cleaning | Bowl, lid, cap, blade, and gasket are dishwasher safe (except motor base) |
| Spare parts and repairability | Glass bowl, locking ring, gasket, blade, lid, measuring cap available; repair by manufacturer or authorized service center |
| Included Accessories | Lid with graduated measuring cap (30 ml), sealing gasket, blade, locking ring |
| Non-slip feet | Yes, on the motor base |
| Warranty | Manufacturer's warranty (refer to the manual) |
Frequently Asked Questions - CBT700E CUISINART
User questions about CBT700E CUISINART
0 question about this device. Answer the ones you know or ask your own.
Ask a new question about this device
Download the instructions for your Blender in PDF format for free! Find your manual CBT700E - CUISINART and take your electronic device back in hand. On this page are published all the documents necessary for the use of your device. CBT700E by CUISINART.
USER MANUAL CBT700E CUISINART
- Advice from the chefs 21
- Questions/Answers 22
- Cleaning and maintenance. 23
- Safety precautions 23
INHALTSVERZEICHNIS
2. CARACTERISTIQUES PRODUIT
Congratulations on your purchase of this Cuisinart® blender.
Constant research into innovation and the care taken in creating this product guarantee you a high quality appliance. Easy to use and maintain, this appliance lets you create all sorts of simple and original preparations.
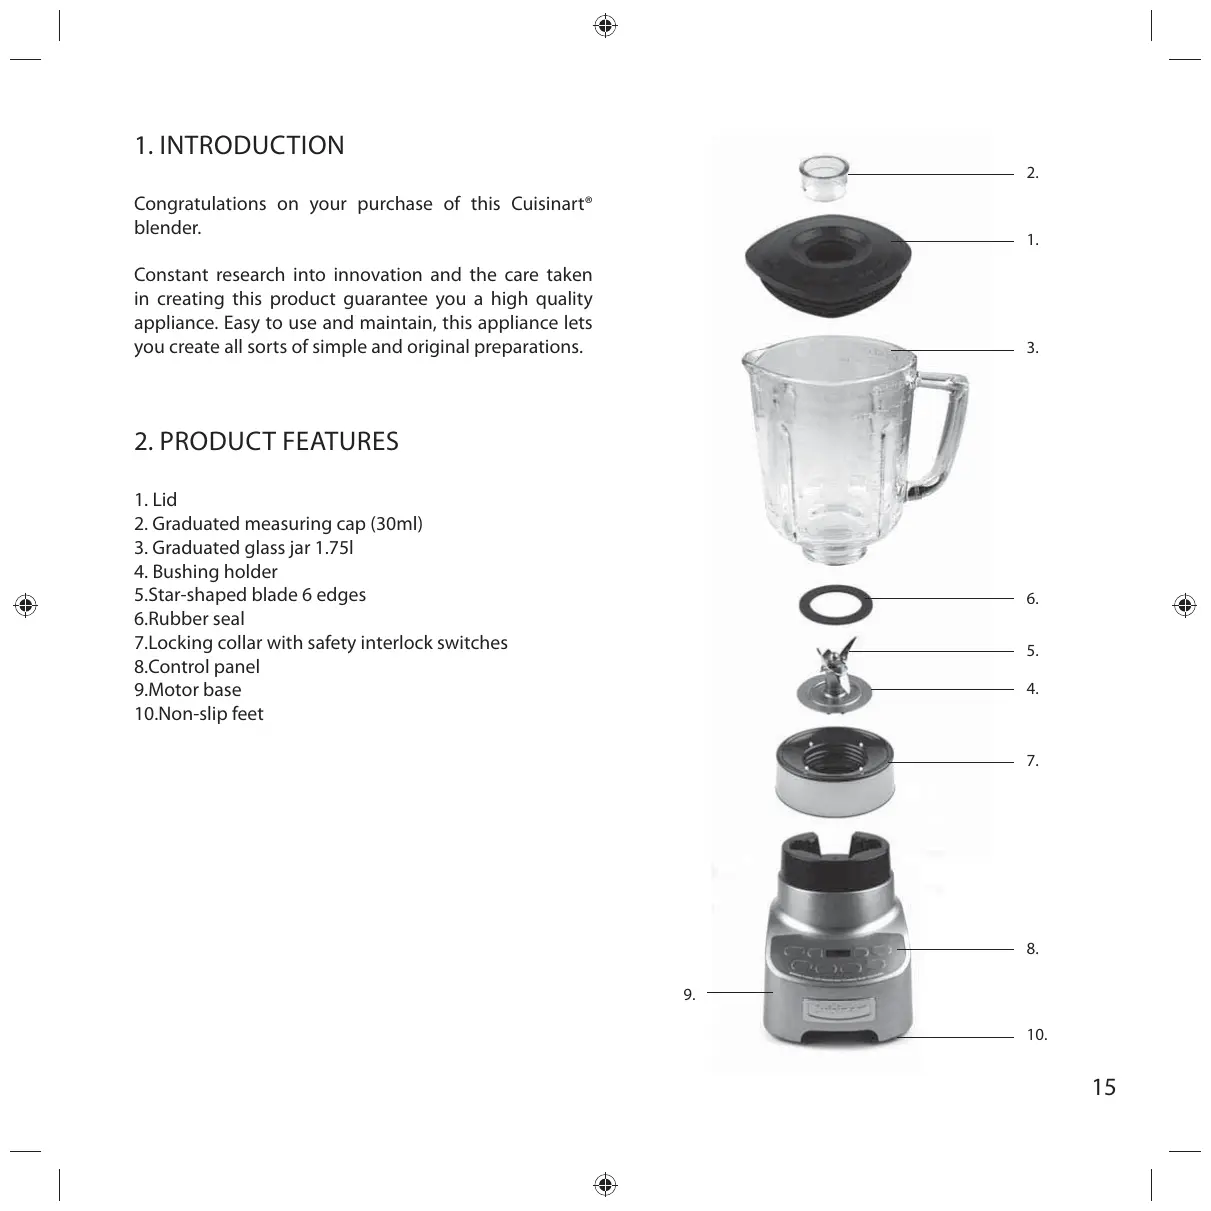
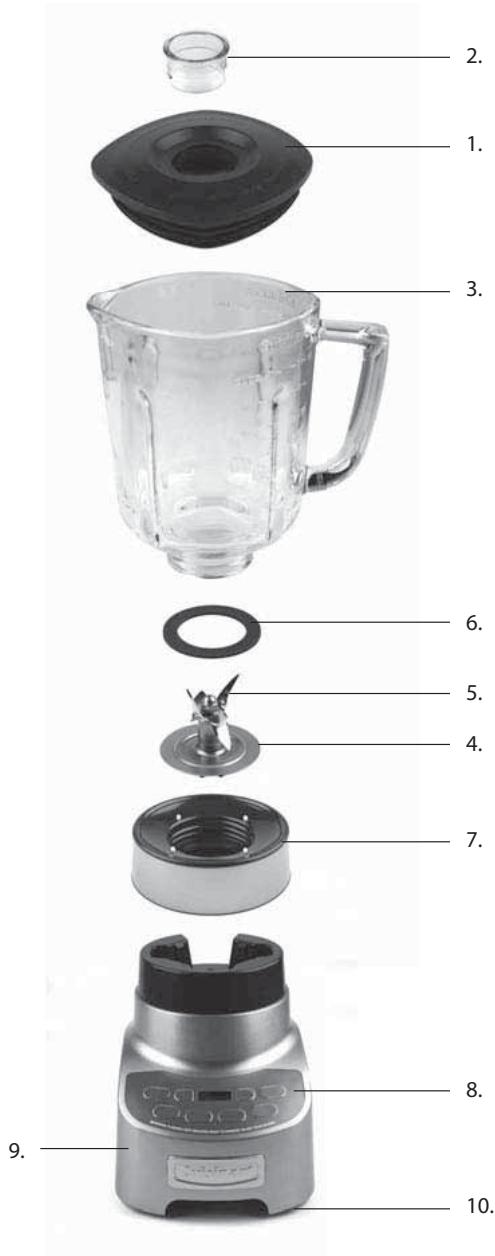
2.PRODUCT FEATURES
- Lid
- Graduated measuring cap (30ml)
- Graduated glass jar 1.75l
- Bushing holder
5.Star-shaped blade 6 edges
6.Rubber seal
7.Locking collar with safety interlock switches - Control panel
9.Motor base
10.Non-slip feet
3. USE
Please wash all the accessories and the jar carefully before using the appliance for the first time.
CAUTION: handle the blade accessories with extreme care.
A. Fitting the Jar
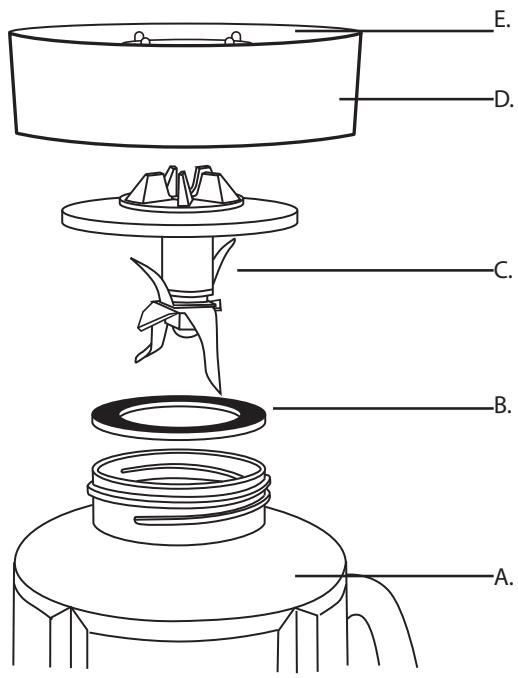
- Remove the lid, turn the glass jar (A) upside down and place it on a level surface.
- Place the rubber seal (B) over the opening on the bottom of the glass jar.
- Turn the blade assembly (C) upside down and place
the blade end in the glass jar opening. TAKE EXTRA CARE WHEN HANDLING THE BLADES AS THEY ARE VERY SHARP.
- Place the locking collar (D) over the blade assembly and tighten firmly by turning in a clockwise direction.
N.B. The locking collar is fitted with safety interlock switches (E) which prevent the appliance from operating if the jar is not fitted correctly. When all the parts are assembled, turn the glass jar right side up.
- Fit the lid and cap onto the jar.
N.B. The lid must always be in place when the appliance is switched on.
- Position the assembled jar on the motor base. The jar should be facing you.
- Take care when placing the jar on the base. Incorrect positions could damage the safety interlock switches.
- Plug in the appliance. Your blender is now ready to be used.
B. Removing the Jar
- Turn the appliance off and unplug from the mains outlet.
- Remove the jar by lifting from the housing base (careful: do not dismantle the jar and blade assembly while it is on the housing base)
- Remove the lid and slowly pour out the contents of the jar.
- To clean the jar, turn the jar upside down and place it on a level surface. Twist the locking collar by turning in an anticlockwise direction.
- Carefully remove the blade. BE VERY CAREFUL WHEN HANDLING THE BLADE BECAUSE IT IS VERY SHARP.
- Remove the rubber seal.
N.B. Take care not to lose this part as it seals the
appliance correctly for proper operation.
C. Control Panel
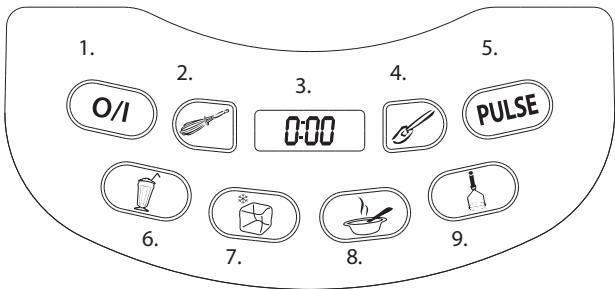
- On/Off
- HIGH: Beat
- Display of preparation time
- LOW: Mix
- Pulse
- Smoothie: Fruit juices & smoothies
- Crushed ice
- Soups & sauces: Liquid preparations
- Purée: Thick preparations
1 and speed settings
- Press ① / 1. A flashing light will come on indicating that the unit is in 'standby' mode.
- Depending on the speed desired, press or once to start the appliance. The corresponding light will come on while the blender is running. A timer will also start and the operation time will appear in the appliance's digital display.
N.B. The preparation time is programmed for 1 minute
-
It is possible to change the speed while the blender is running. Simply press on the desired button.
-
To stop the blender while it is running, press the button that corresponds to the speed being used. The timer will stop counting down and will start again when another speed is selected.
- To stop the blender press 0/1 . The timer will stop counting down and the display is reset to '0:00' When the blender is started again and a speed is selected, the timer starts counting down again from 0:00. Press 0/1 . Once. The flashing light located next to 0/1 goes out automatically which indicates the blender has been turned off.
N.B. When the jar is removed from the base, the appliance shuts off and the timer is reset to 0:00.
2. The PULSE button
This function lets you blend using short bursts for more precise results.
- To use this function, press 0/1 . A light around the button will begin to flash which indicates that the appliance is in 'standby' mode. Press , the light around the button will start to flash which indicates this function is activated.
- Press and hold the button corresponding to the speed desired, the unit will stop operation once the speed desired button is released. Repeat as often as desired.
N.B. The timer indicates the duration during which the PULSE is held down. The timer stops counting down when the PULSE is released. The PULSE can be used with, , ,
- The pulses should be very short bursts. Pause the blending long enough to allow the blade to stop turning.
- The PULSE can be used to chop larger pieces of food or to check the texture of a preparation. This function is particularly useful when you want to blend with precision.
3. Specific programmes
Smoothies
The function used to prepare delicious smoothies is already programmed.
- To use this function, press ( 0/1 ) . The light around the button will start to flash. The appliance is then in 'standby'.
- Press l . The programme begins to run in alternating on/off cycles for 30 seconds.
- If the smoothie is not mixed enough, start another cycle. To do so, go back to the 'standby' mode and press again. An audible chime will sound indicating the end of the programme.
- The programme can be stopped at any time by pressing again or by pressing 0/1.
Ice Crush
- To crush ice, press ① . The light around the button will begin to flash. The appliance is in 'standby' mode.
- Press ⑤ . The programme starts operating in alternating on/off cycles for 1 minute.
- An audible chime will sound indicating the end of the programme.
To start a new cycle, press - To stop the programme, press ⑤ . The appliance will stop and switch to 'standby'. To continue, press ③ again.
To stop the cycle or start another programme, press
Ice Crush (Turbo)
Press for 2 seconds. The programme (lasting one minute) will begin.
- An audible chime will sound indicating the end of the programme
To start a new cycle, press
- To stop the programme, press ② . The blender will stop and switch to 'standby' mode. To continue, press ③ .
To stop the cycle or start another programme, press
Soups & Sauces
- To use this function, press the on/off switch. The light around the button will start to flash. The appliance has returned to 'standby' mode.
- Press to start the programme (lasting one minute).
- An audible chime will sound at the end of the cycle.
Purée
- Press ① to use this function. The corresponding light will begin to flash indicating that appliance is in 'standby' mode.
- Press to start the programme (lasting one minute).
- An audible chime indicates the end of the programme.
N.B.: This function should be used to create semi-liquid purées (carrots, celery, etc.). It cannot be used with cooked potatoes.
D. Using the blender
- Place the motor base on a flat surface. Assemble the jar (see section 3A) and put it on the motor base.
- Place all the ingredients called for in your recipe in the glass jar and put the lid back on. Other ingredients can be added during mixing. To do so, lift the measuring cap located on the lid and pour the ingredients through the opening. Replace the measuring cap in the lid after adding the ingredients.
- Press o/1.
Make your programme selection. - When the programme is finished, press ( 0/1 0 ) and
unplug the appliance from mains.
- CAUTION: Never put your hands into the jar when the blender is plugged in.
- Never add boiling liquids or completely frozen ingredients (except ice cubes or frozen fruit cut in 1.5cm pieces)
- Never place ice, frozen food or very cold liquids in a jar that has come directly from a hot dishwasher.
- Never place very hot liquids or ingredients into a jar that has come directly from the freezer. Boiling liquids should be allowed to cool for 5 minutes before being added to the glass jar.
N.B. Remove the measuring cap when working with hot liquids to allow the steam to escape. Never fill the jar more than 2/3 of its capacity when preparing hot soups.
- Always add liquid ingredients first and then add the remaining ingredients. The ingredients will be more evenly mixed.
- Food may stick to the walls of the jar or become lodged around the blade. Use a spatula to dislodge the food and place the food in the middle of the jar.
- CAUTION: Only use a spatula when the blender is off.
- Replace the lid and the measuring cap and continue mixing if necessary. Never use metal utensils, as this may damage the jar or the blade.
- When the preparation is ready, press ① and unplug the blender from the mains outlet.
- Do not store food or liquids in the jar. Empty and clean the jar after use.
- The blender has an advanced thermal resettable fuse mechanism. If overloaded, the appliance will shut down to protect from overheating. If this happens, to reset the unit, unplug from the mains and let it cool for at least 15 minutes. Then remove some of the contents and restart appliance as usual.
The following table provides a guide to the speeds that are appropriate for blending different types of food and the results that you can obtain.
| SPEED SELECTION | ||
| Ingrédients/ Recipe | Speed | Result |
| Mayonnaise | Thick & creamy | |
| Salad dressing | or | Completely mixed and emulsified |
| Hazelnuts/Walnuts/Almonds | PULSE, | Chopped coarsely or finely |
| Whipped cream/Chantilly | Thick & creamy | |
| Dry bread or biscuits | PULSE | Chopped coarsely or finely, as desired |
| Smoothies/Milkshakes | Smooth, creamy & thick | |
| Baby food/Fruit pap and vegetable purée | Smooth and creamy | |
| Frozen cocktails | Thick & slushy | |
| Spices | PULSE then mix | Chopped coarsely or finely |
| Ice | Coarsely crushed or snowy | |
4. ADVICE FROM THE CHEFS
- Always add liquid ingredients to the jar first. Then add the other ingredients. This way the ingredients will be mixed more evenly.
- Cut most foods into cubes of about 1.5 to 2.5cm for a more even result.
- Use the measuring cap in the lid to measure liquid ingredients like alcohol. Replace the cap after ingredients have been added to the jar. Leave the cap partly open when processing hot ingredients to allow steam to escape.
- When chopping fresh herbs, garlic, onions, zest, breadcrumbs, hazelnuts, spices, etc. make sure the jar and the blade assembly are completely dry.
- If the food tends to stick to the sides of the jar, pulse in short bursts.
- The pulses should be short. Pause long enough between bursts to allow the blade to stop turning.
- Don't over process ingredients. This appliance will usually achieve the desired results in seconds, not minutes.
-
Allow hot foods to cool slightly before processing them, this will prevent too much steam from accumulating and lifting the lid. Leave the measuring cap partly open when processing hot food.
-
If the ingredients don't mix easily when processing cocktails, begin by adding a little liquid.
- This appliance is not appropriate for mashing potatoes (the potatoes will become rubbery), kneading heavy pastries (bread, sweet rolls) or beating egg whites.
How to?
Grind hazelnuts/almonds/walnuts:
Place 100g of the shelled nuts in the glass jar, replace the lid and process in short rapid bursts using until the nuts are ground as desired. For best results, grind small quantities at a time, e.g. 100g or less.
Grinding bread, cookies or crackers:
Break or cut the bread, cookies or crackers into 1.5cm pieces or smaller sizes. For best results with bread, use bread that is a few days old. The drier the bread, the better the results. Place the pieces of bread, cookie or cracker in the jar, replace the lid and process in short bursts by pressing to chop into pieces and then allow the blender to run until the desired texture has been achieved. For best results, process small quantities at once, e.g., 100g or less.
Crush ice:
Place 8 regular-sized ice cubes in the jar. Replace the lid and press the preprogrammed function
Baby food:
Mix 50 to 100g of cooked vegetables, fruits or meat with 3 to 4 tablespoons of liquid (water, milk, fruit juice, bouillon, cooking water) in the jar. Press and mix until the preparation is smooth. If necessary, add more liquid and process the food until the desired consistency has been obtained.
Grinding spices:
For best results, make sure the glass jar and the blade assembly are clean and dry. Place 25 to 50g of spices, seeds or peppercorns in the glass jar. Replace the lid and process in short bursts by pressing to break up and then grind the spices until the desired result has been obtained.
Whipping cream:
Chill the blender jar for 15 minutes. Add 30cl of fresh cream.
Replace the lid and press until the cream thickens. Take care
not to over blend the cream. The consistency will be very thick, but not fluffy cream. It will nonetheless be perfect for serving with with desserts or coffee!
5. QUESTIONS/ANSWERS
| WHAT DO I DO IF: | ANSWERS |
| My appliance does not go on? | Check that the appliance is plugged in correctly. |
| The food leaks from the bottom? | Check that the jar and blade assembly are correctly assembled and that the rubber seal is placed correctly. |
| The food leaks from the lid? | Check that the total quantity of liquid and solid ingredients does not exceed 1.5L. |
| The blade stays blocked? | Remove some of the ingredients. Cut large pieces of food into smaller pieces before chopping and use short bursts for better results. |
| The blade remains blocked despite reducing the quantities in the jar? | Turn off the appliance. The blade was probably not correctly positioned. Check the assembly of the blender. |
| The motor slows? | The amount of food exceeds the maximum recommended. Remove some and process in two batches. |
6. CLEANING AND MAINTENANCE
- The appliance may be left on the kitchen work surface. Unplug the appliance when it is not in use.
- Always unplug the appliance before cleaning it. Clean the jar before using for the first time and after each use to prevent food from drying on it. Do not store food or liquids in the jar. To clean it, remove the blender from the housing base by pulling up.
Turn the locking collar in a anticlockwise direction to unscrew it from the jar (see section 3.B).
- Wash the blade assembly carefully. Do not leave it in soapy water. Always handle very carefully. Wash the jar in warm soapy water, rinse and dry. All parts of this appliance except the motor base are dishwasher safe. To reassemble the jar, follow the instructions under section 3.A.
- To clean the housing base, use a damp sponge with a little mild detergent. Do not use abrasive cleaners. Never immerse the base in water or any other liquid, and never wash in the dishwasher.
7. SAFETY PRECAUTIONS

-
CAUTION: The polythene bags over the product or packaging may be dangerous. To avoid danger of suffocation, keep away from babies and children. These are not toys.
-
Never immerse the base of the appliance in water or any other liquid.
- Always place the housing base on a flat, sturdy, clean and dry surface.
- Unplug the appliance after use, before assembling or dismantling, before removing the food and before cleaning it.
Never leave the appliance unattended when it is plugged in.
To unplug, pull on the plug and never on the lead.
- Never place the appliance on or near a heat source.
- Do not allow the lead to hang over the kitchen table or worktop, and store it by rolling it into the base of the appliance. Keep it away from hot surfaces.
- Children should be supervised to ensure they do not play with the appliance.
- After each use, clean the jar and reassemble completely with the lid and the measuring cap.
- Never place the jar on or remove it from the the housing base while the motor is running.
- Solid and liquid foods placed in the jar should never exceed the capacity of 1.75L.
- Never put your fingers in the jar and never touch the blades when the appliance is plugged in.
- Use this appliance only according to the instructions in this booklet.
- Never over load the blender. If the motor stalls, turn off and unplug the appliance. Remove some of the food, then start again.
- Do not use this appliance if it has fallen or it appears to be damaged.
- If the lead is damaged, it must be replaced by the manufacturer, its after-sales service or a similarly qualified person to avoid any danger.
- No repair should be carried out by the user.
- This unit is not intended for use by people (including children) whose physical, sensory or mental capacities are reduced, or by persons who lack experience or knowledge, unless they have been given instructions beforehand on the use of the unit and are adequately supervised.
- This appliance complies with the basic requirements of Directives 04/108/EEC (Electromagnetic Compatibility) and 06/95/EEC (Safety of domestic electrical appliances).
- For indoor use only.
- This appliance is intended for strictly domestic use.
The symbol

displayed on the product or ones that the appliance may not bed waste. It should be taken to arecycling electrical and electronic
its packaging indicates that the appliance may not be treated as household waste. It should be taken to a collection point for recycling electrical and electronic equipment.
By ensuring that this appliance is disposed of correctly, you will help prevent consequences that are potentially harmful to the environment and to human health which could otherwise be caused by inappropriate waste handling of this appliance. For more detailed information on recycling this appliance, please contact your local council office or your household waste disposal service.
1. EINLEITUNG
- INHALTSVERZEICHNIS
- CARACTERISTIQUES PRODUIT
- 2.PRODUCT FEATURES
- USE
- Fitting the Jar
- N.B. The lid must always be in place when the appliance is switched on.
- Removing the Jar
- N.B. Take care not to lose this part as it seals the
- Control Panel
- and speed settings
- N.B. The preparation time is programmed for 1 minute
- N.B. When the jar is removed from the base, the appliance shuts off and the timer is reset to 0:00.
- The PULSE button
- N.B. The timer indicates the duration during which the PULSE is held down. The timer stops counting down when the PULSE is released. The PULSE can be used with, , ,
- Specific programmes
- Smoothies
- Ice Crush
- Ice Crush (Turbo)
- Soups & Sauces
- Purée
- N.B.: This function should be used to create semi-liquid purées (carrots, celery, etc.). It cannot be used with cooked potatoes.
- Using the blender
- N.B. Remove the measuring cap when working with hot liquids to allow the steam to escape. Never fill the jar more than 2/3 of its capacity when preparing hot soups.
- ADVICE FROM THE CHEFS
- How to?
- Grind hazelnuts/almonds/walnuts:
- Grinding bread, cookies or crackers:
- Crush ice:
- Baby food:
- Grinding spices:
- Whipping cream:
- QUESTIONS/ANSWERS
- CLEANING AND MAINTENANCE
- SAFETY PRECAUTIONS
- EINLEITUNG
Brand : CUISINART
Model : CBT700E
Category : Blender