Forcesilence 530 Power Connected M - Ceiling fan CECOTEC - Free user manual and instructions
Find the device manual for free Forcesilence 530 Power Connected M CECOTEC in PDF.


| Product type | Floor fan |
| Brand | Cecotec |
| Model | Forcesilence 530 Power Connected M |
| Product reference | 05904 / 05905 |
| Power | 50 W |
| Voltage / Frequency | 220-240 V, 50 Hz |
| Speeds | 3 speeds (high, medium, low) + off |
| Operating modes | Eco, Normal, Turbo |
| Timer | Yes, 0.5 h / 1 h / 2 h / 4 h (can be combined up to 7.5 h) |
| Oscillation | Yes, can be activated / deactivated |
| Remote control | Yes, requires 2 AAA batteries |
| Control panel | Yes, electronic |
| Height adjustment | Yes, telescopic rod with nut and thumb screw |
| Adjustable tilt | Yes, grille can be tilted upwards / downwards |
| Safety grilles | Front and rear |
| Usage | Indoor, household use only |
| Maintenance | Soft damp cloth, vacuum cleaner for the grilles |
| Safety | Unplug before cleaning, do not immerse |
| Warranty | 2 years |
| After-Sales Service | Official Cecotec technical support, phone +34 963 21 07 28 |
| Country of origin | Made in China, designed in Spain |
| Recycling | Compliant with WEEE directive 2012/19/EU |
Frequently Asked Questions - Forcesilence 530 Power Connected M CECOTEC
User questions about Forcesilence 530 Power Connected M CECOTEC
0 question about this device. Answer the ones you know or ask your own.
Ask a new question about this device
Download the instructions for your Ceiling fan in PDF format for free! Find your manual Forcesilence 530 Power Connected M - CECOTEC and take your electronic device back in hand. On this page are published all the documents necessary for the use of your device. Forcesilence 530 Power Connected M by CECOTEC.
USER MANUAL Forcesilence 530 Power Connected M CECOTEC
Manual de instrucciones Instruction manual
Safety instructions 6
- Parts and components 23
- Before use 24
- Product assembly 24
- Operation 24
- Cleaning and maintenance 25
- Technical specifications 25
- Disposal of old electrical appliances 25
- Technical support and warranty 26
SOMMAIRE
Read these instructions thoroughly before using the appliance. Keep this instruction manual for future reference or new users. Make sure that the mains voltage matches the voltage stated on the rating label of the appliance and that the wall outlet is grounded.
Check the power cord regularly for visible damage. If the cord is damaged, it must be replaced by the official Technical Support Service of Cecotec in order to avoid any type of danger.
Do not immerse the cord, plug, or any non-removable part of the appliance in water or any other liquid, nor expose the electrical connections to water. Make sure your hands are dry before handling the plug or switching on the appliance. If the device falls accidentally in water, unplug it immediately. Do not reach into the water!
Do not operate the device if any fault or unusual sign is detected. Keep hair, loose clothing, fingers, and other parts of the body away from the openings and moving parts of the appliance.
Make sure the appliance is placed on a flat and stable surface during operation.
Do not use the appliance near window or other places where it could get wet or next to heat sources.
Do not operate the product below or next to curtains.
Do not cover the grids and do not place the product's cord under carpets or other objects during operating. Keep a minimum safety distance from the appliance to any object or wall on each side, back and front.
Do not leave the appliance unattended while in use.
Do not use the appliance with accessories or spare parts that are not provided by Cecotec, this could case danger to people and damage to the product.
Always turn off and unplug the appliance when not in use and before assembling, disassembling or moving it. Pull from the plug, not the cord, to disconnect it from the outlet.
This product is designed only for household use. It is not suitable for commercial or industrial use. Do not use outdoors. Cleaning and maintenance tasks should be carried out according to this manual to ensure correct operation of the device.
This appliance is not intended to be used by children or persons with reduced physical, sensory or mental capabilities or lack of experience and knowledge, unless they have been given
supervision or instruction concerning the use of the appliance in a safe way and understand the hazards involved.
Children shall not play with the appliance. Close supervision is necessary when the appliance is being used by or near children.
INSTRUCTIONS DE SÉCURITÉ
- Control panel
- Height-adjustment bar
- Support
- Base
- Base fixing screw
- Back grid
- Back grid fixing nut
- Blades
- Blade-fixing nut
- Front grid
- Grid ring fastener
- Adjusting wing screw
- Height-adjustment nut
Fig. 2
- Power light indicator
- Oscillation light indicator
- Speed light indicator (high-medium-low)
- On/off
- Timer function
- Speed
- Oscillation function
- Time light indicators (0.5 h-1 h-2 hrs.-4 hrs.)
- Mode light indicator
- Mode
- Timer
- Oscillation
- Mode
- On/off
- Speed
Note: The remote control operates with 2 x AAA batteries.
ENGLISH
2. BEFORE USE
Take the product out of the box.
Remove all packaging material Save the original box.
Make sure all parts and components are included and in good conditions. If any visible signs of damage are observed, contact the Technical Support Service immediately.
3. PRODUCT ASSEMBLY
Step 1: Fan base and support assembly. Use the base-fixing nut to assemble the base to the fan support.
Fig. 3
Step 2: Loosen the height-adjustment nut and lift the height-adjustment bar to the desired level. Use the adjustment wing screw to fix the bar's height.
Fig. 4
Step 3: Place the fan's head on the height-adjustment bar and fix it with the adjusting wing screw provided.
Fig. 5
Step 4: Remove the blade-fixing nut from the motor shaft by turning it clockwise and unscrew the back grid fixing nut anticlockwise from the fan's head. Aligning the position holes, place the back grid in the fan's head and tighten it with the back-grid fixing nut. Do not over screw the nut.
Fig. 6
Step 5: Align the grooves on the blades centre with the fan shaft and introduce them. Make sure that they match correctly and screw the blade fixing nut anticlockwise to fix them tightly to the motor shaft's end.
Fig. 7
Step 6: Install the front grid in its position with the ring making sure the last groove is facing upwards and that the grid ring fastener is facing downwards. Once both grids are fixed and kept together, lock them with the screw.
Fig. 8
4. OPERATION
All operations can be carried out through the fan's control panel and from the remote control.
Place the fan on a flat and dry surface and plug its cord in a power outlet.
Press the On/off button on the control panel or on the remote control to turn the device on or off. The fan will automatically operate at low speed.
Press the speed button repeatedly on the fan's control panel or on the remote control to switch
between the different speed options. The corresponding light indicator will light up.
Press the oscillation button on the fan's control panel or remote control to activate the oscillation function and press again to deactivate it. The oscillation indicator will light up while it is operating.
Press the timer button on the fan's control panel or on the remote control to activate this function. This function has 4 time options: 0.5, 1, 2 and 4 hrs., which can be added up, therefore the timer can be set for up to 7.5 hrs. The corresponding indicator will light up when activated. To adjust the fan's tilt angle, press the grid upwards or downwards.
Press the mode button on the control panel or on the remote control to select the desired operating mode: Eco, Normal and Turbo.
Select the desired speed: 0-Off, 1-Eco, 2-Medium, 3-High.
Make sure that the fan is turned off before assembling, disassembling or adjusting it.
5. CLEANING AND MAINTENANCE
Always turn the device off and unplug it from the power supply before carrying out cleaning and maintenance tasks.
Use a soft, damp cloth to clean the device's surface.
Keep the air vents at the rear of the main body free from dust or fluff. Uuse a vacuum cleaner to remove these when necessary.
6. TECHNICAL SPECIFICATIONS
Product reference: EnergySilence 530 Power Connected White/Black standing fans
Product: 05904/05905
Power: 50 W
Voltage and frequency: 220-240 V, 50 Hz
Made in China | Designed in Spain
7. DISPOSAL OF OLD ELECTRICAL APPLIANCES
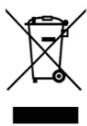
The European directive 2012/19/EU on Waste Electrical and Electronic Equipment (WEEE), specifies that old household electrical appliances must not be disposed of with the normal unsorted municipal waste. Old appliances must be collected separately, in order to optimize the recovery and recycling of the materials they contain, and reduce the impact on human health and the environment.
The crossed out “wheeled bin” symbol on the product reminds you of your obligation to dispose
ENGLISH
of the appliance correctly.
Consumers must contact their local authorities or retailer for information concerning the correct disposal of old appliances and/or their batteries.
8. TECHNICAL SUPPORT AND WARRANTY
This product is under warranty for 2 years from the date of purchase, as long as the proof of purchase is submitted, the product is in perfect physical condition, and it has been given proper use, as explained in this instruction manual.
The warranty will not cover the following situations:
The product has been used for purposes other than those intended for it, misused, beaten, exposed to moisture, immersed in liquid or corrosive substances, as well as any other fault attributable to the customer.
The product has been disassembled, modified, or repaired by persons, not authorised by the official Technical Support Service of Cecotec.
Faults deriving from the normal wear and tear of its parts, due to use.
The warranty service covers every manufacturing defects of your appliance for 2 years, based on current legislation, except consumable parts. In the event of misuse, the warranty will not apply.
If at any moment you detect any problem with your product or have any doubt, do not hesitate to contact Cecotec Technical Support Service at +34 963 210 728.
1. PIÈCES ET COMPOSANTS
Img. 1
Fig./Img./Abb./Afb./Rys./Obr.1
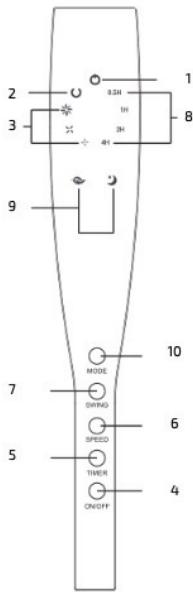
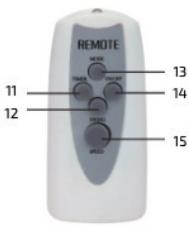
Fig./Img./Abb./Afb./Rys./Obr. 2

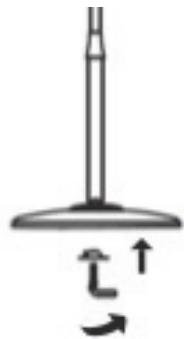
Fig./Img./Abb./Afb./Rys./Obr. 3

Fig./Img./Abb./Afb./
Rys./Obr.4

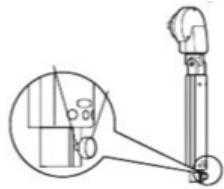
Fig./Img./Abb./Afb./Rys./Obr. 5
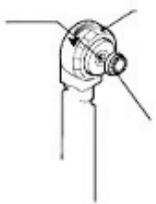

Fig./Img./Abb./Afb./Rys./Obr. 6
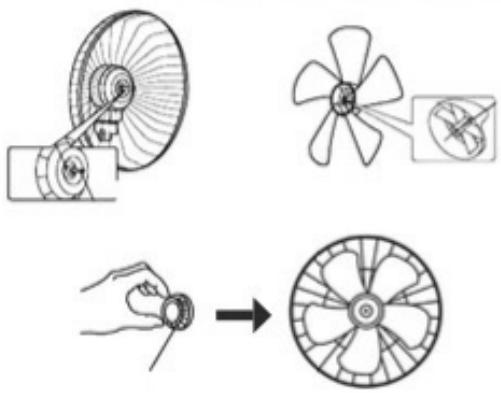
Fig./Img./Abb./Afb./Rys./Obr. 7

Fig./Img./Abb./Afb./Rys./Obr. 8
www.cecotec.es
Quart de Poblet, Valencia (Spain)
EA02200911
Brand : CECOTEC
Model : Forcesilence 530 Power Connected M
Category : Ceiling fan