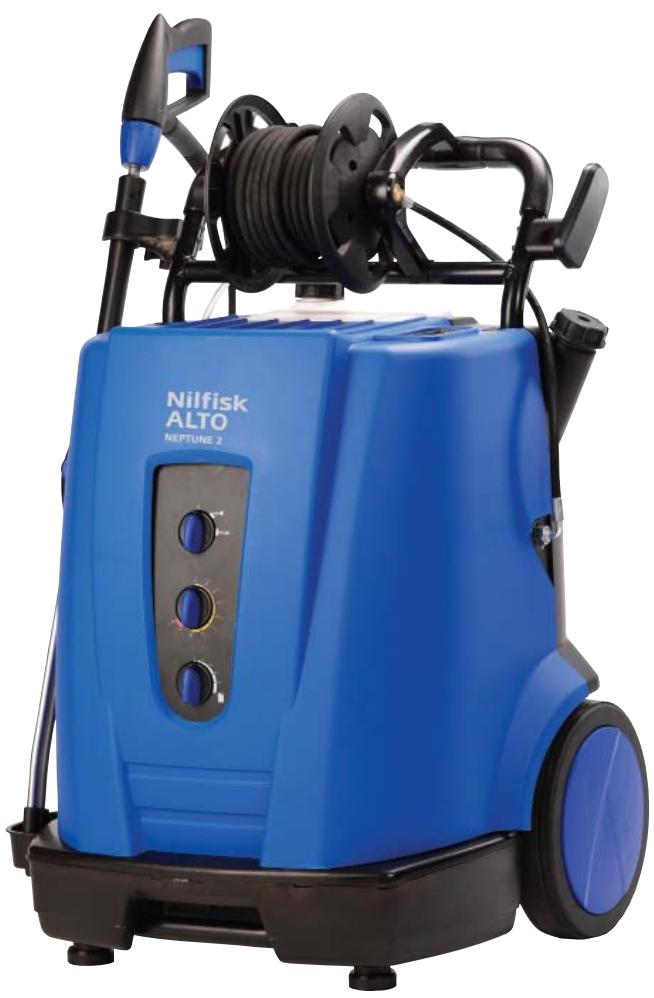
NEPTUNE 2 - Pressure washer NILFISK - Free user manual and instructions
Find the device manual for free NEPTUNE 2 NILFISK in PDF.

User questions about NEPTUNE 2 NILFISK
0 question about this device. Answer the ones you know or ask your own.
Ask a new question about this device
Download the instructions for your Pressure washer in PDF format for free! Find your manual NEPTUNE 2 - NILFISK and take your electronic device back in hand. On this page are published all the documents necessary for the use of your device. NEPTUNE 2 by NILFISK.
USER MANUAL NEPTUNE 2 NILFISK
NEPTUNE 1, NEPTUNE 2 NEPTUNE 2 Special Operating Instructions
NilfiskALTO
Why Compromise
Contents
Symbols used to mark instructions
1 Important safety instructions
2 Description
3 Before starting the cleaner
4 Control / Operation
5 Applications and methods
6 After using the cleaner
7 Maintenance
8 Troubleshooting
9 Further information
2.1 Purpose 4
2.2 Operating elements 5
3.1 Setting up the cleaner 5
3.2 Before use 5
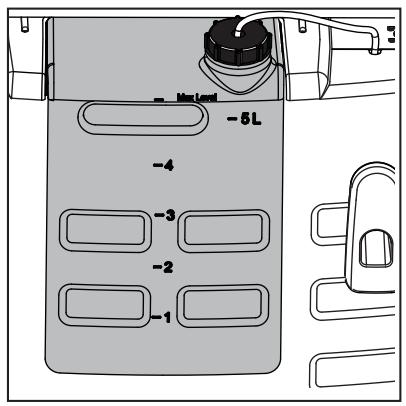
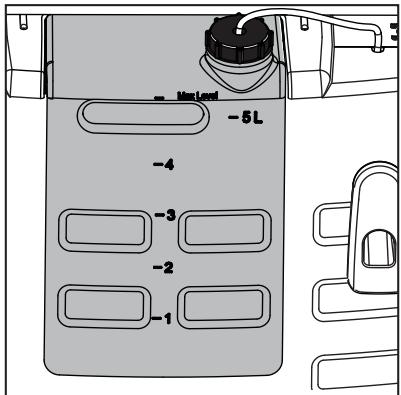
3.3 Fill up detergent tank 5
3.4 Antiscale. 6
3.5 Fill up fuel tank 6
3.6 Connecting the high pressure hose.. 6
3.7 Connecting the water supply 6
3.8 Electrical connection 7
3.9 Antifreeze - before first use 7
4.1 Switching on the cleaner 7
4.2 Connections 7
4.3 Pressure regulation (Ergo Vario Press Gun) ^1) 8
4.4 Using cleaning agents 8
5.1 Techniques 9
5.2 Some typical cleaning tasks 9
6.1 Switching off the cleaner and disconnecting the supply lines 11
6.2 Rolling up the electrical lead and storing accessories..... 11
6.3 NEPTUNE 1 Storing the cleaner (below 0^ ) 11
6.4 NEPTUNE 2 Storing the cleaner (below 0^ ) 12
6.5 Transporting the cleaner 12
7.1 Maintenance plan 13
7.2 Maintenance work 13
8.1 Indications on Display 14
8.2 Other Faults 15
9.1 Recycling the cleaner 16
9.2 Guarantee 16
9.3 EU Declaration of Conformity 16
9.4 Technical data 385

Safety instructions in these operating instructions which must be observed to prevent risks
to persons are marked with this danger symbol.

This indicates tips and instructions to simplify work and to en
sure safe operation.

Before using the high-pressurecleaner, be sure to also read the enclosed operating instruc
tions and keep them within reach at all times.

This symbol is used to mark safety instructions that must be observed to prevent damage to the
machine and its performance.
1 Important safety instructions

For your own safety
The appliance must
only be used by persons, who have been instructed in its correct usage and explicitly commissioned with the task of operating it
only be operated under supervision
not be used by children
not be used by mentally or physically disabled persons
CAUTION!
High-pressure water jets can be dangerous if misused. The jet must not be directed at persons, animals, live electrical equipment or the cleaner itself.
Wear protective clothing, ear protection and safety goggles.
Do not use the cleaner when other people without protective clothing are in the working area. Do not direct the jet towards yourself or towards other persons in order to clean clothes
or footwear. Do not direct the jet towards live animals.
During operation of the cleaner, recoil forces are produced at the spraying device and, when the spray lance is held at an angle, a torque is also created. The spraying device must therefore be held firmly in both hands.
General
Use of the high-pressure cleaner is subject to the applicable local regulations.
Besides the operating instructions and the binding accident prevention regulations valid in the country of use, observe recognised regulations for safety and proper use.
Do not use any unsafe work techniques.
Do not tie the trigger handle open.
Transport
For safe transport in and on vehicles we recommend preventing the equipment from sliding and tilting. Secure it with belts.
For transport at temperatures around or below 0^ , anti-freeze liquid should be drawn into the pump and boiler beforehand (see chapter 6).
Before starting the cleaner
If your machine is a 3 phase version and has been supplied without a plug have it fitted with a suitable 3 phase plugwith an earth conductor by an electrician.
Each time prior to putting the appliance into service, always check the power supply cord and the other important parts of the appliance, such as the high-pressure hose and the spray gun. Do not operate the appliance if any of these parts are damaged.
Set up the appliance such that the mains connector is readily accessible.
Regularly check whether the mains lead is damaged or shows signs of ageing. Use the high-pressure cleaner only when the mains power lead is in a safe condition.
If the mains power lead is damaged, to avoid hazards, this must be replaced either by the manufacturer or through his customer service or a similarly qualified person.
CAUTION!
Unsuitable extension leads can represent a source of danger. Always unwind lead from the reels completely to prevent the mains power lead overheating.
Connectors and couplings of power supply cords and extension leads must be watertight.
When using an extension lead, check the minimum cross-sections of the cable:
| Cable length m | Cross section | |
| <16 A | <25 A | |
| up to 20 m | ø1.5mm² | ø2.5mm² |
| 20 to 50 m | ø2.5mm² | ø4.0mm² |
Check the rated voltage of the high-pressure cleaner before connecting it to the mains power supply. Ensure that the voltage shown on the rating plate corresponds to the voltage of the local mains power supply.
It is important that the electrical connection for this appliance has been installed by an electrician and in compliance with IEC 60364 and the country-specific regulations.
We recommend that the electrical connection to this appliance should incorporate
- either a fault current circuit breaker, which cuts off the mains voltage if the fault current exceeds 30mA for 30 ms,
- or an earth resistance meter.
Check that cleaning will not result in dangerous substances (e.g. asbestos, oil) being washed off the object to be cleaned and harming the environment.
Do not clean delicate parts made of rubber, fabric, etc. with the 0^ jet. Keep some distance between high pressure nozzle and surface in order to prevent the surface from damage.
Do not use the high-pressure hose for lifting loads.
The maximum permissible working pressure and temperature are printed on the high-pressure hose.

Store the cleaner where it will not be exposed to frost or use anti-freeze
Never operate the cleaner without water. Even brief shortages of water result in severe damage to the pump seals.
Water connection

This high pressure washer/cleaner is only allowed to be connected with the drinking water
mains, when an appropriate backflow preventer has been installed, Type BA according to EN 1717. If the back flow preventer hasn't been supplied, one can be ordered from your dealer. The length of the hose between the backflow preventer and the high pressure washer must be at least 6 metres (min diameter 3/4 inch) to absorb possible pressure peaks. Operation by suction (for example from a rainwater vessel) is carried out without backflow preventer. Contact your dealer for suction set recommendations. As soon as water has flown through the BA valve, this water is not considered to be drinking water any more.
Operation
Keep cabinet closed during operation.
Do not damage the mains power lead (e.g. by driving over it, pulling or crushing it).
Disconnect the power cord by pulling the plug only (do not pull or tug the power cord).

IMPORTANT!
This appliance has been devised for use with cleansing agents that are supplied and recommended by the manufacturer. The use of other cleansing agents or chemicals can impair the safety of the appliance.
CAUTION!
The appliance is intended to be used with heating oil EL or diesel oil. Unsuitable fuels (e.g. petrol) must not be used as they can represent a source of danger.
If the machine is to be operated at fuel stations or in other potentially hazardous areas, the machine may only be employed outside the hazard areas defined in the German "Technical Guidelines for Inflammable Fluids" applicable at the point of use due to the potential explosion hazard posed by the burner.
When setting up the appliance indoors, always ensure suitable ventilation and that the exhaust gases are expelled in a suitable way. We will be glad to provide tips for connection systems, on request.
If the machine is to be connected to a flue gas stack, then local building regulations must be observed. We will be glad to provide tips for connection systems, on request.
CAUTION!

Beware of hot water and steam discharge up to 150^ when operating in steam stage.
CAUTION!

Do not touch or cover the exhaust. Risk of burns, sand fire.
Do not touch, cover or place hose or cord over the chimney. Danger for persons, risk of overheating and fire.

Electrical equipment

CAUTION!
Never spray electrical equipment with water: danger for persons, risk of short-circuiting.
Switching on the cleaner may cause voltage fluctuations.
Voltage fluctuations should not occur if the impedance at the transfer point is less than 0.15 . If in doubt ask your local electricity supplier.
Maintenance and repair
CAUTION!
Always remove the plug from the mains plug socket before cleaning or carrying out maintenance work on the cleaner.
Carry out only the maintenance operations described in the operating instructions. Use only original Nilfisk-ALTO spare parts.
Do not make any technical modifications to the high-pressure cleaner.
Ensure that the machine is regularly serviced by Authorised Nilfisk-ALTO dealers in accordance with the maintenance plan. Failure to do so will invalidate the warranty.
CAUTION!
High-pressure hoses, fittings and couplings are important for
the safety of the cleaner. Use only high-pressure parts approved by the manufacturer!
The mains power lead must not differ from the version specified by the manufacturer and may only be changed by an electrician.
Please contact the Nilfisk-ALTO service department or an authorised specialist work-shop for all other maintenance or repair work!
Testing
The cleaner conforms to the German "Guidelines for Liquid Spray Jet Devices". The high-pressure cleaner must be subjected to a safety examination in accordance with the "Accident Prevention Regulations for Working with Liquid Spray Jet Devices (BGVD15)" as required, but at least every 12 months, by an authorised inspector.
After all repairs or modifications to electrical equipment, the protective conductor resistance, the insulation resistance and the leakage current must be measured. Furthermore, a visual inspection of the mains power lead, a voltage and current measurement and a function test must be carried out. Our after-sales service technicians are at your disposal as authorised inspectors.
The complete „Accident Prevention Regulations for Working with Liquid Spray Jet Devices“
are available from the Carl Heymanns Verlag KG, Luxemburger Strasse 449, 50939 Cologne or from the appropriate association of employers' liability insurances.
The pressure-bearing parts of this high-pressure cleaner have been manufactured in accordance with § 9 of the German Pressure Vessels Ordinance and successfully subjected to a pressure test.
Safety devices
Unacceptably high pressure is fed back without residual pressure via a bypass line into the intake line of the pump when the safety device is tripped.
If the conveying capacity falls below a fixed value, the built-in flow monitor automatically switches off the oil burner. The oil burner is set to continuous ignition. As an additional protection mechanism, a thermo-sensor is integrated in the chimney of the heat exchanger. As such, the appliance cannot overheat.
The safety devices are factory set and leaded, and must not be adjusted.
2 Description
2.1 Purpose
This high-pressure cleaner has been designed for professional use. It can be used for cleaning agricultural and construction equipment, stables, vehicles, rusty surfaces, etc.
The cleaner has not been approved for cleaning surfaces which comes into contact with food.
Chapter 5 describes the use of the high-pressure cleaner for various cleaning jobs.
Always use the cleaner as described in these operating instructions. Any other use may damage the cleaner or the surface to be cleaned or may result in severe injury to persons.
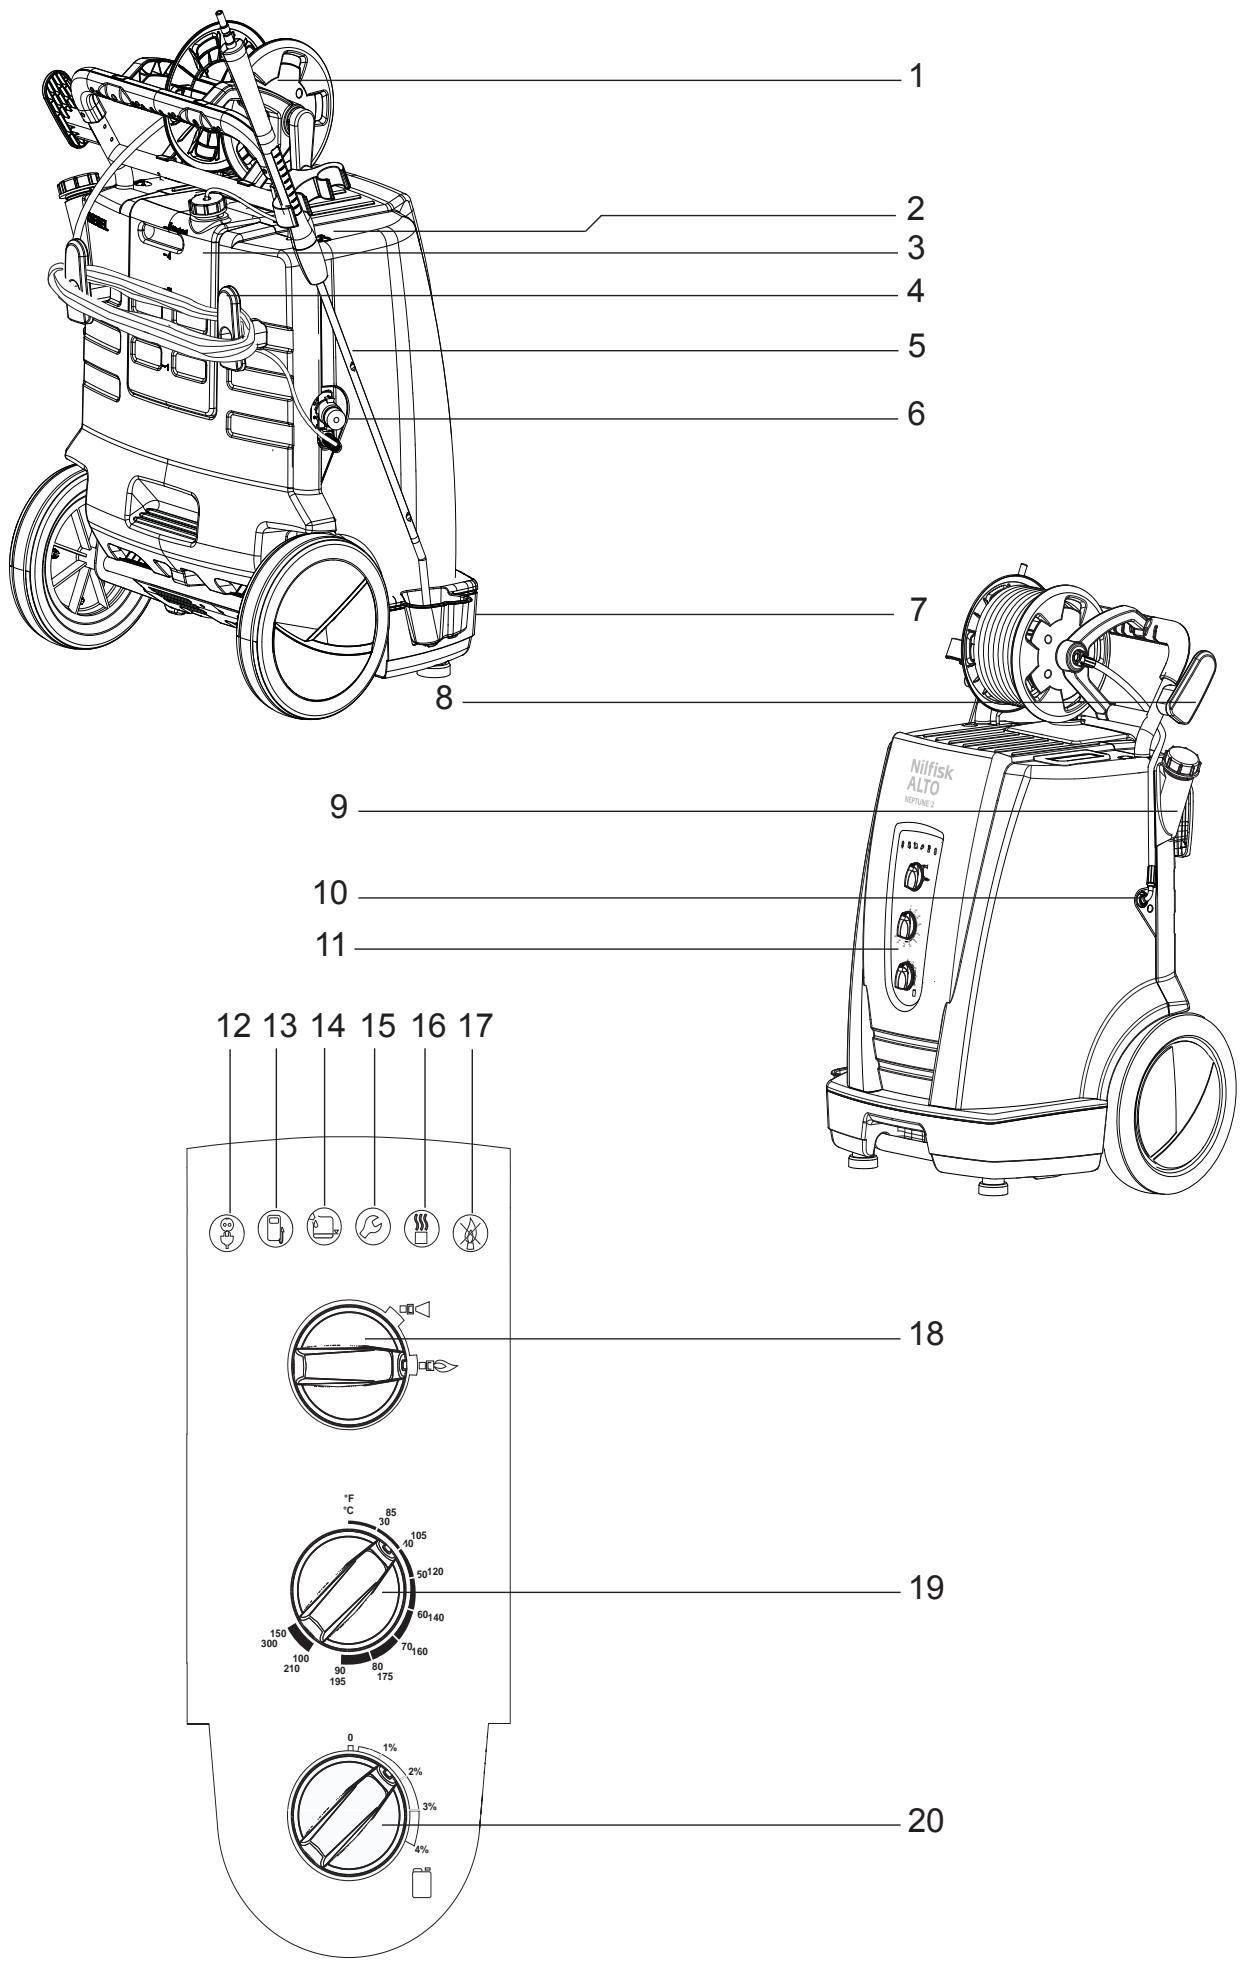
2.2 Operating elements

See fold-out page at front of these operating instructions.
- High pressure hose reel1)
- Top cover release
- Cannister for detergent
- Cable hook
- Spray lance
- Supply water connection
- Spray lance storage
- Hose hook
- Tank filler for fuel
-
High pressure hose connection for machines without hose reel
-
Control panel
- Power ON
- Fuel low
- Nilfisk-ALTO AntiStone low
- Service interval due/expired
- Boiler overheated
- Flame sensor is sooted
- Main switch
- Temperature controller
- Detergent metering knob1)

3 Before starting the cleaner
3.1 Setting up the cleaner
Every fuel-burning appliance, such as pressure washers, depends upon a proper mix of fuel and air (by weight) for proper combustion. Therefore some adjustment of the air regulation to the burner may be necessary to take account of altitude and the resulting air pressure. This is true whether your fuel is Kerosene or Diesel.
Your Nilfisk-ALTO hot water pressure washer was thoroughly tested and adjusted for
optimum performance before it left our factory. The factory is located at approximately 140m (450 ft) above sea level, and the combustion settings are optimal for that elevation.
If your location is higher than 1200m (3900 ft) above sea level, your burner may require re-adjustment for proper performance and best fuel economy. Contact your Dealer or Nilfisk-ALTO for assistance.
3.2 Before use
- Before using the cleaner for the first time, check it carefully to detect any faults or damage.
- Run the machine only when it is in perfect condition.
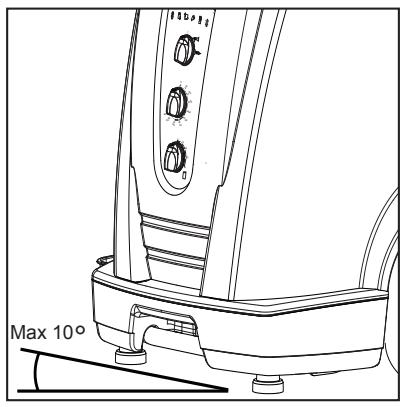
- The slope on which the high pressure cleaner is placed must not exceed more than 10^ in any direction.
- Fill up detergent tank with prediluted detergent.
Capacity see chapter 9.4 Technical Data
3.3 Fill up detergent tank
3.4 Antiscale
The Nilfisk Alto Antiscale dosing system is set by the factory. To adjust the water hardness we recommend that the inlet water is tested accordingly.
Use the schematic to find the right dosage of No Scale/anti stone and water, and add the mixture to the antiscale tank.
| Machine flow L/h | Pump size ml/h | °dH | °f | °e | Dosage |
| 600 | 35 | 0-12 | 0-21,5 | 0 - 15 | 1:2 = 12ml/h |
| 600 | 35 | 12-30 | 21,5 - 53,7 | 15 - 37,5 | Pure = 35ml/h |
| 700 | 35 | 0-12 | 0-21,5 | 0 - 15 | 1:1 = 17ml/h |
| 700 | 35 | 12-30 | 21,5 - 53,7 | 15 - 37,5 | Pure = 35ml/h |
| 800 | 35 | 0-12 | 0-21,5 | 0 - 15 | 1:1 = 17ml/h |
| 800 | 35 | 12-30 | 21,5 - 53,7 | 15 - 37,5 | Pure = 35ml/h |
3.5 Fill up fuel tank
NOTE!
At temperatures below 8^ , the fuel oil begins to solidify (paraffin precipitation). This can lead to difficulties in starting the burner. Before the winter period either add a solidification point / flow improver (available from the fuel oil trade) to the fuel or use winter diesel fuel.
With the machine cold:
- Pour fuel (fuel oil EL, or Diesel oil DIN 51 603) into the fuel tank.
The fuel must be free from contamination.
Tank capacity see chapter 9.4
Technical data.
Be careful not to damage the fuel tank filter to avoid dirt entering in the tank
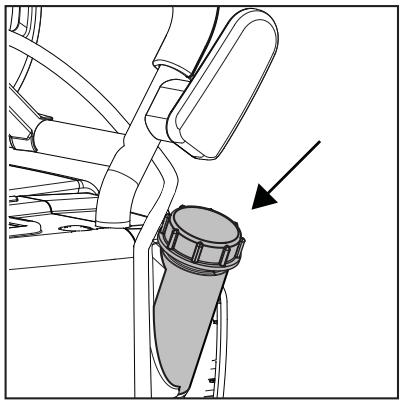
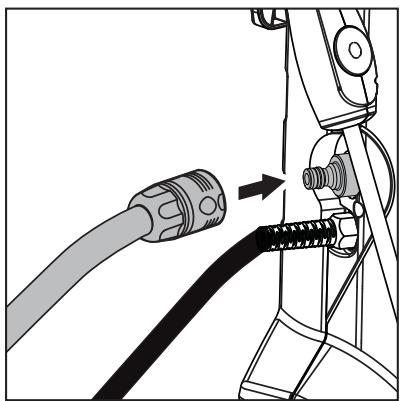
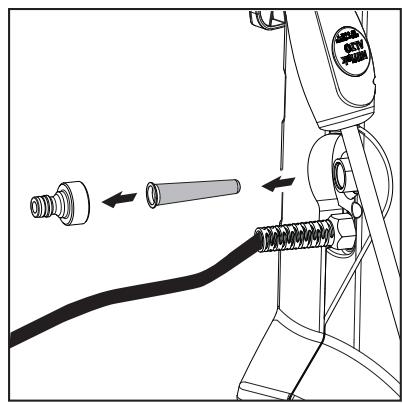
- Put the quick connector of the high pressure hose onto the nipple on the cleaner. ^1)
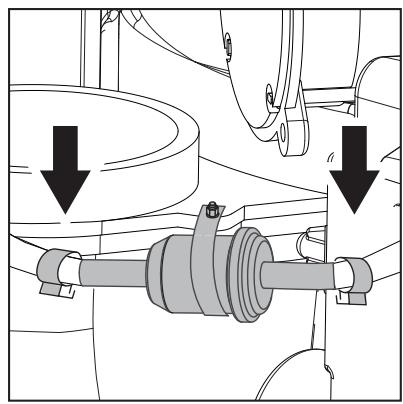
3.6 Connecting the high pressure hose
3.7 Connecting the water supply

In the case of poor water quality (sand, etc.), we recommend that a fine water filter is fitted in the water inlet.
We recommend the use of a textile-reinforced water hose with a nominal diameter of min. 3/4'' (19 mm).
- Rinse the water supply hose briefly in order to prevent sand an other dirt particles entering into the machine.
- Connect water supply hose to the machine.
- Open water tap.
NOTE!
See chapter 9.4 Technical Data for required quantity of water and water pressure.
3.8 Electrical connection

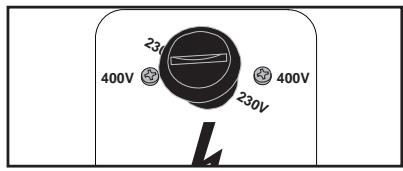
Before connecting devices with voltage changeover1): Check that the pre-selected voltage on the machine corresponds with the voltage of the electrical installation. Otherwise the electrical
devices of the machine can be destroyed.
CAUTION!
When using cable reels:
- Due to the risk of overheating and fire, always unwind the power supply cord fully.
The cleaner may only be connected to a correctly installed electrical installation.
- Observe safety instructions in chapter 1.
- Put the plug into the electrical socket.
3.9 Antifreeze - before first use
The machine is protected with anti-freeze from the factory.
Catch the liquid discharging at first (approx. 5 l) for re-use in a container.
4 Control / Operation
4.1 Switching on the cleaner

NOTE!
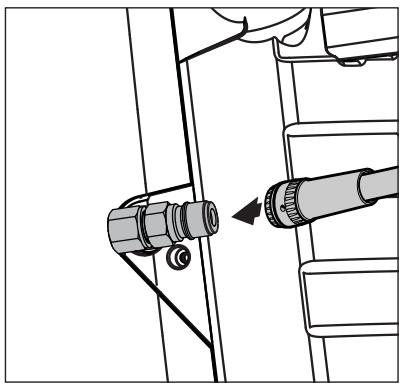
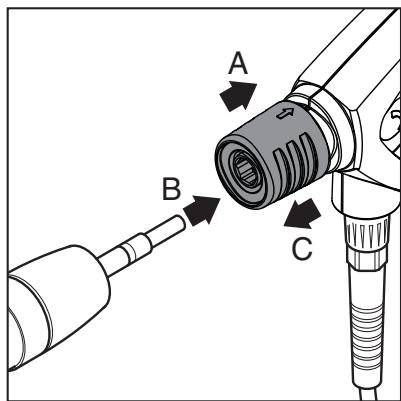
Always remove any dirt from the nipple before connecting the spray lance to the spray gun.
4.2 Connections
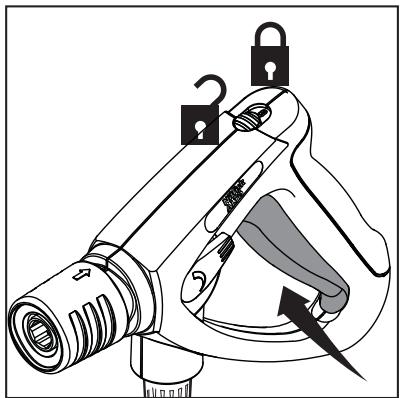
4.2.1 Connecting the spray lance to the spray gun
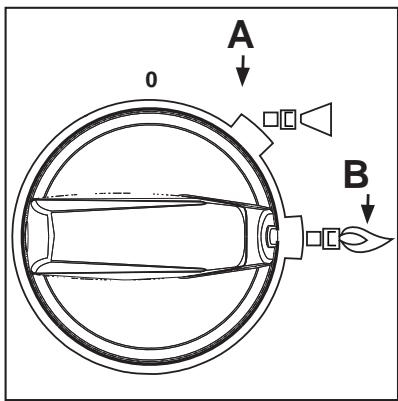
- Move the main switch into position 'Cold Water' (A)
The control electronics system performs a self-test, all the LEDs light up once. The motor starts
lights up.
- Ventilate the machine for air by activating the spray gun
-
When the water flow is even, continue with the following steps
-
Pull the blue quick-release grip (A) of the spray gun backwards.
- Insert the nipple of the spray lance (B) into the quick-release connection and release it.
- Pull the spray lance (or other accessory) forwards to check that it is securely attached to the spray gun.

4.2.2 Hot water operation (up to 100^ )
IMPORTANT!
In the case of appliances with a hose reel:
In hot water mode, unwind the high-pressure hose fully from the hose reel, as otherwise the hose reel may become warped due to the effects of the heat.
4.2.3 Steam operation (over 100^)^1 )

Beware of hot water and steam discharge up to 150^ when operating in steam stage.
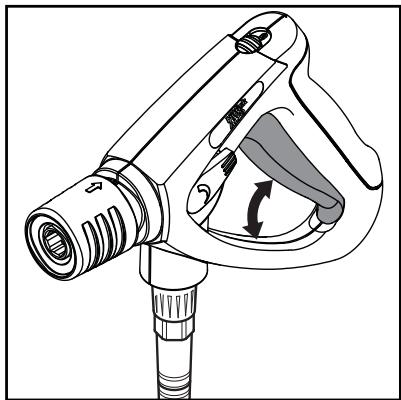
4.3 Pressure regulation (Ergo Vario Press Gun)1
For safety reasons, never tie back or wedge open the trigger of the spray gun in open position during operation. The trigger must be free to close when released, thus interrupting the flow of the water.

4.4 Using cleaning agents


For special applications (e.g. disinfection) the exact detergent concentration has to be determined by measuring cup. For water throughput of the machine see chapter 9.4 technical data.
- Move main switch into the position 'Hot Water' (B) and select the required temperature on the temperature control
- Unlock the spray gun and actuate it
The burner switches on.
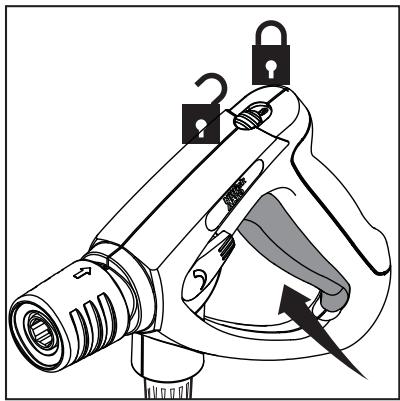
In case of interruptions in work: Also be sure to insert the safety catch even during short interruptions in work (see Fig. in section 6.1)
- Replace the standard nozzle with the steam spray nozzle (See catalogue for accessories).
- Open cover.
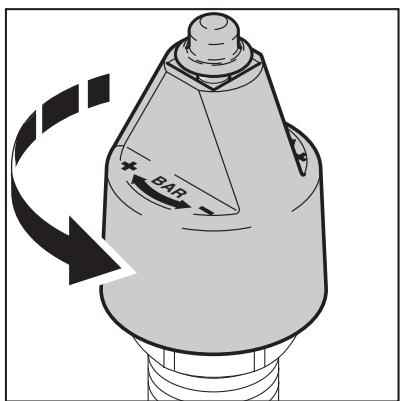
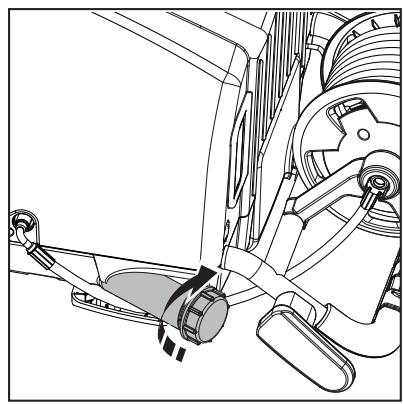
- Turn the twist grip on the safety control block completely to the left (anticlockwise direction).
- Turn the main switch into position 'Hot Water'.
- Select temperature (over 100^ ).
- Operate the Vario trigger in order to vary the water flow and thereby the pressure.
-
Push the trigger forwards to obtain full pressure and flow.
-
Set the desired concentration of cleansing agent at the cleansing agent dosing facility.
- Spray the object to be cleaned.
- Allow the cleaning agent to work, depending on the degree of soiling. Then rinse off with the high pressure spray jet.
CAUTION!
Never allow cleaning agent to dry on the surface to be cleaned. The surface may be damaged.
5 Applications and methods

5.1 Techniques
Efficient high pressure cleaning is achieved by following a few guidelines, combined with your own personal experience of specific cleaning tasks. Accessories and detergents, when correctly chosen, can increase the efficiency of your pressure washer. Here is some basic information about cleaning.
5.1.1 Soaking
Encrusted or thick layers of dirt can be loosened or softened by a period of soaking. An ideal method within agriculture – for example, within pig sties. The soaking method can be achieved by use of foam or simple alkaline detergent. Let the product lie on the dirty surfaces for around 15 minutes before pressure washing. The result will be a much quicker high pressure cleaning process.
5.1.2 Detergent and Foam
Foam or detergent should be applied onto dry surfaces (not in direct sun light) so that the chemical product is in direct contact with the dirt. Detergents are applied from bottom to top, for example on a car bodywork, in order to avoid "super clean" areas, where the detergent collects in higher concentration and streams downwards. Let the detergent work for several minutes before rinsing but never let it dry on the surface being cleaned.
5.1.3 Temperature
Detergents are more effective at higher temperatures. Greases, oils and fats can be broken down more easily at higher temperatures also. Proteins can be cleaned at temperatures of around 60^ . Oils, traffic film around 70^ , and grease can be cleaned at 80^ - 90^ .
5.1.4 Mechanical Effect
In order to break down tough layers of dirt, additional mechanical effect may be required. Special lances and rotary or wash brushes offer this supplementary effect that cuts through dirt.
5.1.5 High Water Flow or High Pressure
High pressure is not always the best solution and high pressure may damage surfaces. The cleaning effect also depends upon water flow. Pressure levels of around 100 bar may be sufficient for vehicle cleaning (in association with hot water). Higher flow levels give the possibility to rinse and flush away large amounts of dirt easily.
5.2 Some typical cleaning tasks
5.2.1 Agriculture
| Task | Accessories | Method |
| Stables Pig Pens, Sties Cleaning of walls, floors and equipment Disinfectant | Chemical Foam Injectors Foam lance Powerspeed lance Floor Cleaner Detergents Universal Alkafoam Disinfectant DES 3000 | 1. Soaking – apply foam to all surfaces (bottom to top) and wait for approx. 15 minutes. 2. Remove the dirt from surfaces with the high pressure lance or chosen accessory. Again, clean from bottom to top on vertical surfaces. 3. To flush away large quantities of dirt, change to low pressure mode and use the higher flow to push away the dirt. 4. Use recommended disinfectant products and methods to ensure hygiene. Apply DES 3000 disinfectant once the surfaces are perfectly clean. |
| Machinery Tractors ploughs etc. | Detergent injection Powerspeed lances Curved lances and under chassis washers Brushes | 1. Apply detergent to vehicle or equipment surfaces in order to soften up dirt and grime. Apply from bottom to top. 2. Proceed with cleaning using the high pressure lance. Clean again from bottom to top. Use accessories to clean in difficult to reach places. 3. Clean fragile areas such as motors, rubber at lower pressure levels to avoid damage. |
5.2.2 Vehicle
| Task | Accessories | Method |
| Vehicle bodywork | Standard lance Detergent injection Curved lances and underchassis washers brushes Detergents Aktive Shampoo Aktive Foam Sapphire Super Plus Aktive Wax Allosil RimTop | 1. Apply detergent to vehicle or equipment surfaces in order to soften up dirt and grime. Apply from bottom to top. In cases of particularly dirty vehicles, pre-spray with a product such as Allosil in order to remove traces of insects etc, then rinse at low pressure and apply normal car cleaning detergent. Let detergents settle for 5 minutes before cleaning off. Metallic surfaces can be cleaned using RimTop. 2. Proceed with cleaning using the high pressure lance. Clean again from bottom to top. Use accessories to clean in difficult to reach places. Use brushes in order to add a mechanical cleaning effect. Short lances can help for cleaning of motors and wheel arches. Curved lances or undercarriage washers can be valuable for the cleaning of car underchassis and wheel arches. 3. Clean fragile areas such as motors, rubber at lower pressure levels to avoid damage. 4. Apply a liquid wax using the pressure washer in order to protect the bodywork from pollution. |
5.2.3 Buildings and Equipment
| Task | Accessories | Method |
| General surfaces | Foam injectors | 1. Apply thick foam over the surfaces to be cleaned. Apply on dry surfaces. Apply from top to bottom on vertical surfaces. Let the foam act for up to 30 minutes for the optimal effect. |
| Metallic equipment | Standard lance | |
| Curved lances | ||
| Tank cleaning head | ||
| Detergents | 2. Proceed with cleaning using the high pressure lance. Use applicable accessories. Use high pressure to dislodge large amounts of incrusted dirt or grime. Use lower pressure and high water volume in order to rapidly flush away loose dirt and rinse surfaces. | |
| Intensive | ||
| J25 Multi | ||
| Combi Aktive | ||
| Alkafoam | ||
| Disinfectant | 3. Apply DES 3000 disinfectant once the surfaces are perfectly clean. | |
| DES 3000 | ||
| Areas covered by amounts of loose dirt, such as animal remains in slaughterhouses, can be cleaned by using high water flow to flush away the dirt to evacuation pits or drains. | ||
| Tank cleaning heads can be used to clean barrels, vats, mixing tanks etc. Cleaning heads may be hydraulically or electrically powered and give the possibility for automatic cleaning without a constant user. | ||
| Rusted or damag- es surfaces prior to treatment | Wet Sandblasting equipment | 1. Connect the sandblasting lance to the pressure washer and place the suction tube in the sand. |
| 2. Always wear protective equipment during sandblast-ing. | ||
| 3. Spray the surfaces to be treated with the mix of water and sand. Rust, paint etc will be stripped off. |
These are merely several examples of cleaning tasks that can be solved by a pressure washer in association with accessories and detergents. Each cleaning task is different. Please consult your local dealer or Nilfisk-ALTO representative in order to discuss the best solution for your own cleaning tasks.
6 After using the cleaner

6.1 Switching off the cleaner and disconnecting supply lines
6.2 Rolling up the electrical lead and storing accessories
- Close water tap.
- Activate spray gun without lance in order to empty all residual water in the system.
- Turn the main switch to position "OFF".
- Pull out the plug from the electrical socket.
- Squeeze the spray gun handle until the cleaner is depressedurised.
- Lock the safety catch on the spray gun.
- Remove the water hose from the cleaner.
To prevent accidents, always carefully roll up the electrical lead and the high pressure hose.
Place the spray lance into the storage position.
6.3 NEPTUNE 1 Storing the cleaner (below 0^ )
Store the cleaner in a dry room without danger of frost or protect as below:
- Remove the water inlet hose from the water supply.
- Place the water inlet hose in a bucket containing an anti-freeze.
- Remove the spray lance.
- Switch on the cleaner with the main switch in position "Cold Water".
- Operate the spray gun.
-
During suction operate the spray gun two or three times.
-
The machine is protected against frost when antifreeze solution emerges from the spray gun.
- Lock the safety catch on the spray gun.
- Remove the water inlet hose from the bucket
- Switch off the cleaner and store it in upright position.
- When the machine is put into service again, the antifreeze solution must be collected and stored for future or proper disposal.

6.4 NEPTUNE 2 Storing the cleaner (below 0^ )
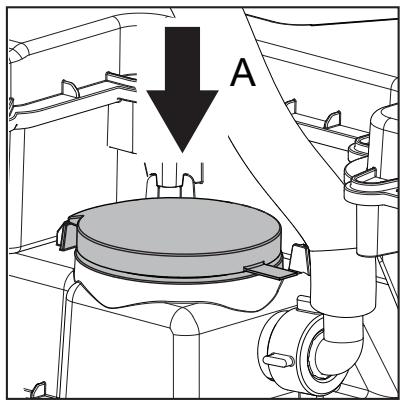
Store the cleaner in a dry room without danger of frost or protect as below:
- Remove the water inlet hose from the cleaner.
- Remove the spray lance.
- Switch on the cleaner with the main switch in position "Cold Water".
- Operate the spray gun.
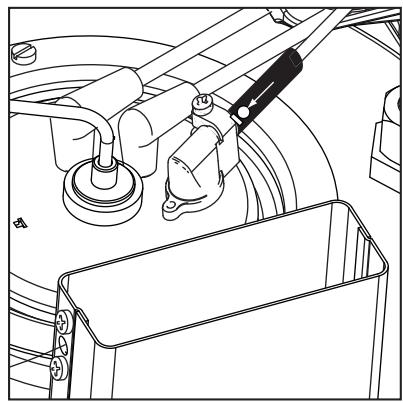
- Open the cover (A)
- Gradually pour antifreeze (approx. 5 litres) into the water tank.
-
During suction operate the spray gun two or three times.
-
The machine is protected against frost when antifreeze solution emerges from the spray gun.
- Lock the safety catch on the spray gun.
10.Close the cover - Switch off the cleaner.
12.To avoid any risks, store the cleaner temporarily in a heated room in upright position. - When the machine is put into service again, the antifreeze solution can be collected and stored for future use.
6.5 Transporting the cleaner

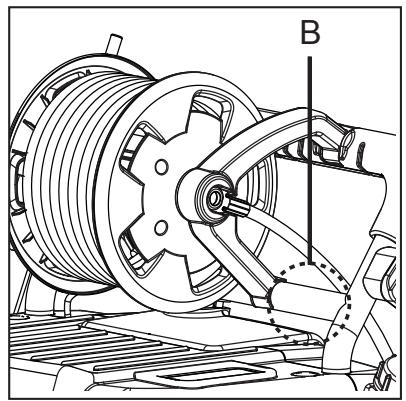
The machine can be in either upright position or tilted position during transportation.
Use the fixing points (B) when securing with belts.

Notice the risk of leaking water by sudden heavy movements during transportation.
7 Maintenance
7.1 Maintenance plan
Maintain water filters and fuel filters as required.
7.2 Maintenance work
7.2.1 Water filters
A water filter is fitted on the water inlet to prevent large particles of dirt from entering into the pump.
- Unscrew quick coupling with tool.
- Remove filter and clean it.
- Remount the filter and quick coupling
7.2.2 Maintenance of fuel filter
- Open hose clips
- Replace fuel filter
- Close hose clips
- Dispose the cleaning solution/damaged filter in accordance with the disposal regulations
7.2.3 Emptying the fuel tank
- Unscrew the cap
- Remove the strain
- Tilt the machine to a horizontal position
- Let the fuel pour into an empty container
7.2.4 Flame sensor1)
- Dismount the sensor and clean with a soft cloth.
- Ensure that the sensor is correctly seated when installing again - the symbols must face upwards.
8.1 Indications on Display
| Indication lights | Cause | Remedy | ||||||
| The light is constant - The appliance is ready for operation > Flashing light - Flow sensor fault - Water tap closed or water shortage - Detergent tank empty - Pressure regulation on the safety control blocks or the VarioPress1) lance is set to low water volume - Machine scaled - Spray gun is leaking - High pressure hose, coupling or line system is leaking - Motor is overheated3) | > Refuel detergent or set SDR value to “0” Turn main switch to position “OFF” - let the machine cool down Remove/disconnect extension cable | |||||||
| > Constant light - Low fuel level | > Top up fuel > Cold water operation is possible | |||||||
| > Flashing light - Low Nilfisk-ALTO Anti-Stone level1) | > Top up Nilfisk-ALTO Anti-Stone | |||||||
| > Constant light - Service interval has expired > Flashing light - Service interval due in 20 hours - Microprocessor error | > Contact Nilfisk-ALTO Service > Contact Nilfisk-ALTO Service Machine shutdown | |||||||
| > Constant light - Boiler overheated. Exhaust sensor (EXT-H) has cut off fuel supply - Insufficient water flow - Machine scaled - Boiler not serviced | > Machine shuts down. Cold water operation is possible. > Check water supply > Contact Nilfisk-ALTO Service | |||||||
| > Constant light - Flame sensor (B7) is sooted - Ignition or fuel system failure | > Clean flame sensor (B7) (see chapter 7.2.4) > Contact Nilfisk-ALTO Service Cold water operation is possible | |||||||
| Indication lights | Cause | Remedy | |||||||
| > | Flashing light - Motor is overheated | Turn main switch to position “OFF” - let the machine cool down Remove/disconnect extension cable Possible phase failure on 3 phase variants1): have electrical connection checked Contact Nilfisk-ALTO Service | |||||||
| > | Flashing light - Faulty temperature sensor (B1) | > | Cold water operation is possible > Check wire to temperature sensor (B1) > Contact Nilfisk-ALTO Service | ||||||
| > | Flashing light - Flow sensor fault | > | Cold water operation is possible > Contact Nilfisk-ALTO Service | ||||||
| > | Flashing light - Overheat error has occurred | > | Cold water operation is possible > Contact Nilfisk-ALTO Service | ||||||
| > | Visual test of lamps - When switching on, all LEDs light up for approximately 1 second | ||||||||
8.2 Other Faults
| Fault | Cause | Remedy |
| not ON | Plug not connected to the electrical plug socket | Put the plug into the electrical socket. Check fuse (see chapter 9.4 Technical Data) |
| Pressure too low | High pressure nozzle worn out Pressure regulation set to low pressure or VarioPress-lance1) set to low water volume1). | Replace nozzle Turn the twist grip on safety control block clockwise (+) or set VarioPress-lance1) to higher water volume (see chapter 4.4) |
| Machine is running with pulsating pressure and makes knocking noise | Pump has drawn in air as the detergent tank is empty | Close detergent valve. Remove lance from gun. Operate spray gun and let machine run until air in pump is gone and the machine is running normally again. |
| No detergent drawn in | Detergent tank empty Dirt in detergent tank Suction valve at cleaning agent inlet soiled | Top up detergent tank Clean detergent tank Remove suction valve and clean or replace |
| Burner soots up | fuel contamination Burner sooted or adjustment incorrect | Contact Nilfisk-ALTO Service |

9 Further information
9.1 Recycling the cleaner
9.2 Guarantee
If the cleaner is discarded, make it unusable immediately
- Unplug the cleaner and cut the power cord.
Our general conditions of business are applicable with regard to the guarantee. Subject to change as a result of technical advances.
The cleaner contains valuable materials that should be recycled. Therefore, make use of your local waste disposal site.
Contact your local authorities or your nearest dealer for further information.
The guarantee is invalidated if the machine is not operated in accordance with these instructions or otherwise abused. The guarantee is invalidated if the machine is not serviced as described.
9.3 EU Declaration of Conformity

EU Declaration of Conformity
Product:
High Pressure Cleaner
Type:
NEPTUNE 1
Description:
230 V 1~, 50 Hz / IP X5
Type:
NEPTUNE 2
Description:
230 V 1~, 50 Hz / 400 V 3~, 50 Hz / IP X5
Type:
NEPTUNE 2 Special
Description:
230 V 1~, 50 Hz / 400 V 3~, 50 Hz / IP X5
The design of the unit corresponds to the following pertinent regulations:
EC Machine Directive
2006/42/EC
Applied harmonised standards:
EC Low-voltage Directive
2006/95/EC
Applied national standards and technical specifications:
EC EMC Directive
2004/108/EC

Anton Sorensen
General Manager EAPC
Technical Operations
Brøndby, 2010
9.4 Technical data
| Description | General | 1-22 EU 230/50/16 | 1-22 GB 230/50/13A | 2-20 US 115/1/60/20 | 2-25 GB 230/1/50/13 | 2-25X GB 230/1/50/13 | |||||
| Data | Tol. (±) | Nom | + Tol/- Tol | Nom | + Tol/- Tol | Nom | + Tol/- Tol | Nom | + Tol/- Tol | Nom | + Tol/- Tol |
| Pressure Pwork @ Cylinder Head(bar) | 10% | 110 | +11/-11 | 110 | +11/-11 | 69 | +7/-7 | 90 | +9/-9 | 90 | +9/-9 |
| Flow. Qiec (l/h) | 10% | 540 | +54/-54 | 540 | +54/-54 | 568 | +57/-57 | 640 | +64/-64 | 640 | +64/-64 |
| Flow. Qmax (l/h) | 10% | 600 | +60/-60 | 600 | +60/-60 | 636 | +64/-64 | 670 | +67/-67 | 670 | +67/-67 |
| Temperature t max, hotwater (°C) | 80 | 80 | 80 | 80 | 80 | ||||||
| Temperature t max, steam (°C) | NA | NA | 150 | 150 | 150 | ||||||
| Elec. V/Ph/Hz | +/-6% | 230/1~/50 | 230/1~/50 | 115/1~/60 | 230/1~/50 | 230/1~/50 | |||||
| Power Consumption (kW) | 2,8 | 2,8 | 2,1 | 2,9 | 2,9 | ||||||
| Fuel tank (l) | 17 | 17 | 17 | 17 | 17 | ||||||
| Detergent tank (l) | 5 | 5 | 5 | 5 | 5 | ||||||
| Noise level 1m ( dBA) | 74 | 74 | 77 | 76 | 76 | ||||||
| Recoil forces with standard lance (10deg.) (N) | 17,6 | 17,6 | 12,9 | 19 | 18,5 | ||||||
| Vibration ISO 5349 (m/s2) | ≤2,5 | ≤2,5 | ≤2,5 | ≤2,5 | ≤2,5 | ||||||
| Weight - Machine alone (kg) | 91 | 91 | 97 | 97 | 99 | ||||||
| Size - Machine alone (mm) | 607x688x1000 | 607x688x1000 | 607x688x1071 | 607x688x1000 | 607x688x1071 | ||||||
| Fuse size (A) | 16 | 13 | 20 | 13 | 13 | ||||||
| Max. inlet pressure (bar) | 6 | 6 | 10 | 10 | 10 | ||||||
| Max. Inlet temperature (°C) | 40 | 40 | 40 | 40 | 40 | ||||||
| Description | General | 2-26 EU 230/1/50/16 | 2-26X EU 230/1/50/16 | 2-26 EU Special 230/1~/50 | 2-26X EU Special 230/1~/50 | 2-30 EU Special 400/3~/50 | |||||
| Data | Tol. (±) | Nom | + Tol/- Tol | Nom | + Tol/- Tol | Nom | + Tol/- Tol | Nom | + Tol/- Tol | Nom | + Tol/- Tol |
| Pressure Pwork @ Cylinder Head(bar) | 10% | 145 | +15/-15 | 145 | +15/-15 | 140 | +14/-14 | 140 | +14/-14 | 155 | +16/-16 |
| Flow. Qiec (l/h) | 10% | 530 | +53/-53 | 530 | +53/-53 | 560 | +56/-56 | 560 | +56/-56 | 600 | +60/-60 |
| Flow. Qmax (l/h) | 10% | 600 | +60/-60 | 600 | +60/-60 | 600 | +60/-60 | 600 | +60/-60 | 660 | +66/-66 |
| Temperature t max, hotwater (°C) | 80 | 80 | 80 | 80 | 80 | ||||||
| Temperature t max , steam (°C) | 150 | 150 | ? | ? | ? | ||||||
| Elec. V/Ph/Hz | +/-6% | 230/1~/50 | 230/1~/50 | 230/1~/50 | 230/1~/50 | 400/3~/50 | |||||
| Power Consumption (kW) | 3,4 | 3,4 | 3,4 | 3,4 | 3,8 | ||||||
| Fuel tank (l) | 17 | 17 | 17 | 17 | 17 | ||||||
| Detergent tank (l) | 5 | 5 | 5 | 5 | 5 | ||||||
| Noise level 1m ( dBA) | 77 | 77 | 74 | 74 | 74 | ||||||
| Recoil forces with standard lance (10deg.) (N) | 20,8 | 20,6 | 21,8 | 21,6 | 24,6 | ||||||
| Vibration ISO 5349 (m/s2) | ≤2,5 | ≤2,5 | ≤2,5 | ≤2,5 | ≤2,5 | ||||||
| Weight - Machine alone (kg) | 97 | 99 | 97 | 99 | 97 | ||||||
| Size - Machine alone (mm) | 607x688x1000 | 607x688x1071 | 607x688x1000 | 607x688x1071 | 607x688x1000 | ||||||
| Fuse size (A) | 16 | 16 | 16 | 16 | 16 | ||||||
| Max. inlet pressure (bar) | 10 | 10 | 10 | 10 | 10 | ||||||
| Max. Inlet temperature (°C) | 40 | 40 | 40 | 40 | 40 | ||||||
| Description | General | 2-30X EU Special 400/3~/50 | 2-30 US 220-240/1/60/20 | 2-33 EU 400/3/50 | 2-33X EU 400/3/50 | 2-33 NO 230-400/3/50 | |||||
| Data | Tol. (±) | Nom | + Tol/- Tol | Nom | + Tol/- Tol | Nom | + Tol/- Tol | Nom | + Tol/- Tol | Nom | + Tol/- Tol |
| Pressure Pwork @ Cylinder Head(bar) | 10% | 155 | +16/-16 | 138 | +14/-14 | 170 | +17/-17 | 170 | +17/-17 | 170 | +17/-17 |
| Flow. Qiec (l/h) | 10% | 600 | +60/-60 | 681 | +68/-68 | 630 | +63/-63 | 630 | +63/-63 | 630 | +63/-63 |
| Flow. Qmax (l/h) | 10% | 660 | +66/-66 | 750 | +75/-75 | 690 | +69/-69 | 690 | +69/-69 | 690 | +69/-69 |
| Temperature t max, hotwater (°C) | 80 | 80 | 80 | 80 | 80 | ||||||
| Temperature t max, steam (°C) | ? | 150 | 150 | 150 | 150 | ||||||
| Elec. V/Ph/Hz | +/-6% | 400/3~/50 | 220-240/1~/60 | 400/3~/50 | 400/3~/50 | 230-400/3~/50 | |||||
| Power Consumption (kW) | 3,8 | 2,15 | 4,1 | 4,1 | 4,1 | ||||||
| Fuel tank (l) | 17 | 17 | 17 | 17 | 17 | ||||||
| Detergent tank (l) | 5 | 5 | 5 | 5 | 5 | ||||||
| Noise level 1m ( dBA) | 74 | 77 | 80 | 80 | 80 | ||||||
| Recoil forces with standard lance (10deg.) (N) | 24,8 | 25,6 | 27,1 | 26,3 | 27,1 | ||||||
| Vibration ISO 5349 (m/s2) | ≤2,5 | ≤2,5 | ≤2,5 | ≤2,5 | ≤2,5 | ||||||
| Weight - Machine alone (kg) | 99 | 97 | 97 | 99 | 97 | ||||||
| Size - Machine alone (mm) | 607x688x1071 | 607x688x1000 | 607x688x1000 | 607x688x1071 | 607x688x1000 | ||||||
| Fuse size (A) | 16 | 20 | 16 | 16 | 26/16 | ||||||
| Max. inlet pressure (bar) | 10 | 10 | 10 | 10 | 10 | ||||||
| Max. Inlet temperature (°C) | 40 | 40 | 40 | 40 | 40 | ||||||
| Description | General | 2-33X NO 230-400/3/50 | 2-41 EU 400/3/50 | 2-41X EU400/3/50 | |||
| Data | Tol. (±) | Nom | + Tol/- Tol | Nom | + Tol/- Tol | Nom | + Tol/- Tol |
| Pressure Pwork @ CylinderHead(bar) | 10% | 170 | +17/-17 | 190 | +19/-19 | 190 | +19/-19 |
| Flow. Qiec (l/h) | 10% | 630 | +63/-63 | 730 | +73/-73 | 730 | +73/-73 |
| Flow. Qmax (l/h) | 10% | 690 | +69/-69 | 780 | +78/-78 | 780 | +78/-78 |
| Temperature t max, hotwater (°C) | 80 | 80 | 80 | ||||
| Temperature t max, steam (°C) | 150 | 150 | 150 | ||||
| Elec. V/Ph/Hz | +/-6% | 230-400/3~/50 | 400/3~/50 | 400/3~/50 | |||
| Power Consumption (kW) | 4,1 | 5,1 | 5,1 | ||||
| Fuel tank (l) | 17 | 17 | 17 | ||||
| Detergent tank (l) | 5 | 5 | 5 | ||||
| Noise level 1m ( dBA) | 80 | 81 | 81 | ||||
| Recoil forces with standard lance(10deg,) (N) | 26,3 | 32,9 | 32,0 | ||||
| Vibration ISO 5349 (m/s2) | ≤2,5 | ≤2,5 | ≤2,5 | ||||
| Weight - Machine alone (kg) | 99 | 97 | 99 | ||||
| Size - Machine alone (mm) | 607x688x1071 | 607x688x1000 | 607x688x1071 | ||||
| Fuse size (A) | 26/16 | 16 | 16 | ||||
| Max. inlet pressure (bar) | 10 | 10 | 10 | ||||
| Max. Inlet temperature (°C) | 40 | 40 | 40 | ||||
| Description | General | 2-16 Gerni 240/1/50/10 | 2-26 Gerni 240/1/50/15 | 2-25 KR 220/1/60/15 | 2-40 EXPT 220,440/3/60 | 2-40X EXPT 220,440/3/60 | |||||
| Data | Tol. (±) | Nom | + Tol/- Tol | Nom | + Tol/- Tol | Nom | + Tol/- Tol | Nom | + Tol/- Tol | Nom | + Tol/- Tol |
| Pressure Pwork @ Cylinder Head(bar) | 10% | 100 | +10/-10 | 145 | +15/-15 | 125 | +13/-13 | 185 | +19/-19 | 185 | +19/-19 |
| Flow. Qiec (l/h) | 10% | 400 | +40/-40 | 530 | +53/-53 | 540 | +54/-54 | 730 | +73/-73 | 730 | +73/-73 |
| Flow. Qmax (l/h) | 10% | 450 | +45/-45 | 600 | +60/-60 | 600 | +60/-60 | 780 | +78/-78 | 780 | +78/-78 |
| Temperature t max, hotwater (°C) | 90 | 80 | 80 | 80 | 80 | ||||||
| Temperature t max, steam (°C) | 150 | 150 | 150 | 150 | 150 | ||||||
| Elec. V/Ph/Hz | +/-6% | 240/1~/50 | 240/1~/50 | 220/1~/60 | 220-440/ 3~/60 | 220-440 / 3~/60 | |||||
| Power Consumption (kW) | 2,2 | 3,4 | 3,2 | 5,7 | 5,7 | ||||||
| Fuel tank (l) | 17 | 17 | 17 | 17 | 17 | ||||||
| Detergent tank (l) | 5 | 5 | 5 | 5 | 5 | ||||||
| Noise level 1m ( dBA) | 77 | 77 | 77 | 81 | 76/76 | 81 | |||||
| Recoil forces with standard lance (10deg.) (N) | 13,0 | 20,8 | 20,0 | 32,7 | 31,8 | ||||||
| Vibration ISO 5349 (m/s2) | ≤2,5 | ≤2,5 | ≤2,5 | ≤2,5 | ≤2,5 | ||||||
| Weight - Machine alone (kg) | 97 | 97 | 97 | 97 | 99 | ||||||
| Size - Machine alone (mm) | 607x688x1000 | 607x688x1000 | 607x688x1000 | 607x688x1000 | 607x688x1071 | ||||||
| Fuse size (A) | 10 | 15 | 15 | 20 | 20 | ||||||
| Max. inlet pressure (bar) | 10 | 10 | 10 | 10 | 10 | ||||||
| Max. Inlet temperature (°C) | 40 | 40 | 40 | 40 | 40 | ||||||