VSK207M - VCR AKAI - Free user manual and instructions
Find the device manual for free VSK207M AKAI in PDF.
User questions about VSK207M AKAI
0 question about this device. Answer the ones you know or ask your own.
Ask a new question about this device
Download the instructions for your VCR in PDF format for free! Find your manual VSK207M - AKAI and take your electronic device back in hand. On this page are published all the documents necessary for the use of your device. VSK207M by AKAI.
USER MANUAL VSK207M AKAI
High Quality (HQ) Images
- On-Screen Displays (OSD)
- CATV Tuner with Hyperband
- 80 Memories for Presets
- Automatic TV station presetting
- 30 Minutes Back-Up in case of Power Failure
- Timer Recording of up to 8 Programs per Month
- One-Touch Timer Recording (OTR)
Video Index Search System
- NTSC Video Cassette Tape Playback on PAL TV
- Auto Power ON and Auto Playback when inserting a Cassette Tape
- Auto Rewind, Auto Eject, and Auto Power OFF
Real-Time Tape Counter with ZERO RETURN-Function - Auto Video Head Cleaning System
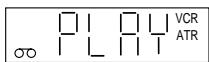
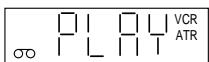
2 Tape Speeds - Digital Auto Tracking (ATR Function)
Repeat - On-Screen Language Display in English, German, French, Italian, or Spanish
- Scart socket
- CE Symbol Guaranteeing Compliance to Currently Effective European Standards.
Preparation
Precautions 2
Locations of Indicators and Controls 4
Remote Control 5
Connections and Installation 7
Setting the TV to the AV-Channel 9
On-screen Language Selection 10
Setting the Time and Date 10
Automatic TV station presetting 11
Mapping TV stations 11
Manual TV station presetting 13
Playback
Loading and Unloading a Cassette Tape 14
Playback 14
SpecialPlayback 15
RepeatPlayback 16
Counter Display 17
Video Index Search System 17
Recording
Recording a TV Program 18
One-Touch Timer Recording (OTR) 19
Timer Recording 20
Other Functions
Duplicating a Video Tape 22
Error Search 23
Video Head Cleaning 24
Specifications 25
Moisture condensation
If the unit is suddenly moved from a cold place to a warm place, do not operate it for two or three hours.
What is moisture condensation?
When cold water is poured into a glass, for example, water vapour in the air will condense on the surface of the glass. This is called moisture condensation.
■ Moisture will condense on the unit in the following cases;
When you move this VCR from a cold to a warm place.
After heating a cold room or under extremely humid conditions.
If you experience the above conditions:
Plug the mains lead into an AC outlet, set the POWER button to ON and leave at the room temperature until moisture condensation disappears.
Depending on the surrounding conditions, this may take for two or three hours.
Video Head Drum
Video Tape
To prevent injuries do not insert your hand into the cassette loading slot.
Watch out for toddlers who often love to imitate the behavior of adults. In some cases, toys inserted into the cassette loading slot have resulted in expensive repairs.

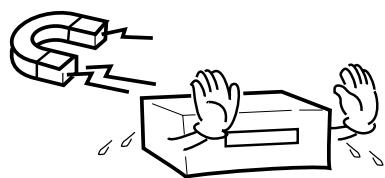
Do not place the unit near appliances which may cause electromagnetic interference such as loudspeakers, amplifiers, electric motors, etc. Magnetic fields may affect picture or sound quality of video recordings.
Avoid extreme moisture and dust.

Leave repairs to a qualified service technician.

Avoid locations subjected to extreme heat and cold.
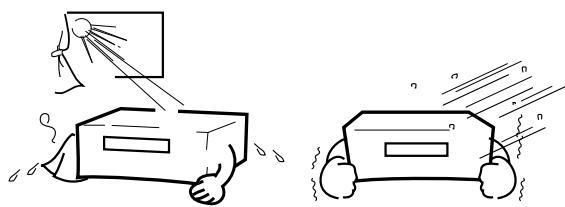
Avoid to place the unit on any surfaces that may by subjected to vibrations or shocks.

Do not insert fingers or any other objects into the cassette loading slot. Also, when cleaning the unit, never spray cleaner or furniture wax directly on the unit housing.
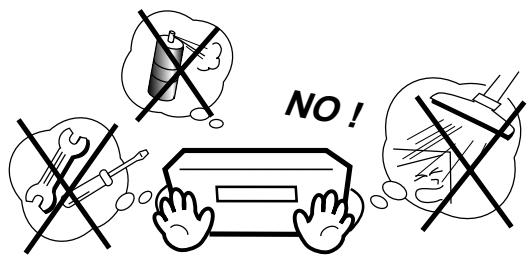
Do not place flower vases on top or next to the unit. Water spilled into the unit could cause serious unit damages. In case of water damage, do not unplug the power cord from its wall outlet and call for qualified service immediately.

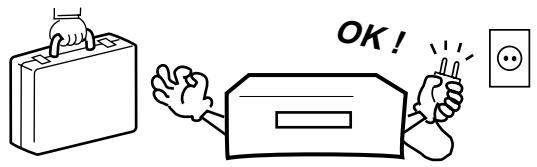
When you leave your home for a long period of time, unplug the power cord for safety reasons.
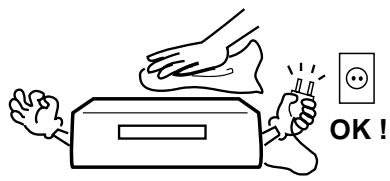
Cleaning Precautions
For cleaning the VCR we recommend a mild soap solution and a slightly moistened soft cloth as it is used for furniture. To avoid electrical shocks unplug the AC power cord from its wall outlet before cleaning. Be especially careful when cleaning plastic components.
To protect the unit during a thunder storm, unplug the power cord and disconnect the antenna.

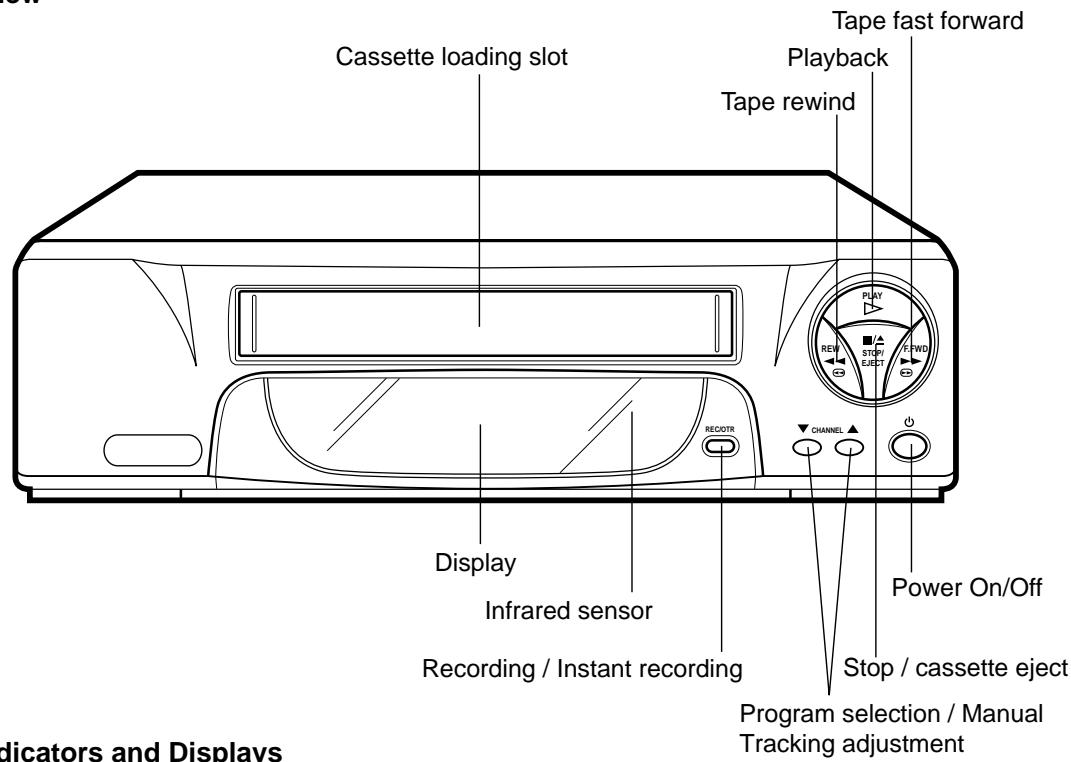
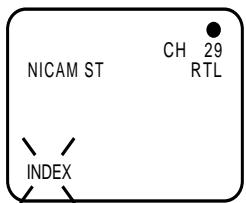
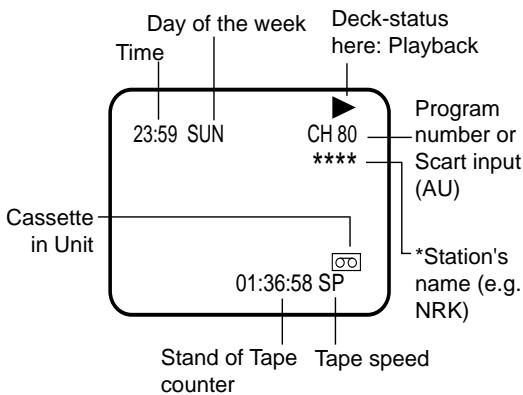
Front view
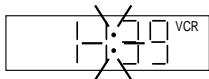
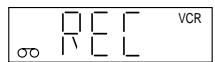
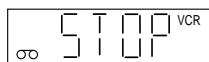
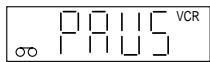
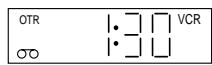
VCR Indicators and Displays
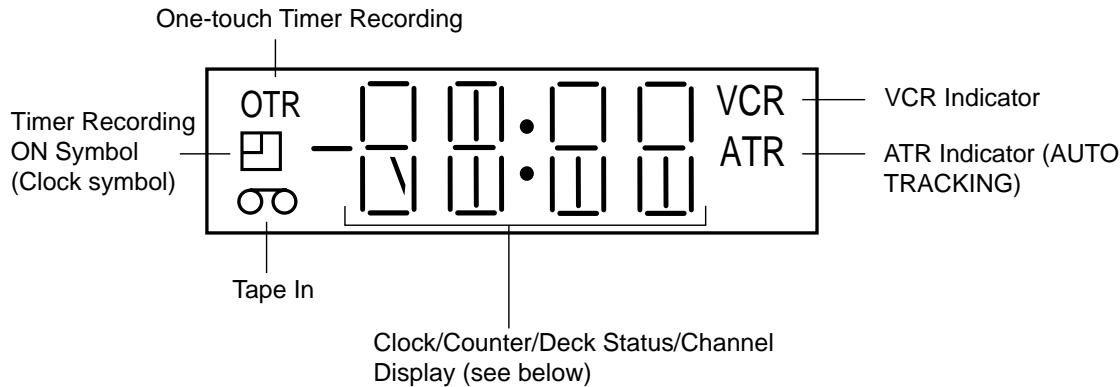
The following indications will light up or blink for several seconds on the display.
| Display | Explanation | Page |
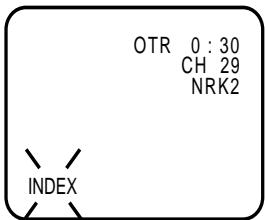
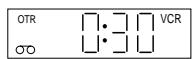
| 0:30 | Remaining Time of OTR | 19 |
| 11:30 | Current Time | 10 |
| 01:54 | Elapsed Time | 17 |
| AU | Scart Input * | 22 |
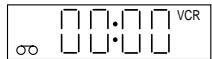
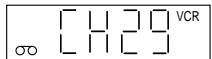
| CH 29 | Channel selected | 18,19 |
| CUE | Forward picture search * | 15 |
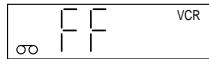
| FF | Fast forward | 14 |
| OFF | AV-Channel is not output | 9 |
| Display | Explanation | Page |
| RF:36 | AV-Channel 36 | 9 |
| PAUS | Pause for recording | 18,22 |
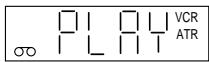
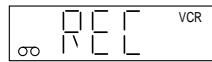
| PLAY | Playback | * 14 |
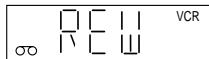
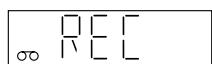
| REC | Recording | 18 |
| REV | Reverse picture search | * 15 |
| REW | Tape rewind | * 14 |
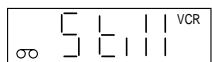
| Still | Still picture | 15 |
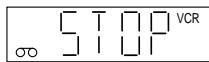
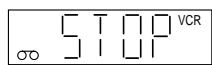
| STOP | Tape stop | * 14,18~19 |
- will appear and change to counter display after approx. 4 seconds.
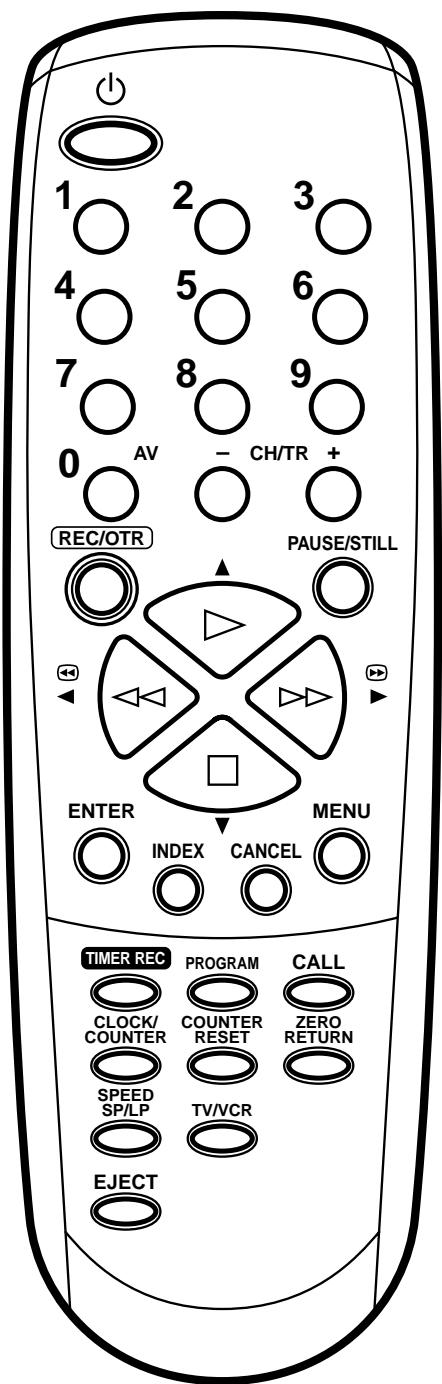
| Page | ||
| 0 | On/Off | 10 |
| ~ | Use as the Number buttons in various setting modes | 10~13 |
| Select channel | 11,13 | |
| AV | Scart Input | 22 |
| CH/TR+ | Select channel step by step | 11,18 |
| Manual Tracking | 15 | |
| REC/OTR | Recording/OTR | 18,19 |
| PAUSE/STILL | Still picture | 15 |
| Pause for recording On/Off | 18 | |
| Playback | 14 | |
| Menu setting | ||
| Reverse picture search/Tape rewind | 14,15 | |
| Menu setting | ||
| Forward picture search/Fast forward | 14,15 | |
| Menu setting | ||
| Tape Stop | 14,15 | |
| Menu setting | ||
| ENTER | Memorize | |
| INDEX | Index | 17 |
| CANCEL | Fade-out channel | 11 |
| Cancel Timer recording | 21 | |
| MENU | Call Menu | 10~13, 16,20 |
| TIMER REC | Timer recording On/Off | 20 |
| PROGRAM | Confirmation of Timer-Recording | 21 |
| CALL | Display status | 18 |
| CLOCK/COUNTER | Clock / Counter | 17 |
| COUNTER RESET | Set Counter to zero | 17 |
| ZERO RETURN | Return to counter position 00:00 | 17 |
| SPEED/SPILP | Select Tape speed | 18,19 |
| TV/VCR | Switch to TV only at Scart connection | 18 |
| EJECT | Tape eject | 14 |
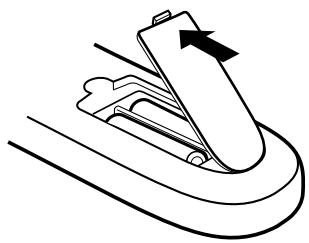
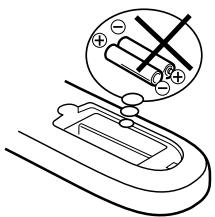
How to install the batteries
Use micro batteries type UM-4 (AAA-Size).
1 Move cover in direction of arrow and take it off.

2 Install the batteries as shown below, pay attention to polarities.
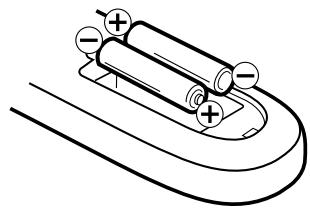
3 Replace cover.
Distance of Remote Control Operation
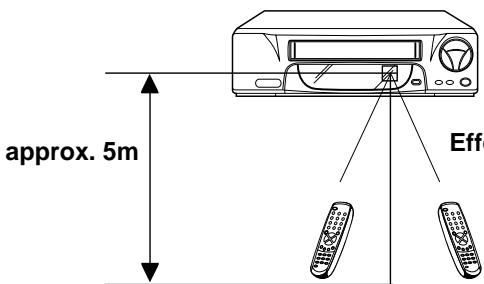
Effective angle: approx. 60^
Remote sensor
- Point the remote control directly at the remote sensor.

Transmitter window
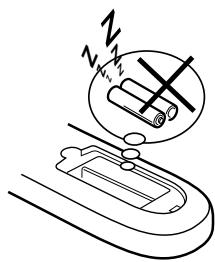
The remote control handset will not work properly in the following cases:
If bright sunlight directly beams onto the unit front.
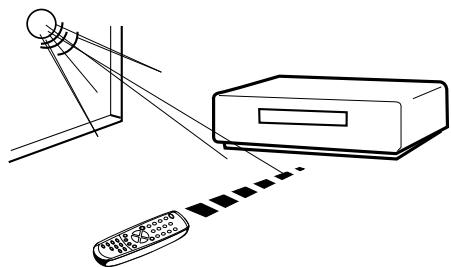
If the batteries have not been installed according to their polarities.
If an obstacle is placed between the unit and the handset.
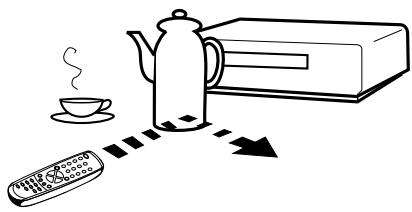
If the batteries are weak.
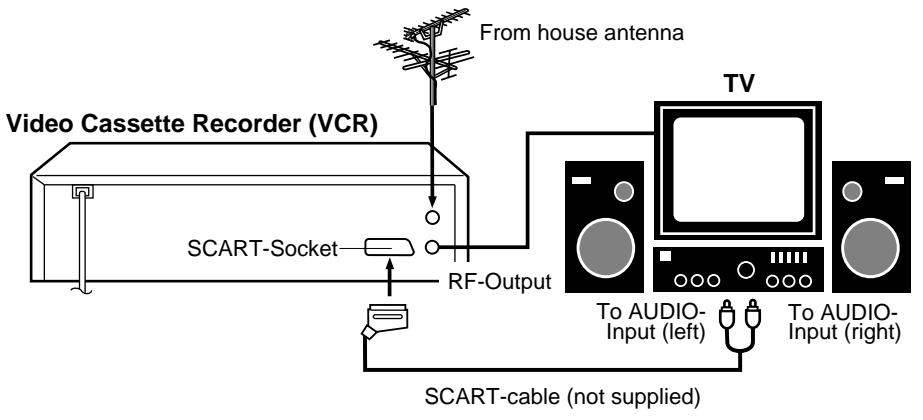
Connect your VCR to your home's aerial and to your TV-set as shown in the illustration.
When you have finished these connections you connect your VCR to the 230V / 50Hz mains.
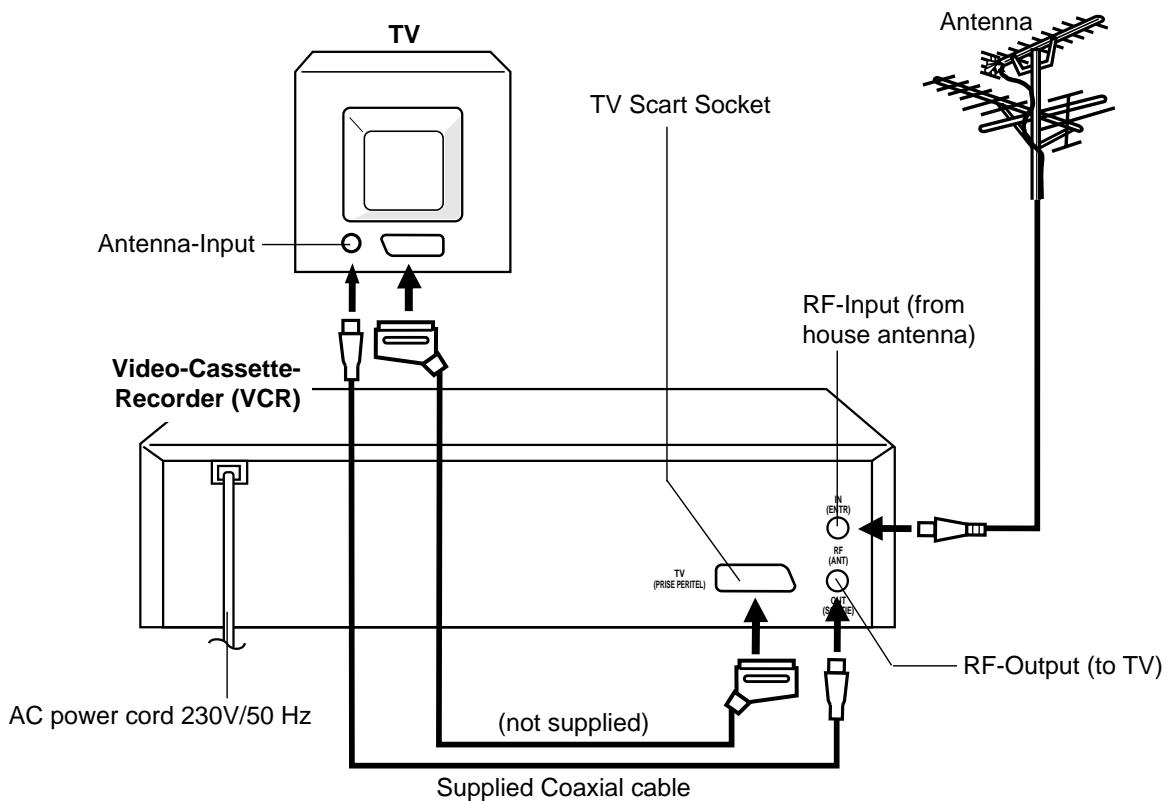
If you don't have a SCART-cable at hand just now, perform now the output channel adjustment (AV-channel) (see pg. 9). This VCR will work without connecting a SCART-cable. Please note that not using a SCART-cable makes installing procedure more complicated. Therefore we recommend to
Connect a TV through the SCART-Socket
You can connect the VCR to your TV with RF cable. If however, your TV has SCART-Socket you can connect it to the VCR with a SCART cable as shown above for better quality pictures and sound.
If your TV-set does not switch to video-playback automatically, please turn your TV's video switch to VIDEO position manually.
The SCART-Socket is suitable to connect the video recorder to other units.
Connection to a Stereo Amplifier
If the VCR is connected to a stereo amplifier, the video soundtrack can be output through the loudspeakers of the stereo system. (The playback sound is in Mono.)
Connection to a Satellite Receiver
If you install a Satellite Receiver, we recommend the following connection:
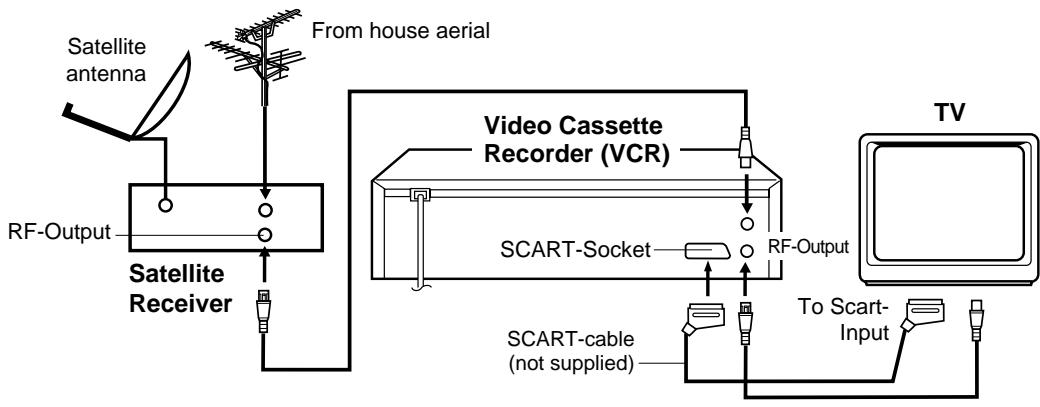
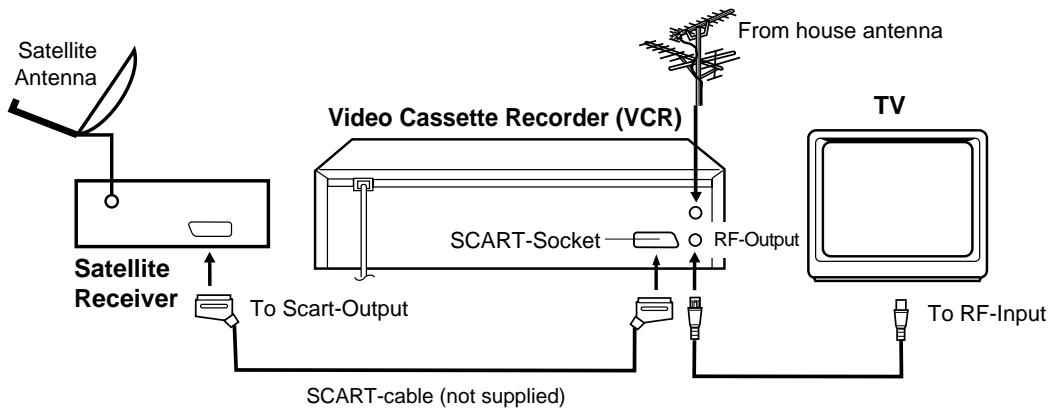
or
Don't execute, if you already installed a scart connection.
This VCR incorporates a TV-transmitter, which broadcasts at channel 36 in UHF-band. Your TV-set can receive this TV-transmitter via the supplied DIN-DIN-coaxial cable. If there is already a TV-transmitter in your neighborhood broadcasting at channel 36, or if you connected another set (e.g. Sat-Receiver) to your VCR via the coaxial cable, you must change the output channel in your VCR (see below).
Preparation
- Turn on the TV.
- Make sure the power of Video recorder has been turned off.
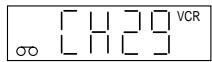
1 Press the VCR's button (not the one on your remote control) and keep pressing it until the display shows RF. The number next to RF is the channel in UHF-band to which you must tune your TV-set.
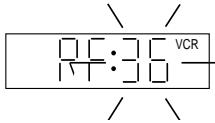
2 Select an unused channel on the TV and tune the TV in the same way as tuning in a TV broadcast station until the TEST appears clearly on the TV screen. Refer to the TV operating instructions for tuning.
Now the output from the VCR is tuned to this channel. Whenever you want to playback a tape, select this channel.
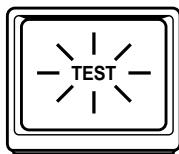
3 If there is interference in the picture (wavy lines, picture roll, etc.), use CHANNEL button to select any RF channel between 23 and 69, retuning your TV until the test appears clearly.
If you connected a satellite receiver as explained on the lower of page 8, you must switch off the VCR's transmitter.
Press the VCR's CHANNEL button repeatedly until OFF
appears in the display window (OFF will appear after 69 or before 23).
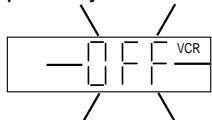
4 Press the button to turn OFF the VCR.
On-screen Language Selection
Turn on your TV and select the AV-Program position, on which you have already set your VCR. (it will happen automatically by Scart-cable connection). So you can follow up the all setting on TV screen. This VCR can display the all setting on the TV screen in English, German, French, Italian or Spanish.
Preparation
Press the button to turn on the VCR.
1 Press MENU,
If you use the unit for the first time and press MENU, instead of the MENU screen in steps 2, 3 the one in step 4 may appear. Please select the language at first.
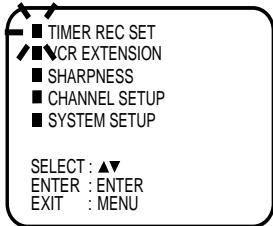
2 Press or repeatedly until the dot before SYSTEM SETUP blinks. Then press ENTER.
Note: If there is no pressing of any buttons for more than 60 seconds, then the VCR switch back to TV-operation automatically.
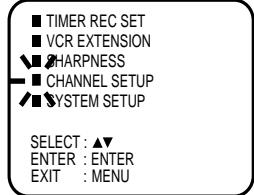
TIMERRECSET
VCR EXTENSION
SHARPNESS
CHANNELSETUP
SYSTEMSETUP

SELECT:
ENTER:ENTER
EXIT : MENU
3
Press


repeatedly
until the dot before LANGUAGE blinks. Then press ENTER.
SYSTEM SETUP
■2LOCK SET
LANGUAGE/SPRACHE/LANGUAGE
LINGUA/LENGUA
SELECT:▲
ENTER:ENTER
EXIT : MENU
4
Press


repeatedly
until the dot points to the desired language. Then press ENTER.
LANGUAGE/SPRACHE/LANGUE
LINGUA/LENGUA
ENGLISH
DEUTSCH
FRANCAIS
ITALIANO
ESPANOL
SELECT:▲▼ OK:ENTER
Press MENU repeatedly until the TV picture appears on the screen.
Setting the Time and Date
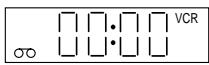
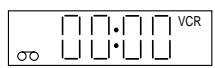
The Clock has a 24-Hour-Display. After you plug the AC power cord in a walloutlet, "0:00" will blink in the Display.
Preparation
Turn on the TV, and select the AV-program position on TV.
Example: Setting the clock to 11:30, 26th October 2002.
1 Press MENU.
If the clock is not set, SYSTEM SETUP menu of step 3 will appear automatically.
2 Press

or

repeatedly
until the dot before SYSTEM SETUP blinks. Then press ENTER.
TIMERRECSET
VCR EXTENSION
SHARPNESS
CHANNEL SETUP
SYSTEMSETUP
SELECT:▲
ENTER:ENTER
EXIT : MENU
3 Press

or

repeatedly
until the dot before CLOCK SET blink. Then press ENTER.
SYSTEM SETUP

CLOCK SET
LANGUAGE/SPRACHE/LANGUAGE
LINGUA/LENGUA
SELECT:
ENTER · ENTER
EXIT ; MENU
4 Pr

repeatedly or 10 number buttons until "26"
appears. Then press


5 Set the month, year, hour and minute in the same way as the step 4. Then press ENTER.
In case of an erroneous input press

to go back to
before step and enter again.
CLOCK SET
DAY 26 WED
MONTH
YEAR
TIME

26 WED

2000
0:00
SELECT:▲▼
:▲▶/0-9
OK :E
ER EXIT:MENU
CLOCK SET
DAY
MONTH
YEAR
TIME
26 SAT
10
2002
11:30
A
SELECT:▲
:
OK F
FR
EXIT:MENU
6 Press MENU repeatedly until the TV picture appears on the screen.
The clock will begin operation and the colon will
blink on the VCR display.
Note:
In case of a power failure the clock will continue to operate for another 30 minutes with quartz-controlled precision. To indicate that the power failure has lasted for an excessive period of time "-:-" will blink on the display. In this case readjust time and date.
Automatic TV station presetting
This VCR has one built-in tuner to receive the broadcast. Before you record one TV-broadcast, you must set and preset the whole of the broadcasts. This VCR can preset up to 80 broadcast.
Automatic station presetting
All stations will be preset in sequence available in your area.
Preparation
Turn on the TV, and select the AV-program position on TV.
1 Press MEN


or

repeatedly
until the dot before CHANNEL SETUP blinks. Then press ENTER.

VCR EXTENSION


CHANNEL SETUP

ENTER:ENTER
EXIT : MENU
2


or

repeatedly
until the dot before AUTO TUNING blink.


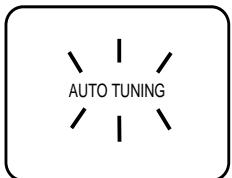
AUTO TUNING

ENTER : ENTER
EXIT ; MENU
3 Press ENTER.
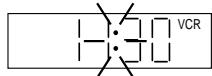
The VCR will begin searching and setting with early stored channel the number is increased by one into memory all the broadcasting channels available in your area (VHF-L, VHF-H, UHF). While setting channels, AUTO TUNING appears. When the setting finished, the CHANNEL MAPPING menu will appear.


4 Press MENU repeatedly until the TV picture appears on the screen.
To skip a channel position
Unwanted channels can be skipped so that they cannot be called up by pressing CH. Select the channel to be skipped, ...e.g. channel 29. Select channel 29, then press CANCEL.
This channel's number will be flashing. That way you can cancel further channels one after the other.
To cancel skipping select the skipped channel using 10 number buttons, then press CANCEL. The channel No. does not blink any longer, and the channel No. now may be selected again using CH.
Note:
- TV reception interference or power failure may result in Automatic station presetting malfunctions. In such a case repeat the setting procedure from the beginning. However, you can not receive the necessary broadcast yet, try to preset the broadcast manually. (See page 13)
- When the unit is in the auxiliary input mode, you can not preset channels.
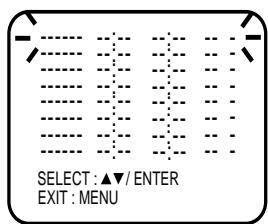
Mapping TV stations
Changing TV station names
For a number of TV stations (such as MTV) no name code will be displayed because these TV stations do not provide the necessary information. You can enter the respective names yourself. Moreover, unwanted station codes can be changed by the user.
Preparation
Turn on the TV, and select the AV-program position on TV.
Exempel: MTV is assigned to station No. 10, but the code "MTV" will not be displayed and will also not appear in the table.
1 Select the "CHANNEL MAPPING" in Menu-screen in the same way as the step 1 ~ 2 on left side. Then press ENTER.
2
Press
repeatedly until the station number position now to be named will blink.
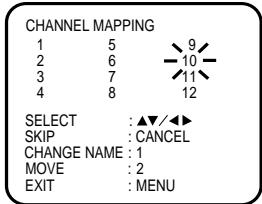
- If you want to turn over the page when the blinking spot is in the left or right edge of on-screen, press >> or <或> repeatedly until the next page's 12 stations appears.
3 Press "1" of 10 number buttons. The first display line will change to "CHANGE BROADCAST NAME".
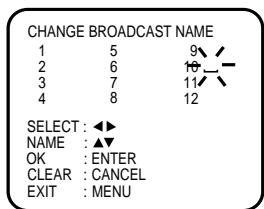
4 Press or
repeatedly until the desired
character appears. Then press . Use

or
to select the next character. Then press
Up to four characters can be used to create a station name. The character " " stands for a space.
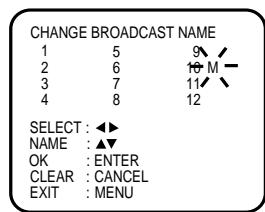
Then press ENTER
Each press of display as follows.
will change the screen
$$ \leftarrow\begin{array}{c}\rightarrow A, B, C, \dots X, Y, Z \rightarrow 0, 1, 2, \dots 7, 8, 9\\sqcup \leftarrow - \leftarrow + \leftarrow / \leftarrow \bullet \rightarrow\end{array} $$
Press MENU repeatedly until the TV picture appears on the screen.
Note:
When a wrong character is entered, press CANCEL
and enter the correct character.
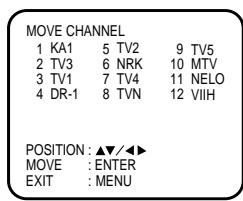
Reassigning TV station positions Preparation
Turn on the TV, and select the AV-program position on TV.
Example: Reassign the TV station under No.
6(TV3) to position No. 2(NRK).
1 Select the "CHANNEL MAPPING" in Menu-screen in the same way as the step 1 2 at the left side of page 11. Then press ENTER.
2 Press / or repeatedly until the TV station to be reassigned blinks.
3 Press "2" of 10 number buttons. Then, the TV station will be moved to the first display line. And position 6 becomes blank.
4 Press / or repeatedly until the position number blinks to which the selected TV station is to be moved, then press ENTER. WAIT blinks.
The data will be ordered in the table newly.
5 After approx. 12 seconds the station TV3 is set in new position 2. The NRK will be extracted to the first line.
Now to finish this procedure and at the same time set the protruded station(NRK) to the blank position 6, press MENU repeatedly until TV-station appears.
- Or you can of course select another station to set in the protruded sta
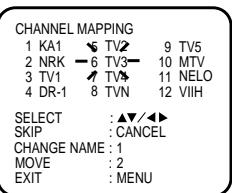
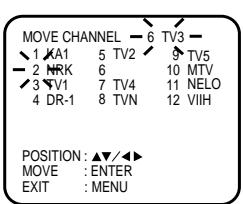
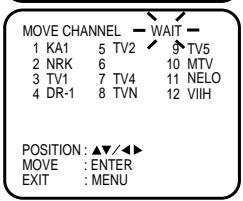
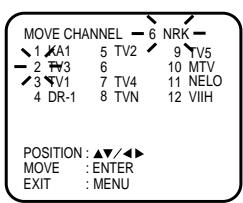
Press MENU repeatedly until the TV picture appears on the screen.
- A position number(6) will indicated near the protruded station(NRK) at the first line. If any button is not pressed for more than 60 seconds, this station(NRK) will be set to this position number(6) automatically.
Skipping unwanted TV stations (Skip those TV stations that are not wanted to be selected by pressing the CHANNEL button.)
Preparation
Turn on the TV, and select the AV-program position on TV.
1 Press MENU.
Press or repeatedly until the dot before CHANNEL SETUP blinks. Then press ENTER.
2 Press or repeatedly until the dot before CHANNEL MAPPING blinks. Then press ENTER.
3 Press or repeatedly

until the TV station to be skipped blinks.
The every channel will appear in the background of this setting screen.

4 Then press CANCEL. The number before the canceled channel (e.g. 12) will be bracketed.
Canceling the skip function:
Press or repeatedly until the skipped TV station blinks, then press CANCEL.
The brackets will disappear.
Press MENU repeatedly until the TV picture appears on the screen.
The Auto CH Memory function(See page 11) memorizes all broadcasts to the suitable CH positions by where you done this function.
However one broadcast may not be memorized depend on the bad receiving condition. In case of these broadcast, use this Manual tuning function.
Manual station presetting
You activate the auto search function until your preferred station is tuned in. Then You memorize this station into the chosen channel memory. For each station you repeat this procedure.
Preparation
Turn on the TV, and select the AV-program position on TV.
Example: Preset the SAT1 on program position 5.
1 Press MENU
Press

or

repeatedly
until the dot before CHANNEL SETUP blinks. Then press ENTER.
TIMERRECSET
VCR EXTENSION
HARPNESS
CHANNEL SETUP
SYSTEMSETUP
SELECT :▲
ENTER:ENTER
EXIT : MENU
Press
Press

or

repeatedly
until the dot before CH TUNING blinks. Then press ENTER.
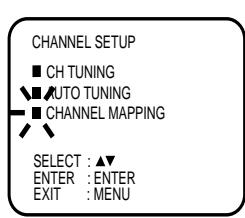
CHANNEL SETUP
CHTUNING
AUTO TUNING
CHANNEL MAPPING
SELECT :▲
ENTER : ENTER
EXIT ; MENU
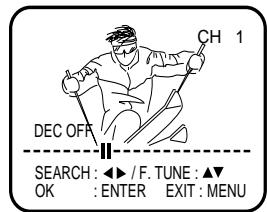
3 Press >> (rising frequency) or 一 (falling frequency) once. The search starts. It stops at each broadcast automatically ("I" change to "▶"). Press >> or 一 repeatedly until the SAT1 appears. Only in case of receiving of
the weak broadcast (drifting picture), search does not stop. If you want to stop, press x = x or

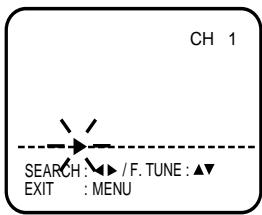
4 If the picture is not satisfactory press


until the best
picture is achieved.
Then press ENTER.
5
Press


repeatedly
until "5" displayed. Or enter 5 with 10 number button.
Then press ENTER.
6 Repeat the steps 3 and 5 to preset other TV stations.
7 Press MENU repeatedly until the TV picture appears on the screen
Note:
Occasionally, the auto search might catch a weak signal and stop. If the TV station signal is weak, you shouldn't store this station.
shouldn't store this station. In that case restart the auto search using or
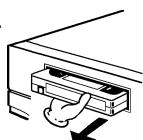
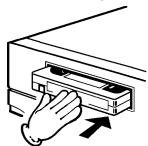
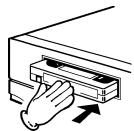
Loading and Unloading a Cassette Tape Use only video cassette tapes marked VHS
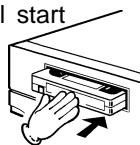
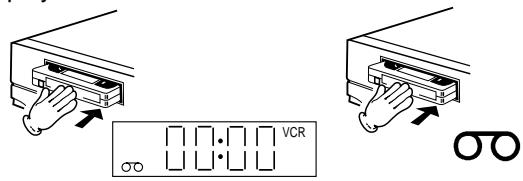
Loading
Push the center of the tape until it is automatically inserted.

Insert the cassette tape with its labeled side facing up and the erase prevention tab positioned at your left. An inverted cassette tape cannot be inserted.
Erase prevention tab
Automatic power ON
When you insert a cassette tape the VCR power will turn ON automatically.
Automatic playback
When loading a cassette tape without an erase prevention tab, playback will start automatically.
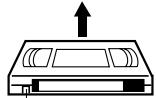
Unloading
1 Press STOP/EJECT on the VCR. When a tape is being played press this button twice.
OR: Press EJECT on the remote control. Even if a tape is being played, press this button only once.

2 Remove the cassette tape.
Automatic tape eject
When the VCR is automatically rewinding the tape and reaches its beginning, the cassette tape will be ejected automatically.
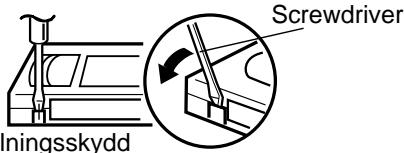
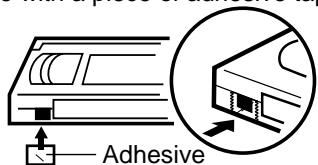
To prevent accidental erasure
Remove the erase prevention tab with a screwdriver.
To record again
Cover the hole with a piece of adhesive tape.
tape
Playback
Preparation
Turn on the TV, and select the AV-program position on TV.
1 Load a pre-recorded cassette tape. When loading a cassette tape without an erase prevention tab, playback will start automatically.
2 Press . Playback will start.
If the cassette has not loaded yet, 00 will blink for 4 seconds.
To stop playback


To rewind the tape or forward it rapidly
To rewind the tape:

To forward the tape:

Forward/reverse picture search mode
When the tape is being transported you can switch to picture search mode (see next page). To do this, press 串 or 串 and hold it down. The unit will resume the tape transport as soon as the button is released.
NTSC Video cassette-Playback
When using a pre-recorded NTSC video cassette tape, the connected TV set must operate with a 60 Hz vertical frequency. Otherwise the on-screen picture will be affected by vertical rolling. Even if your TV set is capable of processing NTSC video signals, the picture may be shortened vertically (appearance of black bars at the top and at the bottom of the TV screen). The dubbing of a NTSC video cassette tape to a standard PAL VCR is not possible.
Picture Search
Reverse picture search function

Press x 1 or x 2 during the playback.
Forward picture search function

Press x 1 or x 2 during the playback.
- To return to playback: Press

Still Picture
Press PAUSE/STILL during playback. To resume
normal playback, press
Digital Auto Tracking Adjustments
When a cassette tape is played, the Digital Auto Tracking System will be activated automatically and provide the optimum picture quality. The ATR indicator blinks while the system is searching for optimum tracking. At the same time, the sound output may be slightly distorted until the automatic adjustment is completed. Then the ATR indicator stops blinking and remains lit as long as the automatic tracking continues. In case of noise-distorted recordings from other sources the system will perform several attempts to improve the playback picture
quality. Use TR to reduce the picture noise on these cassette tapes. You can adjust the Tracking also with CHANNEL on the unit. After doing that, the ATR function will be deactivated, and the ATR indicator is unlit. To return to automatic tracking, eject the tape and play again (see page 14).

Note:
- These Special Playback will automatically change to playback after approx. 5 minutes to protect the video tape against excessive wear.
- When during a Reverse picture search the beginning of tape is reached, the unit will return to playback automatically.
Adjusting the sharpness of the picture
You can make the playback picture clearer or softer.
1 Press
Playback will starts.
2 Press MENU.
TIMERRECSET
CR EXTENSION SHARPPNESS
CHANNEL SETUP SYSTEM SETUP
3 Press 一 or 一 within 60 seconds to adjust
the picture sharper or softer.
Increasing the number makes the picture sharper, and decreasing the number makes the picture softer.
softer sharper
4 Press MENU repeatedly until the TV picture appears on the screen.
Note:
- You can select SHARPNESS in step 2 only during playback.
- To return to the initial sharpness setting, press CANCEL while the sharpness setting screen is appearing.
Scene repeat playback
Preparation
- Turn on the TV, and select the AV-program position on TV.
- Load a video cassette with the erase prevention tab intact. (Otherwise you can not select the position SCENE REPEAT in menu)
1 Press MENU.
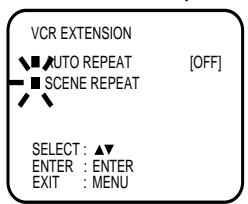
Press or repeatedly until the dot before VCR EXTENSION blinks. Then press ENTER.
2 Press or repeatedly until the dot before SCENE REPEAT blinks. Then press
ENTER.
The playback starts automatically.
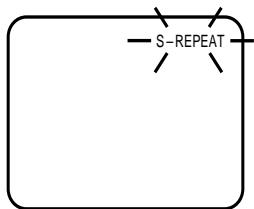
3 Press ENTER at the point you want to start scene repeat playback.
S-REPEAT will blink on the screen.
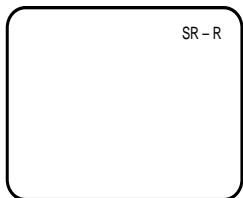
4 Press ENTER once again at the point you want to end scene repeat playback.
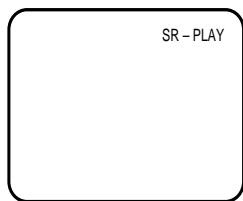
SR-R will appear on the screen and the tape will be rewinded automatically to go back to the starting point.
5 When the starting point was found, the Scene repeat-playback will start automatically.
Now, the Scene you extracted at step 3 and 4 will be played back repeatedly.
To stop Scene repeat playback:

Note:
SR-PLAY in step 5 will not be indicated from the second repeat playback.
Normal repeat playback
Preparation
- Turn on the TV, and select the AV-program position on TV.
- Load a video cassette with the erase prevention tab intact.
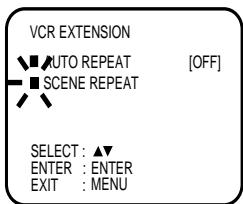
1 Press MENU.
Press or repeatedly until the dot before VCR EXTENSION blinks. Then press ENTER.
AMERRECSET
VCR EXTENSION
SHARPNESS
CHANNEL SETUP
SYSTEMSETUP
SELECT:▲
ENTER:ENTER
EXIT : MENU
2 Press or repeatedly until the dot before AUTO REPEAT blinks.
3 Press x = y + z or ENTER to select [ON] or [OFF].
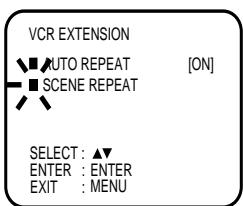
4 Press MENU repeatedly until the TV picture appears on the screen.
If you press , the unit will repeat playing the video tape until the repeat mode is cancelled.
Note:
To cancel auto repeat mode follow above steps 1 to 3, then select "OFF" and confirm by pressing MENU.
Counter Display
ZERO RETURN function
This function makes tape-rewinding stop at the counter 00:00:00 position automatically.
Preparation
-
Turn on the TV, and select the AV-program position on TV.
-
Load a video cassette with the erase prevention tab intact.
1 Press CALL.
The counter display shows the tape running time during playback or recording.

2 Press COUNTER RESET at the desired tape position (e.g. the beginning of recording). The counter display will be reset to the "00:00:00" position.
3 Press when playback or recording is finished.
Press ZERO RETURN. The tape will rewind and automatically stop at the "00:00:00" position.
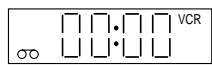
The CLOCK/COUNTER-button
Each time you press CLOCK/COUNTER, the clock and tape counter alternate with each other in the VCR display.
Note:
- When rewinding the tape from the "00:00:00" position, a minus sign (-) appears at the left end of the tape counter.
- When you load a video cassette, the display indication changes to "00:00:00".
- The counter display does not function on non-recorded (blank) sections of the tape. When you rewind, fast forward or play tapes through blank sections, the counter display stops.
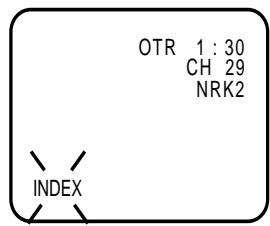
Video Index Search System
The Video Index Search System enables you to locate the beginning of any recording made on this unit. Whenever a recording has begun or when the channel is changed during the RECORD PAUSE mode, an invisible INDEX mark is recorded on the tape. This mark can easily be located by using and .
1 Press INDEX during the playback or tape stop mode.
2 Press number buttons of 0-9 to enter the number of INDEX markings you wish to skip.
Example: If you wish to go to the third recording from the current position, press 3 of number buttons 0-9.
3 Press or . The unit will skip over the selected INDEX markings, when the INDEX marking you chose is found the VCR will resume playing.
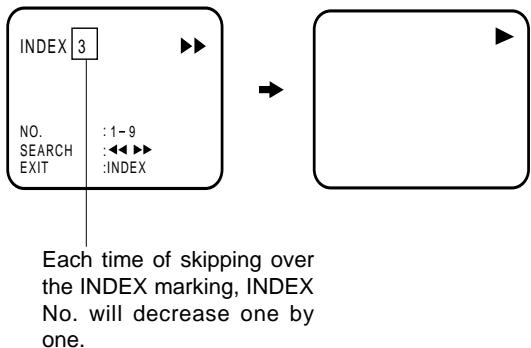
Note:
- When you record an index mark at the very beginning of the tape, the mark may not be found.
- During an index search the tape may stop and begin to play at a slightly different location.
- Video Index Search System may not function properly with old or worn video tapes.
- Maximal 9 INDEX-Marks can be searched.
Preparation
Turn on the TV, and select the AV-program position on TV.
1 Load a blank cassette tape with the erase prevention tab intact. (The VCR will automatically turn on.)
2 Select the program you want to record with CH or 10 number buttons.
1~9: e.g. 5 = press "5"
10~80: e.g. 29 = press "2" and "9".
3 If a recording in Long Play mode is intended, press SPEED SP/LP to display "LP". To check the tape speed, press CALL (see bottom right on this page).
4 Press REC/OTR to start recording.
If the erase prevention tab is removed, the tape will eject when REC/OTR is pressed for recording.
To Stop Recording
Press

To Stop Recording Temporarily
To stop a recording for a short period of time press PAUSE/STILL. Press this button again if you want to resume the recording.

Attention:
A safety circuit turns the pause mode off automatically after 5 minutes, and the VCR will stop the recording mode.
Note:
Since the VCR has a built-in TV tuner the TV set may be turned off when recording. The TV set may only be used to check for accurate program adjustments or to monitor recordings.
Recording with a SCART Cable
You can record a program using the TV receiver of the VCR and at the same time watch another program on the TV set using its receiver. As the VCR automatically switches the TV set the following points should be observed:
1 Press TV/VCR until "VCR" appears on the display. Select the program on the VCR you want to record. This program can be watched on the screen and recorded by the VCR.
2 While the VCR is recording press TV/VCR until the "VCR" indicator on the display goes off. The TV set now displays the program of its built-in receiving module. Select the TV channel you want to watch on the TV set. Although the TV set now shows another program the VCR will
continue recording the previously selected program.
3 Using TVVCR you can switch the TV screen between the VCR picture and the TV picture. If
the "VCR" indicator is lit on the display, you will watch the VCR picture. This has no trouble on the recording.
Auto Rewind Feature
The VCR will automatically rewind when the tape has ended (except during OTR and TIMER REC). It will also eject the cassette tape and turn the unit's power off.
To Display VCR operation Status
Press CALL. The clock, day of the week and more informations will be indicated.
To cancel the indicating: Press CALL until all indicator disappear.
The one-touch timer recording feature provides a simple and convenient way to make a timed recording.
Preparation
Turn on the TV, and select the AV-program position on TV.
1 Load a blank cassette tape with the erase prevention tab intact. (The VCR will automatically turn on.)
2 Select the program you want to record with CH or 10 number buttons.
1~9: e.g. 5 = press "5"
10~80: e.g. 29 = press "2" and "9".
3 If a recording in Long Play mode is intended, press SPEED SP/LP to display "LP". To check the tape speed, press CALL (see page 18).
4 Press REC/OTR twice. The recording will start and stop after 30 minutes. Each additional press of REC/OTR will increase the recording time for
another 30 minutes up to a maximum of 5 hours (see table below).
Tape speed: SP
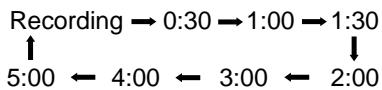
Tape speed: LP

If REC/OTR is pressed once during the recording, the remaining time appears on the screen. When pressed again, the recording time is extended to the nearest 30-minute interval.
Note:
During the OTR, any other function will not operate.
To Extend the Recording Time
Press REC/OTR
repeatedly until the desired time appears on the display.
To stop the OTR


Timer recording can be programmed on the TV-screen with the remote control. The built-in timer allows automatic unattended recording of up to 8 programs within 1 month.
Preparation
- Turn on the TV, and select the AV-program position on TV.
- Load a video cassette with the erase prevention tab intact.
- Make sure with CALL that the time and date are correct.(see page 18).
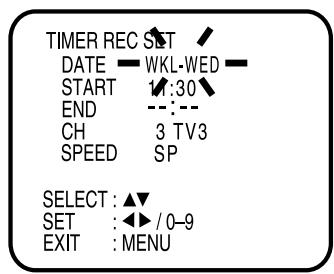
Example: Timer recording for channel 1, 13:00 to 14:30 with Tape speed LP on timer program number 1.
1 Press MENU. Press or repeatedly until the dot before TIMER REC SET blinks. Then press ENTER.
Note: If any button is not pressed within 60 seconds, the unit switches back to TV operation.
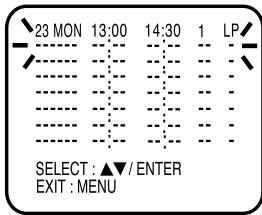
2 Each line stand for one program of the 8 memories. Select one line with or . Then press ENTER.
3 Set the desired date with 或10number buttons. Then press to accept it.

4 Set the Starting time (13:00), ending time (14:30), channel (1 RTP1) and Tape speed (LP) in the same way as the step 3.
The every channel will appear in the background of this setting screen.
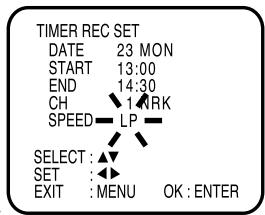
In case of an erroneous
input press to go back to before step and enter again.
5 Press ENTER to accept them.
To enter other programs, repeat steps 2 through 4. Or, press MENU repeatedly until the TV-picture appears.
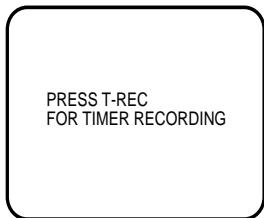
6 The message "PRESS T-REC FOR TIMER RE-CORDING" will appear on TV-screen.
7 You can turn on the timer right now or later by pressing of TIMER REC or . It was not until you turn on the timer that recording will automatically start at the programmed time.
As soon as timer is set, clock symbol will appear in display.
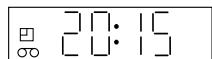
If no video cassette has been loaded, the clock symbol blinks.
- If the cassette is ejected, the erase prevention tab of the cassette may be removed.(see page 14)
- As long as the timer is activated (clock symbol will appear), you cannot use the VCR. If you want to use the VCR, press TIMER REC at first to deactivate the timer.
Note:
- In the event of a power failure the data of the automatic recording will be maintained in the built-in memory for about 30 minutes. Also, the clock will continue to run for this period of time. Thereafter the data will be deleted. When the power resumes, the time display will blink indicating that the timer setting will have to be set.
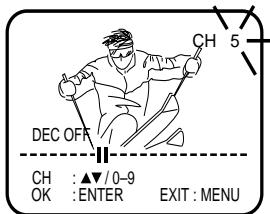
- In case of the timer recording from the scart socket proceed as follows: When "CH" is blinking in picture 4, press AV repeatedly until AU appears.
- If the clock symbol blinks when the timer recording is completed, the TV program has not been completely recorded because of an insufficient tape supply.
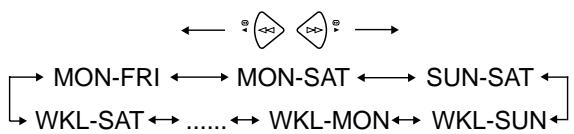
Weekly (e.g. WKL-TU: each Tuesday) or daily (e.g. MON-SAT: Monday to Saturday) Timer recording.
Follow the procedure for timer recording on both pages before. At picture 3 press 或 repeatedly until the desired setting appears. Then press . When you press 或 repeatedly, the indicator at DATE will change as follows, in case of that today is Friday..
In case of Timer programs-overlapping
Do not overlap timer programs as portions of the conflicting programs will be lost. The first recording time has priority over the next recording time as shown in the diagram below.
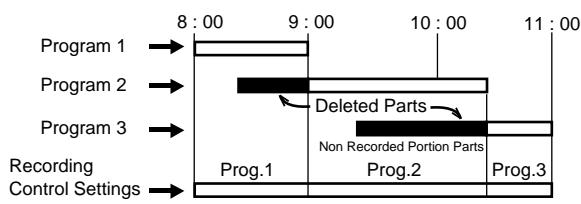
Note:
- The daily/weekly recording can be made continuously until the recording is canceled or the tape reaches the end.
- During timer recording the automatic rewinding mechanism does not function.
Confirmation / Cancellation of the Timer Recording
Preparation
Turn on the TV, and select the AV-program position on TV.
1 If the Timer has been activated, now press TIMER REC to deactivate the Timer. The clock symbol will disappear.
2 Press PROGRAM. All the 8 Timer memories will appear.
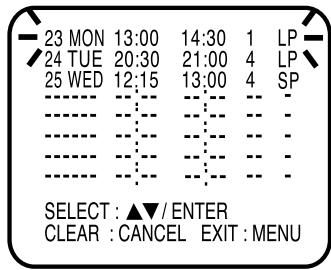
3 To cancel Timer program:
Press or to select the written line. Then press CANCEL. This line is now cancelled.
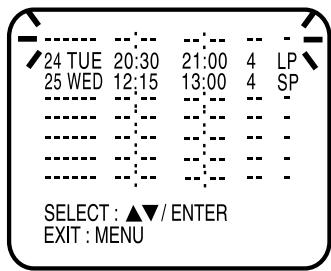
4 Press MENU (or PROGRAM) repeatedly until the TV-picture appears..
Note:
If there are other timed record programs remaining, TIMER REC must be pressed to reactivate the timer, otherwise the remaining timer record programs will be ignored.
When you try to connect with a cable, make sure the power of both units have been turned off.
1 Load a blank cassette tape with the erase prevention tab intact into the recording VCR. Load the previously recorded cassette tape into the playback VCR or a video camera.
2 Use AV or CH of the recording VCR to select the "AU" rather than the preset channel.
3 Press REC/OTR and then PAUSE/STILL of Recording unit.
4 Press PLAY-button and then PAUSE/STILL-button of Playback unit.
5 Press PAUSE/STILL of both units simultaneously to start the Duplicating.
Note:
- Before starting the duplicating process, select the proper tape speed using SPEED SP/LP. For a prerecorded tape the correct tape speed will be set automatically during playback.
- Unauthorized recording of copyrighted television programs, movies, video tapes and other materials infringe on the rights of copyright owners and are contrary to copyright laws.
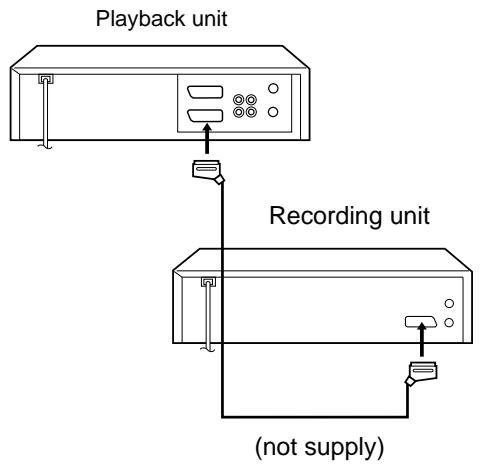
Connection with second Video recorder
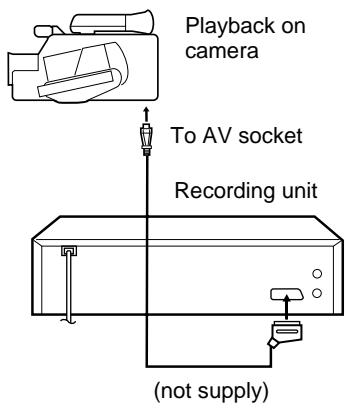
Connection with Video camera
For duplicating a previously recorded tape from a video camera, follow the video camera manufacturer's instructions. A simple video camera dubbing hookup is shown at left.
If your VCR does not work properly check the following points before calling a service technician.
| Symptoms | Possible causes | Remedy | Page |
| Operation | |||
| No power | The AC power cord is not connected. | Connect the AC power cord to an wall outlet. | 7 |
| Cassette tape is not automatically rewound and ejected. | Function only available in playback or normal recording modes; not available for Timer or OTR recordings. | — | |
| VCR does not work (although its power is turned on). | Timer is turned on, and clock symbol appears on the display. | Press TIMER REC to turn OFF the timer. The clock symbol will go off. | 20 |
| TV-Broadcast reception | |||
| A TV program selected by the VCR does not appear on the screen. | Antenna cable is disconnected. | Reconnect the antenna cable. | 7 |
| The video channel is not assigned properly. | On the TV set, select channel 36 or any other channel between 23 and 69 that is not preset to a TV station. | 9 | |
| The display does not indicate "VCR". | Press TV/VCR to indicate "VCR" on the display. | 18 | |
| Recording | |||
| Cassette tape ejects when TIMER REC or REC/OTR is pressed. | The erase prevention tab of the video cassette is removed. | Place a piece of adhesive tape over the gap. | 14 |
| PROGRAM function is not accessible. | The clock is not set. | Set the clock. | 10 |
| The timer is turned on. The clock symbol is lit. | Press TIMER REC to turn OFF the timer. The clock symbol must be unlit. | 21 | |
| Timer recording does not work. | The timer is turned off. The clock symbol is unlit. | Press TIMER REC to turn ON the timer. The clock symbol must be lit. | 20 |
| Time and date of the built-in clock are not set correctly. | Set the current time correctly. | 10 | |
| Timer function does not record the selected program but another one. | Wrong settings on the BS receiver. | For timer recordings the BS receiver must always be ON. | — |
| Tune in the desired TV program on the BS receiver. | — | ||
| STOP button does not work. | This is normal during the timer recording process. | Use TIMER REC to stop the current timer recording. | 21 |
| Playback | |||
| Cannot locate any index marks. | The tape is worn or damaged. | Try another tape. | 17 |
| Noise bars on screen. | Tracking is not adjusted. | Use TR + or – to adjust manually. | 15 |
| Video heads are dirty. | Call a service technician. | 24 | |
| The tape-material is bad. | Try another tape. | — | |
| Other functions | |||
| Remote control does not work. | It is not aimed at the remote sensor. | Aim it at the remote sensor. | 6 |
| Distance too far. | Shorten the distance to the VCR. | 6 | |
| Too much light in the room. | Reduce the light in the room. | 6 | |
| There is an obstacle in the path of the beam. | Clear the path of the beam. | 6 | |
| The batteries are weak. | Replace the batteries. | 6 | |
| The polarity of the inserted batteries is reversed. | Install the batteries correctly. | 6 | |
Video Head Clogging
The video heads record and playback pictures and sound on the video tape. In the event that they become dirty you won't be able to do a perfect recording and the playback picture will be extremely snowy. Also, keep in mind that a poor tape quality and a damaged cassette may contribute to the rapid accumulation of dirt on the heads.
Good Picture
Snowy Picture
Automatic Head Cleaning System
The Automatic Head Cleaning System cleans the video heads automatically when a cassette is inserted and ejected to prevent dirt from accumulating on the heads. However, manual head cleaning is needed if the picture on playback is still unclear although the picture on program is normal. This failure signifies that the head is getting dirty and can occur when playing poor quality or damaged tapes. If the heads require cleaning, use a high quality head-cleaning cassette or have them cleaned professionally.
Attention:
Video heads may eventually wear out and should be replaced when they fail to produce clear pictures even after having been carefully cleaned.
Power Source: AC 230 V/50 Hz
Power Consumption: Approx. 9 W Operation
Approx. 2 W Standby
Operation Temperature: 5^ to 40^
Television System: CCIR: 625 lines, 50 fields, PAL color signal
NTSC tape playback with PAL/60 Hz
Channel coverage: 2-12, X, Y, Z, S1-S41, 21-69
Tape Format: VHS
Tape Speed: SP/LP
Rewind/Forward Time: Approx. 1 minutes 12 seconds (E-180 Cassette)(at +25°C)
Heads: Video: 2 rotary heads
Audio/Control: 1 stationary head
Erase: 1 full track erase, 1 audio erase head
Input Level: SCART-jack:VIDEO:1Vp-p,75
AUDIO: 500mV , 50kV
Output Level: SCART-jack:VIDEO:1Vp-p,75
AUDIO: 500mV , 1 k
RF Output Channel: UHF channel 36 (23 to 69)
Weight: 3,2kg
Dimensions: 360 (W) x 95 (H) x 229 (D)
Tape speed and maximum recording time
| Tape speed | Video cassette tape | |||||
| E-300 | E-240 | E-180 | E-90 | E-60 | E-30 | |
| Standard Play (SP) | 5 hours | 4 hours | 3 hours | 11/2hou. | 1 hours | 30 min. |
| Long Play (LP) | 10 hours | 8 hours | 6 hours | 3 hours | 2 hours | 1 hours |
Accessories
Remote control 1
Battery (AAA/R03/UM-4) 2
DIN/coaxial cable 1
Weight and dimensions shown are approximate. Specifications are subject to changes without prior notice.