
QX4200 - MIDI Sequencer AKAI - Free user manual and instructions
Find the device manual for free QX4200 AKAI in PDF.
User questions about QX4200 AKAI
0 question about this device. Answer the ones you know or ask your own.
Ask a new question about this device
Download the instructions for your MIDI Sequencer in PDF format for free! Find your manual QX4200 - AKAI and take your electronic device back in hand. On this page are published all the documents necessary for the use of your device. QX4200 by AKAI.
USER MANUAL QX4200 AKAI
LOCATION OF CONTROLS AND INDICATORS 5-7
OPERATING INSTRUCTIONS 7-10
CARE OF MAINTENACE 11
TROUBLESHOOTING GUIDE 12
LABEL MENTION 13
SPECIFICATION 14
IMPORTANT SAFETY INSTRUCTIONS
CAUTION
RISK OF ELECTRIC SHOCK DO NOT OPEN
ATTENTION: To reduce the risk of electric shock, do not remove the cover. There are no user serviceable parts inside the unit. Refer all servicing to qualified personnel.

The lightening flash with arrowhead symbol within the triangle is a warning sign alerting the user of "dangerous voltage" inside the unit.

The exclamation point within the triangle is a warning sign alerting the user of important instructions accompanying the product.

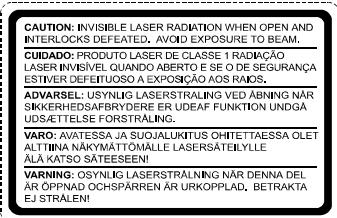
CAUTION: Invisible laser radiation when open and interlocks defeated. Avoid exposure to beam.
I. READ INSTRUCTIONS - All the safety and operating instructions should be read before the product is operated.
-
RETAIN INSTRUCTIONS - The safety and operating instructions should be retained for future reference.
-
HEED WARNINGS - All warnings on the product and in the operating instructions should be adhered to.
-
FOLLOW INSTRUCTIONS - All operating and use instructions should be followed.
-
CLEANING - Unplug this product from the wall outlet before cleaning. Do not use liquid cleaners or aerosol cleaners. Use a damp cloth for cleaning.
-
ATTACHMENTS - Do not use attachments not recommended by the product manufacturer as they may cause hazards.
-
WATER AND MOISTURE - Do not use this product near water - for example, near a bath tub, wash bowl, kitchen sink, or laundry tub; in a wet basement; or near a swimming pool; and the like.
8 ACCESSORIES - Do not place this product on an unstable cart, stand, tripod, bracket, or table. The product may fall, causing serious injury to a child or adult, and serious damage to the product. Use only with a cart, stand, tripod, bracket, or table recommended by the manufacturer, or sold with the product. Any mounting of the product should follow the manufacturer's instructions, and should use a mounting accessory recommended by the manufacturer. A Product and Cart Combination Should Be Moved with Care - Quick stops, excessive force and uneven surfaces may cause the product and cart combination to overturn.
-
VENTILATION - Slots and openings in the cabinet are provided for ventilation and to ensure reliable operation of the product and to protect it from overheating, and these openings must not be blocked or covered. The openings should never be blocked by placing the product on a bed, sofa, rug or other similar surface. This product should not be placed in a built-in installation, such as a bookcase or rack, unless proper ventilation is provided or the manufacturer's instructions have been adhered to.
-
POWER SOURCES - This product should be operated only from the type of power source indicated on the marking label. If you are not sure of the type of power supply to your home, consult your product dealer or local power company. For products intended to operate from battery power, or other sources, refer to the operating instructions.
II. GROUNDING OR POLARIZATION - This product may be equipped with a polarized alternating-current line plug (a plug having one blade wider than the other). This plug will fit into the power outlet only one way. This is a safety feature: If you are unable to insert the plug fully into the outlet, try reversing the plug. If the plug should still fail to fit, contact your electrician to replace your obsolete outlet. Do not defeat the safety purpose of the polarized plug.
-
POWER-CORD PROTECTION - Power-supply cords should be routed so that they are not likely to be walked on or pinched by items placed upon or against them, paying particular attention to cords at plugs, convenience receptacles, and the point where exit from the product.
-
NONUSE PERIODS - The power cord of the product should be unplugged from the outlet when left unused for long periods of time.
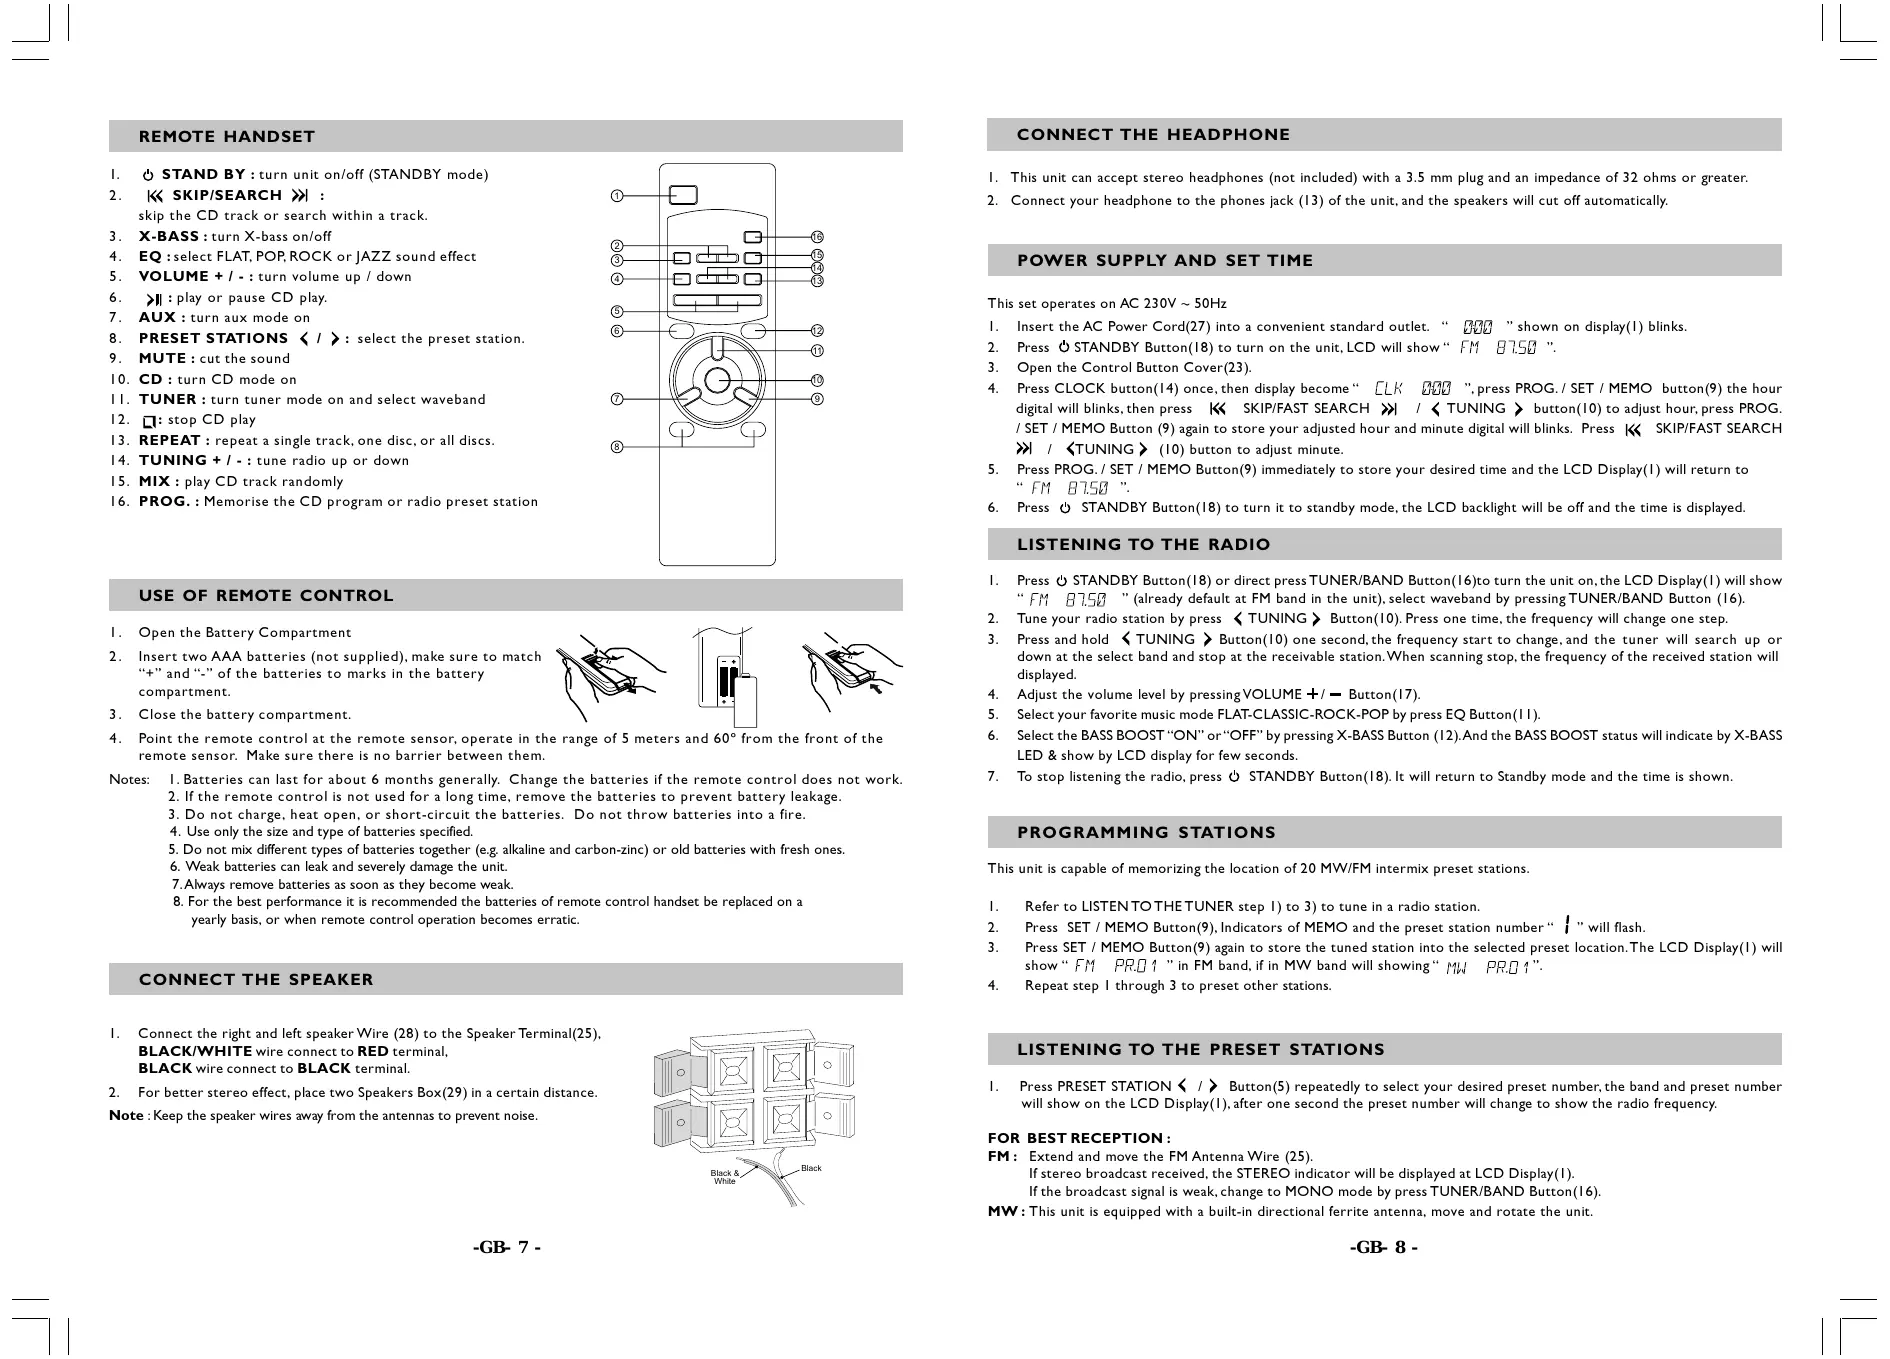
14. OUTDOORANTENNA GROUNDING
- If an outside antenna or cable system is connected to the product, be sure the antenna or cable system is grounded so as to provide some protection against voltage surges and built-up static charges. Article 810 of the National Electrical Code,ANSI/NFPA 70, provides information with regard to proper grounding of the mast and supporting structure, grounding of the lead-in wire to an antenna discharge unit, size of grounding conductors, location of antenna-discharge unit, connection to grounding electrodes, and requirements for the grounding electrode. See Figure 1.

-
LIGHTENING - For added protection for this product during a lightening storm, or when it is left unattended and unused for long periods of time, unplug it from the wall outlet and disconnect the antenna or cable system. This will present damage to the product due to lightening and power-line surges.
-
POWER LINES - An outside antenna system should not be located in the vicinity of overhead power lines or other electric light or power circuits, or where it can fall into such power lines or other electric light or power circuits, or where it can fall into such power lines or circuits. When installing an outside antenna system, extreme care should be taken to keep from touching such power lines or circuits as contact with them might be fatal.
-
OVERLOADING - Do not overload wall outlets, extension cords, or integral convenience receptacles as this can result in a risk of fire or electric shock.
-
OBJECT AND LIQUID ENTRY - Never push objects of any kind into this product through openings as they may touch dangerous voltage points or short-out parts that could result in a fire or electric shock. Never spill liquid of any kind on the product.
-
SERVICING - Do not attempt to service this product yourself as opening or removing covers may expose you to dangerous voltage or other hazards. Refer all servicing to qualified service personnel.
-
DAMAGES REQUIRING SERVICE - Unplug this product from the wall outlet and refer servicing to qualified service personnel under the following conditions.
a) When the power-supply cord or plug is damaged.
b) If liquid has been spilled, or objects have fallen into the product.
c) If the product has been exposed to rain or water.
d) If the product does not operate normally by following the operating instructions. Adjust only those controls that are covered by the operating instructions as an improver adjustment of other controls may result in damage and will often require extensive work by a qualified technician to restore the product to its normal operation.
f) When the product exhibits a distinct change in performance - this indicates a need for service.
- REPLACEMENT PARTS - When replacement parts are required, be sure the service technician has used replacement parts specified by the manufacturer or have the same characteristics as the original part, Unauthorized substitutions may result in fire, electric shock or other hazards.
- SAFETY CHECK - Upon completion of any service or repair to this product, ask the service technician to perform safety checks to determine that the product is in proper operating condition.
- HEAT - The product should be situated away from heat sources such as radiators, heat registers, stoves or other products (including amplifiers) that produce heat.
PREPARATION FOR USE
CD-R / CD-RW play capability of this unit may vary depend on quality of media, CD burner and application software.
Unpacking and Setup
- Carefully remove the unit from the display carton and remove all packing material from the unit itself.
- Remove any descriptive labels that may be found on either the front or top cabinet of the unit. Do not remove any labels located on either the back or button cabinet of the unit.
- Open the CD compartment door. There is a white card in the CD compartment which is Intended to prevent the CD pickup from moving during shipment of the product. Remove this card from the CD compartment before use.
Power Sources
This audio system is designed to operate on 230VAC 50Hz house current. Attempting to operate this unit from any other power source may cause damage to unit, which is not covered by your warranty.
ACOperation
Unwind the AC cord and extend it to its full length, Insert the AC plug into any convenient 230V AC 50Hz household outlet .
- Hold the plug to disconnect it from the mains outlet. Do not pull the power cord.
- When the plug of the unit is connected to the mains outlet, the unit will be still connected to AC even of the power is turned off.
- Disconnect the plug as soon as liquid or objects enter the unit. The unit cannot be used until being checked by experts.

CONTROLS IDENTIFICATION
I. MULTI FUNCTION LCD DISPLAY
2. X-BASS LED INDICATOR
3. CD PLAY/PAUSE BUTTON
4. CD STOP BUTTON
5. PRESET STATION / BUTTON
6. AUX BUTTON
7. MIX BUTTON
8. REPEAT BUTTON
9.PROG./SET/MEMOBU TTON
10. < TUNING > / << SKIP/FAST SEARCH >> BUTTON
I1. EQ BUTTON
12. X-BASS BUTTON
13. PHONES JACK
14. CLOCK BUTTON
I5. TIMER ON/OFF BUTTON
16. TUNER/BAND BUTTON
17. VOLUME + /- BUTTON
18. STANDBY BUTTON
19. CD BUTTON
20. REMOTE SENSOR
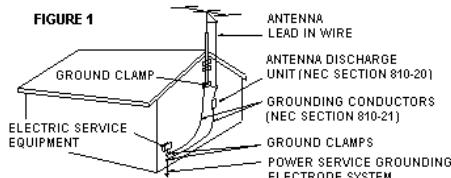
21. CDDOOREJECTBUTTON
22. CD COMPARTMENT
23. CONTROL BUTTON COVER
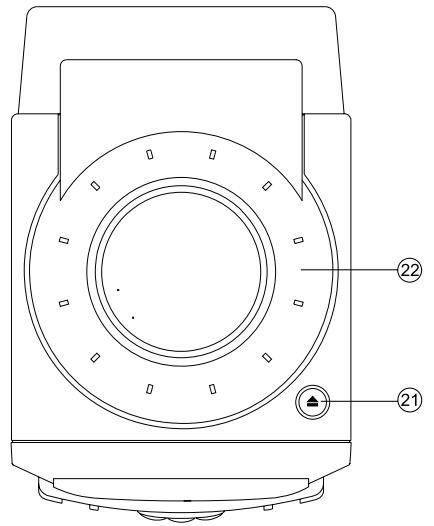
24. AUX JACK INPUT
25. SPEAKER TERMINAL
26. FMANTENNAWIRE
27. AC POWER CORD
28. SPEAKER WIRE
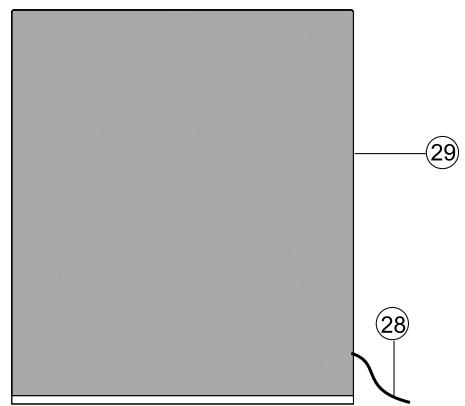
29. SPEAKER BOX
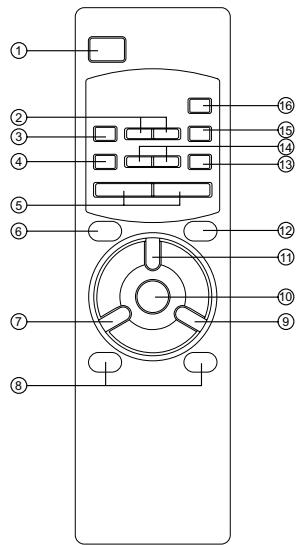
REMOTE HANDSET
- STAND BY: turn unit on/off (STANDBY mode)
- | « SKIP/SEARCH » : skip the CD track or search within a track.
- X-BASS: turn X-bass on/off
- EQ:select FLAT,POP,ROCK or JAZZ sound effect
- VOLUME + I -: turn volume up / down
- : play or pause CD play.
- AUX: turn aux mode on
- PRESET STATIONS I : select the preset station.
- MUTE: cut the sound
- CD: turn CD mode on
III. TUNER: turn tuner mode on and select waveband - stop CD play
- REPEAT: repeat a single track, one disc, or all discs.
- TUNING + / -: tune radio up or down
- MIX: play CD track randomly
16.PROG.:Memorise the CD program or radio preset station
USE OF REMOTE CONTROL
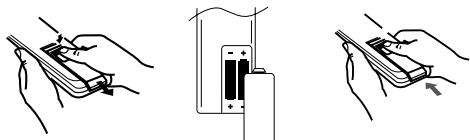
I. Open the Battery Compartment
2. Insert two AAA batteries (not supplied), make sure to match "+" and "-" of the batteries to marks in the battery compartment.
3. Close the battery compartment.
4. Point the remote control at the remote sensor, operate in the range of 5 meters and 60^ from the front of the remote sensor. Make sure there is no barrier between them.
Notes: I. Batteries can last for about 6 months generally. Change the batteries if the remote control does not work.
- If the remote control is not used for a long time, remove the batteries to prevent battery leakage.
- Do not charge, heat open, or short-circuit the batteries. Do not throw batteries into a fire.
- Use only the size and type of batteries specified.
- Do not mix different types of batteries together (e.g. alkaline and carbon-zinc) or old batteries with fresh ones.
- Weak batteries can leak and severely damage the unit.
- Always remove batteries as soon as they become weak.
- For the best performance it is recommended the batteries of remote control handset be replaced on a yearly basis, or when remote control operation becomes erratic.
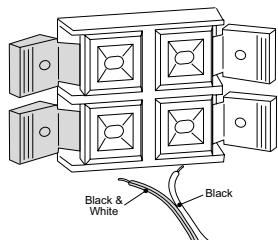
CONNECT THE SPEAKER
I. Connect the right and left speaker Wire (28) to the Speaker Terminal(25), BLACK/WHITE wire connect to RED terminal, BLACK wire connect to BLACK terminal.
2. For better stereo effect, place two Speakers Box(29) in a certain distance.
Note: Keep the speaker wires away from the antennas to prevent noise.
CONNECT THE HEADPHONE
I. This unit can accept stereo headphones (not included) with a 3.5mm plug and an impedance of 32 ohms or greater.
2. Connect your headache to the phones jack (13) of the unit, and the speakers will cut off automatically.
POWER SUPPLY AND SET TIME
This set operates on AC 230V ~ 50Hz
I. Insert the AC Power Cord(27) into a convenient standard outlet. “ 333 ” shown on display(1) blinks.
2. Press STANDBY Button(18) to turn on the unit, LCD will show “FM 87.50”.
3. Open the Control Button Cover(23).
4. Press CLOCK button(14) once, then display become “ [LK 000]”, press PROG. / SET / MEMO button(9) the hour digital will blinks, then press « SKIP/FAST SEARCH » | / « TUNING » button(10) to adjust hour, press PROG. / SET / MEMO Button (9) again to store your adjusted hour and minute digital will blinks. Press « SKIP/FAST SEARCH » | / « TUNING » (10) button to adjust minute.
5. Press PROG./SET/MEMO Button(9) immediately to store your desired time and the LCD Display(I) will return to "FM 87.50".
6. Press STANDBY Button(18) to turn it to standby mode, the LCD backlight will be off and the time is displayed.
- Press STANDBY Button(18) or direct press TUNER/BAND Button(16) to turn the unit on, the LCD Display(1) will show "FM 75" (already default at FM band in the unit), select waveband by pressing TUNER/BAND Button (16).
- Tune your radio station by press TUNING Button(10). Press one time, the frequency will change one step.
- Press and hold TUNING Button(10) one second, the frequency starts to change, and the timer will search up or down at the select band and stop at the receivable station. When scanning stops, the frequency of the received station will displayed.
- Adjust the volume level by pressing VOLUME + / - Button(17)
- Select your favorite music mode FLAT-CLASSIC-ROCK-POP by press EQ Button(I I).
- Select the BASS BOOST "ON" or "OFF" by pressing X-BASS Button (12). And the BASS BOOST status will indicate by X-BASS LED & show by LCD display for few seconds.
- To stop listening the radio, press STANDBY Button(18). It will return to Standby mode and the time is shown.
PROGRAMMING STATIONS
This unit is capable of memorizing the location of 20 MW/FM intermix preset stations.
I. Refer to LISTEN TO THE TUNER step 1) to 3) to tune in a radio station.
2. Press SET / MEMO Button(9), Indicators of MEMO and the preset station number “ I ” will flash.
3. Press SET / MEMO Button(9) again to store the tuned station into the selected preset location. The LCD Display(I) will show “FM PRO 1” in FM band, if in MW band will showing “MW PRO 1”.
4. Repeat step I through 3 to preset other stations.
LISTENING TO THE PRESET STATIONS
- Press PRESET STATION / Button(5) repeatedly to select your desired preset number, the band and preset number will show on the LCD Display(1), after one second the preset number will change to show the radio frequency.
FOR BEST RECEPTION :
FM: Extend and move the FM Antenna Wire (25).
If stereo broadcast received, the STEREO indicator will be displayed at LCD Display(1).
If the broadcast signal is weak, change to MONO mode by press TUNER/BAND Button(16).
MW : This unit is equipped with a built-in directional ferrite antenna, move and rotate the unit.
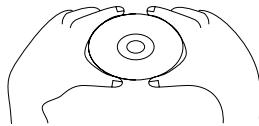
PRECAUTIONS FOR DISCS
HANDLING DISC
- To keep the disc clean, do not touch the play sides of the disc.
- Do not attach paper or ape to the disc.
- Keep the disc away from direct sunlight or heat sources.
- Store the disc in a disc case after playback.
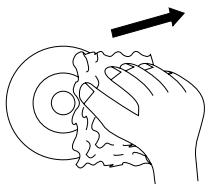
CLEANING DISC
- Before playback, wipe the disc outwards from the center with clean cloth.
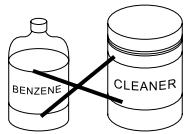
- Do not use any type of solvent such as thinner, done by qualified service personnel.
PLACEMENT
- Put the unit where ventilation is good enough to prevent overheating.
- Never put the unit in direct sunlight or near heat sources.
- Put the unit horizontally, never put any heavy object on the unit.
- To protect the pickup, do not put the unit where there is much dust. If there is dust on the pickup, use a cleaning disc to clean it.
- Refer to the operation instructions of the cleaning disc you bought.
LISTEN TO THE CD
- Press CD Button(19),“[ ] [R[ ] ” is displayed(1),
- Insert the disc( Label side up) to the CD Compartment(21 & 22), the total number of track and the total playing time are displayed(1).
- Press CD PLAY/PAUSE Button(3) to start playing and adjust the volume level(17).
- Select your favorite music mode FLAT-CLASSIC-ROCK-POP by pressing EQ Button(11).
- Select the BASS BOOST "ON" or "OFF" by pressing X-BASS Button (12). And the BASS BOOST status will indicate by X-BASS LED & show by LCD display for few seconds.
NOTE: Use also CD PLAY/PAUSE Button(3) to suspend momentarily the playing track. The current track number and the running time blinks on the display(1), and press again to resume play.
- To stop listening the CD, press CD STOP Button(4), then press STANDBY Button(18). It will return to Standby mode and the time is displayed.
OTHER CD PLAYER FUNCTIONS :
| « SKIP/FAST SEARCH »| Button(10) : press »| Button to skip forward to the next track or repeatedly to skip several tracks. Press « Button to return to the beginning of the track, or press repeatedly to skip backward several tracks at CD playing mode. Press and hold the « or »| button to search quickly within a track.
REPEAT Button(8): A single Track or whole CD can be repeated as any time as you like.
a) Press once to repeat your select track, the display (1) shows REPEAT.
b) Press twice to play the disc continuously, REPEAT on display blinks.
c) Press again to switch off this function.
MIX Button(7): Press to play randomly all the track of the disc, the MIX and the selected track number are displayed(1). Press again switch off this function.
PROGRAM Button(9): To select your own musical program.
a) Insert the disc(21 & 22). The total number of tracks and the total playing time are displayed(1).
b) Press PROG. Button(9), the display shows “ P - 1 ”, and “PROGRAM” on display blinks.
c) Select with « SKIP/FAST SEARCH » Button(10) your desired track, then press PROG. Button(9) to store your program in memory.
d) Redo this operation as many times as necessary. 20 tracks can memorised.
e) Press CD PLAY/PAUSE Button(3) to start playing and the PROGRAM Indicator will light up.
f) To cancel this function, press CD STOP Button(4) to stop the disc and press stop again Program function is cancelled.
NOTE : Normally when playing CD, the CD running time is displayed on the LCD Display (1). It can be changed to show disc remain time by pressing CD Button(19) at normally played.
AUXILIARY INPUT
This product can receive audio signals from other devices, such as TV, VCR, DVD player, tuner. To listen to such output,
I. Connect one end of a RCA plug signal wire (not included) into AUX IN jack (24),
2. Connect the other end of wire to your home equipment,
3. Press AUX Button(6), the 'AUX' and time display (I).
4. Play your home equipment.
5. Adjust the volume level by pressing and holding VOLUME +/ - Button(17).
6. Select your favorite music mode FLAT-CLASSIC-ROCK-POP by pressing EQ Button(11).
7. Select the BASS BOOST "ON" or "OFF" by pressing X-BASS Button (12). And the BASS BOOST status will indicate by X-BASS LED & show by LCD display for few seconds.
8. Stop listening auxiliary input, press STANDBY Button(18) to turn it on Standby mode and the time is displayed.
TIMER FUNCTION AND SET
- Press STANDBY Button(18) to turn on the unit,
- Press CLOCK Button(14) twice, then display show “N 340 ” and TIMER blinks, press SET / MEMO Button(9) the hour digital will blinks.
- Press SET / MEMO Button(9) to store your desired time and the display(I) will return to the last mode played.
- Press CLOCK Button(14) three times, display become “FF”, press TUNING / SKIP/FAST SEARCH
Button(10) to adjust the TIMER OFF time, press SET / MEMO Button(9) to store your desired time.
- Press TIMER ON/OFF Button(15), the TIMER indicator displayed
- Press STANDBY Button(18) to return to standby mode.
- When reaching the preset timer on time, the unit will be turned on in the last mode played, except in Auxiliary mode will change to tuner mode automatically.
- And reaching the preset Timer Off time, the unit will turn off automatically.
- Cancel this function, press TIMER ON/OFF Button(15) again and the Timer indicator will go off.
NOTE: When the power supply was interrupted, the tuner preset station, time and timer will be erased, and the time will blink on the LCD Display. So you need to set the information again.
SLEEP FUNCTION
- Press STANDBY Button(18) to turn on the unit,
- Select your desired function mode(6 or 16 or 19), volume level(17) and music mode(11).
- Press CLOCK Button(14) four times, then display become "5LEEP", press TUNING / << SKIP/FAST SEARCH >> Button(10) to adjust the sleep countdown time, press once will skip 10 minutes (90 minutes is the maximum). Press SET / MEMO Button(9) to store your desired. "5LEEP" and your desired countdown time displayed and it starts the countdown.
- The unit will turn off when countdown time is reached.
- To stop this function, press CLOCK(14) to "Sleep" mode, press
/ SKIP/FAST SEARCH > Button(10) to adjust the sleep time to "”, then press SET / MEMO Button(9), and the unit will play continually.
CARE AND MAINTENANCE
Caring for Compact Discs
- Treat the disc carefully. Handle the disc only by its edges. Never allow your fingers to come in contact with the shiny, unprinted side of the disc.
- Do not attach adhesive tape, stickers, etc. To the disc label.
- Clean the disc periodically with a soft, lint-free, dry cloth. Never use detergents or abrasive cleaners to clean the disc. If necessary, use a CD cleaning kit.
- If a disc skips or gets stuck on a section of the disc, it is probably dirty or damaged (scratched). When cleaning the disc, wipe in straight lines from the center of the disc to the outer edge of the disc. Never wipe in circular motions.
This unit is designed to play only compact discs bearing the identification logo as shown here. Other discs may not conform to the CD standard and may not play properly.
Compact Disc should be stored in their cases after each use to avoid damage.
Do not expose compact disc to direct sunlight, high humidity, high temperatures, or dust, etc. Prolonged exposure or extreme temperatures can warp the disc.
Do not stick or write anything on either side of the disc. Sharp writing instruments, or the ink may damage the surface.

Dripping warning:
"The product shall not be exposed to dripping or splashing and that no objects filled with liquids, such as vases, shall be placed on the product."
Ventilation warning
"The normal ventilation of the product shall not be impeded for intended use."
Unit maintenance
"Never put the unit in direct sunlight or near heat sources."
"Put the unit horizontally, never put any heavy object on the unit."
CONDENSATION
Moisture will appear on the pickup lens in the following cases:
The unit is suddenly moved from a cold place to a warm place.
The unit is put in a room with a heater, or in cold air from an air - conditioner.
* Use the unit in a humid place. In these cases, the unit cannot work. Unload the disc and leave the unit on for about one hour evaporates the water.
MORE INFORMATION
- Do not use your set immediately after transport from a cold place to a warm place, there may be condensation problems.
- Make sure that you keep your set away from water and high temperatures. Clean the player with a soft cloth, or a damp chamois leather. Never use solvents.
NOTES ON COMPACT DISCS
- If there is a scratch, dirt or fingerprints on the disc, it may cause tracking error. Before playing, clean the disc with a cleaning cloth. Wipe the disc from the center out. Don't store discs in places with high temperatures or high humidity - they can become warped. After playing, store the disc in its case.
TROUBLESHOOTING GUIDE
Should this unit exhibit a problem, check the following before seeking service.
| Symptom | Possible Cause | Solution |
| Radio | ||
| Noise or sound distorted on radio broadcasts. | Station not tuned properly for AM or FM. | Retune the AM or FM broadcast station. |
| FM: Telescopic antenna is not properly adjusted. | Reorient FM telescopic antenna. | |
| AM: Unit is not positioned correctly | Rotate unit until best reception is obtained. | |
| FM STEREO indicator does not light. | Poor FM signal being received or BAND switch is not set to FM STEREO. | Retune station, try another station or set BAND switch to FM STEREO. |
| Station is not broadcasting in stereo. | Change stations. | |
| AM or FM, no sound. | FUNCTION switch is not set to the RADIO position. | Slide the FUNCTION switch to the RADIO position. |
| Volume at minimum. | Increase Volume. | |
| Compact Disc Player | ||
| CD Player will not play. | FUNCTION switch is not set to the CD position. | Slide the FUNCTION switch to the CD position. |
| CD is not installed or installed upside-down. | Insert CD with label side up. | |
| CD skip while playing. | Disc is dirty or scratched. | Wipe disc with cloth or use another disc. |
| General | ||
| No Sound. | Headphones connected into the Headphones jack. | Remove the Headphones from the Headphones jack. |
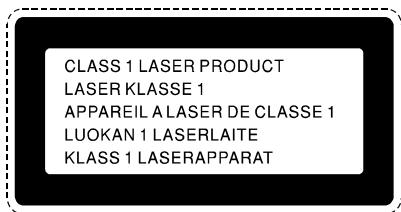
(I) LASER CAUTION LABEL (5 LANGUAGE)
(3) SERIAL NO.LABEL
S/N: 031100001
(5) CLASS I LABEL
(7) PLACE OF ORIGINAL LABEL
MADE IN P.R.C.
(8) THERMAL FUSE LABEL
THERMAL FUSE FITTED D125°C
(2) LASER BEAM LABEL

(4) RATING PLATE
Design and specifications subject to change without notice
CAUTION! This set uses a laser beam. To prevent any accident due to this type of beam, the set should only be opened by properly trained personnel.
The unit conforms to the international safety specifications IEC 65 (VDE 0860) and to guide lines of the european community, 82/499/EWG (VDE 0875), and also complies with current standards concerning electrical safety and electromagnetic compatibility EMC.