
PDX2210I-TOP - Turntable AKAI - Free user manual and instructions
Find the device manual for free PDX2210I-TOP AKAI in PDF.


| Product type | Portable CD player with anti-shock (10 seconds) |
| Brand | Akai |
| Model | PD-X2210I (PDX2210I-TOP) |
| Dimensions (L x D x H) | 138 x 138 x 28.5 mm |
| Weight (without batteries) | 230 g |
| Power supply | 2 AA batteries (LR6/UM-3) or DC 4.5 V AC adapter (center positive) |
| Power consumption | 0.8 W (at 3 V DC) |
| D/A conversion | 1-bit converter, quadruple oversampling |
| Frequency response | 20 – 20,000 Hz |
| Anti-shock | 10-second buffer memory |
| Number of channels | 2 (stereo) |
| Line output level | 0.6 V rms (across 47 kΩ) |
| Headphone output level | 20 mW (across 32 Ω) |
| Bass boost (Bass Boost) | +6 dB at 100 Hz |
| Compatible formats | CD audio, CD-R, CD-RW |
| Playback functions | Normal play, repeat (1 or all), intro, random, programmed (20 tracks) |
| Anti-shock function (ASP) | Can be activated by button, uses buffer memory |
| HOLD function | Key lock during playback |
| Outputs | Headphone jack (3.5 mm), line output (3.5 mm) |
| Rechargeable power | Charging Ni-Cd batteries (1.2 V, 650 mAh) via adapter (charging time: approx. 15 h) |
| Care and cleaning | Clean with a soft cloth and mild detergent; avoid solvents, alcohol, gasoline |
| Safety | Do not expose to humidity or heat sources; disconnect during prolonged non-use |
| Spare parts and repairability | Repair by a qualified technician; use specified replacement parts |
Frequently Asked Questions - PDX2210I-TOP AKAI
User questions about PDX2210I-TOP AKAI
0 question about this device. Answer the ones you know or ask your own.
Ask a new question about this device
Download the instructions for your Turntable in PDF format for free! Find your manual PDX2210I-TOP - AKAI and take your electronic device back in hand. On this page are published all the documents necessary for the use of your device. PDX2210I-TOP by AKAI.
USER MANUAL PDX2210I-TOP AKAI
IMPORTANT SAFETY INSTRUCTIONS
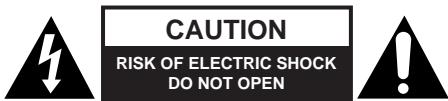

The lightning flash with arrowhead symbol within an equilateral triangle is intended to alert the user to the presence of uninsulated dangerous voltage within the product's enclosure that may be of sufficient magnitude to constitute a risk of electric shock to persons.

The exclamation point within an equilateral triangle is intended to alert the user to the presence of important operating and maintenance (servicing) instructions in the literature accompanying the appliance.
- READ INSTRUCTIONS - All the safety and operating instructions should be read before the product is operated.
- RETAIN INSTRUCTIONS - The safety and operating instructions should be retained for future reference.
- HEED WARNINGS - All warnings on the product and in the operating instructions should be adhered to.
- FOLLOW INSTRUCTIONS - All operating and use instructions should be followed.
- CLEANING - Unplug this product from the wall outlet before cleaning. Do not use liquid cleaners or aerosol cleaners. Use a damp cloth for cleaning.
- ATTACHMENTS - Do not use attachments not recommended by the product manufacturer as they may cause hazards.
- WATER AND MOISTURE - Do not use this product near water - for example, near a bath tub, wash bowl, kitchen sink, or laundry tub; in a wet basement; or near a swimming pool; and the like.
- ACCESSORIES - Do not place this product on an unstable cart, stand, tripod, bracket, or table. The product may fall, causing serious injury to a child or adult, and serious damage to the product. Use only with a cart, stand, tripod, bracket, or table recommended by the manufacturer, or sold with the product. Any mounting of the product should follow the manufacturer's instructions, and should use a mounting accessory recommended by the manufacturer.
A Product and Cart Combination Should Be Moved with Care - Quick stops, excessive force and uneven surfaces may cause the product and cart combination to overturn. - VENTILATION - Slots and openings in the cabinet are provided for ventilation and to ensure reliable operation of the product and to protect it from overheating, and these openings must not be blocked or covered. The openings should never be blocked by placing the product on a bed, sofa, rug or other similar surface. This product should not be placed in a built-in installation, such as a bookcase or rack, unless proper ventilaton is provided or the manufacturer's instructions have been adhered to.
- POWER SOURCES - This product should be operated only from the type of power source indicated on the marking label. If you are not sure of the type of power supply to your home, consult your product dealer or local power company. For products intended to operate from battery power, or other sources, refer to the operating instructions.
-
GROUNDING OR POLARIZATION - This product may be equipped with a polarized alternating-current line plug (a plug having one blade wider than the other). This plug will fit into the power outlet only one way. This is safety feature: If you are unable to insert the plug fully into the outlet, try reversing the plug. If the plug should still fail to fit, contact your electrician to replace your obsolete outlet. Do not defeat the safety purpose of the polarized plug.
-
POWER-CORD PROTECTION - Power-supply cords should be routed so that they are not likely to be walked on or pinched by items placed upon or against them, paying particular attention to cords at plugs, convenience receptacles, and the point where exit from the product.
- NONUSE PERIODS - The power cord of the product should be unplugged from the outlet when left unused for long periods of time.
- OVERLOADING - Do not overload wall outlets, extension cords, or integral convenience receptacles as this can result in a risk of fire or electric shock.
- OBJECT AND LIQUID ENTRY - Never push objects of any kind into this product through openings as they may touch dangerous voltage points or short-out parts that could result in a fire or electric shock. Never spill liquid of any kind on the product.
- SERVICING - Do not attempt to service this product yourself as opening or removing covers may expose you to dangerous voltage or other hazards. Refer all servicing to qualified service personnel.
- DAMAGES REQUIRING SERVICE - Unplug this product from the wall outlet and refer servicing to qualified service personnel under the following conditions.
a) When the power-supply cord or plug is damaged.
b) If liquid has been spilled, or objects have fallen into the product.
c) If the product has been exposed to rain or water.
d) If the product does not operate normally be following the operating instructions. Adjust only those controls that are covered by the operating instructions as an improver adjustment of other controls may result in damage and will often require extensive work by a qualified technician to restore the product to its normal operation.
e) When the product exhibits a distinct change in performance - this indicates a need for service.
- REPLACEMENT PARTS - When replacement parts are required, be sure the service technician has used replacement parts specified by the manufacturer or have the same characteristics as the original part, Unauthorized substitutions may result in fire, electric shock or other hazards.
- SAFETY CHECK - Upon completion of any service or repair to this product, ask the service technician to perform safety checks to determine that the product is in proper operating condition.
- HEAT - The product should be situated away from heat sources such as radiators, heat registers, stoves or other products (including amplifiers) that produce heat.
PRECAUTIONS FOR UNIT SECURITY
- Before operation, check if the voltage of the unit is in line with the local voltage.
- Hold the plug to disconnect it from the mains outlet. Do not pull the power cord.
- When the plug of the unit is connected to the mains outlet, the unit will be still connected to AC even of the power is turned off.
- Disconnect the plug as soon as liquid or objects enter the unit. The unit cannot be used until being checked by experts.
- Do not open the cabinet. Laser rays employed by the unit may damage eyes. Any servicing should be done by qualified service personnel.
PLACEMENT
- Put the unit where ventilation is good enough to prevent overheating.
- Never put the unit in direct sunlight or near heat sources.
- Put the unit horizontally, never put any heavy object on the unit.
- To protect the pickup, do not put the unit where there is much dust. If there is dust on the pickup, use a cleaning disc to clean it.
Refer to the operation instructions of the cleaning disc you bought.
CONDENSATION
Moisture will appear on the pickup lens in the following cases:
- The unit is suddenly moved from a cold place to a warm place.
- Use the unit in a humid place.
In these cases, switch off and leave the unit in a good ventilation place for about one hour to evaporates the water.
CLEANING
- Use soft cloth with a little neutral detergent to wipe the cabinet, panel and controls. Never use abrasive paper, polishing powder or solvent like alcohol and gasoline.
PRECAUTIONS FOR DISCS HANDLING DISC
- To keep the disc clean, do not touch the play sides of the disc.
- Do not attach paper or ape to the disc.
- Keep the disc away from direct sunlight or heat sources.
- Store the disc in a disc case after playback.
CLEANING DISC
- Before playback, wipe the disc outwards from the center with clean cloth.
- Do not use any type of solvent such as thinner, benzine, commercially available cleaners or anti-static spray.
LOCATION OF CONTROLS
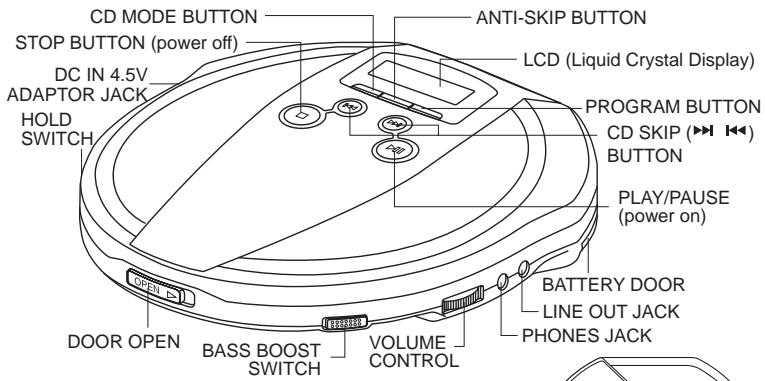
Your CD player requires 2 size "AA" alkaline batteries (not include), or use the AC adaptor
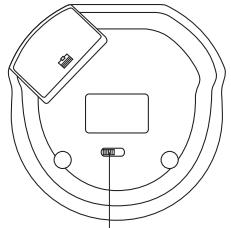
RECHARGE SWITCH
Plug one end of the AC adaptor into the DC 4.5V jack, then plug the other end into AC wall outlet.
PRECAUTIONS ON USING THE AC ADAPTOR
Don't touch the AC adaptor with wet hands. Doing so is dangerous, as this could result in an electric shock.
If the adaptor plug is insert into the DC Jack of the Player, the power supply automatically switch to the AC/DC power and the batteries supply will be disconnected.
DC OPERATION
ALKALINE BATTERY INSTALLATION (NOT SUPPLIED)
Insert two AA batteries (not supplied) into the battery compartment on the bottom of the unit. Be sure to observe the proper polarity.
BATTERY CAUTIONS
- Use only the size and type of batteries specified.
- Be sure to follow the correct polarity when installing the batteries as indicated in the battery compartment. Reversed batteries may cause damage to the device.
- Do not mix different types of batteries together (e.g. alkaline and carbon-zinc) or old batteries with fresh ones.
- If the device in not to be used for a long period of time, it is required to remove the batteries to prevent damage or injury from possible battery leakage.
- Do not try to recharge batteries which is not intended to be recharged; they can overheat and rupture. (follow battery manufacturer's directions)
- Weak batteries can leak and severely damage the unit.
-
Always remove batteries as soon as they become weak.
-
If the display shows the symbol “ ”, this means your batteries are weak, replace them or use the AC adaptor.
- If the display is blank - no numbers show when power is turned on, the batteries are dead.
Replace them or use the AC adaptor.
CHARGING AND USE OF RECHARGEABLE BATTERIES
This unit can fully recharge the specified rechargeable batteries, in approximately 15 hours. The rechargeable batteries (NOT supplied) should be recharged before they are used for the first time or they have not been used for a long period of time because they are low in power (over 60 days).
- Open the battery compartment cover and insert two of the recommended rechargeable batteries, matching polarity. (1.2V 650mA).
ALL BATTERIES MUST BE OF RECHARGEABLE NICKEL-CADMIUM TYPE, OTHERWISE THE BATTERIES MAY EXPLODE OR LEAK.
- Plug in the AC ADAPTOR.
- Slide the recharge switch to "ON" position.
USE ONLY THE AC ADAPTOR FOR CHARGING.
4. After 15 hours, please unplug the AC ADAPTOR and slide the recharge switch to "OFF" position.
DO NOT CHARGE CONTINUOUSLY FOR 24 HOURS OR MORE. DOING SO CAN CAUSE THE PERFORMANCE OF THE RECHARGEABLE BATTERIES TO DETERIORATE.
NOTE: You may play DISC'S whilst charging the batteries.
If the operating time decreases drastically even when the rechargeable nickel-cadmium batteries are properly recharged, purchase a new set of rechargeable nickel-cadmium batteries. When charging for the first time or after a long time, playing time may be reduced. In this case, charge and discharge the batteries several times.
AUTO POWER ON FUNCTION
The power turns on automatically when the PLAY/PAUSE button is pressed.
AUTO POWER OFF FUNCTION
The power turns off immediately after the disc compartment is opened.
When all the tracks on a disc have been played, or the Stop button is pressed, the power turns off automatically within 30 seconds if no button is pressed.
If you pressed the Stop button twice the power will turn off
THE HOLD FUNCTION
It is useful during playing, the function will lock the key on the panel to protect the mistake in the Playing.
During playing slide the HOLD switch to "ON" position, the "HOLD" will appear in the display, the key on the panel will be locked, the panel key is disable.
Slide the HOLD Switch to "OFF" position to stop the function.
LISTENING WITH HEADPHONE (EARPHONE)
Connect the plug of the stereo headphone (earphone) into the headphone jack (marked phones) before use the unit.
CAUTION: Hearing experts advise against exposure to continuous extended play at loud volume levels while using headphones (earphone), possible hearing loss may result. If you experience a ringing in the ears, reduce volume or discontinue use. We want you listening for a life time.
PLAYING A DISC
Be sure to reduce the volume before plugging in or unplugging the headphones/earphones
- Plug the cord from a pair of headphone/earphone into the PHONES jack.
- Slide the Door Open button to open the CD door.
- Hold the disc with the label side up and press it onto the spindle until it "clicks" into place.
- Close the disc compartment, press PLAY/PAUSE button, the disc will begin to spin, the display will indicate "01", play will begin immediately from track number 1.
- Adjust the volume as desired.
- Set the BASS BOOST function as desired.
-
To stop play temporarily, press the PLAY/PAUSE button.
-
The elapsed playing time flashes in the display.
-
Press the PLAY/PAUSE button again to resume.
-
To stop play, press the Stop Button, and the power turns off automatically after a while.
Note: Both 8cm and 12cm discs can be played in the unit.
Place only one disc at a time in the CD compartment.
TRACK SEARCH
- Press the and button during play to skip to the desired track.
- Press the to skip to the next track on the disc.
- Press the to skip to the beginning of the track currently playing.
- Press the twice or more to skip to previous tracks.
FORWARD/REVERSE SEARCH
Press and hold the skip ( ) button during play to scan the disc at high speed. When the desired section of the disc is found, release the button. Normal play will resume.
forward
- If you press and hold the skip button (▶) while playing, it will scan the current playing track forward at high speed.
- If you press and hold the skip button (▶) while playing, it will scan the current playing track backwards at high speed.
BASS BOOST
Use the Bass Boost function to increase the bass output when listening with headphones. During bass boost on setting, sometimes, you may hear some distortion, adjust the volume control to a lower level when using the bass boost feature.
PROGRAMMED PLAY
The tracks on the disc can be programmed for play in any order. (Up to 20 tracks can be programmed.)
During programming, "PROG" in the display.
NOTE: Programming is possible in the STOP mode.
| Program number | 1 | 2 | 3 |
| Track number | 3 | 5 | 9 |
- Press the PROGRAM button in the STOP MODE. The "PROG" appears in the display.
- Press the skip button (▶▶) to select the first track to be programmed.
- Press the PROGRAM button again to enter the track into the memory.
- Repeat steps 2 to 3 to program other track till you finish.
- After programming is finished, press the PLAY/PAUSE Button.
Note: Programmed play will begins automatically if you program 20 tracks.
"PROG" shows steady in the display and programmed play begins.
- The player stops automatically after all programmed tracks have been played.
To play the same program again, press the PLAY/PAUSE Button.
The programming will be cleared if
- Open the door
- Power off
- After random play
- To check the program, press the STOP Button and then the PROGRAM button.
| THE CD MODE BUTTON This button can be pressed during play to accomplish many different kinds of play. | |
| CD Mode button pressed | Once for single track repeat. Twice for all tracks repeat. 3 times for INTRO play. 4 times for RANDOM (SHUFFLE) play. 5 times for return to normal play. |
SINGLE TRACK REPEAT
Press the CD Mode button once during play, and the “ → 1” will appear in the display.
The current track will be played over and over again until Stop button is pressed.
ALL TRACKS REPEAT/CONTINUOUS PLAY
Press the CD Mode button twice during play. And the “ ALL” will appear in the display.
The all tracks on disc will be played over and over again until Stop button is pressed.
INTRO PLAY
Plays the first 10 seconds of all tracks once, then stops.
This is useful if you do not remember the song titles.
- During playback press the STOP button.
- Press the CD Mode button 3 times.
- Press the PLAY/PAUSE button and wait for a while.
- The "INTRO" will appear in the display.
- To stop the intro play and start the normal play. Press the CD Mode button twice more or press the stop button.
Note: If you press the button during playing, it will start the INTRO play after the song finished.
RANDOM OR SHUFFLE PLAY
Plays all the tracks in random order.
- Press the CD Mode button 4 times during playing.
- The "RAND" will appear in the display.
- The display will show the first track the CD player select.
- Press the skip button to skip the next random song.
- To stop the function, press the CD Mode button once more or press the Stop button.
THE ANTI-SKIP MEMORY FUNCTION (10 SEC.)
The digital anti-skip function uses semiconductor memory to prevent the sound from skipping when the unit is subjected to shocks and vibration during play.
-
When the ASP button is pressed during play, the indicator appears in the display and the digital anti-skip function turns on. The digital data equivalent to approximately 3 seconds (10 seconds) of music is stored in a read-ahead memory buffer before it is decoded and played. The display changes from the mark to the mark, indicating that the data has been stored.
-
When the unit is subjected to a shock during play, the data stored in memory continues to be decoded and continue reading new data. As the data is read from memory, the indicator changes to 1 . Once the pickup returns to its original position, new data is stored in memory and the display changes back to the mark.
-
If the set is subjected to repeated shocks and all the data stored in memory is used up, the i=1N mark is displayed and the sound will skip or stop for a brief period until the memory base fills up again.
-
to turn off the anti-skip function, press the ASP button again.
NOTE: Keep the digital anti-skip function off when using the set in stable and no vibration area, where it will not receive shocks. The battery power consumption is less than when it is on.
NOTE: When the digital anti-S function is switched on or off, the sound will be interrupted for 1 to 2 seconds, this is normal (the interrupted time is used for the memory on or off).

CONNECTING TO HOME STEREO SYSTEMS
The line out jack is made to accept a stereo mini plug (3.5mm). By using a commercially available audio line cable, simply connect the cable's mini plug to line out jack on your player, and the other appropriate end to CD/AUX input(s) of your home stereo system.
NOTE: Always switch the power off before making any connections between the player and any other set.
NOTE: The volume control or the player become inoperable when the line out jack is used. Adjustments are made on your audio system.

TECHNICAL SPECIFICATIONS
MODEL NO. PD-X2210I
Audio
D/A conversion
Frequency response
Anti-shock
Wow and flutter
No. of channels
Output level
Bass Boost effect (100Hz) General
Power requirements
Power consumption
Dimension
Weight (without batteries)
1-bit DAC four times oversampling
20-20,000Hz
10 seconds memory
Below measurable limits
2 channels (stereo)
Line output: 0.6V rms (47KΩ)
Headphone: 20mW (32Ω)
+6dB
-2 x LR6 / UM-3 / "AA" alkaline battery
- DC in 4,5V jack accepts AC power adaptor (centre positive)
0.8W (DC 3V)
Approx. 138 (W) x 138 (D) x 28.5 (H) mm
230 g.
Design and specifications subject to change without notice.
CD-R/CD-RW compatibility such as CD-R / CD-RW play capability of this unit may vary depend on quality of media, CD burner and application software & "PRECAUTIONS FOR UNIT" section.
"Playback of CD-R and CD-RW may depend on recording conditions".
TROUBLE SHOOTING GUIDE
| SYMPTOM | CAUSE | SOLUTION |
| CD Player will not turn on. | Dead or weak batteries. | Replace both batteries. |
| The AC adaptor not connected properly. | Check the AC adaptor connection at AC outlet and side of set. | |
| Disc will not play. | Disc inserted incorrectly | Re-insert disc with label side facing up. |
| Defective or wrong type compact disc. | Try another audio compact disc. | |
| CD door not closed. | Close lid securely (push down left corner of door) | |
| Moisture has condensed inside the CD deck. | Take out the CD and leave the CD door open for about an hour to dry the moisture condensation. | |
| No sound from headphones | Headphone plug not inserted properly. | Re-insert headphone plug into the headphone jack (marked phones). |
| Headphone plugged into the line out jack. | Plug headphone into the headphone jack (not the line out jack). | |
| The volume control set to minimum | Increase the volume. | |
| Weak batteries. | Replace with fresh batteries or use the AC adaptor. | |
| Defective compact disc. | Try another compact disc. | |
| Sound is skipping | The compact disc or lens is dirty. | Clean or replace the compact disc or clean the lens with a camera brush or blower. |
| Too much movement of the CD player. | Reduce movement of CD player. | |
| Sound in distorted | Music is too loud. | Decrease the volume control level. |
| Weak batteries. | Batteries are getting weak, replace both batteries or use the AC adaptor. | |
| Bass boost is on and music is too loud. | Lower volume control or slide bass boost switch to off. | |
| Tracks do not change or set does not play normally | Batteries are too weak and the battery symbol will show in display | Replace both batteries with fresh alkaline batteries, or use a AC Adaptor. |
| Buttons do not work | Electronic or static error caused circuitry to lock. | Remove batteries and AC adaptor. Wait a few seconds and re-insert. Make sure batteries are fresh or adaptor has power. |
| The HOLD function is on. | Slide the HOLD switch to OFF position. |


- IMPORTANT SAFETY INSTRUCTIONS
- PRECAUTIONS FOR UNIT SECURITY
- PLACEMENT
- CONDENSATION
- CLEANING
- PRECAUTIONS FOR DISCS HANDLING DISC
- CLEANING DISC
- LOCATION OF CONTROLS
- PRECAUTIONS ON USING THE AC ADAPTOR
- DC OPERATION
- ALKALINE BATTERY INSTALLATION (NOT SUPPLIED)
- BATTERY CAUTIONS
- CHARGING AND USE OF RECHARGEABLE BATTERIES
- AUTO POWER ON FUNCTION
- AUTO POWER OFF FUNCTION
- THE HOLD FUNCTION
- LISTENING WITH HEADPHONE (EARPHONE)
- PLAYING A DISC
- TRACK SEARCH
- FORWARD/REVERSE SEARCH
- BASS BOOST
- PROGRAMMED PLAY
- SINGLE TRACK REPEAT
- ALL TRACKS REPEAT/CONTINUOUS PLAY
- INTRO PLAY
- RANDOM OR SHUFFLE PLAY
- THE ANTI-SKIP MEMORY FUNCTION (10 SEC.)
- CONNECTING TO HOME STEREO SYSTEMS
- TECHNICAL SPECIFICATIONS
- MODEL NO. PD-X2210I
- AUDIO
- DESIGN AND SPECIFICATIONS SUBJECT TO CHANGE WITHOUT NOTICE
Brand : AKAI
Model : PDX2210I-TOP
Category : Turntable