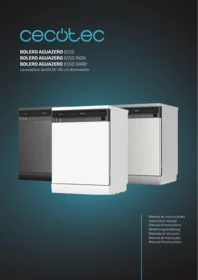
Bolero Aguazero 6550 - Dishwasher CECOTEC - Free user manual and instructions
Find the device manual for free Bolero Aguazero 6550 CECOTEC in PDF.


| Product type | Freestanding dishwasher |
| Brand | Cecotec |
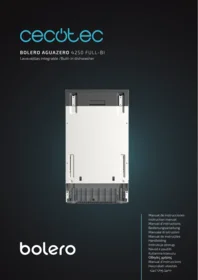
| Model | Bolero Aguazero 6550 |
| Capacity | 14 place settings |
| Dimensions (W x D x H) | 60 x 60 x 85 cm |
| Net weight | 45 kg |
| Power supply | 230 V, 50 Hz |
| Power consumption | 1900 W |
| Energy class | D (scale from A to G) |
| Water consumption per cycle | 9,5 L |
| Energy consumption per cycle | 0,92 kWh |
| Noise level | 46 dB(A) |
| Number of programs | 8 |
| Main programs | Eco, Intensive, Quick 30 min, Glass, Delicate, Pre-wash, Auto, Clean |
| Additional functions | Delay start, Turbo drying, Half load |
| Safety system | Overflow protection, Child lock |
| Maintenance and cleaning | Regular cleaning of the filter and spray arms |
| Spare parts and repairability | Available via Cecotec after-sales service |
| General information | User manual available for download |
Frequently Asked Questions - Bolero Aguazero 6550 CECOTEC
User questions about Bolero Aguazero 6550 CECOTEC
0 question about this device. Answer the ones you know or ask your own.
Ask a new question about this device
Download the instructions for your Dishwasher in PDF format for free! Find your manual Bolero Aguazero 6550 - CECOTEC and take your electronic device back in hand. On this page are published all the documents necessary for the use of your device. Bolero Aguazero 6550 by CECOTEC.
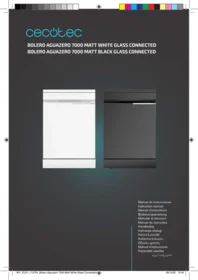
USER MANUAL Bolero Aguazero 6550 CECOTEC
Safety instructions 8
- Parts and components 51
- Before use 51
- Product installation 52
- Operation 53
- Cleaning and maintenance 63
- Troubleshooting 66
- Technical specifications 69
- Recycling of electrical and electronic equipment 71
- Technical support and warranty 72
- Copyright 72
- Simplified EU Declaration of Conformity 72
SOMMAIRE
EN • The coding in this manual is generic and applies to all code variants of the appliance.
Read the following instructions carefully before using the product. Keep this instruction manual for future reference or new users.
- Read these instructions carefully before assembling or using the appliance. These instructions contain important information that will help you get the best out of your equipment. It is your responsibility to make sure every user is informed about the warnings and precautions stated in this instruction manual.
- Warning: Knives and other utensils with sharp points should be loaded in the basket with the points facing downwards or placed in a horizontal position.
- The maximum number of cutlery to be washed is 16.
- This appliance is intended for domestic use only and is not suitable for use in commercial establishments such as bars, restaurants, farms, hotels, motels, and offices.
- Check the power cable regularly for visible damage. If the power cord is damaged, it must be replaced by Cecotec's Official Technical Support Service or similarly qualified personnel to avoid risks.
- This appliance can be used by children aged 8 years and above and people with reduced physical, sensory, or mental capabilities or lack of experience and knowledge if they have been given appropriate supervision or instruction concerning use of the appliance in a safe way and understand the hazards involved.
- Children must not play with the appliance.
- Cleaning and user maintenance must not be carried out by children without supervision.
- After using the dishwasher, there may be remains in the interior. Keep children away from the appliance when it is
open.
- WARNING: check the dishwasher and package are not damaged. Never use the dishwasher if it is damaged, contact the official Cecotec Technical Support Service immediately.
- Packaging material may be dangerous to children. Remove it and place it out of their reach.
- Choose a suitable and safe place to install the dishwasher.
- Never use an extension cord or a multi-socket connection.
- The socket must be accessible after the dishwasher installation.
- After the installation, the first time you run the dishwasher, do it while it is empty.
- Always use the plug provided with the dishwasher. Do not modify the plug provided with the appliance if it does not match the power socket.
- Do not operate the appliance if its cable, plug, or structure show visible damage, do not operate properly, or have been dropped.
- In case of malfunctioning, repairs must be carried out by the official Cecotec Technical Support Service; otherwise, the warranty will be void. Before repairing the dishwasher, you must disconnect it from the power supply and close the stopcock.
- To unplug the dishwasher, pull from the socket, never from the cord.
- During use, the dishwasher uses less energy and water than washing dishes by hand, provided that the household dishwasher is used according to these instructions.
- Do not misuse it, do not stand, sit or place any heavy object on the door or baskets of the dishwasher.
- Do not use the dishwasher if all interior elements are not correctly placed.
- Only use detergents and rinse aids specific for dishwashers.
- Some dishwasher detergents are very alkaline. They may be extremely dangerous if you ingest them. Avoid contact with skin and eyes and keep children away from the dishwasher when the door is open.
- Due to the danger of explosion, do not place chemical solvents in the interior of the machine.
- Do not place tableware which is not dishwasher safe in the appliance.
- Do not fill the baskets over their capacity.
- Cecotec shall not be held liable for any deformation that may occur inside the dishwasher due to misuse.
- Do not open the door while the dishwasher is running, as it could spill hot water.
- Do not leave the door open, as it could cause accidents.
- To avoid electric shock, do not disconnect the dishwasher with your hands wet.
- Cecotec shall not be held liable for any damage, accident, or incident resulting from the misuse of this dishwasher. It is the user's responsibility to operate and maintain the dishwasher according to the instructions and recommendations detailed in this manual. Failure to follow instructions may result in personal injury, property damage, or loss of product warranty.
INSTRUCTIONS DE SÉCURITÉ
- Cutlery basket
- Upper basket
- Lower basket
- Upper spray arm
- Lower spray arm
- Salt container
- Detergent dispenser
Note:
The graphics in this manual are schematic representations and may not exactly match the product.
2. BEFORE USE
- This appliance comes in a packaging designed to protect it during transport. Remove the appliance from its box. You can keep the original box and other packaging materials in a safe place to prevent damage to the appliance if you need to transport it in the future. In case the original packaging is disposed of, make sure all packaging materials are recycled accordingly.
- Check that all parts and components are included and in good condition. If any of them are missing or damaged, please contact Cecotec's Official Technical Support Service immediately.
Box content:
- Dishwasher
- Drain hose
- Salt funnel
- Installation kit
- Water filter
- Instruction manual
- Do not remove the product's serial number in order to keep proper traceability if technical assistance is required.
ENGLISH
3. PRODUCT INSTALLATION
The dishwasher can be built under the worktop according to your needs. To do so, you will need to remove the dishwasher's top plate using the two screws at the rear.
Fig. 2
A. Remove the two screws at the rear.
B. Push backwards to remove the top plate.
Drain hose connection
Insert the drain hose into a drainpipe with a minimum diameter of 4 cm, or let it run into the sink, making sure to avoid bending or crushing it. The height of the drainpipe must be less than 600 mm.
Note: The free end of the hose must not be immersed in water to prevent backflow.
Fig. 3
A. Dishwasher rear
B. Drain hose
C. Water inlet
D. Drainpipe
E. Power cord
F. Worktop
G. Drainpipe

Ensure the drain hose is fixed in either position A or position B in figure 3.
How to drain excess water from hoses
If the drainpipe connection is positioned higher than 600 mm, excess water may remain in the drain hose. It will be necessary to drain the excess water from the hose into a suitable container located outside and below the sink.
Water outlet
Connect the water drain hose. The drain hose must be correctly installed to prevent water leakage. Make sure the drain hose is not bent or crushed.
Extension hose
If you need a drain hose extension, be sure to use a similar hose. It must not be longer than 4 metres; otherwise, the cleaning effect of the dishwasher may be reduced.
Siphon connection
The waste connection must be less than 600 mm (maximum) in height from the bottom of the dishwasher.
Appliance location
Place the appliance in the desired location. The rear must rest against the wall behind it, and the sides should be positioned next to adjacent cabinets or walls.
The dishwasher is equipped with water supply and drain hoses that can be positioned on the right or left side to facilitate proper installation.

Warning!
- Place the dishwasher on a firm, flat floor.
- Do not install the dishwasher on an elevated surface.
4. OPERATION
Each dishwasher has undergone rigorous quality control before leaving the factory to ensure reliability.
You may find water drops or water marks generated by our quality control in your new dishwasher.
Place the cutlery basket in the lower rack. For best results, install it in the centre.
Remove all packaging materials from the exterior and interior of the dishwasher before installation.
Before first use:
- Adjust the water softener level according to the water hardness in the area.
- Add 500 g of salt to the salt compartment, then fill with water to the compartment's brim.
- Refill the rinse aid dispenser.
- Add detergent.
Control panel
Fig. 4
- Power on/off touch icon
- Programmes
- Extra functions
- Start/Pause touch icon
Display operation
| Touch icon | Description |
| Power[67XC] | This touch icon turns the dishwasher on and off. |
| Programme | Select the appropriate washing programme; the programme indicator will light up. |
| Extra functions | Select the appropriate extra washing programme; the indicator will light up. While the dishwasher is switched on, the extra functions that can be selected will flash; the indicator will remain lit once selected. |
Start/Pause | Press this touch icon to Start/Pause a programme.* Reset: Press and hold for 3 seconds to cancel the current programme and select a new one. |
Child Lock | Press and hold the Delay Start and Half Wash buttons simultaneously for three seconds; the child lock indicator will light up and the child lock status will be activated. All touch icons become locked.Repeat these steps to exit child lock status. |
| Self-cleaningAUTO CLEAN | Press and hold the Half Wash and Extra Rapid touch icons simultaneously for 3 seconds to start the self-cleaning programme; the digital display will show a 90-minute countdown. |
Display
| Programme indicator | ECO. Ecological mode, saves energy and water, suitable for general cleaning needs.INTENSIVE. Powerful cleaning mode, suitable for dishes, pots and pans with stubborn stains.RAPID. Suitable for cleaning fresh and slightly sticky food residues at maximum speed.UNIVERSAL. Daily cleaning mode, suitable for moderately soiled dishes.HYGIENE. Suitable for heavily soiled dishes requiring hygienic washing.GLASS. Suitable for washing delicate glassware. |
| Extra functions | Delay Start. You can delay the cycle start time between 0 and 24 hours. Press the Delay Start touch icon to change the time, then press the Start/Pause touch icon.Note: To change the delayed time once the dishwasher has started, press the Power touch icon and restart the dishwasher.1/2 HALF WASH. Reduces water and electricity consumption; you can select three wash states: upper wash, lower wash, and upper and lower wash simultaneously. EXTRA RAPID. Shortens the washing cycle time by increasing the washing temperature to perform a quick wash. Implementation: The wash time in the main wash stage is reduced by 10 minutes, the rinse temperature is increased by 3°C, the drying time is shortened by 15 minutes, and the total time is reduced by 25 minutes. * SUPER DRY. Adds additional drying time to the main washing cycle for enhanced drying results. Implementation: activates hot air for 20 minutes and cold air for 10 minutes in the drying stage, increasing the total time by 30 minutes, increases the hot wash temperature by 3°C above the original maximum rinse temperature, and if the maximum temperature is 75°C, the temperature will remain unchanged.* EXTRA HYGIENE. A temperature increase time is added for complete sterilisation during the wash process. Implementation: The hot wash temperature is increased by 3°C above the original maximum rinse temperature, and if the maximum temperature is 75°C, the temperature remains unchanged. Heats and maintains the temperature during the rinse phase, increasing the total time by 30 minutes.* SILENT WASH. Reduces the motor speed by increasing the washing time during the process, decreasing the noise effect. Implementation method: the main washing time is extended by 45 minutes and the speed is reduced by 100 rpm during operation, but the motor speed must not fall below 2600 rpm.* SAVE+. Saves energy by reducing time and temperature during the drying phase. Recommended for a capacity of 8 plates or less. Implementation: 10 minutes in the main wash stage, 15 minutes in the drying stage, and 25 minutes in total time. After selecting this function, it cannot be overridden to improve drying (Super Dry), enhance sterilisation (Extra Hygiene) or speed up time savings (Extra Rapid). |
| Warning indicator lights | Rinse aid. If the indicator light is lit, it means the dishwasher is low on rinse aid and requires refilling.Salt If the indicator light is lit, it means the dishwasher is low on salt and requires refilling.Water inlet. If the indicator light is lit, it means that the water inlet is closed or blocked. |
*Note: These times are approximate and may vary depending on the type of dishes, level of soiling, and other factors.
Water hardness level adjustment
The dishwasher is designed to allow adjustment of salt consumption based on the hardness of the water used. This is intended to optimise the salt consumption level.
ENGLISH
To adjust salt consumption, proceed as follows:
- Turn on the appliance.
- Within 60 seconds after switching on the appliance, press and hold the Start/Pause touch icon for 5 seconds while the appliance is in standby mode. This action will open the settings mode, then switch to the default water hardness level, and the digital display will show the hardness level as "H3."
- Press the Start/Pause touch icon to select the appropriate setting for your local environment. Settings will change in the following sequence: H1→H2→H3→H4→H5→H6.
- After that, switch off the appliance to save the settings.
It is recommended that adjustments be made according to the following table:
| Knob position | Water hardness | Indicator when setting the water hardness | Salt consumption (g/cycle) | ||
| dH | dF | dE | |||
| H1 | 0-5 | 0-9 | 0-6 | H1 | 0 |
| H2 | 6-11 | 10-20 | 7-14 | H2 | 20 |
| H3 (Default) | 12-17 | 21-30 | 15-21 | H3 | 30 |
| H4 | 18-22 | 31-40 | 22-28 | H4 | 40 |
| H5 | 23-24 | 41-60 | 29-42 | H5 | 50 |
| H6 | 35-55 | 61-98 | 43-69 | H6 | 60 |
Contact your local water authority for information on the water supply's hardness.
Loading salt into the water softener
Water hardness varies from location to location. If hard water is used in the dishwasher, deposits will form on dishes and utensils. The appliance is equipped with a special water softener that uses salts specifically designed to remove lime and minerals from water.
Always use salt specifically designed for dishwashers.
The salt compartment is located beneath the lower basket and should be filled as follows:

Warning!
- Only use salt specifically designed for dishwasher use. Any other type of non-dishwasher-specific salt, especially table salt, will damage the water softener. In case of damage caused by the use of unsuitable salt, the manufacturer offers no warranty nor accepts responsibility for any damage caused.
- Only fill with salt just before starting one of the complete washing programmes. This will prevent any grains of salt or salt water that may have spilled from remaining in the bottom of the appliance for any period, which could cause corrosion.
Fig. 5
A. Remove the lower basket, then unscrew and remove the salt compartment lid.
B. Place the funnel's end into the opening and add in approximately 500 g of salt.
C. If filling the container for the first time, fill it completely with water (approximately 700 ml).
D. Carefully screw the lid back on.
E. Normally, the salt warning light will turn off after the salt compartment has been filled.
NOTE:
- The salt compartment must be refilled when the salt warning light on the control panel illuminates. Although the salt compartment may be sufficiently full, the indicator light may not turn off until the salt has completely dissolved.
- If there is no salt warning light on the control panel (on some models), you can estimate when to add salt to the softener by the number of cycles the dishwasher has completed.
- Take care not to overfill the salt compartment and ensure any spillage is wiped clean.
Detergent usage
All dishwasher cycles require detergent in the corresponding compartment. Add the correct amount of detergent for the selected cycle to ensure optimal performance.
Only use detergents specifically designed for dishwashers. Keep the detergent fresh and dry. Do not put powder detergent into the dispenser until you are ready to wash dishes.
⚠️ Never use soap, laundry detergent or hand washing-up liquid in your dishwasher.
Do not ingest dishwasher detergent. Avoid inhaling the vapours. Dishwasher detergent contains irritants and caustic chemicals that can cause respiratory problems. If dishwasher detergent has been ingested or vapours inhaled, seek medical attention immediately.
⚠️ Keep dishwasher detergent out of children's reach.
Filling the detergent dispenser
- Open the detergent compartment by pressing the button.
ENGLISH
- Add the recommended amount of detergent to the main wash compartment. This compartment has markings for specific detergent quantities: 15 ml or 25 ml, depending on how soiled your dishes are. If your dishes require an intensive wash, add an additional 5 ml of detergent to the pre-wash section of the compartment.
- Then close the detergent compartment by sliding the lid in the direction of the arrow. Fig. 6.
NOTE:
Please follow the manufacturer's recommendations on the detergent packaging.
Rinse aid use
Filling the rinse aid dispenser helps ensure better wash results and improved drying performance.
- To fill the rinse aid compartment, open the compartment lid. Fig. 7
- Fill the compartment with rinse aid up to the MAX level, then close the lid. Take care not to overfill the rinse aid compartment and be sure to clean up any spillage.
- Close the lid to lock the rinse aid compartment.
- Rinse aid is automatically dispensed during the final rinse, ensuring a thorough rinse and spot-free drying.

Warning!
Use only branded rinse aid for dishwashers. Never fill the rinse aid dispenser with any other substances (e.g., dishwasher cleaning agent, liquid detergent). This will damage the appliance.
To change the rinse aid level, follow these steps before switching on the appliance:
- Open the door, then press the Power touch icon to activate the dishwasher.
- Within 60 seconds of switching on the appliance, press and hold the Delay Start touch icon for 5 seconds while the appliance is in standby mode to enter the settings mode and switch the rinse aid level to default. The digital display will show the rinse aid level as "R3."
- To adjust the rinse aid level, press the Delay Start touch icon. The digital display will show the current level, and each press will cycle through "R1→R2→R3→R4→R5."
- Once the appropriate level is selected, press the Power touch icon to save the settings.
Turning the buzzer sound on and off
By default, the buzzer sound is activated.
- Turn on the appliance.
- Press and hold the ECO and Start/Pause touch icons simultaneously for 3 seconds. The buzzer sound will switch off, and the interior lamp will not illuminate when the door is opened.
- Press and hold the ECO and Start/Pause touch icons simultaneously again for 3 seconds to switch the buzzer sound back on.
Note: This function can only be configured in standby mode. After switching off and reconnecting the appliance, the buzzer sound will be activated by default.
Loading the dishwasher baskets
For best dishwasher performance, follow these loading guidelines.

Warning!
Dishes not suitable for dishwasher:
- Temperature-sensitive plasticware, copper and tin containers, aluminium, and silver cutlery.
- Delicate glassware, decorative printed porcelain; utensils with crystal elements, etc.
- Items with absorbent properties (sponges, household cloths).
Precautions when loading or after loading the dishwasher baskets.
- Remove any large food remains.
- It is not necessary to rinse dishes under running water.
- If crockery or cooking utensils have baked-on, burnt, or stuck-on food particles that are difficult to remove, it's recommended to soak them for a while before washing.
Place items in the dishwasher in the following order:
- Items such as cups, glasses, pots/pans, etc. should be placed upside down.
- Curved items or those with recesses should be tilted so water can drain.
- They should be stacked securely and must not tip over.
- They must not obstruct the spray arms from rotating during the wash cycle.
- Place cutlery, chopsticks, and small items in the cutlery basket. Very small items should not be washed in the dishwasher as they could easily fall from the racks.
Removing dishes
To prevent water from dripping from the upper rack to the lower rack, we recommend emptying the lower rack first, then the upper rack.
ENGLISH
Loading the upper basket
The upper rack is designed to hold more delicate and lighter tableware such as glasses, coffee and teacups and saucers, as well as plates, small bowls and shallow pans (as long as they are not too soiled).
Position dishes and cookware so they do not move under the water spray.
Always place glasses, cups and bowls upside down.
Upper basket
Fig. 8
- Cups
- Saucers
- Mugs
- Dessert bowls
- Wine glasses
- Ladles
- Forks
- Table knives
Adjusting the upper basket
Fig. 9
You can adjust the height of your appliance's upper basket to position 1 or 2, depending on your needs.
To adjust the upper basket's height, remove the basket completely and re-mount it at the wheel level shown in 1 and 2.
When in position 1, the upper basket's height will be 5 cm higher. In position 2, the lower basket's height will be 5 cm higher. In this position, you can place large items like pots, etc., in the lower basket.
If your basket has a height adjustment mechanism as shown in Figure 10, you can adjust the basket's position up and down by holding it from both sides.

CAUTION:
We recommend adjusting the upper basket's height before loading the dishes. Adjusting the basket after loading dishes could damage them.
Loading the lower basket
We recommend placing larger, harder-to-clean items in the lower basket: pots, pans, lids,
serving dishes, and bowls, etc.
It is preferable to place serving dishes and lids at the sides of the racks to avoid blocking the rotation of the upper spray arm.
Pots, serving dishes, etc., should always be placed face down. Deep pots should be tilted to allow water flow.
The lower basket features fold-down tine rows to accommodate more large pots and pans.
Lower rack
Figure 11
- Soup plates
- Oven pots
- Glass bowl
- Small pots
- Melamine bowls
- Dinner plates
- Oval platters
- Small dessert plates
- Large dessert plates
Upper cutlery basket
- This basket is specially designed for washing utensils like forks and spoons, placing them between the bars for optimal cleaning.
- It features three adjustable trays, which can be moved to create additional space, allowing longer items to be loaded into the upper basket. Fig. 12
WASHING PROGRAMME
Switching on the appliance
Starting a washing programme
- Pull out both the upper and lower baskets, load the dishes and push them back in. It is recommended to load the lower rack first, then the upper rack.
- Pour in the detergent.
- Insert the plug into the power socket.
- Ensure the water supply is turned on at full pressure. Close the door, press the Power touch icon, then press the Programme touch icon to select your desired "Washing programme." Apply slight force to ensure the door is properly closed.
NOTE: You may hear a click when the door is perfectly closed.
ENGLISH
Changing the programme
- Important: A running cycle can only be modified if it has been operating for a short period. Otherwise, the detergent may have already been released, and the appliance may have drained the wash water. If this is the case, the detergent dispenser must be refilled.
- During the washing cycle, press the Power touch icon to switch off the appliance.
- Press the Power touch icon again to switch on the appliance, then you can change the programme to the desired cycle.
NOTE: If you open the door during washing, the appliance will pause, and the countdown will stop. When you close the door, the appliance will resume operation after 10 seconds.
Forgetting to add a dish
A forgotten dish can be added any time before the detergent dispenser opens.
- Press the Start/Pause touch icon to stop the washing.
- After the spray arms stop working, you can open the door completely.
- Add the forgotten dishes.
- Close the door and the dishwasher will start running after ten seconds.
WARNING!
It is dangerous to open the door during washing, as hot water may scald you. If the door is opened while the dishwasher is running, the appliance will automatically stop.
End of washing programme
When the programme ends, the digital display will show "00," and three short beeps will sound: "beep, beep, beep." Afterwards, the display will indicate "End." If no further action is taken, the dishwasher will automatically switch off after 3 minutes.
⚠️ Open the door with caution, as hot steam may escape.
Hot dishes are fragile and prone to breakage. It's recommended to let them cool for about 15 minutes before removing them.
Open the dishwasher door and leave it ajar for a few minutes to improve drying and allow the dishes to cool.
Unloading the dishwasher
It is normal for the dishwasher interior to be damp. Empty the lower basket first, then the upper basket. This will prevent water from dripping from the upper basket onto dishes in the lower one.
Automatic door opening
The dishwasher door automatically opens at the end of the programme, enhancing drying results.
Wait for the programme to finish and the dishes to cool before unloading.
The drying time with automatic opening varies depending on the selected programme.
NOTE: For optimal drying, do not close the door before the drying phase ends and the appliance switches off automatically.
When the programme finishes, the door will open. Avoid closing it for at least 1 minute to prevent damaging the automatic opening mechanism.
The door should remain open for 30 minutes for effective drying. (Opening time varies by programme).
Deactivating the automatic door opening function
To deactivate the automatic opening function, press and hold the SUPER DRY and EXTRA HYGIENE keys for 3 seconds; the digital display will show “OFF” and flash 3 times.
To activate the function, press and hold the same keys for 3 seconds; the display will show "ON" and flash 3 times. (These actions must be performed before selecting the wash programme).
5. CLEANING AND MAINTENANCE
Before starting any servicing or maintenance, you must always disconnect the appliance from the electrical supply and also turn off the water supply.
Filtration system
The filtration system consists of a coarse filter, flat filter and microfilter.
Fig. 13
- Flat filter: Food and residue will be trapped by a special jet in the lower spray arm.
- Coarse filter: Large residues, such as bone pieces or glass that could clog the drain, will be trapped in the coarse filter. To remove an item caught in this filter, gently squeeze the tabs on top of this filter and lift it out.
- Microfilter: This filter holds soil and food waste in the sump area and prevents it from being redeposited on dishes during a cycle.
ENGLISH
⚠️ Check the filters for blockages every time the dishwasher is used.
⚠️ By unscrewing the coarse filter, you can remove the filtration system. Remove any food residue and clean the filters under running water.
The filter effectively prevents food residue from the dishes from falling into the washing system. However, food residue can sometimes clog the filter, affecting washing performance. It is recommended to check the flat filter for food residue immediately after completing the wash programme and clean it if necessary.
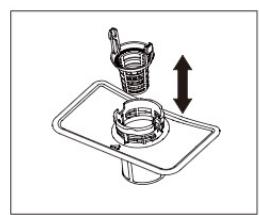
Additionally, it is advisable to disassemble and clean the filter at least once a week. The steps to clean the filter are as follows:
Figure 14
- Remove the coarse filter from the microfilter.
- Turn the microfilter clockwise.
- Pull out the microfilter.
- Remove the flat filter from the dishwasher compartment.
- Clean the filters under running water.
You must clean and rinse the filters thoroughly before reassembling all sections in the reverse order mentioned above.
Please note:
- Never run a programme without the filters in place.
- Incorrect placement of the filters can reduce washing performance and potentially damage your appliance.
- When cleaning the filters, do not knock them. Otherwise, the filters could become deformed and dishwasher performance could decrease.
Cleaning the spray arms
It is necessary to clean the spray arms regularly, as hard water chemicals can clog the jets and bearings of the spray arms.
Figure 15
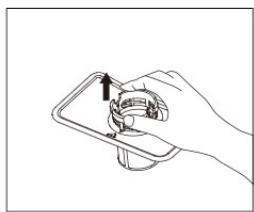
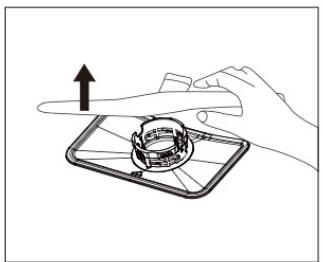
- Pull the lower spray arm upwards to remove it.
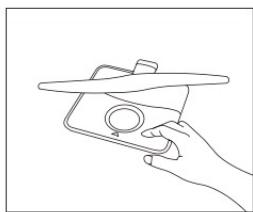
- To remove the upper spray arm, first remove the upper spray arm clasp by turning it.
- You must clean and rinse the spray arms thoroughly before putting them back.
Note: Ensure the upper spray arm clasp is securely fitted when reassembling.
Dishwasher care
To clean the control panel, use a slightly damp cloth and then dry thoroughly.
Never use sharp objects, scouring pads or harsh cleaners on any part of the dishwasher.
Cleaning the door
To clean the edge around the door, you must use only a soft, warm, damp cloth.
To prevent water penetration into the door lock and electrical components, do not use any type of spray cleaner.
WARNING!
Never use a spray cleaner to clean the door panel, as this may damage the door latch and electrical components. It is not permitted to use a scourer or some paper towels due to the risk of scratching or leaving marks on the stainless steel surface.
Protection against freezing
If your dishwasher is left in an unheated location during winter, ask a service technician to:
- Disconnect the electrical power to the dishwasher.
- Turn off the water supply and disconnect the water inlet pipe from the water valve.
- Drain water from the inlet pipe and water valve. (Use a pot to collect the water)
- Reconnect the water inlet pipe to the water valve.
- Remove the filter from the tub and bottom, and use a sponge to remove any water in the sump.
How to maintain your dishwasher
After every wash
After each wash, turn off the appliance's water supply and leave the door slightly ajar so moisture and odours are not trapped inside.
Remove the plug
Before cleaning or performing maintenance, always remove the plug from the socket. Do not take risks.
No solvents or abrasive cleaning
To clean the exterior and rubber parts of the dishwasher, do not use solvents or abrasive cleaning products. Use only a cloth and warm, soapy water. To remove spots or stains from
ENGLISH
the interior surface, use a cloth dampened with water and a little white vinegar, or a cleaning product specifically made for dishwashers.
When going on holiday
When going on holiday, it is recommended to run a wash cycle with the dishwasher empty and then remove the plug from the socket, turn off the water supply and leave the appliance door slightly ajar. This will help the seals last longer and prevent odours from forming in the appliance.
Moving the appliance
If it is necessary to move the appliance, try to keep it upright. If absolutely necessary, it can be placed on its back.
Seals
One of the factors that cause odours in the dishwasher is food trapped in the seals. Regular cleaning with a damp sponge will prevent this.
6. TROUBLESHOOTING
Before contacting technical service, reviewing the information on the following pages might save you from needing to do so.
| Problem | Possible cause | Possible solution |
| The dishwasher does not work | Blown fuse or circuit breaker tripped | Replace the fuse or reset the circuit breaker. Remove any other appliance sharing the same circuit with the dishwasher. |
| Power supply is not turned on. | Ensure the dishwasher is switched on and the door is securely closed. Make sure the power cord is properly plugged into the wall socket. | |
| Water pressure is too low | Check that the water supply is properly connected and the water is opened. | |
| The drain pump does not stop | Overflow | The system is designed to detect an overflow. When doing so, it turns off the circulation pump and turns on the drain pump. |
| Noise | Some audible sounds are normal. | Sound from detergent compartment opening. |
| Utensils are not secure in the baskets or something small has dropped into the basket. | Ensure everything is securely loaded in the dishwasher. | |
| The motor hums. | The dishwasher has not been used regularly. If you do not use it often, remember to programme it to fill and pump out every week, which will help keep the seal moist. | |
| There is foam inside the dishwasher | Unsuitable detergent | The dishwasher has not been used regularly. If this occurs, open the dishwasher and let the foam evaporate. Add 4 litres of cold water inside the dishwasher. Close and secure the dishwasher, then start the "pre-rinse" wash cycle to drain the water. Repeat if necessary. |
| Rinse aid spilled. | Always clean up rinse aid spills immediately. | |
| Stained dishwasher interior. | Detergent with colourant was used. | Ensure the detergent is free of colourant. |
| Dishes and cutlery not clean. | Inappropriate programme. Incorrect basket loading. | Select a stronger programme. Ensure the detergent dispenser and spray arms are not blocked by large dishes. |
| Spots and filming on glasses and cutlery. | 1. Extremely hard water.2. Low inlet temperature.3. Dishwasher overloading. Improper loading.4. Old or damp powder detergent.5. Empty rinse aid dispenser.6. Incorrect detergent dosage. | To remove spots from glassware:1. Remove all metal utensils from the dishwasher.2. Do not add detergent.3. Choose the longest cycle.4. Start dishwasher and let it run for about 18-22 minutes, then it will be in the main wash.5. Open the door to pour 2 cups of white vinegar into the bottom of the dishwasher.6. Close the door and let the dishwasher finish the cycle. If vinegar does not work: Repeat as above except use 1/4 cup (60 ml) of citric acid crystals instead of vinegar. |
| Cloudiness on glassware. | Combination of soft water and too much detergent | Use less detergent if you have soft water and select a shorter cycle to wash glassware and clean it. |
ENGLISH
| Problem | Possible cause | Possible solution |
| Yellow or brown film on internal surfaces. | Tea or coffee stains | Use a solution of white vinegar and warm water or make a paste with bicarbonate of soda to remove stains safely. Apply, let sit, then rinse thoroughly. |
| White film on the interior surface | Hard water minerals. | To clean the interior, use a damp sponge with dishwasher detergent and rubber gloves. Never use any other cleaner to avoid suds. |
| The detergent dispenser lid cannot close properly. | Detergent residue is blocking the opening. | Clean the detergent from the lock. |
| Detergent left in the dispenser. | Dishes blocking the detergent compartments. | Reload the dishes properly. |
| Steam | Normal phenomenon. | Some steam comes through the vent by the door latch during drying and water draining. |
| Black or grey marks on dishes | Aluminium utensils have rubbed against dishes. | Use a mild abrasive cleaner to eliminate those marks. |
| There is water in the bottom of the dishwasher interior. | This is normal. | A small amount of clean water around the outlet on the tub bottom keeps the water seal lubricated. |
| Dishwasher leaks | Overfilled dispenser or rinse aid spills. | Take care not to overfill the rinse aid dispenser. Spills can cause excess of soapsuds and overflow. Wipe any spills with a damp cloth. |
| Dishwasher is not level | Ensure the dishwasher is level. |
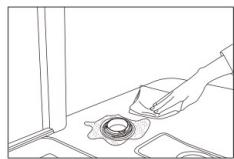
NOTE: Olive pits or similar objects can pass through the filter system and reach the drain pump area. In this case, the drain pump becomes blocked and needs cleaning. Please remove the pump cover by pushing the tail outwards, then you can clean the pump impeller yourself. After that, put the cover back in position. Fig. 16
Improper appliance maintenance may endanger users' safety. Any repairs must be carried out by professionals.
Error codes
After starting the wash cycle, if there is a malfunction, the dishwasher will display an error code.
The following table shows possible error codes and the faults they represent, and the error indicator will keep flashing and beeping.
| Error code | Problem |
| E1 | Overflow/leakage. |
| E2 | Water inlet malfunction. |
| E4 | Water distribution valve malfunction. |
| E5 | Fan malfunction. |
| E6 | Abnormal heating. |
| E7 | Thermistor open/short circuit. |
| EA | Abnormal communication. |
Warning!
For E2, first check the troubleshooting tips before calling Cecotec's Official Technical Support Service.
For E1, turn off the main water supply before contacting Cecotec's Official Technical Support Service.
For E4, E5, E6, E7, EA, please contact Cecotec's Official Technical Support Service.
7. TECHNICAL SPECIFICATIONS
You can consult the technical information by scanning the attached QR code.
| Reference | EU01_132412 | EU01_132413 | EU01_132414 |
| Model | Bolero Aguazero 6550 | Bolero Aguazero 6550 Inox | Bolero Aguazero 6550 Dark |
| QR code |  |  |  |
| Rated voltage | 220-240 V~ | ||
| Rated frequency | 50 Hz | ||
| Total power | 1800 - 2200 W | ||
| Supply pressure | 0.04 - 1.00 Mpa | ||
| Protection rating | IPX1 | ||
| Energy efficiency class* | C | ||
| Capacity | 16 place settings | ||
*A (highest efficiency) to G (lowest efficiency)
Technical data sheet
| Manufacturer: | Cecotec Innovaciones, S.L. | |||
| Address: | Av. Reyes Católicos, 60. 46910, Alfafar (Valencia, Spain) | |||
| Models: | EU01_132412 - Bolero Aguazero 6550 / EU01_132413 - Bolero Aguazero 6550 Inox / EU01_132414 - Bolero Aguazero 6550 Dark | |||
| General product parameters: | ||||
| Parameter | Value | Parameter | Value | |
| Rated capacity (b) (ps) | 16 | Dimensions in cm | Height | 85 |
| Width | 60 | |||
| Depth | 59 | |||
| IEE (b) | 43.4 | Energy efficiency class (b) | C | |
| Washing performance index (b) | 1.13 | Drying performance index (b) | 1.07 | |
| Energy consumption in kWh [per cycle], based on the “ECO” programme using cold water fill. Actual energy consumption will depend on how the appliance is used. | 0.760 | Water consumption in litres [per cycle], based on the “ECO” programme. The actual water consumption will depend on how the appliance is used and on the hardness of the water. | 11.8 | |
| Programme running time (b) (h:min) | 4:11 | Type | Free installation | |
| Airborne acoustical noise emissions (b)[dB(A) re 1 pW] | | 47 | Airborne acoustical noise emission class (b) | C | |
| Off mode (W) (if applicable) | N/A | Standby mode (W) (if applicable) | 0.50 | |
| Delayed start (W) (if applicable) | 4.00 | Networked standby (W) (if applicable) | N/A | |
| Further information (a) (c):Link to the supplier's website, where the information in point 6 of Annex II to Commission Regulation (UE) 2019/2022 (1) can be found:(a) This item shall not be considered relevant for the purposes of Article 2(6) of Regulation (EU) 2017/1369. |(b) For the “ECO” programme.(c) Changes to this item shall not be considered relevant for the purposes of Article 4 of Regulation (EU) 2017/1369.(d) If the product database automatically generates the final content of this cell, the supplier will not enter this data. | ||||
Technical specifications may change without prior notice to improve product quality.
Made in China | Designed in Spain
8. RECYCLING OF ELECTRICAL AND ELECTRONIC EQUIPMENT

This symbol indicates that, according to the applicable regulations, the product and/or batteries must be disposed of separately from household waste. When this product reaches the end of its shelf life, you should dispose of the batteries/accumulators and take them to a collection point designated by the local authorities.
For detailed information on how to properly dispose of electrical and electronic appliances and/or batteries, consumers should contact their local authorities.
Information regarding national packaging recycling systems and their marking can be found on our website.
Compliance with the above guidelines will help protect the environment.
ENGLISH
9. TECHNICAL SUPPORT AND WARRANTY
Cecotec shall be liable to the end user or consumer for any lack of conformity that exists at the time of product delivery under the terms, conditions and deadlines established by applicable regulations.
Repairs should be carried out by qualified personnel.
If at any moment you detect any problem with your product or have any doubt, do not hesitate to contact the official Cecotec Technical Support Service at +34 96 321 07 28.
10. COPYRIGHT
The intellectual property rights over the texts in this manual belong to CECOTEC INNOVACIONES, S.L. All rights reserved. The content of this publication may not, either in part or in its entirety, be reproduced, stored in a retrieval system, transmitted or distributed by any means (electronic, mechanical, photocopying, recording or similar) without prior authorisation from CECOTEC INNOVACIONES, S.L.
11. SIMPLIFIED EU DECLARATION OF CONFORMITY
CE Cecotec Innovaciones hereby declares that this appliance complies with the essential requirements and other relevant provisions of the regulations applicable in the European Union. This appliance has been designed, manufactured and tested in compliance with required safety and quality standards. The full text of the EU Declaration of Conformity can be found on the following website: https://cecotec.es/es/information/declaration-of-conformity
1. PIÈCES ET COMPOSANTS
Image 1
3. INSTALLATION DU PRODUIT

Fig./Img./Abb./Afb./Rys.1
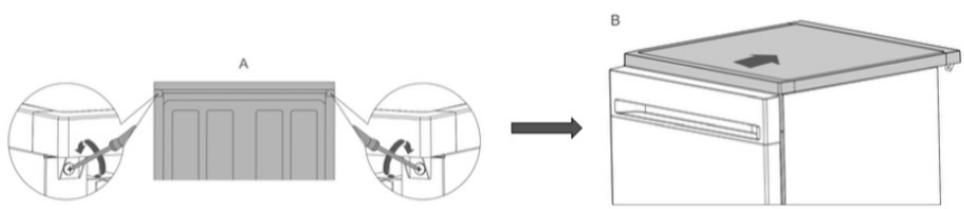
Fig./Img./Abb./Afb./Rys. 2
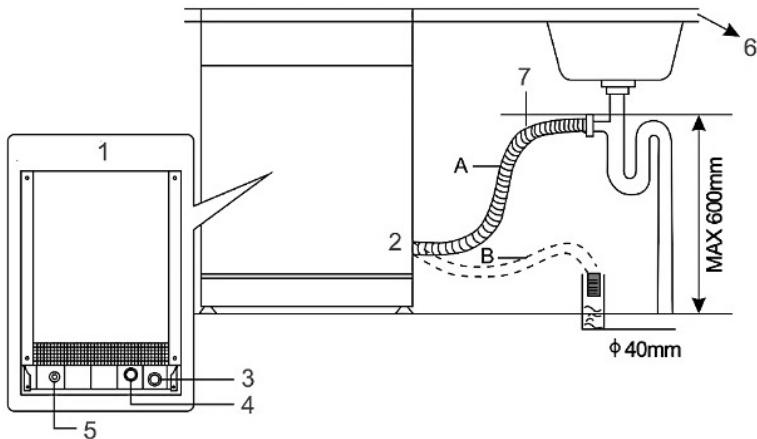
Fig./Img./Abb./Afb./Rys. 3
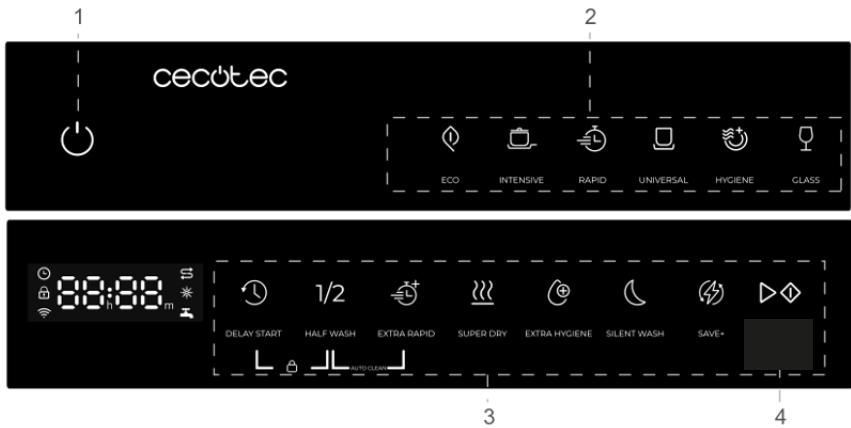
Fig./Img./Abb./Afb./Rys. 4

A

B

C
D

E
Fig./Img./Abb./Afb./Rys. 5

Fig./Img./Abb./Afb./Rys. 6

Fig./Img./Abb./Afb./Rys. 7

Fig./Img./Abb./Afb./Rys. 8

Fig./Img./Abb./Afb./Rys. 9
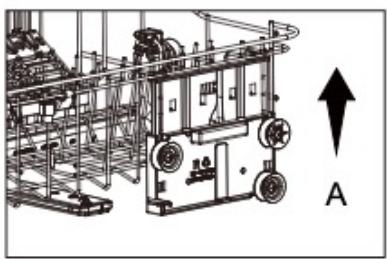

Fig./Img./Abb./Afb./Rys. 10

Fig./Img./Abb./Afb./Rys. 11

Fig./Img./Abb./Afb./Rys. 12
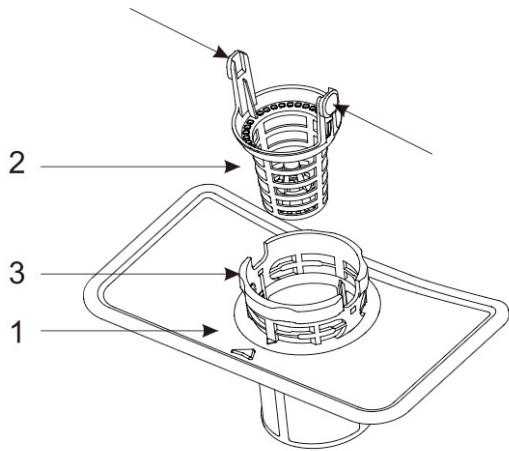
Fig./Img./Abb./Afb./Rys. 13
1

2
3
4

5
Fig./Img./Abb./Afb./Rys. 14
1
2

3
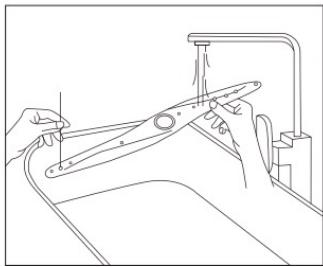
Fig./Img./Abb./Afb./ Rys. 15

Fig./Img./Abb./Afb./ Rys. 16
www.cecotec.es
- SOMMAIRE
- INSTRUCTIONS DE SÉCURITÉ
- Note:
- BEFORE USE
- Box content:
- ENGLISH
- PRODUCT INSTALLATION
- Fig. 2
- Drain hose connection
- Fig. 3
- How to drain excess water from hoses
- Water outlet
- Extension hose
- Siphon connection
- Appliance location
- Warning!
- OPERATION
- Before first use:
- Control panel
- Water hardness level adjustment
- Loading salt into the water softener
- Fig. 5
- Detergent usage
- Filling the detergent dispenser
- Rinse aid use
- Turning the buzzer sound on and off
- Loading the dishwasher baskets
- Precautions when loading or after loading the dishwasher baskets.
- Removing dishes
- Loading the upper basket
- Upper basket
- Adjusting the upper basket
- CAUTION:
- Loading the lower basket
- Lower rack
- Figure 11
- Upper cutlery basket
- WASHING PROGRAMME
- Switching on the appliance
- Starting a washing programme
- Changing the programme
- Forgetting to add a dish
- End of washing programme
- ⚠️ Open the door with caution, as hot steam may escape.
- Unloading the dishwasher
- Automatic door opening
- Deactivating the automatic door opening function
- CLEANING AND MAINTENANCE
- Filtration system
- Fig. 13
- Figure 14
- Please note:
- Cleaning the spray arms
- Figure 15
- Dishwasher care
- Cleaning the door
- Protection against freezing
- How to maintain your dishwasher
- After every wash
- Remove the plug
- No solvents or abrasive cleaning
- When going on holiday
- Moving the appliance
- Seals
- TROUBLESHOOTING
- Error codes
- TECHNICAL SPECIFICATIONS
- RECYCLING OF ELECTRICAL AND ELECTRONIC EQUIPMENT
- TECHNICAL SUPPORT AND WARRANTY
- COPYRIGHT
- SIMPLIFIED EU DECLARATION OF CONFORMITY
- PIÈCES ET COMPOSANTS
- Image 1
- INSTALLATION DU PRODUIT
Brand : CECOTEC
Model : Bolero Aguazero 6550
Category : Dishwasher